foreword
In the previous blog, Cordova was introduced in the first introduction to Cordova, and a Cordova project was created and run. The article also mentioned that plug-ins are the core of Cordova. This blog mainly looks at how to use and how to use plug-ins . custom plugin
Use of Cordova plugins
First of all, the official has provided some plug-ins, and there are also many third-party plug-ins. You can search for the plug-ins you need on the official website .
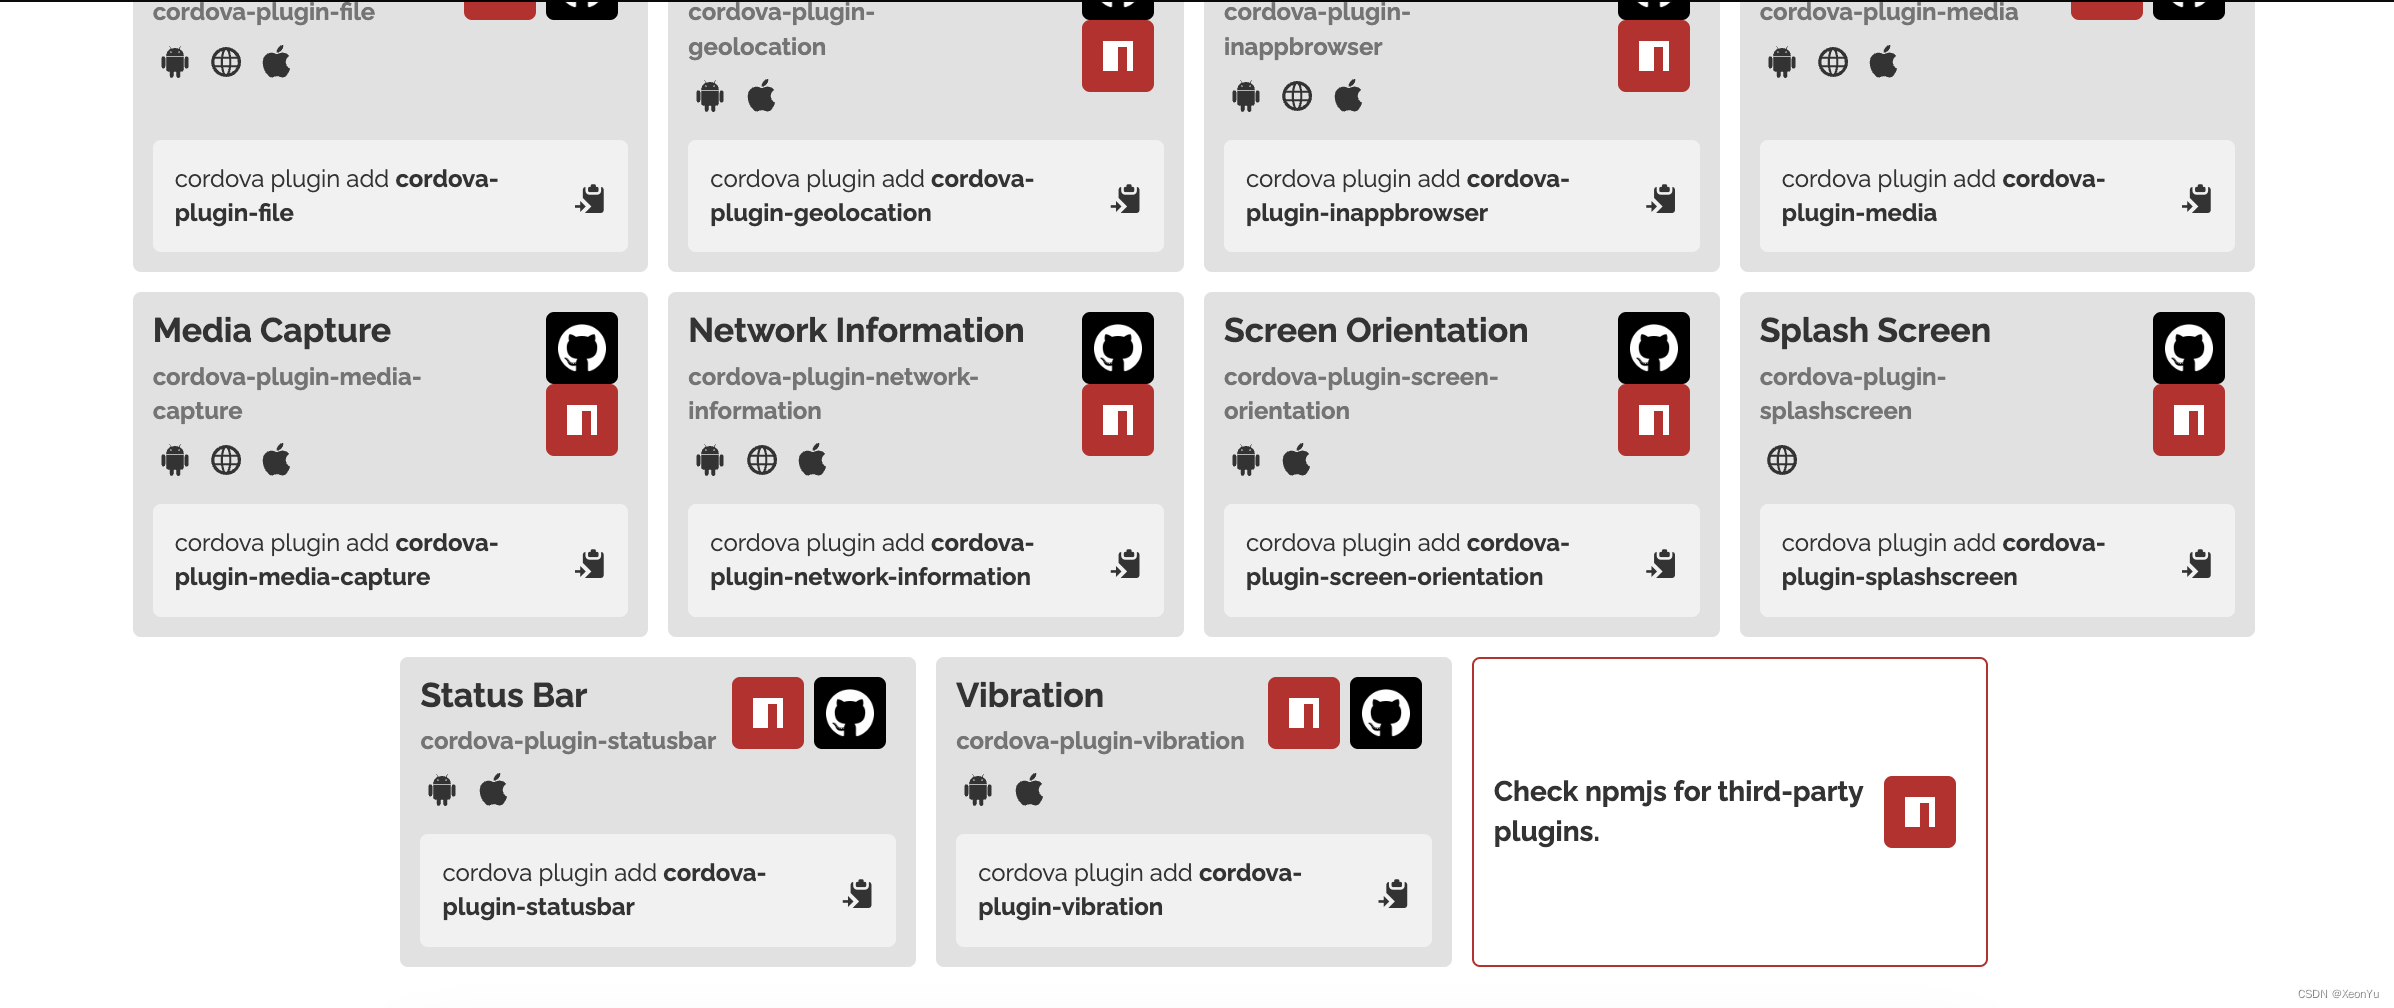
Here I just find two plug-ins to use. The use of plug-ins is very simple, just follow the documentation.
First use a power state plug-
in Follow the documentation, you need to add the plug-in first, and execute the command in the project root directory
cordova plugin add cordova-plugin-battery-status
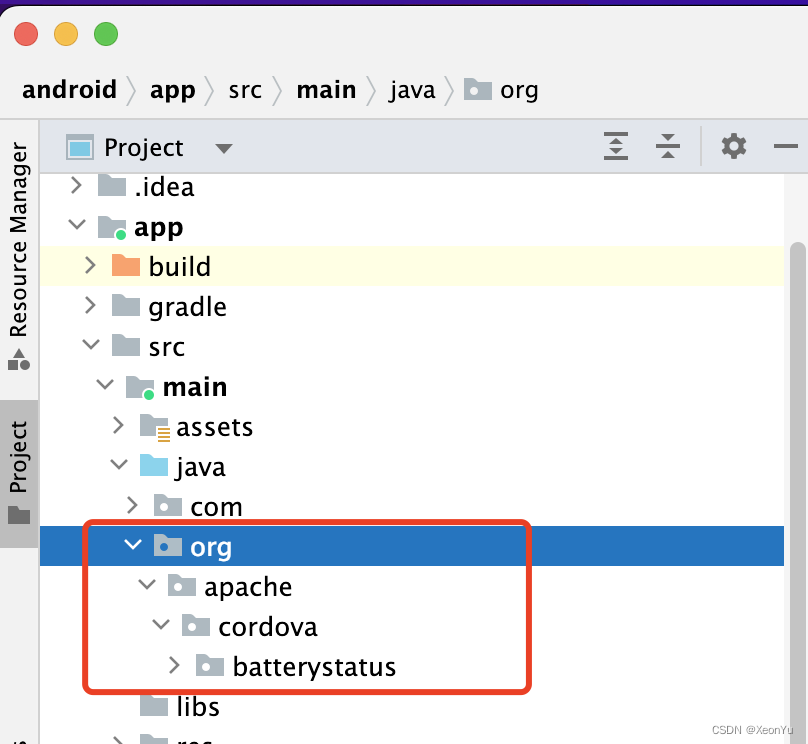
After the execution is completed, some new files will be added to the project.
First, there is an additional directory org.apache.cordova , which stores the Android code of the newly added plugin.
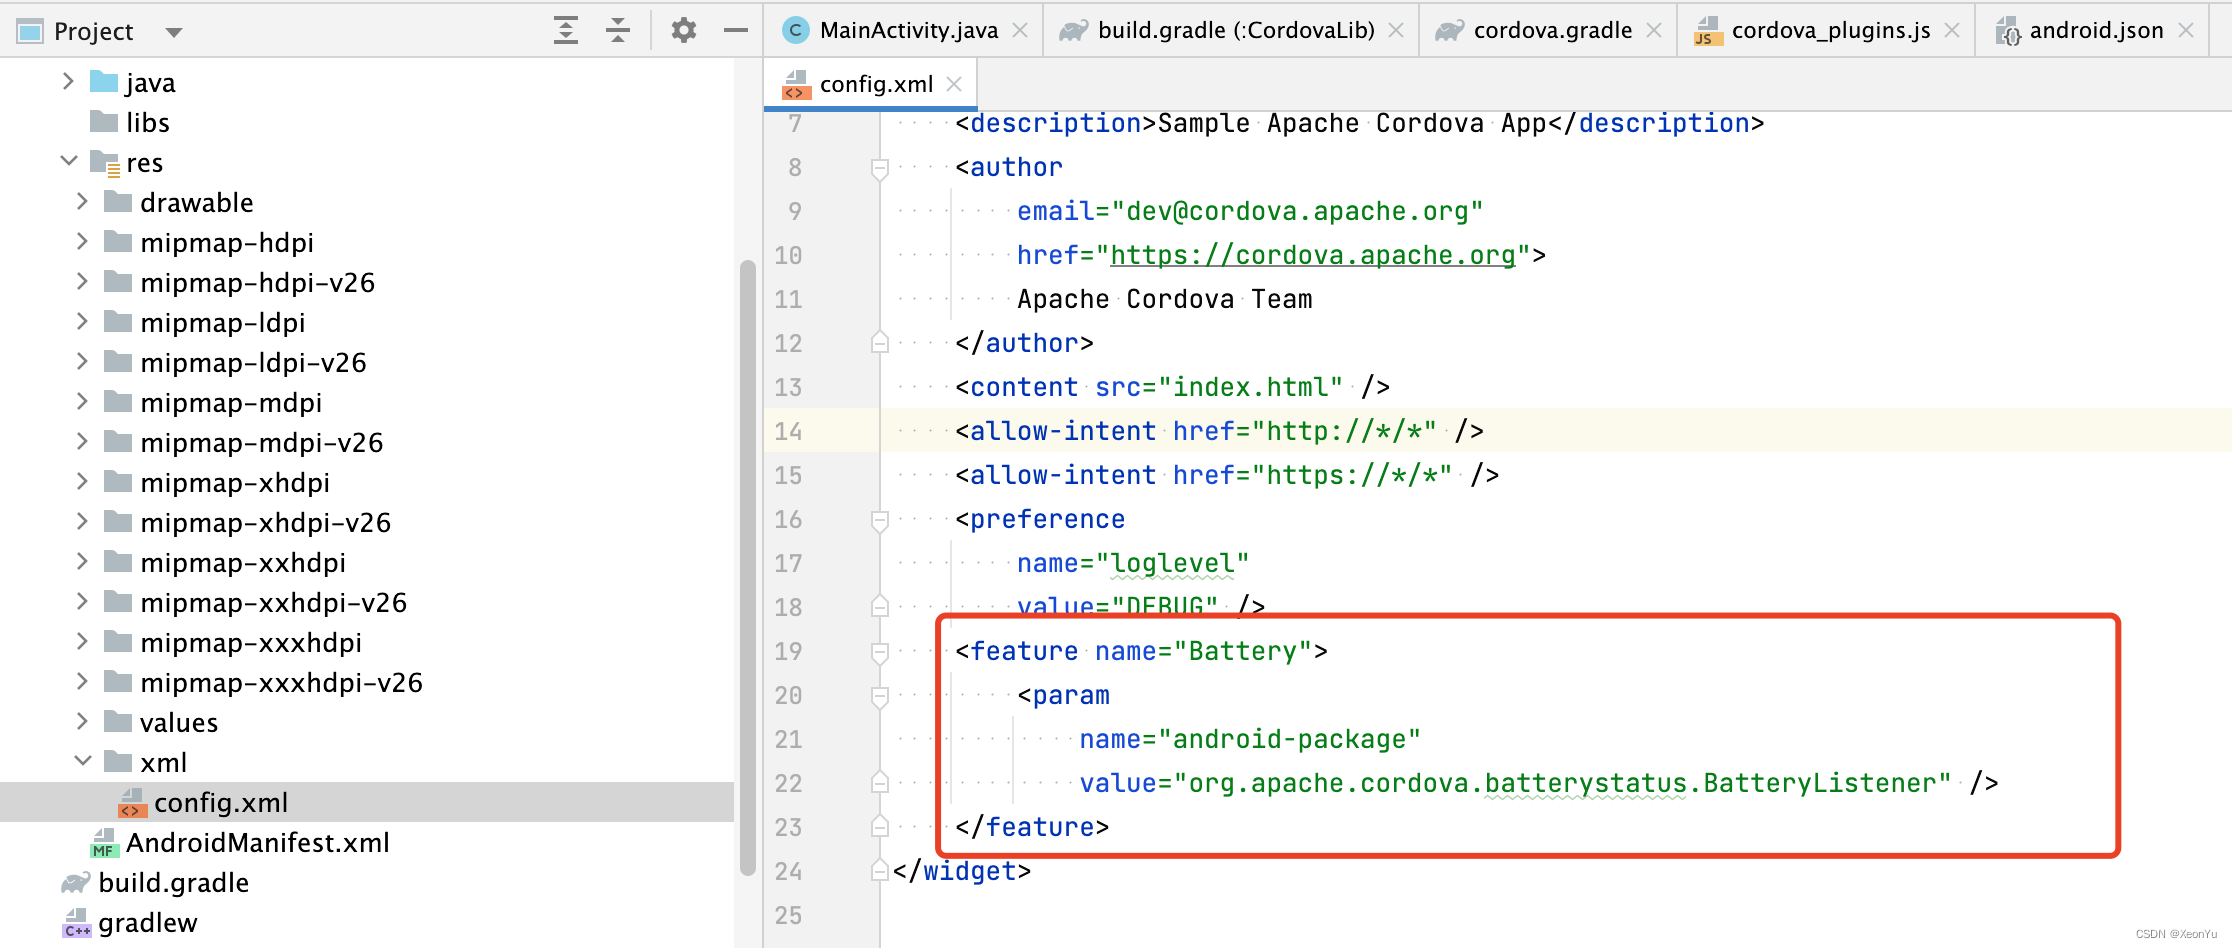
Then the corresponding configuration will be added to the config file.
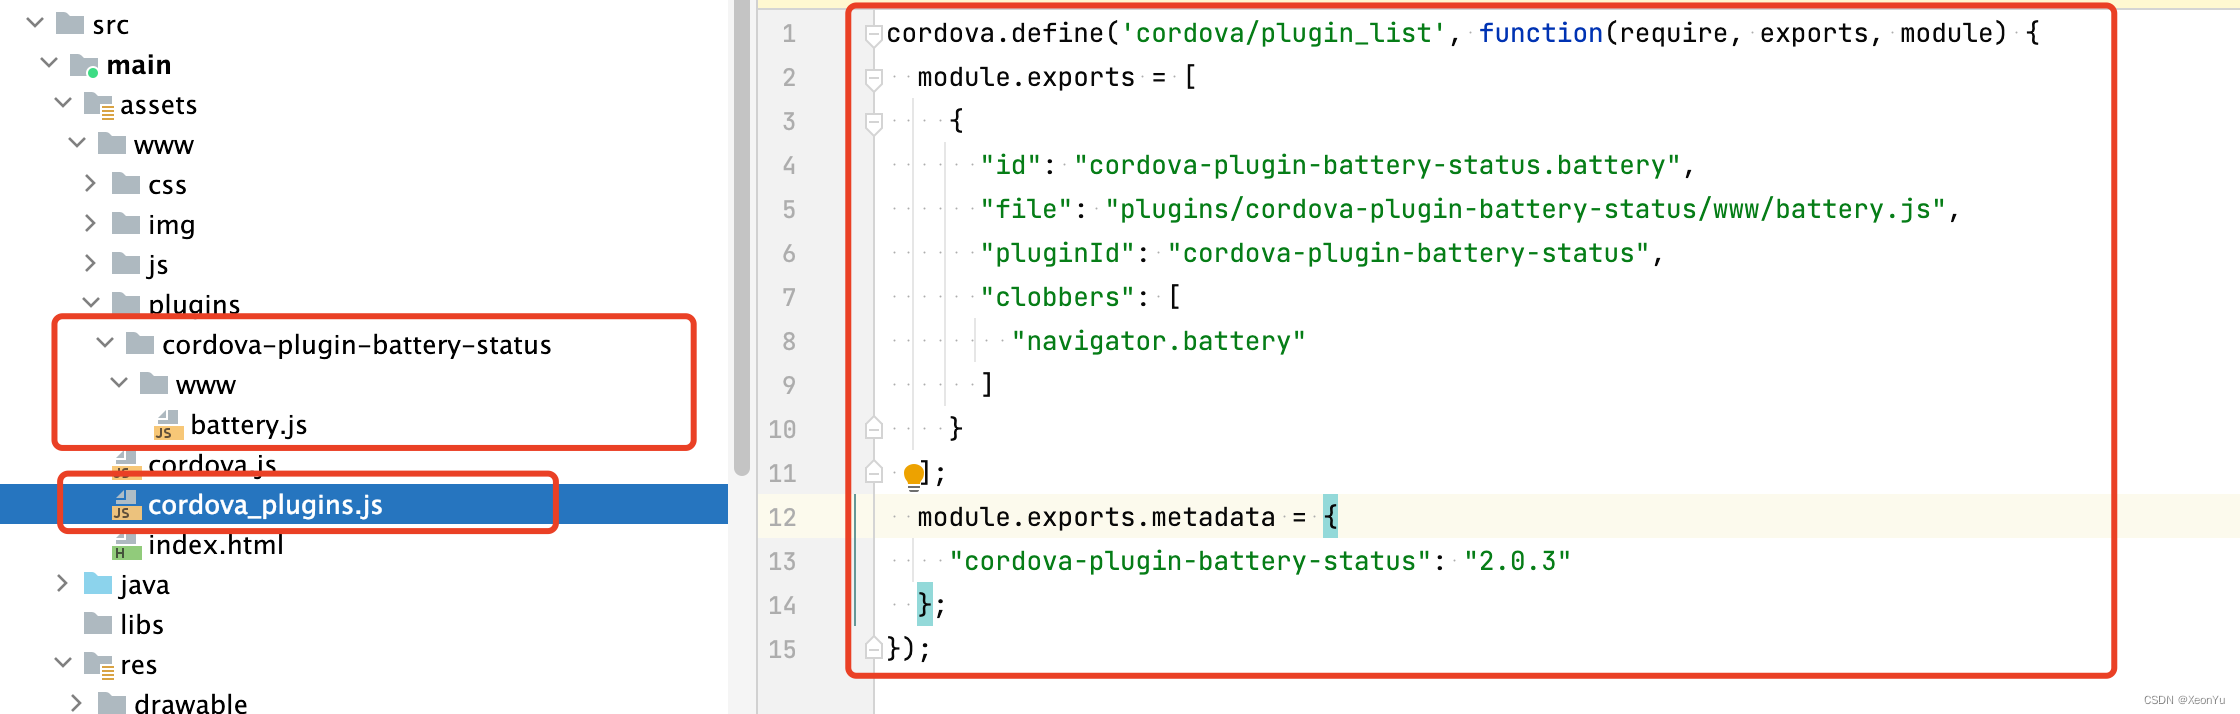
Then the js code related to the plug-in is added to the www directory.
After the plug-in is added, we can use it normally. Just change the front-end code directly below.
The code is very simple.

Modify index.js
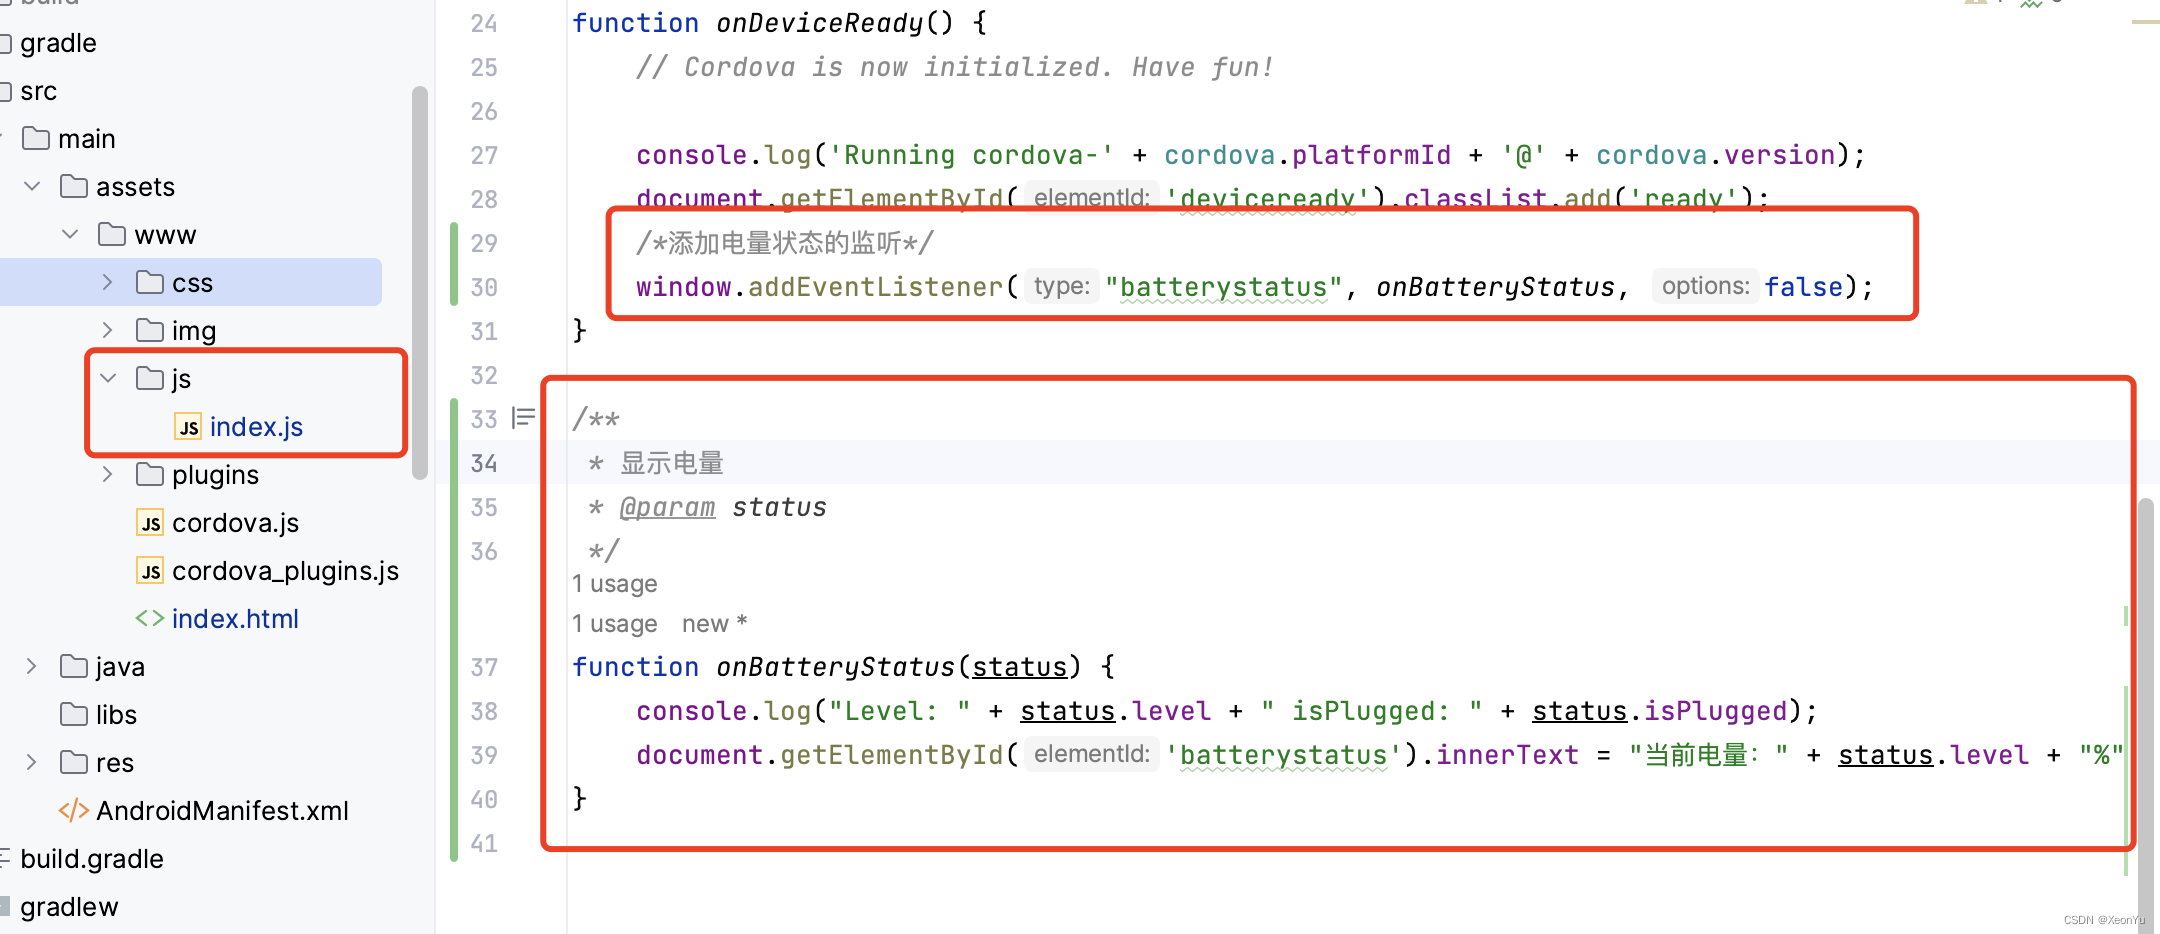
and run it
. You can see that the use of the plug-in is very simple, and Cordova can really help developers quickly realize the communication between H5 and native.
Next, let's use a camera plug-in to see.
The steps are the same, first add the plugin
cordova plugin add cordova-plugin-camera
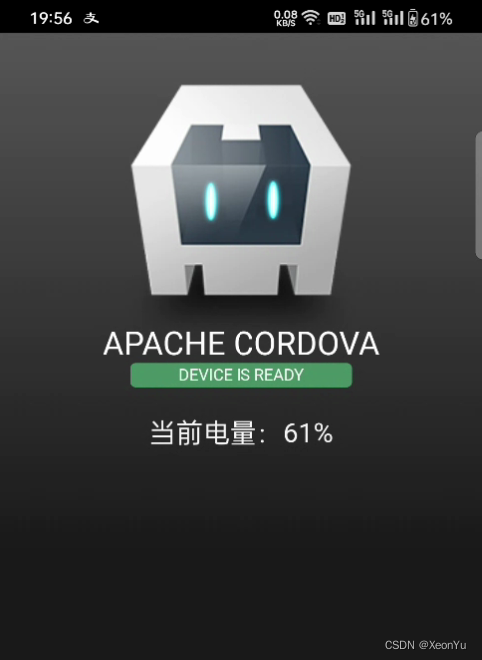
Then write the front-end code according to the document,

write js and
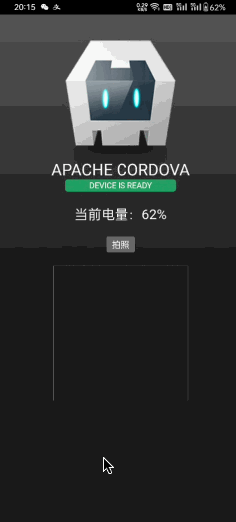
run
Other plug-ins are used in a similar way. The general steps are to add the plug-in first, and then adjust the API.
Custom Cordova plugins
In addition to using official or third-party plug-ins, we often need to customize plug-ins to handle some business-related logic.
First of all, let's take a look at the official definition of plugins: https://cordova.apache.org/docs/en/11.x/guide/hybrid/plugins/index.html
Here I pick the key points
- The Cordova plug-in is a bridge for js to interact with the native, the main direction is js to adjust the native
- The plug-in consists of at least two parts, js code and native code. js is responsible for exporting methods to the front-end call, and native is responsible for implementing business logic and notifying js execution results
- The js call native is finally
cordova.execexecuted by
Then go to the official Android plug-in development guide
same straight to the point
- The Android plug-in class needs to inherit CordovaPlugin , rewrite
execute(String action, JSONArray args, CallbackContext callbackContext)the method, and the native business logic is implemented in this method - js execution
cordova.execfinally executes the nativeexecutemethod
After you know the general process, you can create plug-ins. If you are very familiar with the directories and files of plug-ins, of course you can create them one by one by yourself, but it is recommended to use the official tool plugman to create them to avoid typos .
Proceed as follows
- Install pluginman, it is recommended to use
sudo npm install -g plugmanthe installation to avoid permission problems - After the installation is complete, you can see what instructions plugman has,
plugman -help, and thenplugman create -help 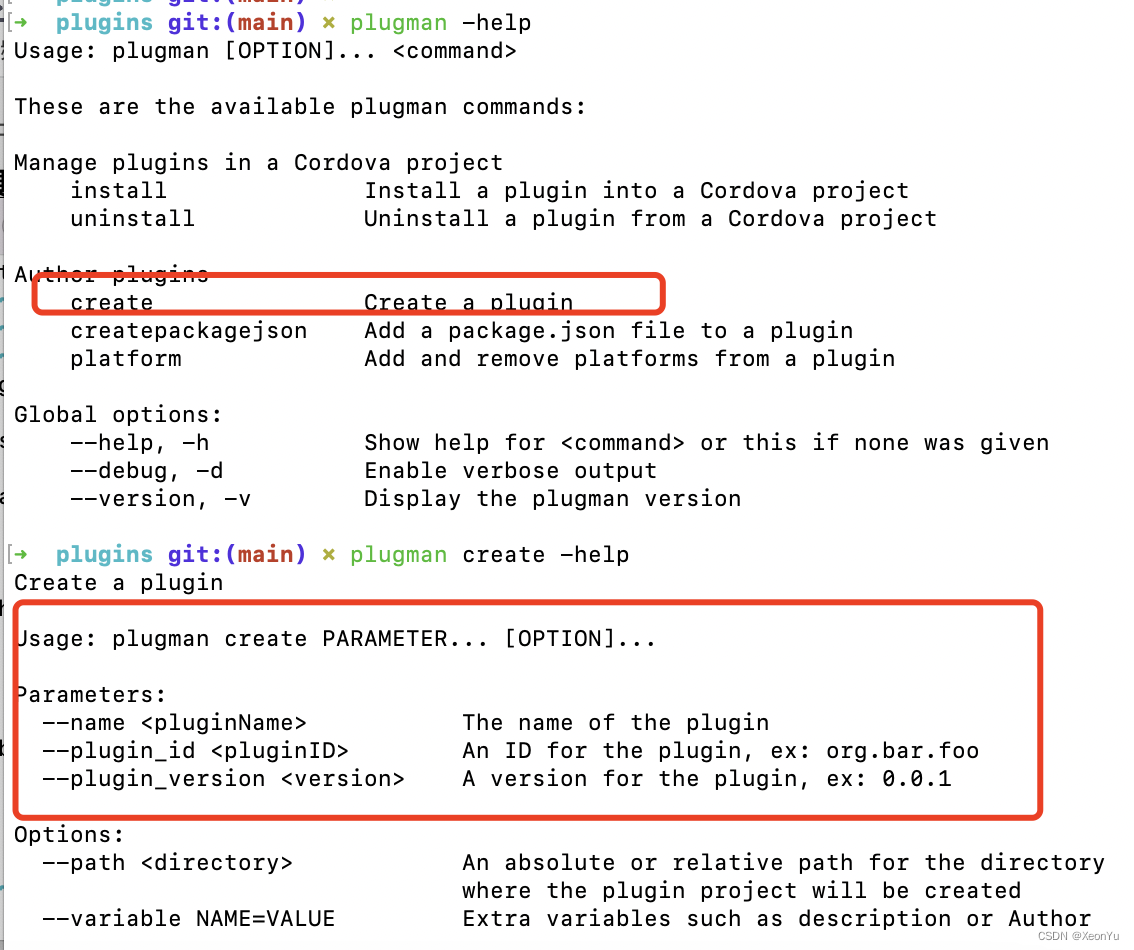
According to the command description, the instruction to create a plug-in isplugman create --name 插件名 --plugin_id 插件id --plugin_version 插件版本
Then it is simple, find a suitable directory to store the new plug-in, and then switch to the directory to execute the command to create the plug-in, for example
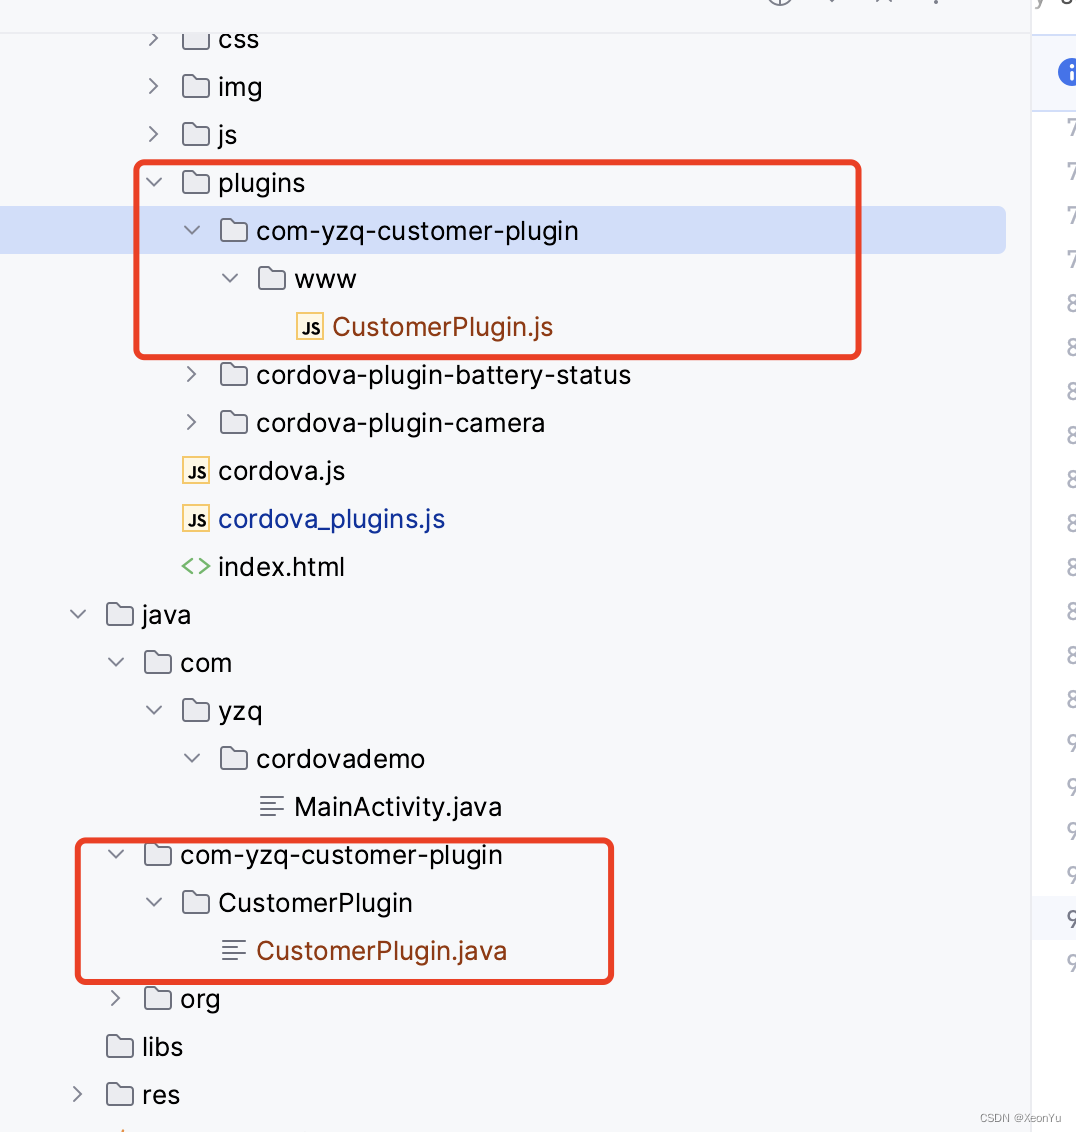
plugman create --name CustomerPlugin --plugin_id com-yzq-customer-plugin --plugin_version 1.0.0
After execution, a directory will be created, which is the preliminary structure of the plug-in
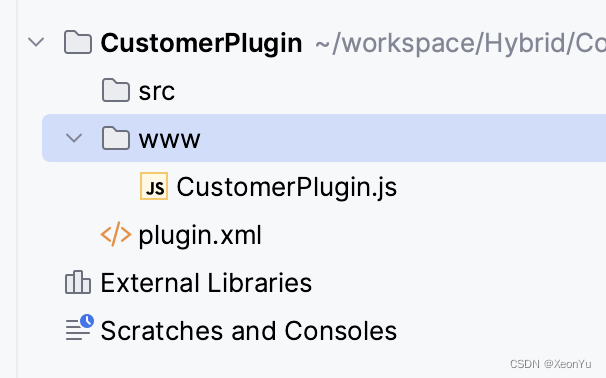
Among them, CustomerPlugin.js under www is the js code part of the two parts of the plug-in mentioned above. It is responsible for exporting the method to the front-end call, and internally executes the exec method. Adjust the code a little to facilitate subsequent calls.
var exec = require('cordova/exec');

/**
 * 导出一个方法给前端调用 coolMethord就是方法名
 * @param arg0 传递的参数
 * @param success 成功的回调
 * @param error 失败的回调
 */
exports.coolMethod = function (arg0, success, error) {


    /**
     * CustomerPlugin 就是指定要调用原生的类名
     * coolMethod 是action,一般在原生代码中会根据该值进行判断执行不同的逻辑
     */
    exec(success, error, 'CustomerPlugin', 'coolMethod', [arg0]);
};
There is also a plugin.xml, which is mainly the configuration of the plug-in. For specific configuration items, please refer to the official plugin.xml document.
The configuration description is as follows
<?xml version='1.0' encoding='utf-8'?>
<plugin id="com-yzq-customer-plugin" version="1.0.0" xmlns="http://apache.org/cordova/ns/plugins/1.0"
        xmlns:android="http://schemas.android.com/apk/res/android">
    <name>CustomerPlugin</name>
    <!--js-module指定进行通信的js接口 src就是接口文件的路径-->
    <js-module name="customer-plugin" src="www/CustomerPlugin.js">
        <!--clobbers target是前端调用时的名字,可自行更改-->
        <clobbers target="customer_plugin"/>
    </js-module>
</plugin>
Well, the code of the js part is available, the following is to add the native code of each end, here only demonstrates the Android platform.
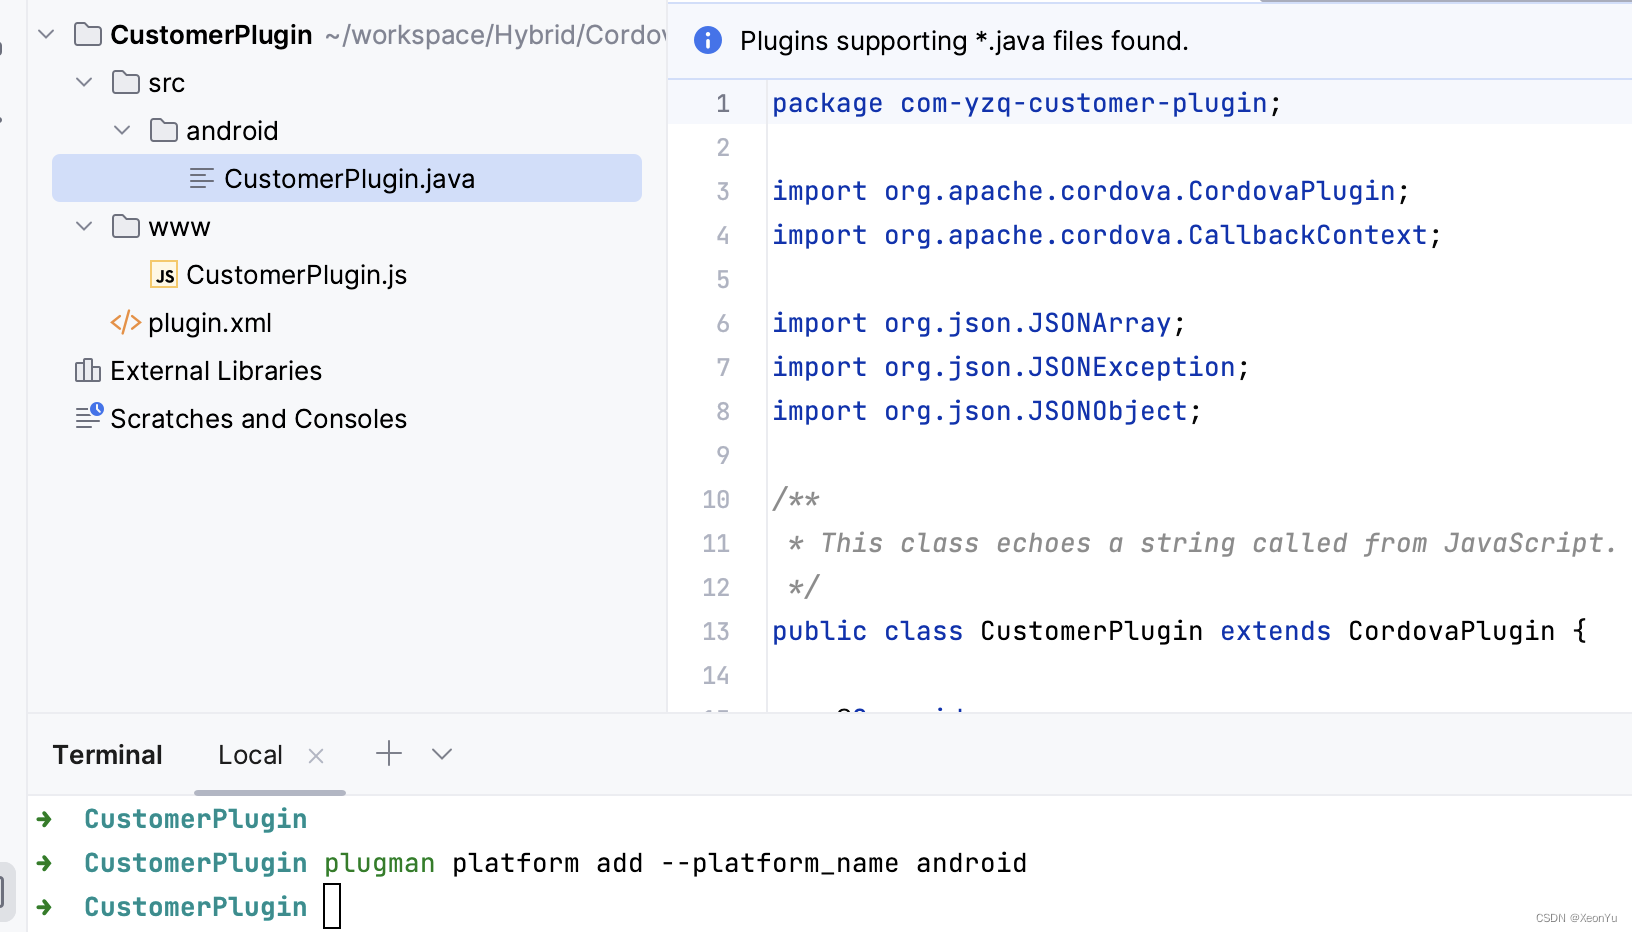
First execute the command in the newly created plugin directory plugman platform add --platform_name android, and then an android directory will appear in the src directory, and the CustomPlugin class inside is the code that our Android students need to write.
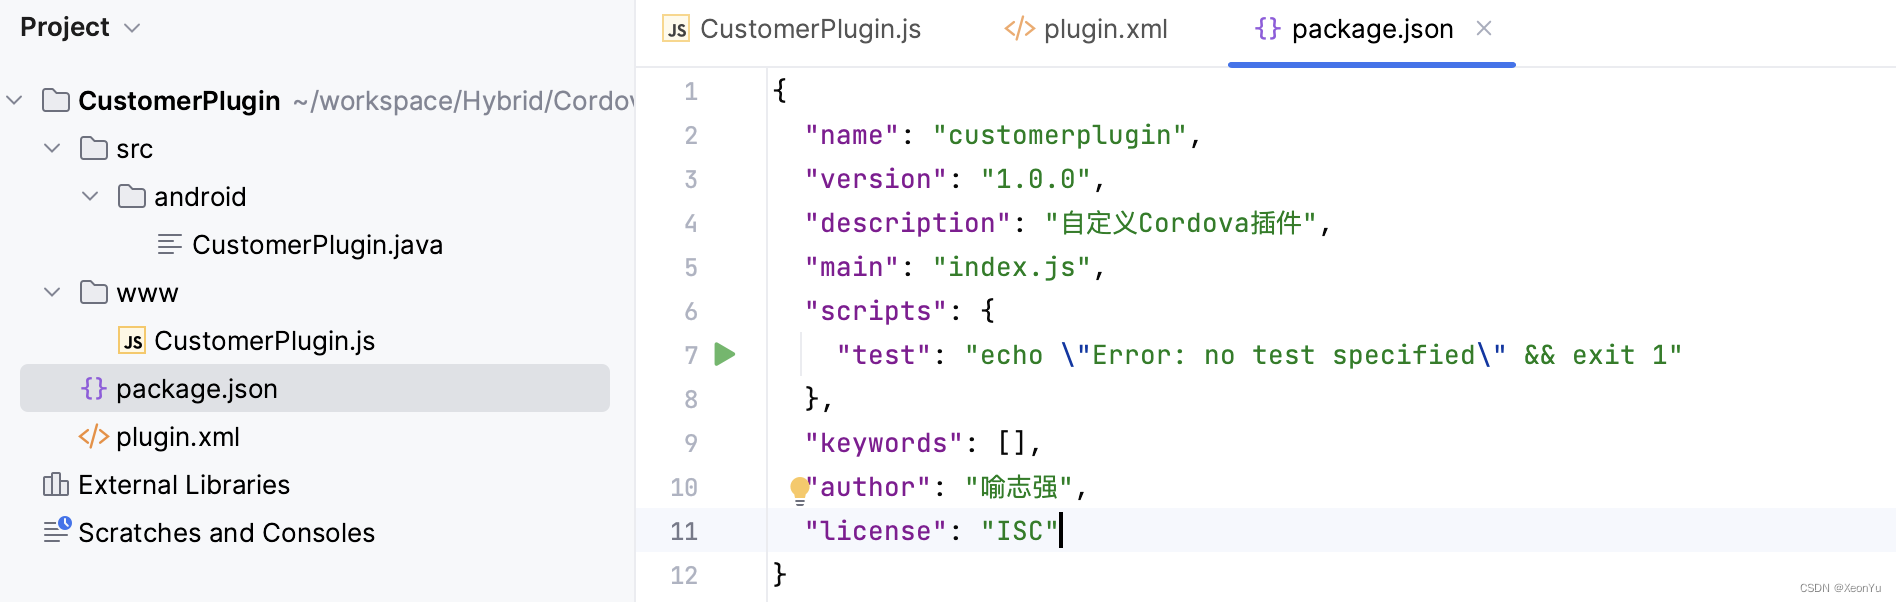
Finally, execute npm init -yesto generate a package.json, and modify the information in package.json after creation.
At this point, the plugin is created.
The following is the same as using the official plug-in before, just import the created plug-in into the project.
cordova plugin add 你的插件路径
After the execution is completed, return to the Android project and you will find that the corresponding files have been added.
Finally, adjust the directory structure, and remember to check whether the configuration in config.xml is correct.
The rest is some business code, first look at the code in CustomerPlugin
package com.yzq.cordovademo.plugin;

import android.widget.Toast;

import org.apache.cordova.CordovaPlugin;
import org.apache.cordova.CallbackContext;

import org.json.JSONArray;
import org.json.JSONException;
import org.json.JSONObject;


/**
 * @author yuzhiqiang ([email protected])
 * @description 自定义的cordova插件
 * @date 2023/3/26
 * @time 15:09
 */

public class CustomerPlugin extends CordovaPlugin {


    /**
     * js 最终会调用到execute方法
     *
     * @param action          The action to execute.
     * @param args            The exec() arguments.
     * @param callbackContext The callback context used when calling back into JavaScript.
     * @return
     * @throws JSONException
     */
    @Override
    public boolean execute(String action, JSONArray args, CallbackContext callbackContext) throws JSONException {


        /*一般根绝传过来的action匹配,做不同的逻辑*/
        if (action.equals("coolMethod")) {


            String message = args.getString(0);
            this.coolMethod(message, callbackContext);
            return true;
        }
        return false;
    }

    private void coolMethod(String message, CallbackContext callbackContext) {


        Toast.makeText(cordova.getActivity(), "插件方法被调用了", Toast.LENGTH_SHORT).show();
        if (message != null && message.length() > 0) {


            /*成功回调给js*/
            callbackContext.success("nativa调用完成");
        } else {


            /*错误回调给js*/
            callbackContext.error("Expected one non-empty string argument.");
        }
    }
}
After the native code is written, the rest is the front-end call. Here is a simple use, or the code added on the basis of the previous project.
The page is very simple, just add a button and
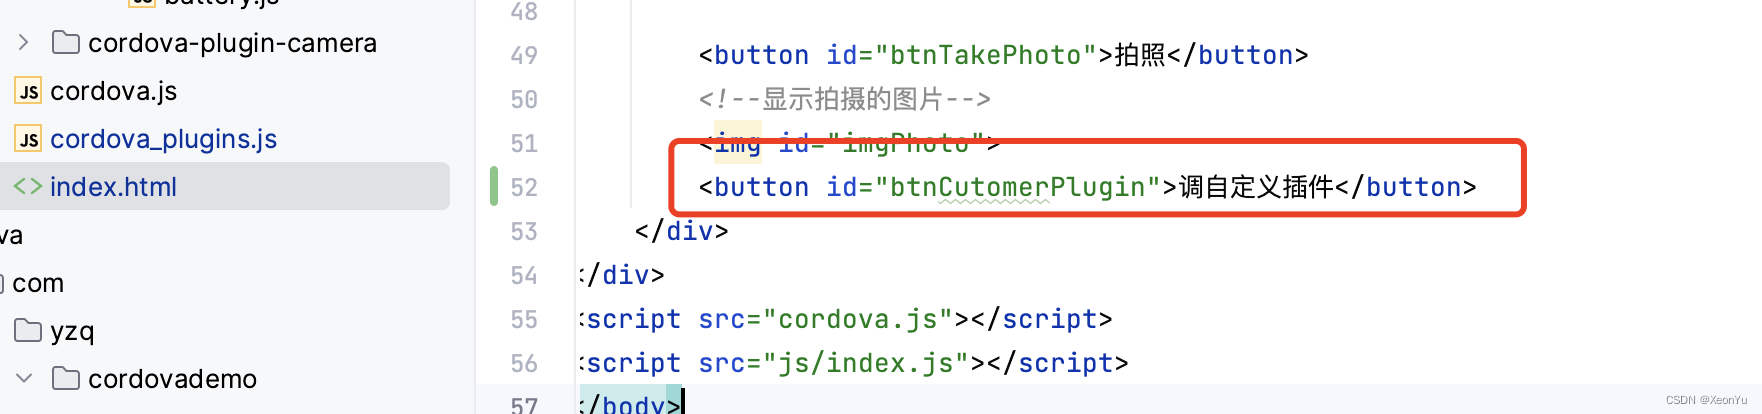
call it normally in js to
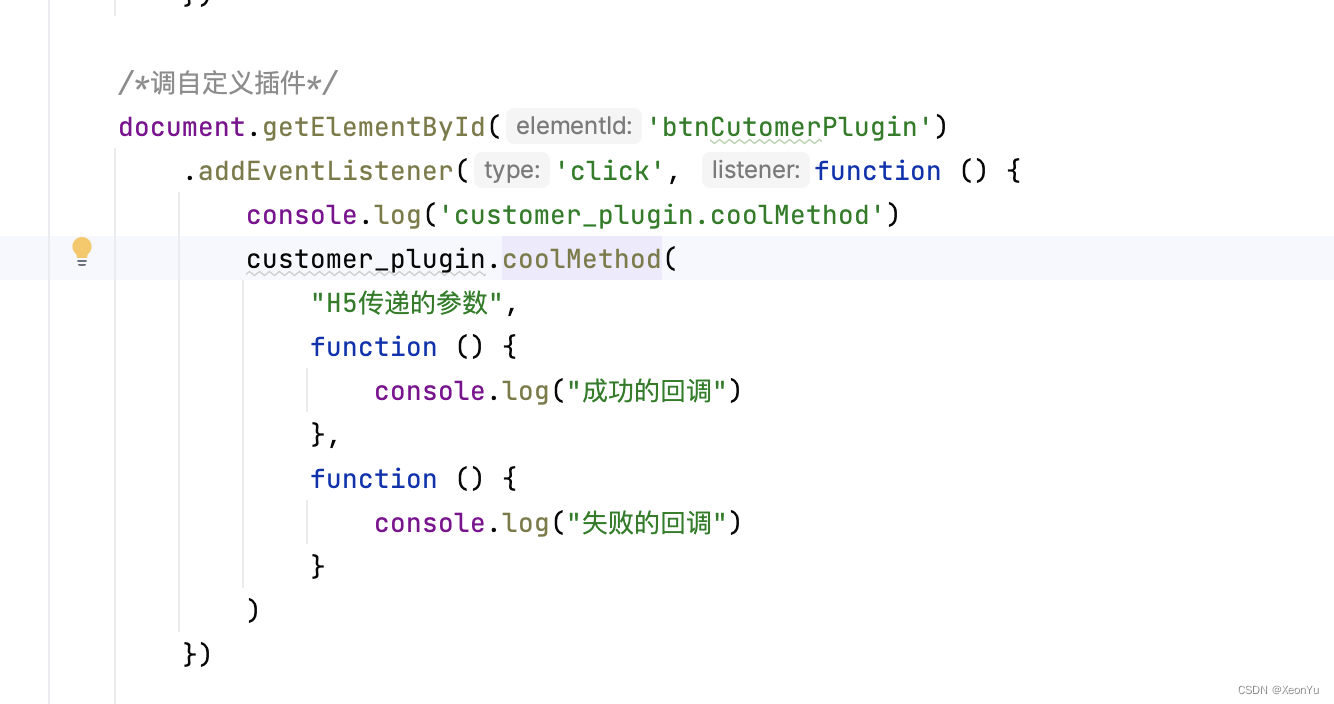
see the effect

It can be seen that h5 can call native methods normally.
At this point, a simple custom plug-in is complete.
The sample code is put on github, you can check it yourself if you need it: CordovaDemo
If you think this article is helpful to you, please give it a thumbs up. It can help more developers. If there are any mistakes in the article, please correct me. For reprinting, please indicate that you are reposting from Yu Zhiqiang’s blog, thank you !