Register components, use components (all projects are written in component)
Why use components: components can be reused, each component is independent, templates, data, css styles do not affect each other
-
Globally registered component component: Do not abuse the global component inx because global components will cause component name pollution
-
Vue2: Vue.component("component name", { } ) global component
-
-
Vue3: app.component("component name", { } ) global component
-

-
vue3: Partial registration component components
-
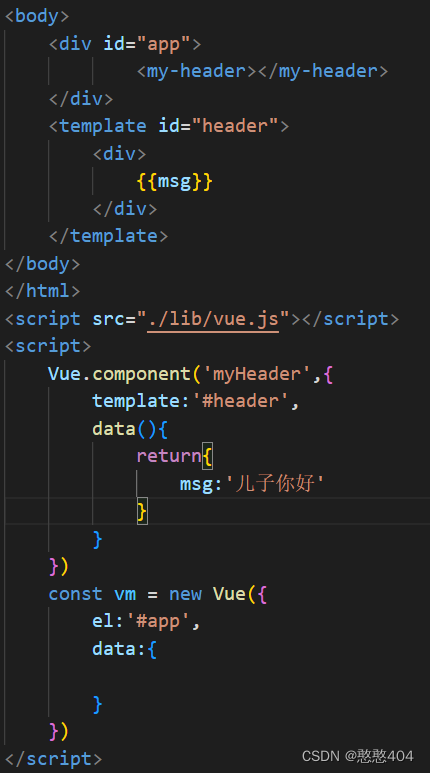
    <div id="app">
            <my-header></my-header>
    </div>

</html>
<script src="./lib/vue.global.js"></script>
<script>
    let app =  Vue.createApp({
        data () {
            return {

            }
        },
        components: { // 局部组件的注册
            // 组件的名字:对象形式的配置项
            'my-header':{
                template:`<div>{

   {msg}}</div>`,
                data() {
                    return {
                        msg:"子组件"
                    }
                },
            }
        }
     })
     app.mount("#app")
</script>
Component parameter passing: solve the problem that data cannot be shared between components (one-way data flow principle)
-
Vue follows a one-way data flow, and the flow of data is from parent to child. When the data of the parent component changes, the data in props will be updated immediately.
-
props: pass from parent to child (read-only attribute): the parent component needs to pass values through custom properties on the child component, and the child component receives the value through props inside (props verification)
-
The parent's child component v-bind (custom attribute) binds the attribute style, and the attribute value is the parent's data passed to the child component
-
Define a props in the child to receive the property name from the venue
-
All the data on the received props can be used directly on the template of the subcomponent, or in the option (remember to bring this) namely: methods, watch, computed
-
eg:::
1.父组件传递 (也可以自定义属性传值 :xiaoming="")
<ZiCom xiaoming="我是传递的数据a" xiaohong='我是传递的第二个b'/>


2.子组件设置接收 props,直接使用
export default
    // 1.使用props定义接收参数
    props:["xiaoming","xiaohong"]
}
props validation:
-
    <!-- 父传子 -->
    <div id="app">
        {

         {fMsg}}
        <!-- 子组件 -->
        <my-kun :title="fMsg" :hei="list[0].title" :num="list[0].price"></my-kun>
    </div>

</html>
<script src="./lib/vue.global.js"></script>
<script>
    let app = Vue.createApp({
        data() {
            return {
                fMsg: '父的数据在此',
                list: [{ title: '小黑子', price: 5 }, { title: '坤坤', price: 5 }, { title: '凡凡', price: 5 }]
            }
        }
    })
    app.component('myKun', {
        template: `<div> {

         {zMsg}}-----{

         {title}}-----{

         {hei}}-----{

         {num}} </div>`,
        // props: ['title','hei','num'],
        props: {
            'title': [String],
            'hei': String,

            // 自定义类型校验函数
            'num': {
                validator(value) {
                    // The value must match one of these strings
                    return ['你好', '不好',5].includes(value)
                }
            },
        },
        data() {
            return {
                zMsg: '爱坤才会赢'
            }
        }
    })

    app.mount('#app')
</script>
-
-
emits: pass from child to parent (monitor event): the parent component needs to bind a custom event to the child component, and the child component triggers the event and passes the value through $emit (can emits effect)
- Parent and child component binding event @myclick="fuMethod"
- Use the fuMethod( val ){ } method in the methods of the parent. Used to receive the data passed by the child and do processing
- The event name myclick needs to be received in emits in the subcomponent, bind the method, and then use it (or use it directly) and then use it in two ways: the
first one: emits:['myClick'], //receive methods:{ ziMethod (){ this.$emit('myclick', this.zMsg) } }, used in html: @click="ziMethods" The second: after receiving,
use <button @click="$emit(' directly in html someEvent')">click me</button> - - Receive in the parent, and the fuMethod method in methods does the receiving processing. After processing, according to: According to the principle of unidirectional data flow, the view is also automatically updated
- parent component
<template>
  <div>
    fufuf
    <!-- 3.绑定自定义事件 -->
    <!-- <ZiCom @自定义事件=“函数”/> -->
    <ZiCom @xiaoming="demo"/>
  </div>
</template>

<script>
import ZiCom from "./ZiCom.vue"
export default {
    components:{
        ZiCom
    },
    methods:{
        // 4定义函数 并且接收自定义事件上面的数据
        demo(val){
            console.log(val)
        }
    }
}
</script>
Subassembly
-
<template> <div> zizi <!-- 1.逆向传值必须必须必须要使用事件来触发 --> <button @click="fun()">点我把数据给父组件</button> </div> </template> <script> export default { data(){ return { zitext:"我是子组件的数据么么哒!!!!!" } }, methods:{ fun(){ // 2.自定义事件 携带我们子组件的数据 // this.$emit("给自定义事件起个名字",你传递的数据) this.$emit("xiaoming",{a:this.zitext}) } } } </script> -
    <!-- 父传子 -->
    <div id="app">
        {

         {fMsg}}
        <!-- 子组件 -->
        <my-kun @myclick="fuMethod"></my-kun>
    </div>

</html>
<script src="./lib/vue.global.js"></script>
<script>
    let app = Vue.createApp({
        data() {
            return {
                fMsg: '父的数据在此',
                list: [{ title: '小黑子', price: 5 }, { title: '坤坤', price: 5 }, { title: '凡凡', price: 5 }]
            }
        },
        methods: {
            fuMethod(msg) {
                console.log(111);
                this.fMsg = msg
            }
        }
    })
    app.component('myKun', {
        template: `<div> {

         {zMsg}} <button @click="ziMethod">哈哈</button> </div>`,
        // 直接写template中
        // <button @click="$emit('someEvent')">click me</button>

        // emits:["myclick"],
        emits: {
            //
            click: null,

            // 校验 submit 事件
            'myclick': (payload) => {
                if (payload) {
                    return true
                } else {
                    console.warn('忘记传参了')
                    return false
                }
            }
        },
        data() {
            return {
                zMsg: '爱坤才会赢'
            }
        },
        methods: {
            ziMethod() {
                this.$emit('myclick', this.zMsg)
            }
        }
    })

    app.mount('#app')
</script>
-
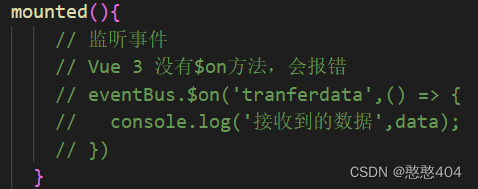
Sibling component pass value:
First instantiate a public communication object (central event president) eventBus.js,
One of the sibling components sends trigger events through $emit,
A component receives listener events via $on
Vue3: There is no clear solution for passing values to sibling components, and state promotion can be used
(Find the common parent component of these two components, and then implement it by passing values between the parent and the child)
//utils文件夹下:eventBus.js

import {createApp} from 'vue'
// 实例化通信对象,导出
export default createApp()
Passing values across components: Method 1: Dependency Injection: Outer components pass values through the provide option, and inner components receive values through inject:
Dependency injection is not recommended : because data tracking is difficult , it is not known which level declares this or which level or several levels are used. If the data needs to be used in multiple components, you can use vueX for state management. If only the child component wants to use the data on the parent component, the parent component can pass values to the child component directly through props.
Passing values across components: Method 2: The vuex state management tool can also be implemented. one-way data flow
A vue file provide can only write one (data at the same level), and only the last one will take effect when writing multiple, so other methods,
The same is true for computed properties, the code is executed from top to bottom, and only the last one takes effect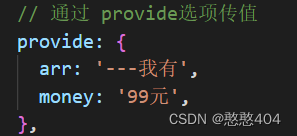

Special attribute ref $parent $root
-
refA reference to register an element or subcomponent. Perform basic page dom operations1. Use ref="on top of the tag's dom"
2.this.$refs. You can find the specified element with your name
Put it on the label: the dom node of the label is obtained.
<template>
  <div>
    <!-- 1.绑定 -->
    <h1 ref="wangcai">找到我</h1>
  <button @click="fun()">点我修改上面的内容</button>

  </div>
</template>

<script>
export default {
  methods:{
    fun(){
      // 2.找到他
      this.$refs.wangcai.style.color="red";
    }
  }
}
</script>
Put it on the component and get the method attribute of the subcomponent. When using the method, remember that the method should be called with (). don't repeat print
<template>
  <div>
    <h1>我是home</h1>
    <!-- 1.把ref绑定到组件身上 -->
    <Rc ref="com"/>
    <button @click="fun()">点我</button>
  </div>
</template>

<script>
import Rc from "@/components/refcom.vue"
export default {
  components:{
    Rc
  },
  methods:{
    fun(){
      // 2.把ref绑定到组件身上父组件就可以得到子组件的所有属性和方法
      console.log(this.$refs.com)
    }
  }
}
</script>
$parent: The method attribute of the parent component can be obtained in the writing subcomponent, if there is one, it will be obtained, and if it is not, it will be null
$set : This.$set("Who do you want to add", "key added by x", "val you want to add")
How to solve the problem of trying to keep the data unchanged in Vue?
<template>
  <div>
      <h2>数据变试图不会改变</h2>
      <h3>{

   {obj.age}}</h3>
      <button @click="funb()">点我</button>
  </div>
</template>

<script>
// 在vue2.0中  数据的双向绑定 是基于数据劫持与发布者订阅者模式的
// 其中数据劫持是通过Object.defineProperty()这个方法来拦截劫持data中的数据的  因为有了这个方法
// 所以数据改变试图也会更新

// 但是 Object.defineProperty()有个问题   他是会监听初始化的数据  如果中途给数组或者对象
// 添加新属性的时候  Object.defineProperty() 就不会监听到  不会监听到就没有数据劫持  没有
// 数据劫持就没有双向绑定  没有双向绑定就没有数据变试图变

export default {
    methods:{
        funb(){
            // this.obj.age=18

            // console.log(this.obj.age)

            this.$set(this.obj,"age",18)
        }
    },
    data(){
        return {
            obj:{
                name:"xixi"
            }
        }
    }
}
</script>
Transparent transmission (attribute): Vue3: transparent transmission attribute. Transparent transmission is divided into automatic transparent transmission binding and manual binding.
What is the transparent attribute? Transparent properties refer to the properties that act on the component when the component is in use, will flow down and be bound to the label in the component.
Transparent transmission: When the parent component passes data to the child component, the child component receives the attribute $attrs passed by the parent component
Transparent transmission function:::
- attribute inheritance: child inherits parent: eg: class, id, style, attribute, event and other headers can be transparently transmitted to the tags in the component.
- Merge class and style
v-on listener inheritance
- whether to disable transparent transmission attributes: inheritAttrs: false
- inheritance of multi-root nodes: child components use props to receive attributes passed by parent components
built-in components
<KeepAlive> cache component: used to wrap dynamic switching components
<KeepAlive> , when wrapping a dynamic component, caches inactive component instances instead of destroying them. Avoid re-rendering components (performance optimization)
keep-alive和include,exclude
activated deactivated
<component :is='coms[index]' /> Dynamic component: determine which component is rendered
      is:特殊Attribute用于绑定[动态组件]

      //动态组件:包裹挂载点即可
      <keep-alive>
           <component :is="Com"></component>
      </keep-alive>

      //路由:包裹路由出口即可
      <keep-alive>
          <router-view/>
      </keep-alive>

      //属性:如果 我把两个都写了  excloud的优先级大于incloude
            include 你要缓存谁
            exclude 你不想缓存谁
     <keep-alive exclude="Db,xxxxx,cccc">
          <!-- 设置动态组件的挂载点 -->
          <component :is="com"></component>
     </keep-alive>


    #### 钩子函数
    activated:在进入到被kepp-alive管理的组件时候触发
    deactivated:在离开被kepp-alive管理的组件时候触发
    替代 `mounted`挂载后 和 `unmounted`销毁后。
    <template>
      <div>
        aaaaaaaa
        <input type="text" />
      </div>
    </template>

    <script>
        export default {
          activated() {
            console.log("进入到了被keep-alive管理的组件中了");
          },
          deactivated() {
            console.log("离开到了被keep-alive管理的组件中了");
          },
        };
    </script>
Animated component <Transiton />: only one label or component can be placed inside (use vue official website to view)
name=" " Custom animation class name prefix, default if not
mode="out-in" set animation order, in-out, out-in
There are a total of 6 CSS classes to be applied to enter and leave transition effects
<Transition>
  <p v-if="show">hello</p>
</Transition>

/* 下面我们会解释这些 class 是做什么的 */
.v-enter-active,
.v-leave-active {
  transition: opacity 0.5s ease;
}

.v-enter-from,
.v-leave-to {
  opacity: 0;
}
Socket <slot /> component: customize the content in the component (borrow a link to explain in detail)
If the content inserted in the switch tag of the component is not displayed by default ( the component is a complete independent individual, there is no way to insert content into the component without special settings ) The slot is used to mix the template of the parent component and the child component
default slot <slot />
Named slot <slot name = "" />
Plug-in plugins + custom instruction directive
Define the plugin: export default { install(app){ } }
Application plug-in: app.use (plug-in) use method will automatically find the install method of the plug-in when it is executed and execute this method to complete the application of the plug-in
Local directives : defined by the directives: { plugin name: { hook function } } option, which can only be used in the current component
The function of the command: depends on the hook function of the command hook created, mounted, updated...
eg: When an input element is inserted into the DOM by Vue, it will be automatically focused
Global directive : Global directive v- directive name is used, defined by the app.directive('cals' { }) method, can be used in any component, the function of the directive: depends on the hook function of the directive hook created, mounted, updated.. ....
Use v-automatically with the name of the directive
-
//a
export default{
    install(app){
        app.directive('focus',{
            // 绑定元素的父组件
            // 及他自己的所有子节点都挂载完成后调用
            mounted(el, binding, vnode, prevVnode) {
                el.focus(); //聚焦
            },
        })
    }
}
// b export default{ install(app){ app.directive('cal',{ // 绑定元素的父组件 // 及他自己的所有子节点都挂载完成后调用 mounted(el, binding, vnode, prevVnode) { el.value = el.value * 10 + '没钱' // 加钱 }, }) } }<template> <div class="childa"> <!-- <h1 ref="title">{ { count }}</h1> --> childa组件 <input v-focus v-calc type="text" :value="4">哎哎哎啊 <input type="text" v-sss :value="6">哎哎哎啊 <h1 ref="title">{ { count }}</h1> <button @click="handleClick">传值</button> </div> </template> <script> export default { data() { return{ p:'123', count:3 } }, methods:{ handleClick(){ this.count++, // console.log(this.$refs.title.innerHTML); this.$nextTick(()=>{ console.log(this.$refs.title.innerHTML); }) } }, 局部自定义指令 directives: { //自定义局部指令,只能在当前组将中使用 // 在模板中启用 v-focus focus:{ // 在绑定元素的父组件 // 及他自己的所有子节点都挂载完成后调用 mounted(el, binding, vnode, prevVnode) { console.log(el); el.focus() } }, sss:{ // 在绑定元素的父组件 mounted(el, binding, vnode, prevVnode) { el.value = el.value * 7+'元' } } } } </script>
-
mixins : mix in
Role: Extract the common code (option) of multiple components to avoid code redundancy
Use: The mixed-in public code will appear in the option position of the component
Global mixing is not recommended, it will cause global pollution, use the following local mixing
import import mixins path, mix in: data is automatically mixed in at the same level, you can directly use the method attributes in mixins

export default{
    // 能写在这里的都是组件已知选项 watch filter directives components data
    methods:{
        saveIndex(i){
            this.index = i
        }
    },
    computed:{
        calc(){
            return 2**10
        }
    }
}
<footer>
<span @click="saveIndex(index)" v-for="item, index in btns" :key="index">{
{ item }}</span>
</footer>
// 导入mixins
import mixins from './mixins/index';
// 应用混入
mixins: [mixins],
methods: {
// 这个可以省略了。
// saveIndex(i) {
// this.index = i
// }
},Two core APIs: (not commonly used)
$forceUpdate(): Force the component to be updated (in extreme cases where it cannot be updated, I wrote it wrong)
$nextTick(): Allows specific code to be executed after the next update cycle of the component
      <button @click="handleClick">传值</button>

  methods:{
    handleClick(){
      this.count++,
      // console.log(this.$refs.title.innerHTML);

      this.$nextTick(()=>{
        console.log(this.$refs.title.innerHTML);
      })
    }
  },