1. Tool introduction
Locust is an open source Python performance testing tool, which is used to simulate a large number of concurrent users accessing websites, APIs, etc. to test the performance and stability of the system. Its main features include:
1. Ease of use: Locust is written based on Python, which is easy to use and has a low learning curve.
2. Distributed support: Locust supports distributed deployment and can run on multiple machines to simulate larger concurrent users.
3. Real-time monitoring: Locust provides real-time monitoring and reporting, and you can view test performance indicators, request response time, error rate and other data.
4. Script writing: Locust uses Python to write test scripts and supports custom requests and user behaviors.
5. Scalability: Locust supports custom plug-ins and extensions to meet different testing needs.
When using Locust for performance testing, you need to write Python scripts to define user behavior and requests, then use Locust to run the test scripts, and set parameters such as the number of concurrent users and request frequency. Locust simulates user behavior and requests, records performance data, and finally generates test reports.
2. Application in the project
2.1 Description
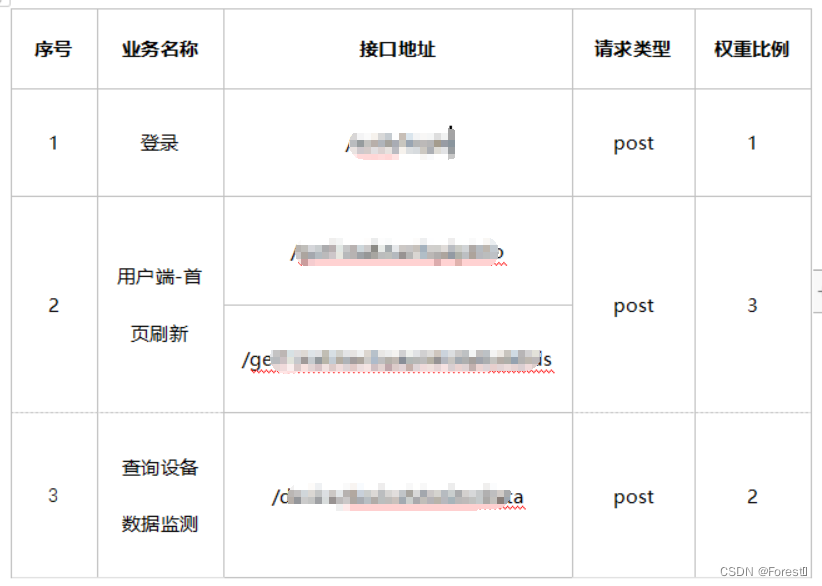
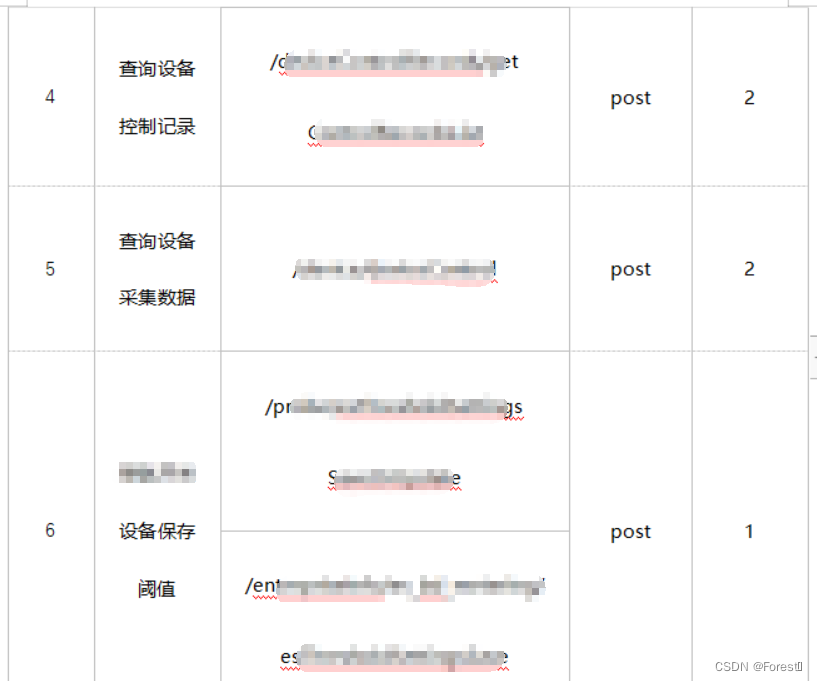
The purpose of this test is to explore the system business processing performance of the company's self-developed system test environment, as well as the system performance under high load conditions. Through the analysis of the project structure and business scenarios, the design is small program login -> home page refresh -> device data Monitoring/control records->device collection data query->device threshold value storage (including web-side interface) business link model for simulation and testing, to achieve multi-interface concurrent pressure testing, design operation interface, concurrency ratio and other details are as follows:
2.2 Sample Code Script
import os, random
from locust import HttpUser, events, task, between


class UserBehavior(HttpUser):  # 定义一个TaskSet类,用于定义用户行为  TaskSet,HttpUser
    # @task  # 若添加@task装饰器,则该方法会在每个用户执行任务时执行,此处注销
    def on_start(self):  # 在测试开始执行的方法,用于进行登录操作获取token,用于后续接口的带入调用
    	# 定义Content-Type请求头类型和请求体
        self.client.headers = {

    'Content-Type': 'application/json'}
        payload = {

    'username': 'xxx',
                   'password': 'xxxxx'}
        rs_login = self.client.post('url',
                                    headers=self.client.headers,
                                    json=payload)
        # 从登录接口返回值中获取token,添加至Content-Type请求头中
        self.client.headers['Authorization'] = 'Bearer ' + rs_login.json()['data']['access_token']
        print(self.client.headers)
        pass

    # @task
    def on_stop(self):
        pass


    # 在@task后添加(weight=权重值),若不填写(weight=权重值),只有task则默认的任务权重为1。注:(weight=权重值)要带上weight=,否则只有数值时,则这个数字将被解释为一个位置参数,而不是权重。
    @task
    def test_login(self):  # 登录接口
        self.client.headers = {

    'Content-Type': 'application/json'}
        payload = {

    'username': 'xxx',
                   'password': 'xxx'}
        rs_login = self.client.post('url',
                                    headers=self.client.headers,
                                    json=payload)
        self.client.headers['Authorization'] = 'Bearer ' + rs_login.json()['data']['access_token']


    @task(weight=3)
    def test_refresh(self):
        rs_rf0 = self.client.post('url',
                                    headers=self.client.headers)
        print(rs_rf0.json()['code'], '刷新操作')

        rs_rf1 = self.client.post('url',
                                    headers=self.client.headers,
                                  json={

    '测试数据': ["xxx"]})
        print(rs_rf1.json()['code'], '刷新操作2')


    @task(weight=2)
    def test_query(self):
        data1 = {

    '28C5363480B514FFA': '测试数据1',
                 '6440FBF646F0010FA': '测试数据2',
                 '642B972C2350035FA': '测试数据3',
                 '6444A4A83250001FA': '测试数据4',
                 '28C46609643A3EDFA': '测试数据5'}

        try:
            for id, msg in data1.items():
                rs_refresh1 = self.client.post('url',
                                            headers=self.client.headers,
                                               json={

    "测试数据"})
                print(rs_refresh1.json()['code'], msg, rs_refresh1.json()['msg'])
        except Exception as e:
            print(e)

class WebsiteUser(UserBehavior):  # 定义一个HttpUser类,继承以上的UserBehavior任务类。
    wait_time = between(0.1, 1.0)  # 定义用户执行任务之间的等待时间,使用between函数指定等待时间范围为0.1秒到1秒之间。
    host = "url"  # 指定要测试的主机地址。
    min_wait = 1000  # 指定用户在执行任务之间的最小和最大等待时间,单位为毫秒。
    max_wait = 3000

if __name__ == '__main__':
    os.system(r'locust -f 脚本路径 --host=测试地址 --web-host=web监控地址,一般为自己的主机ip,若不设置则默认为localhost --web-port=8089')
Do a benchmark test first, and detect the performance of various performance indicators of the system under the condition of small concurrency, as the basis for subsequent comparisons.
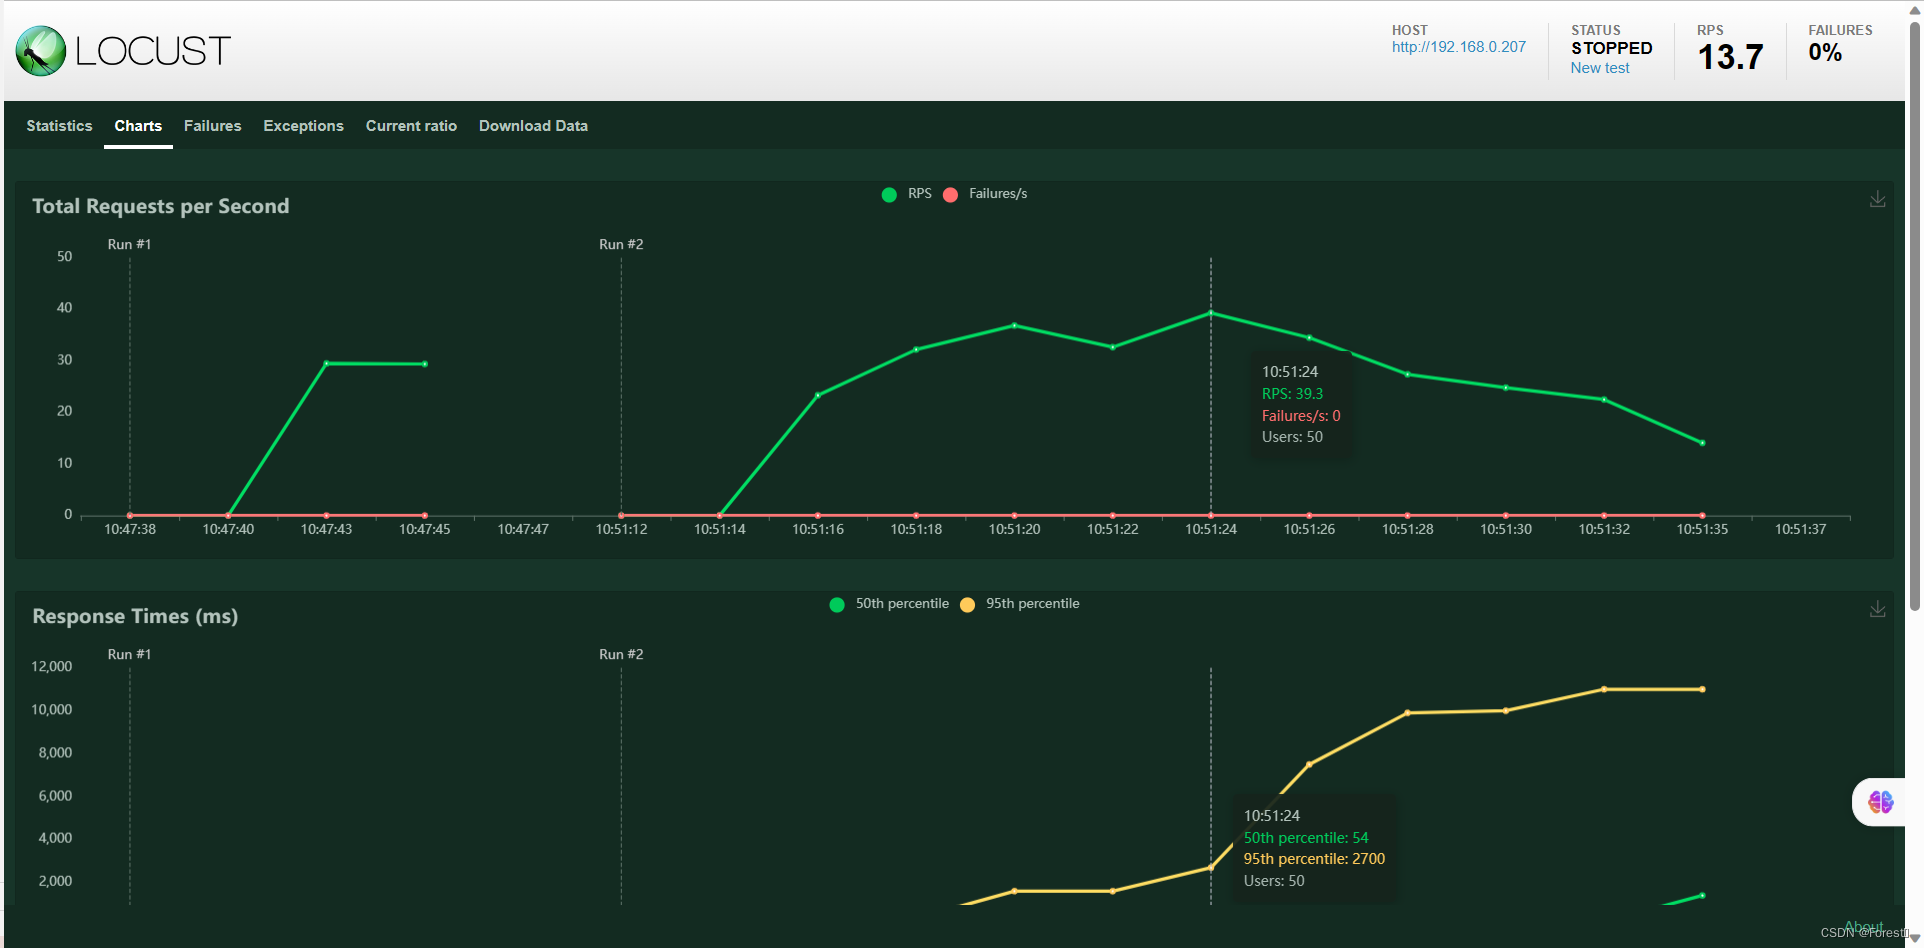
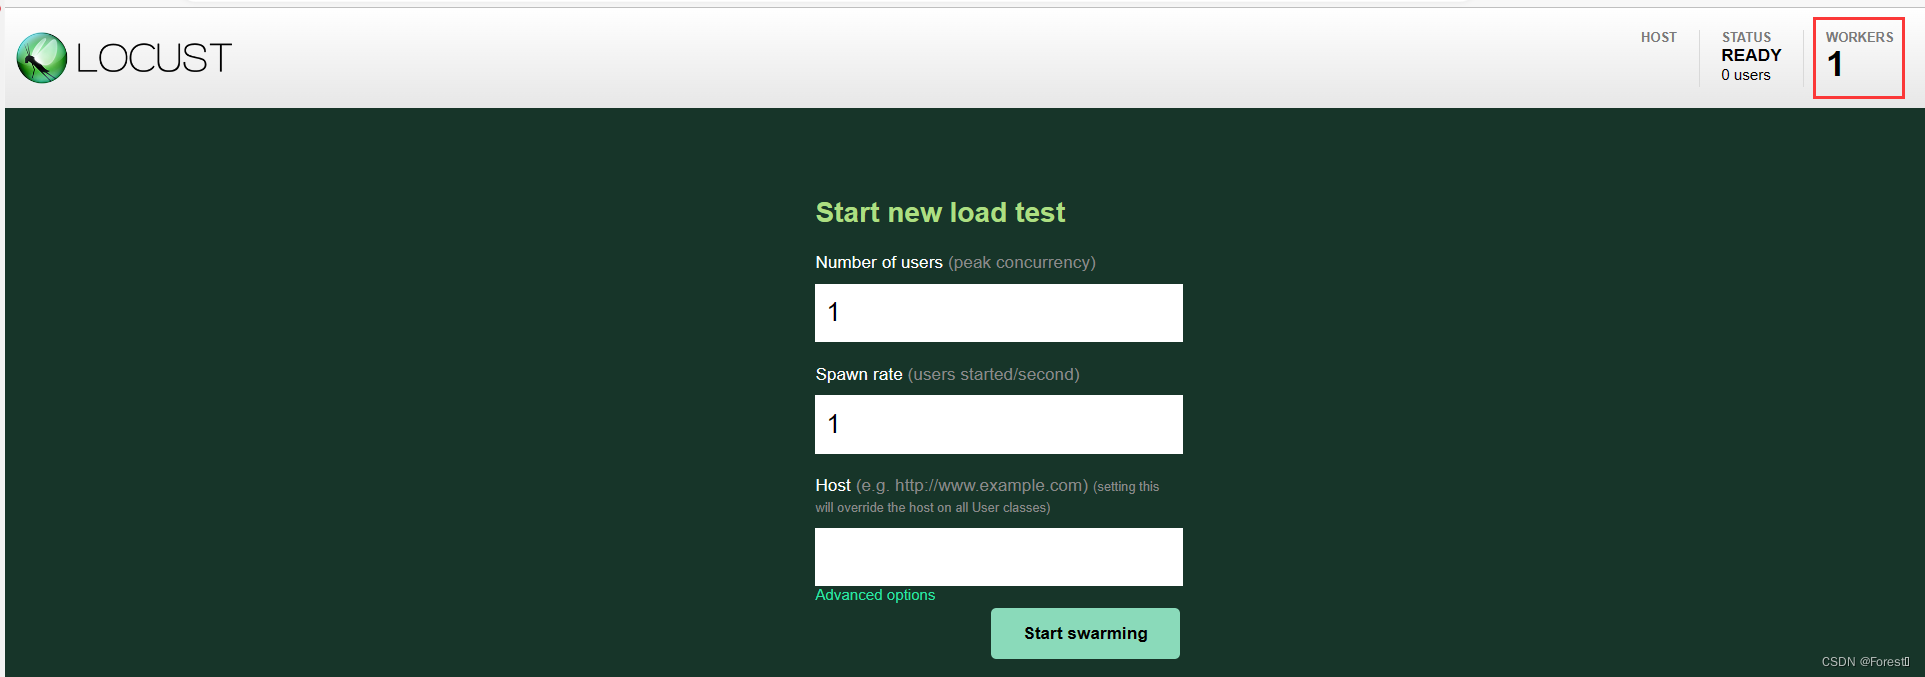
Scenario 1: Set 50 concurrency, increase the number of users per second to 5.

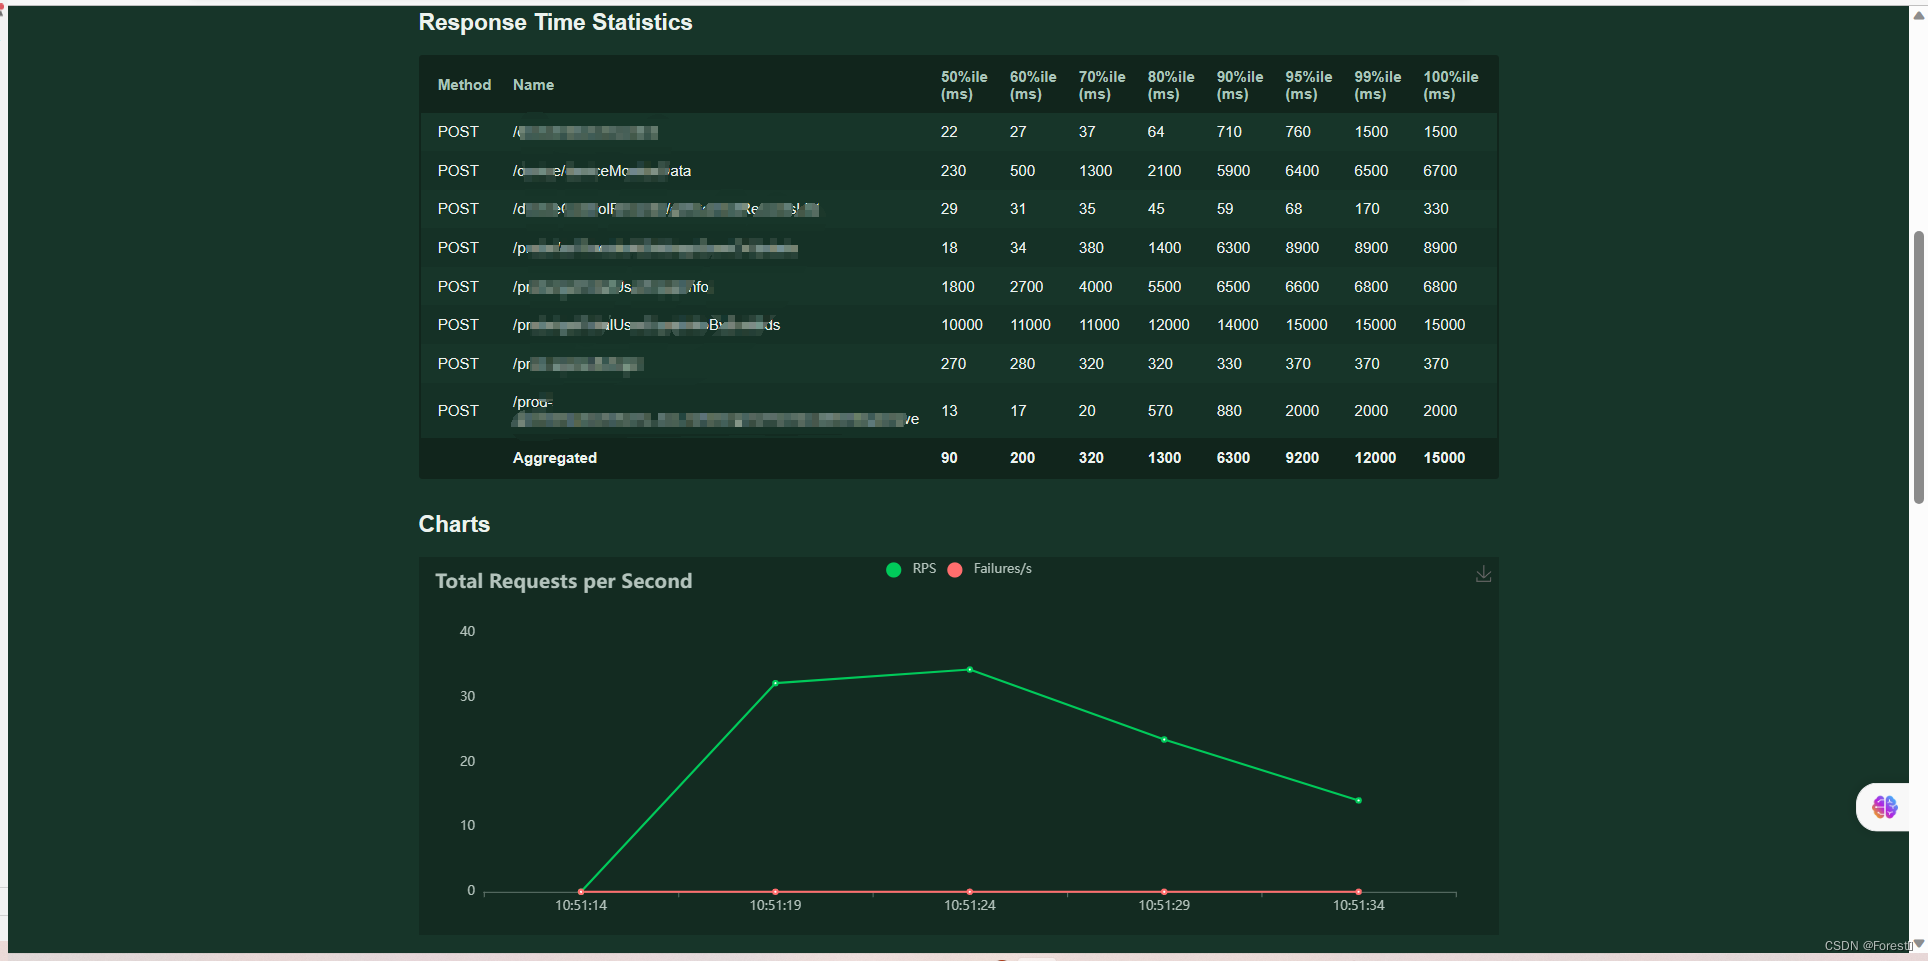
Click the start button to start the pressure test. You can view and monitor various performance data and icon information on this page.
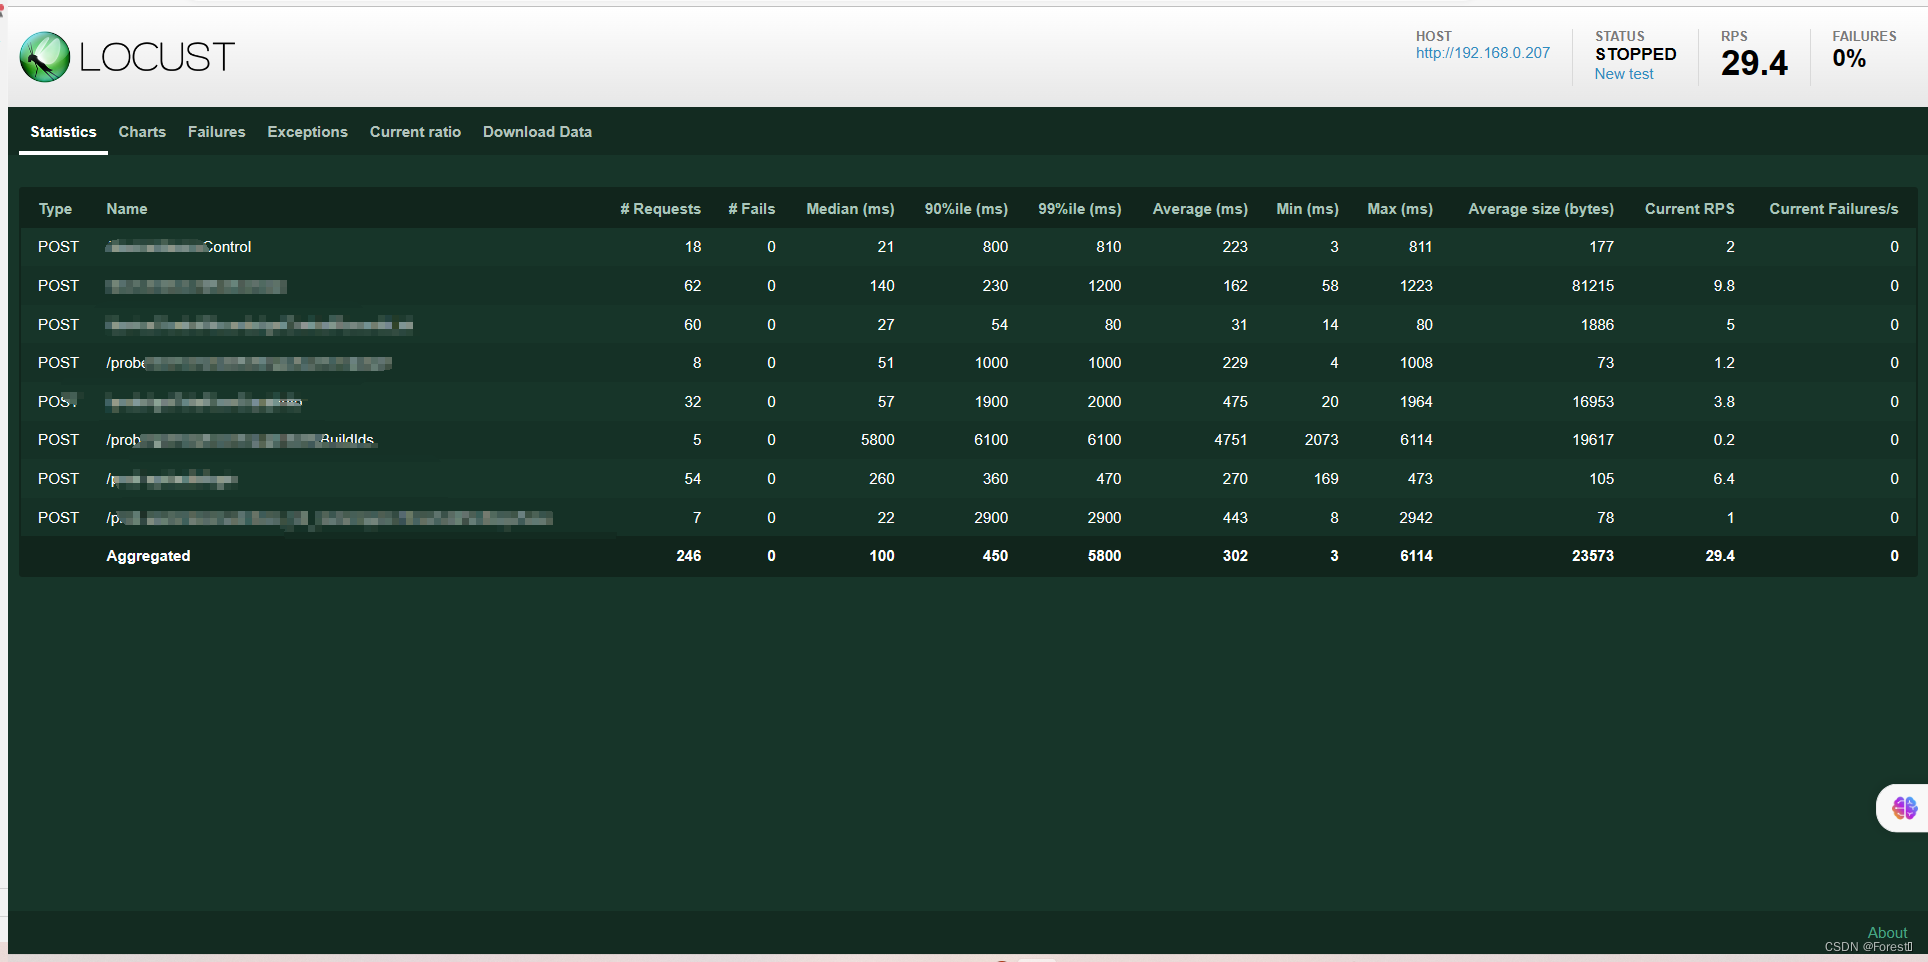
Download data - download report to download the test report in HTML format
3. Distributed pressure measurement
3.1 Description
Distributed stress testing refers to the method of using multiple nodes or machines to simultaneously simulate a large number of concurrent users for performance testing. Each node is responsible for simulating a part of users, sending requests and recording performance data, and then aggregating the data to a central node for analysis and report generation.
Scenarios for using distributed stress testing include:
1. High concurrent load test: When the system needs to handle a large number of concurrent users, distributed stress testing can simulate real user behavior and traffic patterns to evaluate system performance and responsiveness. This is especially important for high-traffic applications such as online shopping, social media, and electronic payments.
2. Elasticity and scalability testing: Distributed pressure testing can simulate the performance of the system under different loads, helping to determine the elasticity and scalability of the system. By adding nodes, you can simulate larger-scale concurrent users and test the stability and scalability of the system under high load.
3. Load balancing test: In a distributed system, load balancing is an important part. Using distributed pressure testing can simulate multiple nodes sending requests to the load balancer at the same time, evaluate the performance and effect of load balancing, and ensure that the system can balance the load and provide high availability.
4. Capacity planning and optimization: Through distributed pressure testing, the capacity and performance bottlenecks of the system can be determined to help capacity planning and optimization. By simulating large-scale concurrent users, the bottleneck point of the system can be found, and corresponding optimization measures can be taken to improve the performance and stability of the system.
3.2 Implementation
Create a master node (1) and slave node scripts (multiple). The master node script is mainly used for monitoring. The slave node script code can be consistent with the master node script code. The pressure test interface can be modified according to actual needs. If you want to test multiple Different interfaces can modify or add tasks in the slave node script code.
3.3 sample code
3.3.1 Master node
import os
from locust import HttpUser, TaskSet, task


# 定义任务类
class UserTask001(HttpUser):
    @task  # 申明需要执行的任务
    def get_index(self):
        self.client.get('/22')  # client是requests的对象

    @task
    def get_image(self):
        self.client.get('/s?ie=utf-8&wd=locust视频')


# 执行任务类
class WebSiteUser(UserTask001):
    # tasks = [UserTask001]  # 定义需要执行的任务集
    min_wait = 1000  # 最小等待时间(思考时间)
    max_wait = 2000  # 最大等待时间(思考时间)
    host = 'http://www.baidu.com'  # 设定请求的域名

if __name__=="__main__":
    #开启master模式
    os.system('locust -f D:\py_code\stress\master_node.py --master')
Note: The execution mode command of the master node must add the parameter –master
3.3.2 Slave nodes
import os
from locust import HttpUser, task


# 定义任务类
class UserTask001(HttpUser):
    @task  # 申明需要执行的任务
    def get_index(self):
        self.client.get('/22')  # client是requests的对象

    @task
    def get_image(self):
        self.client.get('/s?ie=utf-8&wd=locust视频')


# 执行任务类
class WebSiteUser(UserTask001):
    # tasks = [UserTask001]  # 定义需要执行的任务集
    min_wait = 1000  # 最小等待时间(思考时间)
    max_wait = 2000  # 最大等待时间(思考时间)
    host = 'http://www.baidu.com'  # 设定请求的域名

if __name__=="__main__":
    #开启master模式
    os.system('locust -f D:\py_code\stress\secondary.py --worker')
Note: The execution mode command of the master node must add the parameter –worker. After running, you can view the details on the master node console. Executing multiple slave node scripts will display multiple worker web-ui monitoring

page details.
The master node is mainly used for Monitor the execution of the slave node. If the master node and slave node scripts are on different test machines, you need to add the definition –web-host=IP when executing the script, and the ip needs to be corresponding before connecting.