1. go-micro framework
foreword
The previous section explained the cases related to GRPC microservice cluster + Consul cluster + grpc-consul-resolver , knowing the communication protocol used for communication between microservices , how to realize service registration and discovery , building service management clusters , and services and The RPC communication method between services , the specific content includes: protobuf protocol , consul and docker deployment of consul cluster , the use of GRPC framework and other specific implementation solutions. The above specific solutions are all to solve: specific problems in the process of microservice practice A question was raised to realize the project development of microservice architecture . However, in the specific project development process, developers focus on the development of business logic and the realization of functions , a large number of environment configurations , debugging and construction and other basic work It will consume a considerable amount of energy, so it is necessary to centrally manage and maintain the related solutions involved in the microservice architecture , which requires the use of Micro for processing
go-micro introduction
Go Micro is a microservice ecosystem that simplifies distributed development . This system provides efficient and convenient module construction for developing distributed applications . The main purpose is to simplify the development of distributed systems . It implements consul as a service discovery by default ( In 2019, the source code was modified to use mdns by default ), communicate through http , and encode and decode through protobuf and json , which can facilitate developers to develop projects with microservice architecture very simply, and with the increase of business modules and functions , Go Micro can also provide tools and functions to manage microservice environments
github address: https://github.com/asim/go-micro
Main functions of go-micro
Authentication
Authentication is built in as a first-class citizen, authentication and authorization enable a secure zero-trust network by providing identities and certificates for each service, this also includes rule-based access control
dynamic configuration
Load and hot-reload dynamic configuration from anywhere , the config interface provides a way to load application- level configuration from any source (such as environment variables, files, etcd), sources can be merged, and even fallbacks can be defined
data storage
A simple data storage interface for reading, writing and deleting records. It includes support for memory , files and CockroachDB by default. State and persistence become core requirements outside of prototyping. Micro hopes to build it into the framework. middle
service discovery
Automatic service registration and name resolution . Service discovery is the core of microservice development . When service A needs to talk to service B, it needs the location of the service. The default discovery mechanism is multicast DNS (mdns ), a zeroconf system
load balancing
Client-side load balancing based on service discovery , once you have the address of any number of service instances , now you need a way to decide which node to route to, using random hash load balancing to provide even distribution across services , and in case of problems retry different nodes when
message encoding
Dynamic message encoding based on content type , client and server will use codec and content type to seamlessly encode and decode Go types, any kind of message can be encoded and sent from different clients, by default, client and the server will handle this, this includes protobuf and json by default
RPC client/server
RPC-based request/response , supports bidirectional streams , provides an abstraction for synchronous communication, requests to services will be automatically parsed, load balanced, dialed and streamed
Async Messaging
PubSub is built-in as a first-class citizen of asynchronous communication and event-driven architecture . Event notification is the core mode of microservice development . The default message system is HTTP event message agent
event flow
PubSub is great for asynchronous notifications , but for more advanced use cases event streams are preferred, provides persistent storage , consumes from offsets and acknowledgments, Go Micro includes support for NATS Jetstream and Redis streams
Synchronize
Distributed systems are usually built in an eventually consistent manner. Support for distributed locking and leadership (Leader) is built in as a synchronization interface. When using an eventually consistent database or schedule , please use the Sync interface
Pluggable Interfaces
Go Micro uses Go interfaces for each distributed system abstraction. Therefore, these interfaces are pluggable and allow Go Micro to be runtime-agnostic and plug into any underlying technology.
go-micro install
github address: https://github.com/asim/go-micro, as follows, after clicking CLI , you can view the installation related commands :

Through the go install github.com/go-micro/cli/cmd/go-micro@latest installation, after success, the server and client of the microservice can be built through the go-micro new service helloworld command. After building, the system will Automatically generate files and methods for remote calls such as .proto and .pb.go
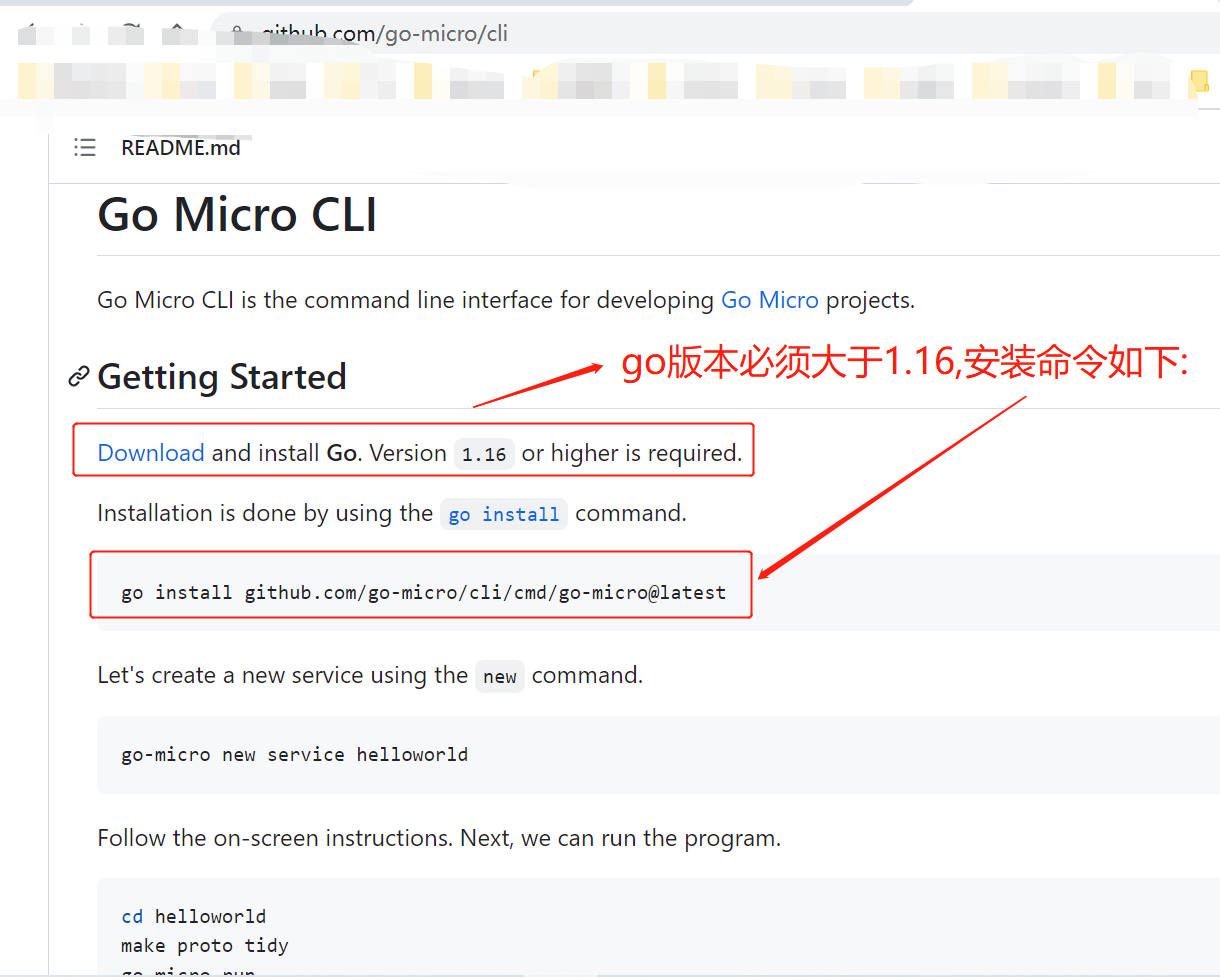
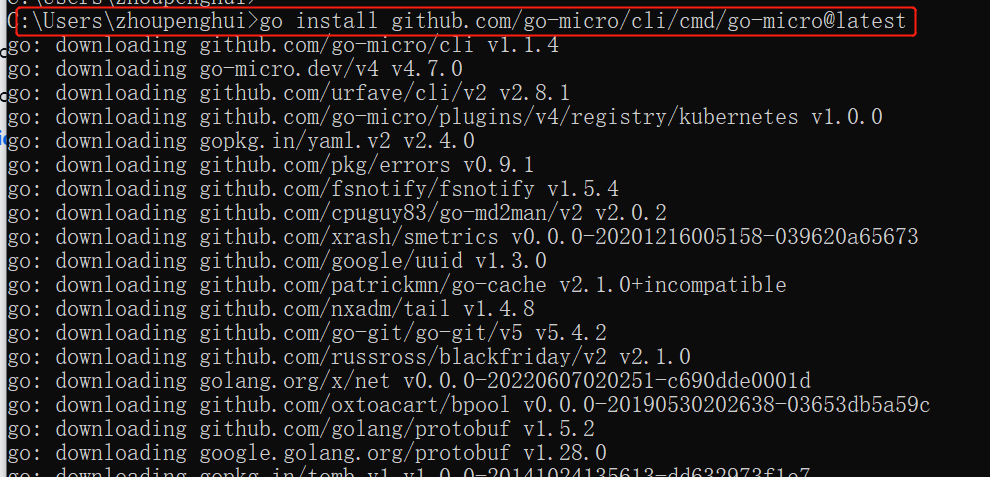
The installation is as follows: run the command go install github.com/go-micro/cli/cmd/go-micro@latest
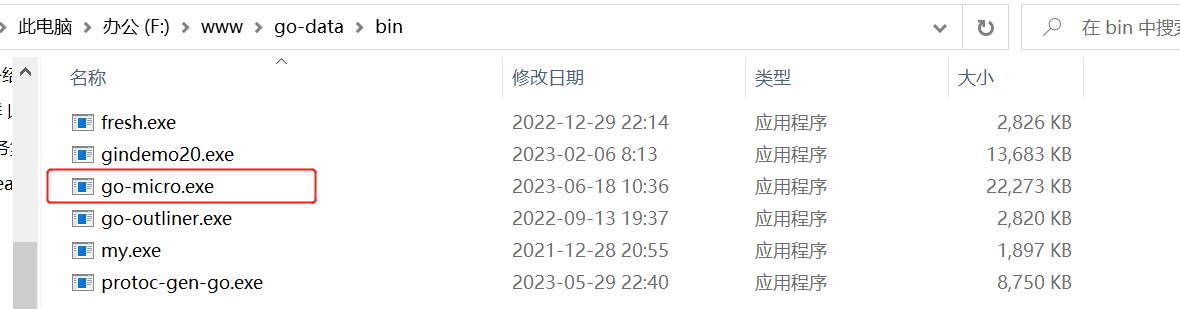
After the command is completed, you can view the corresponding go-micro.exe execution file in the bin directory of GOPATH
Then check whether the installation is successful, enter the command : go-micro

Successful installation
2. Use of go-micro
(1). Simple case explanation of helloworld
create server
Run in the servers directory : go-micro new service helloworld
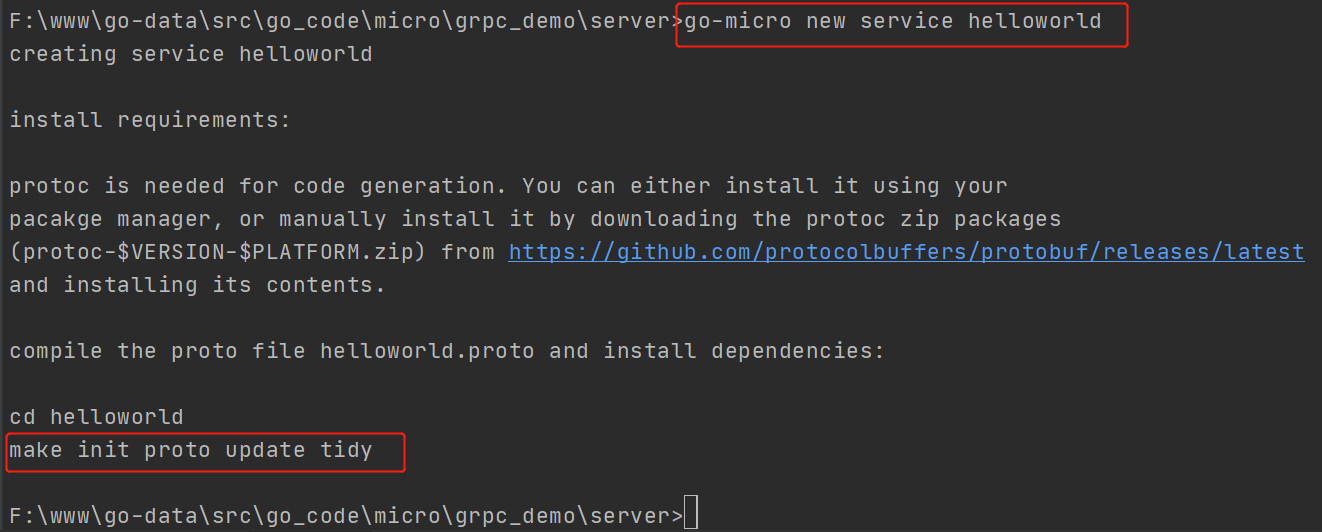


Download project dependencies
When using it for the first time, you need to execute the commands in the Makefile
Makefile内容如下:
GOPATH:=$(shell go env GOPATH)

.PHONY: init
init:
    @go get -u google.golang.org/protobuf/proto
    @go install google.golang.org/protobuf/cmd/protoc-gen-go@latest
    @go install github.com/go-micro/generator/cmd/protoc-gen-micro@latest

.PHONY: proto
proto:
    @protoc --proto_path=. --micro_out=. --go_out=:. proto/helloworld.proto

.PHONY: update
update:
    @go get -u

.PHONY: tidy
tidy:
    @go mod tidy

.PHONY: build
build:
    @go build -o helloworld *.go

.PHONY: test
test:
    @go test -v ./... -cover

.PHONY: docker
docker:
@docker build -t helloworld:latest .windows下依次执行Markfile init里面的命令:
#init里面的命令:引入需要的包
go get -u google.golang.org/protobuf/proto
go install google.golang.org/protobuf/cmd/protoc-gen-go@latest
go install github.com/go-micro/generator/cmd/protoc-gen-micro@latest
#proto:执行生成对应的protobuf相关文件
protoc --proto_path=. --micro_out=. --go_out=:. proto/helloworld.proto
linux下通过make命令下载对应依赖或者编译项目
make proto update tidy完成上面命令后的目录如下:
初始化服务端项目
go mod init helloworld
go mod tidy
如果出现:
F:\www\go-data\src\go_code\micro\grpc_demo\server\helloworld>go mod tidy
go: finding module for package google.golang.org/protobuf/runtime/protoimpl
go: finding module for package go-micro.dev/v4/logger
go: finding module for package go-micro.dev/v4
go: finding module for package go-micro.dev/v4/server
go: finding module for package go-micro.dev/v4/api
go: finding module for package google.golang.org/protobuf/proto
go: finding module for package google.golang.org/protobuf/reflect/protoreflect
go: finding module for package go-micro.dev/v4/client
go: found go-micro.dev/v4 in go-micro.dev/v4 v4.10.2
go: found go-micro.dev/v4/logger in go-micro.dev/v4/logger v1.18.0
go: found go-micro.dev/v4/api in go-micro.dev/v4/api v1.18.0
go: found go-micro.dev/v4/client in go-micro.dev/v4/client v1.18.0
go: found go-micro.dev/v4/server in go-micro.dev/v4/server v1.18.0
go: found google.golang.org/protobuf/proto in google.golang.org/protobuf v1.30.0
go: found google.golang.org/protobuf/reflect/protoreflect in google.golang.org/protobuf v1.30.0
go: found google.golang.org/protobuf/runtime/protoimpl in google.golang.org/protobuf v1.30.0
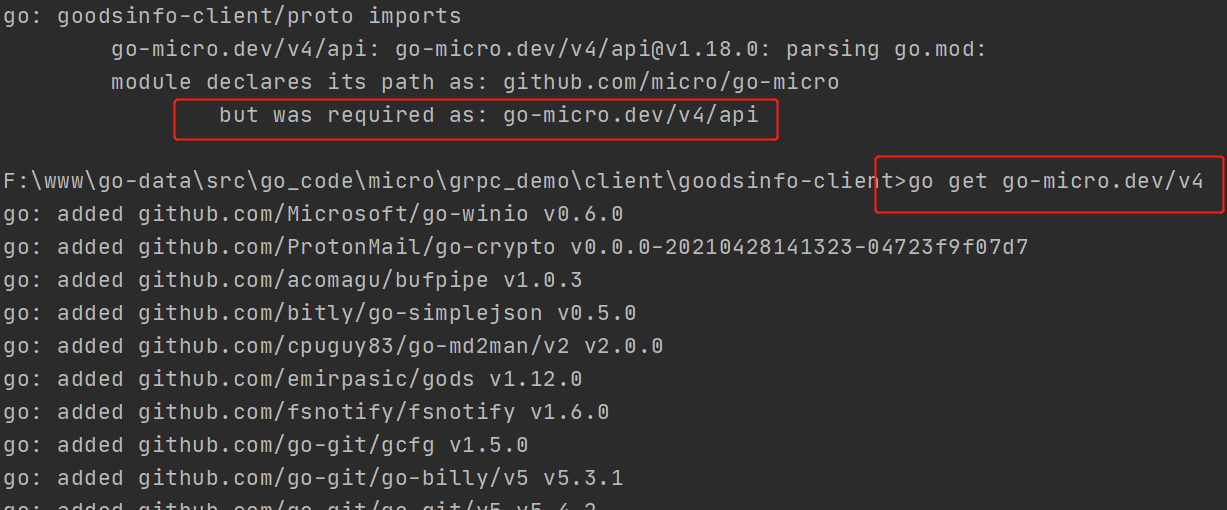
go: helloworld/proto imports
go-micro.dev/v4/api: go-micro.dev/v4/[email protected]: parsing go.mod:
module declares its path as: github.com/micro/go-micro
but was required as: go-micro.dev/v4/api
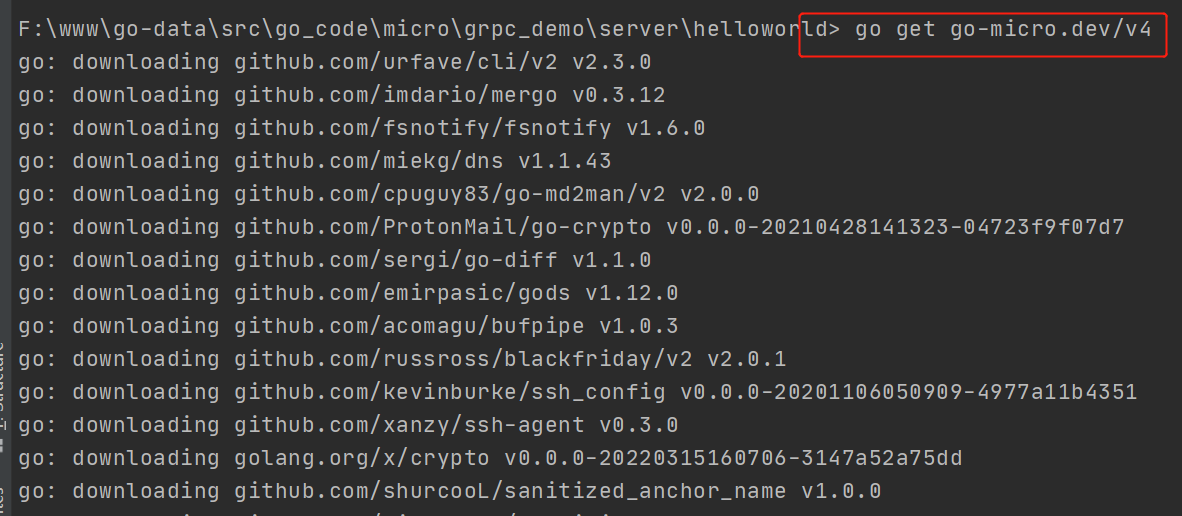
说明下载"go-micro.dev/v4"这个包失败了,这时则需运行命令 go get go-micro.dev/v4,如图:
然后再次执行步骤3中的命令即可
配置服务端consul
(1).启动consul
在配置consul之前,需要启动consul,命令行执行命令 :consul agent -dev,启动consul服务, 也可以使用 consul集群相关操作进行处理
(2).引入consul包
然后在servers/helloworld/main.go下引入consul包:
可以在import引入包后,执行 go mod tidy ,也可以执行 go get github.com/go-micro/plugins/v4/registry/consul 命令引入
github.com/go-micro/plugins/v4/registry/consul(3).实例化consul:
consulReg := consul.NewRegistry()(4).注册consul
srv := micro.NewService(
    micro.Address("192.168.1.132:8080"),  // 选择注册服务器地址,默认为本机,也可以选择consul集群中的client
    micro.Name(service),
    micro.Version(version),
    micro.Registry(consulReg),
)
(5).详细代码
package main

import (
    "helloworld/handler"
    pb "helloworld/proto"
    "go-micro.dev/v4"
    "go-micro.dev/v4/logger"
    "github.com/go-micro/plugins/v4/registry/consul"
)

var (
    service = "helloworld"
    version = "latest"
)

func main() {
    //集成consul
    consulReg := consul.NewRegistry()
    // Create service
    srv := micro.NewService(
        micro.Address("127.0.0.1:8080"),  //指定微服务的ip:  选择注册服务器地址,也可以不配置,默认为本机,也可以选择consul集群中的client
        micro.Name(service),
        micro.Version(version),
        //注册consul
        micro.Registry(consulReg),
    )
    srv.Init(
        micro.Name(service),
        micro.Version(version),
    )

    // Register handler
    if err := pb.RegisterHelloworldHandler(srv.Server(), new(handler.Helloworld)); err != nil {
        logger.Fatal(err)
    }
    // Run service
    if err := srv.Run(); err != nil {
        logger.Fatal(err)
    }
}
(6).结果显示

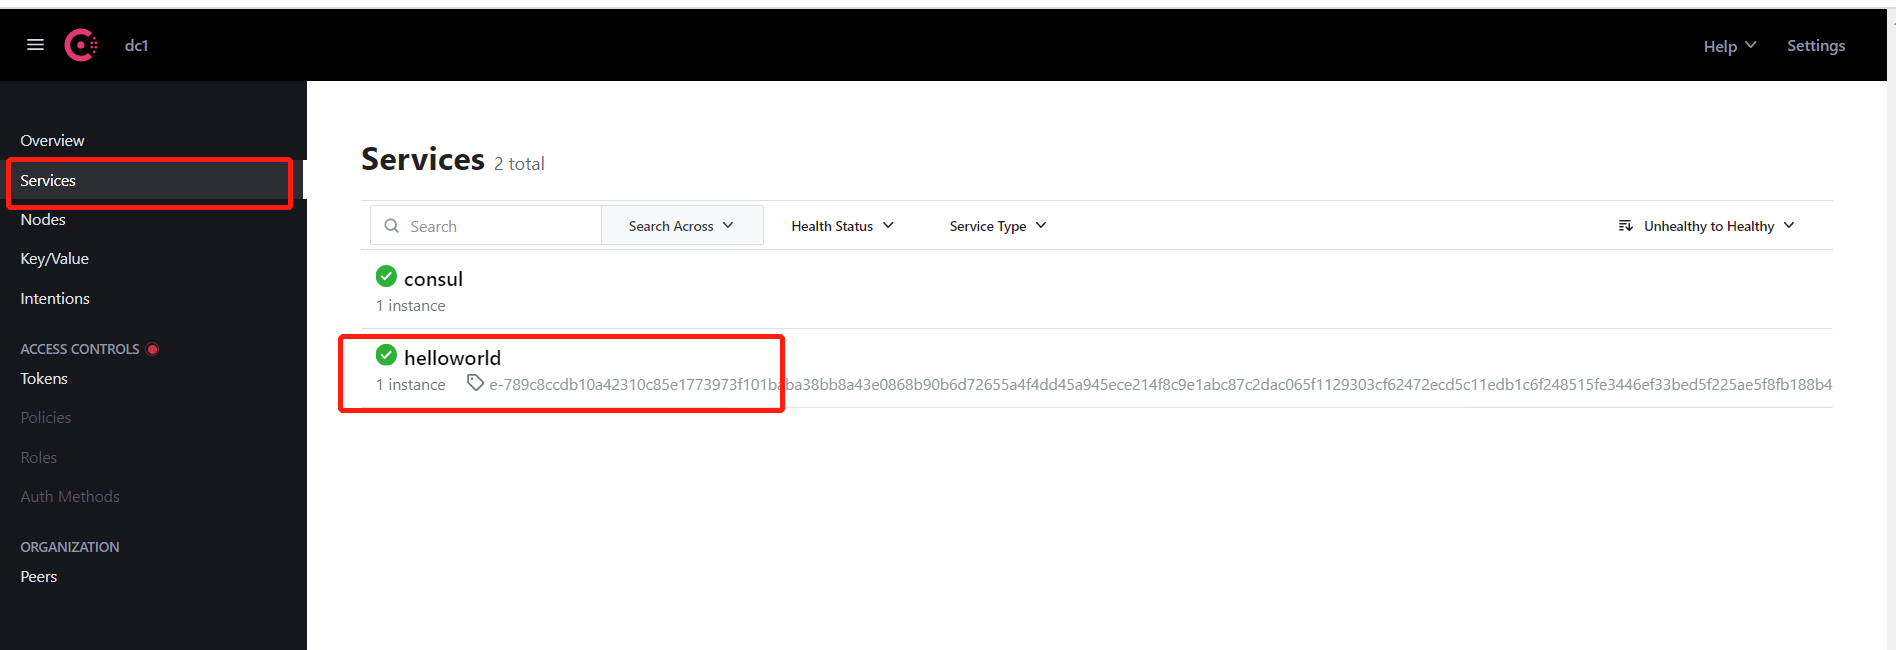
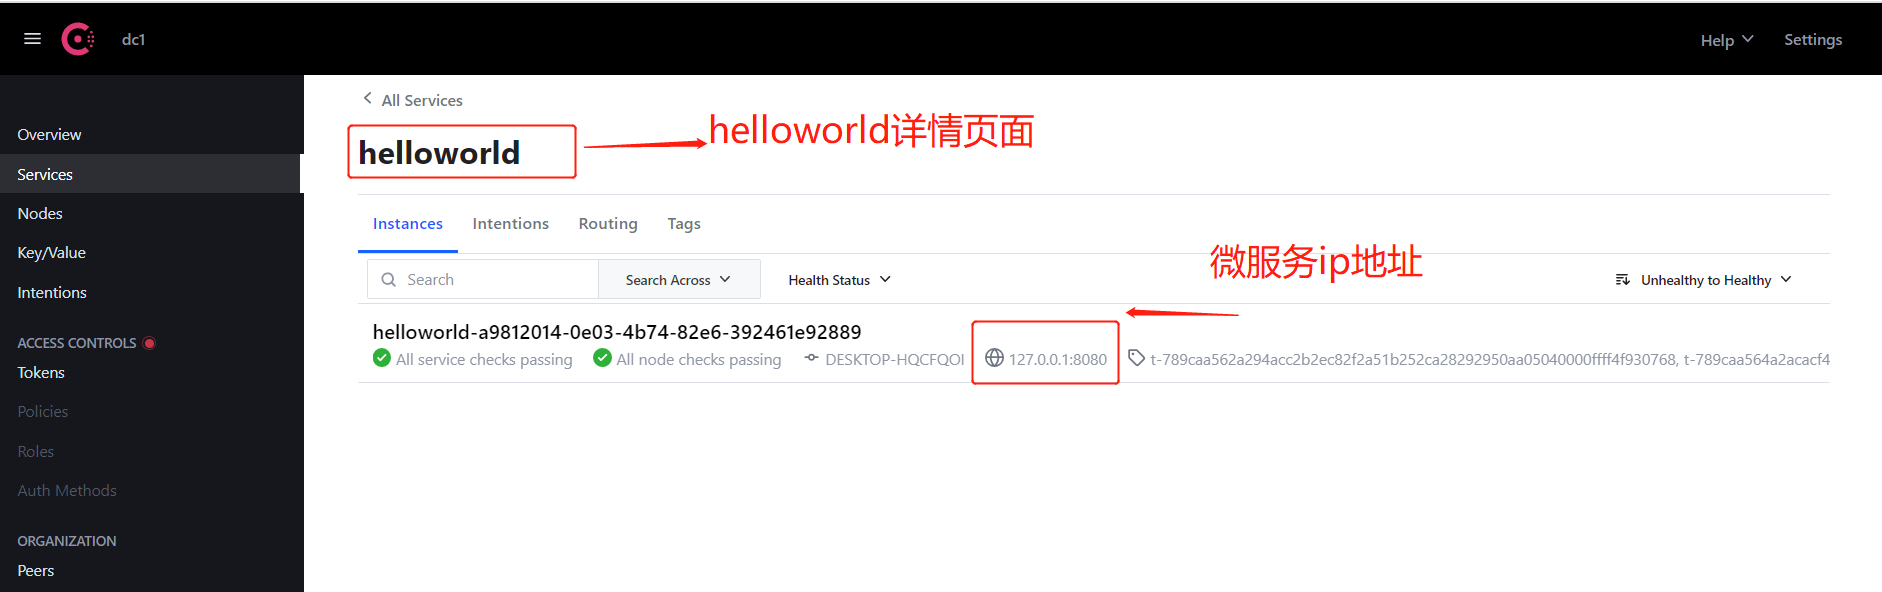
微服务服务端就配置并启动了
生成客户端
(1).生成客户端目录
在client目录下运行 :go-micro new client helloworld
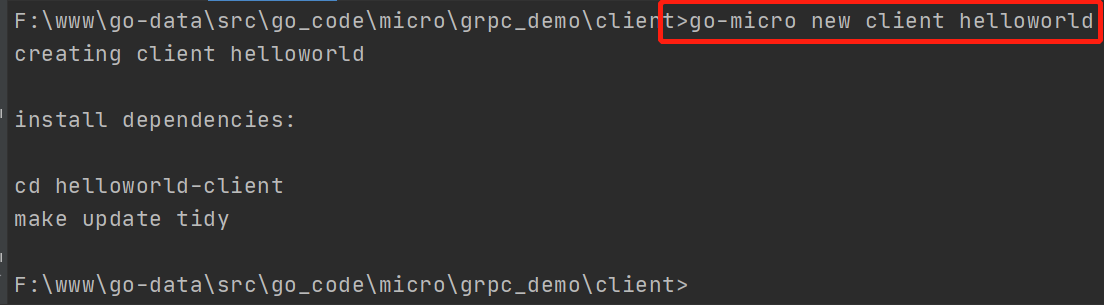
目录如下: 结构和服务端结构一致,参考服务端结构
注意:在这里生成的客户端文件夹名字是helloworld-client
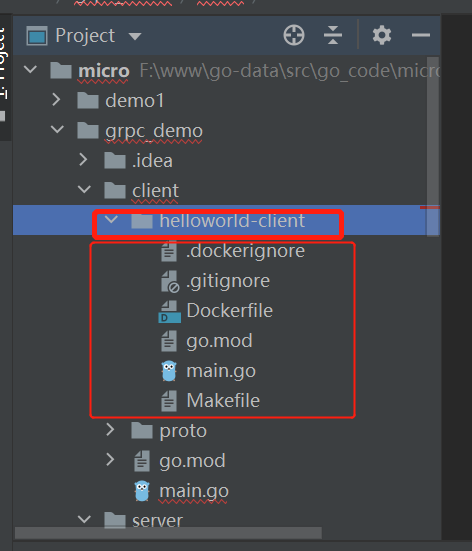
里面也存在 Makefile文件,操作和上面服务端一致, 下面就要让 客户端连接上微服务服务端
(2).创建客户端proto文件相关
这里可以直接把服务端中的proto文件夹复制到helloworld-client文件夹下,然后可以初始化项目,删除go.mod, 执行初始化命令 :go mod init helloworld-client, go mod tidy
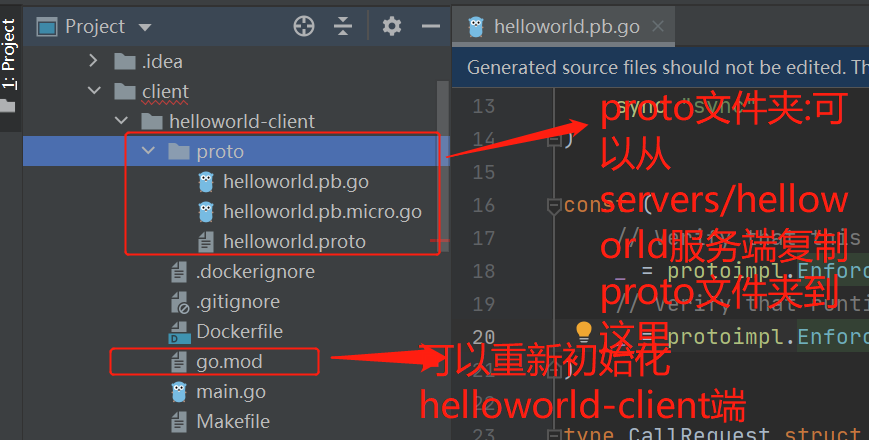
重新初始化helloworld-client: 删除go.mod文件,然后执行: go mod init helloworld-client, go mod tidy
(3).完善helloworld-client/main.go文件
1).修改helloworld/proto包名字
需要把helloworld/proto修改为helloworld-client/proto

然后也要引入consul包
2).引入consul包
然后在client/helloworld-client/main.go下引入consul包:
可以在import引入包后,执行 go mod tidy ,也可以执行 go get github.com/go-micro/plugins/v4/registry/consul 命令引入
github.com/go-micro/plugins/v4/registry/consul3).实例化consul:
consulReg := consul.NewRegistry()4).注册consul
//集成consul
consulReg := consul.NewRegistry(
    //指定微服务的ip:  选择注册服务器地址,默认为本机,也可以选择consul集群中的client
    registry.Addrs("127.0.0.1:8500"),
)
// Create service
srv := micro.NewService(
    //注册consul
    micro.Registry(consulReg),
)
5).详细代码
package main

import (
    "context"
    "time"
    pb "helloworld-client/proto"
    "go-micro.dev/v4"
    "go-micro.dev/v4/logger"
    "go-micro.dev/v4/registry"
    "github.com/go-micro/plugins/v4/registry/consul"
)

var (
    service = "helloworld" //需要和微服务服务端对应的service名统一,这样才能调用该微服务
    version = "latest"
)

func main() {
    //集成consul
    consulReg := consul.NewRegistry(
        //指定微服务的ip:  选择注册服务器地址,默认为本机,也可以选择consul集群中的client
        registry.Addrs("127.0.0.1:8500"),
    )
    // Create service
    srv := micro.NewService(
        //注册consul
        micro.Registry(consulReg),
    )
    srv.Init()

    // 创建客户端实例
    c := pb.NewHelloworldService(service, srv.Client())
    for {
        // Call service: CallRequest就是.proto中的
        rsp, err := c.Call(context.Background(), &pb.CallRequest{Name: "张三"})
        if err != nil {
            logger.Fatal(err)
        }

        logger.Info(rsp)
        //每隔一段时间请求
        time.Sleep(2 * time.Second)  // 每隔2秒请求
    }
}
6).结果显示

客户端配置操作完成
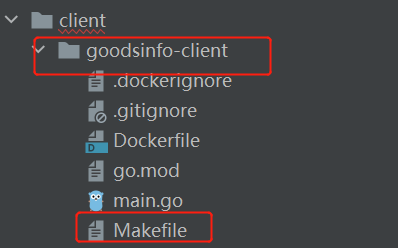
(二).goodsinfo微服务案例讲解
创建服务端
在servers目录下运行 :go-micro new service goodsinfo

目录和上面helloworld案例类似,只不过是名字变成了goodsinfo而已
然后修改goodsinfo.proto,增加需要的服务方法:这里的写法和[golang 微服务] 4. gRPC介绍,Protobuf结合gRPC 创建微服务 里面的类似:
syntax = "proto3";

package goodsinfo;

option go_package = "./proto;goodsinfo";

//商品相关方法
service Goodsinfo {
    //AddGoods: 定义增加商品的微服务, 这里的写法和gRPC中的写法一致
    rpc AddGoods(AddRequest) returns (AddResponse) {}
}

//和gRPC中的写法一致
message AddRequest {
    string title = 1;
    string price = 2;
    string content = 3;
}

//和gRPC中的写法一致
message AddResponse {
    string message = 1;
    bool success = 2;
}
下载项目所需依赖
初次使用时,需执行Makefile里面的命令
Makefile内容如下:
GOPATH:=$(shell go env GOPATH)

.PHONY: init
init:
    @go get -u google.golang.org/protobuf/proto
    @go install google.golang.org/protobuf/cmd/protoc-gen-go@latest
    @go install github.com/go-micro/generator/cmd/protoc-gen-micro@latest

.PHONY: proto
proto:
    @protoc --proto_path=. --micro_out=. --go_out=:. proto/helloworld.proto

.PHONY: update
update:
    @go get -u

.PHONY: tidy
tidy:
    @go mod tidy

.PHONY: build
build:
    @go build -o helloworld *.go

.PHONY: test
test:
    @go test -v ./... -cover

.PHONY: docker
docker:
    @docker build -t helloworld:latest .
windows下依次执行init里面的命令:
#init:引入相关包
go get -u google.golang.org/protobuf/proto
go install google.golang.org/protobuf/cmd/protoc-gen-go@latest
go install github.com/go-micro/generator/cmd/protoc-gen-micro@latest
#proto: 生成protobuf相关文件
protoc --proto_path=. --micro_out=. --go_out=:. proto/helloworld.proto
linux下通过make命令下载对应依赖或者编译项目
make proto update tidy完成上面命令后的目录如下:
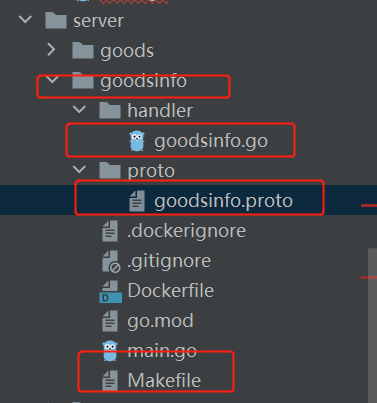
生成了goodsinfo相关handler,以及.pb.go文件

初始化服务端项目
go mod init goodsinfo
go mod tidy
如果出现:
F:\www\go-data\src\go_code\micro\grpc_demo\server\helloworld>go mod tidy
go: finding module for package google.golang.org/protobuf/runtime/protoimpl
go: finding module for package go-micro.dev/v4/logger
go: finding module for package go-micro.dev/v4
go: finding module for package go-micro.dev/v4/server
go: finding module for package go-micro.dev/v4/api
go: finding module for package google.golang.org/protobuf/proto
go: finding module for package google.golang.org/protobuf/reflect/protoreflect
go: finding module for package go-micro.dev/v4/client
go: found go-micro.dev/v4 in go-micro.dev/v4 v4.10.2
go: found go-micro.dev/v4/logger in go-micro.dev/v4/logger v1.18.0
go: found go-micro.dev/v4/api in go-micro.dev/v4/api v1.18.0
go: found go-micro.dev/v4/client in go-micro.dev/v4/client v1.18.0
go: found go-micro.dev/v4/server in go-micro.dev/v4/server v1.18.0
go: found google.golang.org/protobuf/proto in google.golang.org/protobuf v1.30.0
go: found google.golang.org/protobuf/reflect/protoreflect in google.golang.org/protobuf v1.30.0
go: found google.golang.org/protobuf/runtime/protoimpl in google.golang.org/protobuf v1.30.0
go: helloworld/proto imports
        go-micro.dev/v4/api: go-micro.dev/v4/[email protected]: parsing go.mod:
        module declares its path as: github.com/micro/go-micro
                but was required as: go-micro.dev/v4/api
说明下载"go-micro.dev/v4"这个包失败了,这时则需运行命令 go get go-micro.dev/v4,如图:
然后再次执行步骤3中的命令即可
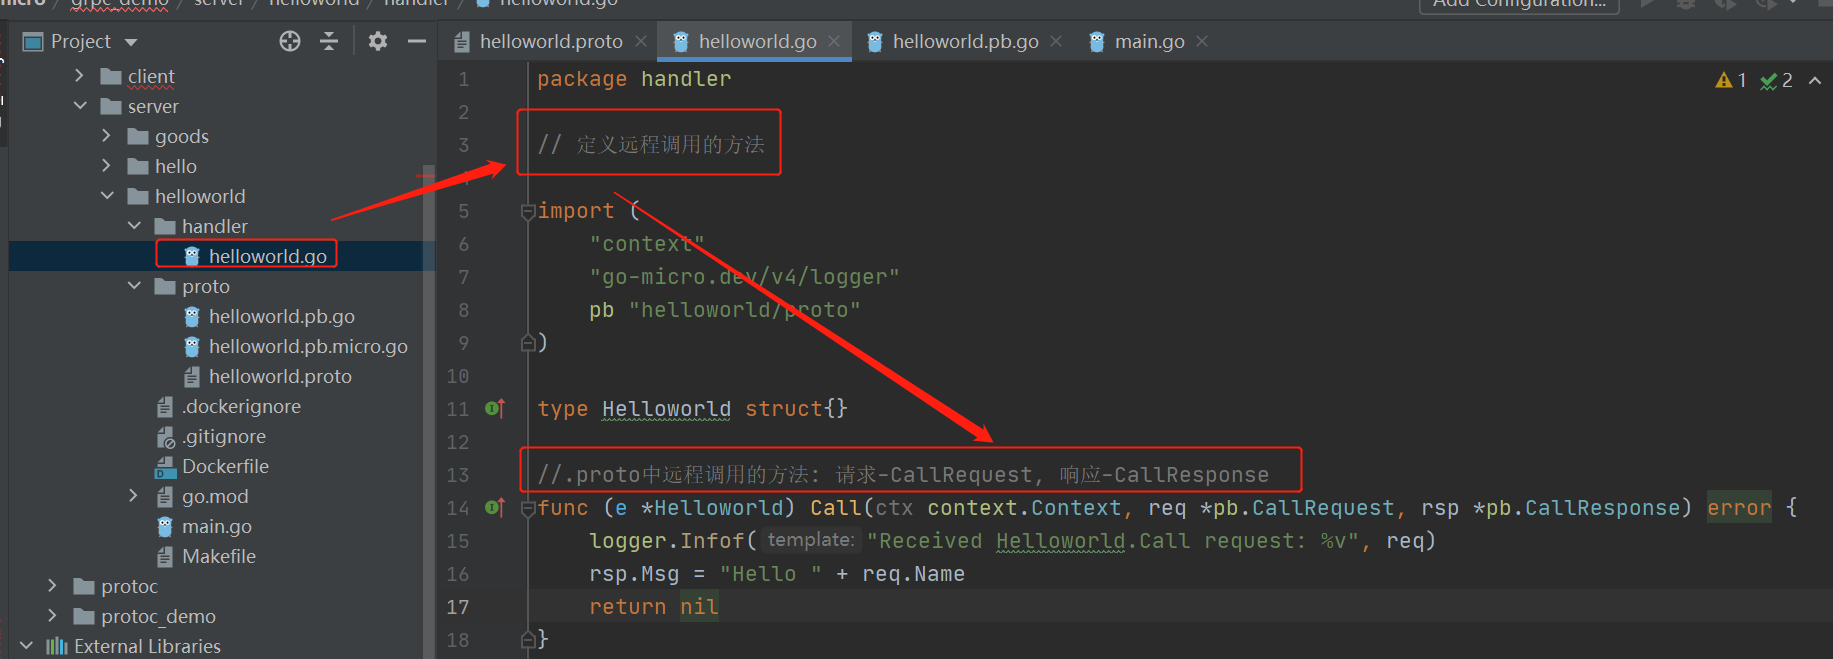
修改远程调用的方法handler/goodsinfo.go
原始的代码:
package handler

import (
    "context"
    "io"
    "time"
    "go-micro.dev/v4/logger"
    pb "goodsinfo/proto"
)

type Goodsinfo struct{}

func (e *Goodsinfo) Call(ctx context.Context, req *pb.CallRequest, rsp *pb.CallResponse) error {
    logger.Infof("Received Goodsinfo.Call request: %v", req)
    rsp.Msg = "Hello " + req.Name
    return nil
}

func (e *Goodsinfo) ClientStream(ctx context.Context, stream pb.Goodsinfo_ClientStreamStream) error {
    var count int64
    for {
        req, err := stream.Recv()
        if err == io.EOF {
            logger.Infof("Got %v pings total", count)
            return stream.SendMsg(&pb.ClientStreamResponse{Count: count})
        }
        if err != nil {
            return err
        }
        logger.Infof("Got ping %v", req.Stroke)
        count++
    }
}

func (e *Goodsinfo) ServerStream(ctx context.Context, req *pb.ServerStreamRequest, stream pb.Goodsinfo_ServerStreamStream) error {
    logger.Infof("Received Goodsinfo.ServerStream request: %v", req)
    for i := 0; i < int(req.Count); i++ {
        logger.Infof("Sending %d", i)
        if err := stream.Send(&pb.ServerStreamResponse{
            Count: int64(i),
        }); err != nil {
            return err
        }
        time.Sleep(time.Millisecond * 250)
    }
    return nil
}

func (e *Goodsinfo) BidiStream(ctx context.Context, stream pb.Goodsinfo_BidiStreamStream) error {
    for {
        req, err := stream.Recv()
        if err == io.EOF {
            return nil
        }
        if err != nil {
            return err
        }
        logger.Infof("Got ping %v", req.Stroke)
        if err := stream.Send(&pb.BidiStreamResponse{Stroke: req.Stroke}); err != nil {
            return err
        }
    }
}
修改成我们想要的代码:
package handler

import (
    "context"
    "go-micro.dev/v4/logger"
    pb "goodsinfo/proto"
)

type Goodsinfo struct{}

func (e *Goodsinfo) AddGoods(ctx context.Context, req *pb.AddRequest, rsp *pb.AddResponse) error {
    logger.Infof("request: %v", req)
    //书写返回的逻辑结果
    rsp.Message = "增加成功"
    rsp.Success = true
    return nil
}
配置服务端consul
(1).启动consul
在配置consul之前,需要启动consul,命令行执行命令 :consul agent -dev,启动consul服务, 也可以使用 consul集群相关操作进行处理
(2).引入consul包
然后在servers/goodsinfo/main.go下引入consul包:
可以在import引入包后,执行 go mod tidy ,也可以执行 go get github.com/go-micro/plugins/v4/registry/consul 命令引入
github.com/go-micro/plugins/v4/registry/consul(3).实例化consul:
consulReg := consul.NewRegistry()(4).注册consul
srv := micro.NewService(
    micro.Address("192.168.1.132:8080"),  // 选择注册服务器地址,默认为本机,也可以选择consul集群中的client
    micro.Name(service),
    micro.Version(version),
    micro.Registry(consulReg),
)
(5).详细代码
package main
import (
"goodsinfo/handler"
pb "goodsinfo/proto"
"go-micro.dev/v4"
"go-micro.dev/v4/logger"
"github.com/go-micro/plugins/v4/registry/consul"
)
var (
service = "goodsinfo"
version = "latest"
)
func main() {
//集成consul
consulReg := consul.NewRegistry()
// Create service
srv := micro.NewService(
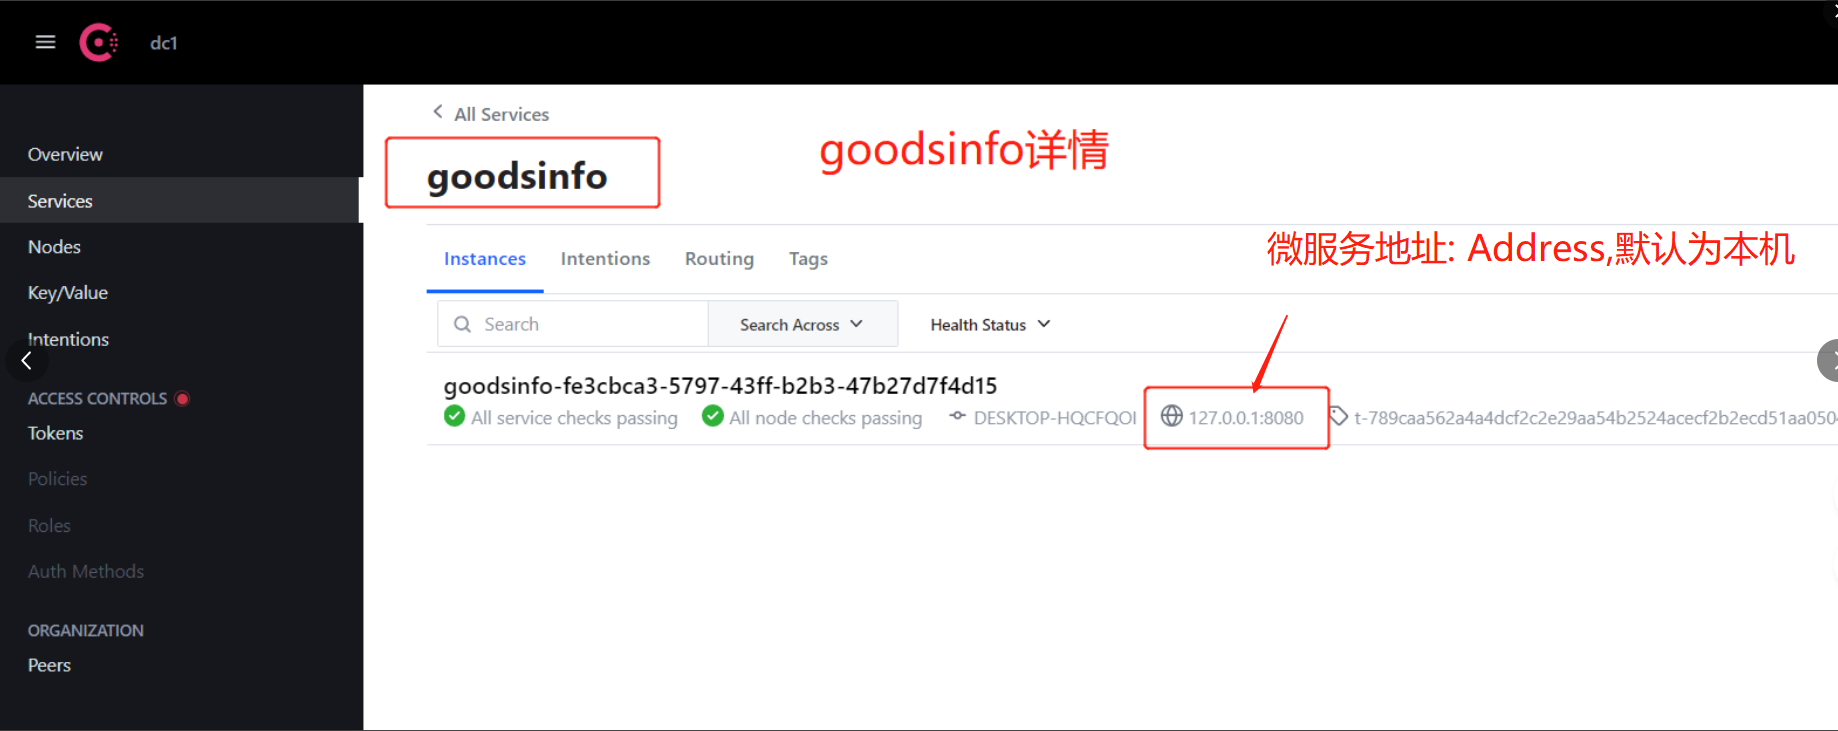
micro.Address("127.0.0.1:8080"), //指定微服务的ip: 选择注册服务器地址,也可以不配置,默认为本机,也可以选择consul集群中的client
micro.Name(service),
micro.Version(version),
//注册consul
micro.Registry(consulReg),
)
srv.Init(
micro.Name(service),
micro.Version(version),
)
// Register handler
if err := pb.RegisterGoodsinfoHandler(srv.Server(), new(handler.Goodsinfo)); err != nil {
logger.Fatal(err)
}
// Run service
if err := srv.Run(); err != nil {
logger.Fatal(err)
}
}(6).结果显示


展示和上面helloworld类似,微服务服务端就配置并启动了
生成客户端
(1).生成客户端目录
在client目录下运行 :go-micro new client goodsinfo

目录如下: 结构和服务端结构一致,参考服务端结构
里面也存在 Makefile文件,操作和上面服务端一致, 下面就要让 客户端连接上微服务服务端
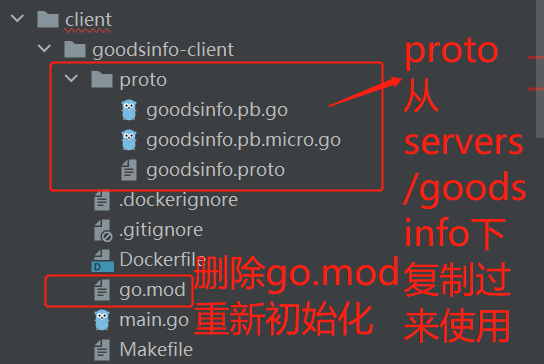
(2).创建客户端proto文件相关
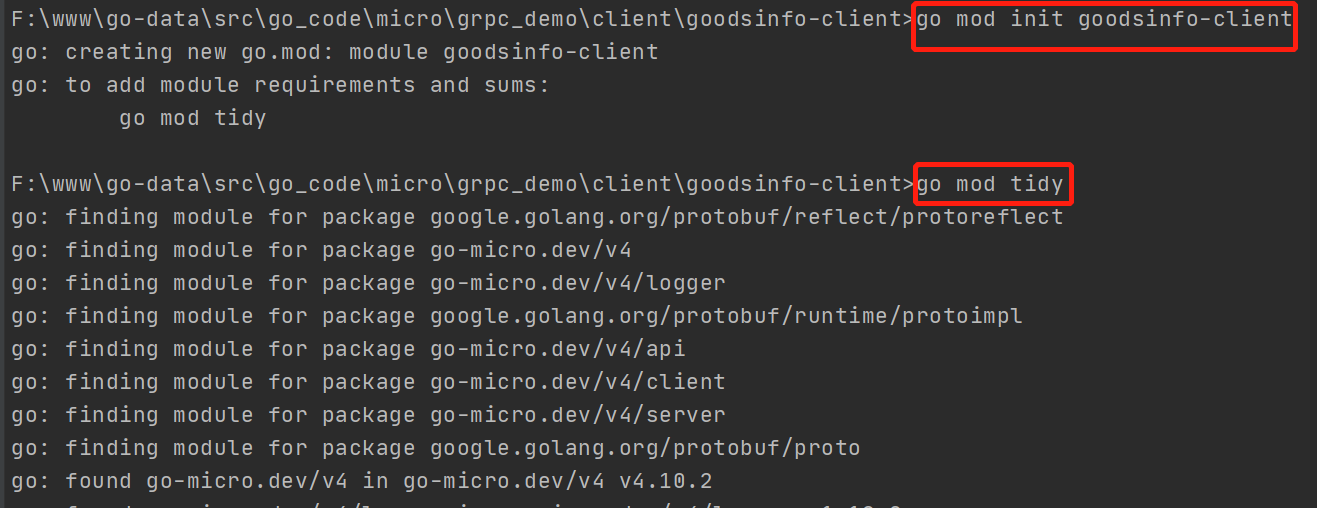
这里可以直接把服务端中的proto文件夹复制到goodsinfo-client文件夹下,然后可以初始化项目,删除go.mod, 执行初始化命令 :go mod init goodsinfo-client, go mod tidy
如果出现:
go: goodsinfo-client/proto imports
        go-micro.dev/v4/api: go-micro.dev/v4/[email protected]: parsing go.mod:
        module declares its path as: github.com/micro/go-micro
but was required as: go-micro.dev/v4/api则go get go-micro.dev/v4,和上面服务器解决方案一致
当然,也可以再次执行Makefile中的命令,和上面服务器一致
(3).完善goodsinfo-client/main.go文件
1).修改goodsinfo/proto包名字
需要把goodsinfo/proto修改为goodsinfo-client/proto
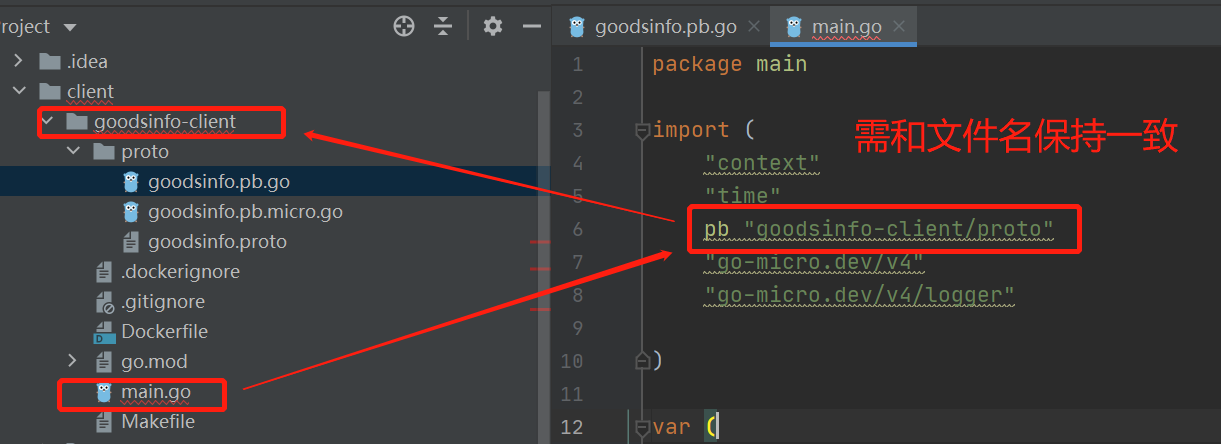
然后也要引入consul包
2).引入consul包
然后在client/goodsinfo-client/main.go下引入consul包:
可以在import引入包后,执行 go mod tidy ,也可以执行 go get github.com/go-micro/plugins/v4/registry/consul 命令引入
github.com/go-micro/plugins/v4/registry/consul3).实例化consul:
consulReg := consul.NewRegistry()4).注册consul
//集成consul
consulReg := consul.NewRegistry(
    //指定微服务的ip:  选择注册服务器地址,默认为本机,也可以选择consul集群中的client
    registry.Addrs("127.0.0.1:8500"),
    )
// Create service
srv := micro.NewService(
    //注册consul
    micro.Registry(consulReg),
)
5).详细代码
package main

import (
    "context"
    "go-micro.dev/v4/registry"
    "time"
    pb "goodsinfo-client/proto"
    "go-micro.dev/v4"
    "go-micro.dev/v4/logger"
    "github.com/go-micro/plugins/v4/registry/consul"
)

var (
    service = "goodsinfo"
    version = "latest"
)

func main() {
    //集成consul
    consulReg := consul.NewRegistry(
        //指定微服务的ip:  选择注册服务器地址,默认为本机,也可以选择consul集群中的client
        registry.Addrs("127.0.0.1:8500"),
        )
    // Create service
    srv := micro.NewService(
        //注册consul
        micro.Registry(consulReg),
    )

    srv.Init()

    // 创建客户端服务
    c := pb.NewGoodsinfoService(service, srv.Client())

    // Call service
    rsp, err := c.AddGoods(context.Background(), &pb.AddRequest{
        Title: "我是一个商品",
        Price: "20.22",
        Content: "内容展示",
    })
    if err != nil {
        logger.Fatal(err)
    }

    logger.Info(rsp)
}
6).结果显示

客户端配置操作完成
[上一节][golang 微服务] 6. GRPC微服务集群+Consul集群+grpc-consul-resolver案例演示
[下一节][golang 微服务] 8.go-micro的负载均衡操作,go Web框(Gin,Beego)调用go-micro微服务