HBase-2.2.2 programming practice
Before starting the exercise, please make sure that you have installed and configured Hadoop 3.1.3, and this is a fully distributed deployment, so if the following results are not the same as what you did, you can try to find a solution.
zero, environment
Host version: Windows11
Virtual machine version: ubuntukylin-16.04-desktop-amd64
VMware version: VMware® Workstation 17 Pro
NIC: bridge mode
jdk version: jdk-8u162
Hadoop version: hadoop-3.1.3
HBase version: hbase-2.2.2
Eclipse version: eclipse-4.7.0
Note: The hardware version used is compatible with VMware 12.X.
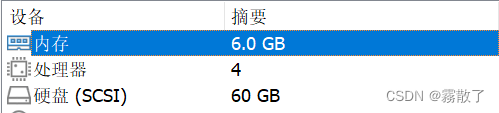
Master
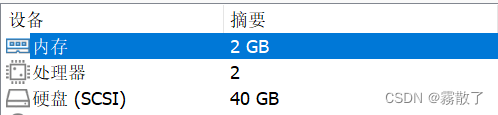
Slave
Compared with the specific hardware configuration, in fact, I don't think it's that important. It's good to have a rough idea, but it's not much different.
1. Introduction to HBase Shell
Advantages and Disadvantages
HBase shell is a command line-based interactive tool provided by HBase for managing and manipulating data in HBase. Its advantages and disadvantages are as follows:
Advantage
- Convenient and fast : HBase shell can be used to operate and manage the HBase database conveniently and quickly without writing programs or using other tools.
- High flexibility : HBase shell supports a variety of command and parameter combinations to meet different needs of operations, such as creating tables, inserting data, querying data, deleting data, etc.
- Easy to learn and use : HBase shell commands are simple and intuitive, and can be learned and used without programming experience.
- Cross-platform support : HBase shell can run on any operating system that supports Java, such as Windows, Linux, MacOS, etc.
- Good scalability : Some automated operations can be realized through custom scripts, such as batch importing data, backing up data, etc.
disadvantage
- Not conducive to large-scale data operations : When processing large-scale data, because the HBase shell is a tool based on the command line, it is not suitable for manually entering a large number of commands for operation, nor is it suitable for complex data processing.
- Does not support transactions : HBase shell does not support transactions, so the atomicity and consistency of operations cannot be guaranteed, and transactions can be implemented through the Java API when writing programs.
- Does not support complex data types : HBase shell does not support complex data types, such as arrays, structures, etc., but Java API can support these data types.
- Error-prone : Due to the large number of HBase shell commands, and the command format is somewhat cumbersome, syntax errors or execution errors are prone to occur.
usage
HBase shell is a command-line interactive tool provided by HBase, which can be used to manage and operate the HBase database. The HBase shell supports most basic database administration tasks, such as creating and dropping tables, adding and removing column families, inserting and retrieving data, and more. The HBase shell uses a SQL-like syntax and provides some additional commands for advanced operations.
Some common commands of the HBase shell include:
- create
table_name,column_family: create a new table- list: list all available tables
- describe
table_name: display the structure information of the table- disable
table_nameand enabletable_name: disable and enable a table- drop
table_name: drop a table- put
table_name,row_key,column_family:column_qualifier,value: Insert a row of data into the table- get
table_name,row_key: Get the data in the table by row- scan
table_name: scan the entire table and return the result
In addition to these basic commands, the HBase shell supports many other advanced commands and options, such as filters, version control, and permission management. In short, the HBase shell is a powerful tool that can help users manage and operate the HBase database. Its command set and syntax are very easy to use, and it can quickly operate and manage the HBase database. However, when dealing with large-scale data and complex data types , which need to be processed using other tools or programming languages.
2. Shell command
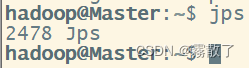
First of all, please make sure that Hadoop and HBase have been turned on. If you are not sure, you can enter jpsand check
jps
If it looks like the picture below, it means that Hadoop and HBase services are not enabled
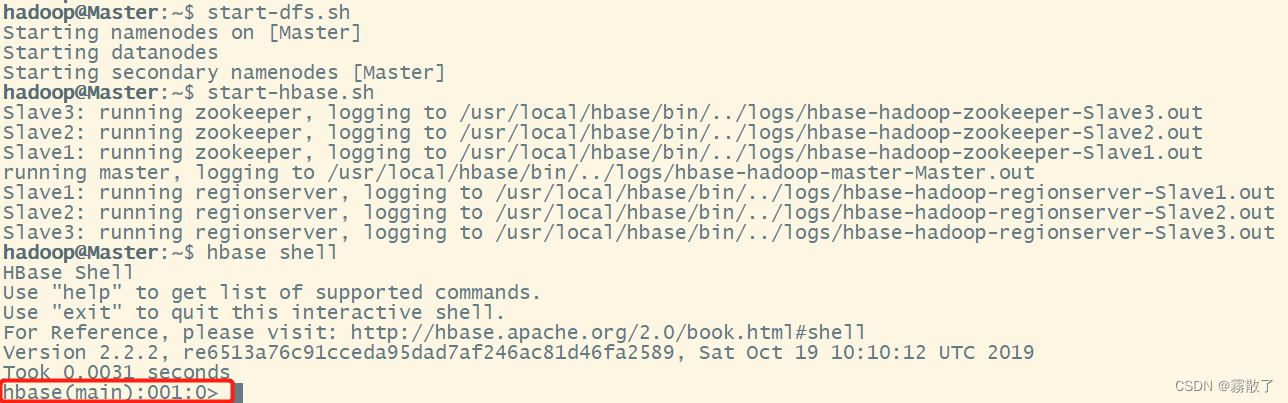
hbase shellConnect to a running HBase instance using the command, located bin/in the directory where HBase is installed. In this example, some of the usage and version information printed when starting the HBase Shell has been omitted. The HBase Shell prompt >ends with a character. shellYou can first enter the following command to open Hadoop and HBase, and open the command line using HBase
start-dfs.sh # 打开 Hadoop
start-hbase.sh # 打开 HBase
hbase shell # 用 HBase 打开 shell
If you see a red frame, it means that it has been successfully opened using HBase shell.
create table
create Enter the table_name , column_family_name`` command in the shell , where table_nameis the table name and column_family_namecolumn family name. Multiple column families can be created, separated by commas. We try to use shellthe command to create a table in HBase, first enter the following command:
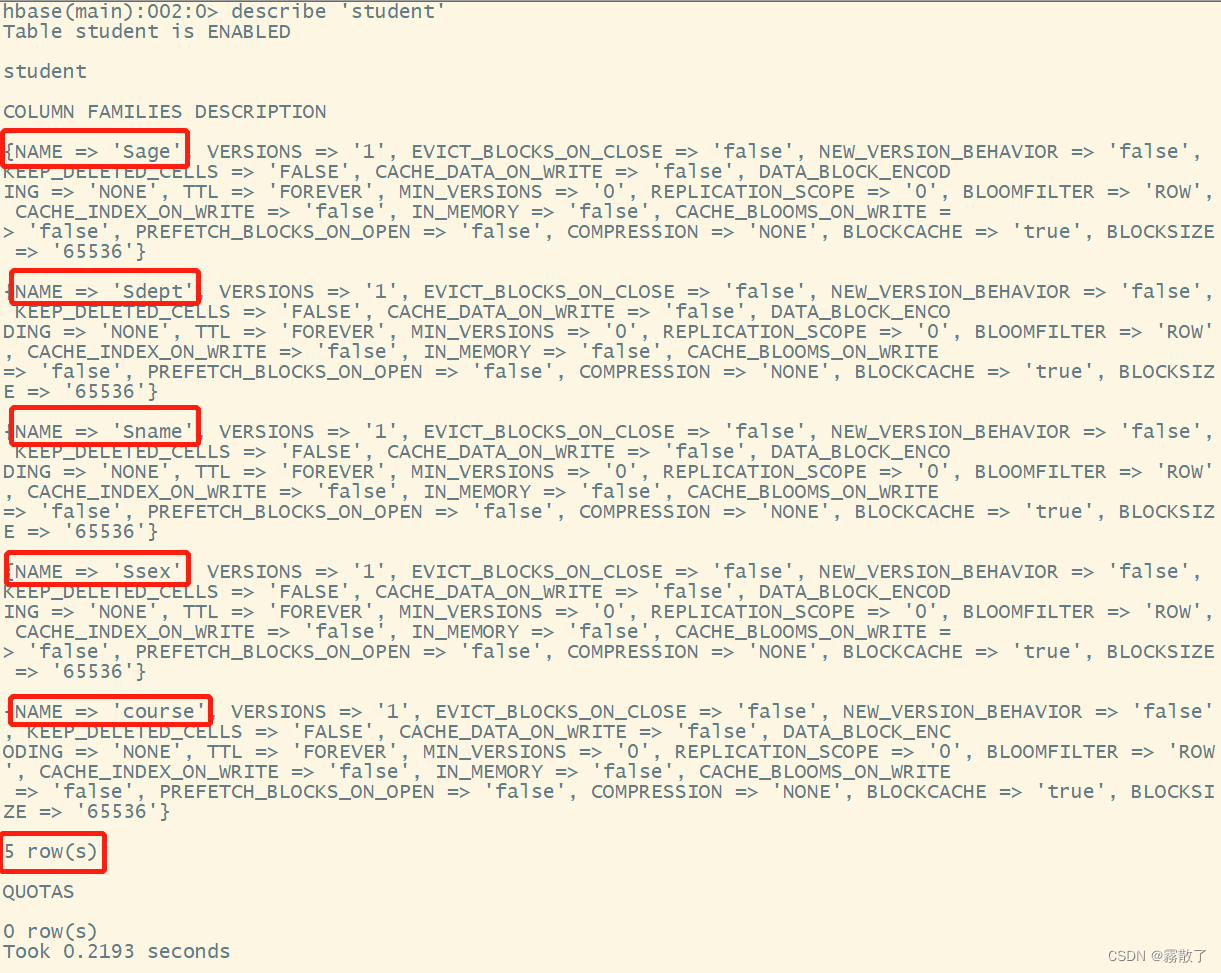
create `student`,`Sname`,`Ssex`,`Sage`,`Sdept`,`course`
If the message shown in the figure appears, it means the operation is successful. create student 的意思就是创建一张新的 `table`(表),并且命名为 `studen`。而后面的Sname ,Ssex ,Sage ,Sdept ,course`` are the fields of this table, which are Sname(student name), Ssex(student gender), Sage(student age), Sdept(student apartment), course(student course selection), because the HBase table will There is a system default attribute as the row key, no need to create it yourself, the default is putthe first data after the table name in the command operation.

listConfirm studentthe table exists with the command
list `student`

After creating studentthe table, you can use describethe command to view studentthe detailed information of the table, including configuring default values
describe `student`
After entering this command, you can see that there are five attributes.
Basic operation of database
增、删、改、查This part mainly focuses on the operation in HBase .
adding data
putCommand: used to insert a piece of data into HBase or update a piece of data. The syntax of the put command is as follows:put `table_name`, `row_key`, `column_family:column_qualifier`, `value`Among them,
table_nameindicates the name of the table where the data is to be inserted;row_keyindicates the row key where the data is located;column_family:column_qualifierindicates the column family and column qualifier, separated by a colon;valueindicates the data value to be inserted.For example, to
test_tableinsert a piece of data into the table named , the row key isrow_key_1, the column family iscf1, the column qualifier isqualifier_1, and the value isvalue_1, you can execute the following command:put `test_table`, `row_key_1`, `cf1:qualifier_1`, `value_1`
Run the following command to studentadd a row of data 202108384110with the student ID and the name to the table HeZaoCha, where the row key is 202108384110.
put `student`,`202108384110`,`Sname`,`HeZaoCha`

Below, a data is added for the column family column 202108384110under the row with a value of . Columns in HBase consist of a column family prefix (in this case ), a colon , and a column qualifier suffix (in this case ).coursebigdata97course:bigdata
put `student`,`202108384110`,`course:bigdata`,`97`

delete data
deleteUse and deleteallcommand in HBase to delete data, the difference between them is:
deleteIt is used to delete a data, which isputthe reverse operation of
deleteCommand: used to delete a piece of data from HBase. The syntax of the delete command is as follows:delete `table_name`, `row_key`, { COLUMN => `column_family:column_qualifier`, TIMESTAMP => timestamp}Among them,
table_nameindicates the name of the table to be deleted;row_keyindicates the row key of the data to be deleted;column_family:column_qualifierindicates the column family and column qualifier to be deleted, separated by a colon;timestampindicates the timestamp of the data to be deleted, if not If specified, the latest version of the data will be deleted.For example, to delete the data
test_tablewhose row key isrow_key_1, column family iscf1, and column qualifier is in the table named , you can execute the following command:qualifier_1delete `test_table`, `row_key_1`, { COLUMN => `cf1:qualifier_1`}
Enter the following deletecommand, and use getthe command to view the result after deletion
delete `student`,`202108384110`,`Ssex` # 删除键为 20210384110 的属性 Ssex
get `student`,`202108384110` # 获取键为 202108384110 的所有属性以及属性值

deleteallOperation is used to delete a record
The command in the HBase shell deleteallis used to delete all cell data in the specified row. To use this command, you need to enter the HBase shell first, and you need to select the table to be operated on first. Here's deleteallhow to use the command:
Select the table to operate, for example:
scan `mytable`Delete all cell data in the specified row, for example:
deleteall `mytable`, `myrow`
Enter the following deleteallcommand, and use scanthe command to view the result after deletion
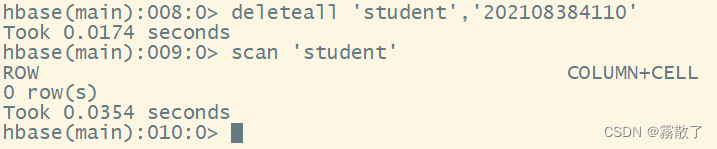
deleteall `student`,`202108384110` # 删除键为 202108384110 的记录
scan `student` # 扫描名为 student 的表
Because the entire record is deleted, the scanned table has no data.
Query data
There are two commands in HBase for viewing data:
getCommand to view a record in a table
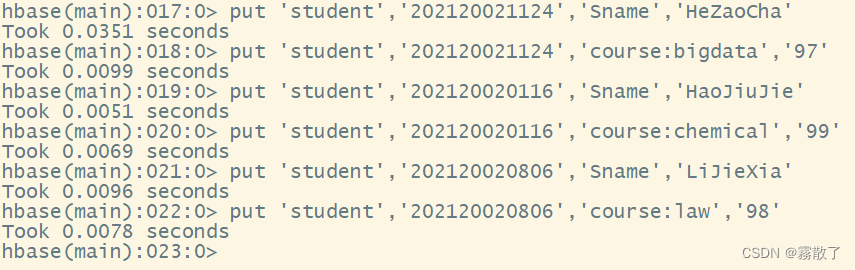
Because we have deleted all the data above, so before practice, we first use putthe command to add three rows of data to the table
put `student`,`202120021124`,`Sname`,`HeZaoCha`
put `student`,`202120021124`,`course:bigdata`,`97`
put `student`,`202120020116`,`Sname`,`HaoJiuJie`
put `student`,`202120020116`,`course:chemical`,`99`
put `student`,`202120020806`,`Sname`,`LiJieXia`
put `student`,`202120020806`,`course:law`,`98`
getThe syntax of the command is as follows:
get `table_name`, `row_key`, {

     COLUMN => `column_family:column_qualifier`}
Among them,
table_nameindicates the name of the table to be queried;row_keyindicates the row key of the data to be queried;column_family:column_qualifierindicates the column family and column qualifier to be queried, and the two are separated by a colon.For example, to query the data
test_tablewhose row key isrow_key_1, column family iscf1, and column qualifier is in the table named , you can execute the following command:qualifier_1get `test_table`, `row_key_1`, { COLUMN => `cf1:qualifier_1`}
get Enter the table_name row_key`` command in the shell , to query a row of data. Use the command to view the records whose getstudent ID is student202120021124
get `student`,`202120021124`

scanCommand to view all data in a table
In HBase, scana command is a command used to scan data in a table. scanCommands can filter data and return results by row key range, column qualifier, timestamp, and other conditions. The following is scanthe detailed usage of the command:
- Scan the entire table: Enter the table_name`` command in the HBase shell
scanto scan the entire table.scanScan by row key range: Enter the table_name, {STARTROW =>start_row_key, ENDROW =>end_row_key command in the HBase shell}to scan the data in the table by row key range.scanSpecify column scan: Enter the table_name, {COLUMNS => [column_family:column_name command in the HBase shell]}to specify the column family and column name to scan the data in the table.scanScanning with a specified version number: Enter the table_name command in the HBase shell, {VERSIONS => number_of_versions}to scan the data in the table with a specified version number.scanSpecify filter scan: Enter the table_name command in the HBase shell, {FILTER => filter_expression}to specify a filter to scan the data in the table. Among them,filter_expressionis the filter expression, you can use HBase built-in filter or custom filter.scanSpecify the maximum number of returned rows: Enter the table_name command in the HBase shell, {LIMIT => max_number_of_rows}to specify the maximum number of returned rows to scan the data in the table.scanScan by offset: Enter the table_name command in the HBase shell, {OFFSET => offset_value}to scan the data in the table by offset.
Use scanthe command to scan the data in the table. When scanning, you can add some options to limit your scanning, only enter the table name, and all the data can be extracted.
scan `student`
It can be seen from the figure that the columns and column values are scanned and extracted.

delete table
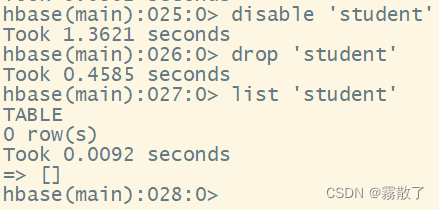
If you want to drop a table or change its settings, and in some other cases, you need to first disabledisable the table with the command. If you want to restart the disabled table, you can use enablethe command to re-enable it.
The command to delete a table is as follows
disable `student` # 禁用名为 student 的表
drop `student` # 移除名为 student 的表
list `student` # 查看 student 表是否存在
As shown in the figure: studentthe table has been deleted.
The above are some basic commands of HBase shell, which can be used for table data management, query and other operations. It should be noted that the HBase shell has low operating efficiency for large-scale data and is not suitable for processing massive data. It is recommended to use programming interfaces or other big data processing frameworks for processing.
Query table historical data
There are many different usages for querying historical data. Below we mainly introduce two:
- Query data in a specified time range
The following are detailed steps for querying data in a specified time range in the HBase shell:
- Select the table to query
Use the "list" command to view all tables, and then use the "scan" command to scan all the data in the table. For example, if you want to query data in a table named "mytable", you can use the following command:
scan 'mytable'
- specify time range
HBase stores data in chronological order, so data can be queried by specifying a time range. A time range can be specified using the "TIMERANGE" keyword. For example, if you want to query data between January 1, 2019 and January 31, 2019, you can use the following command:
scan 'mytable', {

      TIMERANGE => [1483200000, 1485801599] }
Among them, 1483200000 and 1485801599 are timestamps of two different times. This will return all data matching the specified time range.
- Query the data in the specified version range
The following are the detailed steps to query the data in the specified version range in the HBase shell:
- Select the table to query
Use the "list" command to view all the tables, and then use the "scan" command to scan all the data in the table. For example, if you want to query data from a table named "mytable", you can use the following command:
scan 'mytable'
- Specify version range
Use the "VERSIONS" keyword to specify the number of versions to query. For example, if you want to query the first 5 versions of a column under a column family, you can use the following command:
get 'mytable', 'rowkey', {

     COLUMN => 'cf:col', VERSIONS => 5}
Among them, 'rowkey' is the rowkey of the row to be queried, 'cf' is the column family to be queried, 'col' is the column to be queried, and 5 indicates the number of versions to be queried. The command will return data for the first 5 versions that meet the criteria.
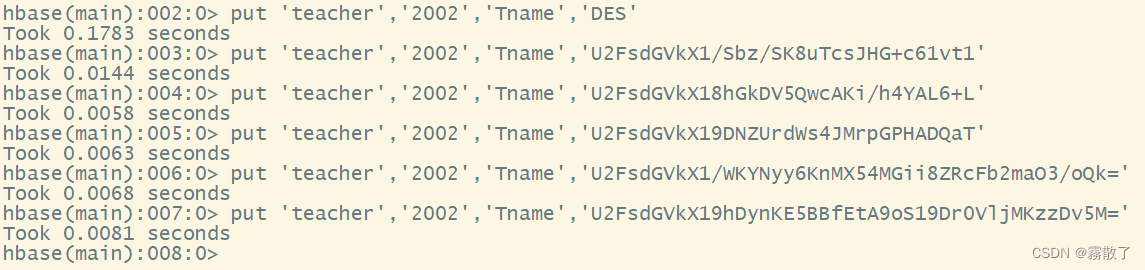
Next, we demonstrate the second usage of querying data in a specified version range .
First, create a table named in the HBase shell teacher, create a column family in the table Tname, and specify that the column family can store up to 5versions of data.
create 'teacher',{

    NAME=>'Tname',VERSIONS=>5}

Then, use putthe command teacherto insert data into the table and update the data, thereby generating historical version data. Below we generate six versions of the data
put 'teacher','2002','Tname','DES'
put 'teacher','2002','Tname','U2FsdGVkX1/Sbz/SK8uTcsJHG+c61vt1'
put 'teacher','2002','Tname','U2FsdGVkX18hGkDV5QwcAKi/h4YAL6+L'
put 'teacher','2002','Tname','U2FsdGVkX19DNZUrdWs4JMrpGPHADQaT'
put 'teacher','2002','Tname','U2FsdGVkX1/WKYNyy6KnMX54MGii8ZRcFb2maO3/oQk='
put 'teacher','2002','Tname','U2FsdGVkX19hDynKE5BBfEtA9oS19Dr0VljMKzzDv5M='
Finally, when querying, we can choose to specify the number of historical versions to query. If not specified, only the latest data is queried by default. The number of historical versions that can be selected is 1 to 5, as shown in the following command
get 'teacher','2002',{

    COLUMN=>'Tname',VERSIONS=>5}

Quit the HBase database table operation
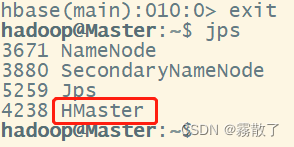
To finally exit database operations, simply enter exitthe command. It should be noted that the exit here refers to exiting the operation on the database table, rather than stopping the background operation of the HBase database.
exit
After exiting, we enter and we jpscan see that HMasterit is still running, so we just exited the HBase shell and exited the operation on the data table instead of stopping the operation of HBase.
3. Java API programming practice
HBase is a distributed NoSQL database based on Hadoop. It uses columnar storage and is suitable for processing large-scale data. The following is the practice process of Java API programming in HBase:
- Introduce HBase-related dependent packages : You need to introduce HBase-related dependent packages into the project, including hbase-client, hbase-common, hbase-protocol, etc.
- Create the HBase configuration object : Create the HBase Configuration object in the code, and set the relevant information of the HBase cluster, such as the Zookeeper address of HBase, the address of the HBase Master, etc.
- Create HBase connection object : use HBaseConfiguration object to create HBase connection object Connection.
- Get the HBase table object : Get the HBase table object Table through Connection, and you can perform operations on the table, such as inserting, querying, and deleting.
- Insert data : Use the Put object to insert data into the HBase table. First create the Put object, then set the row key and column family, column qualifier and value, and finally insert the Put object into the HBase table.
- Query data : Use the Get object to query the data in the HBase table. First create the Get object, then set the row key, column family and column qualifier, and finally get the data through the Table.get() method.
- Delete data : Use the Delete object to delete data in the HBase table. First create the Delete object, then set the row key, column family and column qualifier, and finally delete the data through the Table.delete() method.
- Batch operation data : HBase supports batch operation data, and you can use the Batch operation class to perform batch operations on multiple Put, Get, and Delete objects. The Batch operation class has the Batch.Callback interface, which can call the callback function to process the operation result after the batch operation.
The above is the basic process of Java API programming practice in HBase. In actual development, it is necessary to perform more complex operations according to specific requirements, such as using HBase Filter for data filtering and query, and using HBase Coprocessor for data processing and calculation.
Let's use an example to let everyone experience the operation process in detail. The development tool used in this example is Eclipse. details as follows:
- Download and install HBase : First, you need to download and install HBase. You can download HBase from the HBase official website.
- Create a Java project : Create a new Java project in Eclipse.
- Add the HBase dependency : In the Java project, right-click on the Project and select Properties. Then, under Java Build Path select Libraries, click Add External JAR and select the HBase JAR file you downloaded in step 1.
- Writing HBase code : You can now write HBase code in your Java project.
- Running and debugging the code : You can use Eclipse's debugging features to run and debug the HBase code. In Eclipse, click the "Debug" button to start the debugger. You can set breakpoints, step through execution, inspect variable values, and more.
The specific process is as shown above, if you have not installed Eclipsefriends, you can click here to find Eclipsethe installation method.
Create a Java project
First, start Eclipse, the start command is as follows
cd /usr/local/eclipse # 进入 Eclipse 安装目录
./eclipse # 启动 Eclipse
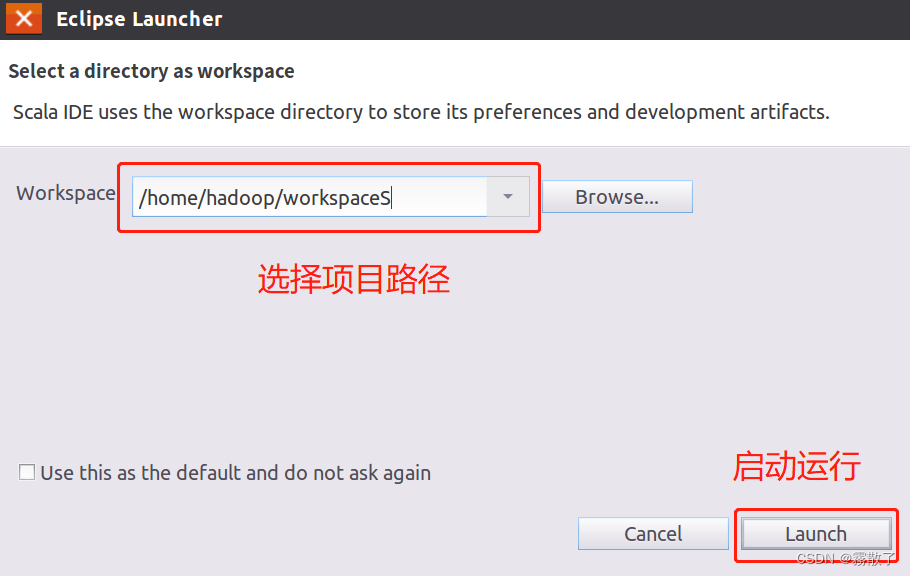
After starting, the interface as shown in the figure below appears, click Launchthe button in the lower right corner of the interface to runEclipse
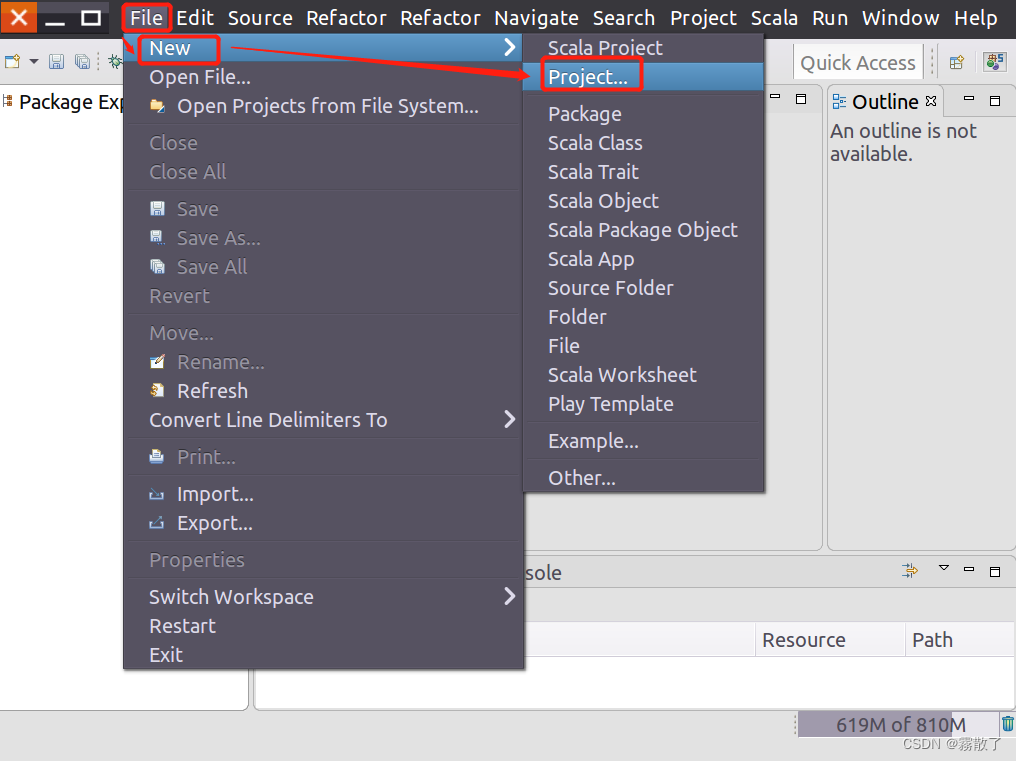
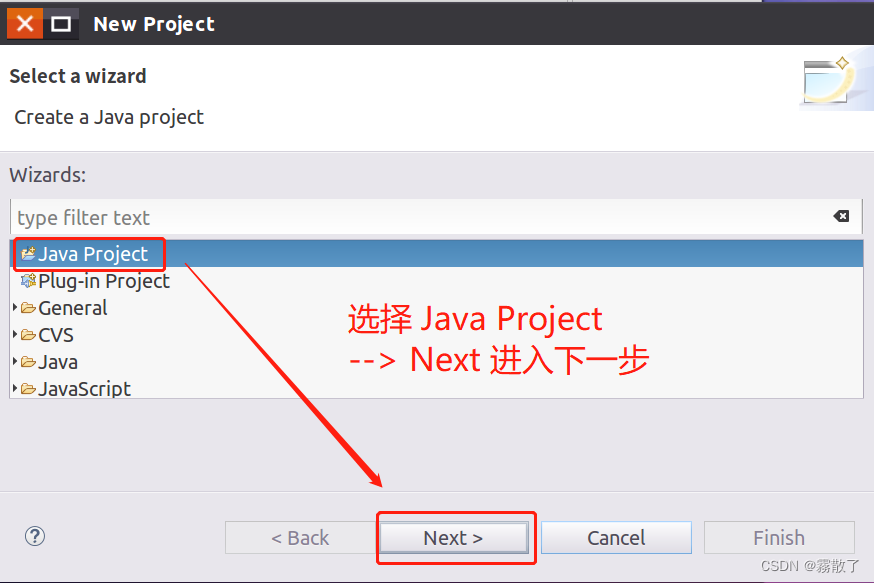
Please click the menu at the top of the software interface File, then select in the pop-up drop-down submenu , and then find and select Newin the submenu .Project
Select Java Project, declare this project to be a Javaproject, and select Nextto proceed to the next step.
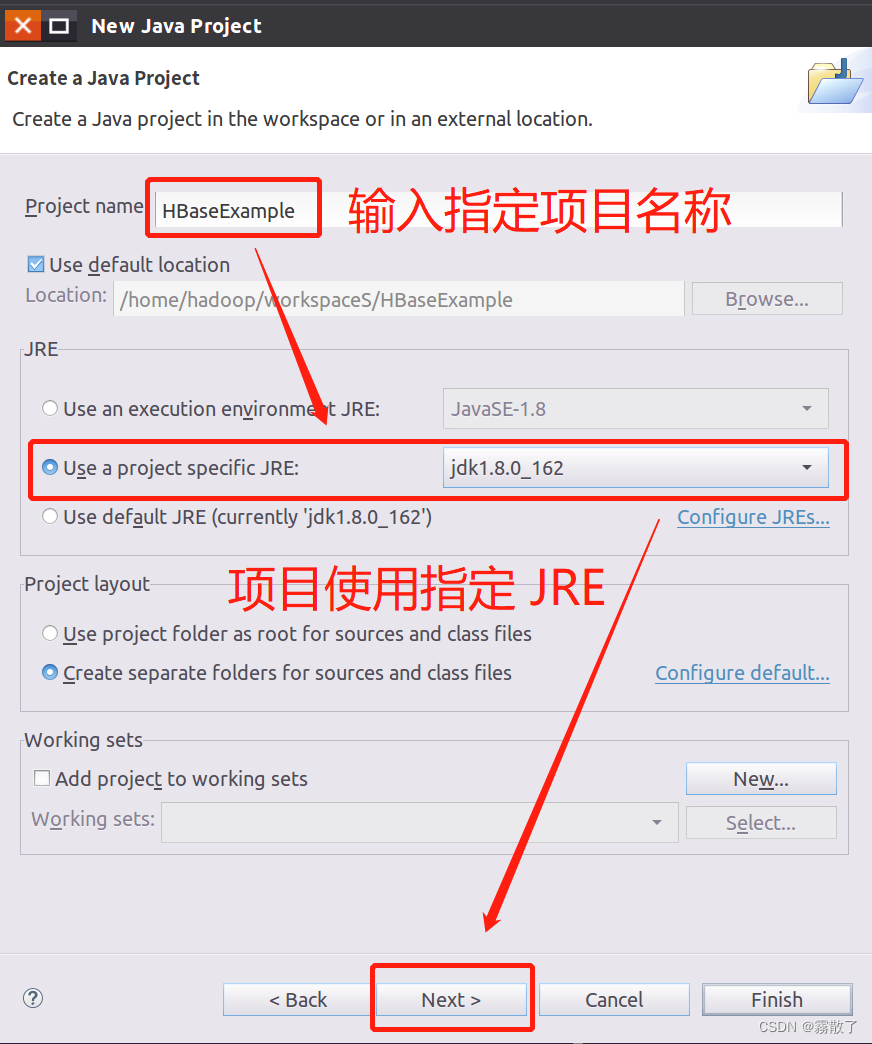
In the following Java project creation dialog, you can enter HBaseExampleas the project name and select the second item in the JRE tab Use a project specific JREto use the project-specific JRE. Finally, click Nextthe button at the bottom of the screen to go to the next step.
Add HBase dependencies
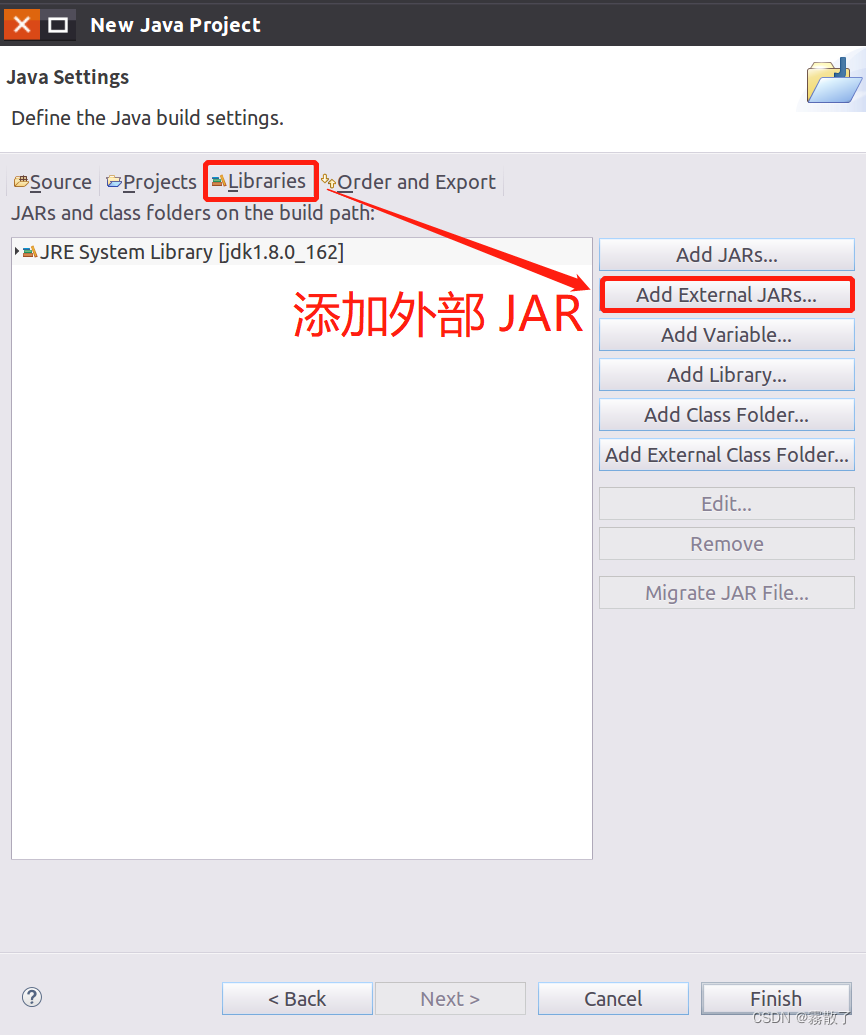
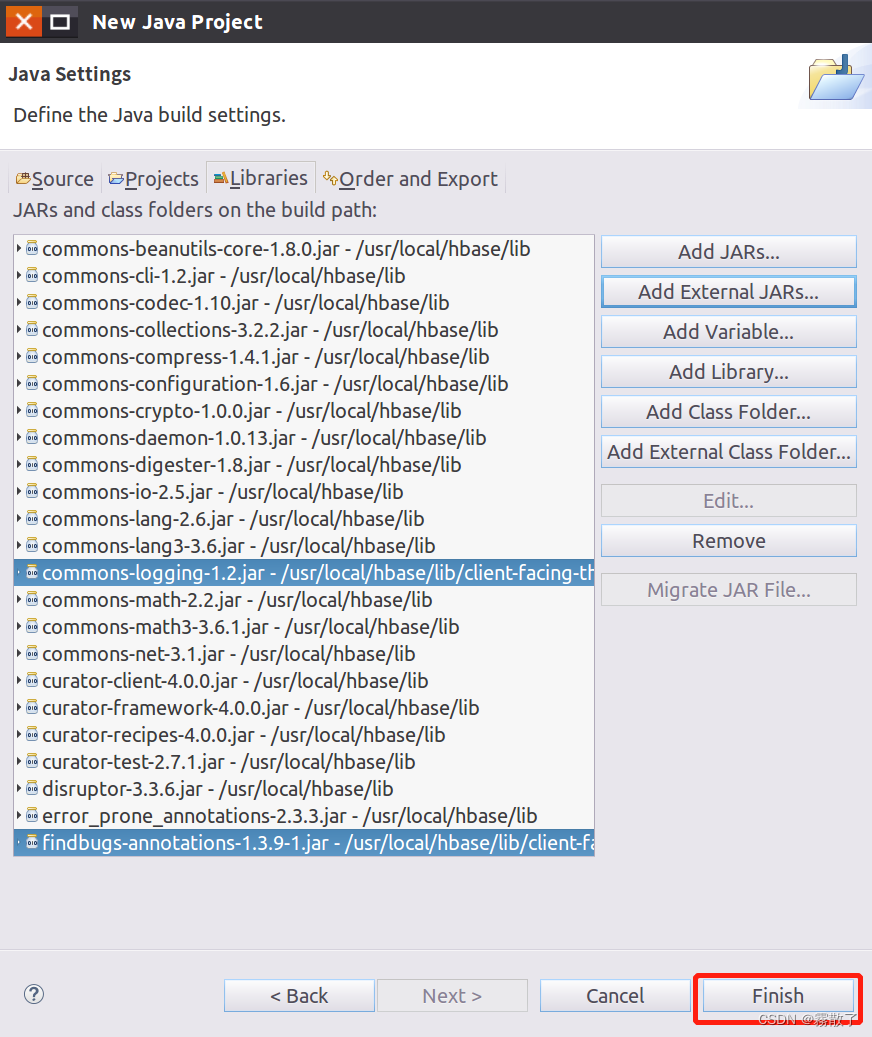
In the window that appears (as shown in the figure below), please click Librariesthe tab, and click Add External JARs...the button on the right side of the screen to add an external JAR package.
In the pop-up JAR Selectioninterface (as shown in the figure below), go to /usr/local/hbase/libthe HBase installation directory, and select all jar files in this directory except the four directories client-facing-thirdparty, ruby, shaded-clientsand (you can use to select all, and then press and hold the key to click the remaining four directories to uncheck), then click the button at the bottom of the screen.zkcliCtrl + ACtrlOK

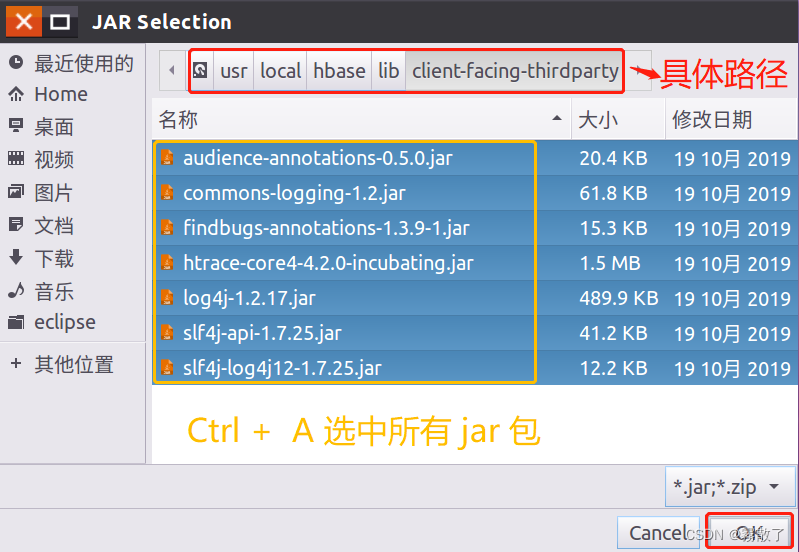
Then, click Add External JARs...the button again, in JAR Selectionthe interface, choose to enter client-facing-thirdpartythe folder, in client-facing-thirdpartythe folder (refer to the figure below), use Ctrl + Ato check all the jar files, and then click OKthe button at the bottom of the page.
After completing the above operations and adding the jar package, return to the interface shown in the figure below, and click Finishthe button at the bottom of the window to complete the creation of the project.
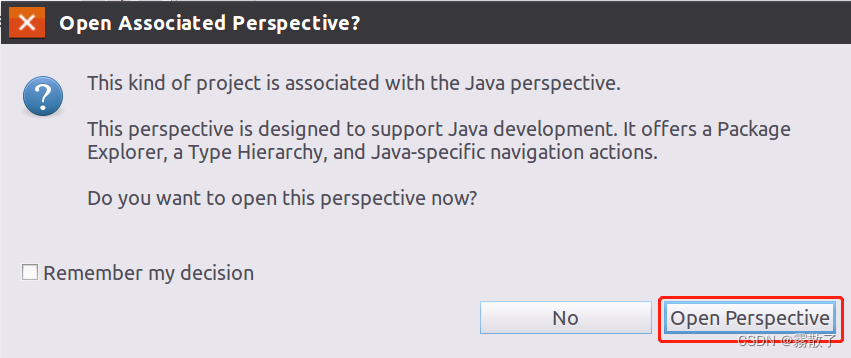
Then a prompt window will pop up (as shown in the figure below)
This type of project is associated with the Java perspective.
This perspective is designed to support Java development. It provides a PackageExplorer, a Type Hierarchy, and Java-specific navigation actions.
Do you want to open this perspective now?
We click Open Perspectivethe button to open the view.
Write HBase code
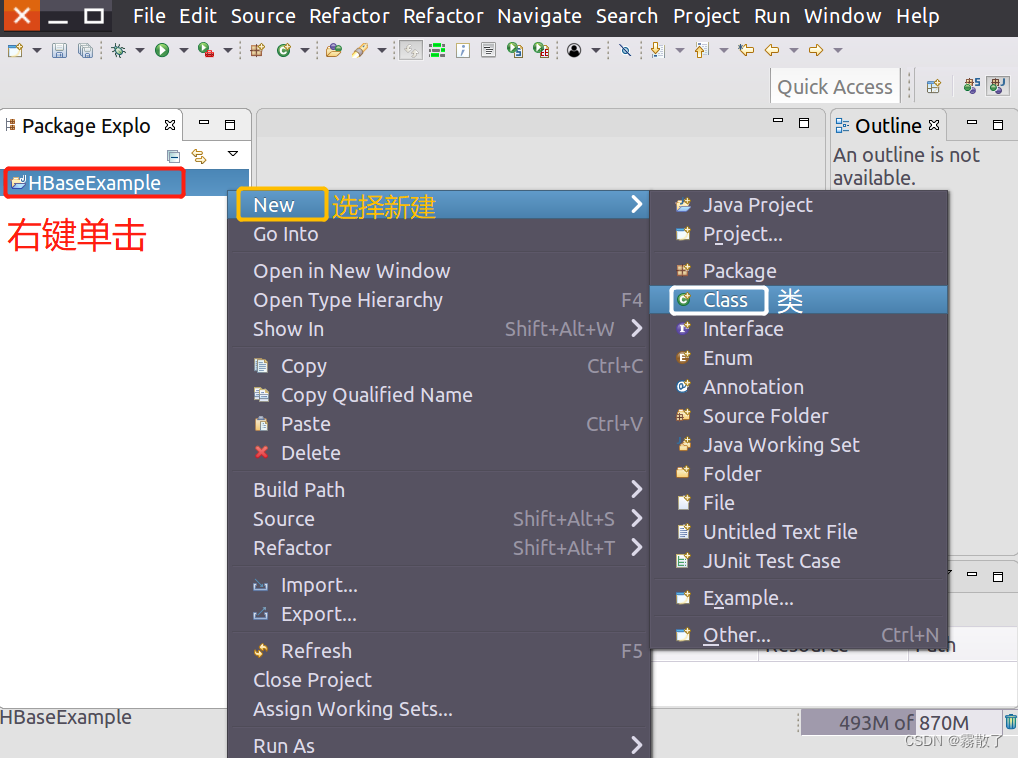
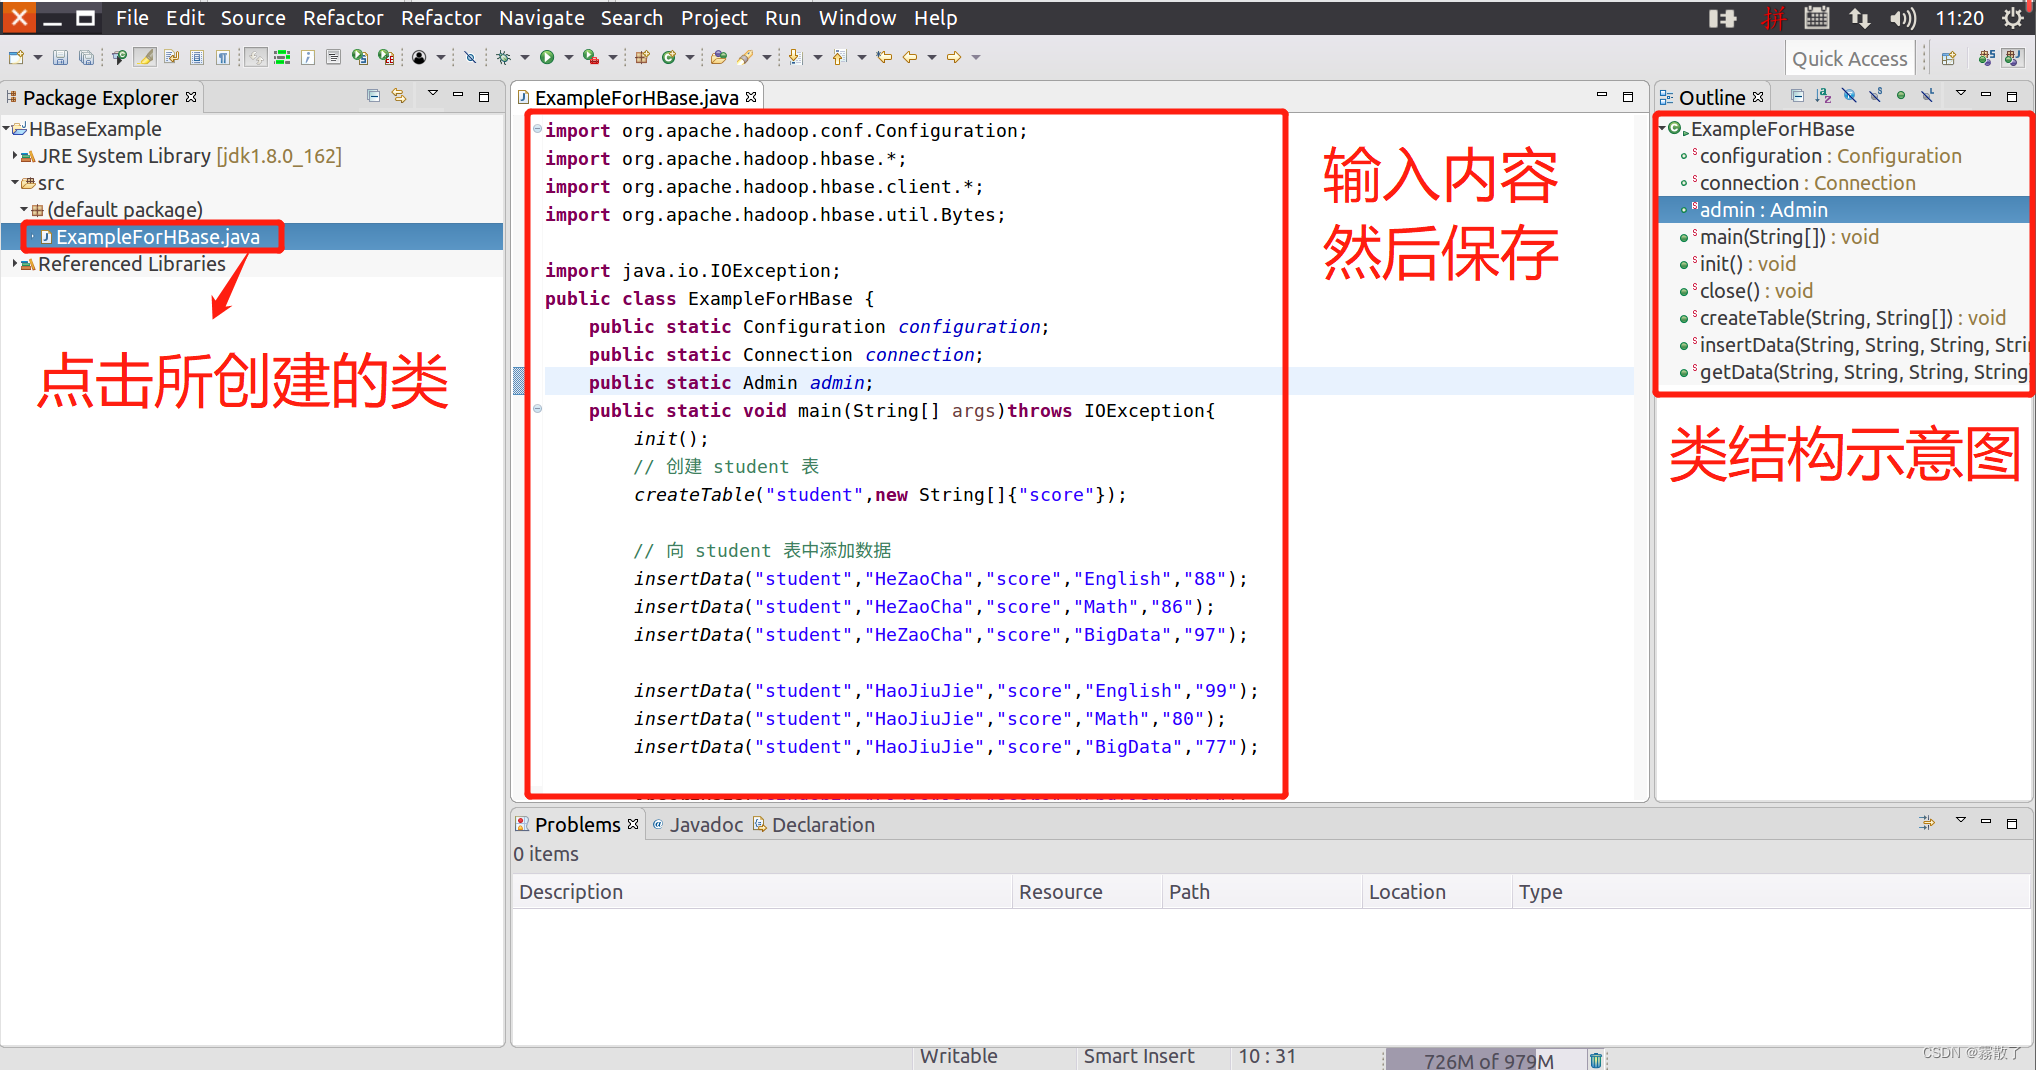
HBaseExampleFind the project name project folder just created , then right-click the project name, select Newthe button in the pop-up menu, and selectClass
Create a new Java class.
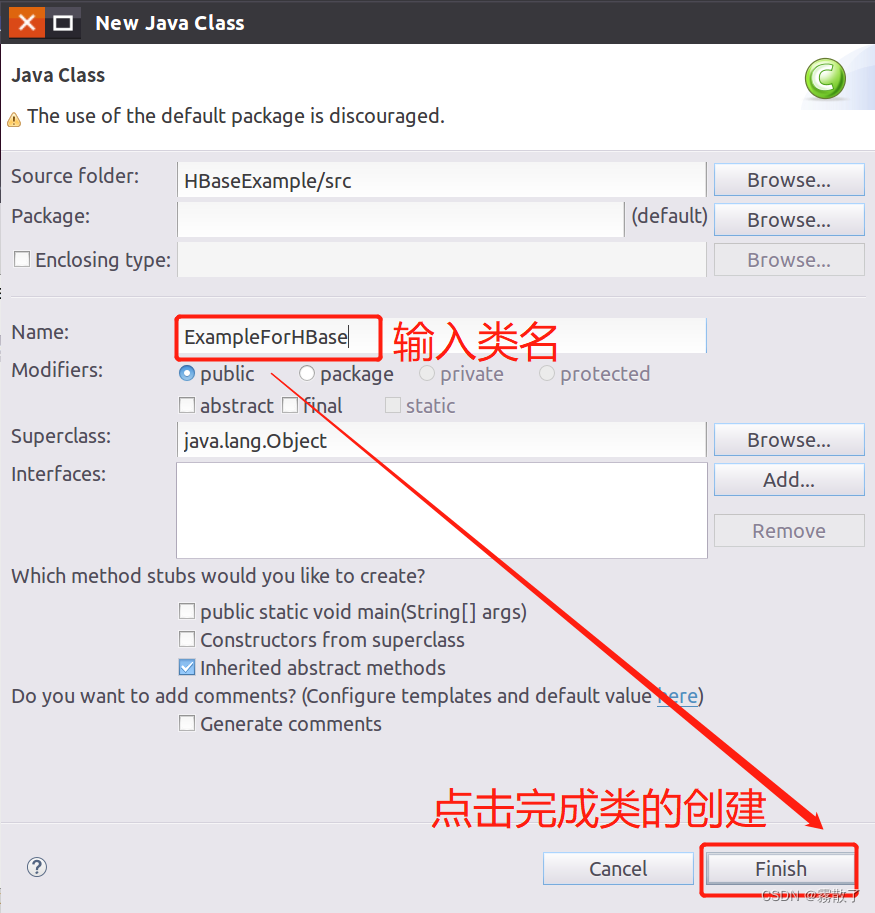
In the dialog box shown in the figure below New Java Class, enter ExampleForHBaseinto Namethe text box, and finally click the button at the bottom Finish.
Select the new Java class created above, then enter the following Java code in the code window, and save it, as shown in the figure below
import org.apache.hadoop.conf.Configuration;
import org.apache.hadoop.hbase.*;
import org.apache.hadoop.hbase.client.*;
import org.apache.hadoop.hbase.util.Bytes;
import java.io.IOException;
public class ExampleForHBase {
public static Configuration configuration;
public static Connection connection;
public static Admin admin;
public static void main(String[] args)throws IOException{
init();
// 创建 student 表
createTable("student",new String[]{
"score"});
// 向 student 表中添加数据
insertData("student","HeZaoCha","score","English","88");
insertData("student","HeZaoCha","score","Math","86");
insertData("student","HeZaoCha","score","BigData","97");
insertData("student","HaoJiuJie","score","English","99");
insertData("student","HaoJiuJie","score","Math","80");
insertData("student","HaoJiuJie","score","BigData","77");
insertData("student","LiJieXia","score","English","66");
insertData("student","LiJieXia","score","Math","87");
insertData("student","LiJieXia","score","BigData","79");
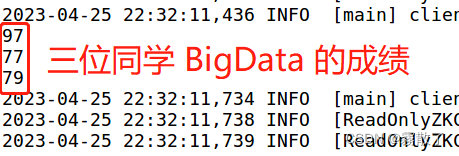
// 获取 student 表中的数据
getData("student", "HeZaoCha", "score","BigData");
getData("student", "HaoJiuJie", "score","BigData");
getData("student", "LiJieXia", "score","BigData");
close();
}
public static void init(){
configuration = HBaseConfiguration.create();
configuration.set("hbase.rootdir","hdfs://localhost:9000/hbase");
try{
connection = ConnectionFactory.createConnection(configuration);
admin = connection.getAdmin();
}catch (IOException e){
e.printStackTrace();
}
}
public static void close(){
try{
if(admin != null){
admin.close();
}
if(null != connection){
connection.close();
}
}catch (IOException e){
e.printStackTrace();
}
}
public static void createTable(String myTableName,String[] colFamily) throws IOException {
TableName tableName = TableName.valueOf(myTableName);
if(admin.tableExists(tableName)){
System.out.println("talbe is exists!");
}else {
TableDescriptorBuilder tableDescriptor = TableDescriptorBuilder.newBuilder(tableName);
for(String str:colFamily){
ColumnFamilyDescriptor family =
ColumnFamilyDescriptorBuilder.newBuilder(Bytes.toBytes(str)).build();
tableDescriptor.setColumnFamily(family);
}
admin.createTable(tableDescriptor.build());
}
}
public static void insertData(String tableName,String rowKey,String colFamily,String col,String val) throws IOException {
Table table = connection.getTable(TableName.valueOf(tableName));
Put put = new Put(rowKey.getBytes());
put.addColumn(colFamily.getBytes(),col.getBytes(), val.getBytes());
table.put(put);
table.close();
}
public static void getData(String tableName,String rowKey,String colFamily, String col)throws IOException{
Table table = connection.getTable(TableName.valueOf(tableName));
Get get = new Get(rowKey.getBytes());
get.addColumn(colFamily.getBytes(),col.getBytes());
Result result = table.get(get);
System.out.println(new String(result.getValue(colFamily.getBytes(),col==null?null:col.getBytes())));
table.close();
}
}
Run and debug code
Before starting to run the program, you need to start HDFS and HBase, open the terminal, and enter the following commands.
start-dfs.sh # 启动 HDFS
start-hbase.sh # 启动 HBase
After enabling the service, enter jpsto check whether the process service is enabled

Then, as shown in the figure below, right-click the code window, select in the pop-up menu , and then click the button Run Asin the pop-up menu to start running the program.1 Java Application

There is an error, this error is that localhostthe location of cannot be found, so the route for the host cannot be found.
java.net.NoRouteToHostException: 没有到主机的路由
	at sun.nio.ch.SocketChannelImpl.checkConnect(Native Method)
	at sun.nio.ch.SocketChannelImpl.finishConnect(SocketChannelImpl.java:717)
	at org.apache.zookeeper.ClientCnxnSocketNIO.doTransport(ClientCnxnSocketNIO.java:361)
	at org.apache.zookeeper.ClientCnxn$SendThread.run(ClientCnxn.java:1141)
2023-04-25 15:14:16,749 WARN  [ReadOnlyZKClient-localhost:2181@0x184cf7cf] zookeeper.ReadOnlyZKClient (ReadOnlyZKClient.java:exec(192)) - 0x184cf7cf to localhost:2181 failed for get of /hbase/hbaseid, code = CONNECTIONLOSS, retries = 3
2023-04-25 15:14:17,748 INFO  [ReadOnlyZKClient-localhost:2181@0x184cf7cf-SendThread(localhost:2181)] zookeeper.ClientCnxn (ClientCnxn.java:logStartConnect(1032)) - Opening socket connection to server localhost/10.13.235.141:2181. Will not attempt to authenticate using SASL (unknown error)
2023-04-25 15:14:19,647 WARN  [ReadOnlyZKClient-localhost:2181@0x184cf7cf-SendThread(localhost:2181)] zookeeper.ClientCnxn (ClientCnxn.java:run(1162)) - Session 0x0 for server null, unexpected error, closing socket connection and attempting reconnect
After a little inspection, I found that my hostsfile configuration was wrong, because my computer had some problems on the weekend, which was actually the result of simple improper operation, and then I reconfigured it again, and wrote this blog again , I'm sorry that I wrote a wrong number and wasted some time. It's good for everyone to learn from it here, and no one should make a mistake. If the error is not reported in this way, it may be that the firewall is not closed. Please also pay attention to the problem of the firewall.

After solving the problem, run again
java.net.ConnectException: 拒绝连接
	at sun.nio.ch.SocketChannelImpl.checkConnect(Native Method)
	at sun.nio.ch.SocketChannelImpl.finishConnect(SocketChannelImpl.java:717)
	at org.apache.zookeeper.ClientCnxnSocketNIO.doTransport(ClientCnxnSocketNIO.java:361)
	at org.apache.zookeeper.ClientCnxn$SendThread.run(ClientCnxn.java:1141)
2023-04-25 15:49:48,359 WARN  [ReadOnlyZKClient-localhost:2181@0x184cf7cf] zookeeper.ReadOnlyZKClient (ReadOnlyZKClient.java:exec(192)) - 0x184cf7cf to localhost:2181 failed for get of /hbase/hbaseid, code = CONNECTIONLOSS, retries = 1
2023-04-25 15:49:49,356 INFO  [ReadOnlyZKClient-localhost:2181@0x184cf7cf-SendThread(Master:2181)] zookeeper.ClientCnxn (ClientCnxn.java:logStartConnect(1032)) - Opening socket connection to server Master/10.13.236.141:2181. Will not attempt to authenticate using SASL (unknown error)
2023-04-25 15:49:49,357 WARN  [ReadOnlyZKClient-localhost:2181@0x184cf7cf-SendThread(Master:2181)] zookeeper.ClientCnxn (ClientCnxn.java:run(1162)) - Session 0x0 for server null, unexpected error, closing socket connection and attempting reconnect
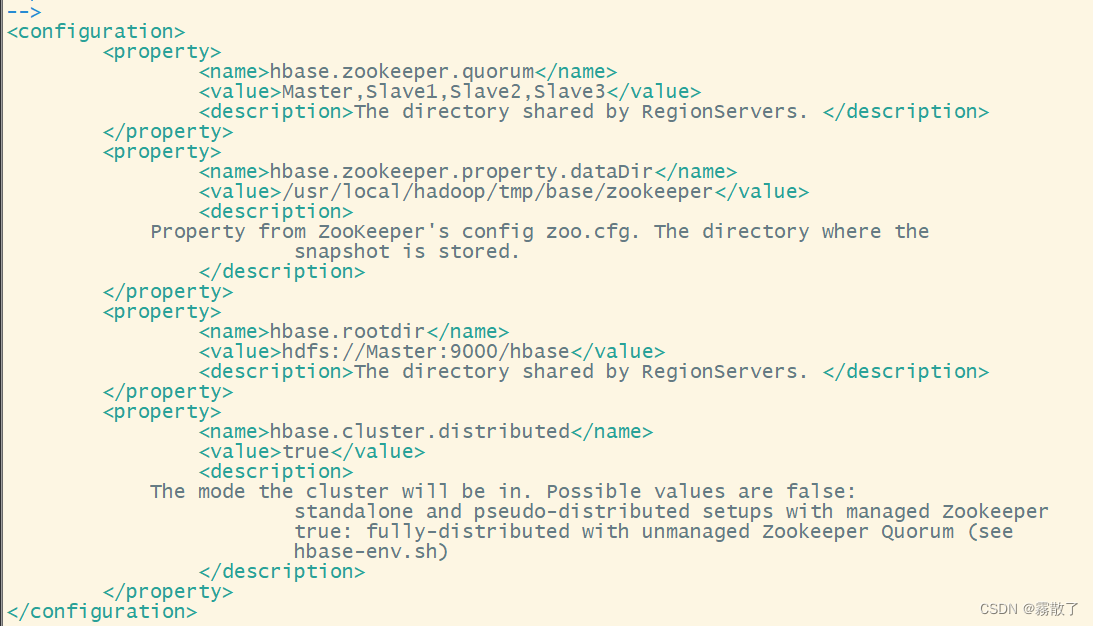
At this point, I gradually found that something was wrong, so I tried again, that is, reconfigured. This time I changed to the hbase-site.xmlfollowing. The only change is that I hbase.zookeeper.quorumadded one more parameter Master. The reason is that he is also ZooKeepera members.
<configuration>
        <property>
                <name>hbase.zookeeper.quorum</name>
                <value>Master,Slave1,Slave2,Slave3</value>
                <description>The directory shared by RegionServers. </description>
        </property>
        <property>
                <name>hbase.zookeeper.property.dataDir</name>
                <value>/usr/local/hadoop/tmp/base/zookeeper</value>
                <description>
            Property from ZooKeeper's config zoo.cfg. The directory where the
                        snapshot is stored.
                </description>
        </property>
        <property>
                <name>hbase.rootdir</name>
                <value>hdfs://Master:9000/hbase</value>
                <description>The directory shared by RegionServers. </description>
        </property>
        <property>
                <name>hbase.cluster.distributed</name>
                <value>true</value>
                <description>
            The mode the cluster will be in. Possible values are false:
                        standalone and pseudo-distributed setups with managed Zookeeper
                        true: fully-distributed with unmanaged Zookeeper Quorum (see
                        hbase-env.sh)
                </description>
        </property>
</configuration>
The effect is shown in the figure:
Then start HBase again, run the instance again, and you can see the following output.
After running, we encountered a small warming, this is:无法为您的平台加载本机Hadoop库...在适用的情况下使用内置Java类

WARN [main] util.NativeCodeLoader (NativeCodeLoader.java:<clinit>(62)) - Unable to load native-hadoop library for your platform... using builtin-java classes where applicable
HADOOP_OPTS=$HADOOP_OPTS -Djava.library.pathThe solution is to modify the local library pointing to Hadoop under the Hadoop environment configuration file
cd /usr/local/hadoop/ # 进入 Hadoop 的安装目录
vim etc/hadoop/hadoop-env.sh # 修改 Hadoop 的环境配置文件
The following double quotes cannot be removed, be sure to pay attention, the double quotes cannot be removed, otherwise an error will be reported-Djava.library.path=/usr/local/hadoop/lib/native': 不是有效的标识符
export HADOOP_OPTS="$HADOOP_OPTS -Djava.library.path=/usr/local/hadoop/lib/native"

After the modification, synchronize the modification with the three nodes, then start HDFS and HBase again, run the instance, and find that the problem is still not solved. tmpClose HBase and Hadoop, then delete the directory under the Hadoop installation directory , and re- Namenodeformat the .
cd /usr/local/hadoop # 进入 Hadoop 的安装目录
hdfs namenode -format # 格式化 HDFS
Run the instance again and find that the problem still cannot be solved.
Try the next approach, right click on the code box, select in the menu Run As, then in the lower menu selectRun Configurations...

Find our instance, select it Arguments, VM argumentstype in the box -Djava.library.path=/usr/local/hadoop/lib/native, and click in the lower right corner Apply --> Run.
-Djava.library.path=/usr/local/hadoop/lib/native

Run the instance again and find that the warning has been resolved.
Fourth, write at the end
Being able to see this shows that everyone is really serious about studying; the editor is here to say sorry, because I reinstalled the computer, the entire virtual machine was restarted, so I have no special problems in many details Pay attention, it was only later that I found out that the previous blog also had many mistakes, so I would like to say sorry to everyone here. In this blog, everyone will correct the error in front of a child. Thank you again for being able to see this. I should not say anything. This blog has some Easter eggs, which are all tributes to some of my brothers and...someone. I really hope that everyone can find this Easter egg. This shows that you are also my comparison A close friend; but I don’t particularly hope that you can find this easter egg, because after all, it’s a bit secret and inconvenient for others to see.