Second, environmental preparation.... 3
Three, use docker to deploy mysql 6
3.1. Create a data storage directory... 6
3.2. Create a bridge network and specify an IP range... 6
3.4, custom configuration... 7
Four, MySQL simple configuration... 9
4.1. Open a terminal in interactive mode in the container mysql... 9
4.3. Give remote users all permissions on all tables... 9
4.4, Verify that Navicat connects to MySQL remotely. 10
Five, the export backup of the database... 11
5.2, database restoration....12
Six, MySQL commonly used simple commands 13
1. Summary
MySQL is a relational database management system developed by MySQL AB in Sweden and currently belongs to Oracle Corporation. MySQL is a relational database management system. A relational database keeps data in different tables instead of putting all the data in one big warehouse, which increases speed and improves flexibility.
- MySQL is open source and is currently a product of Oracle.
- MySQL supports large databases. Can handle large databases with tens of millions of records.
- MySQL uses the standard SQL data language form.
- MySQL can run on multiple systems and supports multiple languages. These programming languages include C, C++, Python, Java, Perl, PHP, Eiffel, Ruby, and Tcl, among others.
- MySQL has good support for PHP, and PHP is very suitable for web program development.
- MySQL supports large databases and data warehouses with 50 million records. The 32-bit system table file can support a maximum of 4GB, and the 64-bit system supports a maximum table file of 8TB.
- \MySQL can be customized, using the GPL agreement, you can modify the source code to develop your own MySQL system.
Second, environmental preparation
2.1, docker deployment
# Prerequisites for installing docker:
1). It must be a computer with 64-bit CPU architecture. Docker currently does not support 32-bit CPUs;
2) .Run Linux3.8 or higher version kernel, the kernel must not be less than 3.10 for CentOS;
3). The kernel must support a suitable storage driver, which can be one of Device Manager, AUFS, vfs, btrfs, and the default driver Device Mapper;
4). The kernel must support and enable the cgroup and namespace namespace functions.
# Use the following command to view the kernel version of centos
uname –r

2.1.1 yum deployment docker
#Note: This is the first installation, if you have installed it before, you must uninstall the old version of the package first!!!
Update the yum package to ensure the latest
yum update
# Uninstall the old version of docker, the new machine can be ignored
sudo yum remove docker \
docker-common \
docker-selinux \
docker-engine
# Install required dependencies
yum install -y yum-utils device-mapper-persistent-data lvm2
# Set yum docker source
//official image
yum-config-manager --add-repo https://download.docker.com/linux/centos/docker-ce.repo
//Ali image
yum-config-manager --add-repo http://mirrors.aliyun.com/docker-ce/linux/centos/docker-ce.repo
# Install DockerCE
sudo yum install docker-ce
2.1.2 Script installation
Script installation (mostly used in test and development environments)
$ curl -fsSL https://get.docker.com -o get-docker.sh
$ sudo sh get-docker.sh
2.2 Configure mirror accelerator
# Take Alibaba Cloud Mirror Accelerator as an example

Note: Each Alibaba Cloud account holds a different mirror accelerator
For users whose Docker client version is greater than 1.10.0
You can use the accelerator by modifying the daemon configuration file /etc/docker/daemon.json
sudo mkdir -p /etc/docker
sudo tee /etc/docker/daemon.json <<-'EOF'
{
"registry-mirrors": ["https://**20l7s9.mirror.aliyuncs.com"]
}
EOF
sudo systemctl daemon-reload
sudo systemctl restart docker
Three, use docker to deploy mysql
3.1. Create a data storage directory
Note: This is the database data storage directory to ensure that the next reinstallation data will not be lost
mkdir -p /data/mysql/data
chmod 777 /data/mysql/data
cd /data/mysql/data
3.2. Create a bridge network and specify an IP range
Note: Multi-container IP access is required
# create a custom network
docker network create --driver bridge --subnet 172.0.0.0/16 ****
#View existing networks
docker network ls
3.3. Docker installs MySQL
Port: 3306, initial password: 123456
Data storage directory: /dat/mysql/data
#Create mysql container
Here we take virtual machine deployment and installation as an example, omitting the specified network, IP
sudo docker run -d -p 3306:3306 \
--name mysql --privileged=true \
-v /data/mysql/data:/var/lib/mysql \
-e MYSQL_ROOT_PASSWORD=123456 \
mysql
Note: If the field --privileged=true is not added, a permission error may be reported, and the error message is shown in the following figure:


3.4, custom configuration
3.4.1. Create a configuration storage mapping directory
mkdir -p /data/mysql/data /data/mysql/logs /data/mysql/conf
chmod -R 755 /data/mysql/
3.4.2. Copy the configuration file in the MySQL container to this path
docker cp mysql:/etc/mysql/my.cnf /data/mysql/conf
3.4.3. Delete the MySQL container
docker rm -f mysql

3.4.4, recreate the MySQL container
#Recreate the MySQL container to map data, logs, and configuration files to the machine
docker run -p 3306:3306 --name mysql8 --restart always \
-v /data/mysql/conf/my.cnf:/etc/mysql/my.cnf \
-v /data/mysql/logs:/logs \
-v /data/mysql/data:/var/lib/mysql \
-v --privileged=true \
-e MYSQL_ROOT_PASSWORD=123456 -d mysql:8.0.31
3.4.5. Edit configuration file
vim /data/mysql/conf/my.cnf
# Maximum number of connections
max_connections=10000
# Set default timezone
default-time_zone='+8:00'
#Restart the MySQL container
docker restart mysql
Four, MySQL simple configuration
4.1. Open a terminal in interactive mode in the container mysql
Enter the docker container
docker exec -it mysql /bin/bash
4.2, mysql login
mysql -u root –p
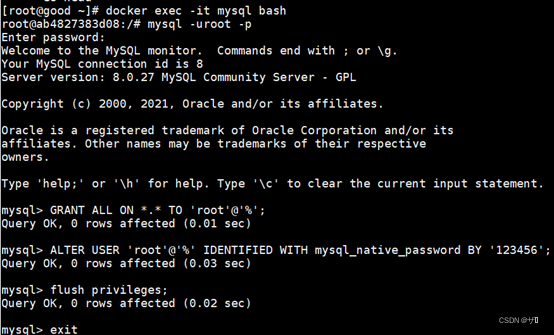
4.3. Give remote users all permissions on all tables
GRANT ALL ON *.* TO 'root'@'%';
# Change encryption rules
ALTER USER 'root'@'localhost' IDENTIFIED BY '123456' PASSWORD EXPIRE NEVER;
# remote access
ALTER USER 'root'@'%' IDENTIFIED WITH mysql_native_password BY '123456';
# Refresh permissions
flush privileges;
# quit
exit
4.4, Verify that Navicat connects to MySQL remotely


Five, the export backup of the database
5.1, database backup
# enter the container
docker exec -it 【Page ID】 /bin/bash
or
docker exec -it [container ID] bash
# Database export (operate after docker enters the container)
# commonly used
# Export the entire database (including the data in the database)
mysqldump -u username -p database>database.sql
# Export the database structure (without data)
mysqldump -u username -p -d database > database.sql
# Export a data table (containing data) in the database
mysqldump -u username -p database tables > table.sql
Export to the specified file path
View the container mapping volume, which is where the folder is mounted (the /var/lib/mysql path in the container will be mounted under a certain directory of linux, check it with the following command)
docker inspect name/id | grep Mounts -A 20

# Export to the specified path as
mysqldump -R -uroot -p database > /var/lib/mysql/database_bak.sql
# /var/lib/mysql/ is the path in the container. After executing the above command, check whether there is a database _bak.sql generated under the path
# Correspondingly, the database _bak.sql is also generated under the mount path of the Linux local system
# Exit the container after the backup is complete
5.2, database restoration
Import the database (operate after docker enters the container)
mysql -uroot -p
use 【database name】;
source 【sql file】# The storage path of the source database here is the path where MySQL is mounted locally in the Linux system
Example: source /data/MySQL/data/database.sql
# import data into database
mysql -uroot -D database name
# Import data into a table in the database
mysql -uroot -D database name table name
Six, MySQL commonly used simple commands
# delete the mysql command
docker rm mysql
# Forcibly delete the mysql container
docker rm -f mysql
# delete mysql mirror
docker rmi mysql
# View the docker image
docker images
# View running containers
docker ps
# see all containers
docker ps -a
# delete container
docker rm container ID or container name
# Export the entire database (including the data in the database)
mysqldump -u username -p database>database.sql
# Export the database structure (without data)
mysqldump -u username -p -d database > database.sql
# Export a data table (containing data) in the database
mysqldump -u username -p database tables > table.sql
# Export the table structure of a data table in the database (without data)
mysqldump -u username -p -d database table > table.sql
# Data recovery
mysql -uroot -p [database name] < [sql file]
# File copy in docker (file copy in docker container to local file)
docker cp [container ID]: [container directory] [target directory]
# Transfer the file into docker to specify the path
# Execute the following command to upload the file to the specified location of the image in the container
docker cp /local path/file name container ID or name:/upload path
# Transfer files from docker to physical machine
Similarly, if we need to transfer the files in docker to the physical machine, we only need to reverse the direction of the previous cp command
docker cp container ID:/upload path/path/filename