Article Directory
Linux editor - vim

The basic concept of vim
When we are doing development, vim mainly solves the problem of our writing code. It is essentially a multi-mode text editor.
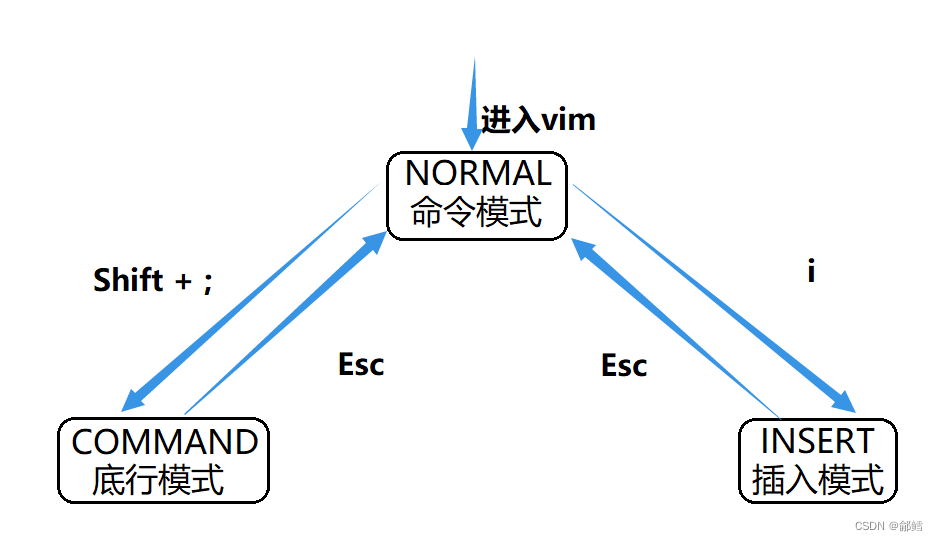
Here we mainly introduce the three most commonly used modes of vim: command mode, insert mode, and bottom line mode.
1. Command mode (Normal mode).
In the command mode, we can control the movement of the screen cursor, delete characters, words or lines, copy and paste, cut and paste and other operations.
2. Insert mode.
Text input is only possible in insert mode, which is the most frequently used editing mode.
3. Bottom row mode (Command mode).
In the bottom line mode, we can save or exit the file, and also perform operations such as searching for strings. In the bottom line mode, we can also directly enter vim help-modes to view all the current modes of vim.
Summary of commands in vim bottom line mode
Command: vim filename
[cxq@VM-4-10-centos lesson6]$ vim test.c
After entering vim, it defaults to the command mode (normal mode). To enter text, you need to switch to the insert mode for
cursor positioning operations.
hjkl : Bottom left, top right
Shift +$ : Position the cursor to the end of the current line.
Shift +^ : Position the cursor to the beginning of the current line.
gg : Position the cursor to the first line
Shift+g : Position the cursor to the last line.
n+Shift+g : Position the cursor to any line.
w , b : Cursor moves across lines according to word
【Delete】
x : Delete the character at the cursor position.
nx : Delete n characters after the cursor position.
X : Delete the previous character at the cursor position.
nX : Delete the first n characters at the cursor position.
dd: delete the line where the cursor is located.
ndd : Delete the next n lines from the line where the cursor is located.
[Copy and Paste]
yy: Copy the line where the cursor is located.
nyy: Copy the next n lines from the line where the cursor is to the buffer.
yw: Copy the characters from the cursor position to the end of the word to the buffer.
nyw: Copy n words after the cursor position to the buffer.
p: Paste the copied content on the next line of the cursor.
np: Paste the copied content n times on the next line of the cursor.
[Cut]
dd: Cut the line where the cursor is located.
ndd: Cut the n lines below the line where the cursor is located.
p: Paste the cut content on the next line of the cursor.
np: Paste the cut content n times on the next line of the cursor.
【Undo】
u: Undo.
Ctrl+r: Undo the previous undo.
【Case switching】
Shift+ ~ : complete the case switching of the character at the cursor position.
n~: Complete the uppercase and lowercase switching of n characters after the cursor position.
[Replacement]
r: Batch replace all characters after the cursor character.
R: Replace the character at the cursor position until the "Esc" key is pressed.
[Change]
cw: Delete the characters from the cursor position to the end of the word, and enter the insert mode.
cnw: Delete the n characters after the cursor position and enter the insert mode.
【Page Turn】
Ctrl+b: Turn up a page.
Ctrl+f: Turn down one page.
Ctrl+u: Turn half a page up.
Ctrl+d: Turn half a page down.
【Window Switching】
Ctrl +ww Window Cursor Switching
Operate on which window the cursor is in
Switching between modes under vim
Before using the bottom line mode, remember to press the Esc key to make sure you are in the command mode, and then press Shift + ;
to enter the bottom line mode.
Line number setting
set nu : display line number.
set nonu : cancel the line number.
Save and exit
w: save the file.
q: Exit vim. If you cannot leave vim, you can follow "q" with a "!" to indicate forced exit.
wq : Save and exit.
Split-screen command
vs file name: realize multi-file editing.
Ctrl+w+w: The cursor switches between multiple screens.
Execute command
! + command : Without exiting vim, you can add "!" in front of the command to execute Linux commands, such as viewing the directory, compiling the current code, etc.
vim configuration
What a user configures belongs to that user and will not affect other users!
Although each user uses the same vim program, everyone uses different vim configurations, because each user (including root and ordinary users) has a configuration file of its own in its own home directory .
If you don’t want to configure it yourself, you can also copy the following command and execute it directly under xshell, it will configure all vim configurations with one click
curl -sLf https://gitee.com/HGtz2222/VimForCpp/raw/master/install.sh -o ./install.sh && bash ./install.sh
Then follow the prompts to enter the root password:
wait for the installation
and finally execute source ~/.bashrc manually.
If you think this article is helpful to you, you might as well move your fingers to like, collect and forward, and give Xi Ling a big attention. Every support from you will be transformed into my motivation to move forward! ! !