Article Directory
foreword
In order to consolidate the knowledge learned, the author tried to start publishing some blogs of learning notes for future review. Of course, it would be great if it could help some newcomers learn new technologies. The author is a piece of food. If there are any mistakes in the records in the article, readers and friends are welcome to criticize and correct.
(The reference source code of the blog can be found in the resources on my homepage. If you have any questions during the learning process, please feel free to ask me in the comment area)
6. Staff management business development
1. Development function preview
- new employee
- Employee Information Paging Query
- Enable/disable employee accounts
- Edit employee information

2. New employee function
1) Demand analysis
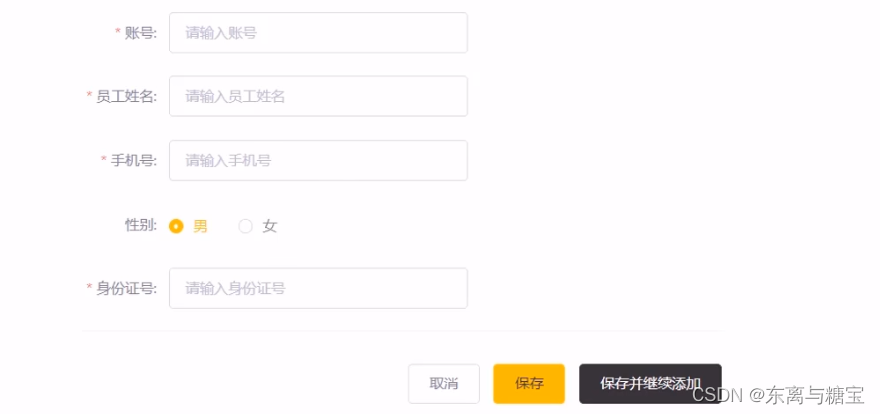
Employee information can be managed in the background system, and background system users can be added by adding new employees. Click the [Add Employee] button to jump to the new page, as follows:
2) Data model (table)
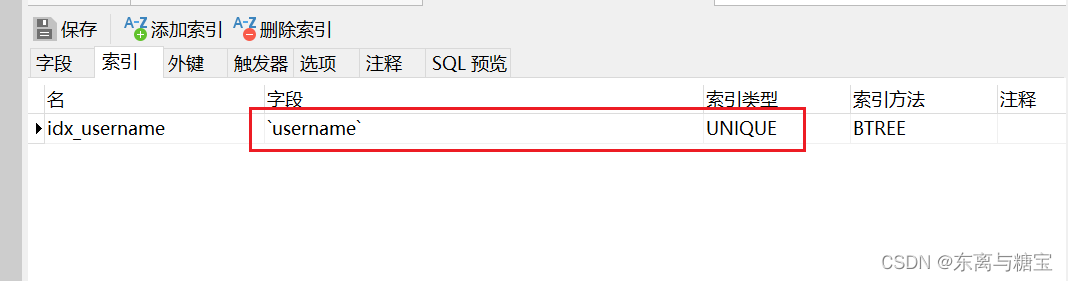
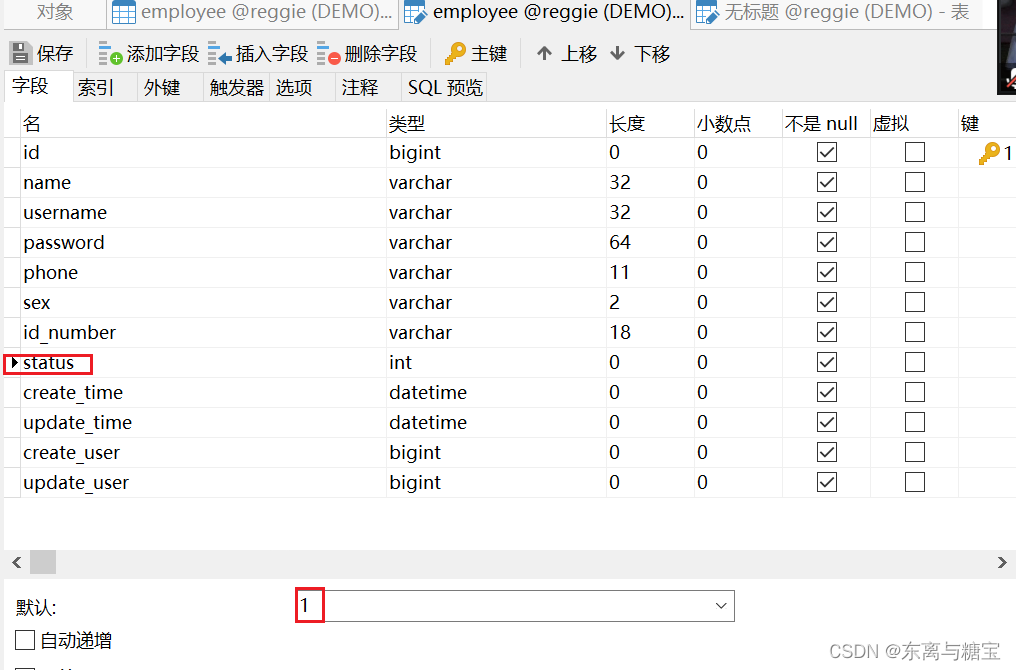
- Adding new employees is actually inserting the employee data entered on our new page into the employee table. It should be noted that a unique constraint is added to the username field in the employee table, because username is the employee's login account and must be unique
- The status field in the employee table has been set to a default value of 1, indicating that the status is normal.
3) Code development
1. Before developing the code, you need to sort out the execution process of the entire program:
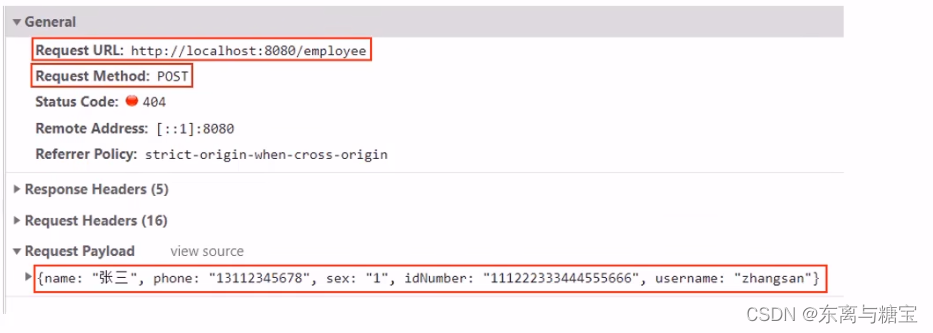
- The page sends an ajax request, and submits the data entered in the new employee page to the server in the form of json
- The server Controller receives the data submitted by the page and calls the Service to save the data
- Service calls Mapper to operate the database and save data
- Example mock request:
2. Front-end page related code analysis

3. Write business code
@Slf4j
@RestController
@RequestMapping("/employee")
public class EmployeeController {


    @Autowired
    private EmployeeService employeeService;

    /**
     * 员工登录
     * @param request
     * @param employee
     * @return
     */
    @PostMapping("/login")
    public R<Employee> login(HttpServletRequest request,@RequestBody Employee employee){


    //...

    /**
     * 新增员工
     * @param employee
     * @return
     */
    @PostMapping
    //通过前端相关页面代码分析发现,只需要判断一个Code,故结果返回一个参数的结果集即可
    public R<String> save(HttpServletRequest request,@RequestBody Employee employee){


        //保证前端页面能够请求到这个方法,并且提交的参数能够封装到实体里面
        log.info("新增员工,员工信息:{}",employee.toString());

        //设置初始密码123456,需要进行md5加密处理
employee.setPassword(DigestUtils.md5DigestAsHex("123456".getBytes()));

        employee.setCreateTime(LocalDateTime.now());
        employee.setUpdateTime(LocalDateTime.now());

        //获得当前登录用户的id
        Long empId = (Long) request.getSession().getAttribute("employee");

        employee.setCreateUser(empId);
        employee.setUpdateUser(empId);

        //mybatis-plus 提供的save方法
        employeeService.save(employee);

        return R.success("新增员工成功");
    }
}
4) Functional test
- Restart the startup class, log in by visiting the login page in the browser, and click Add Employee

- Click Save to view the data in the database table

- view console

5) Write a global exception handler
1. Problem Analysis
- There is still a problem in the previous program, that is, when we add an employee, the account number entered already exists. Since the unique constraint is added to this field in the employee table, the program will throw an exception:
java. sql.SQLIntegrityConstraintViolationException: Duplicate entry 'zhangsan' for key 'idx_username

- At this time, our program needs to catch exceptions, and there are usually two processing methods
- Add try and catch to the Controller method for exception capture
- Use exception handlers for global exception catching
2. Code development
在commond包下创建全局异常处理器类 GlobalExceptionHandler
/**
 * 全局异常处理
 */
 //拦截加了@RestController、@Controller注解的类
@ControllerAdvice(annotations = {

    RestController.class, Controller.class})
//将结果封装为json数据
@ResponseBody
@Slf4j
public class GlobalExceptionHandler {


    /**
     * 异常处理方法
     * @return
     */
     //SQLIntegrityConstraintViolationException.class:拦截异常的类型
    @ExceptionHandler(SQLIntegrityConstraintViolationException.class)
    public R<String> exceptionHandler(SQLIntegrityConstraintViolationException ex){


        log.error(ex.getMessage());

        //spl异常有很多,不一定是重复异常,所以需要重复异常报错信息的部分子字符串进行判断
        if(ex.getMessage().contains("Duplicate entry")){


            String[] split = ex.getMessage().split(" ");
            String msg = split[2] + "已存在";
            return R.error(msg);
        }

        return R.error("未知错误");
    }
}
3. Restart the startup class, log in and add a user with the same account name for testing

3. Employee information page query
1) Demand analysis
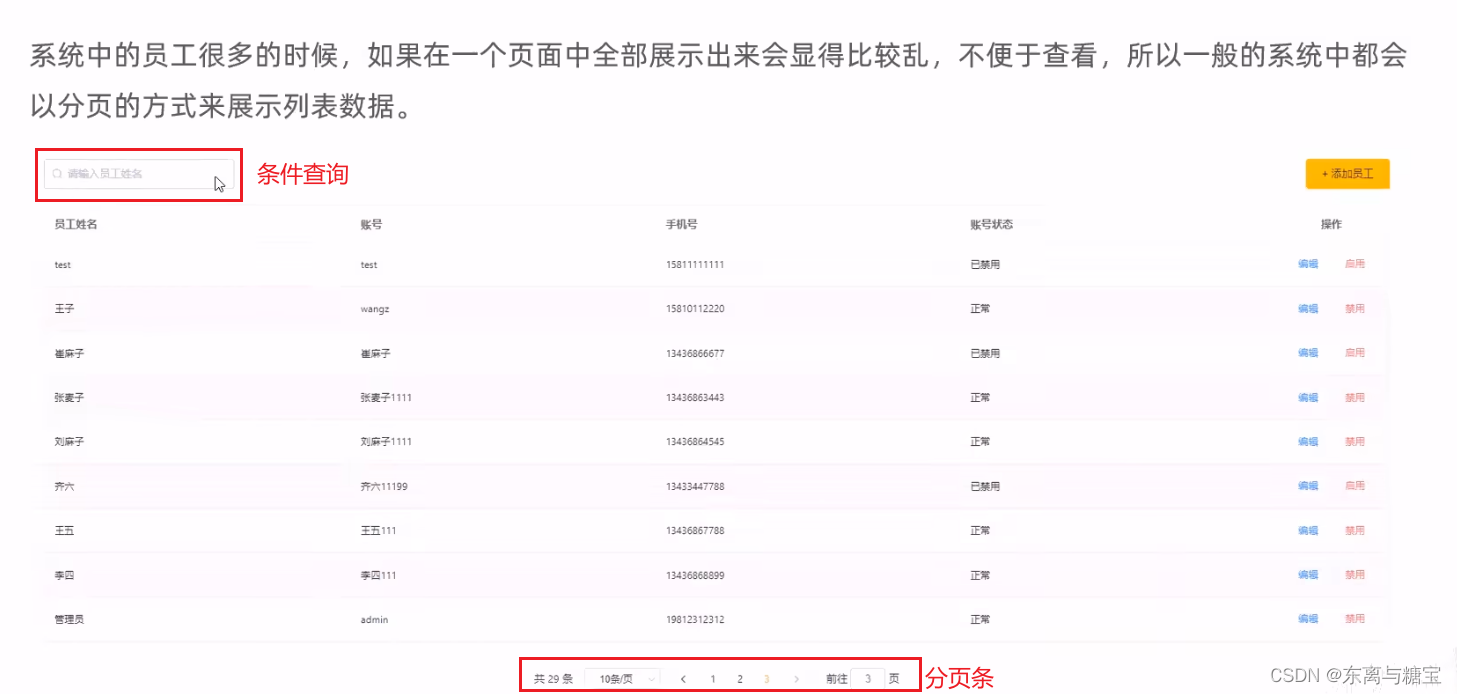
When there are a lot of employees in the system, it will be messy to display all of them on one page, which is not easy to view. Therefore, in general systems, the list data will be displayed in a page-by-page manner.
2) Code development
1. Before developing the code, you need to sort out the execution process of the entire program:
- The page sends an ajax request and submits the pagination query parameters (page, pageSize, name) to the server
- The server Controller receives the data submitted by the page and calls the Service to query the data
- Service calls Mapper to operate the database and query paged data
- Controller responds the queried paging data to the page
- The page receives paging data and displays it on the page through the Table component of ElementUl
2. Front-end related code analysis
- At this time, the page is loaded, F12 enters the console, and we find that the front end has sent a request to the back end
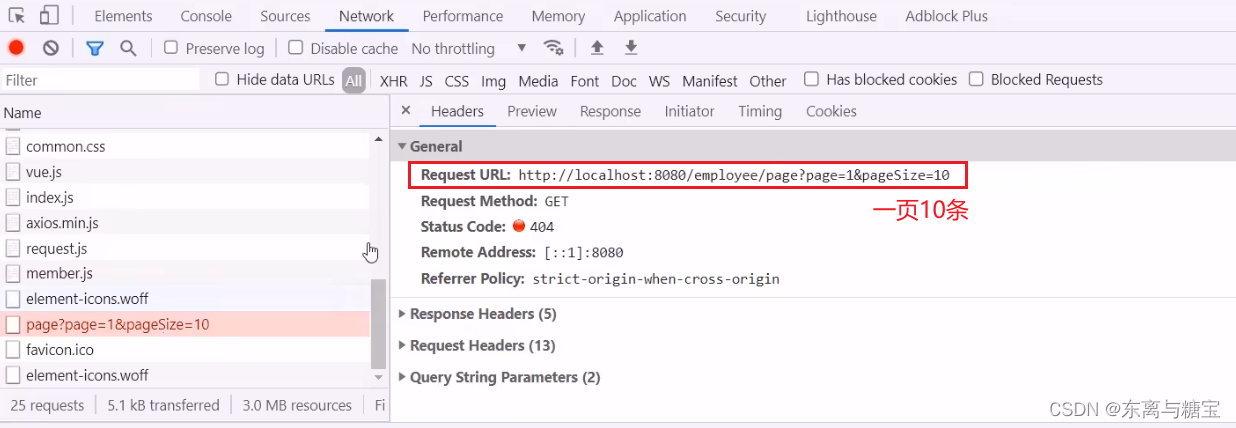
- Front-end related code analysis

- Use the paging plug-in provided by mybatis-plus to create a paging configuration class under the config package
/**
 * 配置MP的分页插件
 */
@Configuration
public class MybatisPlusConfig {


    @Bean
    public MybatisPlusInterceptor mybatisPlusInterceptor(){


        MybatisPlusInterceptor mybatisPlusInterceptor = new MybatisPlusInterceptor();
        mybatisPlusInterceptor.addInnerInterceptor(new PaginationInnerInterceptor());
        return mybatisPlusInterceptor;
    }
}
@Slf4j
@RestController
@RequestMapping("/employee")
public class EmployeeController {


    @Autowired
    private EmployeeService employeeService;

    //...
    /**
     * 员工信息分页查询
     * @param page
     * @param pageSize
     * @param name
     * @return
     */
    @GetMapping("/page")
    //根据页面请求数据需求确认泛型
    public R<Page> page(int page, int pageSize, String name){


        log.info("page = {},pageSize = {},name = {}" ,page,pageSize,name);

        //构造分页构造器
        Page pageInfo = new Page(page,pageSize);

        //构造条件构造器
        LambdaQueryWrapper<Employee> queryWrapper = new LambdaQueryWrapper();
        //添加过滤条件
        queryWrapper.like(StringUtils.isNotEmpty(name),Employee::getName,name);
        //添加排序条件
        queryWrapper.orderByDesc(Employee::getUpdateTime);

        //执行查询
        employeeService.page(pageInfo,queryWrapper);

        return R.success(pageInfo);
    }
}
3) Functional test
1. Restart the startup class, log in and access the background home page

2. Conditional query

3. View console and file structure code examples

4. Disable/Enable Employee
1) Demand analysis
-
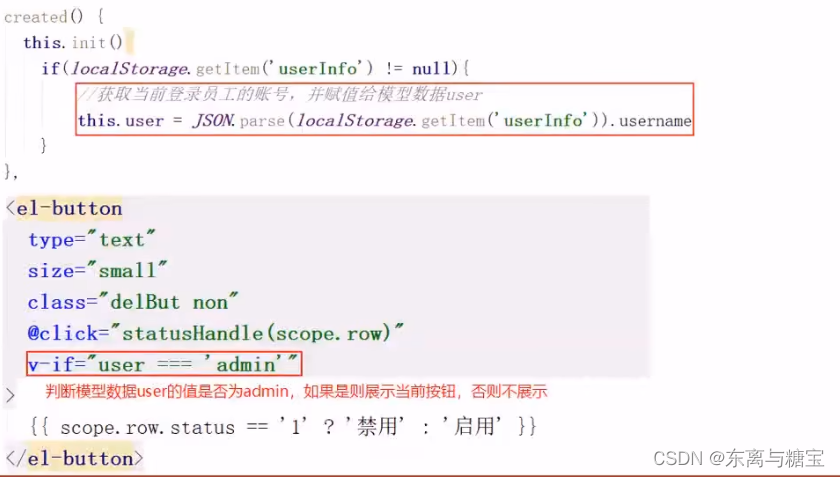
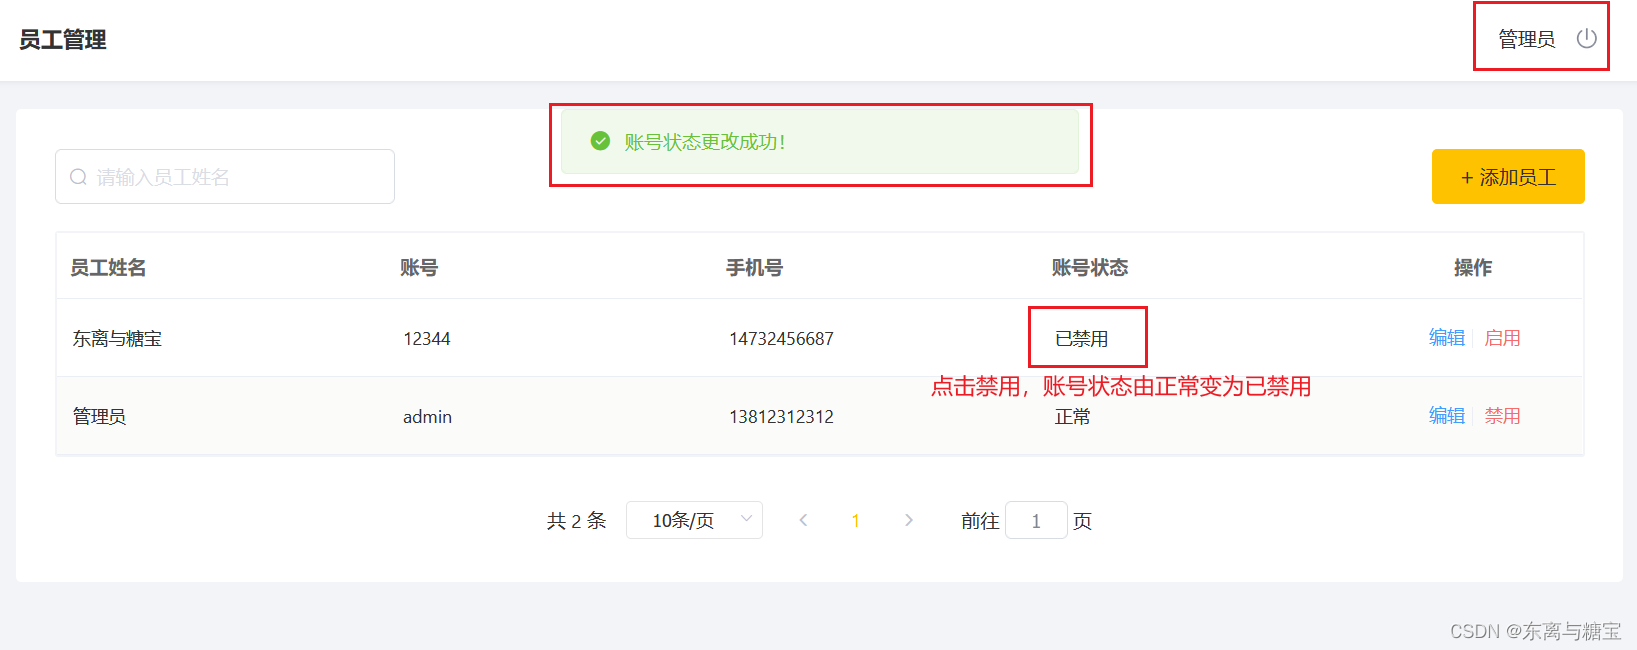
On the employee management list page, you can enable or disable an employee account. Employees whose accounts are disabled cannot log in to the system, and employees whose accounts are enabled can log in normally.
-
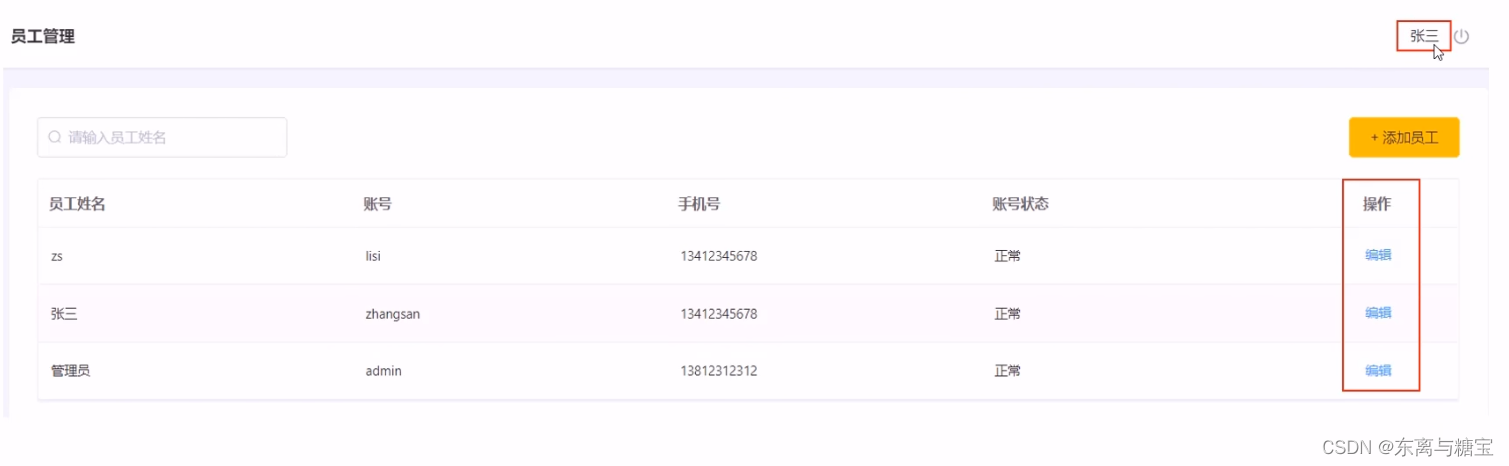
It should be noted that only the administrator (admin user) can enable and disable other ordinary users, so the enable and disable buttons are not displayed after ordinary users log in to the system.
-
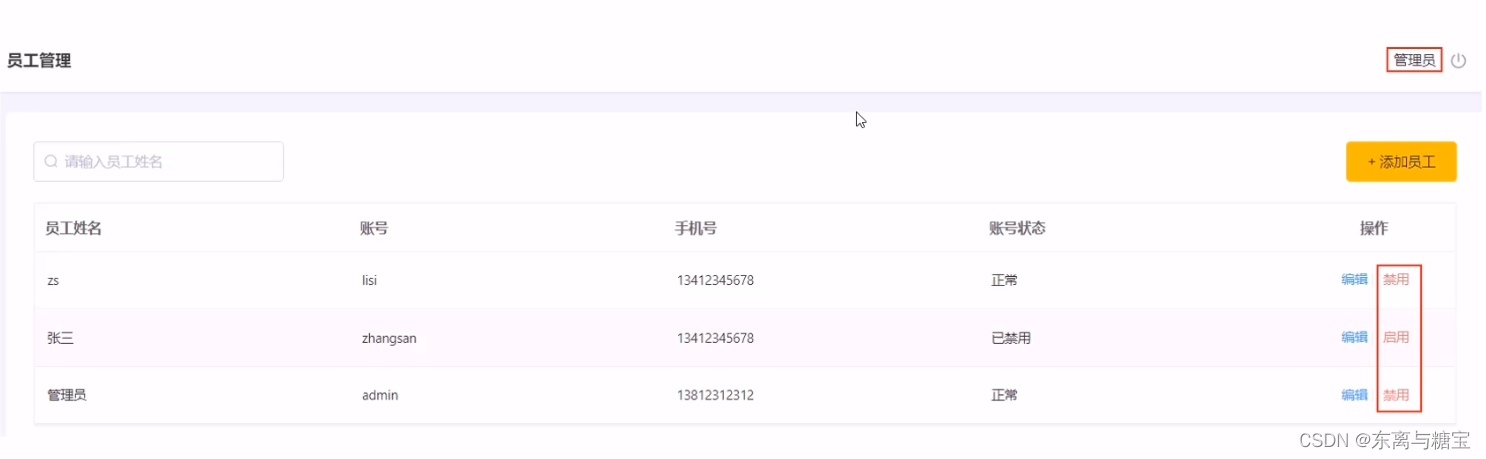
The administrator admin logs in to the system to enable and disable all employee accounts. If the status of an employee account is normal, the button is displayed as "Disabled", and if the status of the employee account is disabled, the button is displayed as "Enabled"
2) Code development
1. Front-end related code analysis
- How to make it so that only the administrator admin can see the enable and disable buttons on the page?

- How is the ajax request sent on the page?
2. Program execution process
- The page sends an ajax request and submits the parameters (id, status) to the server
- The server Controller receives the data submitted by the page and calls the Service to update the data
- Service calls Mapper to operate the database
3. Enabling and disabling employee accounts is essentially an update operation, that is, to operate the status field. Create an update method in the Controller. This method is a general method for modifying employee information.
@Slf4j
@RestController
@RequestMapping("/employee")
public class EmployeeController {


    @Autowired
    private EmployeeService employeeService;
    //...
    /**
     * 根据id修改员工信息
     * @param employee
     * @return
     */
    @PutMapping
    public R<String> update(HttpServletRequest request,@RequestBody Employee employee){


        log.info(employee.toString());

        //获取用户,id是long型
        Long empId = (Long)request.getSession().getAttribute("employee");
        employee.setUpdateTime(LocalDateTime.now());
        employee.setUpdateUser(empId);
        //更新
        employeeService.updateById(employee);

        return R.success("员工信息修改成功");
    }
}
3) Functional test
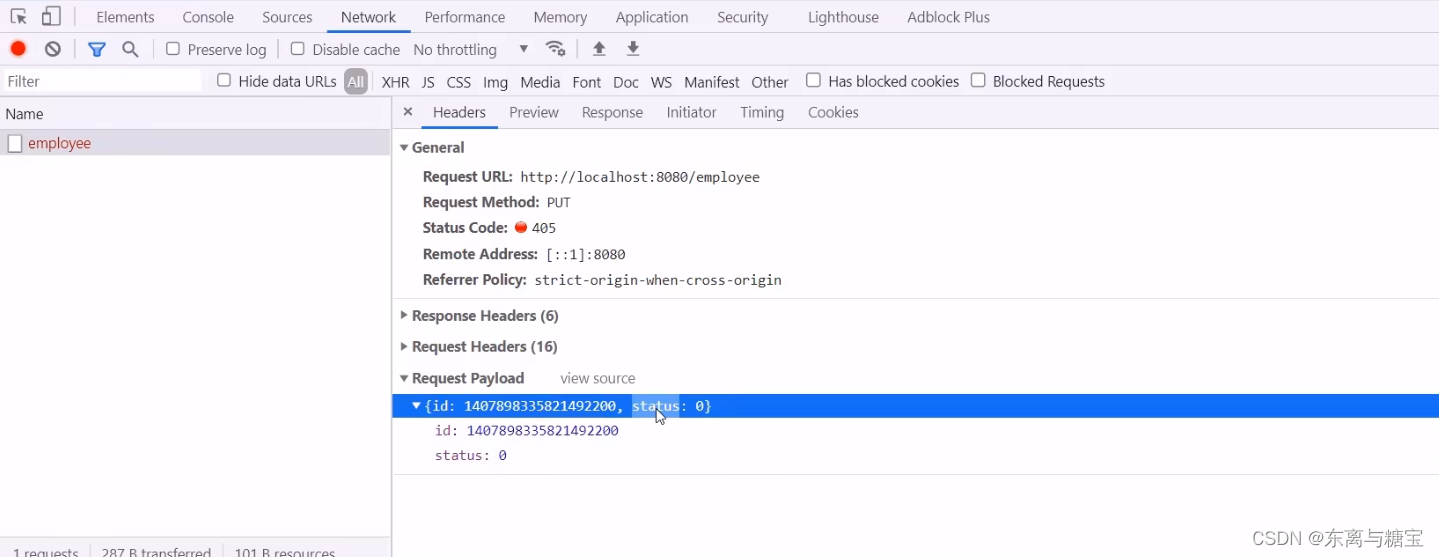
1. Run the startup class, visit the background homepage, click Disable and find that it does not take effect
- There is no error reported during the test, but the function has not been implemented, and the data in the database has not changed. Observe the SOL output by the console

- The result of SOL execution is that the number of updated data rows is 0. Carefully observe the value of id, which is different from the id value of the corresponding record in the database.

2. Reason
- By observing the SOL output by the console, it is found that the value of the employee id passed by the page is inconsistent with the id value in the database. What is going on? The id value in the data that the server responds to the page during pagination query is 19 digits. type is long

- The js processing of long numbers on the page can only be accurate to the first 16 digits, so when the id is finally submitted to the server through an ajax request, it becomes 1391586184024604700
3. Solutions
- We have found the cause of the problem before, that is, js loses precision when processing long data, resulting in inconsistency between the submitted id and the id in the database
- We can process the json data when the server responds to the page, and convert the long data into a String string uniformly. The effect is as follows

4) Code improvement
1. Specific implementation steps:
- Provide object converter Jackson0objectMapper, based on ]ackson to convert Java object to json data
- Extend the message converter of Spring mvc in the WebMvcConfig configuration class, and use the provided object converter in this message converter to convert Java objects to json data
2. Create and write object converter class JacksonObjectMapper under the common package
/**
 * 对象映射器:基于jackson将Java对象转为json,或者将json转为Java对象
 * 将JSON解析为Java对象的过程称为 [从JSON反序列化Java对象]
 * 从Java对象生成JSON的过程称为 [序列化Java对象到JSON]
 */
public class JacksonObjectMapper extends ObjectMapper {


    public static final String DEFAULT_DATE_FORMAT = "yyyy-MM-dd";
    public static final String DEFAULT_DATE_TIME_FORMAT = "yyyy-MM-dd HH:mm:ss";
    public static final String DEFAULT_TIME_FORMAT = "HH:mm:ss";

    public JacksonObjectMapper() {


        super();
        //收到未知属性时不报异常
        this.configure(FAIL_ON_UNKNOWN_PROPERTIES, false);

        //反序列化时,属性不存在的兼容处理
        this.getDeserializationConfig().withoutFeatures(DeserializationFeature.FAIL_ON_UNKNOWN_PROPERTIES);


        SimpleModule simpleModule = new SimpleModule()
                .addDeserializer(LocalDateTime.class, new LocalDateTimeDeserializer(DateTimeFormatter.ofPattern(DEFAULT_DATE_TIME_FORMAT)))
                .addDeserializer(LocalDate.class, new LocalDateDeserializer(DateTimeFormatter.ofPattern(DEFAULT_DATE_FORMAT)))
                .addDeserializer(LocalTime.class, new LocalTimeDeserializer(DateTimeFormatter.ofPattern(DEFAULT_TIME_FORMAT)))

                .addSerializer(BigInteger.class, ToStringSerializer.instance)
                //Long型的序列化器,转换成字符串
                .addSerializer(Long.class, ToStringSerializer.instance)
                .addSerializer(LocalDateTime.class, new LocalDateTimeSerializer(DateTimeFormatter.ofPattern(DEFAULT_DATE_TIME_FORMAT)))
                .addSerializer(LocalDate.class, new LocalDateSerializer(DateTimeFormatter.ofPattern(DEFAULT_DATE_FORMAT)))
                .addSerializer(LocalTime.class, new LocalTimeSerializer(DateTimeFormatter.ofPattern(DEFAULT_TIME_FORMAT)));

        //注册功能模块 例如,可以添加自定义序列化器和反序列化器
        this.registerModule(simpleModule);
    }
}
3. Extend the message converter of Spring mvc in WebmvcConfig
@Slf4j
@Configuration
public class WebMvcConfig extends WebMvcConfigurationSupport {


    //...
    /**
     * 扩展mvc框架的消息转换器
     * @param converters
     */
    @Override
    protected void extendMessageConverters(List<HttpMessageConverter<?>> converters) {


        log.info("扩展消息转换器...");
        //创建消息转换器对象
        MappingJackson2HttpMessageConverter messageConverter = new MappingJackson2HttpMessageConverter();
        //设置对象转换器,底层使用Jackson将Java对象转为json
        messageConverter.setObjectMapper(new JacksonObjectMapper());
        //将上面的消息转换器对象追加到mvc框架的转换器集合中
        converters.add(0,messageConverter);
    }
}
4. Program running test

5. Edit employee information
1) Demand analysis
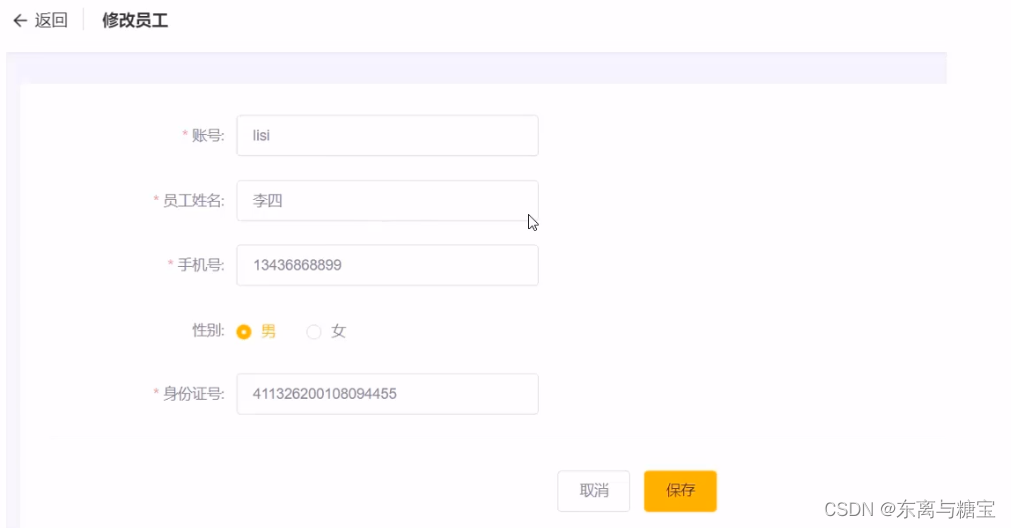
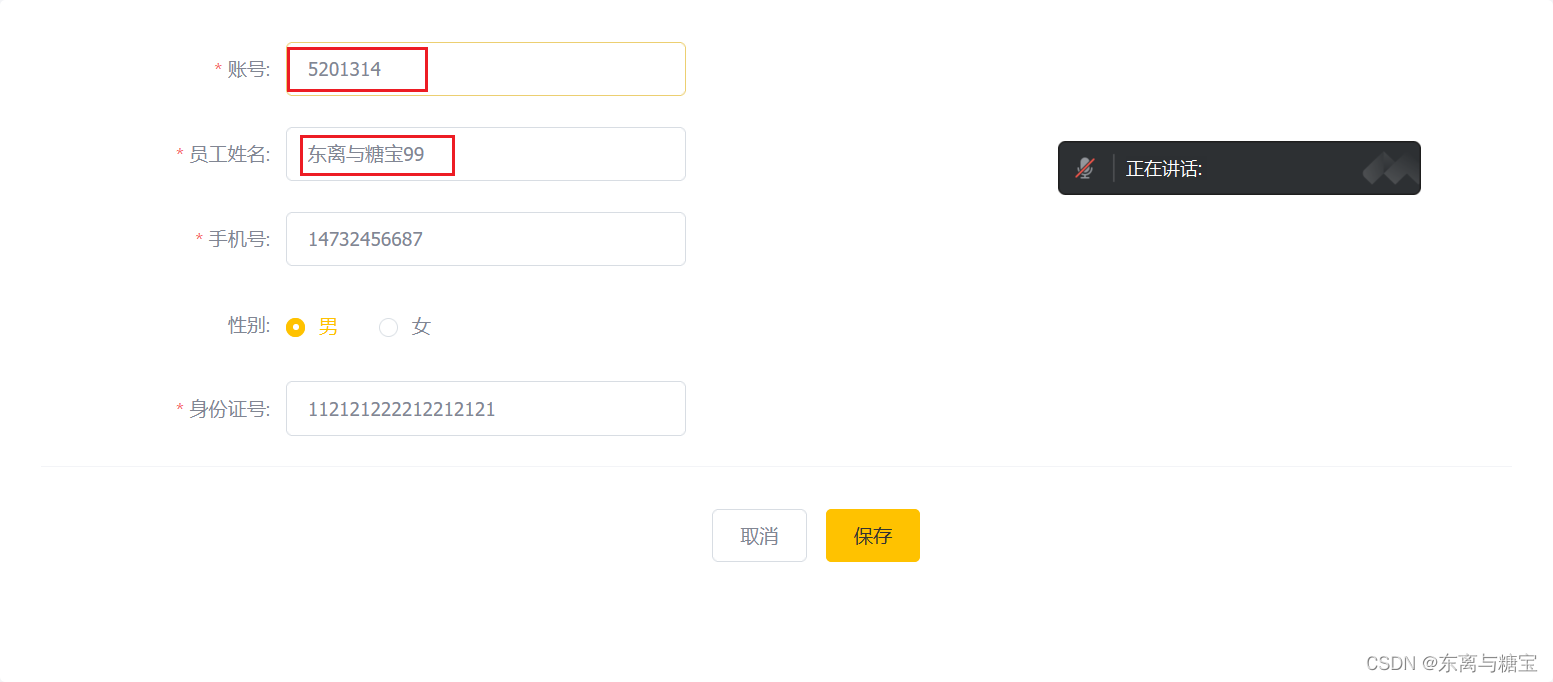
Click the edit button on the employee management list page to jump to the edit page, echo the employee information on the edit page and modify it, and finally click the save button to complete the edit operation
2) Code development
1. Front-end related code analysis
2. Program execution flow
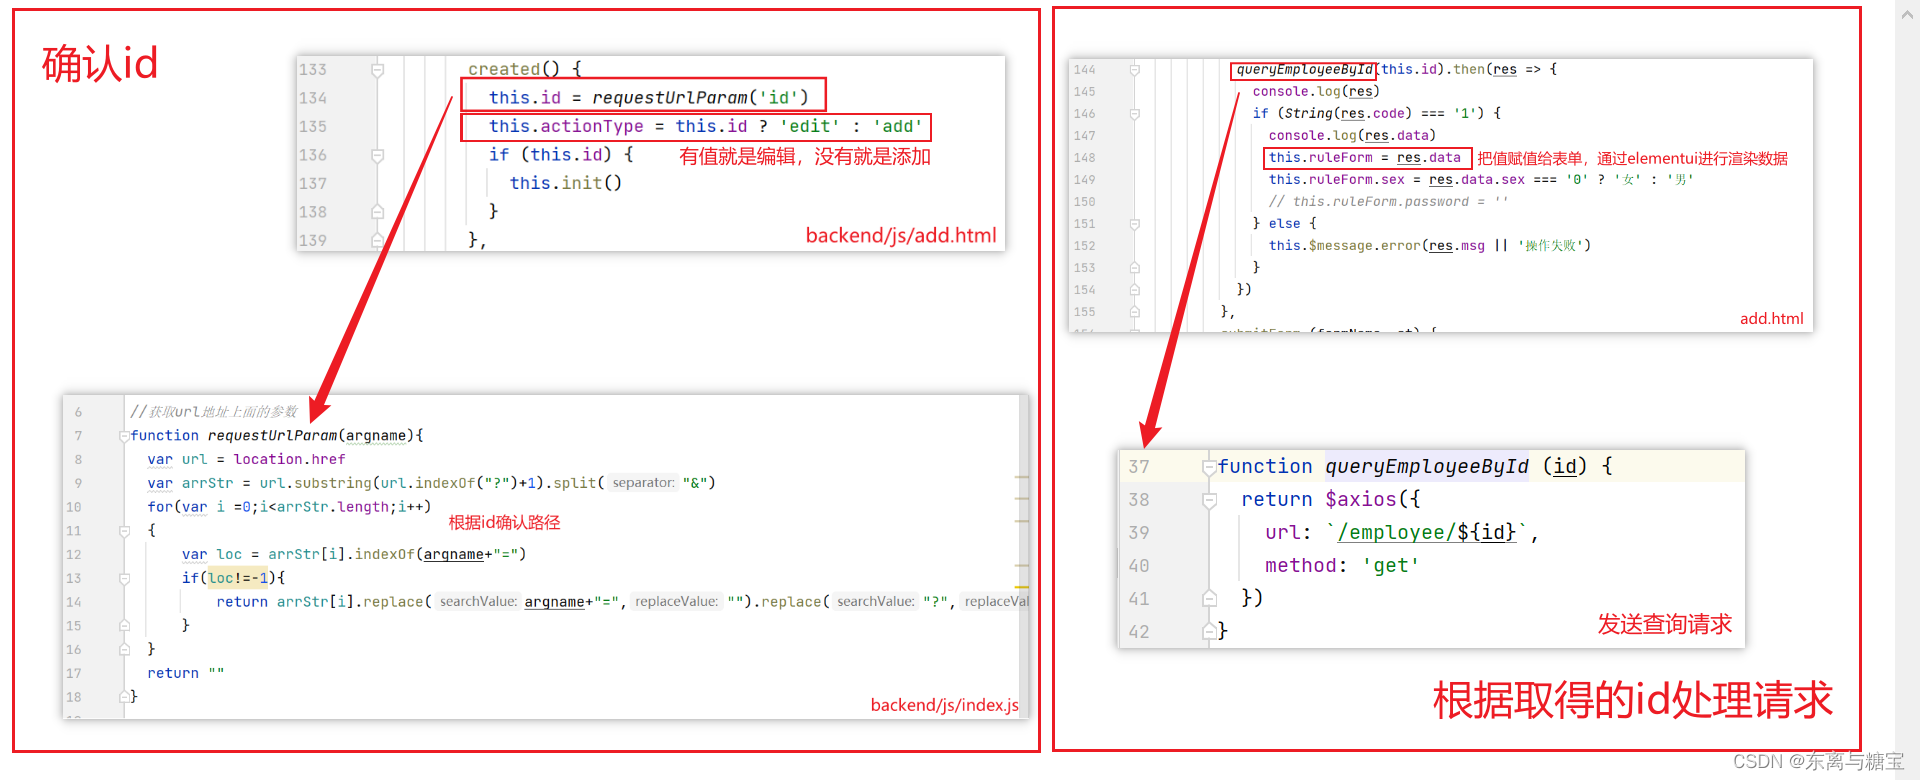
- When the edit button is clicked, the page jumps to add.html and carries the parameter [employee id] in the url
- Get the parameter [employee id] in the url in add.htm[page
- Send an ajax request, request the server, and submit the employee id parameter at the same time
- The server receives the request, queries the employee information according to the employee ID, and responds the employee information to the page in the form of json
- The page receives the json data responded by the server, and echoes the employee information through VUE's data binding
- Click the save button, send an ajax request, and submit the employee information on the page to the server in json format
- The server receives employee information, processes it, and responds to the page after completion
- After receiving the response information from the server, the page performs corresponding processing
注意: add.html页面为公共页面,新增员工和编辑员工都是在此页面操作
3. Write the corresponding controller method
@Slf4j
@RestController
@RequestMapping("/employee")
public class EmployeeController {


    @Autowired
    private EmployeeService employeeService;

    //...
    /**
     * 根据id查询员工信息
     * @param id
     * @return
     */
    @GetMapping("/{id}")
    //路径参数
    public R<Employee> getById(@PathVariable Long id){


        log.info("根据id查询员工信息...");
        Employee employee = employeeService.getById(id);
        if(employee != null){


            //转成json格式
            return R.success(employee);
        }
        return R.error("没有查询到对应员工信息");
    }
}
3) Functional test
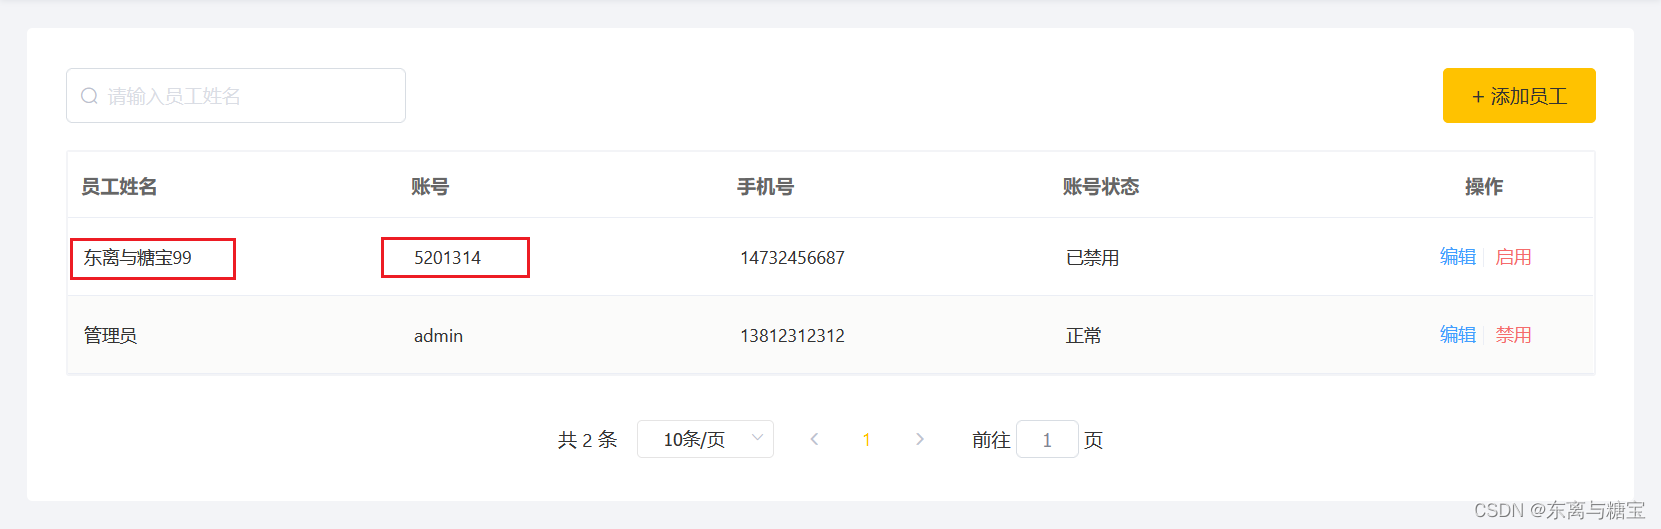
- Restart the startup class, log in to access the background homepage, click Edit to view employee information
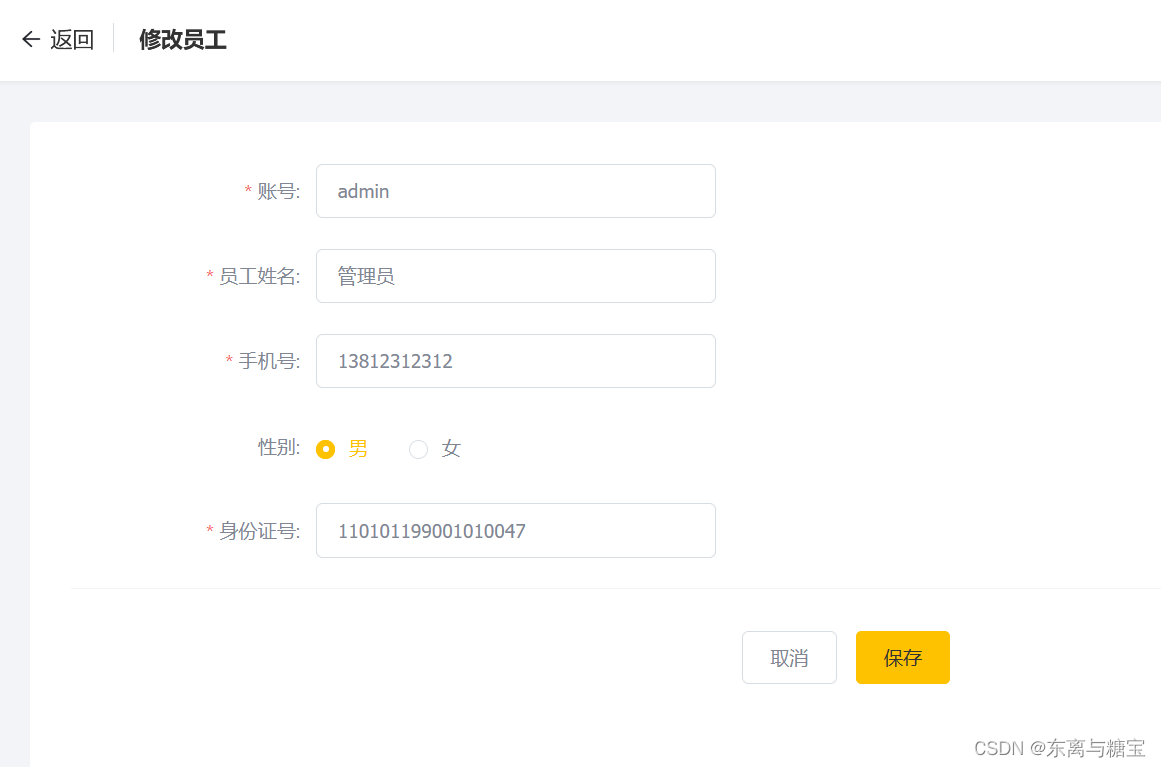
- Modify the information and click Save (the update method to modify the employee status is still called)
Summarize
Everyone is welcome to leave a message for exchange and criticism. If the article is helpful to you or you think the author's writing is not bad, you can click to follow, like, and bookmark to support.
(The reference source code of the blog can be found in the resources on my homepage. If you have any questions during the learning process, please feel free to ask me in the comment area)