Table of contents
- 一、Docker-Compose
-
- 1. Docker-Compose usage scenarios
- 2. Introduction to Docker-Compose
- 3. Docker-Compose installation and deployment
- 4. YAML file format and writing precautions
- 5. Docker Compose configures common fields
- 6. Common commands of Docker Compose
- 7. Docker Compose file structure
- 8. Docker Compose composes nginx image
- 9. Docker Compose writes tomcat image
一、Docker-Compose
1. Docker-Compose usage scenarios
We know that a separate application container can be defined using a Dockerfile template file, and if multiple containers need to be defined, service orchestration is required. There are many technical solutions for service orchestration. Today I will introduce Docker Compose, the official product of Docker.
docker swarm (manage cross-nodes)
Dockerfile allows users to manage a single application container; while Compose allows users to define a set of associated application containers (called a project) in a template (YAML format), such as a Web service container plus On the back-end database service container, etc.
2. Introduction to Docker-Compose
The Docker-Compose project is an official open source project of Docker, which is responsible for the rapid orchestration of Docker container clusters.
Docker-Compose divides the managed containers into three layers, namely project (project), service (service) and container (container). All the files in the Docker-Compose running directory (docker-compose.yml, extends file or environment variable file, etc.) form a project. If there is no special designation, the project name is the current directory name. A project can contain multiple services, and each service defines the image, parameters, and dependencies of the container running. A service can include multiple container instances. Docker-Compose does not solve the problem of load balancing, so other tools are needed to realize service discovery and load balancing, such as Consul.
The default project configuration file of Docker-Compose is docker-compose.yml. The configuration file can be customized through the environment variable COMPOSE_FILE or the -f parameter, which defines multiple dependent services and the containers that each service runs.
Using a Dockerfile template file allows users to easily define a separate application container. In work, we often encounter situations that require multiple containers to cooperate with each other to complete a certain task. For example, to implement a web project, in addition to the web service container itself, it is often necessary to add a back-end database service container, and even a load balancing container.
Compose allows users to define a set of associated application containers as a project through a single docker-compose.yml template file (YAML format).
The Docker-Compose project is written in Python and calls the API provided by the Docker service to manage the container. Therefore, as long as the operating platform supports the Docker API, Compose can be used for orchestration management on it.
3. Docker-Compose installation and deployment
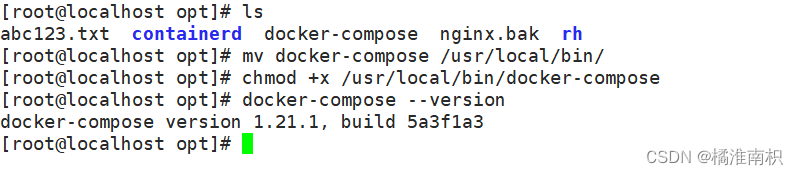
Docker Compose environment installation
Docker Compose 是 Docker 的独立产品,因此需要安装 Docker 之后在单独安装 Docker Compose
#下载
curl -L https://github.com/docker/compose/releases/download/1.21.1/docker-compose-`uname -s`-`uname -m` -o /usr/local/bin/docker-compose
#安装
chmod +x /usr/local/bin/docker-compose
#查看版本
docker-compose --version
4. YAML file format and writing precautions
YAML is a markup language, which can display data serialization format very intuitively, with high readability. Similar to the json data description language, the syntax is much simpler than json. YAML data structures are represented by indentation, consecutive items are represented by minus signs, key-value pairs are separated by colons, arrays are enclosed by brackets [], and hashes are enclosed by curly braces {}.
When using YAML, you need to pay attention to the following:
●Case-sensitive
●Indentation is used to indicate hierarchical relationships
●Tab key indentation is not supported, only spaces can be used for indentation
●The number of spaces for indentation is not important, as long as the same level is left-aligned , usually indented with 2 spaces at the beginning
. Comment with # sign
. Indent with 1 space after symbolic characters, such as colon: , comma, , dash-.
If special characters are included, they will be treated as normal String processing, double quotes (""): special characters as the meaning you want to express
5. Docker Compose configures common fields
Field description
build specifies the Dockerfile file name.
To specify a Dockerfile, use the dockerfile tag in the child tag of the build tag to specify the
dockerfile build image context path.
context can be the path of the dockerfile, or the url address pointing to the git
warehouse
. command, override the command executed by default after the container is started
container_name specifies the container name, because the container name is unique, if you specify a custom name, you cannot scale the specified number of containers
deploy specifies deployment and running service-related configurations, and can only be used in Swarm mode
environment Add the environment variable
networks to join the network, refer to the entry network_mode under the top-level networks
to set the network mode of the container, such as host, bridge, ...
ports expose the container port, the same as -p, but the port cannot be lower than 60
volumes mount a host directory or command volumes to container, named volumes define volume name at top-level volumes
volumes_from mount volume from another service or container, optional arguments :ro and :rw, only version '2' supports
hostname container hostname
sysctls set kernel parameter inside container
links connect to another container, - service name [: service alias]
privileged is used to give the container root permission, note that it is not safe, true | false
restart Set the restart strategy, no, always, no-failure, unless-stopped
no, the default strategy, does not restart the container when the container exits.
on-failure, when the container exits abnormally (exit status is not 0), the container will be restarted.
on-failure: 3, restart the container when the container exits abnormally, up to 3 times.
always, always restart the container when the container exits.
unless-stopped, always restart containers when they exit, but disregard containers that were stopped when the Docker daemon started.
depends_on When using Compose, the biggest advantage is to type fewer startup commands, but the order in which the general project containers are started is required. If you start the container directly from top to bottom, it may fail to start due to container dependencies. For example, if you start the application container without starting the database container, the application container will exit because the database cannot be found. The depends_on tag is used to solve the problem of container dependency and startup sequence.
php:
depends_on:
- apache
- mysql
6. Common commands of Docker Compose
Field description
build Rebuild the service
ps List containers
up Create and start containers
exec Execute the command scale in the container
Specify the number of service containers to start
top Display container process
logs View container output
down Delete containers, networks, data volumes and mirrors
stop/start/ restart stop/start/restart service
7. Docker Compose file structure
yum install -y tree
tree /opt/compose_nginx
/opt/compose_nginx/
├── docker-compose.yml #Create template script
├── nginx
│?? ├── Dockerfile #Create container script
│?? ├── nginx- 1.12.0.tar.gz #Copy source package
│?? └── run.sh #Start service script
└── wwwroot
└── index.html #Site page
8. Docker Compose composes nginx image
(1) Prepare dependent files
mkdir -p /opt/compose_nginx/nginx /opt/compose_nginx/wwwroot
cd /opt/compose_nginx/nginx
cp nginx-1.12.0.tar.gz ./
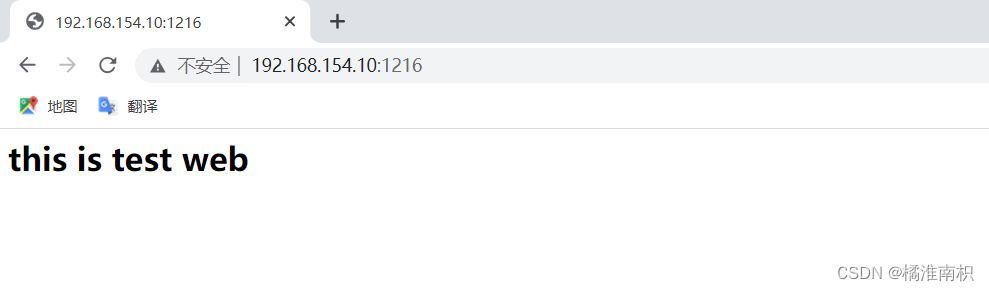
echo "<h1>this is test web</h1>" > /opt/compose_nginx/wwwroot/index.html
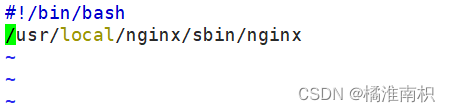
vim run.sh
#!/bin/bash
/usr/local/nginx/sbin/nginx
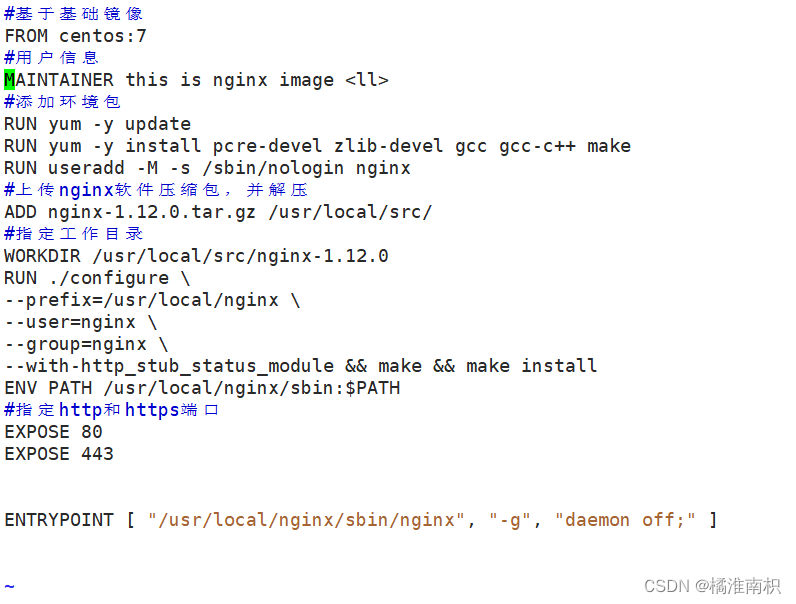
vim Dockerfile
#基于基础镜像
FROM centos:7
#用户信息
MAINTAINER this is nginx image <ll>
#添加环境包
RUN yum -y update
RUN yum -y install pcre-devel zlib-devel gcc gcc-c++ make
RUN useradd -M -s /sbin/nologin nginx
#上传nginx软件压缩包,并解压
ADD nginx-1.12.0.tar.gz /usr/local/src/
#指定工作目录
WORKDIR /usr/local/src/nginx-1.12.0
RUN ./configure \
--prefix=/usr/local/nginx \
--user=nginx \
--group=nginx \
--with-http_stub_status_module && make && make install
ENV PATH /usr/local/nginx/sbin:$PATH
#指定http和https端口
EXPOSE 80
EXPOSE 443
#方法一:
RUN echo "daemon off;" >> /usr/local/nginx/conf/nginx.conf #关闭 nginx 在后台运行
#添加宿主机中run.sh到容器中
ADD run.sh /run.sh
RUN chmod 755 /run.sh
CMD ["/run.sh"]
#方法二:
ENTRYPOINT [ "/usr/local/nginx/sbin/nginx", "-g", "daemon off;" ]

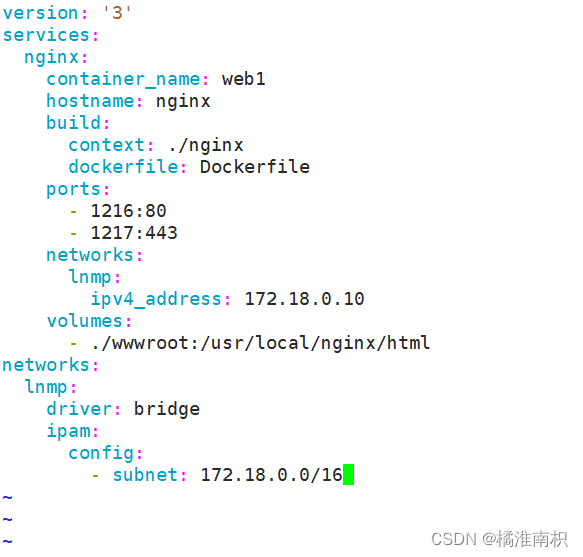
(2) Write the configuration file docker-compose.yml
vim /opt/compose_nginx/docker-compose.yml
version: '3'
services:
  nginx:
    container_name: web1
    hostname: nginx
    build:
      context: ./nginx
      dockerfile: Dockerfile
    ports:
      - 1216:80
      - 1217:443
    networks:
      lnmp:
        ipv4_address: 172.18.0.10
    volumes:
      - ./wwwroot:/usr/local/nginx/html
networks:
  lnmp:
    driver: bridge
    ipam:
      config:
        - subnet: 172.18.0.0/16

cd /opt/compose_nginx/
docker-compose -f docker-compose.yml up -d
-f, --file FILE : use a specific compose template file, the default is docker-compose.yml
-p, --project-name NAME : specify the project name, use the directory name by default
-d : run in the background

9. Docker Compose writes tomcat image
首先创建一个tomcat的docker_compose文件夹
mkdir -p /opt/compose_tomcat/tomcat
将tomcat编译安装的jdk包和tomcat包放入tomcat文件夹中
进入tomcat文件夹编写Dockerfile文件
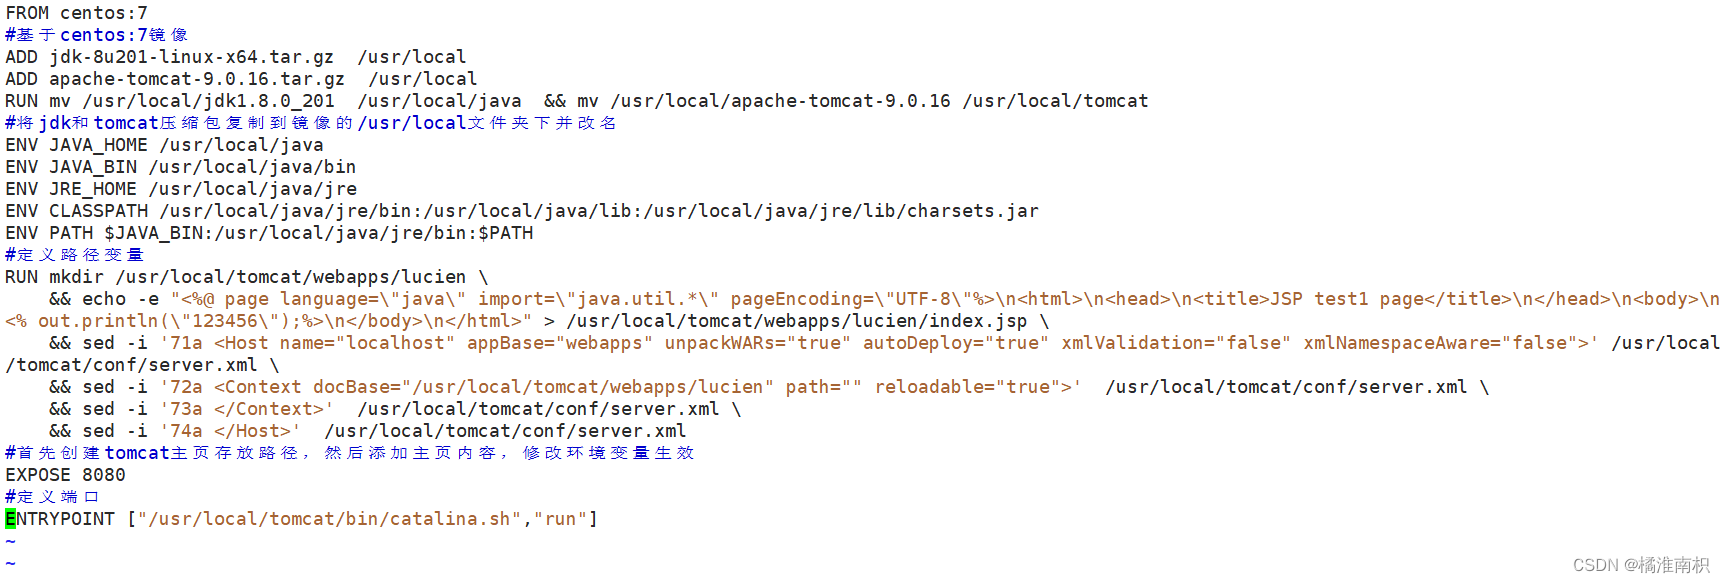
cd /opt/compose_tomcat/tomcat
vim Dockerfile
#文件内容如下
FROM centos:7
#基于centos:7镜像
ADD jdk-8u201-linux-x64.tar.gz /usr/local
ADD apache-tomcat-9.0.16.tar.gz /usr/local
RUN mv /usr/local/jdk1.8.0_201 /usr/local/java && mv /usr/local/apache-tomcat-9.0.16 /usr/local/tomcat
#将jdk和tomcat压缩包复制到镜像的/usr/local文件夹下并改名
ENV JAVA_HOME /usr/local/java
ENV JAVA_BIN /usr/local/java/bin
ENV JRE_HOME /usr/local/java/jre
ENV CLASSPATH /usr/local/java/jre/bin:/usr/local/java/lib:/usr/local/java/jre/lib/charsets.jar
ENV PATH $JAVA_BIN:/usr/local/java/jre/bin:$PATH
#定义路径变量
RUN mkdir /usr/local/tomcat/webapps/lucien \
&& echo -e "<%@ page language=\"java\" import=\"java.util.*\" pageEncoding=\"UTF-8\"%>\n<html>\n<head>\n<title>JSP test1 page</title>\n</head>\n<body>\n<% out.println(\"123456\");%>\n</body>\n</html>" > /usr/local/tomcat/webapps/lucien/index.jsp \
&& sed -i '71a <Host name="localhost" appBase="webapps" unpackWARs="true" autoDeploy="true" xmlValidation="false" xmlNamespaceAware="false">' /usr/local/tomcat/conf/server.xml \
&& sed -i '72a <Context docBase="/usr/local/tomcat/webapps/lucien" path="" reloadable="true">' /usr/local/tomcat/conf/server.xml \
&& sed -i '73a </Context>' /usr/local/tomcat/conf/server.xml \
&& sed -i '74a </Host>' /usr/local/tomcat/conf/server.xml
#首先创建tomcat主页存放路径,然后添加主页内容,修改环境变量生效
EXPOSE 8080
#定义端口
ENTRYPOINT ["/usr/local/tomcat/bin/catalina.sh","run"]
#启动tomcat
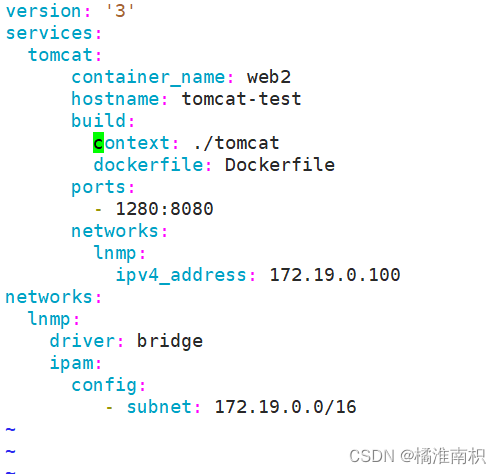
到compose_tomcat路径下创建tomcat的yml文件
cd /opt/compose_tomcat
vim docker-compose.yml
#内容如下:
version: '3'
#docker-compose版本
services:
#定义servers
tomcat:
#容器名tomcat
container_name: web2
hostname: tomcat-test
#主机名tomcat-test
build:
context: ./tomcat
dockerfile: Dockerfile
#镜像构建dockerfile文件夹位置及名称
ports:
- 1280:8080
#端口映射
networks:
lnmp:
ipv4_address: 172.19.0.100
#tomcatip定义
networks:
lnmp:
driver: bridge
ipam:
config:
- subnet: 172.19.0.0/16
#自定义网络模式和网段,保存退出
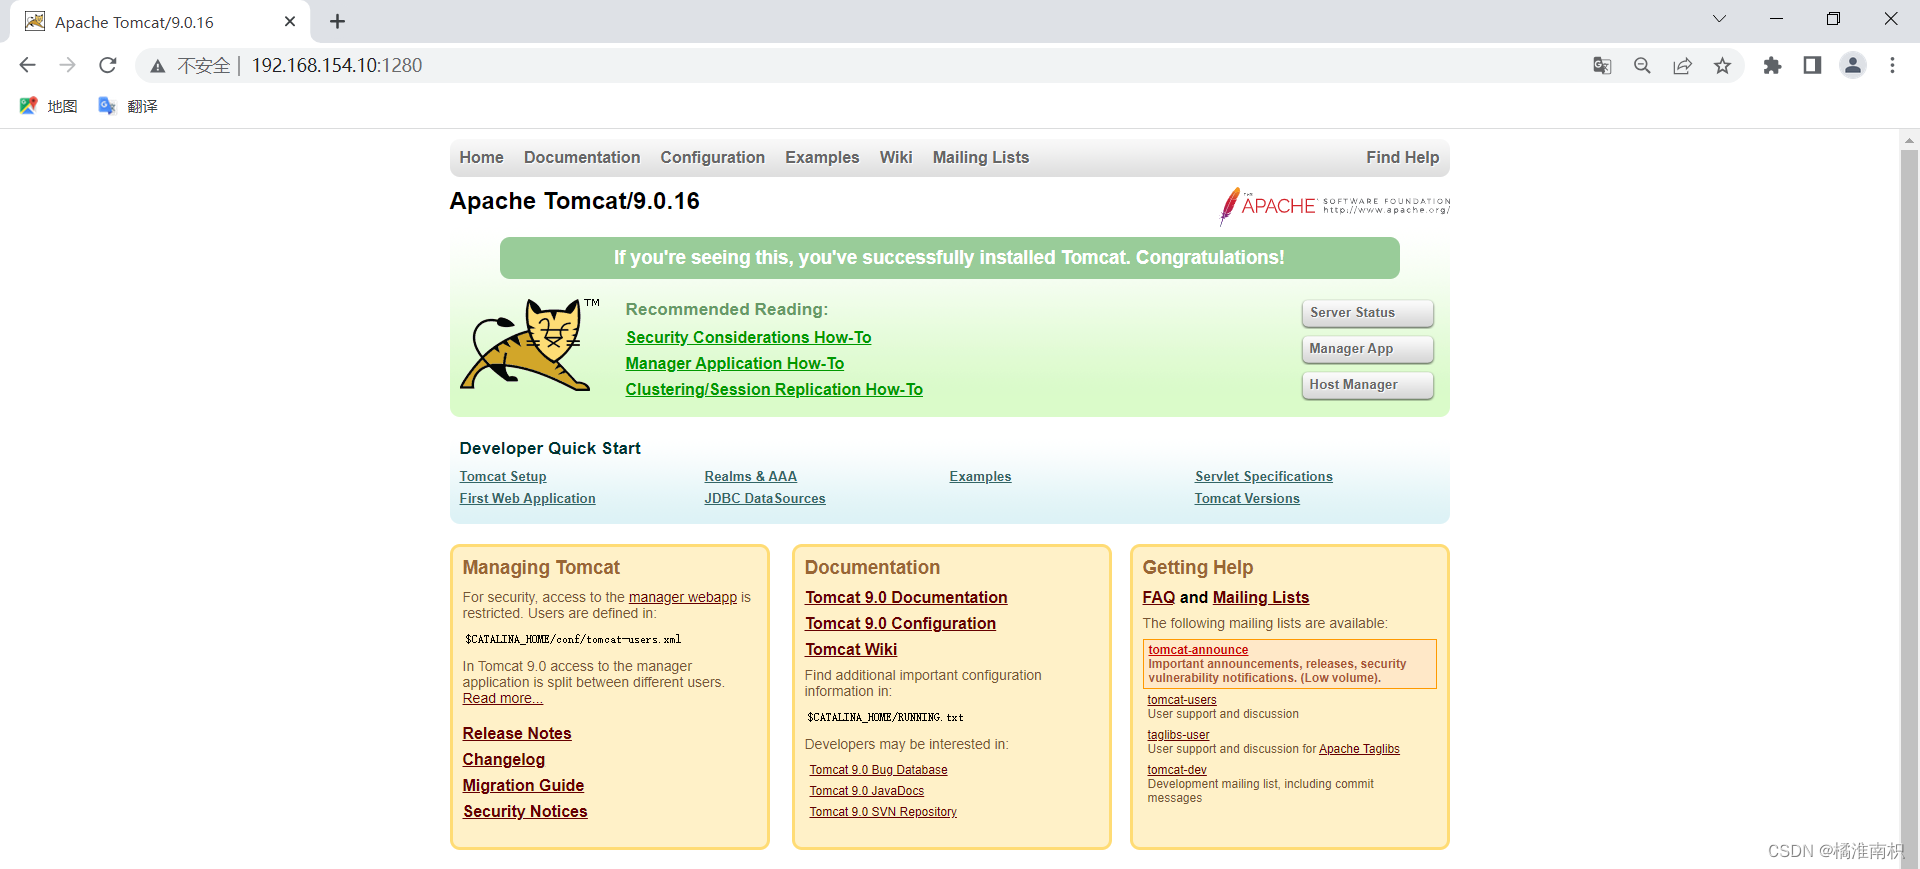
创建并启动tomcat容器,注意在/opt/compose_tomcat路径下执行
docker-compose -f docker-compose.yml up -d
#创建后台启动tomcat容器
docker ps -a
#查看容器状态及端口映射
#访问本机的1280端口查看是否成功