MediaPipe is Google's open source computer vision processing framework. It is based on TensorFlow to train models and supports face recognition, face key points, target detection and tracking, image classification, portrait segmentation, gesture recognition, text classification, speech classification, etc. We can use CPU for inference, or we can choose GPU to accelerate inference. In the filter special effect scene, it is often necessary to use the key points of the face.
Table of contents
1. Configuration parameters and models
5. Test results
1. Configuration parameters and models
1. Configuration parameters
The configuration parameters for detecting key points of faces include the operating mode, the number of faces, the minimum detection face confidence, the minimum display face confidence, the minimum tracking face confidence, and the result callback, as shown in the following table:
| options | describe | Ranges | Defaults |
| running_mode | IMAGE: single image VIDEO: video frame LIVE_STREAM: live stream |
{IMAGE,VIDEO, LIVE_STREAM} |
IMAGE |
| num_faces | The maximum number of detected faces | Greater than 0 | 1 |
| min_face_detection _confidence |
Face Detection Minimum Confidence | [0.0, 1.0] | 0.5 |
| min_face_presence _confidence |
Face showing minimum confidence | [0.0, 1.0] | 0.5 |
| min_tracking_confidence | Face Tracking Minimum Confidence | [0.0, 1.0] | 0.5 |
| output_face_blendshapes | Whether to output blend shapes (for 3D face models) | Boolean | false |
| output_facial_transformation _matrixes |
Whether to output the transformation matrix (for filter effects) | Boolean | false |
| result_callback | Asynchronous callback result (LIVE_STREAM mode) | ResultListener | / |
2. Detection model
Detecting face key points is divided into three steps: first detect the face, then locate the key points, and finally identify facial features. The models used are as follows:
- Face detection model: detect faces according to the key point features of the face;
- Face grid model: 3D face identification with 478 coordinate points;
- Mixed Shape Model: predicts scores for 52 mixed shapes representing coefficients for different expressions;
2. Engineering configuration
Taking the Android platform as an example, import MediaPipe related packages in gradle:
implementation 'com.google.mediapipe:tasks-vision:0.10.0'Then run the task of downloading the model, and specify the path to save the model:
project.ext.ASSET_DIR = projectDir.toString() + '/src/main/assets'
apply from: 'download_tasks.gradle'
The model used here is face_landmarker, set src and dest:
task downloadTaskFile(type: Download) {
    src 'https://storage.googleapis.com/mediapipe-models/face_landmarker/face_landmarker/float16/1/face_landmarker.task'
    dest project.ext.ASSET_DIR + '/face_landmarker.task'
    overwrite false
}

preBuild.dependsOn downloadTaskFile
3. Initialization work
1. Initialize the model
The initialization of the model includes: setting the running mode, model path, detecting the number of faces, calling back the results, etc. The sample code is as follows:
    fun setupFaceLandmark() {
        val baseOptionBuilder = BaseOptions.builder()

        // 设置运行模式,默认CPU
        when (currentDelegate) {
            DELEGATE_CPU -> {
                baseOptionBuilder.setDelegate(Delegate.CPU)
            }
            DELEGATE_GPU -> {
                baseOptionBuilder.setDelegate(Delegate.GPU)
            }
        }
        // 设置模型路径
        baseOptionBuilder.setModelAssetPath(MP_FACE_LANDMARKER_TASK)

        try {
            val baseOptions = baseOptionBuilder.build()
            // 设置检测的人脸数、最小的检测人脸置信度
            val optionsBuilder =
                FaceLandmarker.FaceLandmarkerOptions.builder()
                    .setBaseOptions(baseOptions)
                    .setMinFaceDetectionConfidence(minFaceDetectionConfidence)
                    .setMinTrackingConfidence(minFaceTrackingConfidence)
                    .setMinFacePresenceConfidence(minFacePresenceConfidence)
                    .setNumFaces(maxNumFaces)
                    .setRunningMode(runningMode)

            // LIVE_STREAM模式:设置回调结果
            if (runningMode == RunningMode.LIVE_STREAM) {
                optionsBuilder
                    .setResultListener(this::returnLivestreamResult)
                    .setErrorListener(this::returnLivestreamError)
            }

            val options = optionsBuilder.build()
            faceLandmarker =
                FaceLandmarker.createFromOptions(context, options)
        } catch (e: IllegalStateException) {
            faceLandmarkerHelperListener?.onError(
                "Face Landmark failed to initialize, error: " + e.message)
        } catch (e: RuntimeException) {
            faceLandmarkerHelperListener?.onError(
                "Face Landmark failed to initialize. See error logs for details", GPU_ERROR)
        }
    }
2. Initialize Camera
Taking LIVE_STREAM mode as an example, the initialization of Camera includes: setting pixel format, previewing aspect ratio, binding life cycle, and associating SurfaceProvider. The sample code is as follows:
    private fun bindCameraUseCases() {
        val cameraProvider = cameraProvider ?: throw IllegalStateException("Camera init failed.")

        val cameraSelector =
            CameraSelector.Builder().requireLensFacing(cameraFacing).build()

        // 预览的宽高比为4:3
        preview = Preview.Builder().setTargetAspectRatio(AspectRatio.RATIO_4_3)
            .setTargetRotation(fragmentCameraBinding.viewFinder.display.rotation)
            .build()

        // 设置像素格式为RGBA_8888,预览的旋转角度
        imageAnalyzer =
            ImageAnalysis.Builder().setTargetAspectRatio(AspectRatio.RATIO_4_3)
                .setTargetRotation(fragmentCameraBinding.viewFinder.display.rotation)
                .setBackpressureStrategy(ImageAnalysis.STRATEGY_KEEP_ONLY_LATEST)
                .setOutputImageFormat(ImageAnalysis.OUTPUT_IMAGE_FORMAT_RGBA_8888)
                .build()
                .also {
                    it.setAnalyzer(backgroundExecutor) { image ->
                        // 执行检测人脸关键点
                        faceLandmarkerHelper.detectLiveStream(image, cameraFacing == CameraSelector.LENS_FACING_FRONT)
                    }
                }

        // 绑定之前,先解除绑定
        cameraProvider.unbindAll()

        try {
            // 绑定Lifecycle
            camera = cameraProvider.bindToLifecycle(
                this, cameraSelector, preview, imageAnalyzer)
            // 关联SurfaceProvider
            preview?.setSurfaceProvider(fragmentCameraBinding.viewFinder.surfaceProvider)
        } catch (exc: Exception) {
            Log.e(TAG, "bind lifecycle failed", exc)
        }
    }
4. Detect real-time stream
1. Detect face key points
Before detection, copy the data first, preprocess the image frame, and then perform the detection:
    fun detectLiveStream(
        imageProxy: ImageProxy,
        isFrontCamera: Boolean) {
        val frameTime = SystemClock.uptimeMillis()

        // 拷贝RGB数据到缓冲区
        val bitmapBuffer =
            Bitmap.createBitmap(
                imageProxy.width,
                imageProxy.height,
                Bitmap.Config.ARGB_8888
            )
        imageProxy.use { bitmapBuffer.copyPixelsFromBuffer(imageProxy.planes[0].buffer) }
        imageProxy.close()

        val matrix = Matrix().apply {
            // 图像旋转
            postRotate(imageProxy.imageInfo.rotationDegrees.toFloat())

            // 如果是前置摄像头,需要左右镜像
            if (isFrontCamera) {
                postScale(-1f, 1f, imageProxy.width.toFloat(), imageProxy.height.toFloat())
            }
        }
        val rotatedBitmap = Bitmap.createBitmap(
            bitmapBuffer, 0, 0, bitmapBuffer.width, bitmapBuffer.height,
            matrix, true)

        // 转换Bitmap为MPImage
        val mpImage = BitmapImageBuilder(rotatedBitmap).build()
        // 异步检测人脸关键点
        faceLandmarker?.detectAsync(mpImage, frameTime)
    }
2. Draw face key points
After detecting the key points of the face, it is called back to the main thread:
   override fun onResults(resultBundle: FaceLandmarkerHelper.ResultBundle) {
        activity?.runOnUiThread {
            if (_fragmentCameraBinding != null) {
                // 显示推理时长
                fragmentCameraBinding.bottomSheetLayout.inferenceTimeVal.text =
                    String.format("%d ms", resultBundle.inferenceTime)

                // 传递结果给OverlayView
                fragmentCameraBinding.overlay.setResults(
                    resultBundle.result,
                    resultBundle.inputImageHeight,
                    resultBundle.inputImageWidth,
                    RunningMode.LIVE_STREAM
                )

                // 主动触发渲染
                fragmentCameraBinding.overlay.invalidate()
            }
        }
    }
Finally, draw the key points of the face, including facial expressions and contours:
   override fun draw(canvas: Canvas) {
        super.draw(canvas)
        if(results == null || results!!.faceLandmarks().isEmpty()) {
            clear()
            return
        }

        results?.let { faceLandmarkResult ->
            // 绘制关键点
            for(landmark in faceLandmarkResult.faceLandmarks()) {
                for(normalizedLandmark in landmark) {
                    canvas.drawPoint(normalizedLandmark.x() * imageWidth * scaleFactor,
                        normalizedLandmark.y() * imageHeight * scaleFactor, pointPaint)
                }
            }
            // 绘制线条
            FaceLandmarker.FACE_LANDMARKS_CONNECTORS.forEach {
                canvas.drawLine(
                    faceLandmarkResult.faceLandmarks()[0][it!!.start()].x() * imageWidth * scaleFactor,
                    faceLandmarkResult.faceLandmarks()[0][it.start()].y() * imageHeight * scaleFactor,
                    faceLandmarkResult.faceLandmarks()[0][it.end()].x() * imageWidth * scaleFactor,
                    faceLandmarkResult.faceLandmarks()[0][it.end()].y() * imageHeight * scaleFactor,
                    linePaint)
            }
        }
    }
5. Test results
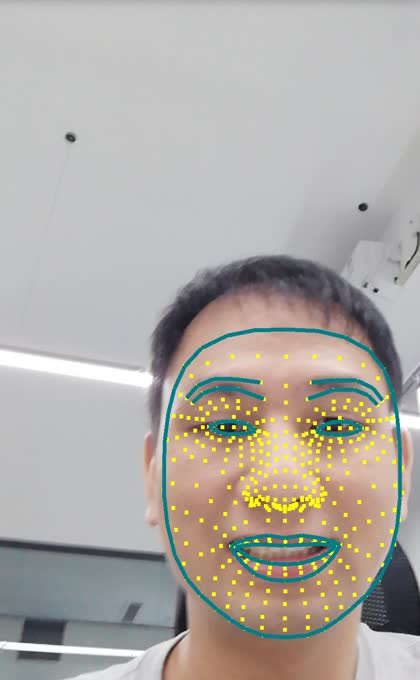
Input data can be still images, live video streams, file video frames. The output data has a face bounding box, a face grid, and key point coordinates. Among them, the key points of the face include: facial contour, mouth, nose, eyes, eyebrows, cheeks, etc., which belong to the 3D landmark model. As shown below:
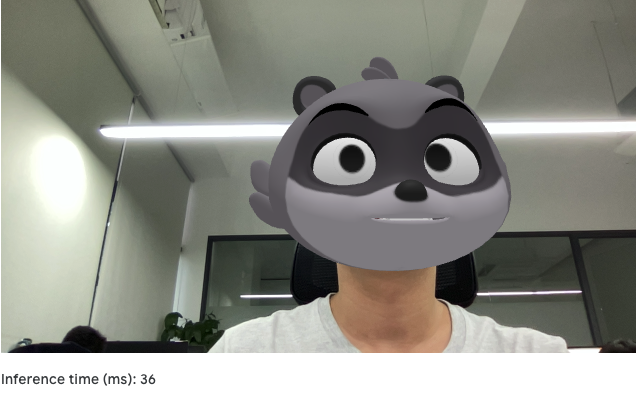
On the basis of face recognition and face key points, it also supports face changing, turning it into a cute cartoon effect. Blinking, shaking the head, opening the mouth and other facial expressions will all have real-time cartoon avatar changes. As shown below: