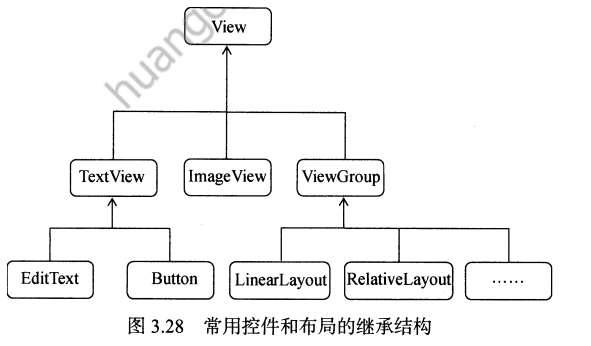
1. How to use common controls
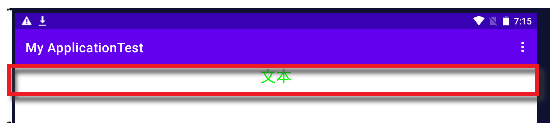
1,TextView
   <TextView
        android:id="@+id/text_view"
        android:layout_width="match_parent"
        android:layout_height="wrap_content"
        android:gravity="center"
        android:textSize="24sp"
        android:textColor="#00ff00"
        android:text="文本"/>
Realize the effect:
2,Button
    <Button
        android:id="@+id/button"
        android:layout_width="match_parent"
        android:layout_height="wrap_content"
        android:text="按钮"
        android:textAllCaps="false"/>
Binding event:
Button button1=(Button) findViewById(R.id.button);
button1.setOnClickListener(new View.OnClickListener() {


    @Override
    public void onClick(View view) {


        Intent intent=new Intent(FirstActivity.this,SecondActivity.class);
        startActivity(intent);
    }
});
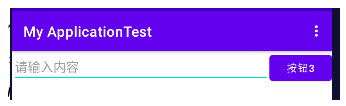
3,EditText
    <EditText
        android:layout_width="match_parent"
        android:layout_height="wrap_content"
        android:id="@+id/edit_text"
        android:hint="请在这里输入字符"
        android:maxLines="2"/>
The button gets the content popup window display:
        Button button1=(Button) findViewById(R.id.button);
        EditText editText=(EditText) findViewById(R.id.edit_text);
        button1.setOnClickListener(new View.OnClickListener() {


            @Override
            public void onClick(View view) {


                String inputText=editText.getText().toString();
                Toast.makeText(FirstActivity.this, inputText, Toast.LENGTH_SHORT).show();
            }
        });
4,ImageView
<ImageView
android:id="@+id/image_view"
android:layout_width="wrap_content"
android:layout_height="wrap_content"
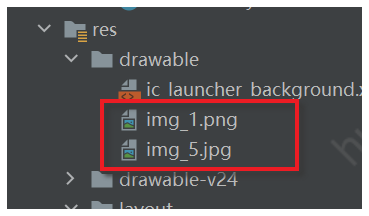
android:src="@drawable/img_1"/>
Toggle picture:
        Button button1=(Button) findViewById(R.id.button);
        ImageView imageView=(ImageView) findViewById(R.id.image_view);
        button1.setOnClickListener(new View.OnClickListener() {


            @Override
            public void onClick(View view) {


                    imageView.setImageResource(R.drawable.img_5);
            }
        });
The map's address:
5, ProgressBar progress bar
Circular progress bar:
    <ProgressBar
        android:id="@+id/progress_bar"
        android:layout_width="match_parent"
        android:layout_height="wrap_content"/>
Control the visibility of the circular progress bar:
 button1.setOnClickListener(new View.OnClickListener() {


     @Override
     public void onClick(View view) {


         //visible:可见,invisible,不可见但占位,gone不可见不占位
         //View.GONE是内置的常数
         if(progressBar.getVisibility()==View.GONE){


             progressBar.setVisibility(View.VISIBLE);
         }else{


             progressBar.setVisibility(View.GONE);
         }
     }
 });
Switch to a long bar progress bar:
    <ProgressBar
        android:id="@+id/progress_bar"
        style="?android:attr/progressBarStyleHorizontal"
        android:max="100"
        android:layout_width="match_parent"
        android:layout_height="wrap_content"/>
Set progress dynamically:
        ProgressBar progressBar=(ProgressBar) findViewById(R.id.progress_bar);
        button1.setOnClickListener(new View.OnClickListener() {


            @Override
            public void onClick(View view) {


                int progress=progressBar.getProgress();
                progress=progress+10;
                progressBar.setProgress(progress);
            }
        });
6, AlertDialog dialog box
button1.setOnClickListener(new View.OnClickListener() {
@Override
public void onClick(View view) {
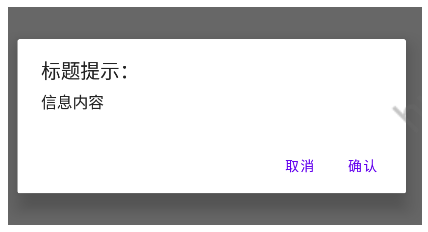
AlertDialog.Builder dialog=new AlertDialog.Builder(FirstActivity.this);
dialog.setTitle("标题提示:");
dialog.setMessage("信息内容");
dialog.setPositiveButton("确认", new DialogInterface.OnClickListener() {
@Override
public void onClick(DialogInterface dialogInterface, int i) {
//点击确认执行的内容
}
});
dialog.setNegativeButton("取消", new DialogInterface.OnClickListener() {
@Override
public void onClick(DialogInterface dialogInterface, int i) {
//点击取消执行的内容
}
});
dialog.show();
}
});
Achieved effect:
7,ProgressDialog
Like AlertDialog, it can block the interaction ability of other controls. The difference is that he has a loading.
ProgressDialog progressDialog= new ProgressDialog(FirstActivity.this);
progressDialog.setTitle("标题设置");
progressDialog.setMessage("正在加载中……");
progressDialog.setCancelable(true);
progressDialog.show();
The effect achieved:
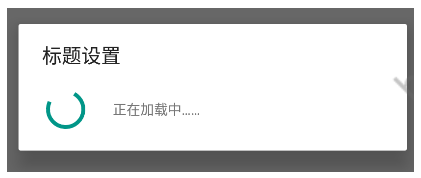
Note that if false is passed in setCancelable(), it means that the ProgressDialog cannot be canceled through the Back key. At this time, you must control it in the code. When the data loading is completed, you must call the ProgressDialog dismiss() method to close the dialog box, otherwise the ProgressDialog will always exist.
Two, 4 basic layouts
What is a layout? The front-end system is already very clear, it is nothing more than a means or layout to better organize page elements.
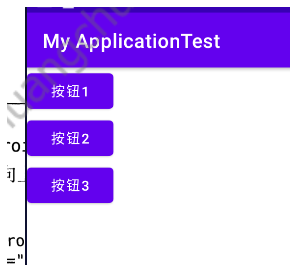
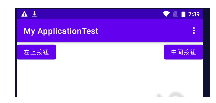
1, linear layout LinearLayout
Page elements are arranged linearly, horizontally or vertically. It is worth noting that it only controls one row or one column, that is to say, in vertical layout, the width of one of the sub-elements cannot be set to 100%, so that other sub-elements will have no place to arrange.
<LinearLayout xmlns:android="http://schemas.android.com/apk/res/android"
    android:orientation="vertical"
    android:layout_width="match_parent"
    android:layout_height="match_parent"
    >
    <Button
        android:id="@+id/button1"
        android:layout_width="wrap_content"
        android:layout_height="wrap_content"
        android:text="按钮1"
        android:textAllCaps="false"/>
    <Button
        android:id="@+id/button2"
        android:layout_width="wrap_content"
        android:layout_height="wrap_content"
        android:text="按钮2"
        android:textAllCaps="false"/>
    <Button
        android:id="@+id/button3"
        android:layout_width="wrap_content"
        android:layout_height="wrap_content"
        android:text="按钮3"
        android:textAllCaps="false"/>
</LinearLayout>
The effect achieved:
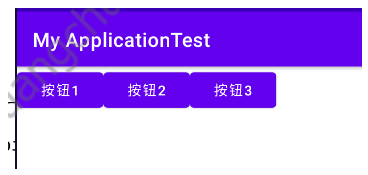
if it is set to horizontal android:orientation="horizontal", it will look like this:
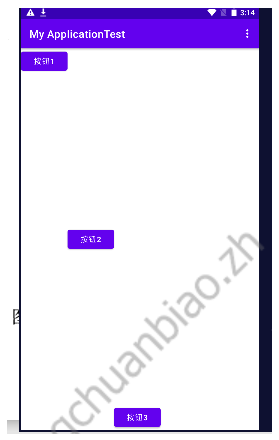
[android:layout_gravity attribute]
It is written on the elements of the layout and is used to control the arrangement of sub-elements on the cross axis, and The item-self in the front-end flex layout has the same effect.
For example:
<LinearLayout xmlns:android="http://schemas.android.com/apk/res/android"
    android:orientation="horizontal"
    android:layout_width="match_parent"
    android:layout_height="match_parent"
    >
    <Button
        android:id="@+id/button1"
        android:layout_width="wrap_content"
        android:layout_height="wrap_content"
        android:text="按钮1"
        android:layout_gravity="top"
        android:textAllCaps="false"/>
    <Button
        android:id="@+id/button2"
        android:layout_width="wrap_content"
        android:layout_height="wrap_content"
        android:text="按钮2"
        android:layout_gravity="center"
        android:textAllCaps="false"/>
    <Button
        android:id="@+id/button3"
        android:layout_width="wrap_content"
        android:layout_height="wrap_content"
        android:layout_gravity="bottom"
        android:text="按钮3"
        android:textAllCaps="false"/>
</LinearLayout>
The effect achieved:
[android:layout_weight="1" attribute]
is similar to flex-grow in flex layout. When using this value, we usually set the element's android:layout_width="0dp" to 0dp, so the element The width is only controlled by layout_weight.
The calculation method of layout_weight is: first get the full width (the total length that can be allocated to the elements with layout_weight set), and then allocate it to the corresponding element in proportion.
For example, there is an input box and a button. The button is fixed in width, and the input box is adaptive. Then you can write:
<LinearLayout xmlns:android="http://schemas.android.com/apk/res/android"
    android:orientation="horizontal"
    android:layout_width="match_parent"
    android:layout_height="match_parent"
    >
    <EditText
        android:id="@+id/input_message"
        android:layout_width="0dp"
        android:layout_height="wrap_content"
        android:layout_weight="1"
        android:hint="请输入内容"/>
    <Button
        android:id="@+id/button3"
        android:layout_width="wrap_content"
        android:layout_height="wrap_content"
        android:text="按钮3"
        android:textAllCaps="false"/>
</LinearLayout>
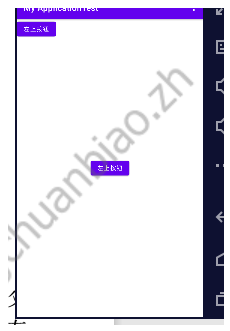
2. Relative layout
When referring to selected parent elements:
<RelativeLayout xmlns:android="http://schemas.android.com/apk/res/android"
    android:orientation="horizontal"
    android:layout_width="match_parent"
    android:layout_height="match_parent"
    >
    <Button
        android:id="@+id/button1"
        android:layout_width="wrap_content"
        android:layout_height="wrap_content"
        android:layout_alignParentTop="true"
        android:layout_alignParentLeft="true"
        android:text="左上按钮"
        android:textAllCaps="false"/>
    <Button
        android:id="@+id/button2"
        android:layout_width="wrap_content"
        android:layout_height="wrap_content"
        android:layout_centerInParent="true"
        android:text="中间按钮"
        android:textAllCaps="false"/>
</RelativeLayout>
Achievement effect:
when selecting elements of the same level as reference objects:
<RelativeLayout xmlns:android="http://schemas.android.com/apk/res/android"
    android:orientation="horizontal"
    android:layout_width="match_parent"
    android:layout_height="match_parent"
    >
    <Button
        android:id="@+id/button1"
        android:layout_width="wrap_content"
        android:layout_height="wrap_content"
        android:layout_above="@+id/button2"
        android:layout_toLeftOf="@id/button2"
        android:text="左上按钮"
        android:textAllCaps="false"/>
    <Button
        android:id="@+id/button2"
        android:layout_width="wrap_content"
        android:layout_height="wrap_content"
        android:layout_centerInParent="true"
        android:text="中间按钮"
        android:textAllCaps="false"/>
    <Button
        android:id="@+id/button3"
        android:layout_width="wrap_content"
        android:layout_height="wrap_content"
        android:layout_below="@+id/button2"
        android:layout_toLeftOf="@id/button2"
        android:text="左上按钮"
        android:textAllCaps="false"/>
</RelativeLayout>
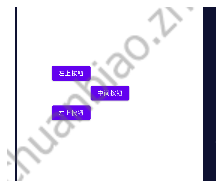
There is also an edge alignment with the same level as a reference. This attribute is: layout_alignLeft, etc.
3. Frame layout FrameLayout
There is no convenient positioning method for this layout, and all controls will be placed in the upper left corner of the layout by default. And they're stacked one on top of the other.
Of course, it can be handled with layout_gravity. It is similar to the float layout in the front end.
<FrameLayout xmlns:android="http://schemas.android.com/apk/res/android"
    android:orientation="horizontal"
    android:layout_width="match_parent"
    android:layout_height="match_parent"
    >
    <Button
        android:id="@+id/button1"
        android:layout_width="wrap_content"
        android:layout_height="wrap_content"
        android:layout_gravity="left"
        android:text="左上按钮"
        android:textAllCaps="false"/>
    <Button
        android:id="@+id/button2"
        android:layout_width="wrap_content"
        android:layout_height="wrap_content"
        android:layout_gravity="right"
        android:text="中间按钮"
        android:textAllCaps="false"/>
</FrameLayout>
4. Percentage layout
In fact, this layout has been deprecated.
Since linearLayout itself already supports proportionality, the percentage layout is only a functional extension for Frame-layout and RelativeLayout.
Different from the previous three layouts, the percentage layout is a new layout, so how can the new layout be used on all Android versions? For this reason, the Android team defines the percentage layout in the support library. We only need You need to add the dependency of the percentage layout library in the project's build.gradle to ensure the compatibility of the percentage layout on all Android system versions.
Open the app/buildgradle file and add the following content in the dependencies:
implementation 'androidx.percentlayout:percentlayout:1.0.0'
After modification, there will be this prompt at the top of AS:

Click Sync Now, and gradle will start to synchronize.
Layout code:
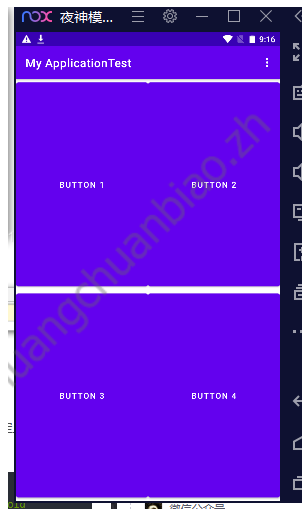
<?xml version="1.0" encoding="utf-8"?>
<androidx.percentlayout.widget.PercentFrameLayout xmlns:android="http://schemas.android.com/apk/res/android"
    android:layout_width="match_parent"
    android:layout_height="match_parent"
    xmlns:app="http://schemas.android.com/apk/res-auto">

    <Button
        android:id="@+id/button1"
        android:text="Button 1"

        android:layout_gravity="left|top"
        app:layout_widthPercent="50%"
        app:layout_heightPercent="50%"
        />
    <Button
        android:id="@+id/button2"
        android:text="Button 2"

        android:layout_gravity="right|top"
        app:layout_widthPercent="50%"
        app:layout_heightPercent="50%"
        />
    <Button
        android:id="@+id/button3"
        android:text="Button 3"

        android:layout_gravity="left|bottom"
        app:layout_widthPercent="50%"
        app:layout_heightPercent="50%"
        />
    <Button
        android:id="@+id/button4"
        android:text="Button 4"

        android:layout_gravity="right|bottom"
        app:layout_widthPercent="50%"
        app:layout_heightPercent="50%"
        />


</androidx.percentlayout.widget.PercentFrameLayout>
Realize the effect:
Third, create a custom control
1. Customize and import layout
It's just layout xml (only ui), not the smallest functional unit in the front end (with ui and events)
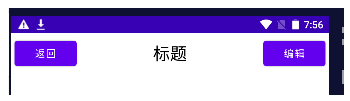
For example, when we want to create a title bar:
the first step is to create a title.xml layout file:
<LinearLayout xmlns:android="http://schemas.android.com/apk/res/android"
    android:layout_width="match_parent"
    android:layout_height="wrap_content">
    <Button
        android:id="@+id/title_back"
        android:layout_width="wrap_content"
        android:layout_height="wrap_content"
        android:layout_gravity="center"
        android:layout_margin="5dp"
        android:textColor="#fff"
        android:text="返回" />
    <TextView
        android:id="@+id/title_text"
        android:layout_width="0dp"
        android:layout_height="wrap_content"
        android:layout_gravity="center"
        android:layout_weight="1"
        android:gravity="center"
        android:text="标题"
        android:textColor="#000000"
        android:textSize="24sp"/>
    <Button
        android:id="@+id/title_edit"
        android:layout_width="wrap_content"
        android:layout_height="wrap_content"
        android:layout_gravity="center"
        android:layout_margin="5dp"
        android:textColor="#fff"
        android:text="编辑" />
</LinearLayout>
Step 2: Introduce the title.xml layout
<LinearLayout xmlns:android="http://schemas.android.com/apk/res/android"
    android:layout_width="match_parent"
    android:layout_height="match_parent">
    <include layout="@layout/title"/>
</LinearLayout>
Step 3: Shield the default title bar:
    protected void onCreate(Bundle savedInstanceState) {


        super.onCreate(savedInstanceState);
        setContentView(R.layout.first_layout);
        ActionBar actionbar=getSupportActionBar();
        if(actionbar!=null){


            actionbar.hide();
        }
    }
Achieved effect:
2. Custom controls
As above, we have created a title in one activity, but if there are multiple pages that need this title and have a click event, then writing a click event in each activity is more or less redundant.
We want to have built-in event handling like the front-end public components. This requires the creation of custom controls.
Step 1: Create a new com.example.uicustomviews, in which the new TitleLayout inherits from LinearLayout, making it our custom title bar control.
public class TitleLayout extends LinearLayout {


    //重写它的构造函数
    public TitleLayout(Context context, AttributeSet attrs){


        super(context,attrs);
        //对标题栏布局进行动态加载
        LayoutInflater.from(context).inflate(R.layout.title,this);
    }
}
Step 2: Add this custom control in the layout file:
<LinearLayout xmlns:android="http://schemas.android.com/apk/res/android"
    android:layout_width="match_parent"
    android:layout_height="match_parent">
    <com.example.uicustomviews.TitleLayout
        android:layout_width="match_parent"
        android:layout_height="wrap_content"/>
</LinearLayout>
After compiling, you will find that the effect is the same as the previous writing method.
Step 3: Define events in TitleLayout.
public class TitleLayout extends LinearLayout {


    //重写它的构造函数
    public TitleLayout(Context context, AttributeSet attrs){


        super(context,attrs);
        //对标题栏布局进行动态加载
        LayoutInflater.from(context).inflate(R.layout.title,this);
        Button titleBack=(Button) findViewById(R.id.title_back);
        Button titleEdit=(Button) findViewById(R.id.title_edit);
        titleBack.setOnClickListener(new OnClickListener() {


            @Override
            public void onClick(View view) {


                ((Activity) getContext()).finish();
            }
        });
        titleEdit.setOnClickListener(new OnClickListener() {


            @Override
            public void onClick(View view) {


                Toast.makeText(getContext(), "点击编辑", Toast.LENGTH_SHORT).show();
            }
        });
    }
}
In this way, it is the same as the components in the front end, with ui and corresponding events.
The process is as follows:
Four, the most commonly used control ListView
It's actually a long list.
1. Easy to use
The first step: use in layout:
<LinearLayout xmlns:android="http://schemas.android.com/apk/res/android"
    android:layout_width="match_parent"
    android:layout_height="match_parent">
   <ListView
       android:id="@+id/list_view"
       android:layout_width="match_parent"
       android:layout_height="match_parent"/>
</LinearLayout>
Step 2: Pass data in the activity
public class FirstActivity extends BaseActivity {


    //定义的数据,实际应该来自网络请求等
    private String [] data ={


"asda","adfsg","asda","adfsg","asda","adfsg","asda","adfsg","asda","adfsg","asda","adfsg","asda","adfsg","asda","adfsg","asda","adfsg","asda","adfsg","asda","adfsg","asda","adfsg","asda","adfsg","asda","adfsg","asda","adfsg","asda","adfsg",
    };

    @Override
    protected void onCreate(Bundle savedInstanceState) {


        super.onCreate(savedInstanceState);
        setContentView(R.layout.first_layout);
        //使用ArrayAdapter适配器将数据格式转化成listView可以使用的格式
        ArrayAdapter<String> adapter =new ArrayAdapter<String>(FirstActivity.this,android.R.layout.simple_list_item_1,data);
        ListView listView=(ListView) findViewById(R.id.list_view);
        //将转化后的数据赋值给listView
        listView.setAdapter(adapter);
    }
}
It is worth noting that android.R.layout.simple_list_item_1 is a built-in xml file, which only uses a TextView for simple use of text.
Achieved effect:

Five, a more powerful RecyclerView
It is stronger long list component and it is recommended to use it.
1. Import package
Recyclerview is a control based on the support package. Since androidx has replaced the supprot package, it is recommended that you use the Androidx package.
Introduce the following code in the build.gradle file to import the RecyclerView package:
dependencies {


    implementation 'androidx.recyclerview:recyclerview:1.1.0'
}
2, use in the main activity
<LinearLayout xmlns:android="http://schemas.android.com/apk/res/android"
    android:layout_width="match_parent"
    android:layout_height="match_parent">
   <androidx.recyclerview.widget.RecyclerView
       android:id="@+id/list_main"
       android:layout_width="match_parent"
       android:layout_height="match_parent" />
</LinearLayout>
3. Write the adapter
Create a new FruitAdapter class:
public class FruitAdapter extends RecyclerView.Adapter<FruitAdapter.ViewHolder> {


    private List<Fruit> mFruitList;
    //定义了内部类ViewHolder
    static class ViewHolder extends RecyclerView.ViewHolder{


        ImageView fruitImage;
        TextView fruitName;
        //构造函数传入view,通常是recyclerView子项的最外层布局
        public ViewHolder(View view){


            super(view);
            fruitImage=(ImageView) view.findViewById(R.id.fruit_image);
            fruitName=(TextView) view.findViewById(R.id.fruit_name);
        }
    }
    //构造函数,用于把要展示地数据源传进来,并赋值给一个全局变量mFruitList
    public FruitAdapter(List<Fruit> fruitList){


        mFruitList= fruitList;
    }
    //重写方法,用于创建ViewHoler实例,我们在这个方法中将fruit_item布局加载进来,然后创建一个ViewHolder实例。
    //并且把加载出来的布局传入到构造函数中,最后将ViewHolder的实例返回。
    @Override
    public ViewHolder onCreateViewHolder(@NonNull ViewGroup parent, int viewType) {


        View view= LayoutInflater.from(parent.getContext()).inflate(R.layout.fruit_item,parent,false);
        ViewHolder holder=new ViewHolder(view);
        return holder;
    }
    //用于对RecyclerView子项的数据进行赋值的,会在每个子项被滚动到屏幕内的时候执行。
    //这里我们通过position参数得到当前项的Fruit实例
    //再将数据设置到ViewHolder的ImageView和TetxView当中
    @Override
    public void onBindViewHolder(@NonNull FruitAdapter.ViewHolder holder, int position) {


        Fruit fruit =mFruitList.get(position);
        holder.fruitImage.setImageResource(fruit.getImageId());
        holder.fruitName.setText(fruit.getName());
    }
    //它用于告诉RecyclerView一共有多少子项,直接返回数据源的长度就可以了。
    @Override
    public int getItemCount() {


        return mFruitList.size();
    }
}
4. Use the adapter
After the adapter is ready, we can start using RecyclerView and modify the code in FirstActivity:
public class FirstActivity extends BaseActivity {


    //定义的数据,实际应该来自网络请求等
    private List<Fruit> fruitList=new ArrayList<Fruit>();

    @Override
    protected void onCreate(Bundle savedInstanceState) {


        super.onCreate(savedInstanceState);
        setContentView(R.layout.first_layout);
        initFruits();
        RecyclerView recyclerView=(RecyclerView) findViewById(R.id.recycler_view);
        //使用线性布局
        LinearLayoutManager layoutManager=new LinearLayoutManager(this);
        recyclerView.setLayoutManager(layoutManager);
        //将数据传入适配器,构造视图
        FruitAdapter adapter=new FruitAdapter(fruitList);
        recyclerView.setAdapter(adapter);
    }
    private void initFruits(){


        for (int i=0;i<5;i++){


            Fruit apple=new Fruit("Apple",R.drawable.img_1);
            fruitList.add(apple);
            Fruit banana=new Fruit("banana",R.drawable.img_2);
            fruitList.add(banana);
            Fruit orange=new Fruit("orange",R.drawable.img_3);
            fruitList.add(orange);
            Fruit pear=new Fruit("pear",R.drawable.img_4);
            fruitList.add(pear);
        }
    }
}
Among them, the Fruit class and fruit_item.xml are the codes used in the previous section.
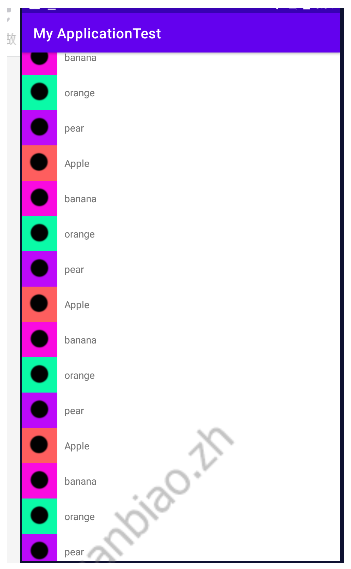
5. The effect achieved
6. Implement horizontal scrolling and waterfall layout
As far as the above is concerned, if you change to horizontal scrolling, you need to modify the fruit_item to a vertical layout:
Step 1: Modify the layout of the item
<LinearLayout xmlns:android="http://schemas.android.com/apk/res/android"
    android:orientation="vertical"
    android:layout_width="100dp"
    android:layout_height="wrap_content">
    <ImageView
        android:id="@+id/fruit_image"
        android:layout_width="wrap_content"
        android:layout_height="wrap_content"
        android:layout_gravity="center_horizontal"/>
    <TextView
        android:id="@+id/fruit_name"
        android:layout_width="wrap_content"
        android:layout_height="wrap_content"
        android:layout_gravity="center_horizontal"
        android:layout_marginTop="10dp"
        />

</LinearLayout>
Step 2: Modify the default portrait layout to landscape layout
public class FirstActivity extends BaseActivity {


    //定义的数据,实际应该来自网络请求等
    private List<Fruit> fruitList=new ArrayList<Fruit>();

    @Override
    protected void onCreate(Bundle savedInstanceState) {


        super.onCreate(savedInstanceState);
        setContentView(R.layout.first_layout);
        initFruits();
        RecyclerView recyclerView=(RecyclerView) findViewById(R.id.recycler_view);
        //使用线性布局
        LinearLayoutManager layoutManager=new LinearLayoutManager(this);
        //将默认的纵向布局修改为横向布局
        layoutManager.setOrientation(LinearLayoutManager.HORIZONTAL);
        recyclerView.setLayoutManager(layoutManager);
        //将数据传入适配器,构造视图
        FruitAdapter adapter=new FruitAdapter(fruitList);
        recyclerView.setAdapter(adapter);
    }
    private void initFruits(){


        for (int i=0;i<5;i++){


            Fruit apple=new Fruit("Apple",R.drawable.img_1);
            fruitList.add(apple);
            Fruit banana=new Fruit("banana",R.drawable.img_2);
            fruitList.add(banana);
            Fruit orange=new Fruit("orange",R.drawable.img_3);
            fruitList.add(orange);
            Fruit pear=new Fruit("pear",R.drawable.img_4);
            fruitList.add(pear);
        }
    }
}
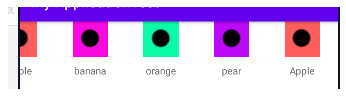
Achieved effect:
7. Waterfall layout
Step 1: Modify the layout of the item
<LinearLayout xmlns:android="http://schemas.android.com/apk/res/android"
    android:orientation="vertical"
    android:layout_width="match_parent"
    android:layout_height="wrap_content"
    android:layout_margin="5dp"
    >
    <ImageView
        android:id="@+id/fruit_image"
        android:layout_width="wrap_content"
        android:layout_height="wrap_content"
        android:layout_gravity="center_horizontal"/>
    <TextView
        android:id="@+id/fruit_name"
        android:layout_width="wrap_content"
        android:layout_height="wrap_content"
        android:layout_gravity="left"
        android:layout_marginTop="10dp"
        />

</LinearLayout>
Step 2: Modify FirstActivity.xml
protected void onCreate(Bundle savedInstanceState) {


        super.onCreate(savedInstanceState);
        setContentView(R.layout.first_layout);
        initFruits();
        RecyclerView recyclerView=(RecyclerView) findViewById(R.id.recycler_view);
        //修改为栅格布局
        StaggeredGridLayoutManager layoutManager=new StaggeredGridLayoutManager(3,StaggeredGridLayoutManager.VERTICAL);
        recyclerView.setLayoutManager(layoutManager);
        //将数据传入适配器,构造视图
        FruitAdapter adapter=new FruitAdapter(fruitList);
        recyclerView.setAdapter(adapter);
    }
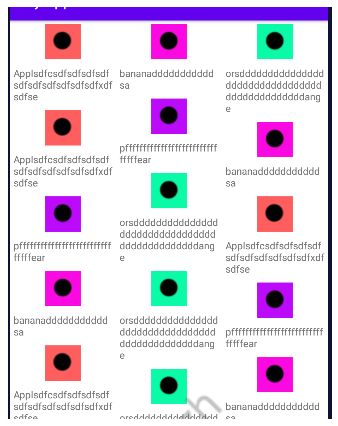
Achieved effect:
8. Its click event
Modify the adapter file:
public class FruitAdapter extends RecyclerView.Adapter<FruitAdapter.ViewHolder> {


    private List<Fruit> mFruitList;
    //定义了内部类ViewHolder
    static class ViewHolder extends RecyclerView.ViewHolder{


        View fruitView;
        ImageView fruitImage;
        TextView fruitName;
        //构造函数传入view,通常是recyclerView子项的最外层布局
        public ViewHolder(View view){


            super(view);
            fruitView=view;
            fruitImage=(ImageView) view.findViewById(R.id.fruit_image);
            fruitName=(TextView) view.findViewById(R.id.fruit_name);
        }
    }
    //构造函数,用于把要展示地数据源传进来,并赋值给一个全局变量mFruitList
    public FruitAdapter(List<Fruit> fruitList){


        mFruitList= fruitList;
    }
    //重写方法,用于创建ViewHoler实例,我们在这个方法中将fruit_item布局加载进来,然后创建一个ViewHolder实例。
    //并且把加载出来的布局传入到构造函数中,最后将ViewHolder的实例返回。
    @Override
    public ViewHolder onCreateViewHolder(@NonNull ViewGroup parent, int viewType) {


        View view= LayoutInflater.from(parent.getContext()).inflate(R.layout.fruit_item,parent,false);
        final ViewHolder holder=new ViewHolder(view);
        holder.fruitView.setOnClickListener(new View.OnClickListener(){


            @Override
            public void onClick(View v){


                int position=holder.getAdapterPosition();
                Fruit fruit =mFruitList.get(position);
                Toast.makeText(v.getContext(), fruit.getName(), Toast.LENGTH_SHORT).show();
            }
        });
        holder.fruitImage.setOnClickListener(new View.OnClickListener(){


            @Override
            public void onClick(View v){


                int position=holder.getAdapterPosition();
                Fruit fruit =mFruitList.get(position);
                Toast.makeText(v.getContext(), "点击了图片", Toast.LENGTH_SHORT).show();
            }
        });
        return holder;
    }
    //用于对RecyclerView子项的数据进行赋值的,会在每个子项被滚动到屏幕内的时候执行。
    //这里我们通过position参数得到当前项的Fruit实例
    //再将数据设置到ViewHolder的ImageView和TetxView当中
    @Override
    public void onBindViewHolder(@NonNull FruitAdapter.ViewHolder holder, int position) {


        Fruit fruit =mFruitList.get(position);
        holder.fruitImage.setImageResource(fruit.getImageId());
        holder.fruitName.setText(fruit.getName());
    }
    //它用于告诉RecyclerView一共有多少子项,直接返回数据源的长度就可以了。
    @Override
    public int getItemCount() {


        return mFruitList.size();
    }
}
6. Best practices for writing pages
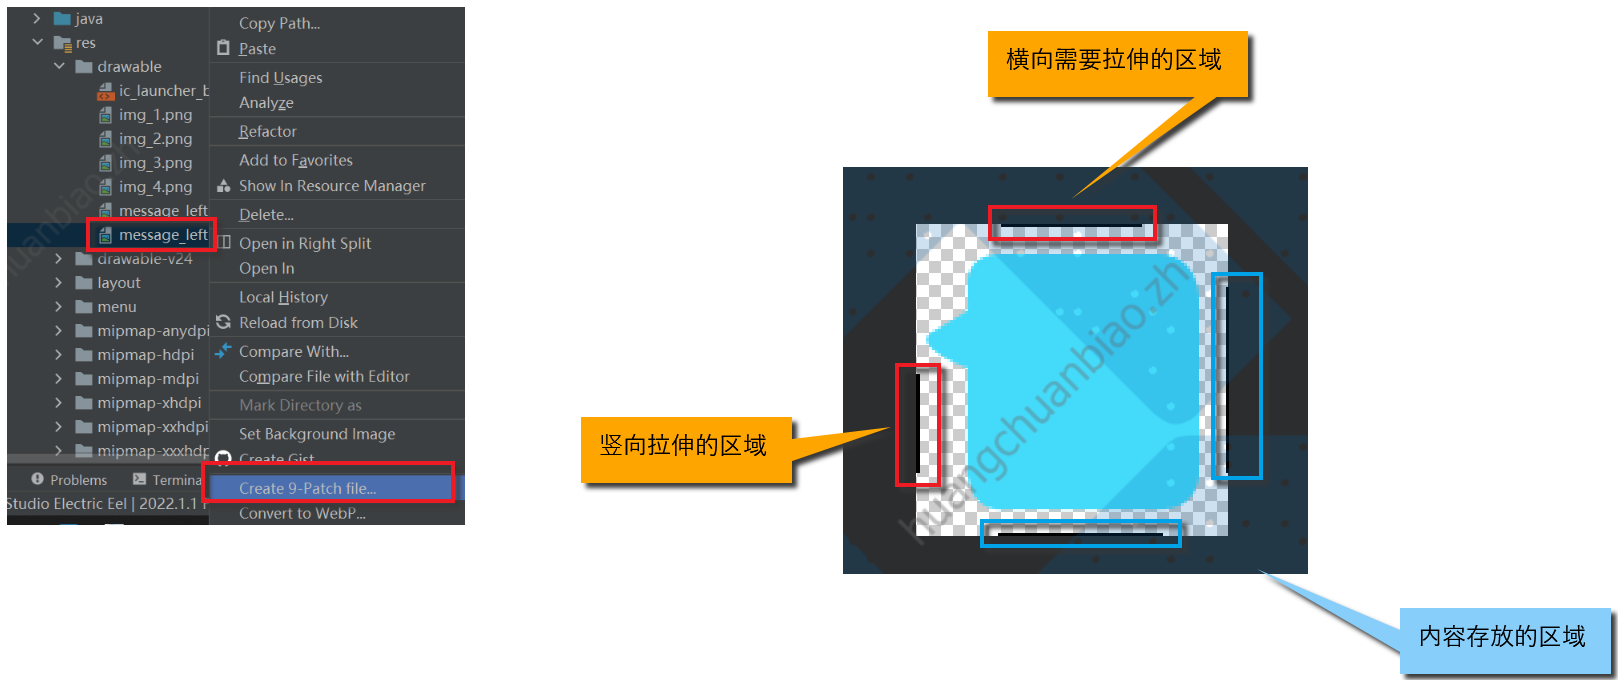
1. Make a Nine-Patch image
Images in this format can specify which areas can be stretched and which areas cannot.
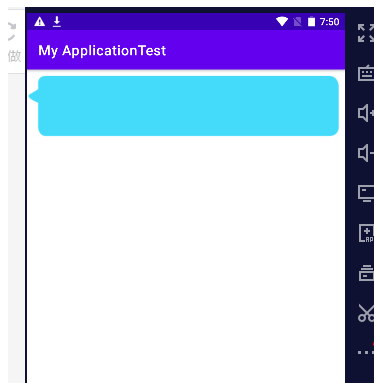
2, modify the firstLayout.xml test
<LinearLayout xmlns:android="http://schemas.android.com/apk/res/android"
    android:layout_width="match_parent"
    android:layout_height="wrap_content"
    android:background="@drawable/message_left"
    >
</LinearLayout>
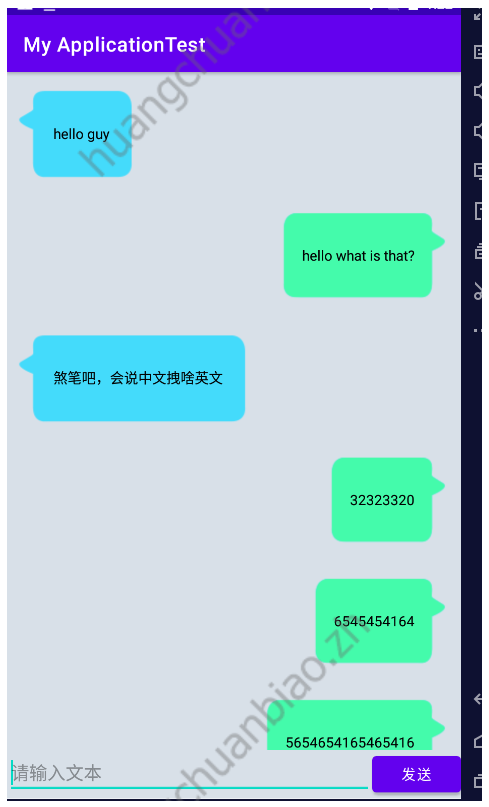
3. Start writing the chat interface
First use the same method to make the message_right image.
Because we need to use recyclerView, according to the above method, we need to introduce it first.
Introduce the following code in the build.gradle file to import the RecyclerView package:
dependencies {


    implementation 'androidx.recyclerview:recyclerview:1.1.0'
}
Write the page layout of the main activity:
<LinearLayout xmlns:android="http://schemas.android.com/apk/res/android"
    android:orientation="vertical"
    android:layout_width="match_parent"
    android:layout_height="match_parent"
    android:background="#d8e0e8"
    >
    <androidx.recyclerview.widget.RecyclerView
        android:id="@+id/recycler_view"
        android:layout_width="match_parent"
        android:layout_height="0dp"
        android:layout_weight="1"/>
    <LinearLayout
        android:layout_width="match_parent"
        android:layout_height="wrap_content">
        <EditText
            android:id="@+id/input_text"
            android:layout_width="0dp"
            android:layout_height="wrap_content"
            android:layout_weight="1"
            android:hint="请输入文本"
            android:maxLines="2"/>
        <Button
            android:id="@+id/send"
            android:layout_width="wrap_content"
            android:layout_height="wrap_content"
            android:text="发送"/>

    </LinearLayout>
</LinearLayout>
Then create a new Msg class:
public class Msg {


    //表示是收到的信息
    public static final int TYPE_RECEIVED=0;
    //表示是发出的信息
    public static final int TYPE_SEND=1;
    public String content;
    private int type;
    public Msg(String content,int type){


        this.content=content;
        this.type=type;
    }
    public String getContent(){


        return content;
    }
    public int getType(){


        return type;
    }
}
Next, write the layout of the recyclerView subitem and create a new msg_item.xml file:
<LinearLayout xmlns:android="http://schemas.android.com/apk/res/android"
    android:orientation="vertical"
    android:layout_width="match_parent"
    android:layout_height="wrap_content"
    android:padding="10dp">

    <LinearLayout
        android:id="@+id/left_layout"
        android:layout_width="wrap_content"
        android:layout_height="wrap_content"
        android:layout_gravity="left"
        android:background="@drawable/message_left"
        android:orientation="horizontal">
        <TextView
            android:id="@+id/left_msg"
            android:layout_width="wrap_content"
            android:layout_height="wrap_content"
            android:layout_gravity="center"
            android:layout_margin="10dp"
            android:textColor="#000"/>
    </LinearLayout>
    <LinearLayout
        android:id="@+id/right_layout"
        android:layout_width="wrap_content"
        android:layout_height="wrap_content"
        android:layout_gravity="left"
        android:background="@drawable/message_right"
        android:orientation="horizontal">
        <TextView
            android:id="@+id/right_msg"
            android:layout_width="wrap_content"
            android:layout_height="wrap_content"
            android:layout_gravity="center"
            android:layout_margin="10dp"
            android:textColor="#000"/>
    </LinearLayout>
</LinearLayout>
Next, create an adapter and create a new class MsgAdapter:
public class MsgAdapter extends RecyclerView.Adapter<MsgAdapter.ViewHolder> {


    private List<Msg> mMsgList;
    //定义了内部类ViewHolder
    static class ViewHolder extends RecyclerView.ViewHolder{


        LinearLayout leftLayout;
        LinearLayout rightLayout;
        TextView leftMsg;
        TextView rightMsg;
        //构造函数传入view,通常是recyclerView子项的最外层布局
        public ViewHolder(View view){


            super(view);
            leftLayout=(LinearLayout) view.findViewById(R.id.left_layout);
            rightLayout=(LinearLayout) view.findViewById(R.id.right_layout);
            leftMsg=(TextView) view.findViewById(R.id.left_msg);
            rightMsg=(TextView) view.findViewById(R.id.right_msg);
        }
    }
    //构造函数,用于把要展示地数据源传进来,并赋值给一个全局变量mFruitList
    public MsgAdapter(List<Msg> msgList){


        mMsgList= msgList;
    }
    //重写方法,用于创建ViewHoler实例,我们在这个方法中将fruit_item布局加载进来,然后创建一个ViewHolder实例。
    //并且把加载出来的布局传入到构造函数中,最后将ViewHolder的实例返回。
    @Override
    public ViewHolder onCreateViewHolder(@NonNull ViewGroup parent, int viewType) {


        View view= LayoutInflater.from(parent.getContext()).inflate(R.layout.msg_item,parent,false);
        ViewHolder holder=new ViewHolder(view);
        return holder;
    }
    //用于对RecyclerView子项的数据进行赋值的,会在每个子项被滚动到屏幕内的时候执行。
    //这里我们通过position参数得到当前项的Fruit实例
    //再将数据设置到ViewHolder的ImageView和TetxView当中
    @Override
    public void onBindViewHolder(@NonNull MsgAdapter.ViewHolder holder, int position) {


        Msg msg =mMsgList.get(position);
       if(msg.getType()==Msg.TYPE_RECEIVED){


           //左侧收到
           holder.leftLayout.setVisibility(View.VISIBLE);
           holder.rightLayout.setVisibility(View.GONE);
           holder.leftMsg.setText(msg.getContent());
       }else if(msg.getType()==Msg.TYPE_SEND){


           //右侧收到
           holder.leftLayout.setVisibility(View.GONE);
           holder.rightLayout.setVisibility(View.VISIBLE);
           holder.rightMsg.setText(msg.getContent());
       }
    }
    //它用于告诉RecyclerView一共有多少子项,直接返回数据源的长度就可以了。
    @Override
    public int getItemCount() {


        return mMsgList.size();
    }
}
Then pass in the data in the main activity:
public class FirstActivity extends BaseActivity {


    private List<Msg> msgList=new ArrayList<>();
    private EditText inputText;
    private Button send;
    private RecyclerView msgRecyclerView;
    private MsgAdapter adapter;
    @Override
    protected void onCreate(Bundle savedInstanceState) {


        super.onCreate(savedInstanceState);
        setContentView(R.layout.first_layout);
        initMsgs();
        inputText=(EditText) findViewById(R.id.input_text);
        send =(Button) findViewById(R.id.send);
        msgRecyclerView=(RecyclerView) findViewById(R.id.recycler_view);
        LinearLayoutManager layoutManager =new LinearLayoutManager(this);
        //将信息显示区域设定成线性布局
        msgRecyclerView.setLayoutManager(layoutManager);
        //传入数据给适配器处理
        adapter=new MsgAdapter(msgList);
        msgRecyclerView.setAdapter(adapter);

        send.setOnClickListener(new View.OnClickListener() {


            @Override
            public void onClick(View view) {


                String content =inputText.getText().toString();
                if(!"".equals(content)){


                    Msg msg=new Msg(content,Msg.TYPE_SEND);
                    msgList.add(msg);
                    //当有新消息时,刷新显示
                    adapter.notifyItemInserted(msgList.size()-1);
                    //将ListView定位到最后一行
                    msgRecyclerView.scrollToPosition(msgList.size()-1);
                    inputText.setText("");
                }
            }
        });
    }
    private void initMsgs(){


        Msg msg1=new Msg("hello guy",Msg.TYPE_RECEIVED);
        msgList.add(msg1);
        Msg msg2=new Msg("hello what is that?",Msg.TYPE_SEND);
        msgList.add(msg2);
        Msg msg3=new Msg("煞笔吧,会说中文拽啥英文",Msg.TYPE_RECEIVED);
        msgList.add(msg3);
    }
}
Achieved effect: