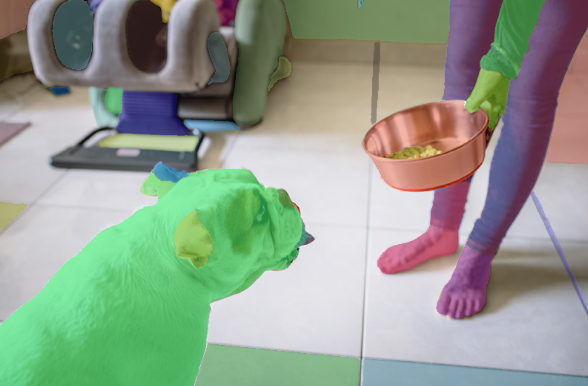
1. Use matplotlib to display the full color mask and save it
### import os.path

import cv2
import matplotlib.pyplot as plt
import numpy as np
from segment_anything import sam_model_registry, SamAutomaticMaskGenerator


def matplotlib_plot_sam_masks(masks,alpha=0.35):  # 使用matplotlib绘制Sam的masks掩码

    for mask in masks:
        mask_segmentation = mask['segmentation'] * alpha  # 获取mask
        color_list = np.random.random((1, 3)).tolist()[0]  # 随机生成颜色
        img_ones = np.ones((image.shape[0], image.shape[1], 4))
        for i in range(3):  # 将图像的RGB通道设置为随机的颜色
            img_ones[:, :, i] = color_list[i]
        img_ones[:, :, 3] = mask_segmentation
        img_ones = cv2.resize(img_ones, (image.shape[1], image.shape[0]))  # 将掩模图像缩放至与原始图像相同的大小
        ax = plt.gca()
        ax.set_autoscale_on(False)
        ax.spines['top'].set_visible(False)
        ax.spines['right'].set_visible(False)
        ax.spines['bottom'].set_visible(False)
        ax.spines['left'].set_visible(False)

        ax.imshow(img_ones)

def get_filename_and_houzhui(full_path):
    import os
    path, file_full_name = os.path.split(full_path)
    file_name, 后缀名 = os.path.splitext(file_full_name)
    return path,file_name,后缀名

image_name = 'notebooks/images/dog.jpg'
image = cv2.imread(image_name)
image = cv2.cvtColor(image, cv2.COLOR_BGR2RGB)

sam_model = sam_model_registry['vit_b'](checkpoint='models/sam_vit_b_01ec64.pth').to(device='cuda')
mask_generator = SamAutomaticMaskGenerator(sam_model)

masks = mask_generator.generate(image)


plt.imshow(image)
plt.axis('off')
matplotlib_plot_sam_masks(masks,alpha=0.35)
path,file_name,后缀名 = get_filename_and_houzhui(full_path = image_name)
output_name = os.path.join('output',f"{file_name}_mask.png")
plt.savefig(output_name, bbox_inches='tight', dpi=600, pad_inches=0.0)
plt.show()
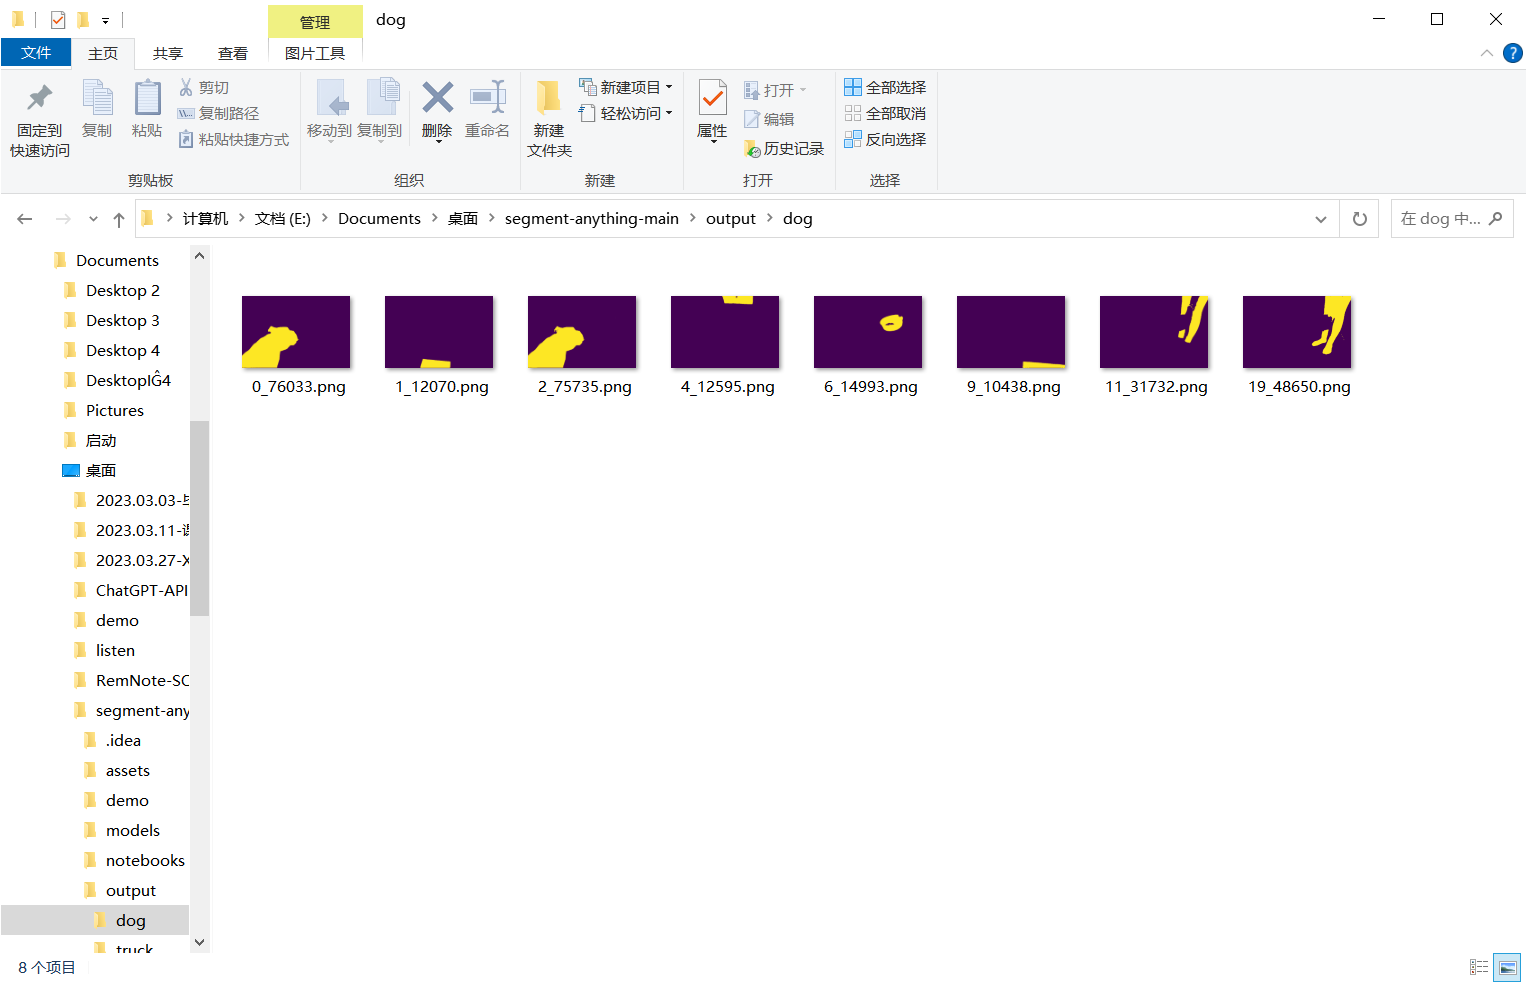
2. Use matplotlib to display a single mask, and only save the mask image with an area greater than a threshold
### import os.path

import cv2
import matplotlib.pyplot as plt
import numpy as np
from segment_anything import sam_model_registry, SamAutomaticMaskGenerator

def get_filename_and_houzhui(full_path):
    import os
    path, file_full_name = os.path.split(full_path)
    file_name, 后缀名 = os.path.splitext(file_full_name)
    return path,file_name,后缀名

def make_dir(path):
    import os
    dir = os.path.exists(path)
    if not dir:
        os.makedirs(path)


def set_mask_area_threshold_to_save(masks, mask_area_threshold = 2000, output_path=''):  # 设置一定的面积阈值,只有大于阈值的图片才会被保存

    for index,mask in enumerate(masks):
        mask_segmentation = mask['segmentation']  # 获取mask
        mask_area = mask['area']

        if(mask_area > mask_area_threshold):       #设置一定的面积阈值,用来挑选对应的mask掩码图片
            print("mask_area:", mask_area)
            plt.imshow(mask_segmentation)

            output_file_path = os.path.join(output_path,f"{index}_{mask_area}.png")
            plt.savefig(output_file_path, bbox_inches='tight', dpi=600, pad_inches=0.0)

            # plt.axis('off')
            # plt.show()


image_name = 'notebooks/images/dog.jpg'
path,file_name,后缀名 = get_filename_and_houzhui(full_path = image_name)
make_dir(f'output/{file_name}')
output_path = f'output/{file_name}/'


image = cv2.imread(image_name)
image = cv2.cvtColor(image, cv2.COLOR_BGR2RGB)

sam_model = sam_model_registry['vit_b'](checkpoint='models/sam_vit_b_01ec64.pth').to(device='cuda')
mask_generator = SamAutomaticMaskGenerator(sam_model)

masks = mask_generator.generate(image)

plt.imshow(image)
plt.axis('off')
set_mask_area_threshold_to_save(masks, 10000, output_path)
plt.show()
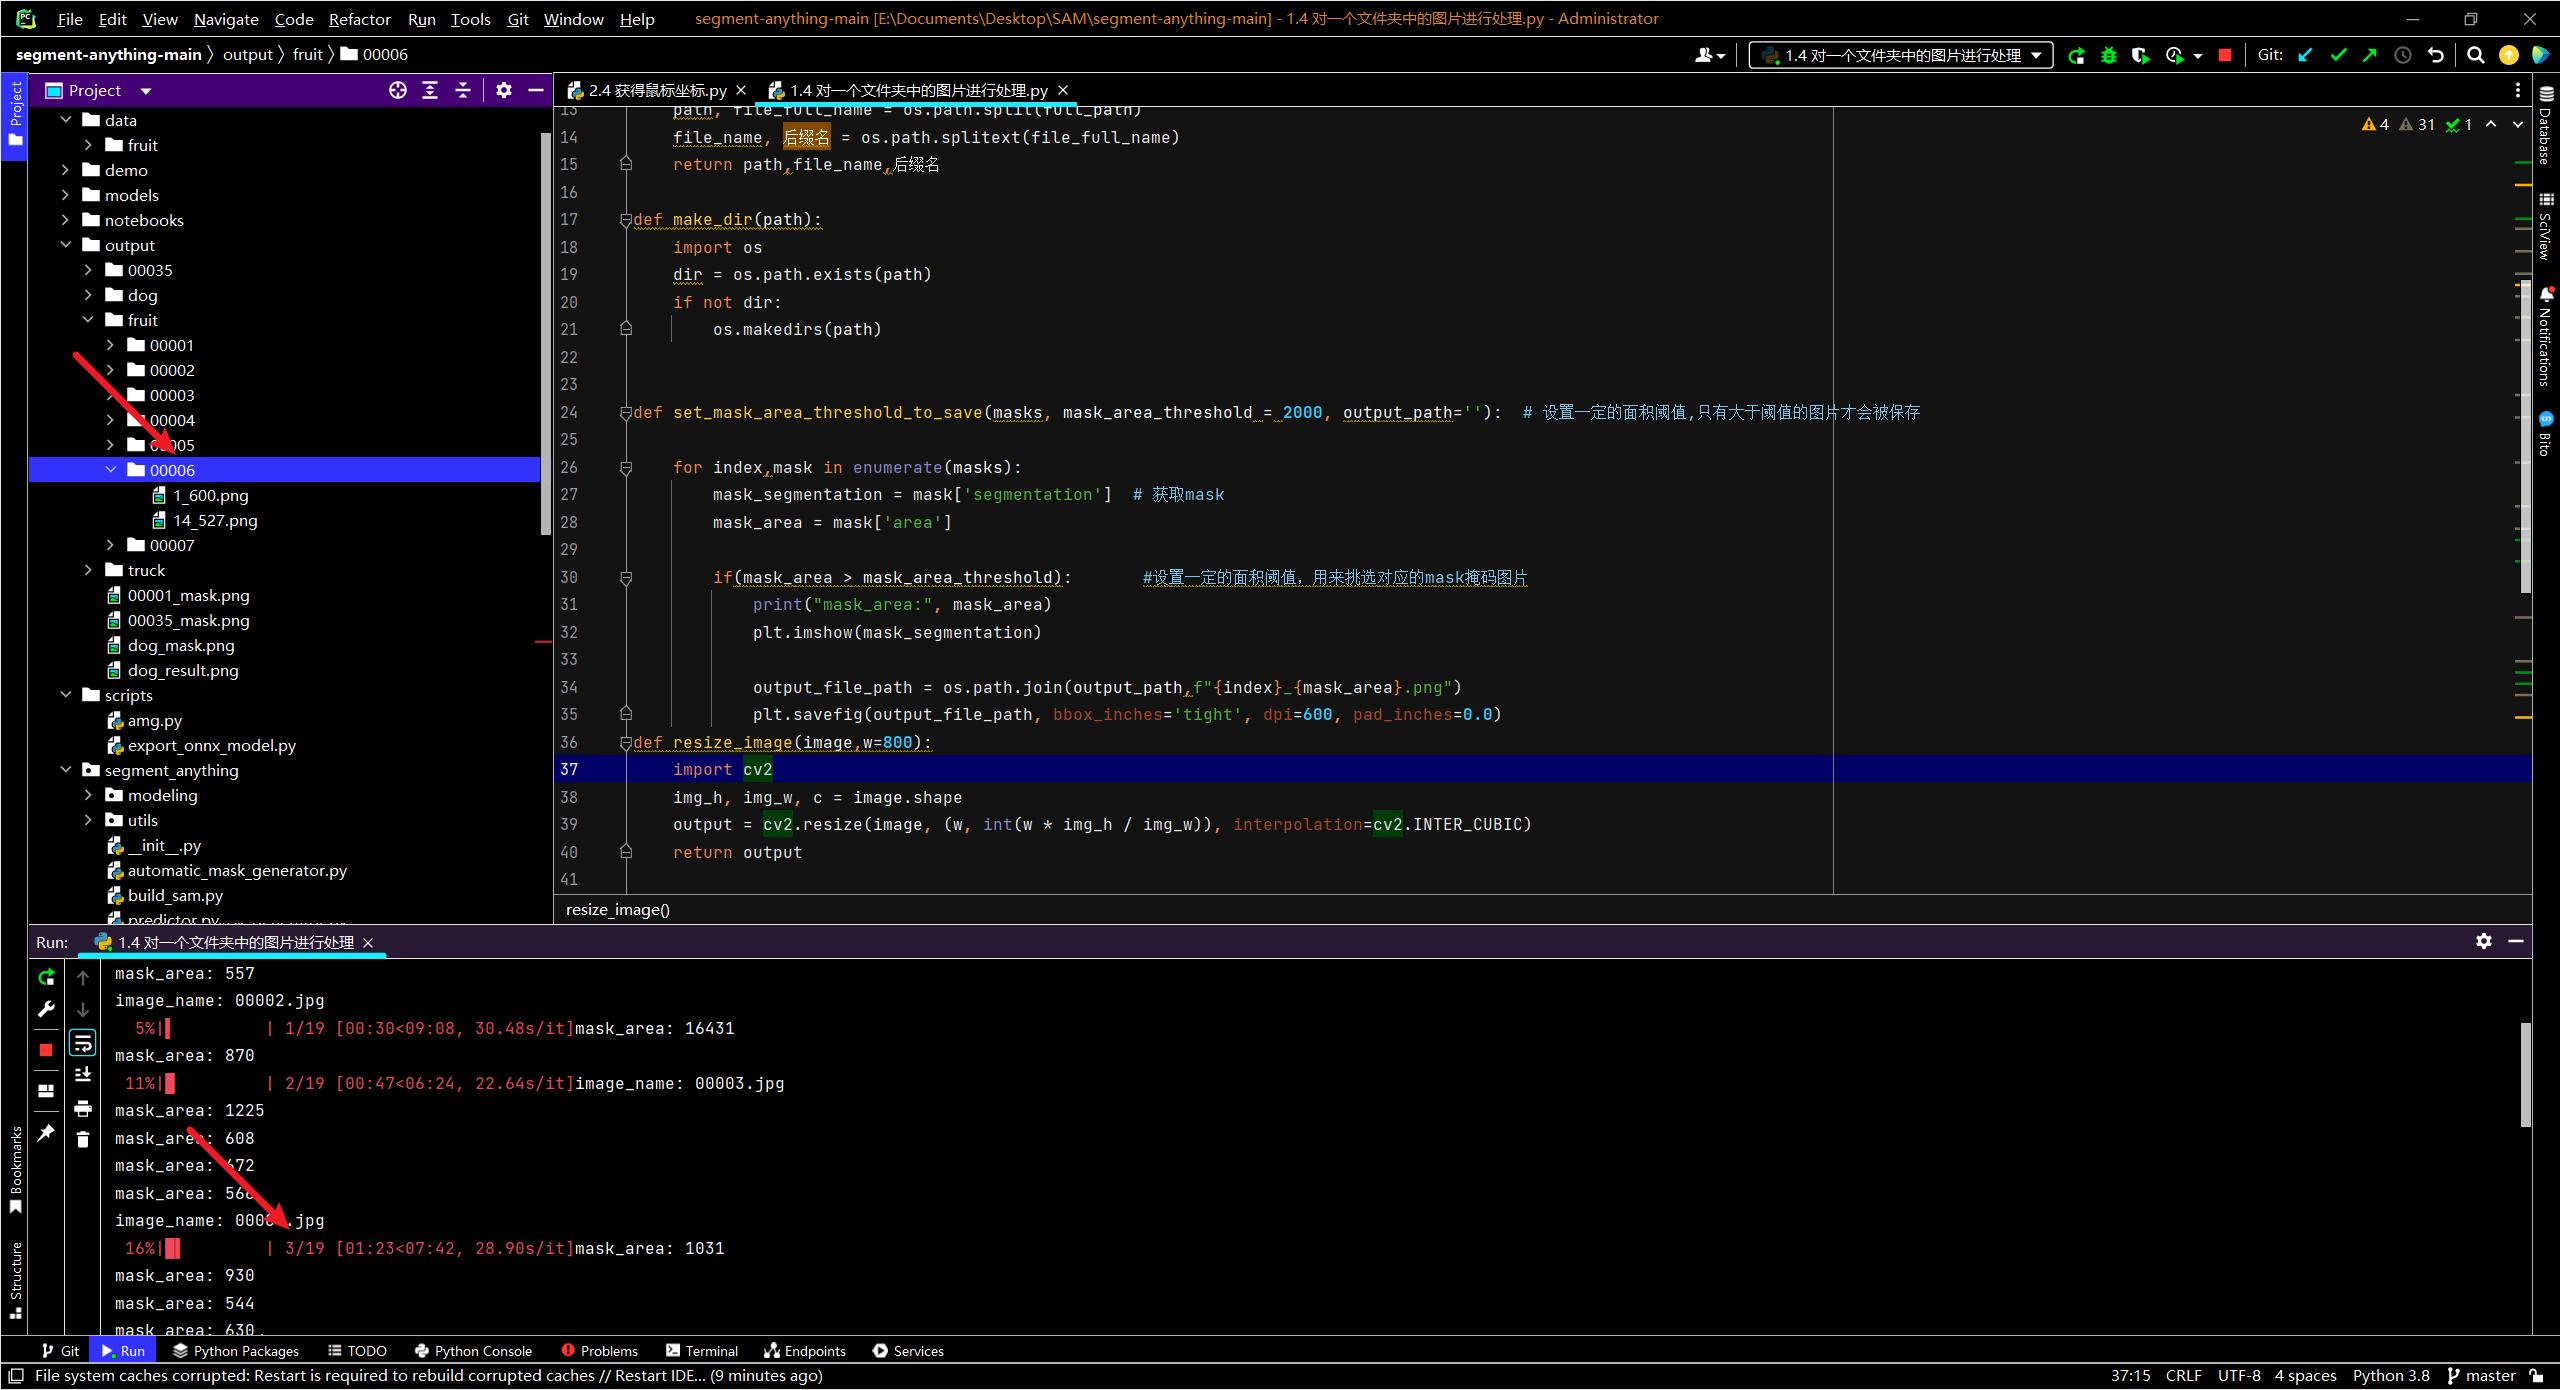
3. Process the pictures in an entire folder, and only save the mask pictures whose area is larger than a certain threshold
- The processing speed is relatively slow. It took half an hour to process 20 pictures. Maybe the code or the parameters set are wrong.
### import os.path

import cv2
import matplotlib.pyplot as plt
import numpy as np
from segment_anything import sam_model_registry, SamAutomaticMaskGenerator
import os
import cv2
from tqdm import tqdm


def get_filename_and_houzhui(full_path):
    import os
    path, file_full_name = os.path.split(full_path)
    file_name, 后缀名 = os.path.splitext(file_full_name)
    return path, file_name, 后缀名


def make_dir(path):
    import os
    dir = os.path.exists(path)
    if not dir:
        os.makedirs(path)


def set_mask_area_threshold_to_save(masks, mask_area_threshold=2000, output_path=''):  # 设置一定的面积阈值,只有大于阈值的图片才会被保存

    for index, mask in enumerate(masks):
        mask_segmentation = mask['segmentation']  # 获取mask
        mask_area = mask['area']

        if (mask_area > mask_area_threshold):  # 设置一定的面积阈值,用来挑选对应的mask掩码图片
            print("mask_area:", mask_area)
            plt.imshow(mask_segmentation)

            output_file_path = os.path.join(output_path, f"{index}_{mask_area}.png")
            plt.savefig(output_file_path, bbox_inches='tight', dpi=600, pad_inches=0.0)


def resize_image(image, w=800):
    import cv2
    img_h, img_w, c = image.shape
    output = cv2.resize(image, (w, int(w * img_h / img_w)), interpolation=cv2.INTER_CUBIC)
    return output


image_dir_path = 'data/fruit'
image_name_list = os.listdir(image_dir_path)
for image_name in tqdm(image_name_list):
    print("image_name:", image_name)
    image_path = os.path.join(image_dir_path, image_name)
    image = cv2.imread(image_path)
    image = cv2.cvtColor(image, cv2.COLOR_BGR2RGB)
    image = resize_image(image, 640)

    path, file_name, 后缀名 = get_filename_and_houzhui(full_path=image_path)
    output_path = f'output/fruit/{file_name}/'
    make_dir(output_path)

    sam_model = sam_model_registry['vit_b'](checkpoint='models/sam_vit_b_01ec64.pth').to(device='cuda')
    mask_generator = SamAutomaticMaskGenerator(sam_model)

    masks = mask_generator.generate(image)

    set_mask_area_threshold_to_save(masks, 500, output_path)
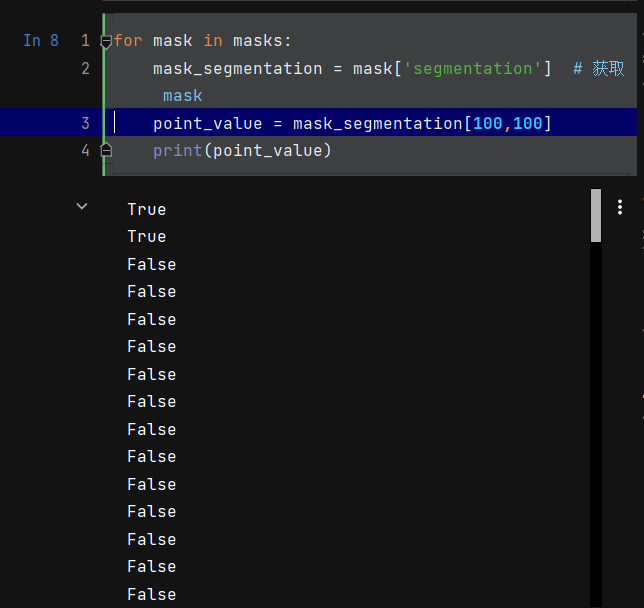
4. Check whether there is a mask mask at a specific coordinate point
### import os.path

import cv2
import matplotlib.pyplot as plt
import numpy as np
from segment_anything import sam_model_registry, SamAutomaticMaskGenerator


def matplotlib_plot_sam_masks(masks,alpha=0.35):  # 使用matplotlib绘制Sam的masks掩码

    for mask in masks:
        mask_segmentation = mask['segmentation'] * alpha  # 获取mask
        color_list = np.random.random((1, 3)).tolist()[0]  # 随机生成颜色
        img_ones = np.ones((image.shape[0], image.shape[1], 4))
        for i in range(3):  # 将图像的RGB通道设置为随机的颜色
            img_ones[:, :, i] = color_list[i]
        img_ones[:, :, 3] = mask_segmentation
        img_ones = cv2.resize(img_ones, (image.shape[1], image.shape[0]))  # 将掩模图像缩放至与原始图像相同的大小
        ax = plt.gca()
        ax.set_autoscale_on(False)
        ax.spines['top'].set_visible(False)
        ax.spines['right'].set_visible(False)
        ax.spines['bottom'].set_visible(False)
        ax.spines['left'].set_visible(False)

        ax.imshow(img_ones)


def set_mask_area_threshold_to_save(masks, mask_area_threshold=2000, output_path=''):  # 设置一定的面积阈值,只有大于阈值的图片才会被保存

    for index, mask in enumerate(masks):
        mask_segmentation = mask['segmentation']  # 获取mask
        mask_area = mask['area']

        if (mask_area > mask_area_threshold):  # 设置一定的面积阈值,用来挑选对应的mask掩码图片
            print("mask_area:", mask_area)
            plt.imshow(mask_segmentation)

            output_file_path = os.path.join(output_path, f"{index}_{mask_area}.png")
            plt.savefig(output_file_path, bbox_inches='tight', dpi=600, pad_inches=0.0)


def on_click(event):
    if event.button == 1:
        x, y = event.xdata, event.ydata
        print(f"鼠标左键点击:x={x:.2f}, y"
              f"={y:.2f}")
        output_name = os.path.join('output', f"{file_name}_mask.png")
        print('开始保存----------------->')
        plt.savefig(output_name, bbox_inches='tight', dpi=600, pad_inches=0.0)

        for index, mask in enumerate(masks):
            mask_segmentation = mask['segmentation']  # 获取mask
            mask_area = mask['area']
            # points


        print('保存完毕----------------->')
        # set_mask_area_threshold_to_save()
    elif event.button == 3:
        print("鼠标右键点击")


def make_dir(path):
    import os
    dir = os.path.exists(path)
    # print('---------------------------------------------------')
    # print(path)
    if not dir:
        os.makedirs(path)


def get_filename_and_houzhui(full_path):
    import os
    path, file_full_name = os.path.split(full_path)
    file_name, 后缀名 = os.path.splitext(file_full_name)
    return path,file_name,后缀名

def resize_image(image,w=800):
    import cv2
    img_h, img_w, c = image.shape
    output = cv2.resize(image, (w, int(w * img_h / img_w)), interpolation=cv2.INTER_CUBIC)
    return output

image_name = 'data/fruit/00001.jpg'

image = cv2.imread(image_name)
image = cv2.cvtColor(image, cv2.COLOR_BGR2RGB)
image = resize_image(image,640)


sam_model = sam_model_registry['vit_b'](checkpoint='models/sam_vit_b_01ec64.pth').to(device='cuda')
mask_generator = SamAutomaticMaskGenerator(sam_model)

masks = mask_generator.generate(image)


for mask in masks:
    mask_segmentation = mask['segmentation']  # 获取mask
    # print(mask_segmentation)
    point_value = mask_segmentation[100,100]
    print(point_value)
5. Check whether there is a mask mask in the area clicked by the mouse
- If this code is not particularly accurate, because sometimes there may be a point with two masks, it may be because the area is wrong

### import os.path

import cv2
import matplotlib.pyplot as plt
import numpy as np
from segment_anything import sam_model_registry, SamAutomaticMaskGenerator


def matplotlib_plot_sam_masks(masks,alpha=0.35):  # 使用matplotlib绘制Sam的masks掩码

    for mask in masks:
        mask_segmentation = mask['segmentation'] * alpha  # 获取mask
        color_list = np.random.random((1, 3)).tolist()[0]  # 随机生成颜色
        img_ones = np.ones((image.shape[0], image.shape[1], 4))
        for i in range(3):  # 将图像的RGB通道设置为随机的颜色
            img_ones[:, :, i] = color_list[i]
        img_ones[:, :, 3] = mask_segmentation
        img_ones = cv2.resize(img_ones, (image.shape[1], image.shape[0]))  # 将掩模图像缩放至与原始图像相同的大小
        ax = plt.gca()
        ax.set_autoscale_on(False)
        ax.spines['top'].set_visible(False)
        ax.spines['right'].set_visible(False)
        ax.spines['bottom'].set_visible(False)
        ax.spines['left'].set_visible(False)

        ax.imshow(img_ones)


def set_mask_area_threshold_to_save(masks, mask_area_threshold=2000, output_path=''):  # 设置一定的面积阈值,只有大于阈值的图片才会被保存

    for index, mask in enumerate(masks):
        mask_segmentation = mask['segmentation']  # 获取mask
        mask_area = mask['area']

        if (mask_area > mask_area_threshold):  # 设置一定的面积阈值,用来挑选对应的mask掩码图片
            print("mask_area:", mask_area)
            plt.imshow(mask_segmentation)

            output_file_path = os.path.join(output_path, f"{index}_{mask_area}.png")
            plt.savefig(output_file_path, bbox_inches='tight', dpi=600, pad_inches=0.0)


def on_click(event):
    if event.button == 1:
        x, y = event.xdata, event.ydata
        x = int(x)
        y = int(y)
        print('-----------------开始显示----------------->')
        print('x:',x,'y:',y)
        output_name = os.path.join('output', f"{file_name}_mask.png")
        # plt.savefig(output_name, bbox_inches='tight', dpi=600, pad_inches=0.0)

        for index, mask in enumerate(masks):
            # mask_segmentation = mask['segmentation']  # 获取mask
            mask_area = mask['area']
            # points
            mask_segmentation = mask['segmentation']  # 获取mask
            point_value = mask_segmentation[int(y), int(x)]
            if point_value == True:
                print(point_value)

        print('-----------------结束显示----------------->')


        # set_mask_area_threshold_to_save()
    elif event.button == 3:
        print("鼠标右键点击")


def make_dir(path):
    import os
    dir = os.path.exists(path)
    # print('---------------------------------------------------')
    # print(path)
    if not dir:
        os.makedirs(path)


def get_filename_and_houzhui(full_path):
    import os
    path, file_full_name = os.path.split(full_path)
    file_name, 后缀名 = os.path.splitext(file_full_name)
    return path,file_name,后缀名

def resize_image(image,w=800):
    import cv2
    img_h, img_w, c = image.shape
    output = cv2.resize(image, (w, int(w * img_h / img_w)), interpolation=cv2.INTER_CUBIC)
    return output

image_name = 'data/fruit/00001.jpg'

image = cv2.imread(image_name)
image = cv2.cvtColor(image, cv2.COLOR_BGR2RGB)
image = resize_image(image,640)


sam_model = sam_model_registry['vit_b'](checkpoint='models/sam_vit_b_01ec64.pth').to(device='cuda')
mask_generator = SamAutomaticMaskGenerator(sam_model)

masks = mask_generator.generate(image)


fig, ax = plt.subplots()  # 创建画布和子图对象
ax.imshow(image)
plt.axis('off')
cid = fig.canvas.mpl_connect('button_press_event', on_click)  # 绑定鼠标点击事件

matplotlib_plot_sam_masks(masks,alpha=1)
path,file_name,后缀名 = get_filename_and_houzhui(full_path = image_name)
make_dir(path)
output_name = os.path.join('output',f"{file_name}_mask.png")

plt.savefig(output_name, bbox_inches='tight', dpi=600, pad_inches=0.0)
plt.show()