Task
If the car is running normally, everything is normal and the system works normally; if the car is in a locked state, the system starts to work. At this time, it will monitor whether there are children in the car without adults. If there are children, when the temperature in the car rises to a certain threshold, an alarm will be issued to prevent children from being forgotten or left behind. phenomenon in the car.
Achieving goals and methods:
①: The most important thing in this design is to monitor whether there are people in the car, and use visual technology to monitor the situation. This system uses the camera to collect images inside the car, (later can be modified, transmission method) Gigabit Ethernet port to transmit the image to the computer for image processing. The image processing development platform can use deep learning neural network and artificial intelligence methods to obtain face recognition. Ultimately, the decision on which approach to take is determined by the effect achieved.
②: Use STM32 microcontroller as another main control system to realize the control function. Carbon dioxide sensor, infrared temperature detection, (here is using the sensor module DS18B20) buzzer alarm module. In addition, to communicate with the first main control MCU (STM32) of this design, it is necessary to use the serial port and the single-chip microcomputer to exchange information and data.
Project Summary:
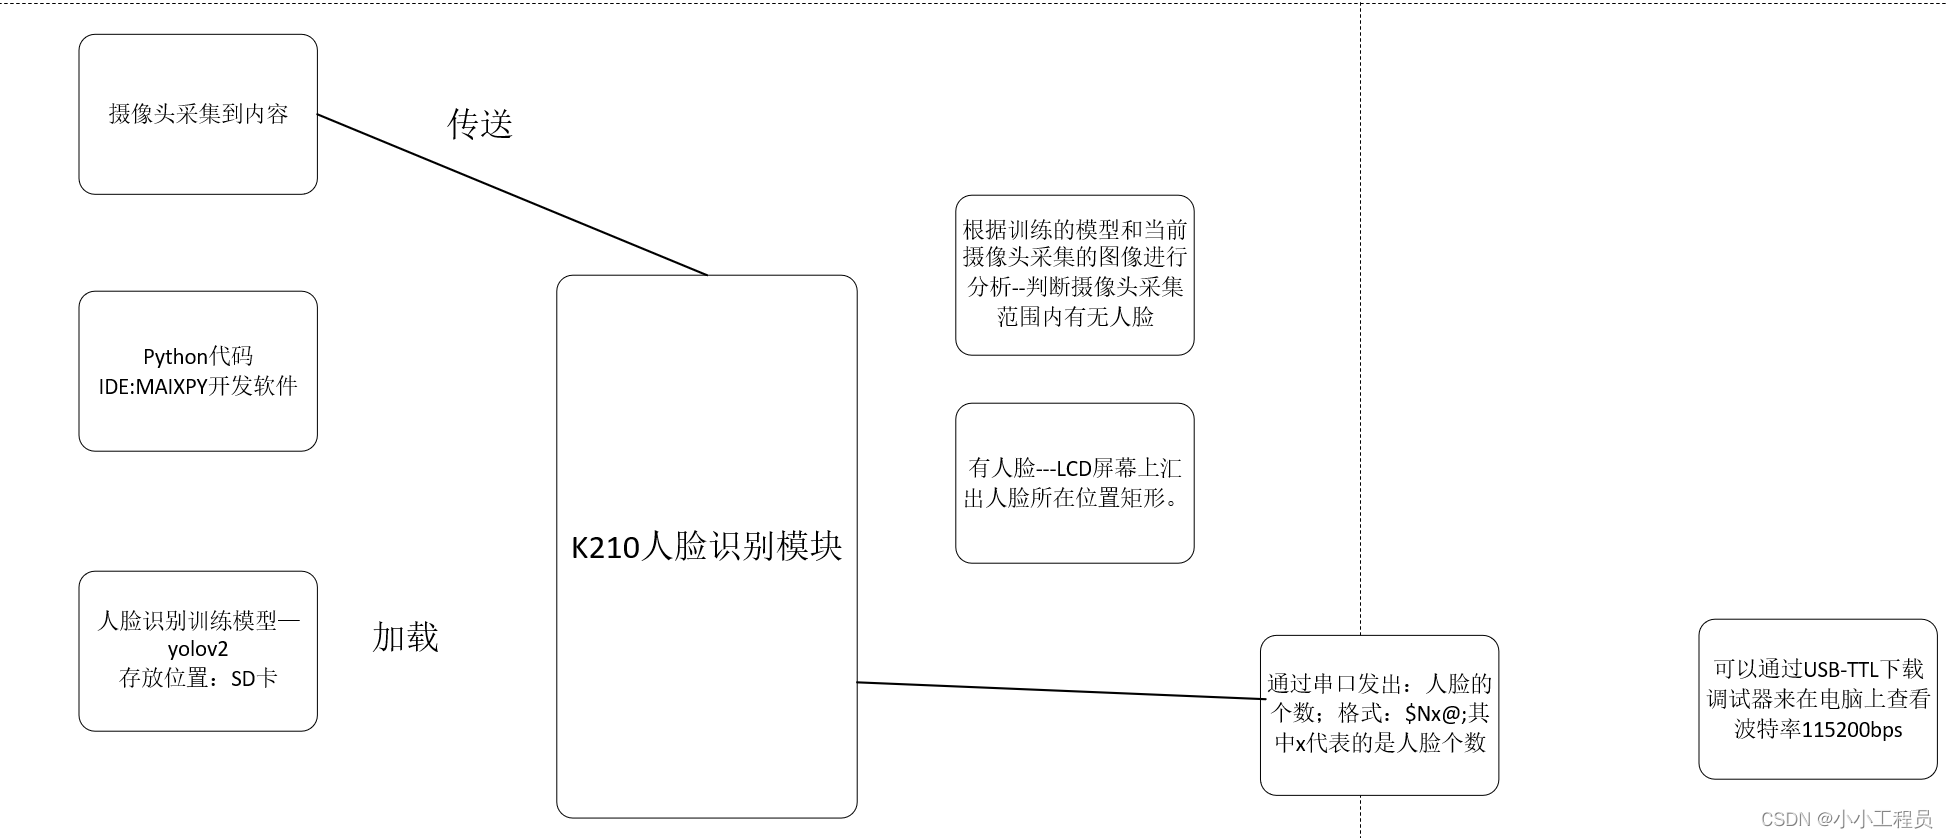
The main function is to use face detection technology to judge whether there are people in the car when parking, and at the same time detect the air quality in the car. If the air quality in the car is not suitable for the user to stay, it will automatically alarm to remind people to get off the car. It is mainly divided into two parts. The first part is machine vision face detection. I used the K210 module produced by the current domestic Canaan Technology Company. It uses the RISC-V architecture and achieves a computing power of 1TOPS. It is 300mW, which can well meet the needs of machine vision applications. This time I mainly use this chip for face detection. I use the yolo algorithm to deploy the trained face detection model to the K210 module, and then pass the detection results through the serial port. Output the detection results to the STM32 microcontroller. The second part is the detection and control part of the STM32 microcontroller. The STM32 microcontroller uses a TVOC gas sensor to detect the air quality in the car, such as the concentration of formaldehyde, CO2 concentration, and PM2.5 concentration. If the environment in the car is relatively poor, the microcontroller controls the voice. The module performs voice broadcast to achieve the function of reminding the user. All information is displayed on an OLED screen.
in kind
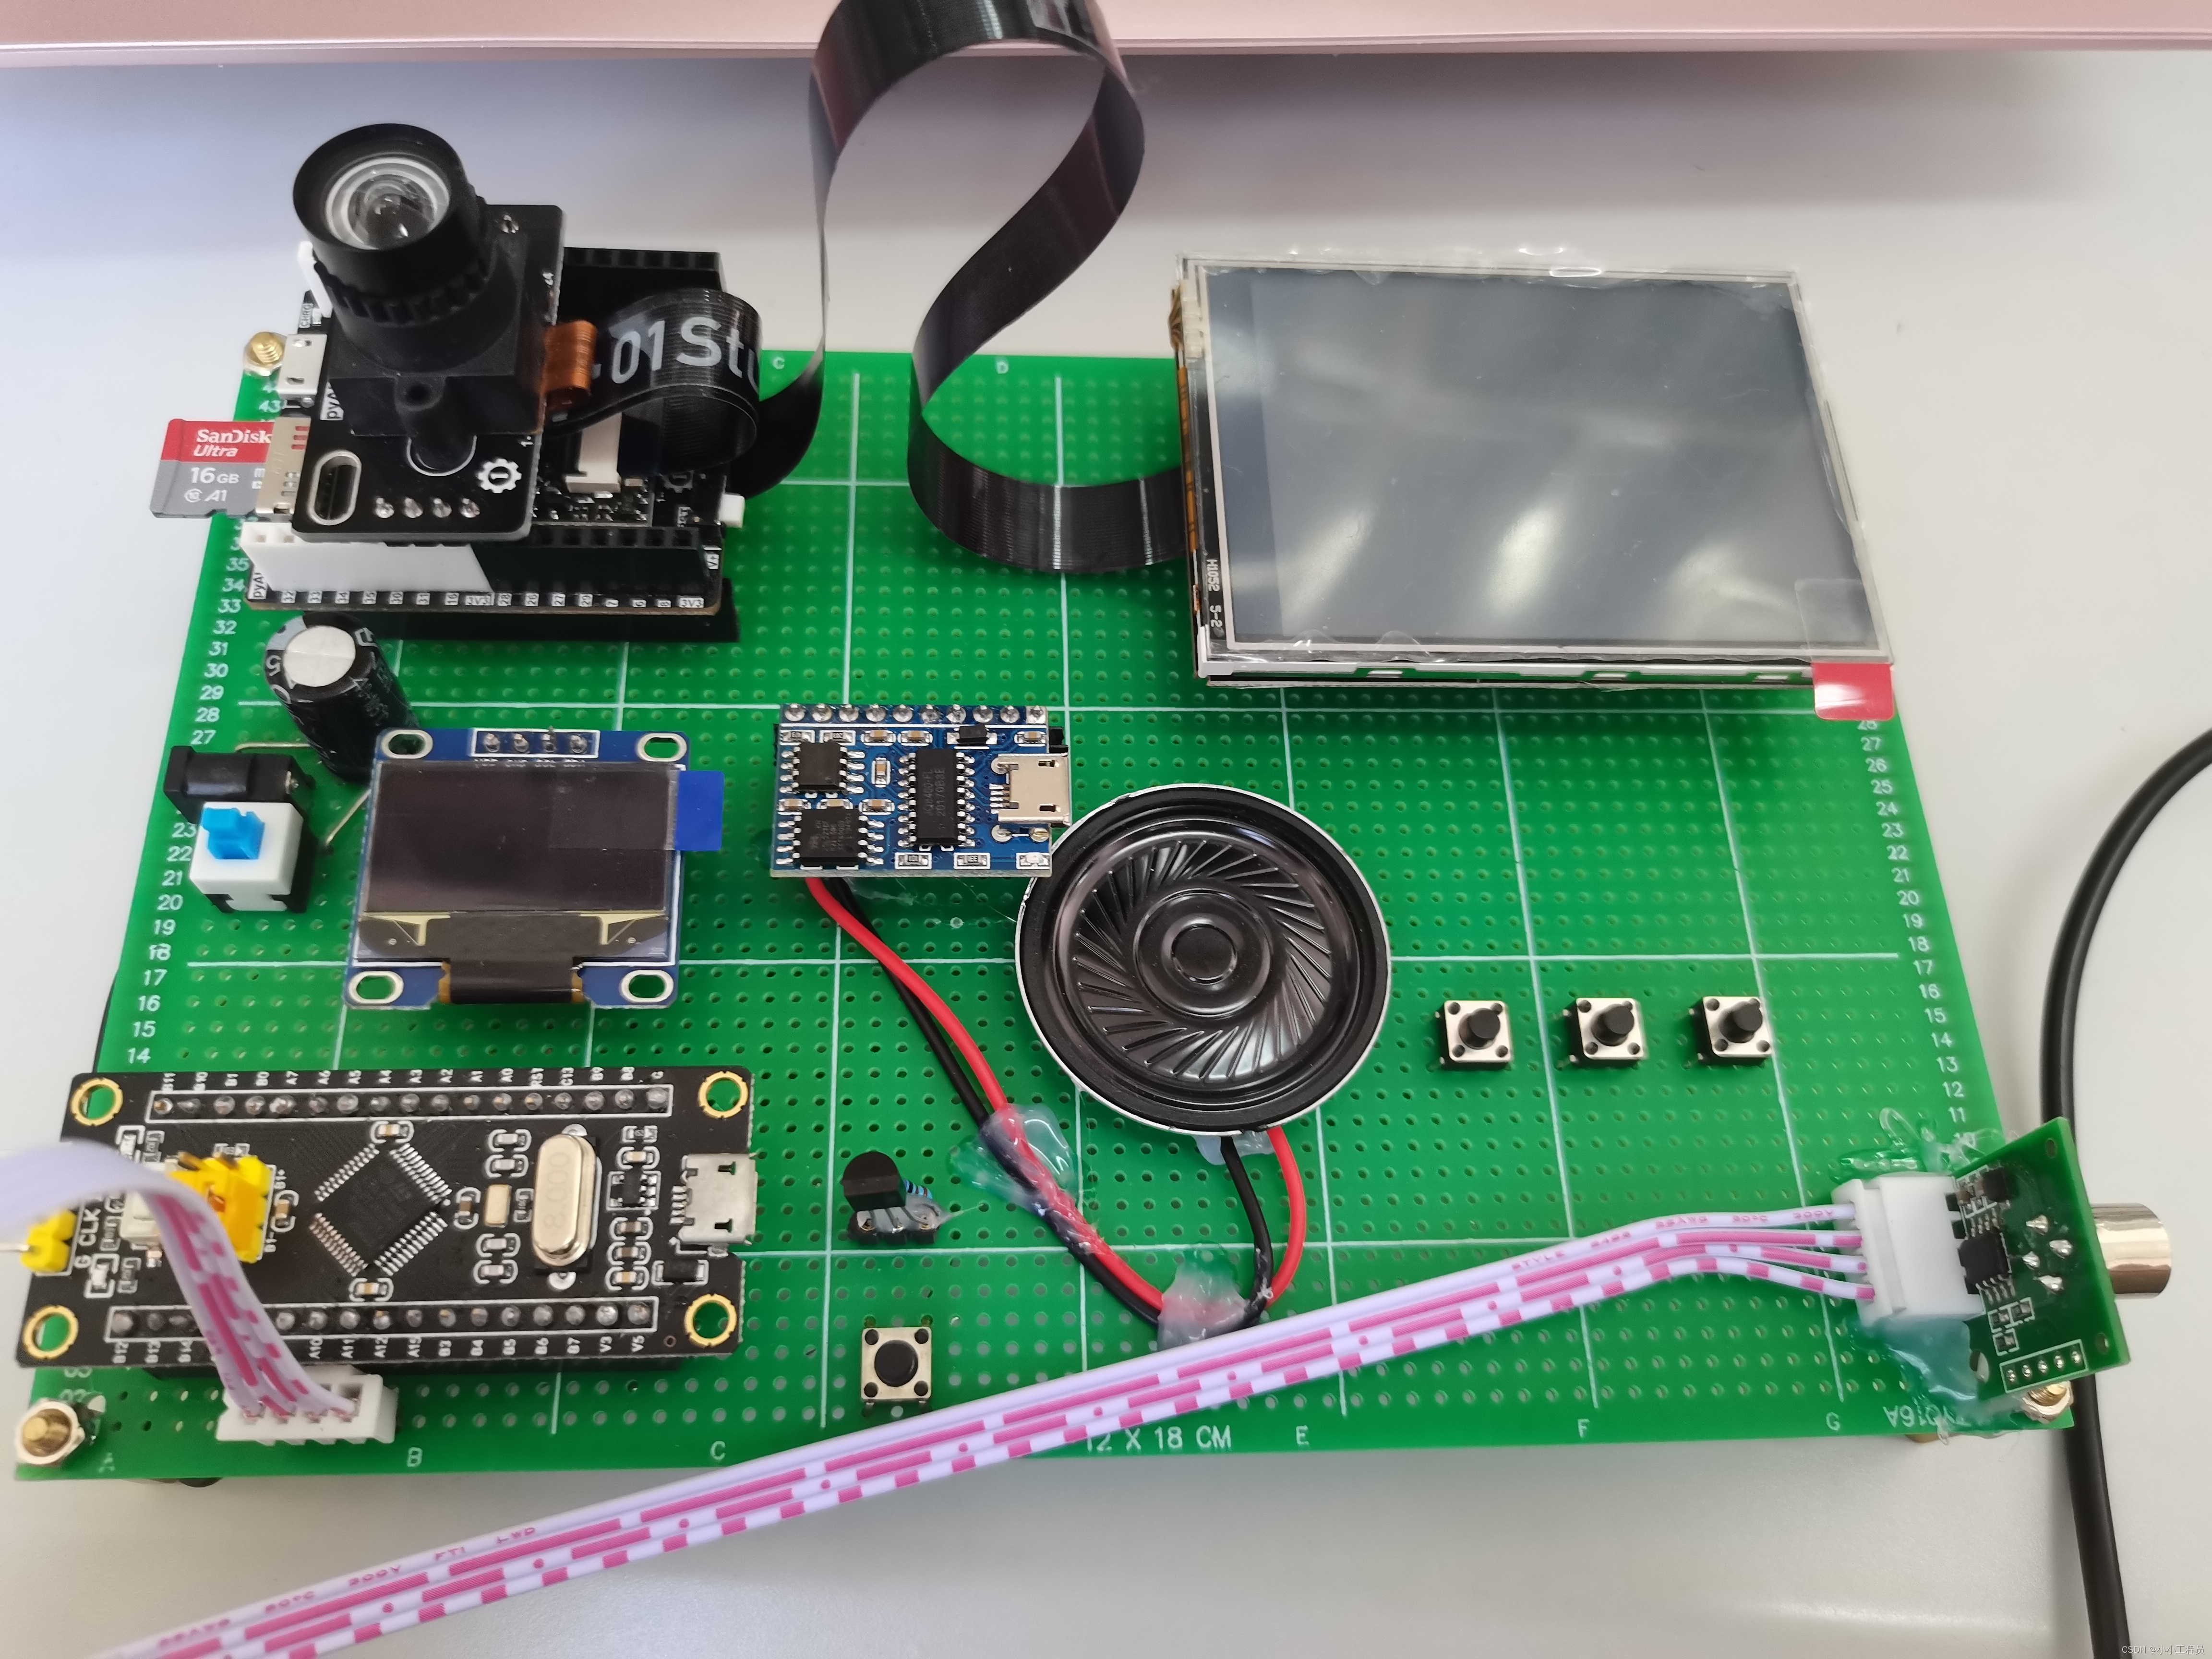
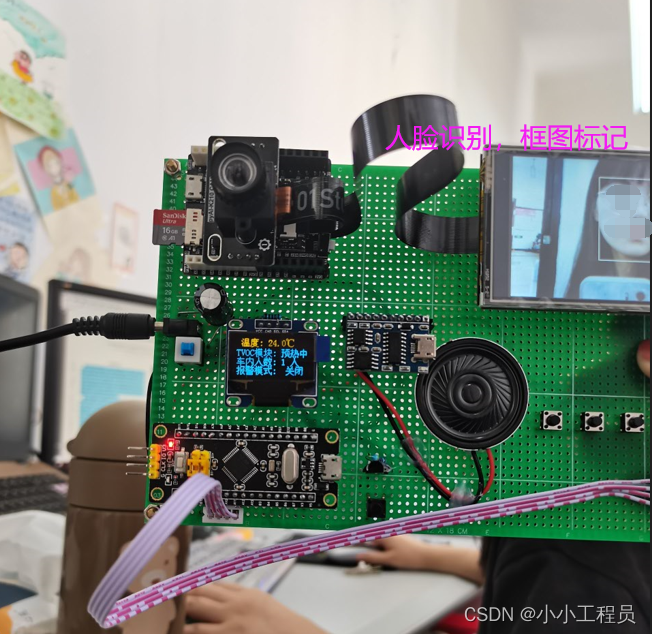
K210 module
Very useful embedded deployment module for deep learning. Although the speed is not high and there are not many resources to allocate, it is still possible to do simple applications, and the official routines are relatively complete. Open source websites also have a lot of information related to micropython , so it is worth learning.
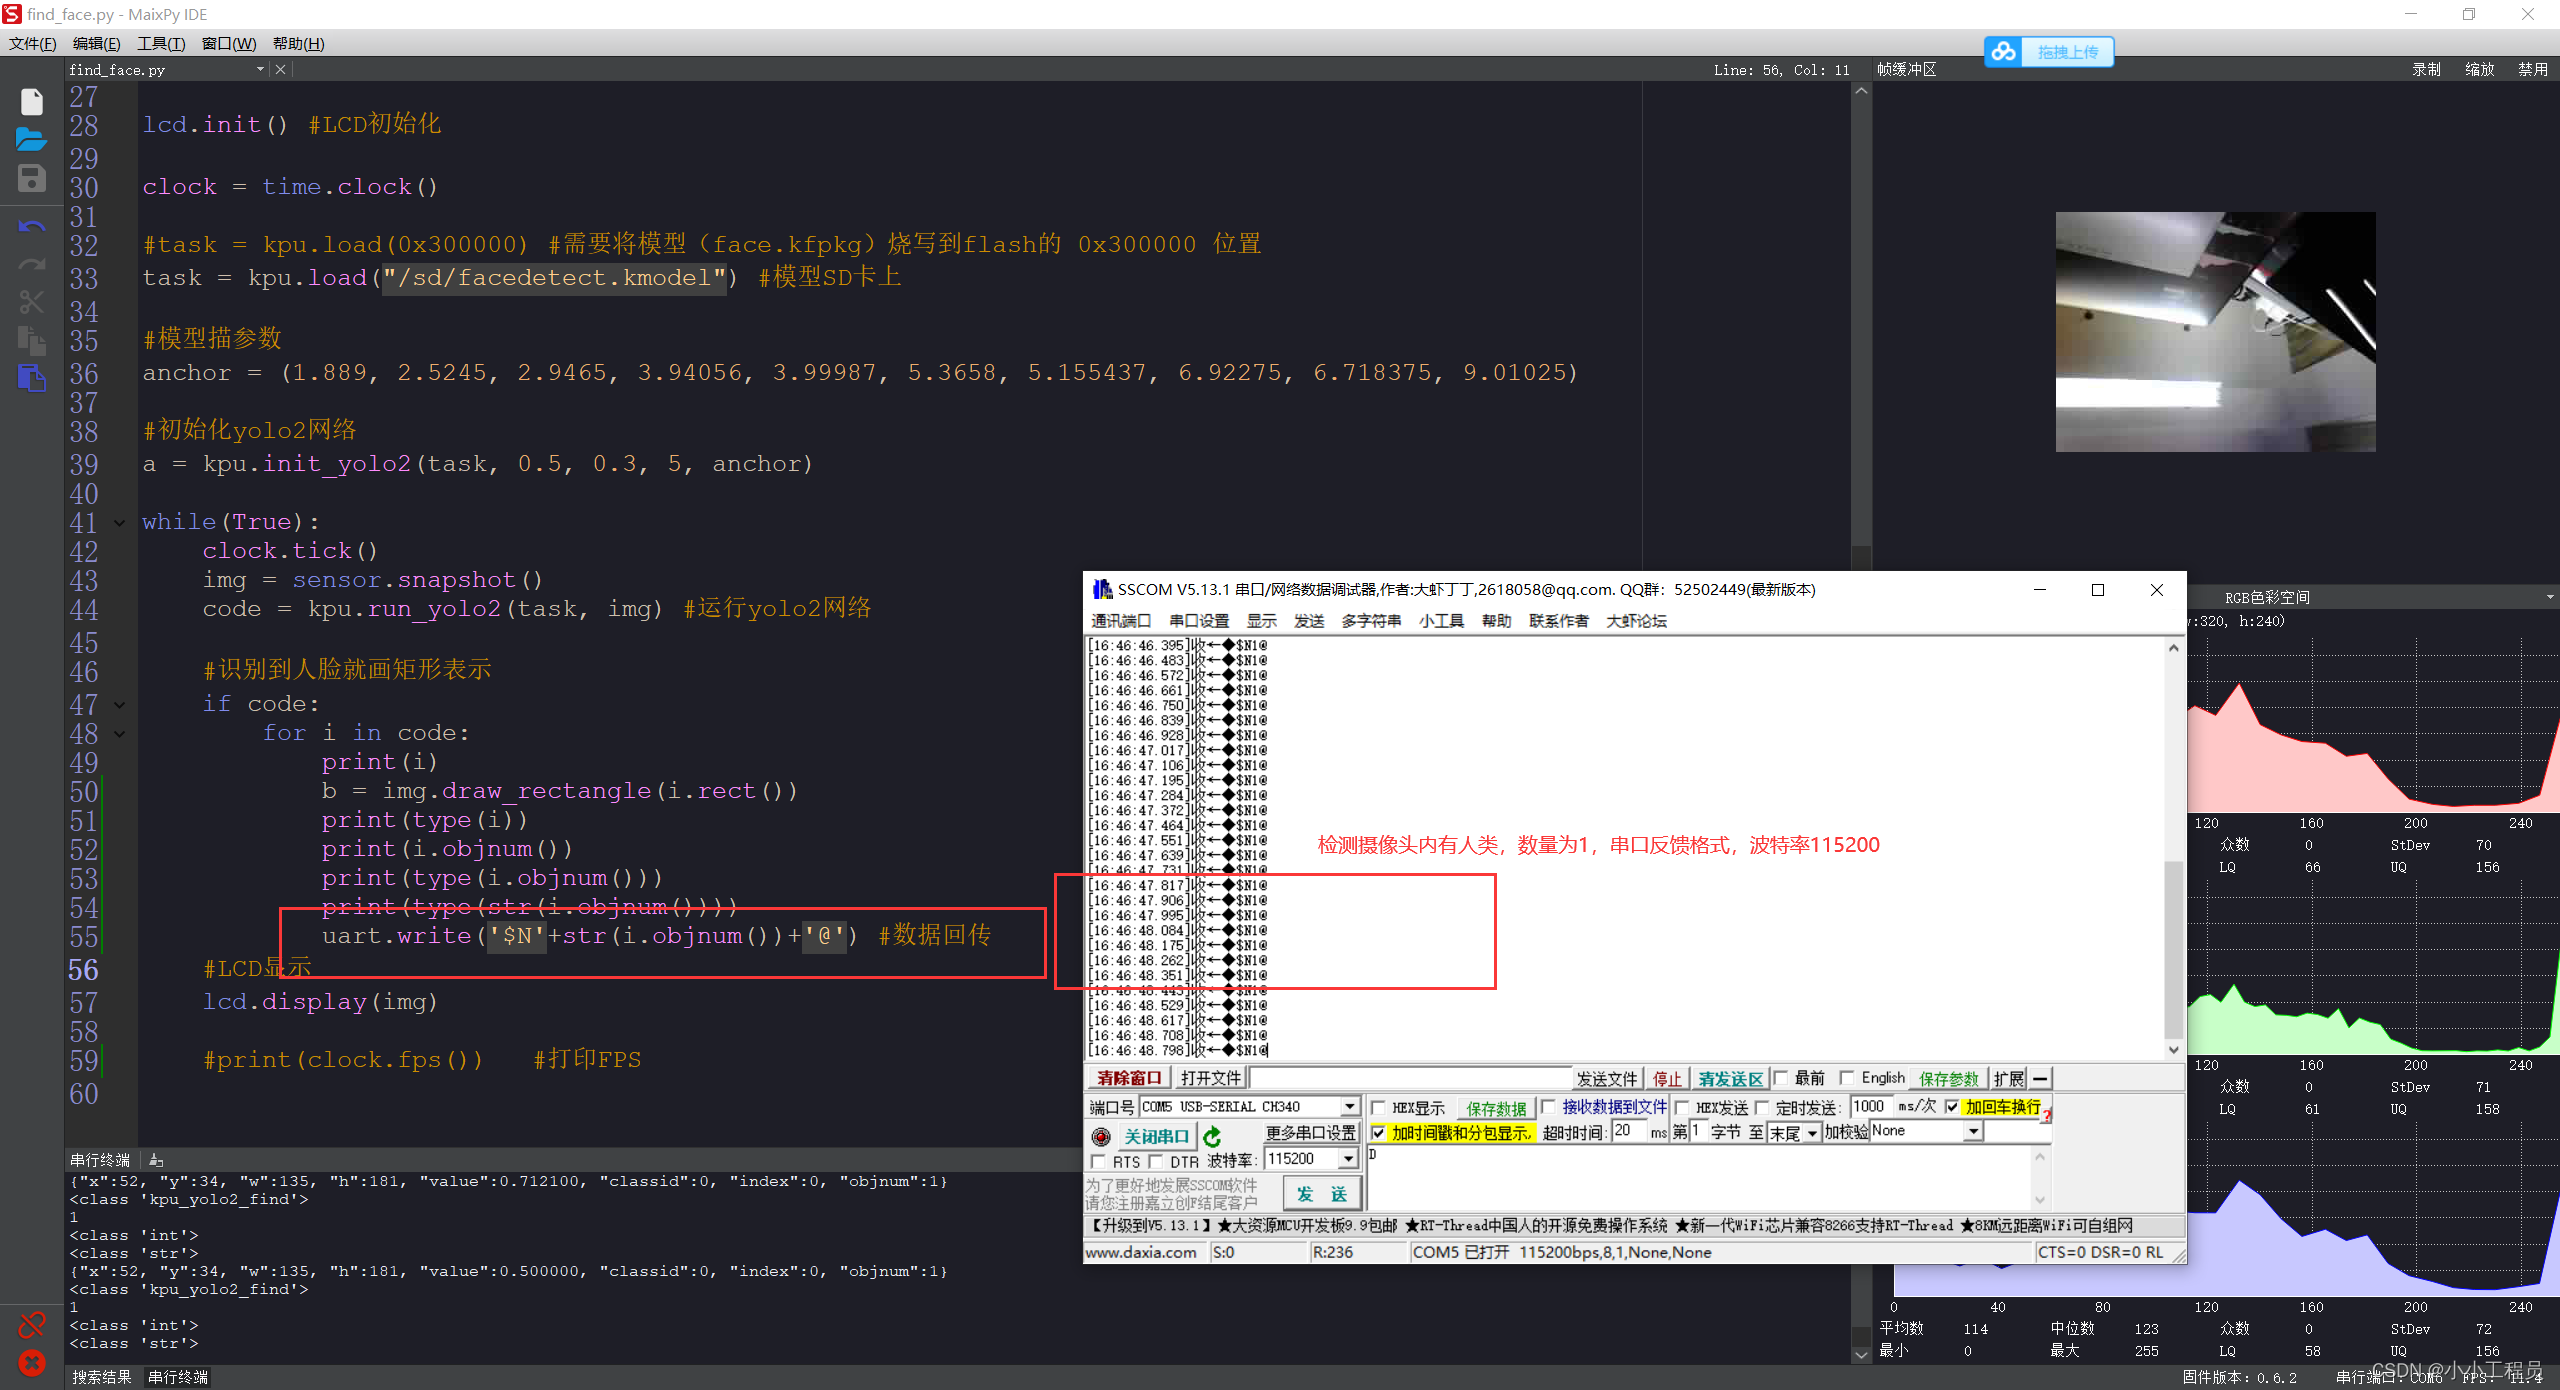
I have made little changes to the reference routine given by the official, just combine the serial port to output the result of face recognition. The output format of the serial port is self-defined. For the sake of simplicity, no verification is done. After all, it is only an experiment and has no industrial application.
#实验名称:人脸检测
#开发板官方:01Studio
#更改设计:燃烧电子
'''
运行代码,将摄像头正对自己,可以看到将自己的脸检测出来。
系统默认摄
像头是前置。注要将开发板竖起来!!!,即 LCD横屏显示。
'''
import sensor,lcd,time
import KPU as kpu
from machine import UART,Timer
from fpioa_manager import fm
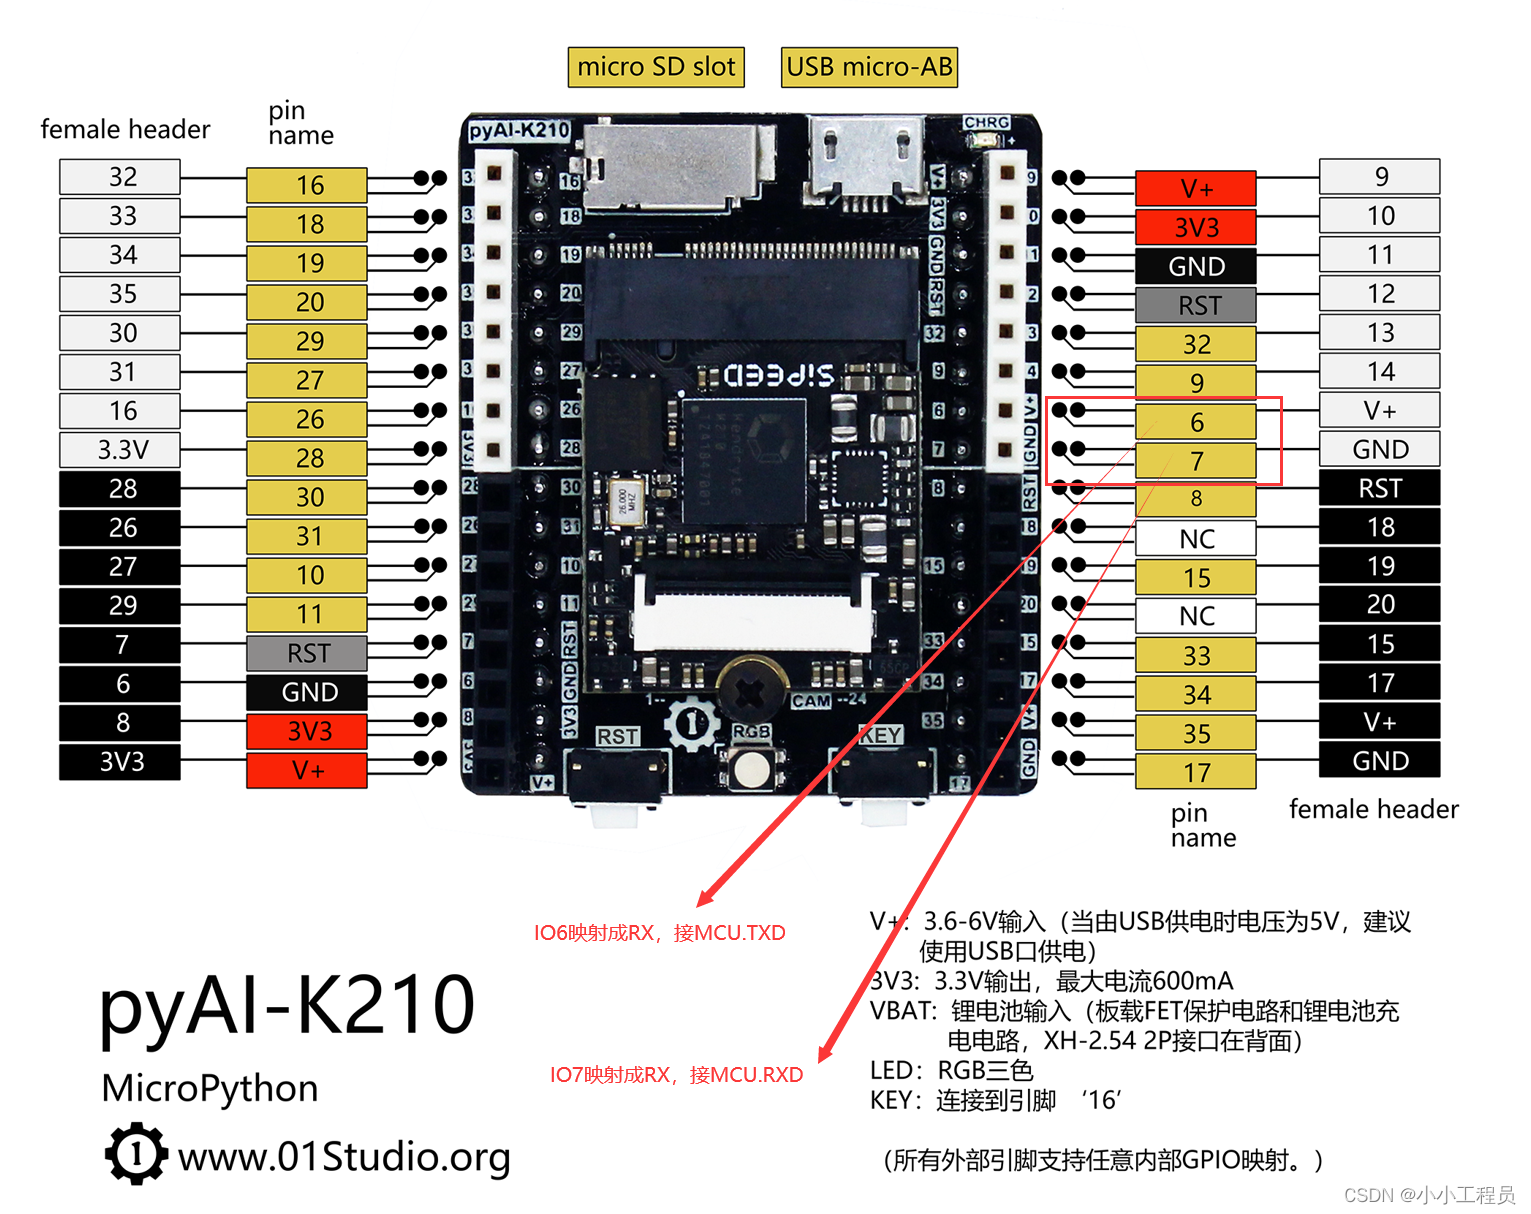
#映射串口引脚
fm.register(6, fm.fpioa.UART1_RX, force=True)
fm.register(7, fm.fpioa.UART1_TX, force=True)
#初始化串口
uart = UART(UART.UART1, 115200, read_buf_len=4096)
#uart.write('Hello 01Studio!')
#设置摄像头
sensor.reset()
sensor.set_pixformat(sensor.RGB565)
sensor.set_framesize(sensor.QVGA)
#sensor.set_vflip(0) #设置摄像头 0前置/1后置
lcd.init() #LCD初始化
lcd.rotation(2) #屏幕方向设定,【dir】取值范围[0-3],从0 到3 依顺时钟旋转。
clock = time.clock()
#task = kpu.load(0x300000) #需要将模型(face.kfpkg)烧写到flash的 0x300000 位置
task = kpu.load("/sd/facedetect.kmodel") #模型SD卡上
#模型描参数
anchor = (1.889, 2.5245, 2.9465, 3.94056, 3.99987, 5.3658, 5.155437, 6.92275, 6.718375, 9.01025)
#初始化yolo2网络
a = kpu.init_yolo2(task, 0.5, 0.3, 5, anchor)
#计数变量
Counter=0
#定时器回调函数
def fun(tim):
global Counter
Counter = Counter + 1
#定时器0初始化,周期1秒
tim = Timer(Timer.TIMER0, Timer.CHANNEL0, mode=Timer.MODE_PERIODIC, period=1000, callback=fun)
num=0
while(True):
clock.tick()
img = sensor.snapshot()
code = kpu.run_yolo2(task, img) #运行yolo2网络
#识别到人脸就画矩形表示
if code:
for i in code:
print(i)
b = img.draw_rectangle(i.rect())
num=num+1;
#print(type(i))
#print(i.objnum())
#print(type(i.objnum()))
#print(type(str(i.objnum())))
#LCD显示
lcd.display(img)
print(clock.fps()) #打印FPS
if Counter: #1S发送一次,不能太快了
Counter=0
uart.write('$N'+str(num)+'@') #数据回传
num=0;

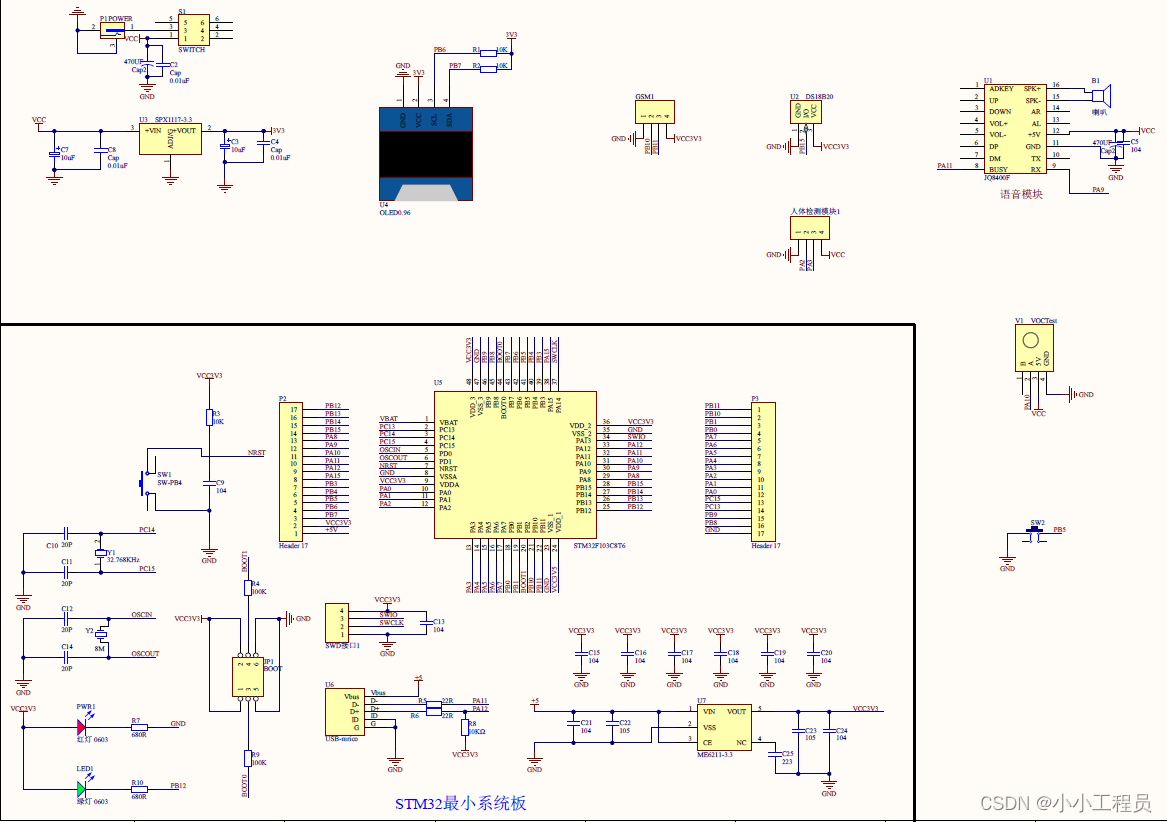
schematic diagram
resource usage
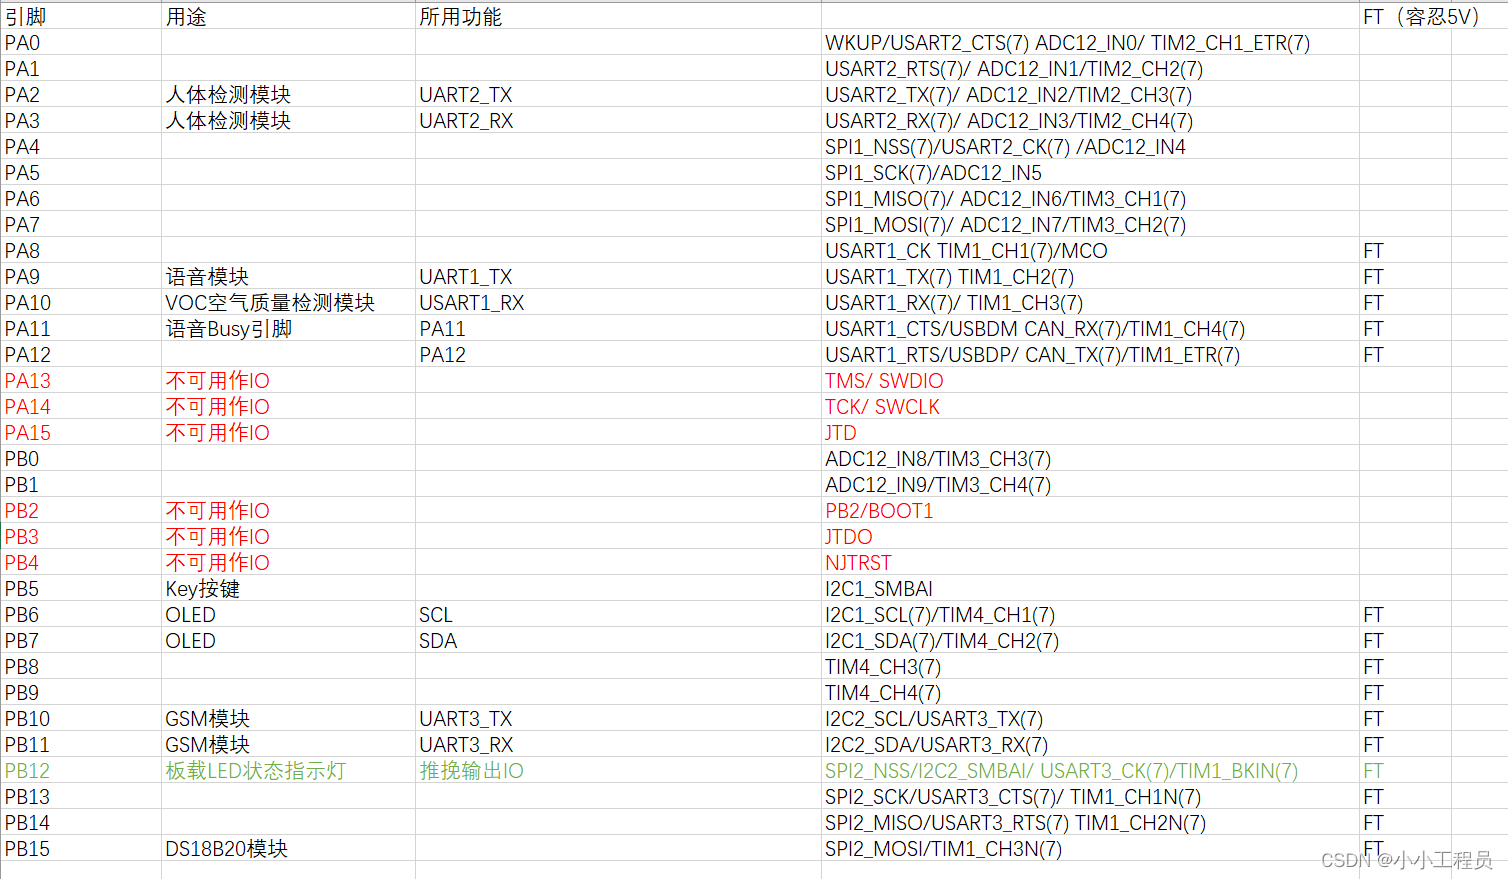
STM32 core board part
main program
/*******************************************************************************

\* 文件名称:基于STM32单片机与K210人脸识别模块的儿童滞留小车报警系统

\* 实验目的:1.

\* 2.

\* 程序说明:完整程序Q:277 227 2579;@: itworkstation@ hotmail.com

\* 日期版本:本项目分享关键细节,熟悉使用单片机的可做参考代码。完整讲解+源代码工程可联系获取,可定制。

*******************************************************************************/

/* Includes ------------------------------------------------------------------*/
#include "main.h"
#include "ds18b20.h"
#include "usart1.h"
#include "usart2.h"
#include "JQ_8400.h"
#include "key.h"
#include "key01.h"
/* Private typedef -----------------------------------------------------------*/
/* Private define ------------------------------------------------------------*/
/* Private macro -------------------------------------------------------------*/
/* Private variables ---------------------------------------------------------*/
/* Private function prototypes -----------------------------------------------*/
/* Private functions ---------------------------------------------------------*/

/**
  * @说明     主函数
  * @参数     None
  * @返回值   None
  */
STRUCT_NVICPriority NVICPriority_Structure;
int main(void)
{


	short DS18B20_temp;   //温度值	16位有符号

	LCD_Show.CO2H =600;
	LCD_Show.TH = 280;

	LED_Init();
	LED_Control(OFF);
	OLED_Init();
	LCD_Display();

	NVICPriority_Structure.Usart1 = 1;
	NVICPriority_Structure.Usart2 = 2;
	USART1_Init();
	USART2_Init();

	JQ8400_Init();
	JQ8400_6x00SendCmd(SET_SOUND,0x1A);		   //音量,十六进制输入
	JQ8400_6x00SendCmd(SELECTE_MODE,MODE_DQTZ);		   //设定循环模式,单曲停止
	JQ8400_6x00SendCmd(SELECTE_PLAY,2);	 //播放曲目2

	Delay_ms(1000);
	LCD_Menu = LCD_SHOWMESSAGE;LCD_refresh = TRUE;LCD_Display();
	while(DS18B20_Init())	//DS18B20初始化	检测是否存在
	{


		Delay_ms(20);
	}
	do
	{


		DS18B20_temp=DS18B20_Get_Temp();  //DS18B20程序的部分
	}while(DS18B20_temp == 850);


	Key01_Init();
	Key_Init();
	while(1){


		Proc_DS18B20();
		Proc_PyCv();
		Proc_TVOC();
		Key01_Scan();
		Proc_Key();
		LCD_Display();
	}
}
air quality sensor
#ifndef __TVOC_h
#define __TVOC_h

#include "stm32f10x.h"
#include "Def_config.h"

#define TVOC_Buffer_Length 100
#define TVOC_Length 5

typedef struct
{


	char TVOC_Rec_Buffer[TVOC_Buffer_Length];
	ENUM_JUDGE isGetData;		//是否获取到数据
	ENUM_JUDGE isParseData;	//是否解析完成
	u16 TVOC;		//字符串形式存储   TVOC浓度
	u16 CO2;		//字符串形式存储   CO2浓度
	u16 PA;		//字符串形式存储     甲醛浓度  甲醛的英文字母缩写是PA
	ENUM_JUDGE isUsefull;		//信息是否有效
} _TVOCData;

extern _TVOCData TVOC_Data;

void TVOC_RecHandle(u8 Res);
void parseTVOCBuffer(void);
void TVOC_Clear_Data(void);


#endif
#include "TVOC.h"
#include <string.h>
#include <stdio.h>

_TVOCData TVOC_Data;
void TVOC_Clear_Data(void)
{


	TVOC_Data.isGetData = FALSE;
	TVOC_Data.isParseData = FALSE;
	TVOC_Data.isUsefull = FALSE;
	memset(TVOC_Data.TVOC_Rec_Buffer, 0, TVOC_Buffer_Length);      //清空
	TVOC_Data.TVOC = 0;
	TVOC_Data.CO2 = 0;
	TVOC_Data.PA = 0;
}
char  TVOC_RX_BUF[TVOC_Buffer_Length]; //接收缓冲,最大TVOC_Buffer_Length个字节.末字节为换行符
u8 point2Tvoc = 0;
void TVOC_RecHandle(u8 Res)
{


	if(Res == 0x5f)
	{


		point2Tvoc = 0;
	}
	TVOC_RX_BUF[point2Tvoc++] = Res;
	if(point2Tvoc >= 8)
	{


		memset(TVOC_Data.TVOC_Rec_Buffer, 0, TVOC_Buffer_Length);      //清空
		memcpy(TVOC_Data.TVOC_Rec_Buffer, TVOC_RX_BUF, point2Tvoc); 	//保存数据
		TVOC_Data.isGetData = TRUE;

		memset(TVOC_RX_BUF, 0, TVOC_Buffer_Length);      //清空
	}
	if(point2Tvoc >= TVOC_Buffer_Length)
	{


		point2Tvoc = TVOC_Buffer_Length;
	}
}
//int HexToDec(u16 hexNum)
//{


//}
void parseTVOCBuffer(void)
{


	u16 TVOC=0,CO2=0,PA=0;
	if (TVOC_Data.isGetData)
	{


		TVOC_Data.isGetData = FALSE;
		if(TVOC_Data.TVOC_Rec_Buffer[0] == 0x5f)
		{


			TVOC_Data.isParseData = TRUE;
			TVOC_Data.isUsefull = TRUE;

			TVOC = (u16)TVOC_Data.TVOC_Rec_Buffer[1];
			TVOC = (TVOC<<8) | TVOC_Data.TVOC_Rec_Buffer[2];

			PA = (u16)TVOC_Data.TVOC_Rec_Buffer[3];
			PA = (PA<<8) | TVOC_Data.TVOC_Rec_Buffer[4];

			CO2 = (u16)TVOC_Data.TVOC_Rec_Buffer[5];
			CO2 = (CO2<<8) | TVOC_Data.TVOC_Rec_Buffer[6];

			TVOC_Data.TVOC = TVOC;
			TVOC_Data.PA = PA;
			TVOC_Data.CO2 = CO2;
		}
		else
		{


			TVOC_Clear_Data();
		}
	}
}
python CV
k210 and STM32 communication driver
#ifndef __PyCv_H
#define __PyCv_H

#include "stm32f10x.h"
#include "Def_config.h"

#define PyCv_Buffer_Length 50
#define PyCv_Length 5

typedef struct
{


	char PyCv_Rec_Buffer[PyCv_Buffer_Length];
	ENUM_JUDGE isGetData;		//是否获取到数据
	ENUM_JUDGE isParseData;	//是否解析完成
	char PersonNum[PyCv_Length];		//字符串形式存储
	ENUM_JUDGE isUsefull;		//信息是否有效
} _PyCvData;

extern _PyCvData PyCv_Data;

void PyCv_RecHandle(u8 Res);
void PyCv_Clear_Data(void);
void parsePyCvBuffer(void);

#endif
#include "PyCv.h"
#include <string.h>
#include <stdio.h>

_PyCvData PyCv_Data;
char  PyCv_RX_BUF[PyCv_Buffer_Length]; //接收缓冲,最大PyCv_Buffer_Length个字节.末字节为换行符
u8 point2 = 0;
void PyCv_RecHandle(u8 Res)
{


	if(Res == '$')
	{


		point2 = 0;
	}
	PyCv_RX_BUF[point2++] = Res;
	if(Res == '@' || point2 >3)
	{


		memset(PyCv_Data.PyCv_Rec_Buffer, 0, PyCv_Buffer_Length);      //清空
		memcpy(PyCv_Data.PyCv_Rec_Buffer, PyCv_RX_BUF, point2); 	//保存数据
		PyCv_Data.isGetData = TRUE;
		point2 = 0;
		memset(PyCv_RX_BUF, 0, PyCv_Buffer_Length);      //清空
	}
	if(point2 >= PyCv_Buffer_Length)
	{


		point2 = PyCv_Buffer_Length;
	}
}
u8 PyCv_Find(char *a)                   // 串口命令识别函数
{


    if(strstr(PyCv_Data.PyCv_Rec_Buffer,a)!=NULL)
	    return 1;
	else
		return 0;
}
void PyCv_Clear_Data(void)
{


	PyCv_Data.isGetData = FALSE;
	PyCv_Data.isParseData = FALSE;
	PyCv_Data.isUsefull = FALSE;
	memset(PyCv_Data.PersonNum, 0, PyCv_Length);      //清空
	memset(PyCv_Data.PyCv_Rec_Buffer, 0, PyCv_Buffer_Length);      //清空
}
void parsePyCvBuffer(void)
{


	char *subString;
	char *subStringNext;
	if (PyCv_Data.isGetData)
	{


		PyCv_Data.isGetData = FALSE;
		if(PyCv_Find("$N"))
		{


			PyCv_Data.isParseData = TRUE;
			PyCv_Data.isUsefull = TRUE;

			subString = strstr(PyCv_Data.PyCv_Rec_Buffer, "N");
			subString++;
			subStringNext = strstr(PyCv_Data.PyCv_Rec_Buffer, "@");
			memcpy(PyCv_Data.PersonNum, subString, subStringNext - subString);
		}
		else
		{


			PyCv_Data.isParseData = FALSE;
			PyCv_Data.isUsefull = FALSE;
		}
	}
}
DS18B20 temperature
#ifndef __DS18B20_H
#define __DS18B20_H

#include "main.h"
//
//DS18b20数字温度传感器驱动代码

//GPIOX_CLH 端口配置高寄存器
//31 30  29 28   27 26  25  24  23 22  21  20  19 18  17  16
//CNF7   MODE7   CNF6   MODE6   CNF5   MODE5   CNF4   MODE4
//15 14  13 12   11 10  9  8    7  6   5   4   3  2   1   0
//CNF3   MODE3   CNF2   MODE2   CNF1   MODE1   CNF0   MODE0

//GPIOX_CRH 端口配置高寄存器
//31 30  29 28   27 26  25  24  23 22  21  20  19 18  17  16
//CNF15  MODE15  CNF14  MODE14  CNF13  MODE13  CNF12  MODE12
//15 14  13 12   11 10  9  8    7  6   5   4   3  2   1   0
//CNF11  MODE11  CNF10  MODE10  CNF9   MODE9   CNF8   MODE8

//eg1:
//IO方向设置
//#define DS18B20_IO_IN()  {GPIOA->CRH&=0XFFFFFFF0;GPIOA->CRH|=8;}
//#define DS18B20_IO_OUT() {GPIOA->CRH&=0XFFFFFFF0;GPIOA->CRH|=3;}
//IO操作函数
//#define	DS18B20_DQ_OUT PAout(8) //数据端口	PA8
//#define	DS18B20_DQ_IN  PAin(8)  //数据端口	PA8


//说明:如上面PA8 口就是使用CNF8 和MODE8    下面的0XFFFFFFF0  0位出现在CRH的0-3bit    8和3不变 不需要移动
//说明:如下面PB15口就是使用CNF15 和MODE15  下面的0X0FFFFFFF  0位出现在CRH的28-31bit  8和3不变 需要左移28位  就是移到bit28-31位
//


//IO方向设置
#define DS18B20_IO_IN()  {

      GPIOB->CRH&=0X0FFFFFFF;GPIOG->CRH|=8<<28;}
#define DS18B20_IO_OUT() {

      GPIOB->CRH&=0X0FFFFFFF;GPIOG->CRH|=3<<28;}
IO操作函数
#define	DS18B20_DQ_OUT PBout(15) //数据端口
#define	DS18B20_DQ_IN  PBin(15)  //数据端口


u8 DS18B20_Init(void);//初始化DS18B20
short DS18B20_Get_Temp(void);//获取温度
void DS18B20_Start(void);//开始温度转换
void DS18B20_Write_Byte(u8 dat);//写入一个字节
u8 DS18B20_Read_Byte(void);//读出一个字节
u8 DS18B20_Read_Bit(void);//读出一个位
u8 DS18B20_Check(void);//检测是否存在DS18B20
void DS18B20_Rst(void);//复位DS18B20
#endif
#include "ds18b20.h"


void DQ_mode(u8 mode)
{


	GPIO_InitTypeDef  GPIO_InitStructure;

 	RCC_APB2PeriphClockCmd(RCC_APB2Periph_GPIOB, ENABLE);	 //使能PORTG口时钟
	if(mode == 1)
	{


		GPIO_InitStructure.GPIO_Pin = GPIO_Pin_15;				//PORTG.11 推挽输出
		GPIO_InitStructure.GPIO_Mode = GPIO_Mode_Out_PP;
		GPIO_InitStructure.GPIO_Speed = GPIO_Speed_50MHz;
		GPIO_Init(GPIOB, &GPIO_InitStructure);
		GPIO_WriteBit(GPIOB,GPIO_Pin_15,Bit_RESET);
	}
	else
	{

    	GPIO_InitStructure.GPIO_Pin = GPIO_Pin_15;				//PORTG.11 推挽输出
		GPIO_InitStructure.GPIO_Mode = GPIO_Mode_IN_FLOATING;
		GPIO_Init(GPIOB, &GPIO_InitStructure);
	}
}

//复位DS18B20
void DS18B20_Rst(void)
{


	DQ_mode(1); 	//SET PG11 OUTPUT
    DS18B20_DQ_OUT=0; 	//拉低DQ
    Delay_us(750);    	//拉低750us
    DS18B20_DQ_OUT=1; 	//DQ=1
	Delay_us(15);     	//15US
}
//等待DS18B20的回应
//返回1:未检测到DS18B20的存在
//返回0:存在
u8 DS18B20_Check(void)
{


	u8 retry=0;
	DQ_mode(0);	//SET PG11 INPUT
    while (DS18B20_DQ_IN&&retry<200)
	{


		retry++;
		Delay_us(1);
	};
	if(retry>=200)return 1;
	else retry=0;
    while (!DS18B20_DQ_IN&&retry<240)
	{


		retry++;
		Delay_us(1);
	};
	if(retry>=240)return 1;
	return 0;
}
//从DS18B20读取一个位
//返回值:1/0
u8 DS18B20_Read_Bit(void)
{


    u8 data;
	DQ_mode(1);	//SET PG11 OUTPUT
    DS18B20_DQ_OUT=0;
	Delay_us(2);
    DS18B20_DQ_OUT=1;
	DQ_mode(0);	//SET PG11 INPUT
	Delay_us(12);
	if(DS18B20_DQ_IN)data=1;
    else data=0;
    Delay_us(50);
    return data;
}
//从DS18B20读取一个字节
//返回值:读到的数据
u8 DS18B20_Read_Byte(void)
{


    u8 i,j,dat;
    dat=0;
	for (i=1;i<=8;i++)
	{


        j=DS18B20_Read_Bit();
        dat=(j<<7)|(dat>>1);
    }
    return dat;
}
//写一个字节到DS18B20
//dat:要写入的字节
void DS18B20_Write_Byte(u8 dat)
 {


    u8 j;
    u8 testb;
	  DQ_mode(1);	//SET PG11 OUTPUT;
    for (j=1;j<=8;j++)
	{


        testb=dat&0x01;
        dat=dat>>1;
        if (testb)
        {


            DS18B20_DQ_OUT=0;	// Write 1
            Delay_us(2);
            DS18B20_DQ_OUT=1;
            Delay_us(60);
        }
        else
        {


            DS18B20_DQ_OUT=0;	// Write 0
            Delay_us(60);
            DS18B20_DQ_OUT=1;
            Delay_us(2);
        }
    }
}
//开始温度转换
void DS18B20_Start(void)
{


    DS18B20_Rst();
	  DS18B20_Check();
    DS18B20_Write_Byte(0xcc);	// skip rom
    DS18B20_Write_Byte(0x44);	// convert
}

//初始化DS18B20的IO口 DQ 同时检测DS的存在
//返回1:不存在
//返回0:存在
u8 DS18B20_Init(void)
{


 	GPIO_InitTypeDef  GPIO_InitStructure;

 	RCC_APB2PeriphClockCmd(RCC_APB2Periph_GPIOB, ENABLE);	 //使能PORTG口时钟

 	GPIO_InitStructure.GPIO_Pin = GPIO_Pin_15;				//PORTG.11 推挽输出
 	GPIO_InitStructure.GPIO_Mode = GPIO_Mode_Out_PP;
 	GPIO_InitStructure.GPIO_Speed = GPIO_Speed_50MHz;
 	GPIO_Init(GPIOB, &GPIO_InitStructure);

 	GPIO_SetBits(GPIOB,GPIO_Pin_15);    //输出1

	DS18B20_Rst();

	return DS18B20_Check();
}
//从ds18b20得到温度值
//精度:0.1C
//返回值:温度值 (-550~1250)
short DS18B20_Get_Temp(void)
{


    u8 temp;
    u8 TL,TH;
	  short tem;
    DS18B20_Start ();  			// ds1820 start convert
    DS18B20_Rst();
    DS18B20_Check();
    DS18B20_Write_Byte(0xcc);	// skip rom
    DS18B20_Write_Byte(0xbe);	// convert
	  TL=DS18B20_Read_Byte(); 	// LSB
    TH=DS18B20_Read_Byte(); 	// MSB


    if(TH>7)
    {


        TH=~TH;
        TL=~TL;
        temp=0;					//温度为负
    }else temp=1;				//温度为正
    tem=TH; 					//获得高八位
    tem<<=8;
    tem+=TL;					//获得底八位
    tem=(float)tem*0.625;		//转换
	//printf(" %d ",tem);
	if(temp)return tem; 		//返回温度值
	else return -tem;
}