Table of contents
foreword
Plt is used in the following, if you don’t understand, you can read my article: Detailed analysis of python’s Matplotlib (with code)
It is a good choice to use data enhancement when the data is relatively small
Import the corresponding package:
from PIL import Image
from torchvision import transforms as tfs
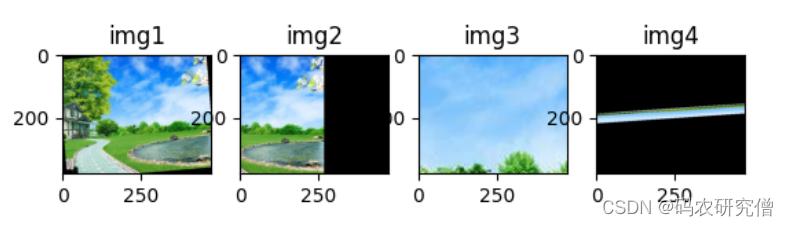
Read the corresponding photo:
# 此处的Path 该项目的相对路径 或者 绝对路径
# 读取 显示 照片
image = Image.open('scenery.jpg')
print(image.size)
image
Screenshot below:
Data augmentation is done in the following ways:
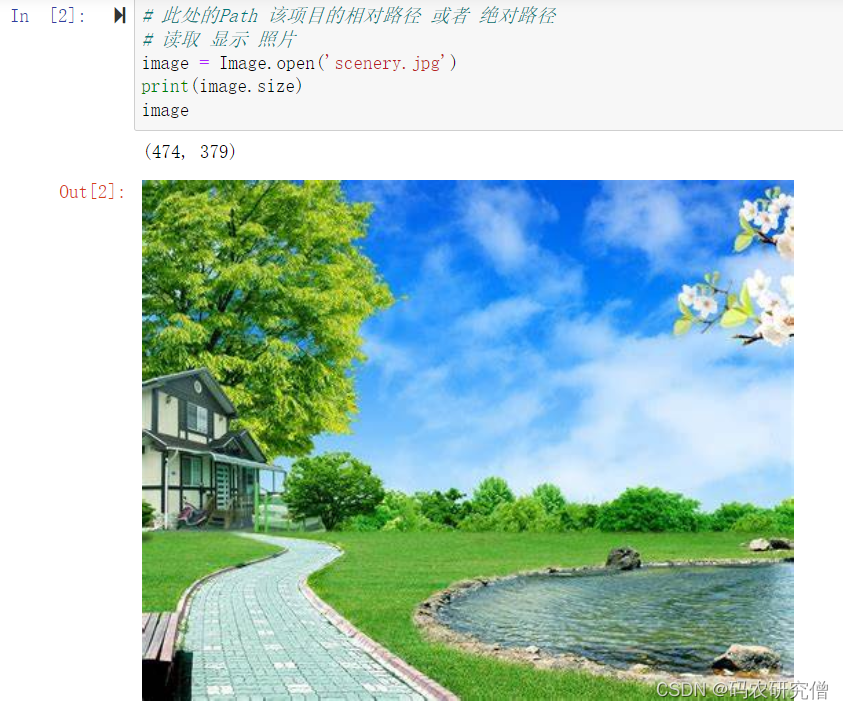
1. Cropping
Describe the scaling before cropping (after all, cropping is based on scaling)
from PIL import Image
from torchvision import transforms as tfs

# 原图尺寸为474 * 379
img = Image.open('scenery.jpg')

# 默认是300 * 300
# 缩放原图到一定比例
img1 = tfs.Resize((300,300))(img)

import matplotlib.pyplot as plt
axs = plt.figure().subplots(1, 2)

axs[0].set_title('474 * 379')
axs[0].imshow(img)

axs[1].set_title('300 * 300')
axs[1].imshow(img1)
Screenshot below:
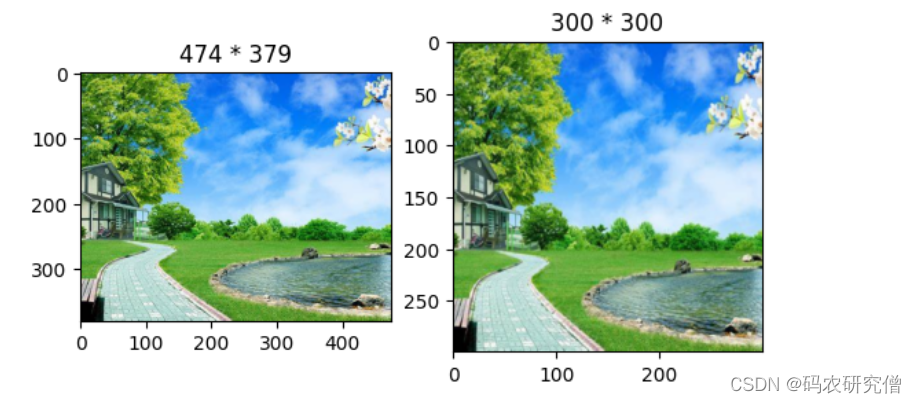
1.1 Center cropping
- Core functions:
transforms.CenterCrop(size)
The size parameter is int, and the center of the original image is cropped to the set size.
If the parameter is (h, w), the cropped size is (h, w)
from PIL import Image
from torchvision import transforms as tfs

# 打开对应的图片
img = Image.open('scenery.jpg')

# 默认是300 * 300
img1 = tfs.CenterCrop(300)(img)
# 设置对应的尺寸为300 * 200
img2 = tfs.CenterCrop((300,200))(img)

# 通过plt输出图片
import matplotlib.pyplot as plt
axs = plt.figure().subplots(1, 2)

axs[0].set_title('300 * 300')
axs[0].imshow(img1)

axs[1].set_title('300 * 200')
axs[1].imshow(img2)
Screenshot below:

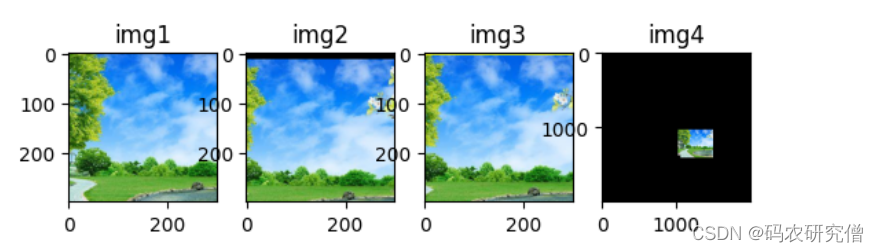
1.2 Random cropping
- Core functions:
transforms.RandomCrop(size, padding=None, pad_if_needed=False, fill=0, padding_mode='constant')
| parameter | Specific instructions |
|---|---|
| size | 1. For size, the result is size * size 2. For (h,w), the result is h * w |
| padding | Filling size 1. When it is a, fill it up, down, left, and right. 2. When it is (a, b), fill it with a pixel left and right, and fill it with b pixels up and down. 3. When it is (a, b, c, d), fill it with left, top, Right and bottom are filled with a, b, c, d respectively |
| pad_if_need | The default is False is True, beyond the size to fill |
| fill | The color of the channel fill |
| padding_mode | Fill mode 1.constant, the pixel value is filled by fill 2.edge, the image edge pixel value is filled 3.reflect, mirror fill, the last pixel is not mirrored, that is reflection. 1, 2, 3, 4 become 3, 2, 1, 2, 3, 4, 3, 2 4.symmetric, mirror fill, the last pixel is mirrored, that is, symmetrical. 1, 2, 3, 4 becomes 2, 1, 1, 2, 3, 4, 4, 3 |
from PIL import Image
from torchvision import transforms as tfs

img = Image.open('scenery.jpg')

# 默认都300 * 300
img1 = tfs.RandomCrop(300)(img)

# padding为填充元素
img2 = tfs.RandomCrop(300,padding=(16, 64))(img)

# fill填充的色彩
img3 = tfs.RandomCrop(300,padding=(16, 64),fill=(255, 255, 0))(img)

# 超出尺寸,该参数需要设置为True
img4 = tfs.RandomCrop(2000,pad_if_needed=True)(img)

import matplotlib.pyplot as plt
axs = plt.figure().subplots(1,4)

axs[0].set_title('img1')
axs[0].imshow(img1)

axs[1].set_title('img2')
axs[1].imshow(img2)

axs[2].set_title('img3')
axs[2].imshow(img3)

axs[3].set_title('img4')
axs[3].imshow(img4)
Screenshot below:
Follow the code for fill mode:
from PIL import Image
from torchvision import transforms as tfs

img = Image.open('scenery.jpg')

# 填充模式为constant,默认本身也是constant
img1 = tfs.RandomCrop(500,padding=128,padding_mode='constant')(img)

# 填充模式为edge
img2 = tfs.RandomCrop(500,padding=128,padding_mode='edge')(img)

# 填充模式为reflect
img3 = tfs.RandomCrop(500,padding=128,padding_mode='reflect')(img)

# 填充模式为symmetric
img4 = tfs.RandomCrop(500,padding=128,padding_mode='symmetric')(img)


import matplotlib.pyplot as plt
axs = plt.figure().subplots(1,4)

axs[0].set_title('img1')
axs[0].imshow(img1)

axs[1].set_title('img2')
axs[1].imshow(img2)

axs[2].set_title('img3')
axs[2].imshow(img3)

axs[3].set_title('img4')
axs[3].imshow(img4)
Screenshot below:
1.3 Random size cropping
- Core functions:
transforms.RandomResizedCrop(size, scale=(0.08, 1.0), ratio=(3/4, 4/3), interpolation=<InterpolationMode.BILINEAR: 'bilinear'>)
| parameter | Specific instructions |
|---|---|
| size | 1. For size, the result is size * size 2. For (h,w), the result is h * w |
| scale | Randomly crop the area ratio, randomly select a number between the default interval (0.08,1) |
| ratio | Random aspect ratio, randomly select a number between the default interval (3/4,4/3) |
| interpolation | interpolation method ( PIL. Image. NEAREST, PIL. Image. BILINEAR, PIL. Image. BICUBIC) |
from PIL import Image
from torchvision import transforms as tfs

img = Image.open('scenery.jpg')

# 裁剪的尺寸都是300 * 300
# 随机裁剪面积比例为0.1-1之间的一个数
img1 = tfs.RandomResizedCrop(300,scale=(0.1,1))(img)

# 随机裁剪长宽比为1-4/3之间的一个数
img2 = tfs.RandomResizedCrop(300,ratio=(1,4/3))(img)

import matplotlib.pyplot as plt
axs = plt.figure().subplots(1,3)

axs[0].set_title('original')
axs[0].imshow(img)

axs[1].set_title('img1')
axs[1].imshow(img1)

axs[2].set_title('img2')
axs[2].imshow(img2)
Screenshot below:
2. Flip
2.1 Horizontal Flip
- Core functions:
transforms.RandomHorizontalFlip(p=0.5)
p is the probability value, if p is 1, 100% flip. p is 0.5, there is a 50 percent probability that it may or may not flip
from PIL import Image
from torchvision import transforms as tfs

img = Image.open('scenery.jpg')

# p为1一定翻转
# p为0.5 ,百分之50的概率可能会翻转也可能不会
img1 = tfs.RandomHorizontalFlip(p=1)(img)

import matplotlib.pyplot as plt
axs = plt.figure().subplots(1, 2)

axs[0].set_title('original')
axs[0].imshow(img)

axs[1].set_title('flip horizontal')
axs[1].imshow(img1)
Screenshot below:

2.2 Vertical Flip
- Core functions:
transforms.RandomVerticalFlip(p=0.5)
p is the probability value, if p is 1, 100% flip. p is 0.5, there is a 50 percent probability that it may or may not flip
from PIL import Image
from torchvision import transforms as tfs

img = Image.open('scenery.jpg')

# p为1一定翻转
# p为0.5 ,百分之50的概率可能会翻转也可能不会
# 注意区分与水平翻转的函数
img1 = tfs.RandomVerticalFlip(p=1)(img)

import matplotlib.pyplot as plt
axs = plt.figure().subplots(1, 2)

axs[0].set_title('original')
axs[0].imshow(img)

axs[1].set_title('flip vertical')
axs[1].imshow(img1)
Screenshot below:

2.3 Random rotation
- Core functions:
transforms.RandomRotation(degrees, expand=False, center=None, fill=0, resample=None)
| parameter | Specific instructions |
|---|---|
| degrees | Rotation angle 1. For a, randomly select the rotation angle in the (-a, a) interval 2. For (a, b), randomly select the rotation angle in the (a, b) interval |
| expand | Whether to show the full picture if the picture exceeds the size 1. The default is False, the full picture will not be displayed if it exceeds 2. True, the full picture will be displayed if it exceeds |
| center | Rotation axis position default center rotation |
| resample | resampling method |
from PIL import Image
from torchvision import transforms as tfs

img = Image.open('scenery.jpg')

# 逆时针旋转45
img1 = tfs.RandomRotation(degrees=(45, 45))(img)

# 逆时针旋转45,旋转超出区域启动扩展
img2 = tfs.RandomRotation(degrees=(45, 45), expand=True)(img)

# 逆时针旋转,图外区域填充颜色
img3 = tfs.RandomRotation(degrees=(45, 45), fill=(255, 255, 0))(img)

import matplotlib.pyplot as plt
axs = plt.figure().subplots(1,4)

axs[0].set_title('original')
axs[0].imshow(img)

axs[1].set_title('img1')
axs[1].imshow(img1)

axs[2].set_title('img2')
axs[2].imshow(img2)

axs[3].set_title('img3')
axs[3].imshow(img3)
Screenshot below:

3. Hue
3.1 Gray scale transformation
- Core functions:
transforms.Grayscale(num_output_channels=1)
Generally, it is not set, and the default is single-channel grayscale. If three-channel grayscale is required, the corresponding value can be changed to 3.
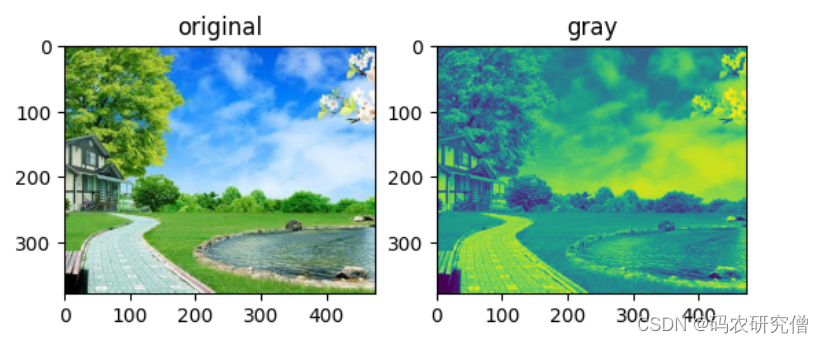
from PIL import Image
from torchvision import transforms as tfs

img = Image.open('scenery.jpg')

# 灰度变换
img1 = tfs.Grayscale()(img)

import matplotlib.pyplot as plt
axs = plt.figure().subplots(1,2)

axs[0].set_title('original')
axs[0].imshow(img)

axs[1].set_title('gray')
axs[1].imshow(img1)
Screenshot below:
3.2 Color dithering
- Core functions:
transforms.ColorJitter(brightness=0, contrast=0, saturation=0, hue=0)
| parameter | Specific instructions |
|---|---|
| brightness | Brightness 1. Tuple (min, max), random transformation in a given interval, no negative value 2. Floating point number, the brightness range is [max(0, 1 - brightness), 1 + brightness] |
| contrast | contrast . Same rules as above |
| saturation | saturation . Same rules as above |
| hue | Hue 1. Tuple (min, max), random transformation in a given interval, no negative value 2. Floating point number, hue range is [-hue, hue] interval random transformation, the overall interval range is [0,0.5] or [- 0.5,0.5] |
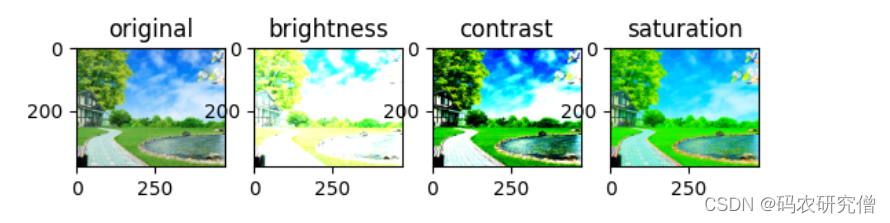
from PIL import Image
from torchvision import transforms as tfs

img = Image.open('scenery.jpg')

# 亮度设置3
img1 = tfs.ColorJitter(brightness=(3, 3))(img)

# 对比度设置3
img2 = tfs.ColorJitter(contrast=(3, 3))(img)

# 饱和度设置3
img3 = tfs.ColorJitter(saturation=(3, 3))(img)

import matplotlib.pyplot as plt
axs = plt.figure().subplots(1,4)

axs[0].set_title('original')
axs[0].imshow(img)

axs[1].set_title('brightness')
axs[1].imshow(img1)

axs[2].set_title('contrast')
axs[2].imshow(img2)

axs[3].set_title('saturation')
axs[3].imshow(img3)
Screenshot below:
3.3 Randomly Flip Colors
- Core function:
transforms.RandomInvert(p=0.5)
p is the probability value, if p is 1, 100% flip. p is 0.5, there is a 50 percent probability that it may or may not flip
from PIL import Image
from torchvision import transforms as tfs

img = Image.open('scenery.jpg')

# 随机翻转图片颜色
img1 = tfs.RandomInvert(p=0.5)(img)

import matplotlib.pyplot as plt
axs = plt.figure().subplots(1,2)

axs[0].set_title('original')
axs[0].imshow(img)

axs[1].set_title('img1')
axs[1].imshow(img1)
Screenshot below:

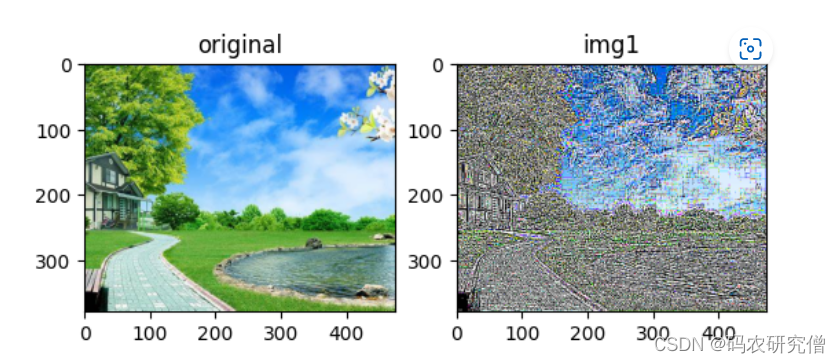
3.4 Randomly adjust sharpness
- Core functions:
transforms.RandomAdjustSharpness(sharpness_factor, p=0.5)
sharpness_factor This parameter is to adjust the sharpness, 0 is blurred, and 1 is the original image. The larger the number, the higher the sharpness. There is no upper limit of sharpness
p as a probability value. If p is 1, it will be 100% flipped. p is 0.5, there is a 50 percent probability that it may or may not flip
from PIL import Image
from torchvision import transforms as tfs

img = Image.open('scenery.jpg')

# 随机调转图片锐度
img1 = tfs.RandomAdjustSharpness(200)(img)

import matplotlib.pyplot as plt
axs = plt.figure().subplots(1,2)

axs[0].set_title('original')
axs[0].imshow(img)

axs[1].set_title('img1')
axs[1].imshow(img1)
Screenshot below:
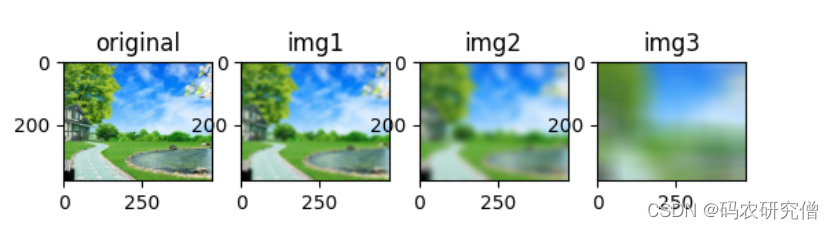
3.5 Gaussian Blur
- Core functions:
transforms.GaussianBlur(kernel_size, sigma=(0.1, 2.0))
| parameter | Specific instructions |
|---|---|
| kernel_size | blur radius (odd) |
| sigma | Standard deviation of normal distribution 1. It is (min, max), randomly select a number in the (min, max) interval 2. Floating point number, then it is the number |
from PIL import Image
from torchvision import transforms as tfs

img = Image.open('scenery.jpg')

# size为11,标准差为10
img1 = tfs.GaussianBlur(11,10)(img)

# size为51,标准差为10
img2 = tfs.GaussianBlur(51,10)(img)

# size为101,标准差为100
img3 = tfs.GaussianBlur(101,100)(img)

import matplotlib.pyplot as plt
axs = plt.figure().subplots(1,4)

axs[0].set_title('original')
axs[0].imshow(img)

axs[1].set_title('img1')
axs[1].imshow(img1)

axs[2].set_title('img2')
axs[2].imshow(img2)

axs[3].set_title('img3')
axs[3].imshow(img3)
Screenshot below:
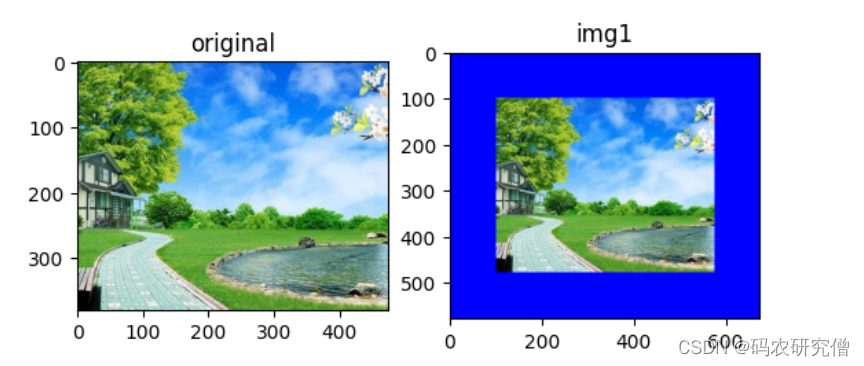
4. Edge padding
- Core functions:
transforms.Pad(padding, fill=0, padding_mode=‘constant’)
| parameter | Specific instructions |
|---|---|
| padding | Expand the size 1. For a, fill a up, down, left, and right. 2. When it is (a, b), fill a pixel left and right, and fill b pixels up and down. 3. When it is (a, b, c, d), fill left, top, Right and bottom are filled with a, b, c, d respectively |
| fill | The padding value defaults to 0, black. Can also fill three channels |
| padding_mode | Fill mode 1.constant, the pixel value is filled by fill 2.edge, the image edge pixel value is filled 3.reflect, mirror fill, the last pixel is not mirrored, that is reflection. 1, 2, 3, 4 become 3, 2, 1, 2, 3, 4, 3, 2 4.symmetric, mirror fill, the last pixel is mirrored, that is, symmetrical. 1, 2, 3, 4 becomes 2, 1, 1, 2, 3, 4, 4, 3 |
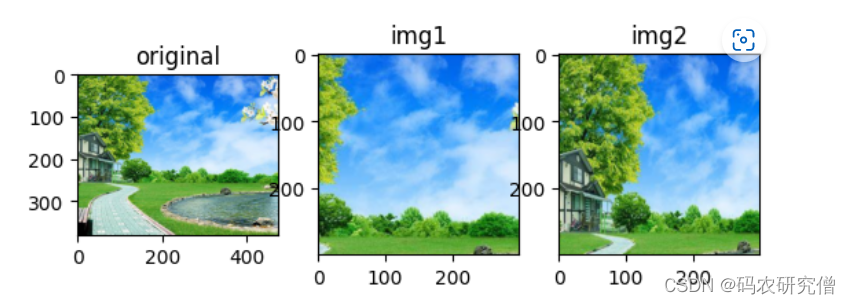
from PIL import Image
from torchvision import transforms as tfs

img = Image.open('scenery.jpg')

# 第一个参数:扩充的宽度
# 第二个参数:填充颜色
img1 = tfs.Pad(100,fill=(0, 0, 255))(img)

import matplotlib.pyplot as plt
axs = plt.figure().subplots(1,2)

axs[0].set_title('original')
axs[0].imshow(img)

axs[1].set_title('img1')
axs[1].imshow(img1)
Screenshot below:
5. Affine transformation
The meaning is: a combination of rotation, translation, scaling, distortion, etc.
- Core functions:
transforms.RandomAffine(degrees, translate=None, scale=None, shear=None, resample=0, fillcolor=0)
| parameter | Specific instructions |
|---|---|
| degrees | Random rotation angle range, 0 means no rotation |
| translate | The horizontal and vertical translation factors are (a, b), and the horizontal translation position is (-img_width * a, img_width * a). A number is randomly selected in this interval. The vertical translation is (-img_height * b, img_height * b) randomly select a number in this interval |
| scale | The scaling factor is (a, b), randomly select a number in the (a, b) interval |
| shear | The range of random distortion angle is (a, b), randomly select a number in the (a, b) interval |
| resample | Re-sampling |
| fillcolor | Fill color, three channels can be filled |
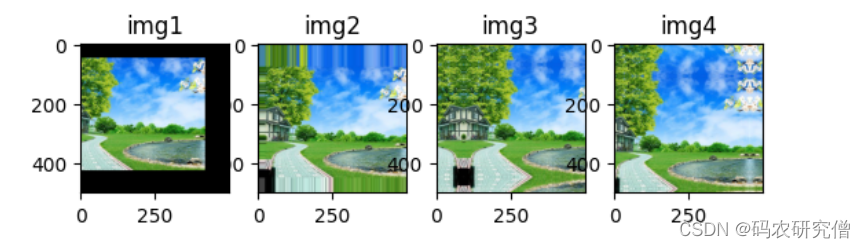
from PIL import Image
from torchvision import transforms as tfs

img = Image.open('scenery.jpg')

# 随机旋转
img1 = tfs.RandomAffine(45)(img)

# 随机平移
img2 = tfs.RandomAffine(0, (0.7, 0))(img)

# 随机缩放
img3 = tfs.RandomAffine(0, None, (3, 5))(img)

# 随机扭曲
img4 = tfs.RandomAffine(0, None, None, (45, 90))(img)

import matplotlib.pyplot as plt
axs = plt.figure().subplots(1,4)

axs[0].set_title('img1')
axs[0].imshow(img1)

axs[1].set_title('img2')
axs[1].imshow(img2)

axs[2].set_title('img3')
axs[2].imshow(img3)

axs[3].set_title('img4')
axs[3].imshow(img4)
Screenshot below: