The deployment process is relatively complicated! Please browse patiently!
Table of contents
1. Introduction to jumpserver bastion machine
1.1 Why do you need to use a bastion host?
1.2 Main functions of the bastion host
2.1 Turn off the firewall and SElinux
1.4 yum source backup and preparation
1.6 Modify the system character set
3.1 Delete mairadb (CentOS7 comes with mariadb)
3.3 Change mysql password and password complexity
4.3 Install python virtual environment
6.2 Install dependencies or tools
6.3 Install the py module in the python virtual environment
6.4 Get SECRET_KEY, BOOTSTRAP_TOKEN secret key
6.5 Change the jumpserver configuration file
7.3 View the jumpserver database again
8. Start the jumpserver service
10. Deploy the guacamole component
10.1 Download guacamole-server and ssh-forward
10.3 Compile and install guacamole
10.5 Setting up the guacamole environment
10.6 Start tomcat and guacamole
11.1 Create a new Linux user nginx
12. Compile and install nginx, nginx-module-vts
11.4 Explanation of monitoring list
12. Change the nginx configuration again
14.2 nginx occupation and restart
14.4 pip3 install virtualenv error
14.5 Start jumpserver after restarting the host
1. Introduction to jumpserver bastion machine
1.1 Why do you need to use a bastion host?
In order to prevent non-cloud operation and maintenance personnel from wrongly operating the company's internal servers and causing losses, then we need to use a springboard machine. Even if the company's internal personnel need to operate the server, they must be verified. And after connecting to the springboard, all login and operation records will be recorded.
Springboard machine:
The springboard machine is just a server. When the operation and maintenance personnel use the management server, they must first connect to the springboard machine, and then they can control the server in the intranet and log in to the target device for maintenance and operation. The springboard machine belongs to the category of the intranet bastion machine, and is a host application system for single sign-on. The disadvantage of the springboard machine is that it only realizes the security of server login, but it does not realize the behavior control and auditing of operation and maintenance developers. Using the springboard machine may make wrong operations on the server, and it is difficult to locate the operator.
Bastion machine:
Combining the advantages of the springboard machine, and can record the operator and records, the bastion machine can create a system account. The function of the system account is to distinguish roles, but it cannot confirm the executor of the account.
The role of the bastion machine:
Due to the lack of springboard machines, enterprises need newer, better, and more secure technical concepts to manage the operation and maintenance of servers. They need a system that can satisfy role management, role authorization, information resource access control, operation records and Auditing, system change and maintenance controls, and more.
1. Core system operation and maintenance and security audit management
2. Filter and intercept non-request access, malicious attacks, reject illegal orders, monitor audit ports, call the police and track responsibility
3. Alarm, recording, analysis, processing
1.2 Main functions of the bastion host
1. Single sign-on function
2. Account management function
3. Identity authentication
4. Resource authorization
5. Access control
2. Preparation
虚拟机平台:VMware
IP:192.168.132.65 (自定义)
虚拟机配置:1vpcu 1核 2G 40G (测试学习环境,生产环境具体情况而定)
没有特别说明情况下,所有wget或下载的文件默认存储在/opt目录下
python = 3.6.x  Python版本必须3.6及以上
mysql5.7 版本必须大于5.6
redis  缓存型数据库
2.1 Turn off the firewall and SElinux
systemctl stop firewalld
systemctl disable firewalld

关闭selinux,重启后生效
修改/etc/selinux/config 文件
将SELINUX=enforcing改为SELINUX=disabled
1.2 Time Synchronization
date

yum install ntpdate -y
timedatectl set-timezone Asia/Shanghai
ntpdate ntp1.aliyun.com
systemctl enable ntpdate

date  #查看系统时间是否同步准确
1.3 Change the hostname
hostnamectl set-hostname jumpserver1.4 yum source backup and preparation
mkdir /etc/yum.repos.d/bak
mv /etc/yum.repos.d/*.repo /etc/yum.repos.d/bak/    #备份yum源

wget -O /etc/yum.repos.d/CentOS-Base.repo http://mirrors.aliyun.com/repo/Centos-7.repo
wget -O /etc/yum.repos.d/epel.repo http://mirrors.aliyun.com/repo/epel-7.repo

yum clean all
yum makecache  #清楚缓存,重写建立yum仓库
1.5 Install initial tools
yum install -y bash-completion vim lrzsz wget expect net-tools nc nmap tree dos2unix htop iftop iotop unzip telnet sl psmisc nethogs glances bc ntpdate openldap-devel gcc zlib zlib-devel1.6 Modify the system character set
echo 'LANG="zh_CN.UTF-8"' > /etc/locale.conf #永久修改,无需重启ls --help can be viewed, and some Chinese characters are displayed to indicate that the repair is successful

1.7 restart
reboot3. Install MySQL
Install mysql first, otherwise it will be difficult to handle subsequent mysql installation errors, so first ensure that the mysql installation is complete.
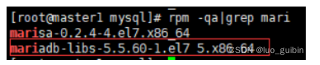
3.1 Delete mairadb (CentOS7 comes with mariadb)
The mysql-like database that comes with centos7 is mariadb, which will conflict with mysql and must be deleted first! ! !
3.2 install mysql5.7
cd /opt

wget http://dev.mysql.com/get/mysql-5.7.26-1.el7.x86_64.rpm-bundle.tar
tar -xvf mysql-5.7.26-1.el7.x86_64.rpm-bundle.tar

mkdir mysql
mv mysql-community*.rpm mysql   #移动到mysql目录下

rpm -ivh mysql-community-common-5.7.26-1.el7.x86_64.rpm
rpm -ivh mysql-community-libs-5.7.26-1.el7.x86_64.rpm
rpm -ivh mysql-community-client-5.7.26-1.el7.x86_64.rpm
rpm -ivh mysql-community-server-5.7.26-1.el7.x86_64.rpm

rpm -ivh mysql-community-devel-5.7.26-1.el7.x86_64.rpm (平时安装mysql这个可以省略,但部署jumpserver后续步骤会用到mysql-devel工具)

systemctl start mysqld
systemctl enable mysqld
If the following error is reported, please add the --nodeps attribute, adding this attribute means not checking dependencies.
warning: mysql-community-server-5.7.26-1.el7.x86_64.rpm: Header V3 DSA/SHA1 Signature, key ID 5072e1f5: NOKEY
error: Failed dependencies:
View the initial password of the root user
grep 'temporary password' /var/log/mysqld.logIf the view password is blank, you need to delete the residual mysql file
rm -rf /var/lib/mysql
systemctl restart mysqld
grep 'temporary password' /var/log/mysqld.log
3.3 Change mysql password and password complexity
mysql -uroot -p
#黏贴刚刚拿到的密码

show variables like 'validate_password%';  #查看密码复杂度

mysql> set global validate_password_length=6;  #长度
mysql> set global validate_password_mixed_case_count=0;  #字符个数
mysql> set global validate_password_special_char_count=0;  #特殊符号个数
mysql> flush privileges;

create database jumpserver default charset 'utf8' collate 'utf8_bin';  #新建名为jumpserver的数据库
set password for 'root'@'localhost' =password('yz123456');  #更改mysql的root用户密码为yz123456
create user 'jumpserver'@'%' IDENTIFIED BY 'yz123456';  #创建mysql用户jumpserver且密码为yz123456

grant all privileges on root.* to 'jumpserver'@'%' identified by 'yz123456';
grant all privileges on jumpserver.* to 'jumpserver'@'%' identified by 'yz123456';  #赋权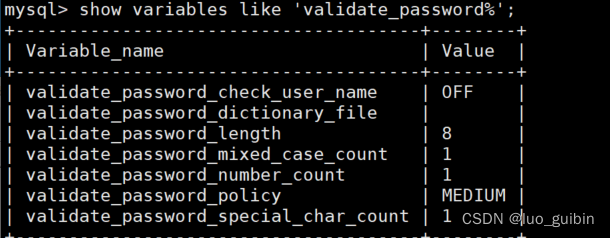
Password complexity property explained:
validate_password_length #password length
validate_password_mixed_case_count #number of uppercase and lowercase characters
validate_password_number_count #number of numbers
validate_password_special_char_count #number of special characters
Fourth, install python3.6
4.1 install python3.6
pyhton version must be greater than or equal to 3.6.X
cd /opt
wget https://www.python.org/ftp/python/3.6.10/Python-3.6.10.tgz
tar -xvf Python-3.6.10.tgz

yum install -y openssl openssl-devel  #ssl工具,必须在安装python前安装

cd /opt/Python-3.6.10/
./confiure --prefix=/usr/local/python3.6  #编译并指定python3.6目录
make -j3 && make instal  #编译安装

echo "PATH="/usr/local/python3.6/bin:$PATH"" >> /etc/profile  #添加环境
source /etc/profile  #刷新一下环境
##随后命令行输入python3.6就能进入了(quit()退出)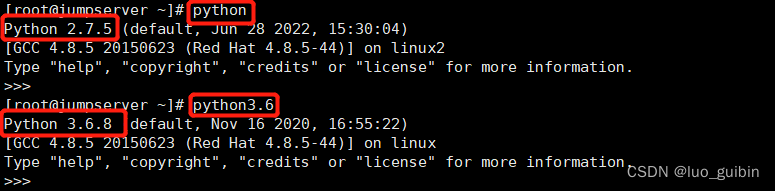
Note that the results of typing python and python3.6 in the terminal are different. Python2.7 comes with Linux and does not need to be uninstalled, and it will not affect it.
4.2 Replace pip3 source
mkdir /root/.pip
touch /root/.pip/pip.conf
vim /root/.pip/pip.conf

#########将下面的内容写入###########

[global]
index-url = https://mirrors.aliyun.com/pypi/simple/
4.3 Install python virtual environment
The virtual environment is created to deal with the scenario of the same version of py and different modules required by multiple applications in one service area. virtualenv is a python virtualization module tool.
pip3 install virtualenv

cd /usr/local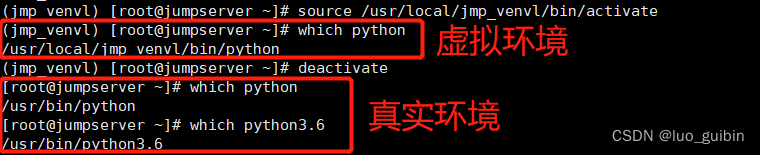
virtualenv --python=python3 jmp_venvl ![]()
Note that there are two python interpreters at this point
The interpreter body is: /usr/local/python3.6/bin/python3.6
The virtual interpreter is: /usr/local/jmp_venel/bin/python3
Switch python virtual environment
source /usr/local/jmp_venvl/bin/activate  #刷新环境,可以进去python虚拟环境,进入后终端会哟jmp_venvl标识

deactivate  #退出当前的虚拟环境/切换回物理真实环境
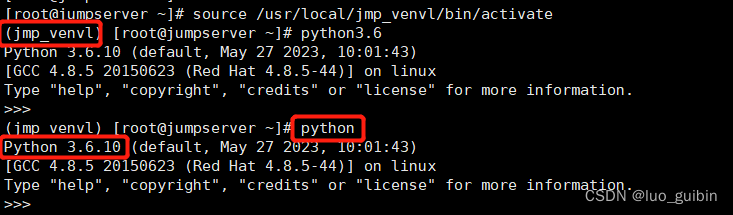
At this time, the input python is also version 3.6 instead of 2.7, because it is in the virtual environment at this time.
Five, install redis
yum -y install redis
systemct start redis
systemct enable redis

redis-cli  #验证
[root@jumpserver ~]# redis-cli
127.0.0.1:6379> ping
PONG  #返回PONG证明可以正常启动
6. Deploy jumpserver
6.1 Download and decompress
wget https://github.com/jumpserver/jumpserver/releases/download/v2.1.0/jumpserver-v2.1.0.tar.gz
tar -zxvf jumpserver-v2.1.0.tar.gz
ln -s /opt/jumpserver-v2.1.0 jumpserver
6.2 Install dependencies or tools
yum install -y bash-completion vim lrzsz wget expect net-tools nc nmap tree dos2unix htop iftop iotop unzip telnet sl psmisc nethogs glances bc ntpdate openldap-devel6.3 Install the py module in the python virtual environment
Note: To install the jumperserver module, you must ensure that you are in the virtual environment of py3, and you must activate the environment before installing! ! !
cd /opt/jumpserver/requirements/
cat /opt/jumpserver/requirements/requirements.txt

source /usr/local/jmp_venvl/bin/activate  #非常重要!!!
pip3 install -r /opt/jumpserver/requirements/requirements.txt

deactivate
pip3 requirements.txt error
No matching distribution found for mysqlclient==1.3.14
It prompts that mysqlclient==1.3.14 cannot be found. There is indeed this item in requirements.txt, and mysql-devel needs to be installed. If you follow my steps to install mysql, this error will not appear. Many posts on the Internet use yum to install, yum install mysql-devel prompts that there is no yum source, because mysql is manually installed, so there is no mysql repo source, we can manually install mysql-devel, if an error is reported, add the --nodeps attribute.
###解决方法###
cd /opt/mysql
rpm -ivh mysql-community-devel
6.4 Get SECRET_KEY, BOOTSTRAP_TOKEN secret key
These two keys are needed in the next steps
#获取SECRET_KEY
if [ "$SECRET_KEY" = "" ]; then SECRET_KEY=`cat /dev/urandom | tr -dc A-Za-z0-9 | head -c 50` ; echo "SECRET_KEY=$SECRET_KEY" >> ~/.bashrc; echo $SECRET_KEY; else echo $SECRET_KEY; fi

#获取BOOTSTRAP_TOKEN
if [ "$BOOTSTRAP_TOKEN" = "" ]; then BOOTSTRAP_TOKEN=`cat /dev/urandom | tr -dc A-Za-z0-9 | head -c 16`; echo "BOOTSTRAP_TOKEN=$BOOTSTRAP_TOKEN" >> ~/.bashrc; echo $BOOTSTRAP_TOKEN; else echo $BOOTSTRAP_TOKEN; fi
SECRET_KEY: UtsbR8W5fJ81M4s6k0vcITUiASsHOTRKOIq0KvCnzzXupQpqcp BOOTSTRAP_TOKEN: 1iTfoBKVFv13PtSg
6.5 Change the jumpserver configuration file
cd /opt/jumpserver
cp config_example.yml config.yml  #example是配置文件模板,真正生效的配置文件是config.yml
vim config.yml

#将刚刚两个密钥填入,并填一下数据库密码"yz123456"
egrep -v "^#|^$" config.yml can remove the comment content and blank lines before displaying, and can view the effective information of the configuration file concisely. The two keys here need to be changed to yours, fill in the database password, and the others do not need to be changed.
[root@jumpserver jumpserver]# cd /opt/jumpserver
[root@jumpserver jumpserver]# egrep -v "^#|^$" config.yml
SECRET_KEY: UtsbR8W5fJ81M4s6k0vcITUiASsHOTRKOIq0KvCnzzXupQpqcp  #KEY
BOOTSTRAP_TOKEN: 1iTfoBKVFv13PtSg                               #TOKEN
DB_ENGINE: mysql     #使用的数据库是什么
DB_HOST: 127.0.0.1   #默认的IP地址
DB_PORT: 3306        #默认端口
DB_USER: jumpserver      #默认的用户就是我们在数据库那步创建的user
DB_PASSWORD:yz123456     #数据库的密码
DB_NAME: jumpserver      #数据库用户名
HTTP_BIND_HOST: 0.0.0.0  #jumpserver运行的地址,写的0表示绑定这台机器对内对外所有的IP,如果是在公网的jumpserver会很危险
HTTP_LISTEN_PORT: 8080   #jumpserver后台启动的地址
WS_LISTEN_PORT: 8070     #WEB SOCKET
REDIS_HOST: 127.0.0.1    # 默认redis的IP
REDIS_PORT: 6379         #默认redis的端口
7. Data Migration
Jumpserver is a program developed by python's web framework django. Data migration must be performed first to generate library table information before the program can be run.
7.1 View jumpserver database
[root@jumpserver jumpserver]# mysql -u root -p
Enter password:

mysql> show databases;   #查看数据库
+--------------------+
| Database           |
+--------------------+
| information_schema |
| jumpserver         |
| mysql              |
| performance_schema |
| test               |
+--------------------+
5 rows in set (0.01 sec)
mysql> use jumpserver    #进入到jumpserver这库中
Database changed
mysql> show tables;      #查看库中的表
Empty set (0.00 sec)     #还未导入,库中无表
7.2 Data Migration
Be sure to enter the python virtual environment first! ! !
source /usr/local/jmp_venvl/bin/activate
cd /opt/jumpserver/apps
python3 /opt/jumpserver/apps/manage.py makemigrations  #显示浅蓝色字体表示成功
python3 /opt/jumpserver/apps/manage.py migrate         #显示多张表导入成功并有OK字样

deactivate
Please add --fake attribute for error reporting, python manage.py migrate --fake


If the data table returns OK and displays faked, it means the migration failed. Please check the mysql startup status, systemctl status mysqld, and make sure that mysqld is running.
7.3 View the jumpserver database again
Data migration succeeded
(jmp_venvl) [root@jumpserver /]# mysql -u root -p
Enter password:

mysql> show databases;
+--------------------+
| Database           |
+--------------------+
| information_schema |
| jumpserver         |
| mysql              |
| performance_schema |
| sys                |
+--------------------+
5 rows in set (0.12 sec)

mysql> use jumpserver;
Database changed

mysql> show tables;
+----------------------------------------------+
| Tables_in_jumpserver                         |
+----------------------------------------------+
| applications_databaseapp                     |
| applications_remoteapp                       |
| assets_adminuser                             |
| assets_asset                                 |
| assets_asset_labels                          |
...
8. Start the jumpserver service
cd /opt/jumpserver
/opt/jumpserver/jms start -d  #-d表示后台运行 start|stop|restart|status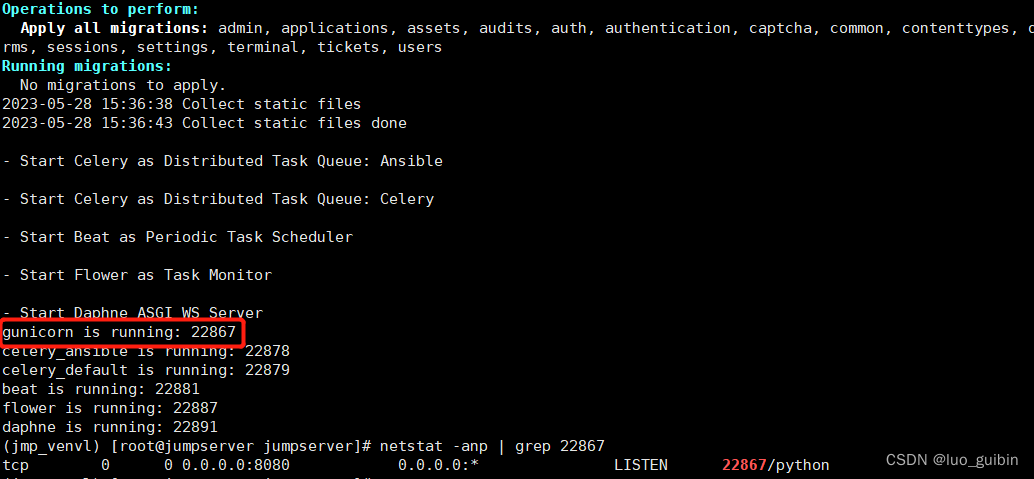
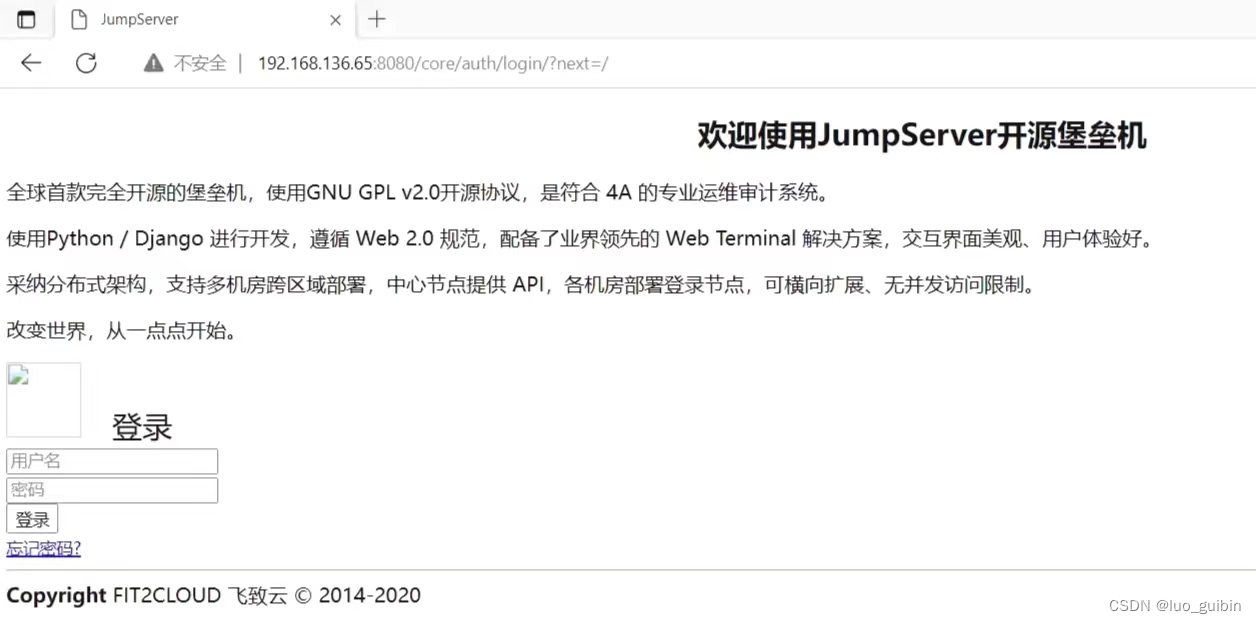
Verify the jumpserver initialization page
192.168.136.65:8080
9. Deploy koko components
The koko component implements the components of SSH Server and Web Terminal Server, improves SSH and WebSocket interfaces, and uses Paramiko and Flask to develop, allowing us to type commands on the web page online like xshell. It is developed by the golang programming language. Compared with the previous coco components (written in py), the performance is higher.
cd /opt
wget https://github.com/jumpserver/koko/releases/download/v2.1.0/koko-v2.1.0-linux-amd64.tar.gz
tar -zxvf koko-v2.1.0-linux-amd64.tar.gz
cd koko-v2.1.0-linux-amd64/
cp config_example.yml config.yml
vim config.yml
##填入获取的BOOTSTRAP_TOKEN,将redis的注释删掉###
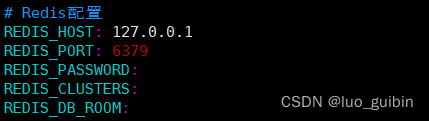
[root@jumpserver koko-v2.1.0-linux-amd64]# egrep -v "^#|^$" config.yml
CORE_HOST: http://127.0.0.1:8080
BOOTSTRAP_TOKEN: 1iTfoBKVFv13PtSg
REDIS_HOST: 127.0.0.1
REDIS_PORT: 6379
REDIS_PASSWORD:
REDIS_CLUSTERS:
REDIS_DB_ROOM:
./koko -d #启动koko服务
10. Deploy the guacamole component
The Apache springboard project, Jumpserver uses other components to implement the RDP function. Jumpserver does not modify other codes but adds additional plug-ins to support Jumpserver calls. (RDP here is the remote desktop protocol, and the background server can be operated through the browser)
Official website download link: Apache Guacamole™: 1.2.0
10.1 Download guacamole-server and ssh-forward
cd /opt
wget -O docker-guacamole-v2.1.1.tar.gz https://github.com/jumpserver/docker-guacamole/archive/master.tar.gz
tar -xf docker-guacamole-v2.1.1.tar.gz

#解压后目录名为docker-guacamole-master,目录下有三个文件#
[root@jumpserver opt]# ls /opt/docker-guacamole-master/
Dockerfile    guacamole.properties     etc

cd /opt/docker-guacamole-master/
wget http://download.jumpserver.org/public/guacamole-server-1.2.0.tar.gz  #下载guacamole-server
tar -zxvf guacamole-server-1.2.0.tar.gz

wget http://download.jumpserver.org/public/ssh-forward.tar.gz--2020-08-09 14:33:54--  http://download.jumpserver.org/public/ssh-forward.tar.gz  #下载ssh-forward
tar -zxvf ssh-forward.tar.gz

cd /opt/docker-guacamole-master/guacamole-server-1.2.0  #进入源码包

yum -y install cairo-devel libjpeg-turbo-devel libjpeg-devel libpng-devel libtool uuid-devel freerdp-devel pango-devel libssh2-devel libtelnet-devel libvncserver-devel libwebsockets-devel pulseaydio-libs-devel openssl-devel libvorbis-devel libwebp-devel  #安装依赖
10.2 Install ffmpeg tools
The ffmpeg tool is used to process media files
yum -y install epel-release

rpm -v --import http://li.nux.ro/download/nux/RPM-GPG-KEY-nux.ro
rpm -Uvh http://li.nux.ro/download/nux/dextop/el7/x86_64/nux-dextop-release-0-5.el7.nux.noarch.rpm

yum -y install ffmpeg ffmpeg-devell
10.3 Compile and install guacamole
cd /opt/docker-guacamole-master/guacamole-server-1.2.0  #进入源码包
./configure --with-init-dir=/etc/init.d  #编译
make && make install  #编译安装
10.4 Install java environment
yum -y install java-1.8.0-openjdk

cd /opt
wget http://mirrors.tuna.tsinghua.edu.cn/apache/tomcat/tomcat-9/v9.0.74/bin/apache-tomcat-9.0.74.tar.gz
tar -xf apache-tomcat-9.0.74.tar.gz
mv apache-tomcat-9.0.74 tomcat9
rm -rf /opt/tomcat9/webapps/*

cd /opt/docker-guacamole-master/
wget http://download.jumpserver.org/release/v2.1.1/guacamole-client-v2.1.1.tar.gz  #guacamole-clent里有一个war包和jar包
tar -xf guacamole-client-v2.1.1.tar.gz

##更改tomcat配置文件###
sed -i 's/Connector port="8080"/Connector port="8081"/g' /opt/tomcat9/conf/server.xml
echo "java.util.logging.ConsoleHandler.encoding = UTF-8" >> /opt/tomcat9/conf/logging.properties

###3个软链接###
ln -sf /opt/docker-guacamole-master/guacamole-client-v2.1.1/guacamole-1.0.0.war /opt/tomcat9/webapps/ROOT.war
ln -sf /opt/docker-guacamole-master/guacamole-client-v2.1.1/guacamole-auth-jumpserver-1.0.0.jar /config/guacamole/extensions/guacamole-auth-jumpserver-1.0.0.jar
ln -sf /opt/docker-guacamole-master/guacamole.properties /config/guacamole/guacamole.properties
10.5 Setting up the guacamole environment
./bashrc is an environment variable configuration file similar to profile. Use ls --all in the /root directory to view it, which is hidden by default.
export JUMPSERVER_SERVER=http://127.0.0.1:8080
echo "export JUMPSERVER_SERVER=http://127.0.0.1:8080" >> ~/.bashrc
export BOOTSTRAP_TOKEN=Ovn181zT7q7a8Die
echo "export B00TSTRAP_TOKEN=Ovn181zT7q7a8Die" >> ~/.bashrc
export JUMPSERVER_KEY_DIR=/config/guacamole/keys
echo "export JUMPSERVER_KEY_DIR=/config/guacamole/keys" >> ~/.bashrc
export GUACAMOLE_HOME=/config/guacamole
echo "export GUACAMOLE_HOME=/config/guacamole" >> ~/.bashrc
export GUACAMOLE_LOG_LEVEL=ERROR
echo "export GUACAMOLE_LOG_LEVEL=ERROR" >> ~/.bashrc
export JUMPSERVER_ENABLE_DRIVE=true
echo "export JUMPSERVER_ENABLE_DRIVE=true" >> ~/.bashrc
Parameter meaning:
JUMPSERVER_SERVER refers to the address accessed by the core
BOOTSTARAP_TOKEN must be changed to your own, if you forget it, go to config.yml under jumpserver to find it
JUMPSERVER_KEY_DIR Key storage directory after successful authentication
GUACAMOLE_HOME is the directory where the guacamole.properties configuration file is located
GUACAMOLE_LOG_LEVEL is the log level generated
JUMPSERVER_ENABLE_DRIVE mount shared disk for rdp protocol
10.6 Start tomcat and guacamole
/etc/init.d/guacd start  #启动服务
/opt/tomcat9/bin/startup.sh  #启动tomcat
Eleven, lina/luna module
Lina belongs to the front-end module and is responsible for the display of the page. Luna is now the front-end of the web terminal, and the front-end page of the plan is provided by this project. jumpserver only provides api, and is no longer responsible for rendering html in the background. It can be combined with lina to realize the terminal of the command line interface on the webpage.
11.1 Create a new Linux user nginx
useradd -M -s /sbin/nologin nginx11.2 install lina/luna
cd /opt
wget https://github.com/jumpserver/lina/releases/download/v2.1.0/lina-v2.1.0.tar.gz
wget https://github.com/jumpserver/luna/releases/download/v2.1.1/luna-v2.1.1.tar.gz
tar -zxvf lina-v2.1.0.tar.gz
tar -zxvf luna-v2.1.1.tar.gz
mv lina-v2.1.0 lina
mv luna-v2.1.1 luna
chown -R nginx:nginx lina  #改变他的属主属组,让他归nginx管理
chown -R nginx:nginx luna  #改变他的属主属组,让他归nginx管理
12. Compile and install nginx, nginx-module-vts
12.1 download nginx
cd /opt
wget http://nginx.org/download/nginx-1.22.0.tar.gz
tar -zxvf nginx-1.22.0.tar.gz
wget https://gitcode.net/mirrors/vozlt/nginx-module-vts/-/archive/master/nginx-module-vts-master.zip  #可能会报错,但链接是没问题的,需要去windows主机下载然后传到/opt目录下
unzip nginx-module-vts-master.zip

yum -y install gcc gcc-c++ pcre pcre-devel zlib zlib-devel openssl openssl-devel make

cd /opt/nginx-1.22.0/
./configure --prefix=/usr/local/nginx --user=nginx --group=nginx --add-module=/opt/nginx-module-vts-master/
make && make install

nginx -V  #查看nginx安装信息
nginx -t  #测试ngixn,返回nginx状态,带有successful为成功
11.2 Change nginx.conf
vim /usr/local/nginx/conf/nginx.conf Just copy directly, no need to change, please use vim paste mode, :set paste if the paste format is wrong.
#user  nobody;
worker_processes  1;

#error_log  logs/error.log;
#error_log  logs/error.log  notice;
#error_log  logs/error.log  info;

#pid        logs/nginx.pid;


events {
    worker_connections  1024;
}


http {
    include       mime.types;
    default_type  application/octet-stream;
    vhost_traffic_status_zone;                  #流量状态监控
    #log_format  main  '$remote_addr - $remote_user [$time_local] "$request" '
    #                  '$status $body_bytes_sent "$http_referer" '
    #                  '"$http_user_agent" "$http_x_forwarded_for"';

    #access_log  logs/access.log  main;
log_format main '{ "@timestamp": "$time_local", '
'"@fields": { '
'"uri":"$request_uri",'
'"url":"$uri",'
'"upstream_addr":"$upstream_addr",'
'"remote_addr": "$remote_addr", '
'"remote_user": "$remote_user", '
'"body_bytes_sent": "$body_bytes_sent", '
'"host":"$host",'
'"server_addr":"$server_addr",'
'"request_time": "$request_time", '
'"request_time":"$request_time",'
'"status":"$status",'
'"request": "$request", '
'"request_method": "$request_method", '
'"size":$body_bytes_sent,'
'"upstream_time":"$upstream_response_time"'
'"http_referrer": "$http_referer", '
'"body_bytes_sent":"$body_bytes_sent", '
'"http_x_forwarded_for": "$http_x_forwarded_for", '
'"http_user_agent": "$http_user_agent" } }';
    sendfile        on;
    #tcp_nopush     on;

    #keepalive_timeout  0;
    keepalive_timeout  65;

    #gzip  on;

    server {
        listen       80;
        server_name  localhost;

        #charset koi8-r;

        #access_log  logs/host.access.log  main;

        location / {
            root   html;
            index  index.html index.htm;
        }
        location /status {
            vhost_traffic_status_display;
            vhost_traffic_status_display_format html;
        }
        #error_page  404              /404.html;

        # redirect server error pages to the static page /50x.html
        #
        error_page   500 502 503 504  /50x.html;
        location = /50x.html {
            root   html;
        }

        # proxy the PHP scripts to Apache listening on 127.0.0.1:80
        #
        #location ~ \.php$ {
        #    proxy_pass   http://127.0.0.1;
        #}

        # pass the PHP scripts to FastCGI server listening on 127.0.0.1:9000
        #
        #location ~ \.php$ {
        #    root           html;
        #    fastcgi_pass   127.0.0.1:9000;
        #    fastcgi_index  index.php;
        #    fastcgi_param  SCRIPT_FILENAME  /scripts$fastcgi_script_name;
        #    include        fastcgi_params;
        #}

        # deny access to .htaccess files, if Apache's document root
        # concurs with nginx's one
        #
        #location ~ /\.ht {
        #    deny  all;
        #}
    }


    # another virtual host using mix of IP-, name-, and port-based configuration
    #
    #server {
    #    listen       8000;
    #    listen       somename:8080;
    #    server_name  somename  alias  another.alias;

    #    location / {
    #        root   html;
    #        index  index.html index.htm;
    #    }
    #}


    # HTTPS server
    #
    #server {
    #    listen       443 ssl;
    #    server_name  localhost;

    #    ssl_certificate      cert.pem;
    #    ssl_certificate_key  cert.key;

    #    ssl_session_cache    shared:SSL:1m;
    #    ssl_session_timeout  5m;

    #    ssl_ciphers  HIGH:!aNULL:!MD5;
    #    ssl_prefer_server_ciphers  on;

    #    location / {
    #        root   html;
    #        index  index.html index.htm;
    #    }
    #}

}
ln -s /usr/local/nginx/sbin/nginx /usr/local/sbin/
cd /usr/local/sbin/
./nginx #开启服务11.3 Verifying nginx
192.168.136.65
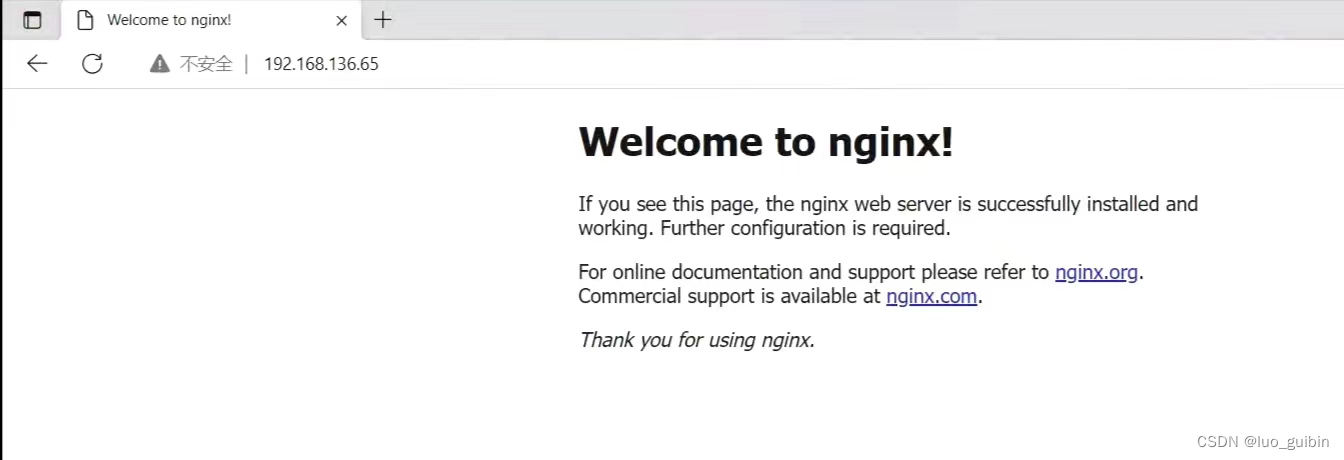
192.168.136.65/status
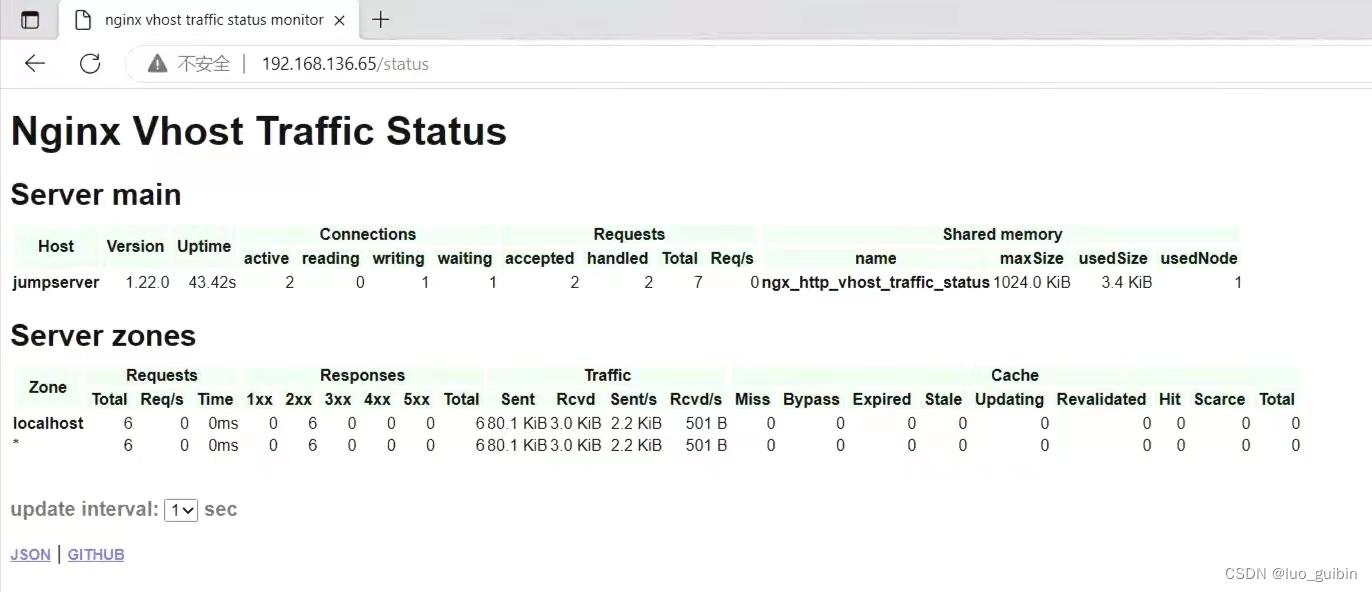
11.4 Explanation of monitoring list
The information of the monitoring list
Server main Main server
**Host: **host name
**Version: **version number
**Uptime:**server running time
Connections active: current number of client connections reading: read client connections Total writing: the total number of client connections written
Requsts accepted: the total number of client connections handled: the total number of client connections handled Total: the total number of requests Req/s: the number of requests per second
Shared memory: shared memory name: specified in the configuration shared memory name maxSize: the maximum limit of the shared memory specified in the configuration usedSize: the current size of the shared memory usedNode: the number of nodes currently used in the shared memory Server zones server zone zone: the current zone
Requests
Total
: the total number of requests Req/s: per second Number of requests time: Time
Responses: Number of status codes 1xx, 2xx, 3xx, 4xx, 5xx: Indicates the number of different status codes in response Total: The total number of response status codes
Traffic indicates traffic Sent: Sent traffic Rcvd: Received traffic Sent/s: Traffic sent per second Rcvd/s: Traffic received per second
Cache indicates cache Miss: Number of missed caches Bypass: Number of avoided caches Expirde: Number of expired caches Stale: Number of valid caches Updating: Number of cache updates Revalidated : Revalidated cache book Hit: Number of cache hits Scarce: Number of requests that failed to meet cache requirements Total: Total
12. Change the nginx configuration again
vim /usr/local/nginx/conf/nginx.confIn fact, only the server part was changed . For the convenience of copying, I copied the entire file. If the paste format is wrong, please use vim paste mode, :set paste.
worker_processes  1;

events {
    worker_connections  1024;
}


http {
    include       mime.types;
    default_type  application/octet-stream;
    vhost_traffic_status_zone;                  #流量状态监控
    #log_format  main  '$remote_addr - $remote_user [$time_local] "$request" '
    #                  '$status $body_bytes_sent "$http_referer" '
    #                  '"$http_user_agent" "$http_x_forwarded_for"';

    #access_log  logs/access.log  main;
log_format main '{ "@timestamp": "$time_local", '
'"@fields": { '
'"uri":"$request_uri",'
'"url":"$uri",'
'"upstream_addr":"$upstream_addr",'
'"remote_addr": "$remote_addr", '
'"remote_user": "$remote_user", '
'"body_bytes_sent": "$body_bytes_sent", '
'"host":"$host",'
'"server_addr":"$server_addr",'
'"request_time": "$request_time", '
'"request_time":"$request_time",'
'"status":"$status",'
'"request": "$request", '
'"request_method": "$request_method", '
'"size":$body_bytes_sent,'
'"upstream_time":"$upstream_response_time"'
'"http_referrer": "$http_referer", '
'"body_bytes_sent":"$body_bytes_sent", '
'"http_x_forwarded_for": "$http_x_forwarded_for", '
'"http_user_agent": "$http_user_agent" } }';
    sendfile        on;
    #tcp_nopush     on;

    #keepalive_timeout  0;
    keepalive_timeout  65;

    #gzip  on;
    server {
        listen       80;
        client_max_body_size 100m; #录像和文件上传大小限制
        #charset koi8-r;

        #access_log  logs/host.access.log  main;

        location /ui/ {
            try_files $uri / /index.html;
            alias /opt/lina/;
        }
        location /status {
            vhost_traffic_status_display;
            vhost_traffic_status_display_format html;
        }
        location /luna/ {
            try_files $uri / /index.html;
            alias /opt/luna/;   #luna路径,如果修改安装目录,此处需要修改
        }
        location /media/ {    #静态文件处理
        add_header Content-Encoding gzip;
        root /opt/jumpserver/data/; #录像位置,如果修改安装目录,此处需要修改

        }
        location /static/ {
        root /opt/jumpserver/data/;
        }
        location /koko/ {  #当我们请求koko,他会通过proxy_pass进行反向代理
        proxy_pass http://localhost:5000;
        proxy_buffering off;
        proxy_http_version 1.1;
        proxy_set_header Upgrade $http_upgrade;
        proxy_set_header Connection "upgrade";
        proxy_set_header X-Real-IP $remote_addr;
        proxy_set_header Host $host;
        proxy_set_header X-Forwarded-For $proxy_add_x_forwarded_for;
        access_log off;
        }
        location /guacamole/{
        proxy_pass http://localhost:8081/ ;
        proxy_buffering off;
        proxy_http_version 1.1;
        proxy_set_header upgrade $http_upgrade;
        proxy_set_header Connection $http_connection;
        proxy_set_header X-Real-IP $remote_addr;
        proxy_set_header Host $host;
        proxy_set_header X-Forwarded-For $proxy_add_x_forwarded_for;
        access_log off;
        }
        location /ws/{
        proxy_set_header X-Real-IP $remote_addr;
        proxy_set_header Host $host;
        proxy_set_header X-Forwarded-For $proxy_add_x_forwarded_for;
        proxy_pass http://localhost:8070;
        proxy_http_version 1.1;
        proxy_buffering off;
        proxy_set_header upgrade $http_upgrade;
        proxy_set_header Connection "upgrade";
        }
        location /api/{
        proxy_pass http://localhost:8080;
        proxy_set_header X-Real-IP $remote_addr;
        proxy_set_header Host $host;
        proxy_set_header X-Forwarded-For $proxy_add_x_forwarded_for;
        }
        location /core/ {
        proxy_pass http://localhost:8080;
        proxy_set_header X-Real-IP $remote_addr;
        proxy_set_header Host $host;
        proxy_set_header X-Forwarded-For $proxy_add_x_forwarded_for;
        }
        location / {
        rewrite ^/(.*)$ /ui/$1 last;
        }

}
}
restart nginx
cd /usr/local/sbin/nginx
./nginx
If the following error occurs after restarting nginx
nginx: [emerg] "server" directive is not allowed here in /usr/local/nginx/conf/nginx.conf:1
Check the format, usually one missing or one more parenthesis.
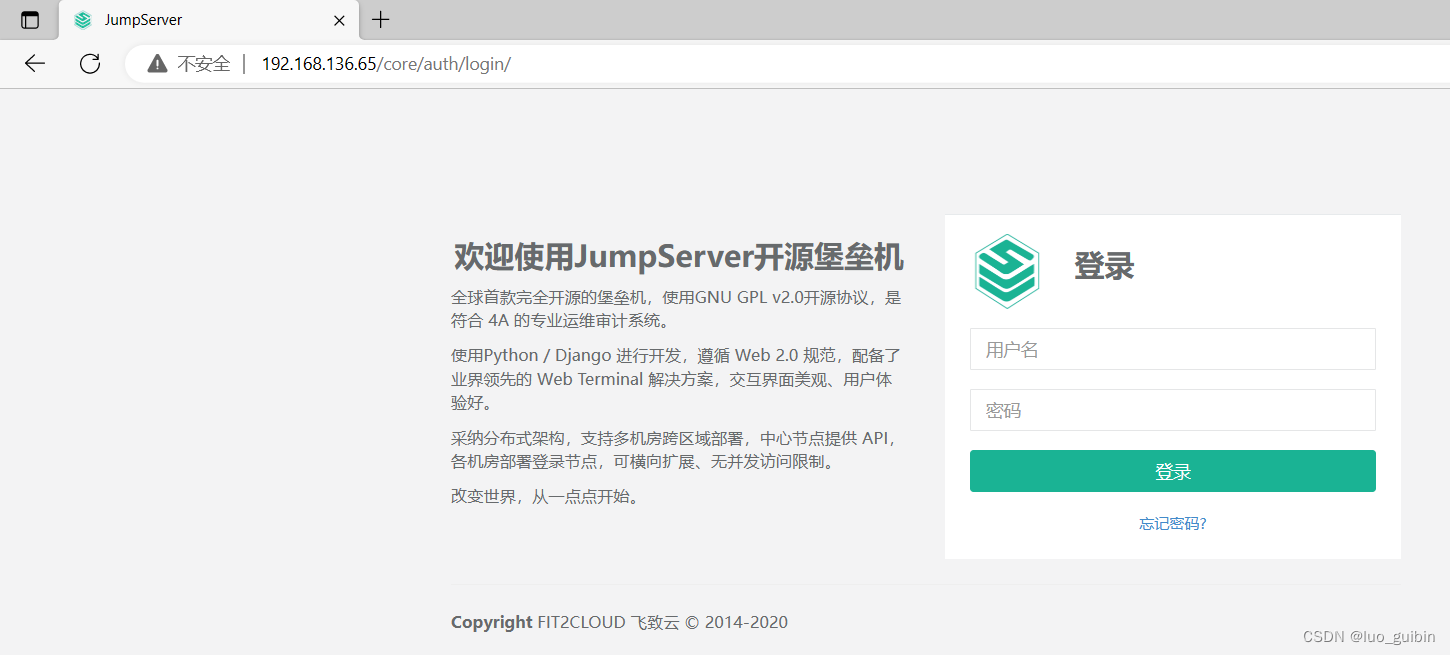
Thirteen, access jumpserver
192.168.136.65
At this time, it is no longer port 8080, but port 80. Because it is proxied by nginx, the default username and password are both admin .

14. Problem Summary
14.1 pip package path
[root@jumpserver wheels]# cd /opt/py3/lib/python3.6/site-packages
'pidfile' has no attribute 'TimeoutPIDLockFile' The pidfile module does not have the TimeoutPIDLockFile attribute. This error will occur when I install another tutorial, which cannot be solved. Restart a virtual machine, and follow my tutorial in this article. This problem will not occur.
14.2 nginx occupation and restart
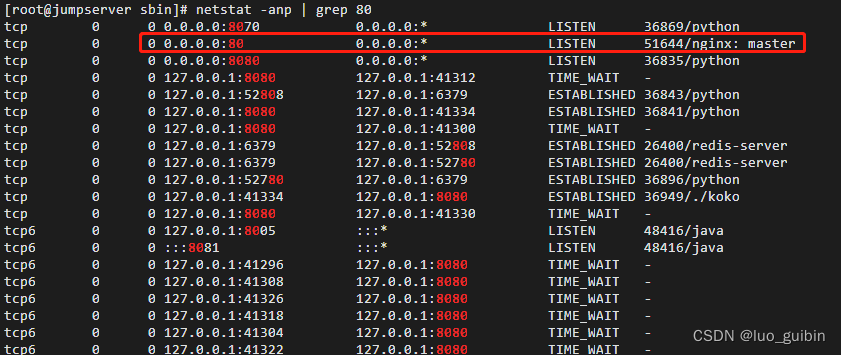
nginx: [emerg] still could not bind() error indicating that port 80 is occupied
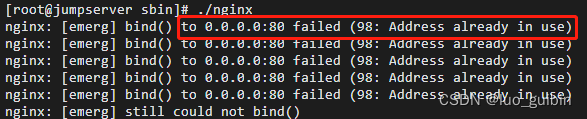
View port usage
netstat -anp | grip 80
It is useless to kill the process with kill -9 , nginx: worker or nginx: master has been automatically restarted and occupies port 80
###解决方法###
cd /usr/local/sbin/nginx
pkill nginx
./nginx
14.3 mysql import data error
python3 /opt/jumpserver/apps/manage.py makemigrations reports an error
python3 /opt/jumpserver/apps/manage.py migrate
mysql database password pure number error
###解决方法###
改密码解决方法,提前避免改为问题,密码需要有英文字母和数字组合。
如果你前面mysql密码设置的跟我一样不会出现该问题。

(jum_venel) [root@jumpserver apps]# mysqladmin -ujumpserver -p password
Enter password:
New password:
Confirm new password:
14.4 pip3 install virtualenv error
The openssl tool is missing, and python3 needs to be uninstalled and recompiled
###解决方法###
rm -rf /usr/local/python3.6/  #卸载原先的python3.6
yum install openssl openssl-devel -y
cd /etc/python
./configure --prefix=/usr/local/python3.6
 make -j3 && make install
14.5 Start jumpserver after restarting the host
Since jms and nginx are not set to start automatically after booting, it is necessary to start manually when booting without eating
###解决方法###
source /usr/local/jmp_venvl/bin/activate
/opt/jumpserver/jms start -d
./usr/local/sbin/nginx
15. Reference Links
Nginx compilation and installation + monitoring module Nginx-module-vts_IT.cat's blog - CSDN blog
Linux operation documentation - deployment and use of jumpserver platform system