Program Questions Question
1 Questions and Answers Questions
from Dr. Tujiang
Description of the topic
Programming implementation: Dr. Wang has 5 addition multiple-choice questions, please give the correct option
Specific requirements
1). Dr. Wang asked: "n + m =? ", n (0-9 random number), m (0-9 random number)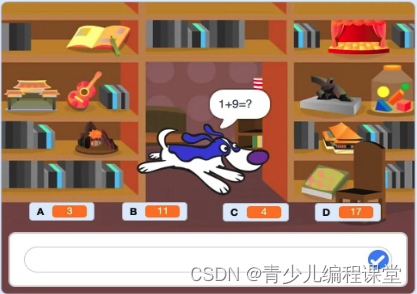
2). There are four options A, B, C, and D below, one random option is the correct answer, and the other options are wrong answers (all options cannot be repeated)
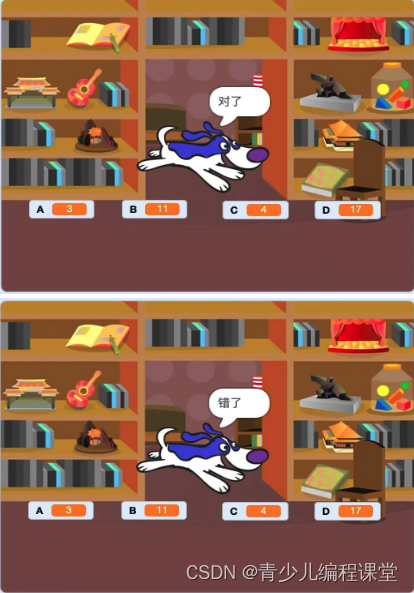
3). Input options in the query box, if correct, Dr. Wang said: "Right", if wrong, Dr. Wang said: "Wrong";
4). Dr. Wang gave 5 multiple-choice questions in a row;
5). After completing the 5 multiple-choice questions, Dr. Wang said: "How many questions were answered correctly" and waited for 1 second, then said: "How many points did you get?" and the options were cleared ( 20 points for each multiple choice question);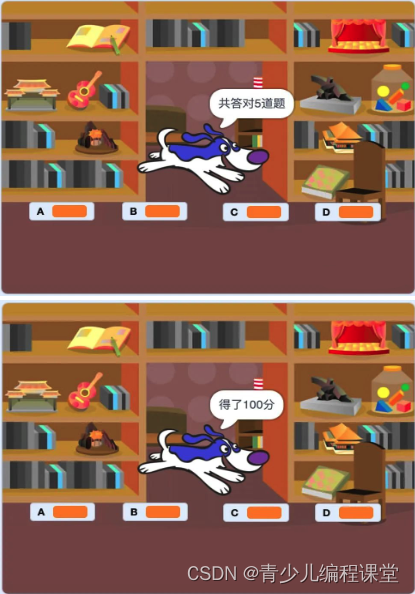
6). The program runs continuously and meets all the above requirements
 As the last question of the intermediate and senior group, this question is obviously more difficult than the previous 6 questions. The difficulty of this question lies in how to generate the four options A, B, C, and D. There are 3 key points here: 4 options cannot be repeated ;
One and only one option is the correct answer;
the order of the correct answer is random, it can be any one of A, B, C, D;
in order to realize this function, we can use the list and random numbers to calculate first For the correct answer, insert it into the list as the first item in the list, and then use the random number to get the other 3 wrong options. They all increase or decrease a random number on the basis of the correct answer, and then insert it into the random number of the list. Location. Programming implementation
Next, we will write a program in the following 4 steps to complete the work:
1. Random questions
2. Generate A, B, C, D options
3. Ask and judge whether the answer is correct
4. Count the number of correct answers and scores
The title requires an addition multiple-choice question, and the range of the two addends is 0-9. Therefore, we can create two variables " and " m" to represent the two addends, and at the same time to judge whether the input answer is Correct, create a variable "answer" to store the correct answer. Then use the connection operator to connect "n", "+", "m" and "=?" to get a calculation, the code of this part is shown in the figure Show:
2. Generate options A, B, C, and D. Now that you have the title, you need to generate four options A, B, C, and D. According to the previous analysis, you need to define a list "option" to save 4 options. option, and need to create four variables "A", "B", "C", and "D" respectively
to represent the options. We can insert the correct answer into the "Options" list first, and then randomly insert 3 disturbing options into the list. When inserting, we can use the "Insert command at item x of the option to disrupt the order of the list. This part of the code is shown in the figure: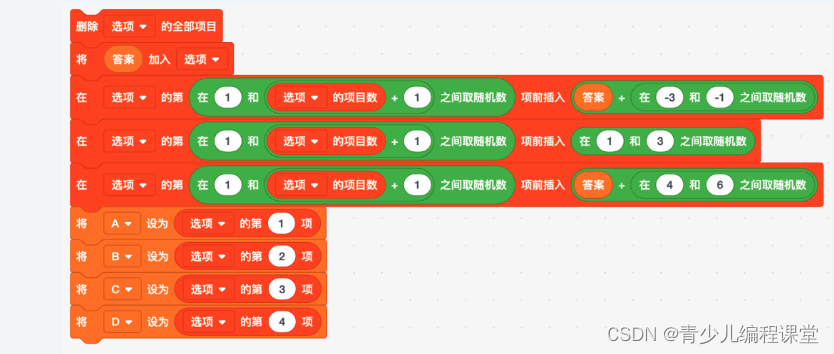
3. Ask and judge whether the answer is correct
With the questions and options, you can ask and judge whether the answer is correct. It should be noted that the player input is A, B, C, D, not a certain number. Therefore, we need to discuss according to the situation. If you enter A, you need to judge whether the variable "A" is equal to the variable "answer". If you enter B, you need to judge whether the variable "B" is equal to the variable "answer". By analogy...
If the answer is correct, say "Yes", and increase the variable "Number of Correct Answers" by 1, otherwise it is wrong, this part of the code is shown in the figure: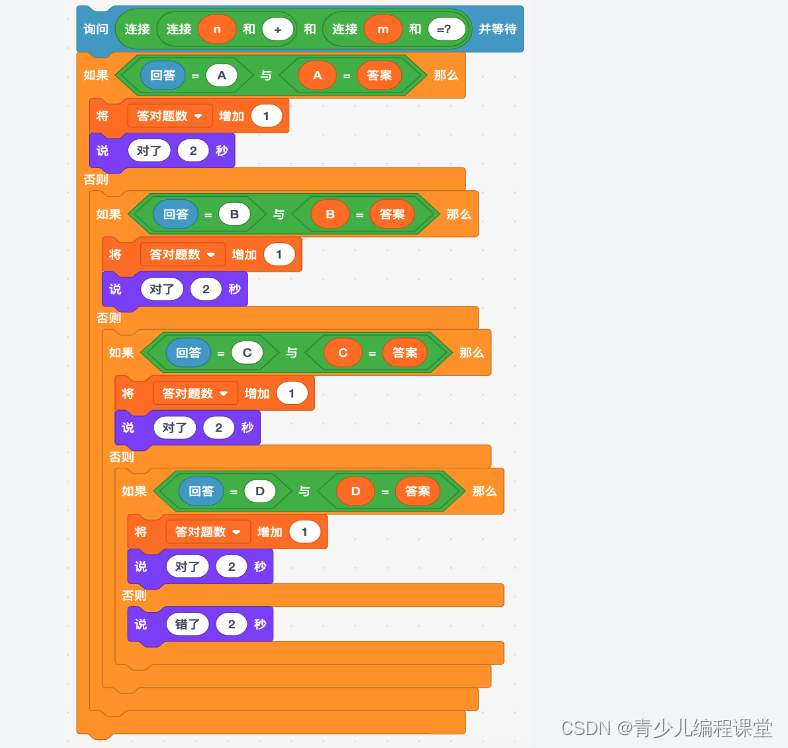
4. Statistics on the number of correct answers and scores The code only describes the question and answer of one question, and the question requires 5 questions, so you need to use the "repeat 5 times command" to wrap this part of the code as 5 times After the loop is executed, you need to count the number of correct answers and scores. Here, each question is worth 20 points. You can use the "20 correct answers" to get the score. At the same time, don't forget to set the variables "A", "B", "C" and " D" four options. The code is shown in the figure: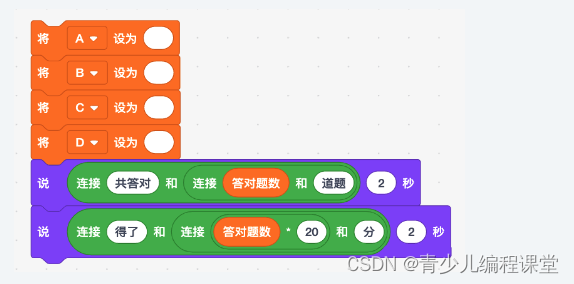
Question 2 Questions and Answers
Mayan Temple
Topic Description
Programming Implementation: Mayan Temple.
Specific Requirements
1). Click the green flag, and the corresponding characters and backgrounds will appear;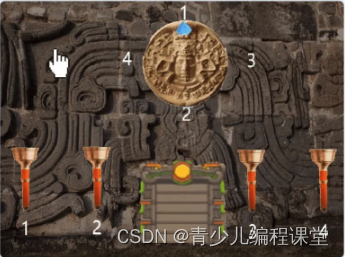
2). Press the space bar, the Mayan compass says: "Please observe the order in which the torches are lit", and then the four torches in the temple light up and go out once in a random order;
3. The Mayan compass said: "Please light up all the torches in the order just now", and then use the up, down, left, and right buttons to control the finger to move in the corresponding direction. Move the finger to a torch, press the S key, and the torch will be turned on
. will light up again;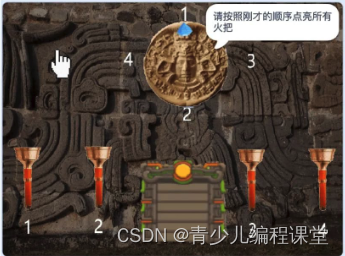
4). All four torches are lit. If the order of lighting is wrong, the Mayan compass will say: "Error", and the game is over;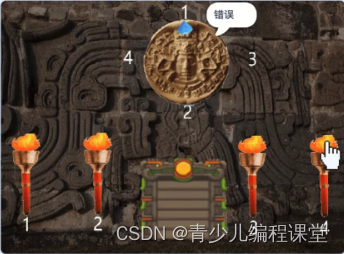
5. All four torches are lit up. If the order of lighting is correct, the Mayan compass will say: "Correct", and according to the number represented by each torch, rotate clockwise to the corresponding number position in 4 times, with an interval of 1 second each time
. Consistent with the order in which the torches are lit;

6). After the Mayan compass turns successfully, the gate will open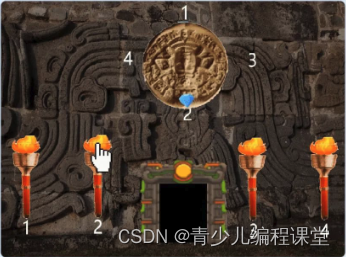

Next, we need to consider how to randomly light up the order. We can use the numbers 1, 2, 3, and 4 to represent the lighting order of the 4 torches, and save them in the "torch order" list. There are usually two ways to achieve this
:
First insert 1, 2, 3, and 4 into the list in sequence, and then shuffle the order;
insert 1, 2, 3, and 4 in sequence at random positions in the list;
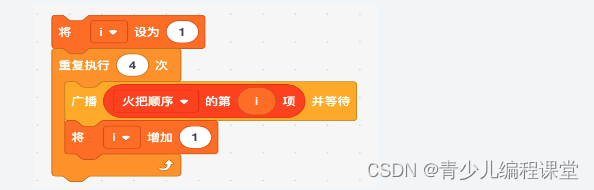
from the perspective of code simplicity, it is more convenient to choose the second method Simple, the code is as follows:  The key here is to "insert xx before the second item in the list". If the list is empty, there is only one position that can be inserted. If there is 1 data in the list, then the newly inserted The data has two positions to choose from, before or after the first data, correspondingly, if there are two data in the list, then the newly inserted data has three positions to choose from, and so on.., that is This position can be obtained by a random number, but the range of the random number is related to the number of items in the list, which is what the above code does. Next, the compass needs to tell the 4 torches to light themselves separately. This requires the use of the event broadcast mechanism. We can traverse the "torches lit" list, and send broadcasts to the 4 torches in turn according to the numbers in the list. Traditional The best approach is to use the "if..then" command to judge the numbers, and then send broadcast messages respectively. Random numbers can be used to send broadcasts. The name of the broadcast message is the number 1, 2, 3 or 4. Combined with the loop, the program can be made simpler. The code is as follows:
Correspondingly, when the torch 1 character receives the broadcast message "1", first switch the torch to the lit shape, wait for 1 second, and then switch to the extinguished shape, the code is as follows
Similarly, the other 3 torch characters need to do the same when they receive message "2", message "3", and message "3". . So far, the function of lighting up 4 torches in random order and then going out has been realized.
2. Wait for the player to light up the torches and record the sequence
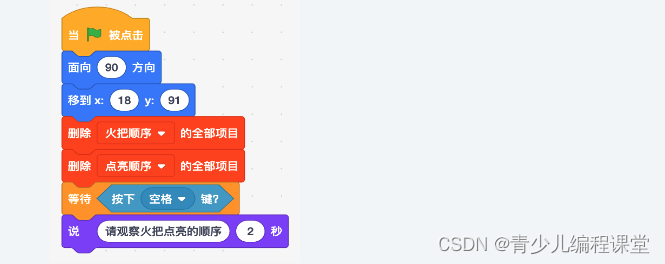
. After the compass character sends 4 broadcasts, it needs to prompt "Please light up all the torches in the order just now" and wait for the player to light up the torches. Continue to write the code under the compass character code as follows :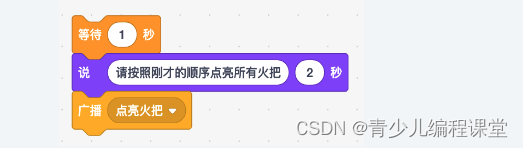
Here, the reason to wait for 1 second is because the time between lighting and extinguishing of the 4 torches is also exactly 1 second. After the broadcast is sent, the 4 torch characters need to process the broadcast message, and wait for the finger to move to the torch and press the S key to light the torch. Once the torch is lit, the serial number of the torch needs to be saved to the "point "Light order" list, and judge whether all four torches are lit. If they are all lit, it is necessary to judge whether the order of the two is correct. Take the role of torch 1 as an example, its code is as follows


So far, the function of waiting for the player to light the torch and record the order has been completed.
3. Compare the two lighting sequences
Next, you need to compare the random lighting sequence of the computer and the lighting sequence of the player. In fact, it is necessary to judge whether the two lists of "torch sequence" and "lighting sequence" are equal. The key is How to compare?
The simple idea is to directly compare two lists, but it should be noted that this method is not always correct in scratch, and in all programming languages, this method is generally not used directly
. Let's change the way of thinking and connect the numbers in the two lists respectively. Get a string and then do the comparison, which is done in the compass role. code show as below:

It should be noted that for the string, its initial value should be set to empty, if the order of the two is the same, it will say "correct", and then broadcast "rotation", otherwise it will say "wrong", and the game will end.
4. Rotate the compass
After the compass receives the "rotate" broadcast, it needs to rotate the compass sequentially according to the lighting sequence. This is another difficulty of this work, because the sequence here is random and different each time. There are many ways to achieve it, and I will introduce the simplest one here, and it is also the easiest way for children to understand. First of all, we need to find the key points. What changes during the compass rotation? There is no doubt that it is the direction, and the corresponding direction values of 1, 2, 3, and 4 here are 90, -90, 180, and 0 respectively. This is easy to handle, if the current number is 1, then let the compass turn right repeatedly until the direction is 90 degrees, if the current number is 2, then let the compass turn right repeatedly until the direction is -90, and so on ..In this process, we don't need to care about where the current compass is, is it very convenient, the specific implementation code is as follows: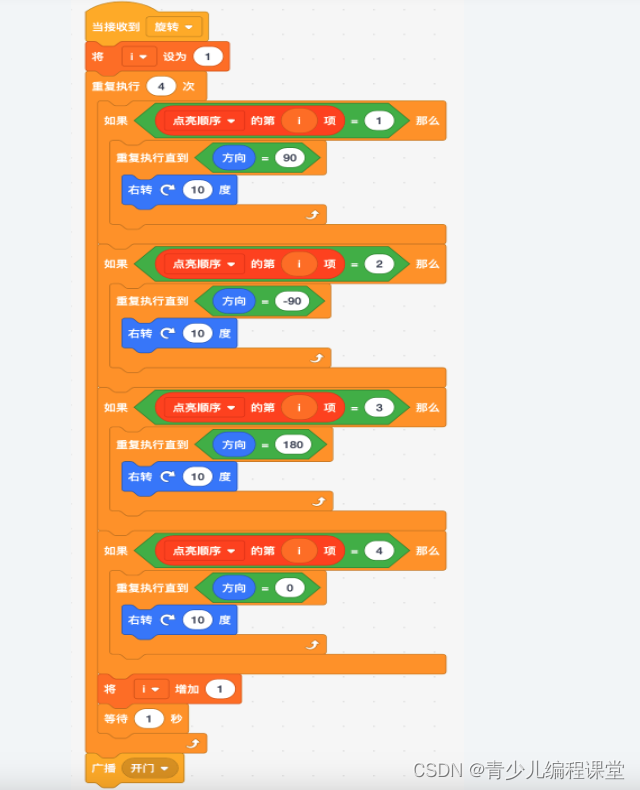
5. Open the gate.
The last step is to open the gate. This is very simple. After the gate character receives the "open the door" broadcast message, he can directly switch the shape. The code is as follows: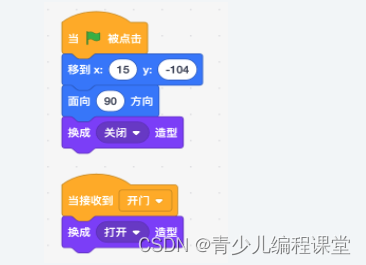
Question 3 Questions and Answers
Escape from the Secret Room
Description of the topic
Programming implementation: escape from the secret room
Specific requirements:
1). Click on the green flag, and the corresponding characters and backgrounds will appear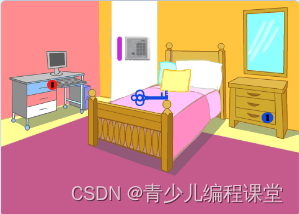
2). After clicking the blue key on the bed, the key can follow the pointer to move;
3. Drag the mouse to move the key to the second keyhole of the bedside cabinet, and a dialog box "open the crown" will appear. Wait for 1 second for the blue key to disappear, you can take out the red key from the crown, and the red key will appear
on the screen;
4). Click on the red key, the red key will follow the inside pointer to move to the keyhole of the first drawer on the computer desk, a dialog box "Open the drawer" will appear, wait for 1 second for the red key to disappear, and you can use it from
the drawer Take out the white door card, and the white door card will appear on the screen;

5). Click on the door card, the door card can move with the marker pointer, and disappear when it touches the purple handle, the combination lock will randomly say 5 numbers (0-9), and input the maximum five digits composed of these 5 numbers And the input box appears;

6. If the maximum five digits entered are correct, the prompt will be: "Correct, the door is open", if the maximum five digits entered are wrong, the prompt will be: "Please re-enter (one more chance)", and a prompt will be displayed for all wrong inputs in two
opportunities : "Error, the door is locked".


As you can see, there are 4 roles here. Combined with the flow chart above, we can write programs in the order of the roles.
1. Blue key
For the role of the blue key, there are three small functions:
Initialize settings
Click the key, let the key move with the mouse
Open the drawer, get the red key
First upload the code, as shown in the picture: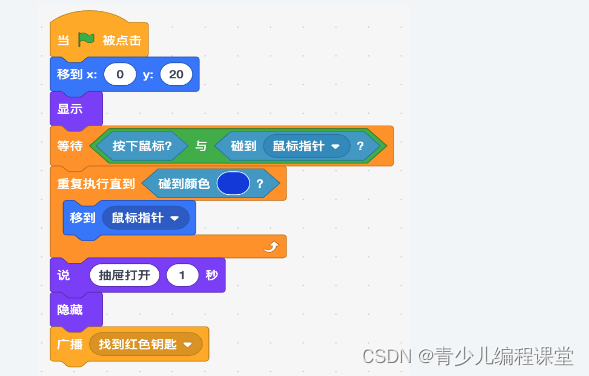
Among them, the initialization includes position setting and display, so as to ensure that the blue key appears on the bed every time the game starts. For the processing of pressing and leaving the mark, the "when the character is clicked" instruction is not used, but the "wait condition" instruction is used, which can ensure that the blue key can only be clicked once, and the key can only be clicked after clicking the green flag . This is a very useful Scratch programming tip, which can make the program more rigorous and reduce unnecessary bugs. To open the drawer, color collision detection is used here. Once it touches the blue keyhole, you can say "the drawer is open" and hide the blue key. When you open the drawer, you find the red key. From the role of the blue key to the role of the red key, it involves communication between roles. This requires the use of the event collision mechanism, so a broadcast "find the red key" is finally sent. It's as if the blue key character made a phone call to the red key character.
2. Red key
The effect of the red key character is basically the same as that of the blue key. The difference is as follows: the
position is different
, it is hidden at the beginning,
and the door card can only be obtained by touching the red key hole.
The red key has two code blocks, One is the green flag code block, indicating the initial state, and the other is the code that needs to be processed after receiving the "red key found" broadcast. The specific code is as follows:
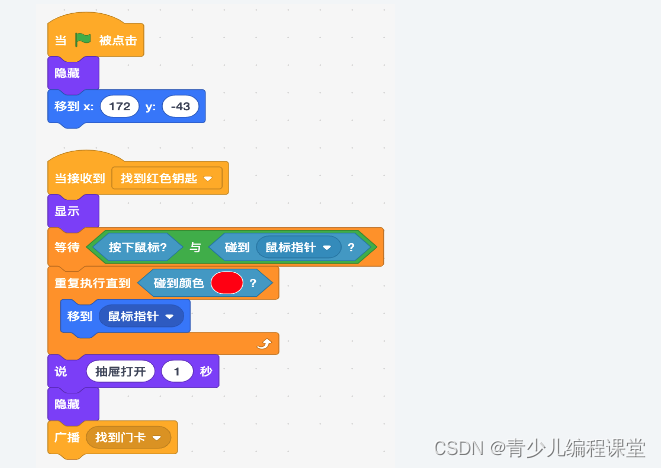
In the same way, after saying "drawer open" and hiding itself, the door card role needs to be notified, so a broadcast "find card" instruction is added at the end of the code.
3. White door card
The logic and code of the door card role are basically the same, so I won’t go into details here, just upload the code directly:
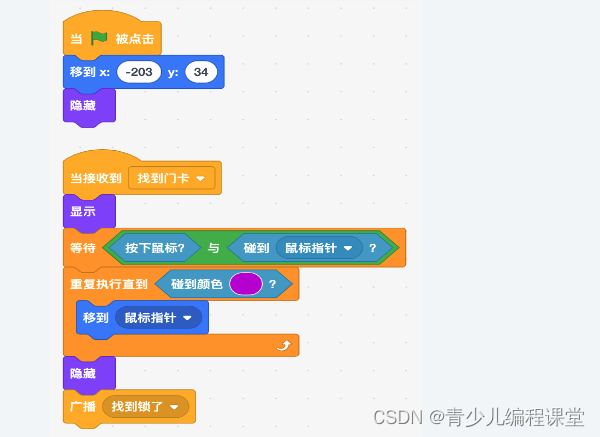
After the door card role is hidden, a "lock found" broadcast message needs to be sent to the password lock role.
4. Combination lock
After receiving the "lock found" broadcast message sent by the door card role, the following three small functions need to be implemented: generating a random password, prompting the user to enter the password, and
judging
whether the password
is correct. Time for children to develop logical thinking skills and data processing skills. First, let’s generate a random password. The password is a 5-digit number, and each digit is randomly selected from 0-9. The idea is actually quite simple, that is, in the order of ten thousand, one thousand, one hundred, ten, one Take a random number from 0 to 9 in turn.
The specific implementation is also very simple, first define a variable "Number String" and set it to empty, then use the string concatenation operation to connect the numbers on each digit one by one, and save these numbers to the "Number" list, which is convenient Subsequent processing, this part of the code is as follows: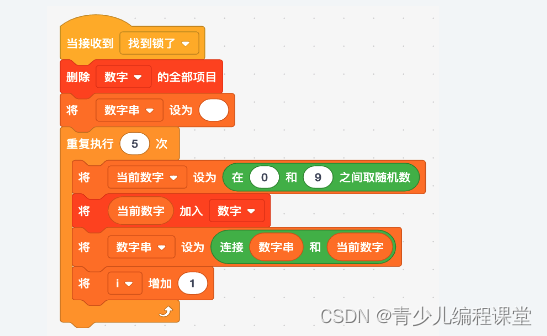
Secondly, we need to obtain the password through the "number" list, and the password is a maximum of 5 digits composed of these 5 numbers. In response to this requirement, the usual practice is to sort the list, and then spell the 5 numbers into a number in turn, but this method is a bit difficult, and many children can't grasp it for a while. If you are careful, you may have discovered that these 5 numbers are all one-digit numbers, and the value range is 0-9. We can change the way of thinking, for these 5 numbers, let each number be compared with 9, how to be equal, then this number is located in the high position of the password number, and then 8, 7, 6, 5, 4, 3, 2 , 1, 0 for comparison, after one round, you can get the maximum 5 digits.
Counting loops and nested loops are needed here. In order to simplify the code, you can use a self-made building block to obtain a maximum of 5 digits as a password. The code is as follows: Then you can 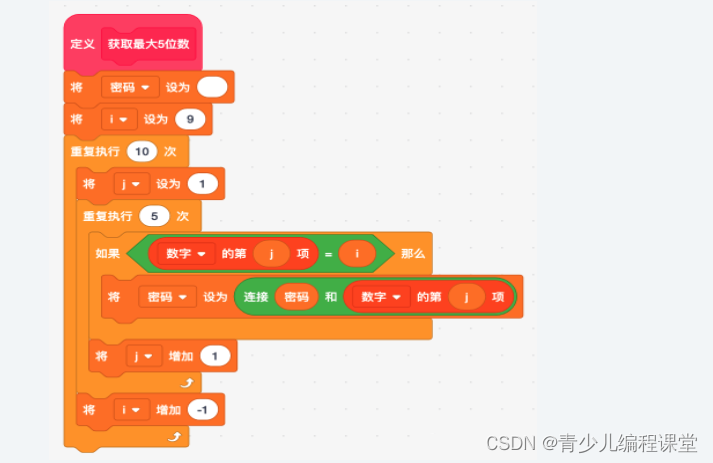 call this self-made building block to obtain the so-called password before asking, and save it in In the variable "password". Next, the player enters a number as a password in the input box, and judges whether the password is correct. Since there are only two opportunities at most, according to the flow chart drawn above, we only need to use two "if...then...otherwise" instructions. The specific code is as shown in the figure:

At this point, the entire function is fully realized
Question 4 Questions and Answers
Switch bullets
Topic description
Programming implementation: switch bullets
Specific requirements
1). Click the green flag to display the corresponding role and background;
2). Press the number key 1 to fire a type 1 bullet - flame bomb;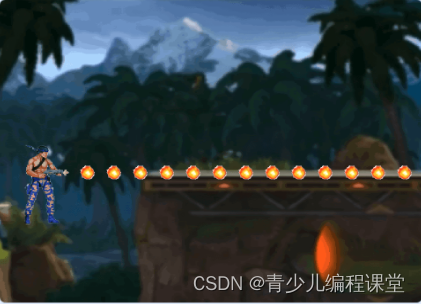
3). Press the number key 2 to fire 2 types of bullets - flame shot;
4). Press the number key 1 again to fire a type 1 bullet-flame bomb;
5). The bullet is in a continuous firing state, and the number key 1 and number 2 can continuously switch the type of bullet fired. Note  : Many children who have just started learning programming , the "repeat" instruction here is often missed, resulting in no effect. Remember, the "if..then" instruction can only be executed once, and it usually needs to be used in conjunction with the "repeat" instruction.
Next, you need to deal with firing two different bullets separately.
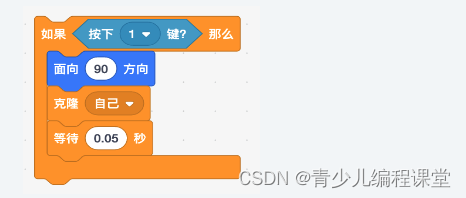
2. Fire type 1 bullets - fire bomb
type bullets are always launched along a 90-degree direction, so you only need to set the bullet role to 90 degrees and clone continuously. Just control the frequency of cloning bullets, which is a common practice Just wait for a while, such as 0.05 seconds, the code of this part is as follows:
Once the bullet clone is generated, it can move forward continuously until it touches the edge of the stage and disappears. The code is as follows: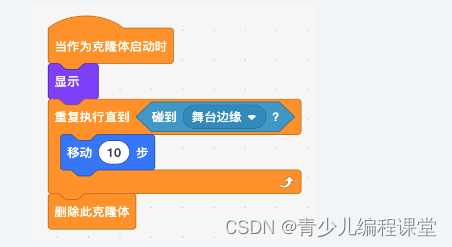
In this way, Type 1 bullets can be fired successfully.
3. Launch 2 types of bullets - flame shotguns. This is the focus and difficulty of this question. Shooting bullets along 5 different directions means that we need to clone 5 bullets at once when pressing the number key 2, and Set different directions. Seems pretty simple, and most students would write something like this:

Logically speaking, there is nothing wrong with writing this way, but the effect looks a bit strange, as shown in the following figure: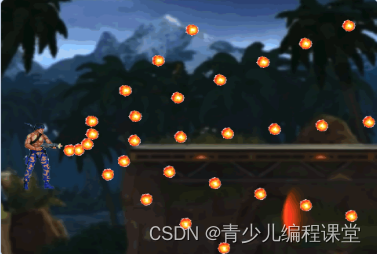
If you are sharp-eyed, you may have already discovered that the five bullets here are not fired at the same time, and there is an obvious sequence. Although there is no "wait for 1 second" instruction here, the code execution still takes time, so the 5 bullets here are still in order, which leads to the effect shown in the figure above.
(O 0? Can 5 bullets be cloned at the same time?
Of course, Teacher Chaoping will teach you a trick today. You can use self-made building blocks to define the program for cloning 5 bullets as self-made building blocks, as shown in the figure: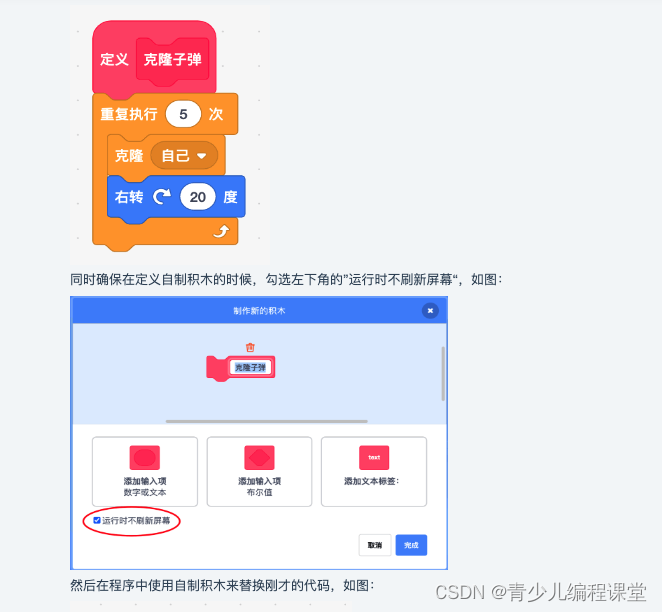

Then, you may ask, what does "do not refresh the screen during runtime" mean here? In fact, more precisely, "no new screen during runtime" is not a new stage. Its function is to save the stage refresh step when the code in the self-made building block is executed, and refresh the screen after the entire self-made building block is executed.
Because refreshing the stage consumes computer resources and takes a certain amount of time, using the "do not refresh the screen when running" function can speed up the execution efficiency of specific codes and shorten the running time, but the user cannot see the effect changes during the running of the program through the stage , it can be easily understood that this part of the code is executed at the same time. In addition to the effect of ensuring that multiple bullets are cloned at the same time in this example, it can also be used to draw good graphics between Scratch brushes, and the physics engine that controls the behavior of characters when they collide. It provides the possibility to achieve more and richer effects, which is a relatively powerful function. So far, the effect of firing 2 types of bullets has also been completed.
Question 5 Questions and Answers
Piggy Bank
Title Description
Programming Implementation: Piggy Bank
Specific Requirements:
1). Click the green flag, and the corresponding character and background will appear (the initial balance is 1000)
2). Click to save money, ask how much to save and a dialog box will appear
3). Enter the amount of money deposited, and the balance will show the total amount of money deposited;
4). Click to withdraw money, ask how much to withdraw and a dialog box will appear

5).Input the withdrawn amount in the dialog box, and the balance will show the total amount of withdrawn money;
6). If the amount of money withdrawn is greater than the balance, the balance will be displayed after less than 1 second;


Note: The "+" command in Scratch only works on numbers. If the input is non-number content, it will be treated as 0. So, if the input is not a pure numeric string, then the balance will remain the same.
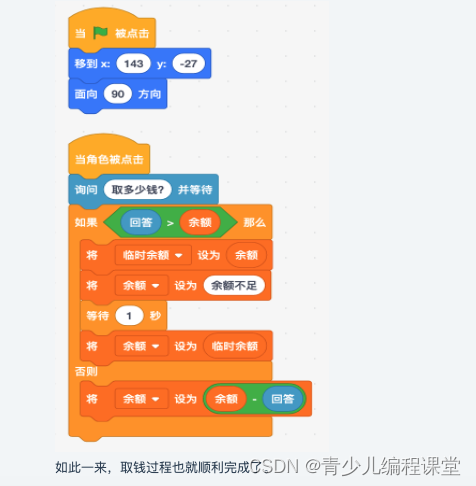
2. The process of withdrawing money
The next step is the process of withdrawing money. When you click the "Withdraw" button, you will be asked "How much to withdraw?" and will be processed according to the input amount. There are two situations here. One is that the balance is insufficient, and the other is that the balance is sufficient, so we need to use the "if...then...else" double branch conditional instruction. If the balance is sufficient, just subtract it directly. If the balance is insufficient, you need to modify the variable "balance" to "insufficient balance" first, and then display the original balance after 1 second, so we need to use a temporary variable "temporary balance" to save the balance.
Switch to the "Withdraw" role and write the code as follows:
Question 6 Questions and Answers
Rotating Windmill
Title Description
Programming Implementation: Rotating Windmill (Brush question, use a brush to draw without other characters appearing, otherwise 0 points)
Specific requirements
1). Click on the green flag and use a brush to draw the triangular base of the windmill (size and color can be set by yourself, pen thickness: 20);
2). Draw four rectangular fan blades (the size and color can be set by yourself);
3). The fan blades can continue to rotate clockwise (the fan blades rotate in situ)
4). The drawn windmill can be fully presented on the stage (The base and fan blades cannot be separated)
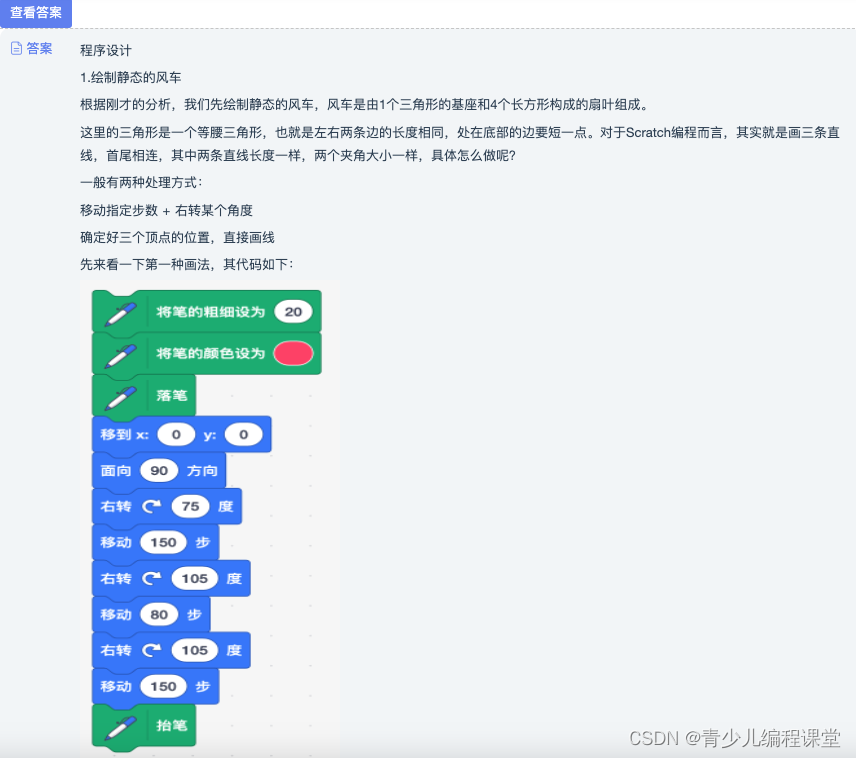
How do you feel when you see this code? Is it a little sentimental? Then there are many doubts. How are the right turns of 75 degrees and 105 degrees calculated, and how are the movements of 150 steps and 80 steps determined? Obviously,
for For primary and middle school students, this method is difficult to understand and not very operable. Let's look at the second method, first determine the positions of the three vertices. The first vertex is easier to determine, which is the center of the stage. Its coordinate is (0.0), according to the symmetry principle of the coordinate axis. The other two vertices are symmetrical with respect to the Y axis. If the x coordinate of one of the vertices is 50, then the x coordinate of the other vertex is -50. As for the y coordinate, it is much simpler. Just make a rough estimate, such as -150 ,as the picture shows: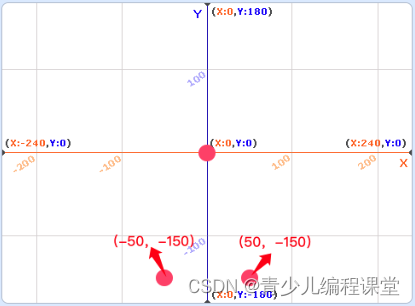
After determining the 3 vertices, drawing is very simple. For convenience, this part of the code is defined as a self-made building block, as shown in the figure: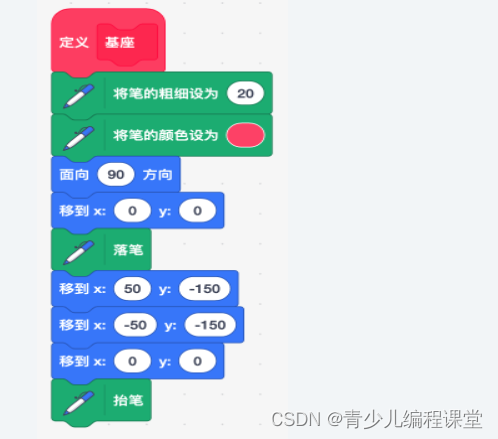
Compared with the first method, is this method easier to understand? The key is strong operability. Teacher Chaoping strongly recommends this method. Next, we draw the fan blade. The fan blade is composed of 4 rectangles, which form a circle. This is much simpler than drawing a triangle. For convenience, it is defined as a self-made building block. The code is as follows: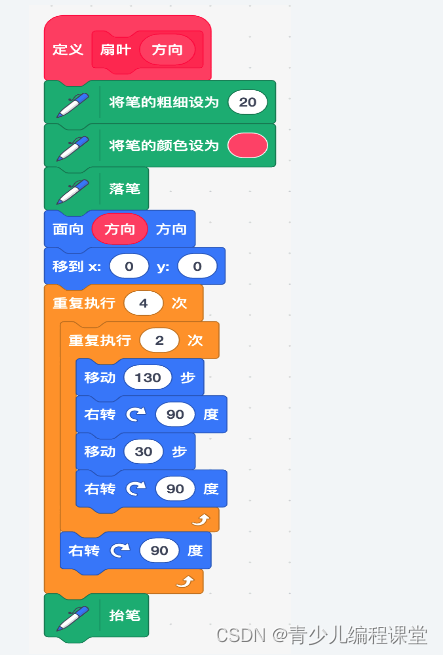
Two points need to be explained:
1). Nested loops are used here. The inner loop is to draw a fan blade (rectangular), the length and width are 130 and 30 respectively, and the unit is step (picture cable), and the outer loop is to draw 4 fan blades.
2). We added a parameter "direction" to the self-made building block, so that the direction of the windmill can be flexibly set to prepare for the next rotation.
2. Let the windmill rotate
How to make the windmill rotate, this is related to the principle of ton animation, what is ton animation? The so-called ton animation is to draw different content on each ton of the time axis, so that it can be played continuously. into animation. Flipbook animation is a one-time animation, in which each page is one meal, and the process of flipping the book is played continuously, thus forming an animation effect. To put it simply, animation is a collection of N static pictures, and then display these pictures sequentially through control, because of the "visual residue" of the human eye, it will cause us the "illusion" of animation, which is the same as the principle of playing a movie!
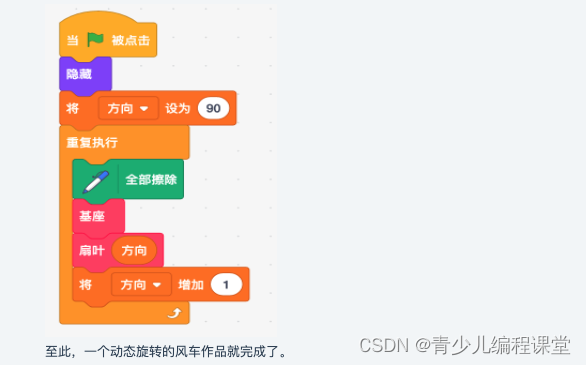
Once you understand animation, it's much easier for us to make the pinwheel spin. Although the drawn pinwheels are stationary, we can start with one direction (say 90 degrees), draw a pinwheel, then change the direction to 91 degrees, draw another pinwheel, and so on...here Each windmill is a meal, and every time a new windmill is drawn, the original content is erased, so that a pause animation can be formed, and a dynamic rotating windmill effect can be obtained.
The code is actually very simple, as follows:
Question 7 Questions and Answers
Text Effects
Description of the topic
Programming implementation: text effects.
Specific requirements:
1). Click the green flag, and the stage will be blank for 1 second;
2). "Blue" Ning appears with special effects (initial pixel value: 300) and gradually appears clearly
3). After the "blue" Ning appears for 1 second, the word "bridge" is gradually and clearly presented with special effects (virtual image initial value: 100)
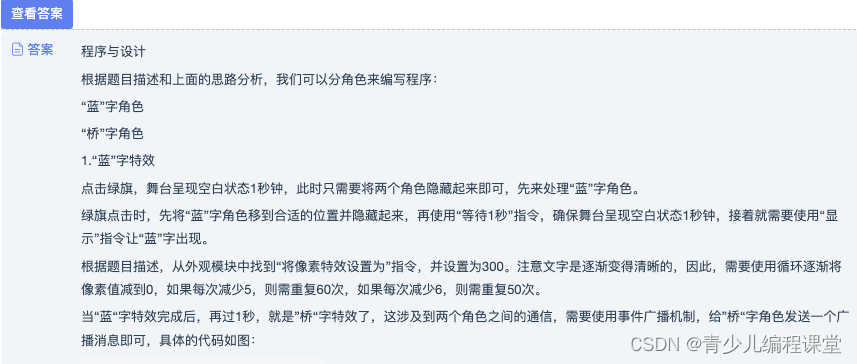

2. Special effects of the word "bridge"
For the character "bridge", when the green flag is clicked, it will not be displayed. Let's complete this part of the code first, as shown in the figure: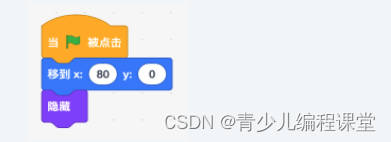
After receiving the "bridge" broadcast sent by the "blue" character, first display the "bridge" character, then set its virtual image effect value to 100, and then go through multiple cycles to gradually decrease the virtual image value to 0, the corresponding code is as follows:
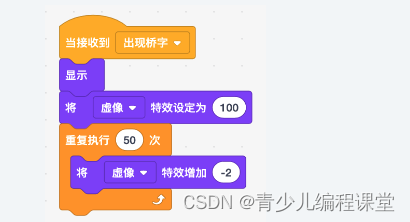
So far, the two text effects of "blue" and "bridge" have been realized.
However, there is one detail that needs to be explained. There are 7 kinds of graphic effects in Scratch programming, namely color, fisheye, vortex, image, Mosaic, brightness and virtual image, as shown in the figure: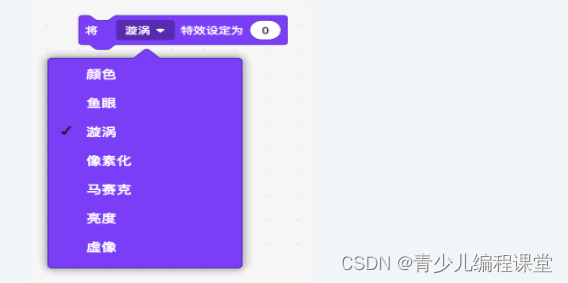
Under normal circumstances, the initial value of all special effects is 0, which means that there is no special effect. This is why in the above code, both "pixelization" and "virtual image" are gradually reduced to 0. When the "pixelization" and "virtual image" are reduced to 0, the special effect is gone, and it is completely clear up.