Article directory
- 1. IOC container
- Two, based on XML management Bean
-
- 1. Get beans
- 2. Setter injection of dependency injection
- 3. Constructor injection of dependency injection
- 4. Special value processing
- 5. Assign values to object type properties
- 6. Assign values to array type properties
- 7. Assign values to collection type attributes
- 8. Automatic assembly based on xml
- 3. Manage beans based on annotations ( ☆ )
-
- 1. The configuration class replaces bean.xml
- 2. @Autowired injection
-
- Method 1: Attribute Injection (`Most Commonly Used`)
- Method 2, set injection
- Method 3, constructor injection
- Method 4. Formal parameter injection
- Method 5. There is only one constructor, and injection through the constructor does not require annotations
- Way 6, @Autowired annotation and @Qualifier annotation combination
- 3. @Resource injection
- 4. Principle - Handwritten IoC
Spring Core (core container)

Spring core provides the core implementation of IOC, DI, and Bean configuration loading creation Core
concepts: Beans, BeanFactory, BeanDefinitions, ApplicationContext
- spring-core: the basic implementation of IOC and DI
- spring-beans: BeanFactory and Bean assembly management (BeanFactory)
- spring-context: Spring context context, that is, IOC container (AppliactionContext)
- spring-expression: spring expression language
1. IOC container
1. Inversion of control (ioc)
- Inversion of Control is a
思想 - Inversion of control is to reduce program coupling and improve program scalability
- Inversion of control, what is the inversion?
- Hand
对象的创建over the rights and hand over the responsibility to the third-party container - Hand
对象和对象之间关系over the maintenance rights to the third-party container
- Hand
- How to realize the idea of inversion of control?
- DI (Dependency Injection): dependency injection
2. Dependency Injection
DI (Dependency Injection): dependency injection, dependency injection realizes the idea of inversion of control
- Refers to the process of creating an object in Spring, configuring the object
依赖属性through configuration注入 - There are two common implementations of dependency injection:
- set injection
- constructor injection
- Bean management refers to: Bean objects
创建, and Bean objects属性的赋值(or maintenance of relationships between Bean objects)
So the conclusion is: IOC is an idea of inversion of control, and DI is a concrete realization of IoC
3. Implementation of IoC container in Spring
- Spring's IoC container is a product implementation of the IoC idea
- The components managed in the IoC container are also called beans
- Before creating a bean, you first need to create an IoC container
- Spring provides two implementations of the IoC container:
- BeanFactory
- This is the IoC container's
基本实现 - Is the interface used internally by Spring
- For Spring itself, not for developers to use
- This is the IoC container's
- ApplicationContext
BeanFactory 的子接口,提供了更多高级特性- For Spring users
- Almost all occasions use ApplicationContext instead of the underlying BeanFactory
- BeanFactory
The main implementation class of ApplicationContext
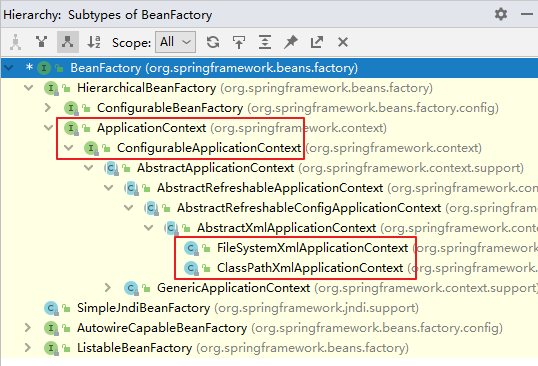
| type name | Introduction |
|---|---|
| ClassPathXmlApplicationContext | Create an IOC container object by reading a configuration file in XML format under the classpath |
| FileSystemXmlApplicationContext | Create an IOC container object by reading a configuration file in XML format through a file system path |
| ConfigurableApplicationContext | The sub-interface of ApplicationContext includes some extension methods refresh() and close(), which allow ApplicationContext to have the ability to start, close and refresh the context |
| WebApplicationContext | Specially prepared for web applications, create IOC container objects based on the web environment, and import and store the objects in the ServletContext domain |
Two, based on XML management Bean
build project
- add dependencies
<!--spring context依赖-->
<!--当你引入Spring Context依赖之后,表示将Spring的基础依赖引入了-->
<dependency>
    <groupId>org.springframework</groupId>
    <artifactId>spring-context</artifactId>
    <version>6.0.3</version>
</dependency>
- import java class
public class User {


}
- beans.xml
<?xml version="1.0" encoding="UTF-8"?>
<beans xmlns="http://www.springframework.org/schema/beans"
       xmlns:xsi="http://www.w3.org/2001/XMLSchema-instance"
       xsi:schemaLocation="http://www.springframework.org/schema/beans
       http://www.springframework.org/schema/beans/spring-beans.xsd">

    <!--1 获取bean演示,user对象创建-->
    <bean id="user" class="com.xc.spring6.iocxml.bean.User"></bean>
</beans>
1. Get beans
Method 1. Obtain according to id
public class TestUser {


    public static void main(String[] args) {


        ApplicationContext context = new ClassPathXmlApplicationContext("bean.xml");
        // 根据id获取bean
        User user = (User) context.getBean("user");
    }
}
Method 2. Obtain by type
public class TestUser {


    public static void main(String[] args) {


        ApplicationContext context = new ClassPathXmlApplicationContext("bean.xml");
        User user = context.getBean(User.class);
    }
}
Method 3. Obtain beans according to id and type
public class TestUser {


    public static void main(String[] args) {


        ApplicationContext context = new ClassPathXmlApplicationContext("bean.xml");
        User user = context.getBean("user",User.class);
    }
}
Notice
- When obtaining beans by type,
指定类型the bean in the IOC container is required to have one and only one - When a total of two are configured in the IOC container
<bean id="user" class="com.xc.spring6.iocxml.bean.User"></bean>
<bean id="user1" class="com.xc.spring6.iocxml.bean.User"></bean>
An exception will be thrown when obtained according to the type: NoUniqueBeanDefinitionException (no unique Bean definition exception)
expand
根据接口类型Can the bean be obtained if the component class implements the interface ? (可以, provided that the bean is unique)- If there is an interface
多个实现类, these implementation classes are configured with beans, can the beans be obtained according to the interface type? (不行, because the bean is not unique)
2. Setter injection of dependency injection
- Create a student class Student
@Data
public class Student {


    private Integer id;
    private String name;
    private Integer age;
    private String sex;
}
- Assign values to properties when configuring beans
<bean id="studentOne" class="com.xc.spring6.bean.Student">
    <!-- property标签:通过组件类的setXxx()方法给组件对象设置属性 -->
    <!-- name属性:指定属性名(这个属性名是getXxx()、setXxx()方法定义的,和成员变量无关) -->
    <!-- value属性:指定属性值 -->
    <property name="id" value="1001"></property>
    <property name="name" value="张三"></property>
    <property name="age" value="23"></property>
    <property name="sex" value="男"></property>
</bean>
- test
@Test
public void testDIBySet(){


    ApplicationContext ac = new ClassPathXmlApplicationContext("spring-di.xml");
    Student studentOne = ac.getBean("studentOne", Student.class);
    System.out.println(studentOne);
}
3. Constructor injection of dependency injection
- Add a parameterized structure to the Student class
public Student(Integer id, String name, Integer age, String sex) {


    this.id = id;
    this.name = name;
    this.age = age;
    this.sex = sex;
}
- configuration bean
<bean id="studentTwo" class="com.xc.spring6.bean.Student">
    <constructor-arg value="1002"></constructor-arg>
    <constructor-arg value="李四"></constructor-arg>
    <constructor-arg value="33"></constructor-arg>
    <constructor-arg value="女"></constructor-arg>
</bean>
Note:
The constructor-arg tag also has two attributes to further describe the constructor parameters
- index attribute: specifies the index where the parameter is located (starting from 0)
- name attribute: specify the parameter name
- test
@Test
public void testDIByConstructor(){


    ApplicationContext ac = new ClassPathXmlApplicationContext("spring-di.xml");
    Student studentOne = ac.getBean("studentTwo", Student.class);
    System.out.println(studentOne);
}
4. Special value processing
literal assignment
<!-- 使用value属性给bean的属性赋值时,Spring会把value属性的值看做字面量 -->
<property name="name" value="张三"/>
null value
<property name="name">
    <null />
</property>
xml entity
<!-- 小于号在XML文档中用来定义标签的开始,不能随便使用 -->
<!-- 解决方案一:使用XML实体来代替 -->
<property name="expression" value="a < b"/>
CDATA section
<property name="expression">
    <!-- 解决方案二:使用CDATA节 -->
    <!-- CDATA中的C代表Character,是文本、字符的含义,CDATA就表示纯文本数据 -->
    <!-- XML解析器看到CDATA节就知道这里是纯文本,就不会当作XML标签或属性来解析 -->
    <!-- 所以CDATA节中写什么符号都随意 -->
    <value><![CDATA[a < b]]></value>
</property>
5. Assign values to object type properties
- employee and department
// 部门累
@Data
public class Dept {


    private String dname;
}
// 员工类
@Data
public class Emp {


    //对象类型属性:员工属于某个部门
    private Dept dept;
    //员工名称
    private String ename;
    //员工年龄
    private Integer age;
}
Method 1: Referencing an external bean
<bean id="dept" class="com.xc.spring6.iocxml.ditest.Dept">
    <property name="dname" value="安保部"></property>
</bean>
- Use
ref属性the department attribute assignment object for the Emp class
<bean id="emp" class="com.xc.spring6.iocxml.ditest.Emp">
    <!--注入对象类型属性
        private Dept dept;
    -->
    <property name="dept" ref="dept"></property>
    <!--普通属性注入-->
    <property name="ename" value="lucy"></property>
    <property name="age" value="50"></property>
</bean>
Method 2: inner bean
<bean id="emp2" class="com.xc.spring6.iocxml.ditest.Emp">
    <!--普通属性注入-->
    <property name="ename" value="mary"></property>
    <property name="age" value="20"></property>
    <!--内部bean-->
    <property name="dept">
        <bean id="dept2" class="com.xc.spring6.iocxml.ditest.Dept">
            <property name="dname" value="财务部"></property>
        </bean>
    </property>
</bean>
Method 3: Cascade attribute assignment
- name attribute = object. attribute name
<bean id="dept3" class="com.xc.spring6.iocxml.ditest.Dept">
    <property name="dname" value="技术研发部"></property>
</bean>

<bean id="emp3" class="com.xc.spring6.iocxml.ditest.Emp">
    <property name="ename" value="tom"></property>
    <property name="age" value="30"></property>

    <property name="dept" ref="dept3"></property>
    <property name="dept.dname" value="测试部"></property>
</bean>
6. Assign values to array type properties
- Add an array of hobby attributes to the Emp employee class
//爱好
private String[] loves;
<bean id="emp" class="com.xc.spring6.iocxml.ditest.Emp">
    <!--普通属性-->
    <property name="ename" value="lucy"></property>
    <property name="age" value="20"></property>
    <!--对象类型属性-->
    <property name="dept" ref="dept"></property>
    <!--数组类型属性-->
    <property name="loves">
        <array>
            <value>吃饭</value>
            <value>睡觉</value>
            <value>敲代码</value>
        </array>
    </property>
</bean>
7. Assign values to collection type attributes
- Dept department class adds employee collection
//一个部门有很多员工
private List<Emp> empList;
<bean id="empone" class="com.xc.spring6.iocxml.ditest.Emp">
    <property name="ename" value="lucy"></property>
    <property name="age" value="20"></property>
</bean>
<bean id="emptwo" class="com.xc.spring6.iocxml.ditest.Emp">
    <property name="ename" value="mary"></property>
    <property name="age" value="30"></property>
</bean>

<bean id="dept" class="com.xc.spring6.iocxml.ditest.Dept">
  <property name="dname" value="技术部"></property>
  <property name="empList">
        <list>
            <ref bean="empone"></ref>
            <ref bean="emptwo"></ref>
        </list>
  </property>
</bean>
If you assign a value to a Set collection type attribute, you only need to change the list tag in it
set标签to
8. Automatic assembly based on xml
- Match a bean in the IOC container according to the specified policy
- Automatically assign values to the class type or interface type properties that the specified bean depends on
- Based on XML automatic assembly, the bottom layer uses set injection
bean class
public class UserServiceImpl  implements UserService{


    private UserDao userDao;
    public void setUserDao(UserDao userDao) {


        this.userDao = userDao;
    }

    @Override
    public void addUserService() {


        userDao.addUserDao();
    }
}
configure bean.xml
- Automatic assembly method: byType
- byType: According to
类型匹配a bean of a compatible type in the IOC container, the property is automatically assigned a value- If in the IOC, there is no bean of any compatible type that can assign a value to the property, the property is not assembled, that is, the default value is null
- If in the IOC, there are multiple beans of compatible types that can assign values to the property, an exception NoUniqueBeanDefinitionException will be thrown
<bean id="userService" class="com.xc.spring6.autowire.service.impl.UserServiceImpl"
autowire="byType"></bean>

<bean id="userDao" class="com.xc.spring6.autowire.dao.impl.UserDaoImpl"></bean>
- Automatic assembly method: byName
- byName: Assign the auto-assembled attribute
属性名as the bean id to match the corresponding bean in the IOC container
3. Manage beans based on annotations ( ☆ )
1. The configuration class replaces bean.xml
@Configuration
//@ComponentScan({"com.xc.spring6.controller", "com.xc.spring6.service","com.xc.spring6.dao"})
@ComponentScan("com.xc.spring6")
public class Spring6Config {


}
2. @Autowired injection
- Use the @Autowired annotation alone,
默认根据类型装配 - View annotation source code
@Target({

    ElementType.CONSTRUCTOR, ElementType.METHOD,
ElementType.PARAMETER, ElementType.FIELD, ElementType.ANNOTATION_TYPE})
@Retention(RetentionPolicy.RUNTIME)
@Documented
public @interface Autowired {


    boolean required() default true;
}
- Annotation can mark the position
- On the construction method
- method
- visit
- attribute
- Note on
- This annotation has a required attribute
- The default value is true, indicating that the injected Bean must exist during injection, and an error will be reported if it does not exist
- If the required attribute is set to false, it doesn't matter whether the injected Bean exists or not
Method 1: attribute injection ( 最常用)
- Annotation-based automatic assembly, the bottom layer uses reflection injection, so the set method is not required
@Service
public class UserServiceImpl implements UserService {


    @Autowired
    private UserDao userDao;
}
Method 2, set injection
@Service
public class UserServiceImpl implements UserService {


    private UserDao userDao;

    @Autowired
    public void setUserDao(UserDao userDao) {


        this.userDao = userDao;
    }
}
Method 3, constructor injection
@Service
public class UserServiceImpl implements UserService {


    private UserDao userDao;

    @Autowired
    public UserServiceImpl(UserDao userDao) {


        this.userDao = userDao;
    }
}
Method 4. Formal parameter injection
@Service
public class UserServiceImpl implements UserService {


    private UserDao userDao;

    public UserServiceImpl(@Autowired UserDao userDao) {


        this.userDao = userDao;
    }
}
Method 5. There is only one constructor, and injection through the constructor does not require annotations
- When there is only one constructor with parameters, the @Autowired annotation can be omitted
@Service
public class UserServiceImpl implements UserService {


    private UserDao userDao;

    public UserServiceImpl(UserDao userDao) {


        this.userDao = userDao;
    }
}
Way 6, @Autowired annotation and @Qualifier annotation combination
- If the UserDao interface has
两个实现类 - Injecting via @Autowired will throw an exception (expected single matching bean but found 2: xx1, xx2)
- At this point, you can specify the name of the specific bean through the @Qualifier annotation
@Service
public class UserServiceImpl implements UserService {


    @Autowired
    @Qualifier("userDaoImpl") // 指定bean的名字
    private UserDao userDao;

}
3. @Resource injection
The @Resource annotation can also complete property injection. So what is the difference between it and the @Autowired annotation?
- The @Resource annotation is in the JDK extension package, which means it is part of the JDK
- So this annotation is a standard annotation, which is more versatile
- The annotation type specified in the JSR-250 standard. JSR is the Java Specification Proposal
- The @Autowired annotation is the Spring framework's own
- The @Resource annotation is assembled byName by name by default. If it cannot be found by name, it will automatically start assembly by type byType
- The @Autowired annotation is assembled byType by type by default. If you want to assemble by name, you need to use it with the @Qualifier annotation.
- @Resource annotation is used on properties and setter methods
- @Autowired annotations are used on properties, setter methods, construction methods, and construction method parameters
The @Resource annotation belongs to the JDK extension package, so it is not included in the JDK, and the following dependencies need to be introduced additionally.
If it is JDK8, no additional dependencies need to be introduced. Higher than JDK11 or lower than JDK8 need to introduce the following dependencies
<dependency>
    <groupId>jakarta.annotation</groupId>
    <artifactId>jakarta.annotation-api</artifactId>
    <version>2.1.1</version>
</dependency>
Method 1. Inject according to name
@Service
public class UserServiceImpl implements UserService {


    @Resource(name = "userDao")
    private UserDao myUserDao;

}
Method 2: Unknown name injection
- When the @Resource annotation is used without specifying a name, it is still searched according to the name, which is the attribute name
@Service
public class UserServiceImpl implements UserService {


    @Resource
    private UserDao userDao;
}
Method 3, the case where the name cannot be found
- Obviously, when the name cannot be found, it will naturally start byType for injection
@Service
public class UserServiceImpl implements UserService {


    @Resource
    private UserDao userDaoNotFound ;

}
4. Principle - Handwritten IoC
Define the @Bean annotation for marked beans and the @Di annotation for dependency injection
- @Bean is equivalent to @Component
- @Di is equivalent to @Autowired
@Target(ElementType.TYPE)
@Retention(RetentionPolicy.RUNTIME)
public @interface Bean {


}

@Target({

    ElementType.FIELD})
@Retention(RetentionPolicy.RUNTIME)
public @interface Di {


}
Define the bean container interface
public interface ApplicationContext {


    Object getBean(Class<?> clazz);
}
Annotate bean container interface and implementation of dependency injection
public class AnnotationApplicationContext implements ApplicationContext {


    //创建map集合,放bean对象
    private final Map<Class<?>, Object> beanFactory = new HashMap<>();
    private static String rootPath;

    //返回对象
    @Override
    public Object getBean(Class<?> clazz) {


        return beanFactory.get(clazz);
    }

    //创建有参数构造,传递包路径,设置包扫描规则
    //当前包及其子包,哪个类有@Bean注解,把这个类通过反射实例化
    public AnnotationApplicationContext(String basePackage) {


        // com.xc
        try {


            //1 把.替换成\
            String packagePath = basePackage.replaceAll("\\.", "/");
            //2 获取包绝对路径
            Enumeration<URL> urls = Thread.currentThread().getContextClassLoader().getResources(packagePath);
            while (urls.hasMoreElements()) {


                URL url = urls.nextElement();
                String filePath = URLDecoder.decode(url.getFile(), StandardCharsets.UTF_8);
                //获取包前面路径部分,字符串截取
                rootPath = filePath.substring(0, filePath.length() - packagePath.length());
                //包扫描
                loadBean(new File(filePath));
            }
        } catch (Exception e) {


            throw new RuntimeException(e);
        }
        //属性注入
        loadDi();
    }

    //包扫描过程,实例化
    private void loadBean(File file) throws Exception {


        //1 判断当前是否文件夹
        if (file.isDirectory()) {


            //2 获取文件夹里面所有内容
            File[] childrenFiles = file.listFiles();
            //3 判断文件夹里面为空,直接返回
            if (childrenFiles == null || childrenFiles.length == 0) {


                return;
            }
            //4 如果文件夹里面不为空,遍历文件夹所有内容
            for (File child : childrenFiles) {


                //4.1 遍历得到每个File对象,继续判断,如果还是文件夹,递归
                if (child.isDirectory()) {


                    //递归
                    loadBean(child);
                } else {


                    //4.2 遍历得到File对象不是文件夹,是文件,
                    //4.3 得到包路径+类名称部分-字符串截取
                    String pathWithClass = child.getAbsolutePath().substring(rootPath.length());
                    //4.4 判断当前文件类型是否.class
                    if (pathWithClass.contains(".class")) {


                        //4.5 如果是.class类型,把路径\替换成.  把.class去掉
                        // com.xc.service.UserServiceImpl
                        String allName = pathWithClass.replaceAll("/", ".").replace(".class", "");
                        //4.6 判断类上面是否有注解 @Bean,如果有实例化过程
                        //4.6.1 获取类的Class
                        Class<?> clazz = Class.forName(allName);
                        //4.6.2 判断不是接口
                        if (!clazz.isInterface()) {


                            //4.6.3 判断类上面是否有注解 @Bean
                            if (clazz.isAnnotationPresent(Bean.class)) {


                                //4.6.4 实例化
                                Object instance = clazz.getConstructor().newInstance();
                                //4.7 把对象实例化之后,放到map集合beanFactory
                                //4.7.1 判断当前类如果有接口,让接口class作为map的key
                                if (clazz.getInterfaces().length > 0) {


                                    beanFactory.put(clazz.getInterfaces()[0], instance);
                                } else {


                                    beanFactory.put(clazz, instance);
                                }
                            }
                        }
                    }
                }
            }
        }
    }

    //属性注入
    private void loadDi() {


        //实例化对象在beanFactory的map集合里面
        //1 遍历beanFactory的map集合
        Set<Map.Entry<Class<?>, Object>> entries = beanFactory.entrySet();
        for (Map.Entry<Class<?>, Object> entry : entries) {


            //2 获取map集合每个对象(value),每个对象属性获取到
            Object obj = entry.getValue();
            //获取对象Class
            Class<?> clazz = obj.getClass();
            //获取每个对象属性获取到
            Field[] declaredFields = clazz.getDeclaredFields();
            //3 遍历得到每个对象属性数组,得到每个属性
            for (Field field : declaredFields) {


                //4 判断属性上面是否有@Di注解
                if (field.isAnnotationPresent(Di.class)) {


                    //如果私有属性,设置可以设置值
                    field.setAccessible(true);
                    //5 如果有@Di注解,把对象进行设置(注入)
                    try {


                        field.set(obj, beanFactory.get(field.getType()));
                    } catch (IllegalAccessException e) {


                        throw new RuntimeException(e);
                    }
                }
            }
        }
    }
}
test class
@Bean
public class UserDaoImpl  implements UserDao {


    @Override
    public void add() {


        System.out.println("dao.......");
    }
}
@Bean
public class UserServiceImpl implements UserService {


    @Di
    private UserDao userDao;

    @Override
    public void out() {


        userDao.print();
        System.out.println("Service层执行结束");
    }
}
public class SpringIocTest {


    @Test
    public void testIoc() {


        ApplicationContext applicationContext = new AnnotationApplicationContext("com.xc");
        UserService userService = (UserService)applicationContext.getBean(UserService.class);
        userService.add();
        System.out.println("run success");
    }
}
output result
service.......
dao.......
run success