1. node.js download and installation
下载地址:nodejs.cn/download/
官方文档:nodejs.cn/learn
2. Create project installation dependencies
npm npm i nodemon -g //全局安装nodemon,可以自动重启后端服务
npm init -y //初始化一个项目,会生成package.json的配置文件
npm i koa
npm i koa-body //解析请求和响应
npm i koa/router //配置路由
npm i koa/corsr //配置跨越
3. Enter the topic and create the entry file tentatively as app.js
const http = require("http"); //网络模块

const port = 3000; //端口号

const server = http.createServer((req, res) => {


  // req= request 请求,res=response 响应
  {


    //自定义响应内容
    res.statusCode = 200; //响应状态码
    res.setHeader("Content-Type", "text/plain"); //响应头
    res.end("hello world!\n"); //响应内容
  }
});

server.listen(port, () => {


  console.log(`服务器运行在 http://localhost:${

     port}/`);
});
Execute node app.js and the access address will appear. The server runs at http://localhost:3000/ and you can see our response content hello world if you open it directly.
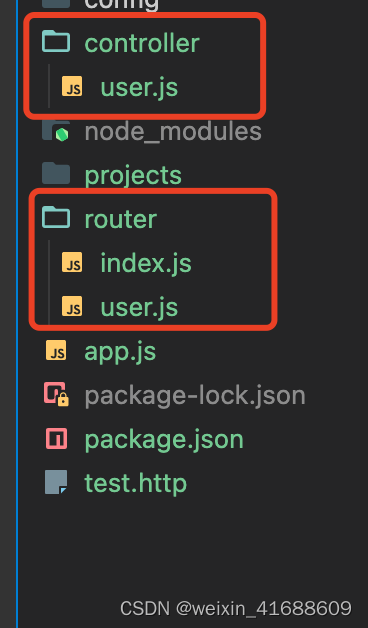
4. A simple hello world is built. Now we use koa to build a small demo. The red box below is a basic directory
app.js为项目入口文件
router为配置请求接口的地方
controller为处理请求,返回用例数据的地方
5. Now we start to modify the entry file app.js
const koa = require('koa');
const koaBody = require("koa-body");//解析请求和响应
const cors  = require('koa-cors');//配置跨越
const router = require('./router');//路由

const app = new koa();
// 配置跨域
app.use(cors());

//解析请求内数据 默认get
app.use(
    koaBody({


        parsedMethods:["POST", "DELETE", "PATCH", "PUT"]
    })
);
// 路由匹配
app.use(router.routes());

app.listen(3000,()=>{


    console.log('run in http://localhost:3000')
})
6. Next, let's deal with index.js under the router folder
 const Router = require("@koa/router");
 const fs = require("fs");
 const path = require("path");

 const router = new Router();

 let fileList = fs.readdirSync(__dirname);

 for (const fileName of fileList) {


   if (fileName === "index.js") continue;
   let fileRoute = require(path.join(__dirname, fileName));
   router.stack.push(...fileRoute.stack);
 }

 module.exports = router;
7 Then router/user.js
const Router = require("@koa/router");
const userController = require("../controller/user");
const router = new Router();
router
  //用户登录和查询接口
  .post("/api/login", userController.login)
  .get("/api/userInfo", userController.getInfo);

module.exports = router;
8 controller/user.js file
class User {


    // 登录
    login(ctx) {


      //登录是post请求,从ctx.request.body中解构后端需要的参数
      // delete、patch、put请求也是从ctx.request.body中解构后端需要的参数
      let {

     username, password } = ctx.request.body;

      {


        //添加验证,从数据库读取数据等等操作,后端逻辑书写区域
      }

      //通过验证后返回请求数据,ctx.body={

    内容都是可以自定义的}
      return (ctx.body = {


        code: 200,
        msg: "登录成功",
        data: {


          username: "admin",
          password: "123456",
        },
      });
    }

    //查询用户信息
    getInfo(ctx) {


      //查询是get请求,从ctx.query中解构后端需要的参数
      let {

     username } = ctx.query;

      {


        //添加验证,从数据库读取数据等等操作,后端逻辑书写区域
      }

      //通过验证后返回请求数据,ctx.body={

    内容都是可以自定义的}
      return (ctx.body = {


        code: 200,
        msg: "查询成功",
        data: {


          username: "admin",
          password: "123456",
        },
      });
    }
  }

  module.exports = new User();
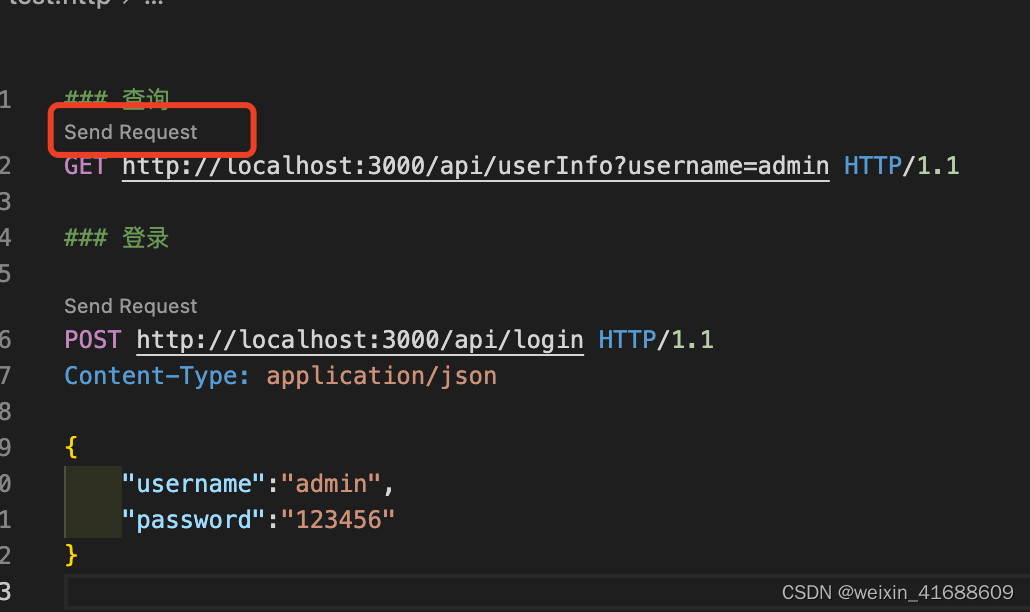
Call it a day If you use vscode, you can install the REST Client plugin for testing
test
Create a new test.http file with the following contents
### 查询
GET http://localhost:3000/api/userInfo?username=admin HTTP/1.1

### 登录

POST http://localhost:3000/api/login HTTP/1.1
Content-Type: application/json

{


    "username":"admin",
    "password":"123456"
}
If you have installed the REST Client plug-in, click to test it