Simple understanding and use of Android View
Android View
1. What is View?
In Android, what is a View?
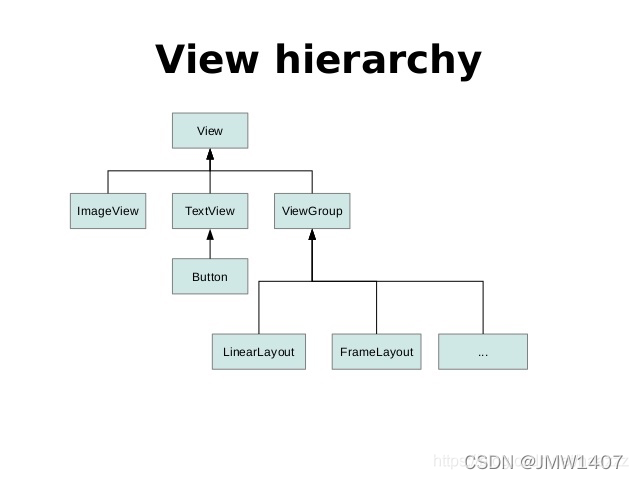
- View is the base class of all controls in Android, whether it is simple TextView, Button or complex LinearLayout and ListView, their common base class is View;
- View is an abstraction of controls in the interface layer. It represents a control. In addition to View, there is also ViewGroup. From the name, ViewGroup can be translated as a control group, that is, a group of Views;
- In Android, ViewGroup also inherits View,
这就意味着View可以是单个控件,也可以是由多个控件组成的一组控件
2. The position parameter of View
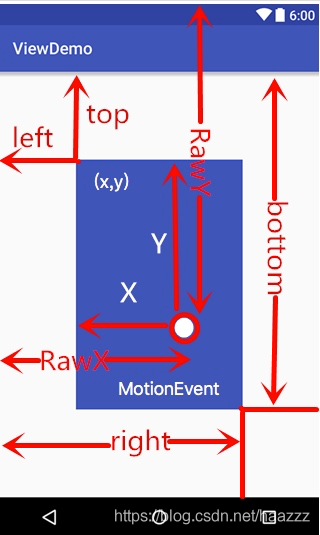
View and position are mainly determined by its four vertices, corresponding to the four attributes of View: top, left, right, bottom ,
- top is the ordinate of the upper left corner
- left is the abscissa of the upper left corner
- right is the abscissa of the lower right corner
- bottom is the vertical coordinate of the lower right corner
The correspondence is shown in the figure:
According to the above figure, we can get the relationship between the width and height of the View and the coordinates;
width = right - left;
hight = bottom - top;
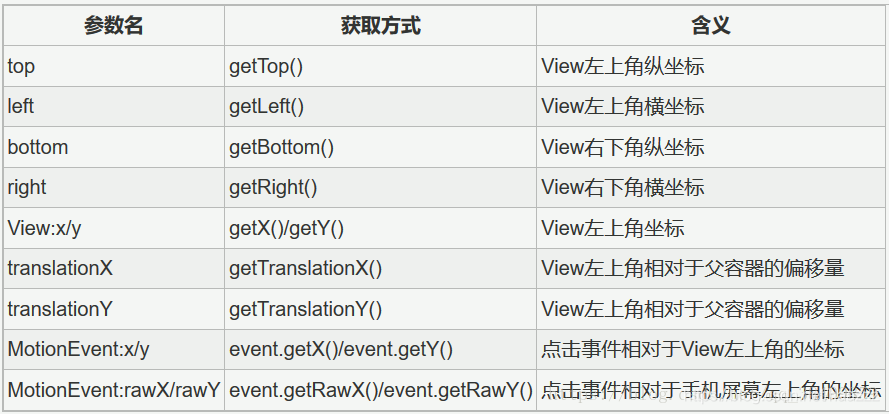
How to get these four parameters of View?
left = getLeft();
right = getRight();
top = getTop();
bottom = getBottom();
Note: Starting from Android 3.0, View adds several additional parameters: x, y, translationX and translationY,
- xy is the coordinates of the upper left corner of the View
translationXandtranslationYis the offset of the upper left corner of the View relative to the parent container.
These parameters are also relative to the coordinates of the parent container; the conversion relationship of these parameters is as follows:
x = left + translationX;
y = top + translationY;
You must know the basics of custom View!
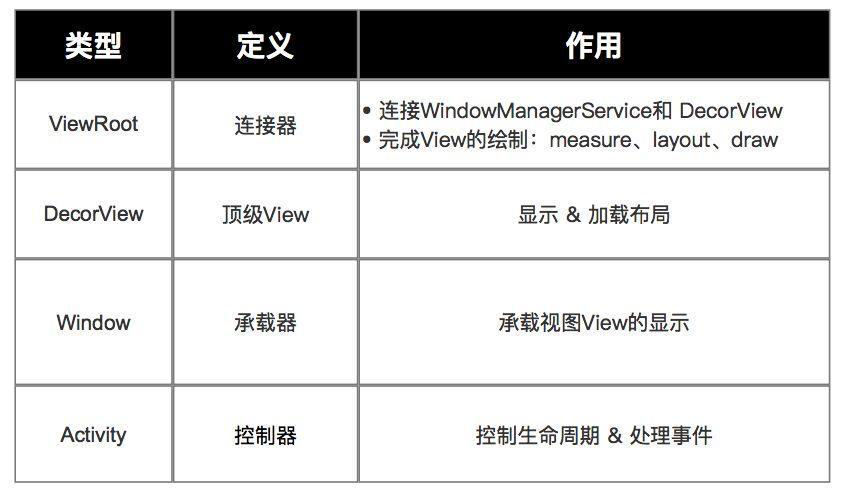
3. Hierarchical relationship of UI management system
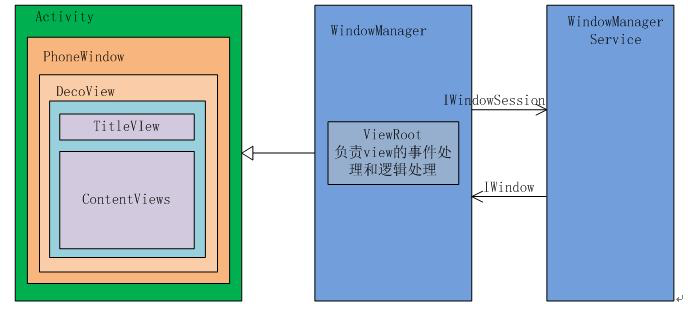
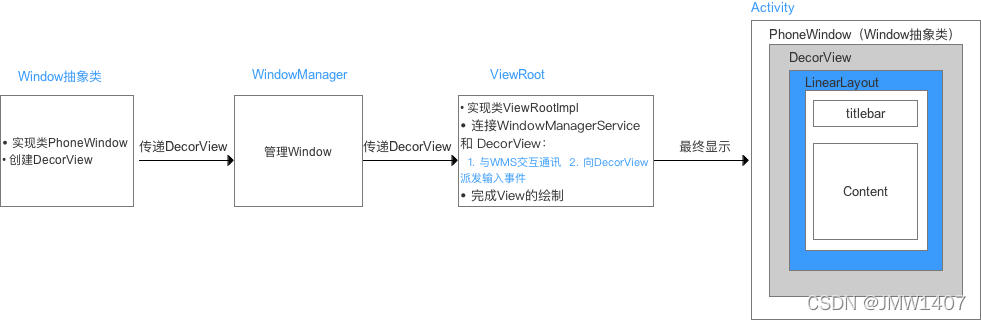
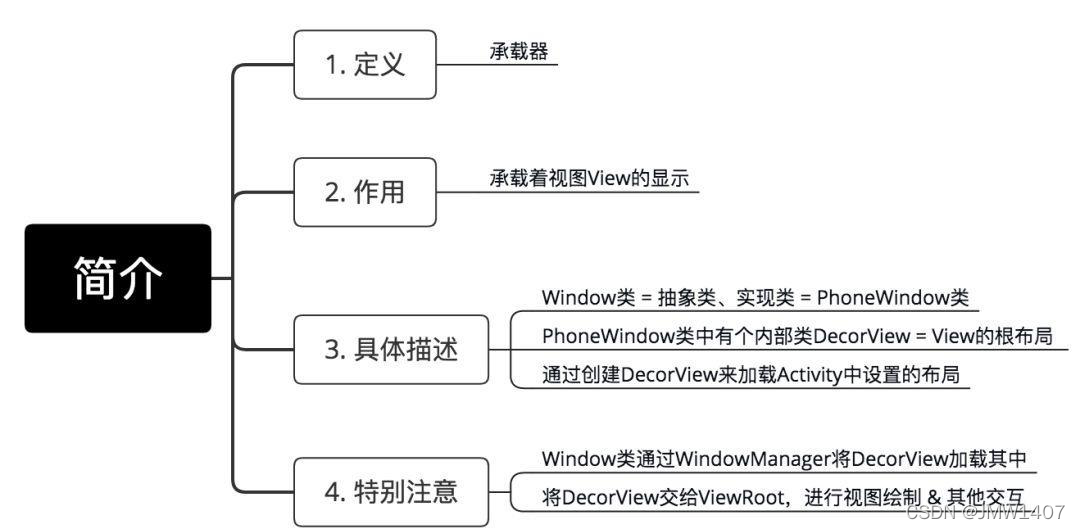
PhoneWindow: The most basic window system in the Android system,继承自Windows类, is responsible for managing interface display and event response. It is the interface for Activity to interact with the View systemDecorView: The starting node View in PhoneWindow, inherited from the View class, used as the entire view container. Used to set window properties. It is essentially a FrameLayoutViewRoot: Created when Activtiy starts, responsible for management, layout, rendering window UI, etc.
ViewRoot and DecorView
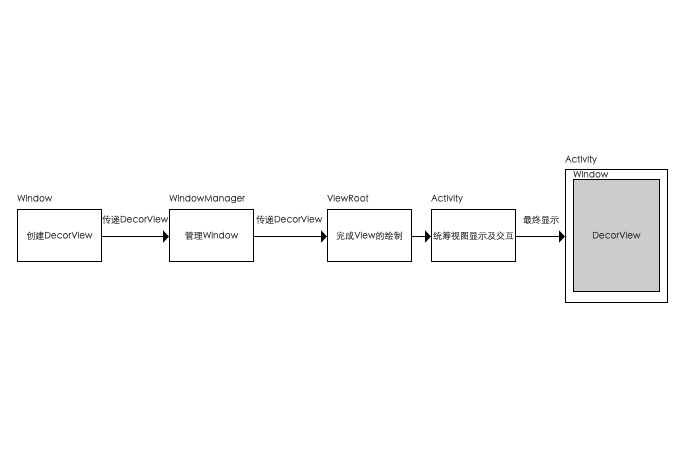
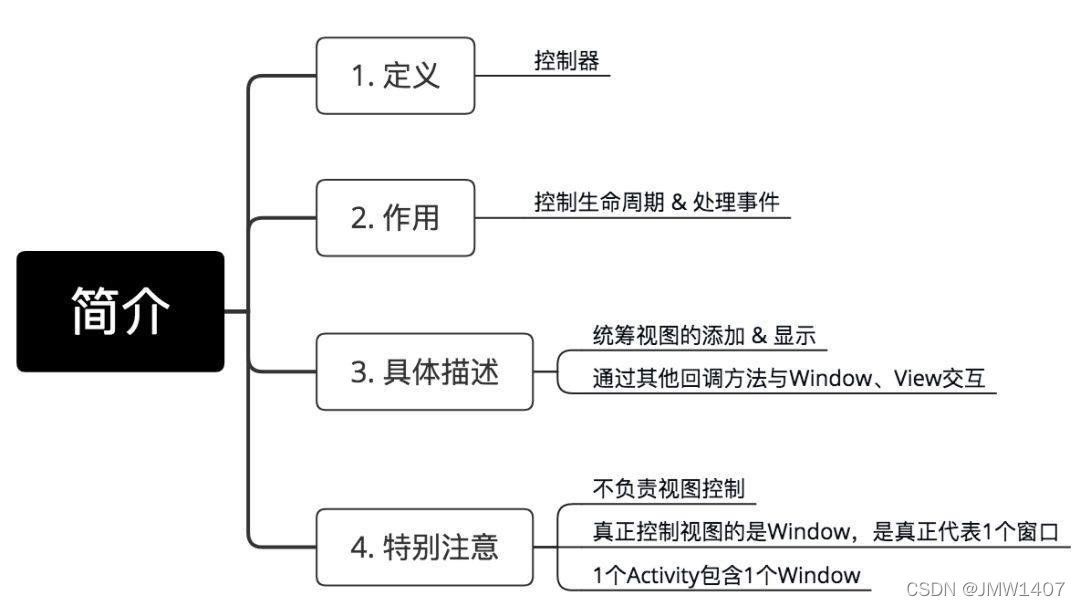
ViewRootIt is the bond that connectsWIndowManagerandDecorVIewconnects. The three major processes of View (measure layout draw) are allViewRootcompleted through.- In ActivityThread, after the Activity is created,
DecorViewit will be added toWindowit, created at the same timeViewRootImpl, and then associatedDecorViewwith it (through the setView method of ViewRoot).ViewRootImpl
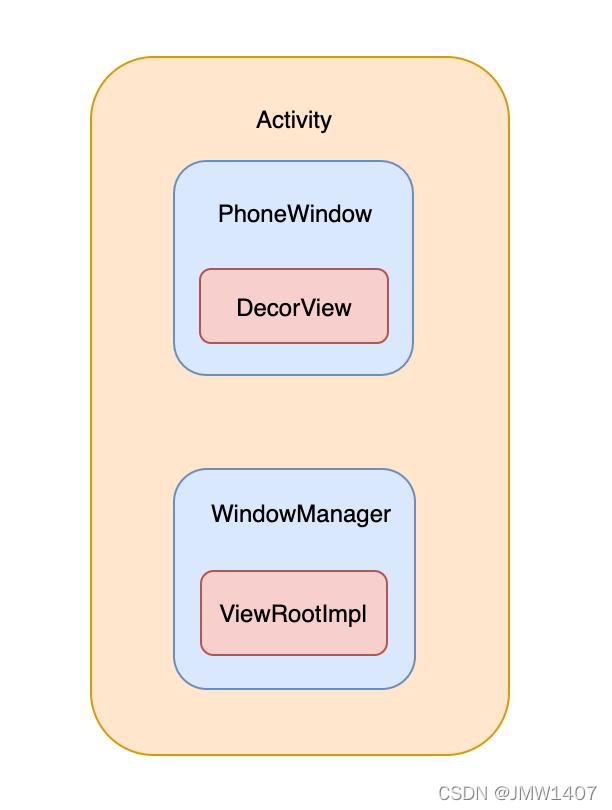
3.1, the relationship between ViewRoot, DecorView, Window and Activity
"What is the relationship between activity, window, and View?"
- 1.
windowIt is an instance variableactivityin , which is essentially an interface, and the only implementation class isPhoneWindow. - 2. The main method
activityof this book is actually to leave it to you to do it. The relationship between and can be compared to a monitor and the displayed content.setContentViewphonewindowwindowView - 3. Each computer
activityhas a "display"window, and the "displayed content" isDecorView. This "display" defines methods to decide how to display content. For examplesetTitleColorsetTitle, it is to set the color of the navigation bartitle,setAllowReturnTransitionOverlapset the entry/exit animation, and so on.
So window is a member variable of activity, and window and View are the relationship between "display" and "display content".
3.1.1、 ViewRoot

// 在主线程中,Activity对象被创建后:
// 1. 自动将DecorView添加到Window中 & 创建ViewRootImpll对象
root = new ViewRootImpl(view.getContent(),display);

// 3. 将ViewRootImpll对象与DecorView建立关联
root.setView(view,wparams,panelParentView)
The timing of ViewRootImpl creation
ActivityThread.handleResumeActivitycreated in
3.1.2、 DecorView
When was DecorView created?
The call chain is Activity.setContentView -> PhoneWindow.setContentView -> installDecor
- The top-level View is the root node of the Android view tree; it is also a subclass of FrameLayout
- Display & load layout. The events of the View layer pass through DecorView first, and then pass to the View
Contains a vertical LinearLayout, divided into 2 parts:
- top = titlebar (titlebar)
- Bottom = The layout file set by () in
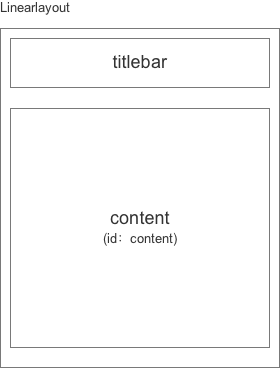
the content bar (content) is actually added to the content bar and becomes its only sub - centerActivitysetContentViewView = idcontentFrameLayout
// 在代码中可通过content得到对应加载的布局

// 1. 得到content
ViewGroup content = (ViewGroup)findViewById(android.R.id.content);
// 2. 得到设置的View
ViewGroup rootView = (ViewGroup) content.getChildAt(0);
3.1.2.1, DecorView creation and display
Custom View drawing preparation - DecorView creation
1. The creation of DecorView
- 1. Create an instance object of the subclass
Windowof the abstract class ;PhoneWindow - 2.
PhoneWindowSet the object for the class objectWindowManager; - 3.
PhoneWindowCreate aDecroViewclass object for the class object (increase according to the selected theme style); - 4. The layout file set in the increase
DecroViewin the class object .contentActivity
At this point, DecorView (that is, the top-level View) has been created and added to the layout file set in the Activity, but it is still not displayed, that is, it is not visible.
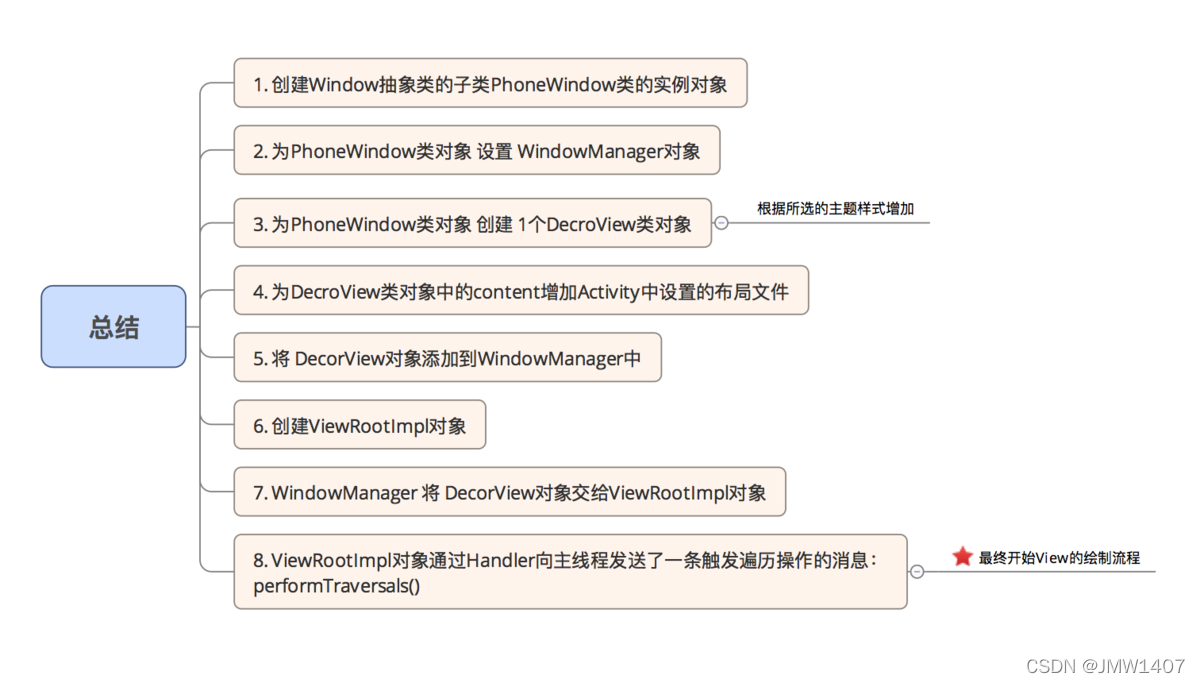
2. Display of DecorView
- 1. Add
DecorViewthe object toWindowManager; - 2. Create
ViewRootImplan object; - 3.
WindowManagerGiveDecorViewthe object toViewRootImplthe object; - 4.
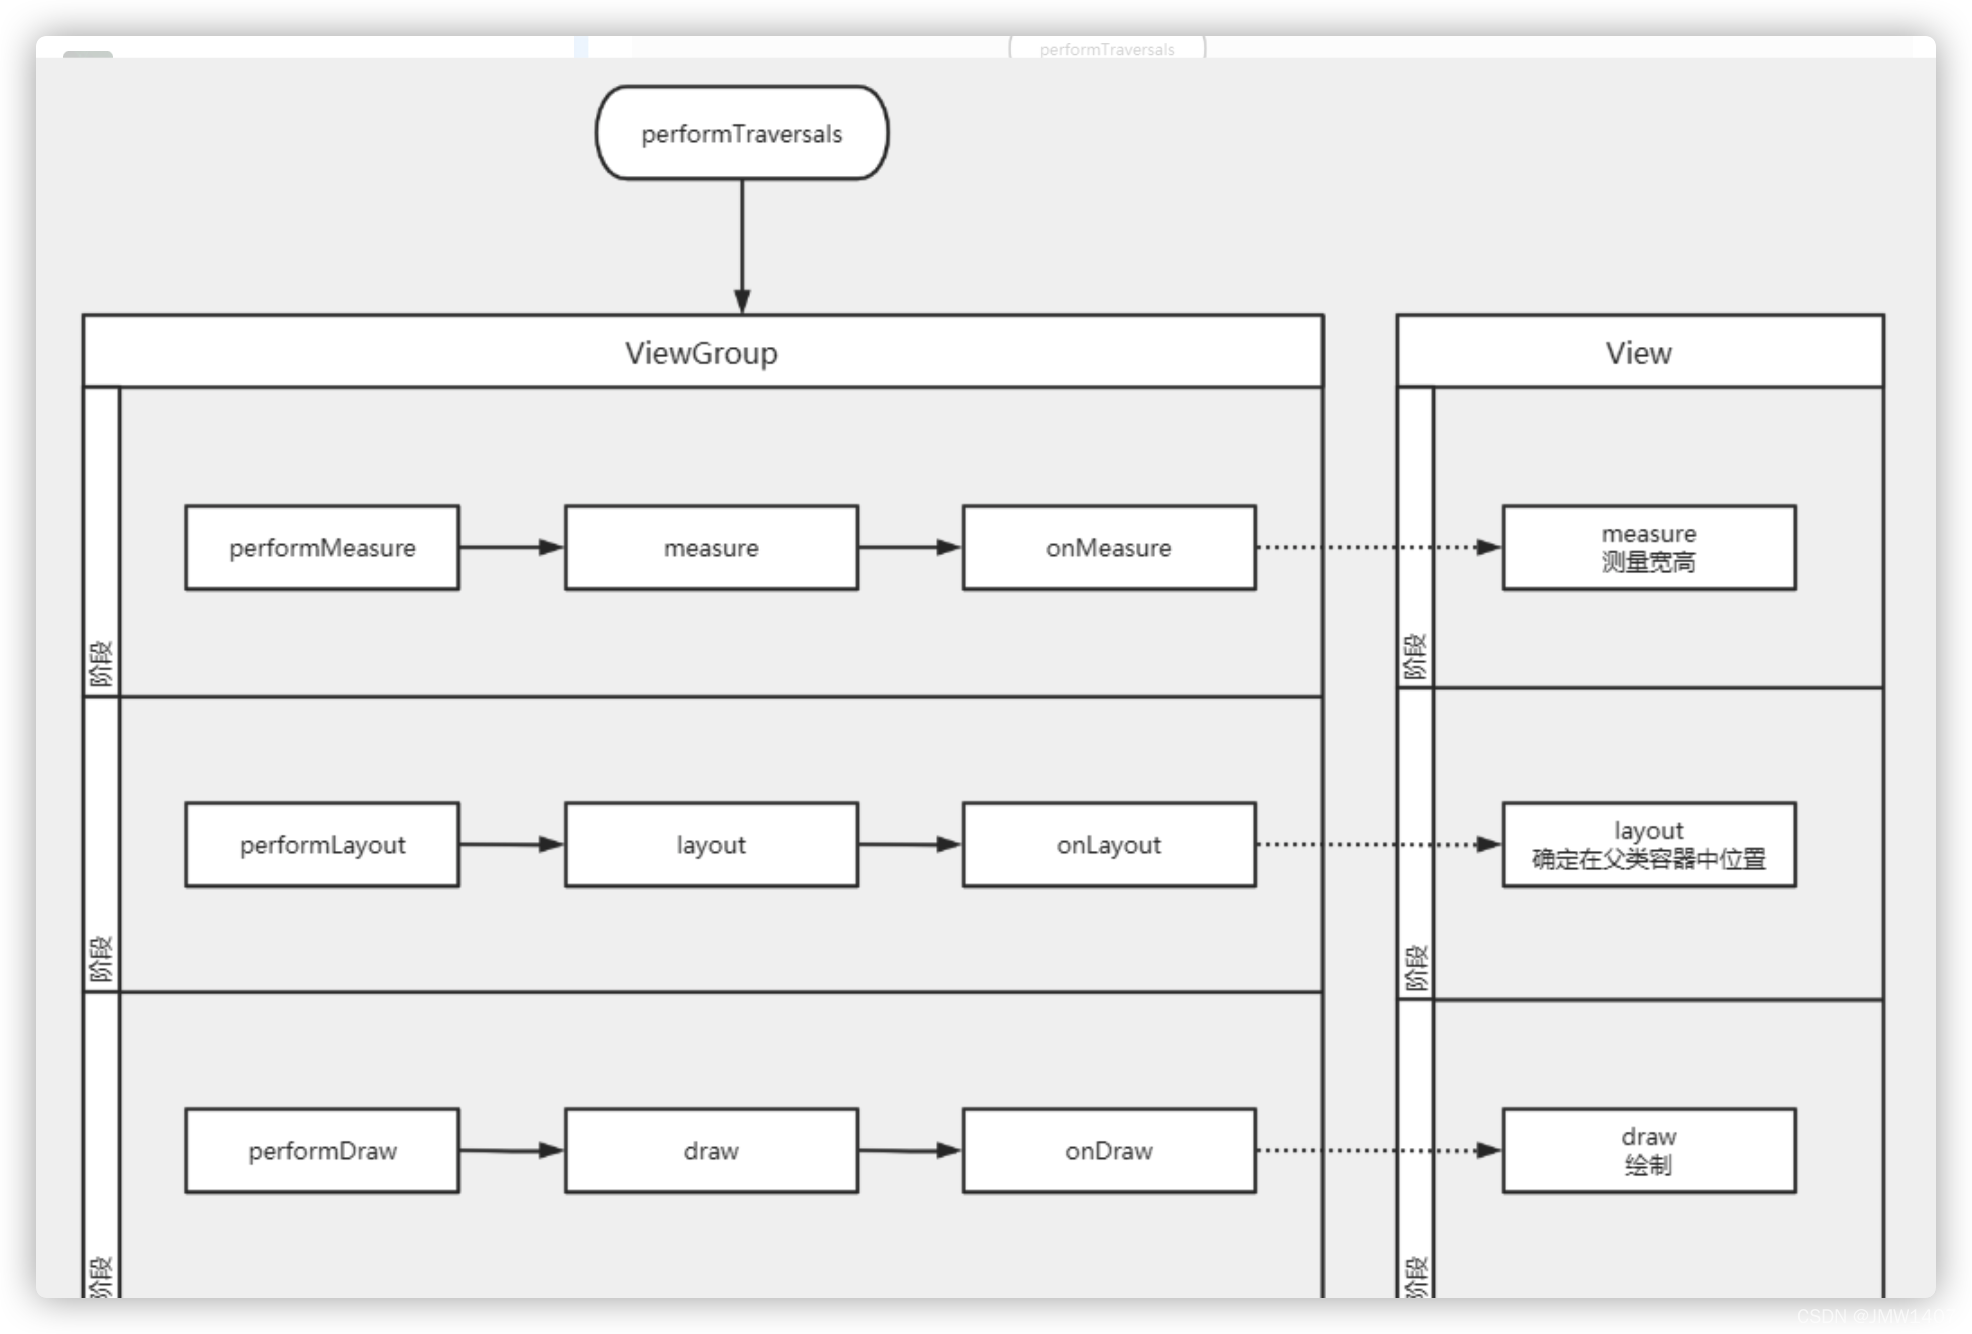
ViewRootImplThe objectHandlersends a message that triggers the traversal operation to the main thread:performTraversals(); this method is used for the executionViewof the drawing process(measure、layout、draw).ViewRootImplVarious changes received in the object (such as window property changes from WmS, size changes from the control tree, redrawing requests, etc.) all trigger the call of performTraversals() and complete related processing, and are finally displayed in the visible Activity.
It can be seen from the above conclusions that:
- Calls of performTraversals () drive the orderly work of the control tree;
- Once this method fails to execute normally, the entire control tree will be in a dead state;
- Therefore, performTraversals () can be said to be the core logic of the ViewRootImpl class object. The follow-up logic of performTraversals () is the three major processes of View drawing:
测量流程(measure)、布局流程(layout)、绘制流程(draw).
3.1.3、Window
3.1.4、 Activity
4. View drawing process
- 1.
measureDetermine the width and height of the View. After the measure is completed, you cangetMeasureWidth/getMeasureHeightobtain the measured width and height; - 2.
layoutDetermine the coordinates of the four vertices of the View and the width and height of the actual View, which can be called
togetLeft/getTop/getRight/getBottom/getWidth/getHeightobtain the corresponding attributes; - 3.
drawIt determines the display of the View, and the content of the View is displayed on the screen after the draw is completed.
4.0. When is the drawing process of the first View triggered?
ActivityThread.handleResumeActivitytriggered inonResumeafter the end
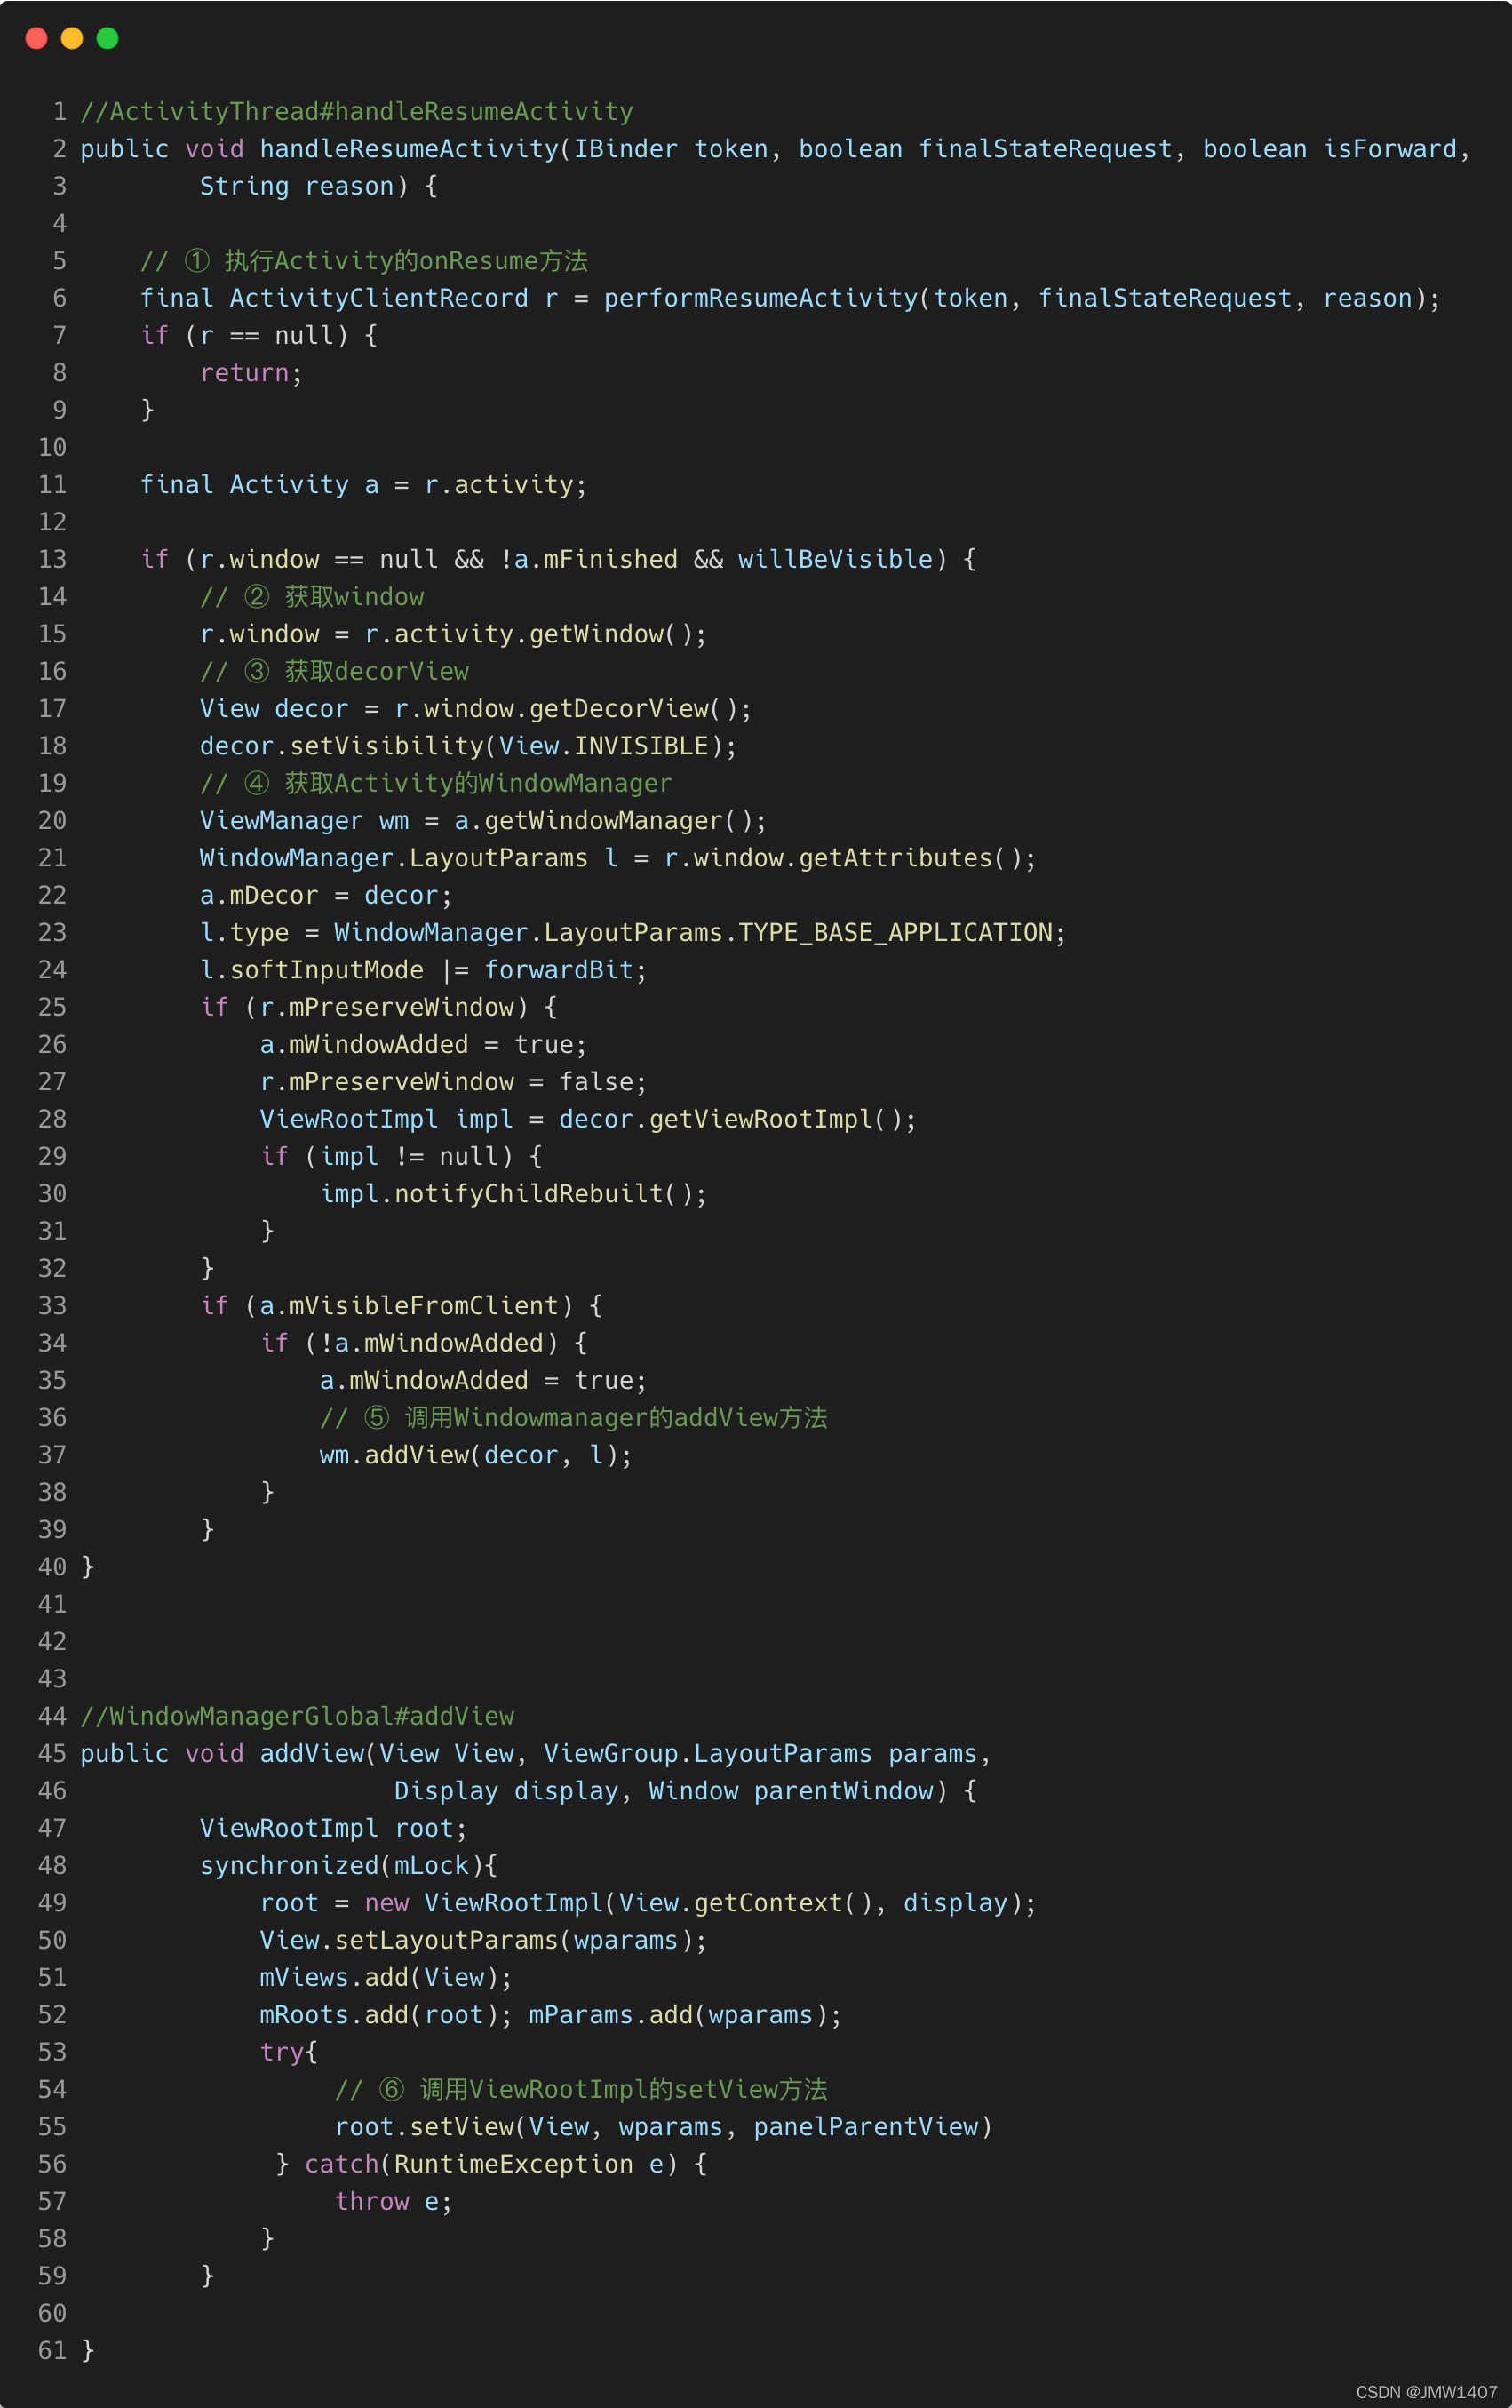
ActivityThread.handleResumeActivitywill call wm.addViewto add DecorView, wmyesWindowManagerImpl
// WindowManagerImpl
    public void addView(@NonNull View view, @NonNull ViewGroup.LayoutParams params) {


        applyDefaultToken(params);
        mGlobal.addView(view, params, mContext.getDisplay(), mParentWindow);
    }
// WindowManagerGlobal
    public void addView(View view, ViewGroup.LayoutParams params,
            Display display, Window parentWindow) {


        // 这里的 view 就是 DecorView
        // ...
        ViewRootImpl root;
        View panelParentView = null;

        synchronized (mLock) {


            // ...
            root = new ViewRootImpl(view.getContext(), display);

            view.setLayoutParams(wparams);

            mViews.add(view);
            mRoots.add(root);
            mParams.add(wparams);

            // do this last because it fires off messages to start doing things
            try {


                root.setView(view, wparams, panelParentView);
            } catch (RuntimeException e) {


            }
        }
    }
// ViewRootImpl.setView
    public void setView(View view, WindowManager.LayoutParams attrs, View panelParentView) {


      requestLayout();
    }
Finally, the drawing of the first View is triggered by WindowManagerImpl.addView-> WindowManagerGlobal.addView-> -> ViewRootImpl.setView-> .ViewRootImpl.requestLayout
Expansion: RootViewImpl, WindowManager, WindowManagerGlobal call relationship
4.1、Measure
View will make a measurement first to figure out how much area it needs to occupy. The Measure process of View exposes an interface onMeasure to us, and the definition of the method is as follows
protected void onMeasure(int widthMeasureSpec, int heightMeasureSpec) {

    }
The View class already provides a basic onMeasure implementation
 protected void onMeasure(int widthMeasureSpec, int heightMeasureSpec) {


    setMeasuredDimension(getDefaultSize(getSuggestedMinimumWidth(), widthMeasureSpec),
            getDefaultSize(getSuggestedMinimumHeight(), heightMeasureSpec));
  }
  public static int getDefaultSize(int size, int measureSpec) {


    int result = size;
    int specMode = MeasureSpec.getMode(measureSpec);
    int specSize = MeasureSpec.getSize(measureSpec);

    switch (specMode) {


    case MeasureSpec.UNSPECIFIED:
        result = size;
        break;
    case MeasureSpec.AT_MOST:
    case MeasureSpec.EXACTLY:
        result = specSize;
        break;
    }
    return result;
  }
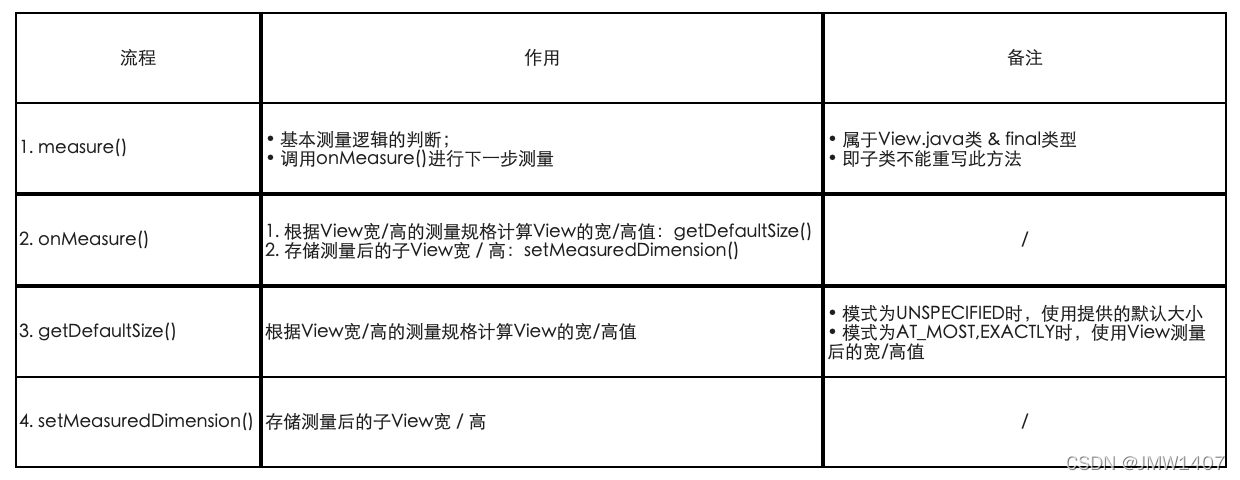
Among them invoke, setMeasuredDimensionthe () method is used to set Viewthe width and height in the measure process, and the minimum value returned getSuggestedMinimumWidthby () also has a corresponding method.ViewWidthHeight
MeasureSpecA class is Viewone of the classes 内部静态类. It defines three constants UNSPECIFIED, AT_MOST, EXACTLY. In fact, we can understand it in this way. They correspond to match_parent, wrap_content, in LayoutParams respectively xxxdp. We can rewrite onMeasureto redefine the width and height of the View.
UNSPECIDIEDThe parent container does not have any restrictions on the view, it can be as big as it needs to be, and it is generally used for internal measurement of the system.AT_MOSTCorresponding to wrap_content of LayoutParams, the parent container specifies the available size.EXACTLYCorresponding to the match_parent of LayoutParams and the specific value (xxxdp), it means that the parent container has detected the size of the view.
Custom View measurement process (Measure)
MeasureSpec of View measurement in Android
1. Single view
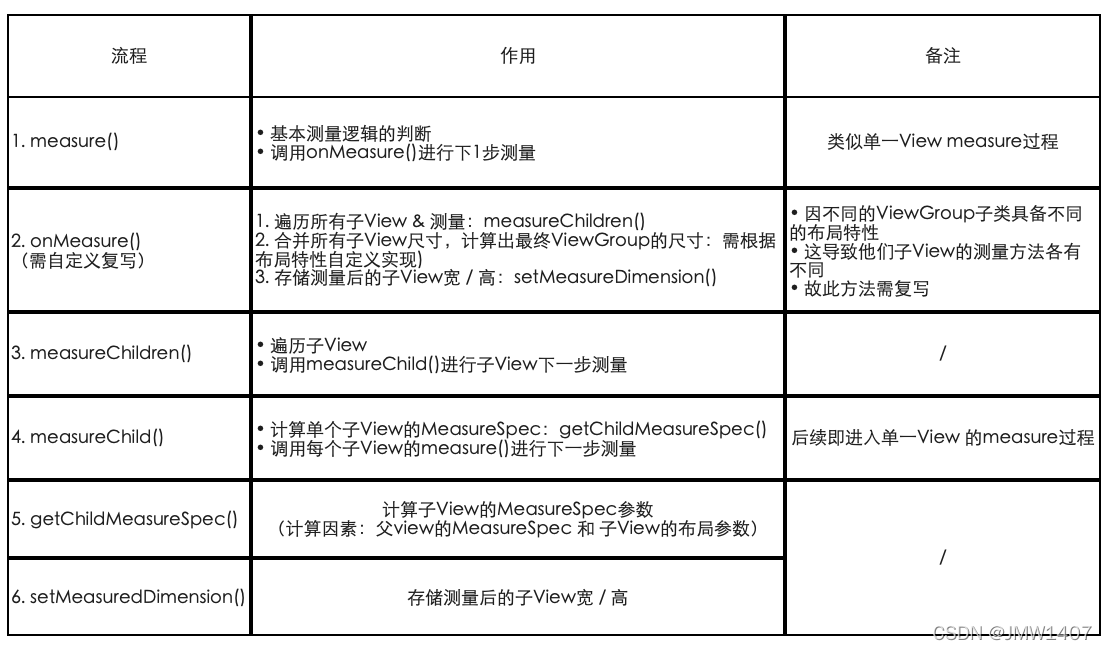
2. Viewgroup
4.2、Layout
The Layout process is very simple for the View class, and View also exposes the onLayout method to us
protected void onLayout(boolean changed, int left, int top, int right, int bottom) {


}
Because we are talking about View now, there is no sub-View to arrange, so we don't need to do extra work in this step. Insert a sentence, for ViewGroupclasses and onLayoutmethods, we need to set the size, width and height of all sub-Views
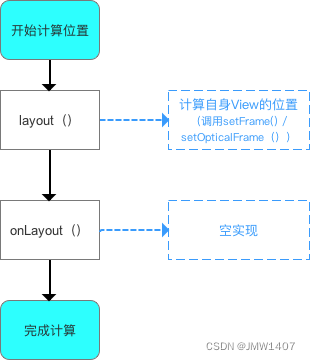
1. The layout process of a single View is analyzed as follows:
2. The layout process (Layout) process for the view group ViewGroup
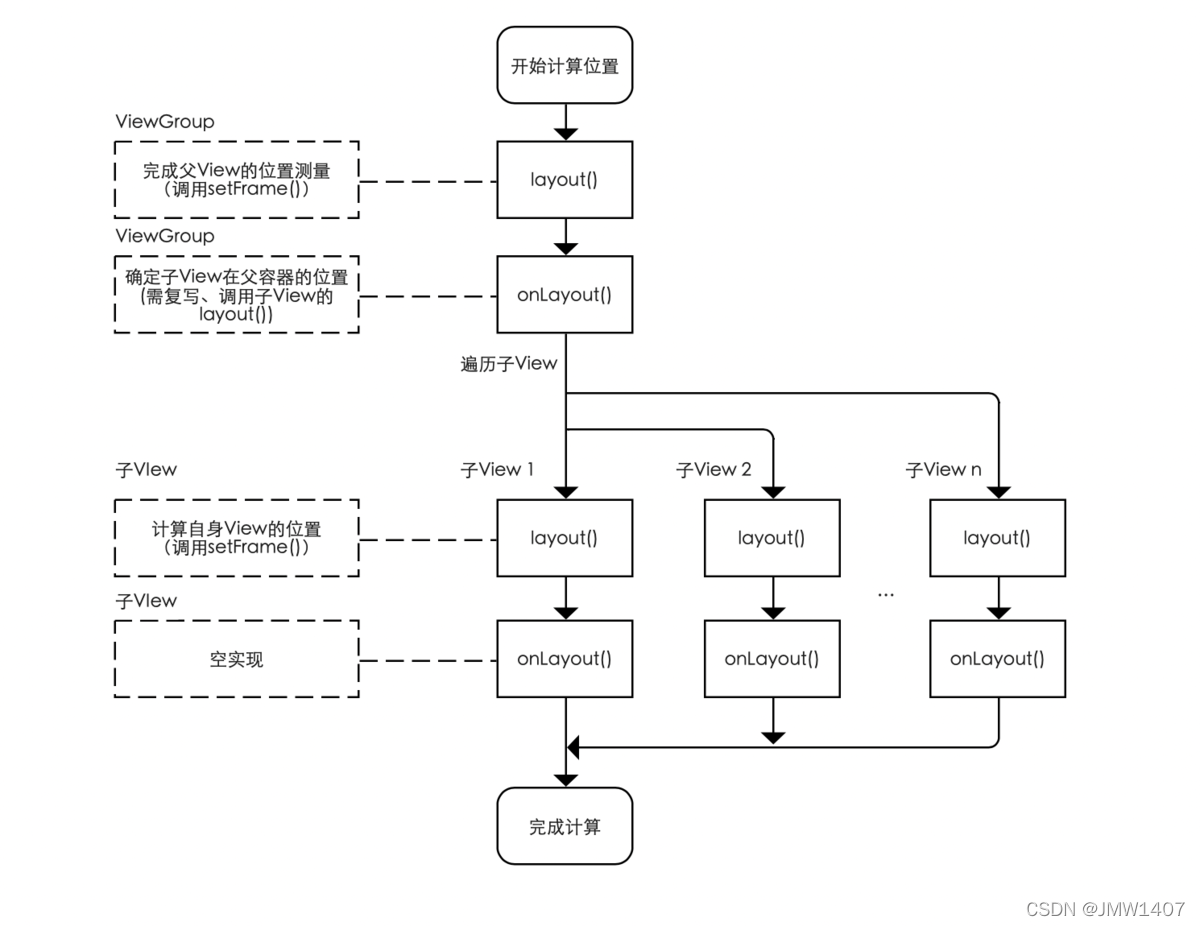
ViewGroup and View also have methods: layout(), onLayout(), but the application scenarios of the two are different:
- When the position is calculated at the beginning
ViewGroup, the () and () areViewGroupcalled ;layoutonLayout - When starting to traverse the child and calculate the position of the child View, the child 's () and ()
Vieware called , similar to a single process.ViewlayoutonLayoutViewlayout
Summarize:

4.3、Draw
The Draw process is to draw the View style we need on the canvas. Similarly, View exposes the onDraw method to us
protected void onDraw(Canvas canvas) {


}
The onDraw of the default View class does not have a single line of code, but it provides us with a blank canvas. For example, like a scroll, we are painters, and what kind of effect we can draw depends entirely on us.
1. The draw process of a single View is analyzed as follows: that is, only the View itself needs to be drawn.
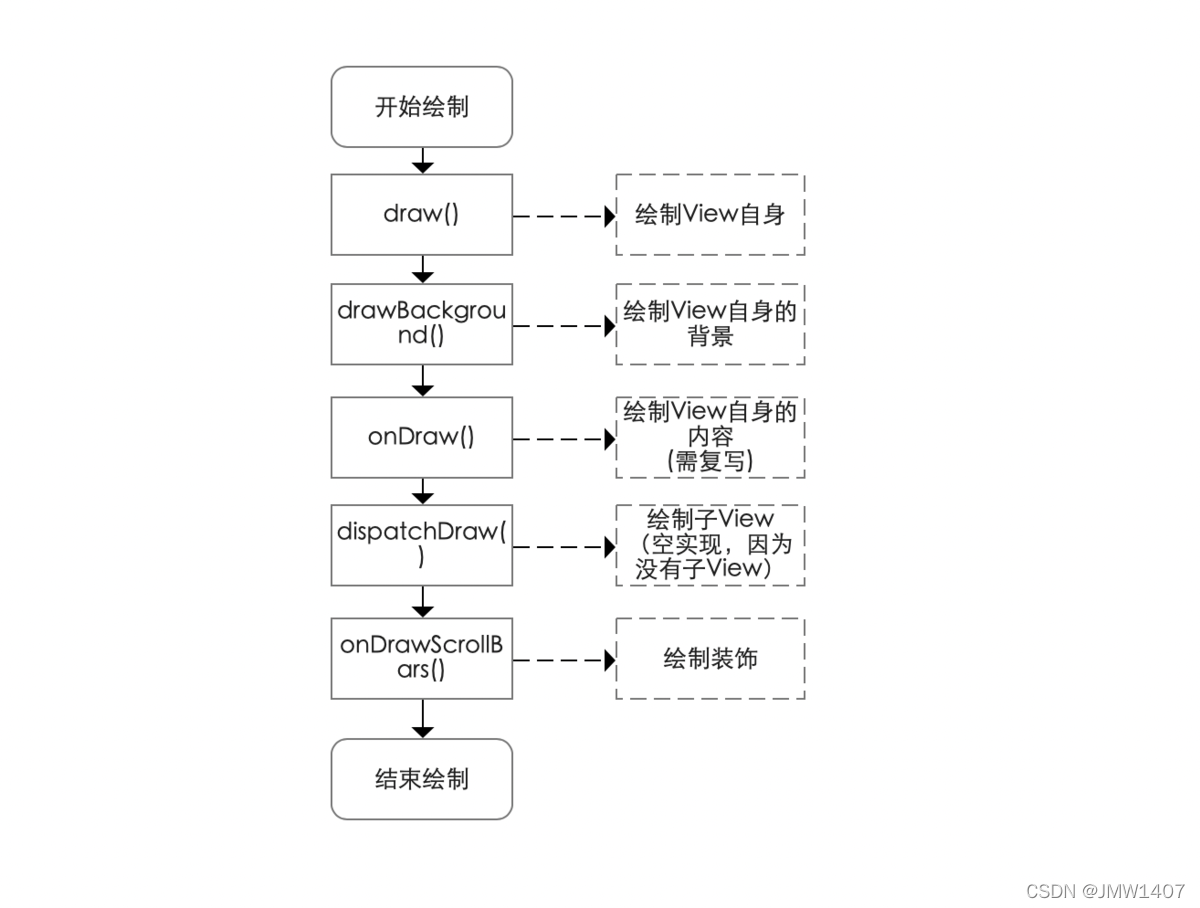
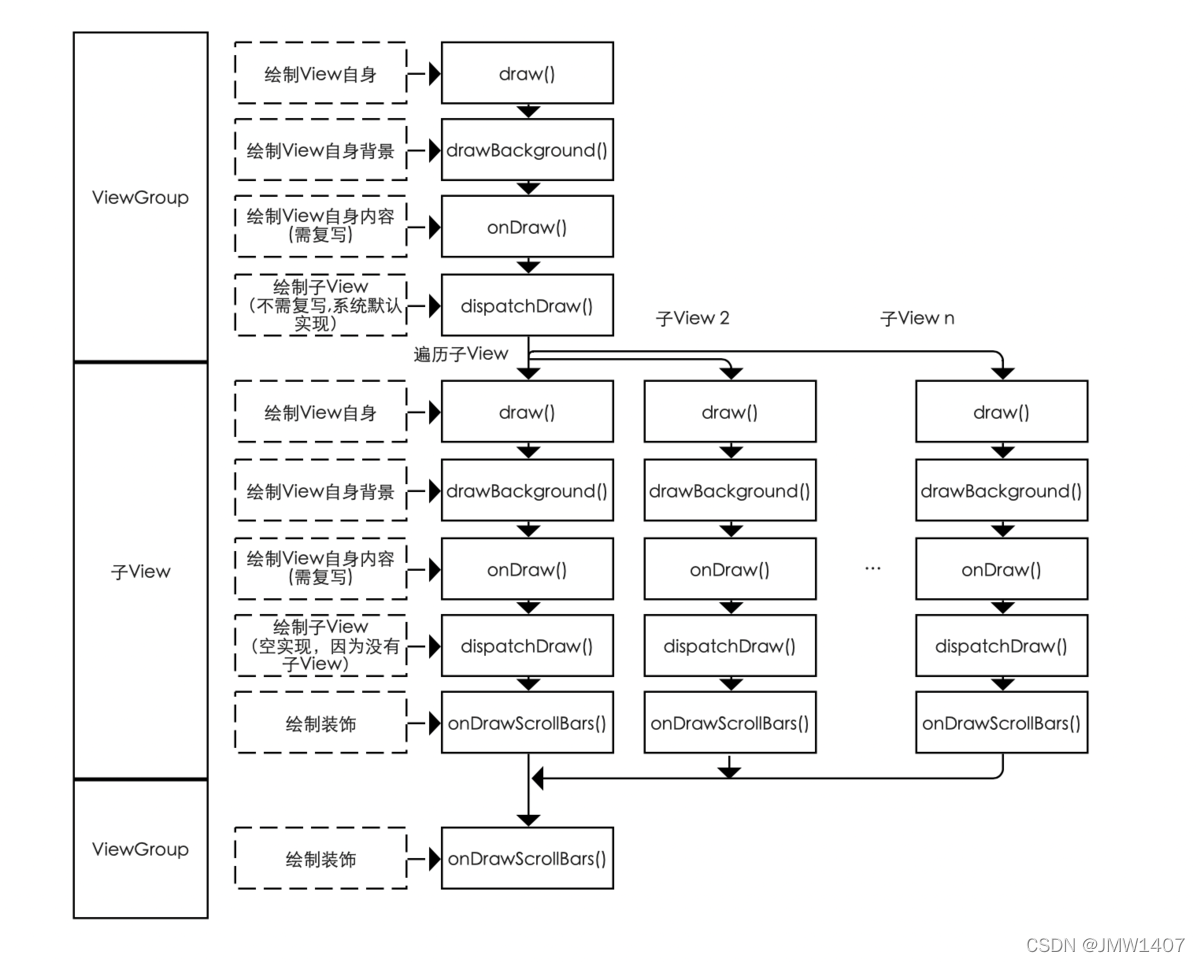
2. The draw process of ViewGroup is as follows
4.4, three more important methods
requestLayout:  View重新调用一次layout过程。

invalidate:  View重新调用一次draw过程

forceLayout: 标识View在下一次重绘,需要重新调用layout过程。
4.4. Custom attributes
We have introduced the entire View drawing process, and there is another very important knowledge, , 自定义控件属性we all know that View already has some basic attributes, such as layout_width, layout_height, backgroundetc. We often need to define our own attributes, so we can do this specifically.
- 1.
valuesUnder the folder, open itattrs.xml. In fact, the name of this file can be arbitrary. It is more standardized to write it here, which means that all the attributes of the view are placed in it. - 2. Because our following example will use two lengths and one color value attribute, we first create three attributes here.
<declare-styleable name="rainbowbar">
  <attr name="rainbowbar_hspace" format="dimension"></attr>
  <attr name="rainbowbar_vspace" format="dimension"></attr>
  <attr name="rainbowbar_color" format="color"></attr>
</declare-styleable>
4.5. Implement a relatively simple Google rainbow progress bar.
For simplicity, here I only use one color
public class RainbowBar extends View {


  //progress bar color
  int barColor = Color.parseColor("#1E88E5");
  //every bar segment width 宽度
  int hSpace = Utils.dpToPx(80, getResources());
  //every bar segment height 高度
  int vSpace = Utils.dpToPx(4, getResources());
  //space among bars 间隙
  int space = Utils.dpToPx(10, getResources());
  float startX = 0;
  // delta表示每次矩形框移动量
  float delta = 10f;
  Paint mPaint;

  public RainbowBar(Context context) {


    super(context);
  }

  public RainbowBar(Context context, AttributeSet attrs) {


    this(context, attrs, 0);
  }

  public RainbowBar(Context context, AttributeSet attrs, int defStyleAttr) {


    super(context, attrs, defStyleAttr);
    //read custom attrs
    TypedArray t = context.obtainStyledAttributes(attrs,
            R.styleable.rainbowbar, 0, 0);
    hSpace = t.getDimensionPixelSize(R.styleable.rainbowbar_rainbowbar_hspace, hSpace);
    vSpace = t.getDimensionPixelOffset(R.styleable.rainbowbar_rainbowbar_vspace, vSpace);
    barColor = t.getColor(R.styleable.rainbowbar_rainbowbar_color, barColor);
    t.recycle();   // we should always recycle after used
    mPaint = new Paint();
    mPaint.setAntiAlias(true);
    mPaint.setColor(barColor);
    mPaint.setStrokeWidth(vSpace);
  }

  .......
}
View has three construction methods that we need to rewrite. Here are the scenarios where the next three methods will be called.
- The first method is usually called when we use it like this,
View view = new View(context); - The second method, when we use View in the xml layout file, will be called during inflate layout,
<View
layout_width="match_parent"
layout_height="match_parent"/>
- The third method is similar to the second method, but the style attribute setting is added, and the third construction method will be called when the inflater is laid out.
<View
style="@styles/MyCustomStyle"
layout_width="match_parent"
layout_height="match_parent"/>
You may feel a little confused above, I wrote the code for initializing and reading custom attributes hspace, vspace, and barcolorin the third construction method, but I RainbowBardid not add attributes () in the linear layout style, then follow our above Explain that the inflate layout should invoke the second construction method, but we call the third construction method in the second construction method, ; so there is no problem in this(context, attrs, 0)reading custom attributes in the third construction method, This is a small detail to avoid code redundancy-,-
Draw
Because we don't need to pay attention to the measrue and layout process here, just rewrite the onDraw method directly.
 //draw be invoke numbers.
int index = 0;
@Override
protected void onDraw(Canvas canvas) {


    super.onDraw(canvas);
    //get screen width
    //这部分是用来计算当前的坐标起始点有没有在屏幕外面, delta表示每次矩形框移动量
    float sw = this.getMeasuredWidth();
    if (startX >= sw + (hSpace + space) - (sw % (hSpace + space))) {


        startX = 0;
    } else {


        startX += delta;
    }
    float start = startX;
    // draw latter parse
    //从当前起始点位置开始绘制矩形框,直到当前的起点坐标在屏幕外了
    while (start < sw) {


        canvas.drawLine(start, 5, start + hSpace, 5, mPaint);
        start += (hSpace + space);
    }

    start = startX - space - hSpace;

    // draw front parse
    //先判断每次偏移后初始坐标是否到屏幕的左边缘外了,没有则绘制矩形框,达到和初始坐标点右边的连接起来
    while (start >= -hSpace) {


        canvas.drawLine(start, 5, start + hSpace, 5, mPaint);
        start -= (hSpace + space);
    }
    if (index >= 700000) {


        index = 0;
    }
    invalidate();
}

//布局文件
<?xml version="1.0" encoding="utf-8"?>
<LinearLayout     xmlns:android="http://schemas.android.com/apk/res/android"
xmlns:app="http://schemas.android.com/apk/res-auto"
android:layout_width="match_parent"
android:layout_height="match_parent"
android:gravity="center"
android:layout_marginTop="40dp"
android:orientation="vertical" >

<com.sw.demo.widget.RainbowBar
    android:layout_width="match_parent"
    android:layout_height="wrap_content"
    app:rainbowbar_color="@android:color/holo_blue_bright"
    app:rainbowbar_hspace="80dp"
    app:rainbowbar_vspace="10dp"
    ></com.sw.demo.widget.RainbowBar>

</LinearLayout>
canvasIn fact, it is the method of calling drawLine, and then drawadvances the starting point each time. At the end of the method, we call invalidatethe method. As we have explained above, this method will make View call the onDrawmethod again, so our progress bar is always on The effect of drawing forward.
reference
1. Detailed explanation of Android View
2. Teach you how to customize Android View
3. Daily question (19) Please describe the drawing process of View
4. Summary of Android View understanding
5. Carson takes you to learn Android: one article sorts out custom View Workflow
6. [Morning Flowers in the Evening] Android Custom View Chapter 1 (1) View Drawing Process
7. [Android Interview] View Drawing Process
8. Android Interview: Start with 12 real interview questions about the View drawing process in a big factory, with You fully understand the View drawing process
9. Android interviewer: "Come tell me about View drawing?"