At the beginning of this section, we will analyze and explore some common behaviors in ResourceManager, and see how some specific key behaviors flow in RM. This section will go deep into the source code to explore the specific process of "starting ApplicationMaster".
1. The overall process
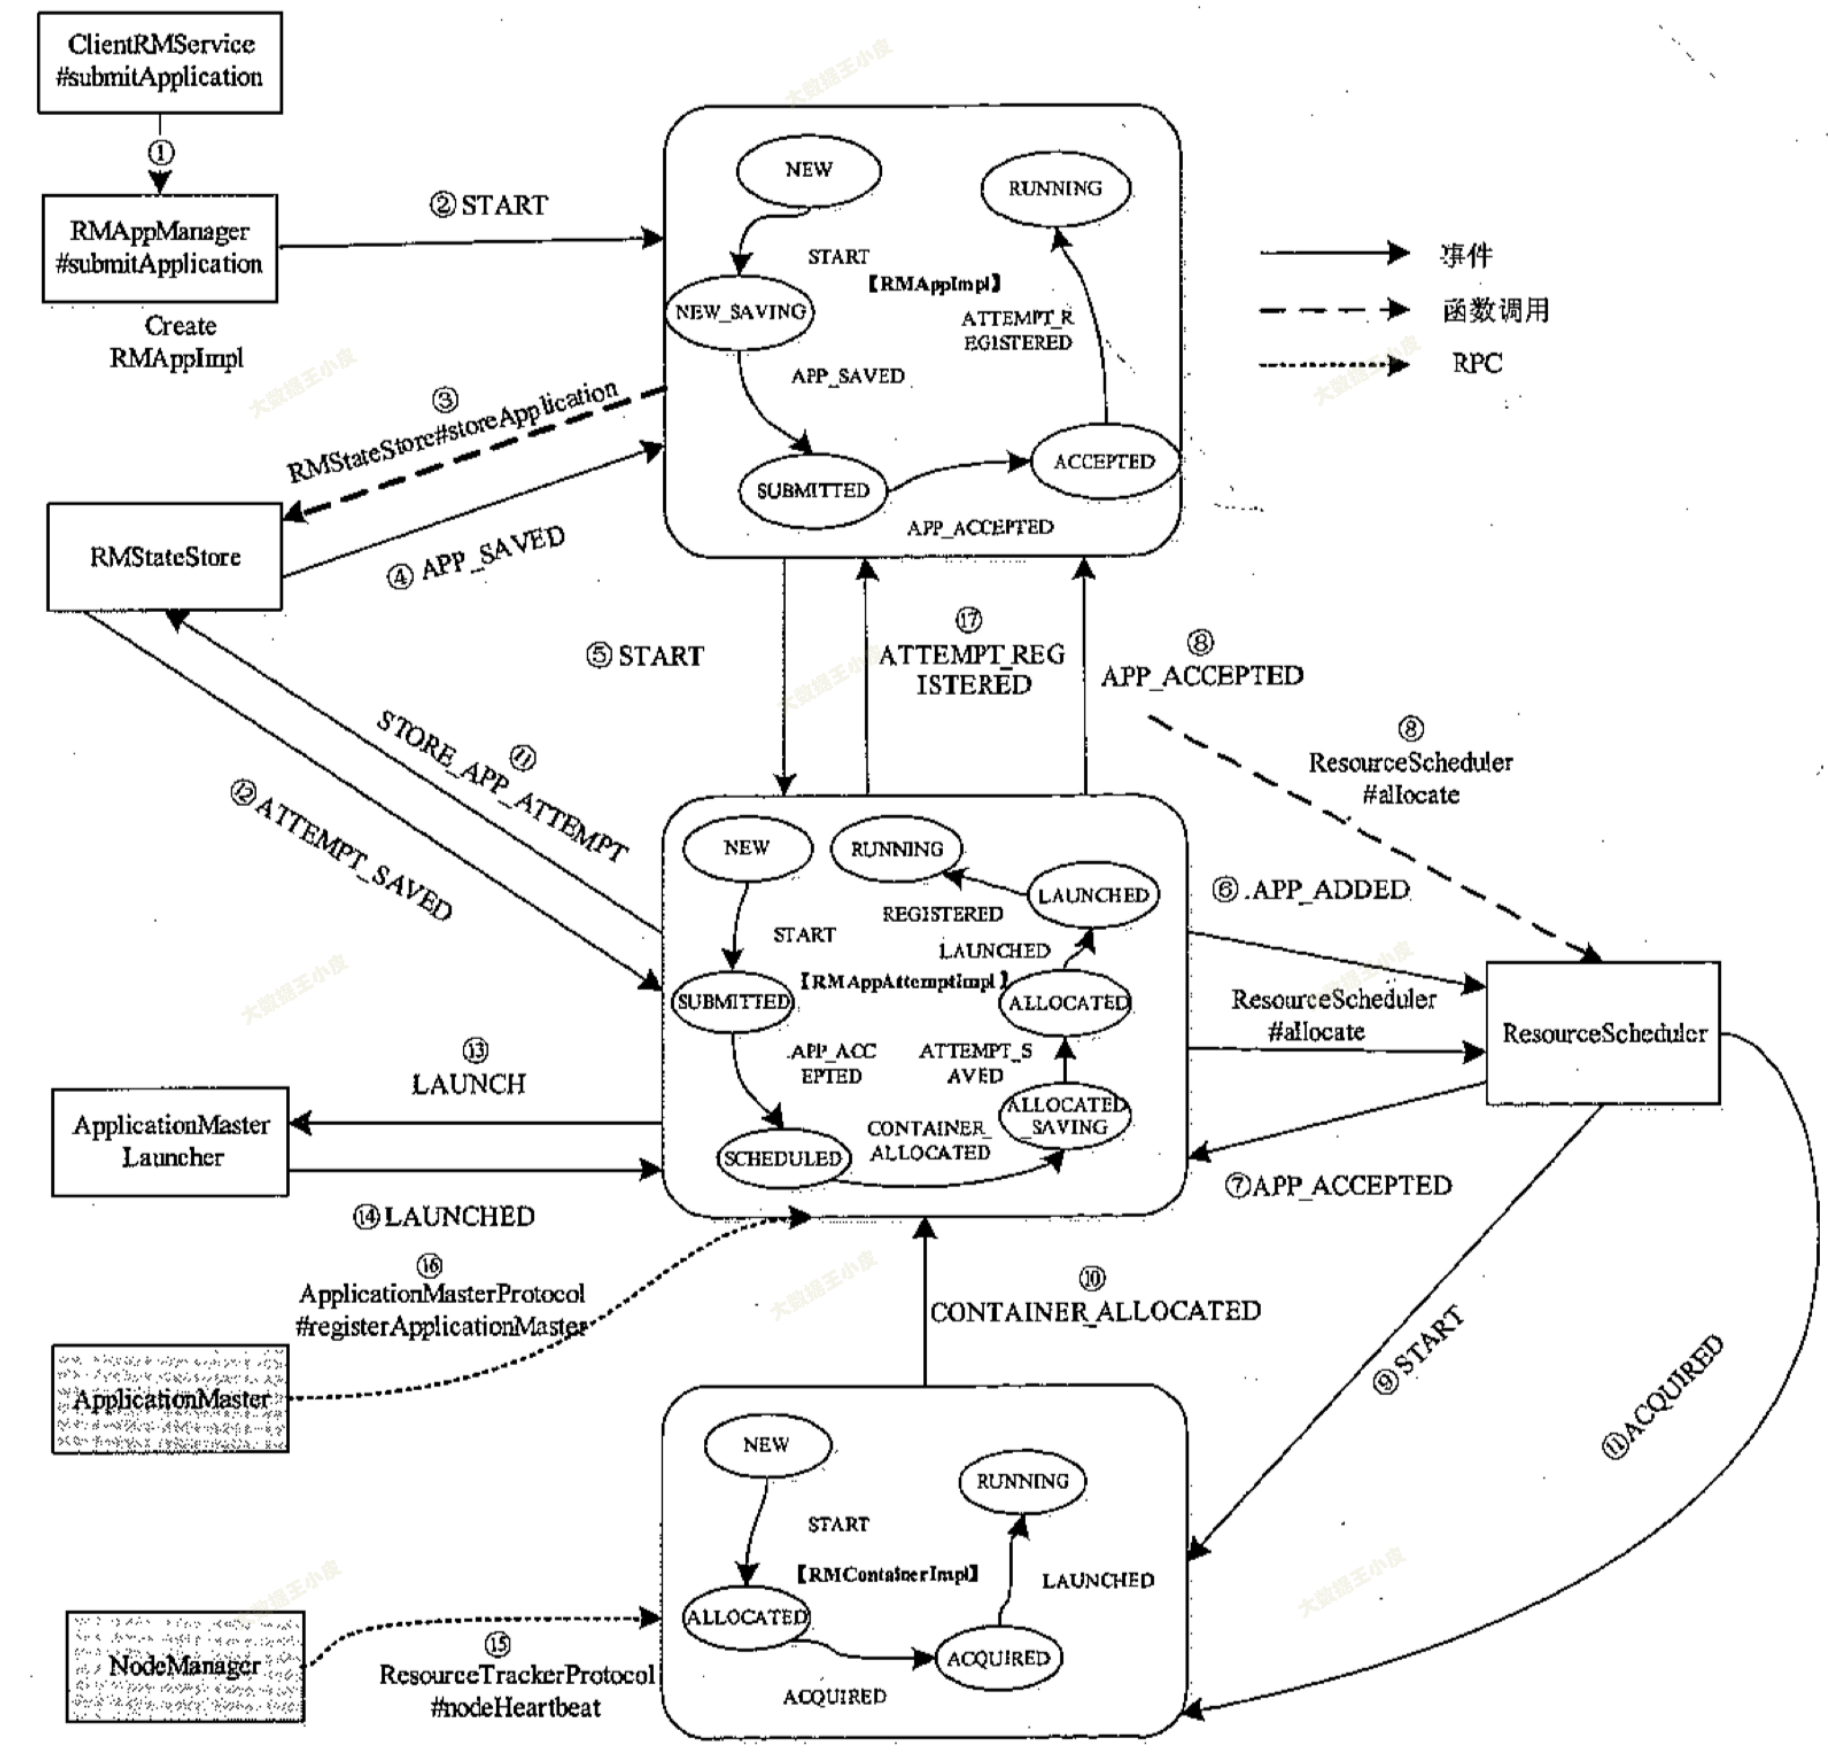
This section introduces the whole process from submitting the application to starting the ApplicationMaster, involving several main components such as Client, RMService, RMAppManager, RMApplmpl, RMAppAttemptImpl, RMNode, and ResourceScheduler. ApplicationClientProtocol#submitApplicationAfter the client invokes the RPC function , the processing on the ResourceManager side is shown in the figure below.
2. Specific process analysis
Next, following the flow chart above, we go deep into the source code and analyze how each step is executed:
at the beginning, the client initiates task submission , and sends events submitApplication()through ClientRMServiceand , and then hands them over to process.RMAppManagerRMAppEventType.STARTRMAppImpl
  protected void submitApplication(
      ApplicationSubmissionContext submissionContext, long submitTime,
      String user) throws YarnException {


    ApplicationId applicationId = submissionContext.getApplicationId();

    RMAppImpl application =
        createAndPopulateNewRMApp(submissionContext, submitTime, user, false);
    Credentials credentials = null;
    try {


      credentials = parseCredentials(submissionContext);
      if (UserGroupInformation.isSecurityEnabled()) {


        this.rmContext.getDelegationTokenRenewer()
            .addApplicationAsync(applicationId, credentials,
                submissionContext.getCancelTokensWhenComplete(),
                application.getUser());
      } else {


        // Dispatcher is not yet started at this time, so these START events
        // enqueued should be guaranteed to be first processed when dispatcher
        // gets started.
        // 这里发送 RMAppEventType.START 事件
        this.rmContext.getDispatcher().getEventHandler()
            .handle(new RMAppEvent(applicationId, RMAppEventType.START));
      }
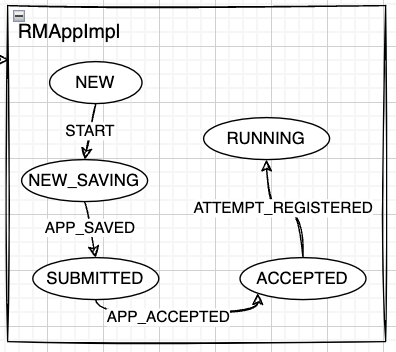
RMAppImplThis thing is a state machine. After receiving an event, it will change the state and process the corresponding logic.
(Students who are not familiar with the state machine can turn to my previous article to learn "2-4 Yarn Basic Library-State Machine Library")
Intercept a part of the state transition code:
  private static final StateMachineFactory<RMAppImpl,
                                           RMAppState,
                                           RMAppEventType,
                                           RMAppEvent> stateMachineFactory
                               = new StateMachineFactory<RMAppImpl,
                                           RMAppState,
                                           RMAppEventType,
                                           RMAppEvent>(RMAppState.NEW)


     // Transitions from NEW state
    .addTransition(RMAppState.NEW, RMAppState.NEW,
        RMAppEventType.NODE_UPDATE, new RMAppNodeUpdateTransition())
     // 收到 RMAppEventType.START 事件
    .addTransition(RMAppState.NEW, RMAppState.NEW_SAVING,
        RMAppEventType.START, new RMAppNewlySavingTransition())
    .addTransition(RMAppState.NEW, EnumSet.of(RMAppState.SUBMITTED,
            RMAppState.ACCEPTED, RMAppState.FINISHED, RMAppState.FAILED,
            RMAppState.KILLED, RMAppState.FINAL_SAVING),
        RMAppEventType.RECOVER, new RMAppRecoveredTransition())
    .addTransition(RMAppState.NEW, RMAppState.KILLED, RMAppEventType.KILL,
        new AppKilledTransition())
    .addTransition(RMAppState.NEW, RMAppState.FINAL_SAVING,
        RMAppEventType.APP_REJECTED,
        new FinalSavingTransition(new AppRejectedTransition(),
          RMAppState.FAILED))
a) RMAppImpl - START
RMAppEventType.STARTAfter the event is received , it will be executed RMAppNewlySavingTransition().
  private static final class RMAppNewlySavingTransition extends RMAppTransition {


    @Override
    public void transition(RMAppImpl app, RMAppEvent event) {


      // If recovery is enabled then store the application information in a
      // non-blocking call so make sure that RM has stored the information
      // needed to restart the AM after RM restart without further client
      // communication
      LOG.info("Storing application with id " + app.applicationId);
      app.rmContext.getStateStore().storeNewApplication(app);
    }
  }
If you follow along, you will find that it sends out RMStateStoreEventType.STORE_APPevents , and RMStateStoreyou can find the corresponding event processing in . Discovery is also a state machine:
.addTransition(RMStateStoreState.ACTIVE,
    EnumSet.of(RMStateStoreState.ACTIVE, RMStateStoreState.FENCED),
    RMStateStoreEventType.STORE_APP, new StoreAppTransition())
Follow StoreAppTransitionto see what's done (send RMAppEventType.APP_NEW_SAVEDevent)
  private static class StoreAppTransition
      implements MultipleArcTransition<RMStateStore, RMStateStoreEvent,
          RMStateStoreState> {


    @Override
    public RMStateStoreState transition(RMStateStore store,
        RMStateStoreEvent event) {


      if (!(event instanceof RMStateStoreAppEvent)) {


        // should never happen
        LOG.error("Illegal event type: " + event.getClass());
        return RMStateStoreState.ACTIVE;
      }
      boolean isFenced = false;
      ApplicationStateData appState =
          ((RMStateStoreAppEvent) event).getAppState();
      ApplicationId appId =
          appState.getApplicationSubmissionContext().getApplicationId();
      LOG.info("Storing info for app: " + appId);
      try {


        store.storeApplicationStateInternal(appId, appState);
        // 这里发送了 RMAppEventType.APP_NEW_SAVED 事件
        store.notifyApplication(new RMAppEvent(appId,
               RMAppEventType.APP_NEW_SAVED));
      } catch (Exception e) {


        LOG.error("Error storing app: " + appId, e);
        isFenced = store.notifyStoreOperationFailedInternal(e);
      }
      return finalState(isFenced);
    };
  }
2) RMAppImpl - APP_NEW_SAVED
Let's go back RMAppImpland find the corresponding state transition logic.
    // 刚刚我们的状态是 NEW_SAVING,收到了 APP_NEW_SAVED 事件,执行 AddApplicationToSchedulerTransition() 后,转换为 SUBMITTED 状态
    .addTransition(RMAppState.NEW_SAVING, RMAppState.SUBMITTED,
        RMAppEventType.APP_NEW_SAVED, new AddApplicationToSchedulerTransition())
The event is sent in AddApplicationToSchedulerTransition()the SchedulerEventType.APP_ADDED. Then RMAppImpltransition to RMAppState.SUBMITTEDthe state.
SchedulerEventType.APP_ADDEDWill be captured and processed by multiple event handlers:
1) ResourceSchedulerWrapperEvent handler, only record
      } else if (schedulerEvent.getType() == SchedulerEventType.APP_ADDED
          && schedulerEvent instanceof AppAddedSchedulerEvent) {


        AppAddedSchedulerEvent appAddEvent =
                (AppAddedSchedulerEvent) schedulerEvent;
        String queueName = appAddEvent.getQueue();
        appQueueMap.put(appAddEvent.getApplicationId(), queueName);
      }
2) The implementation class AbstractYarnSchedulerof . Take CapacitySchedulerfor example :
executeaddApplication()
    case APP_ADDED:
    {


      AppAddedSchedulerEvent appAddedEvent = (AppAddedSchedulerEvent) event;
      String queueName = resolveReservationQueueName(appAddedEvent.getQueue(),
          appAddedEvent.getApplicationId(), appAddedEvent.getReservationID(),
          appAddedEvent.getIsAppRecovering());
      if (queueName != null) {


        if (!appAddedEvent.getIsAppRecovering()) {


          addApplication(appAddedEvent.getApplicationId(), queueName,
              appAddedEvent.getUser(), appAddedEvent.getApplicatonPriority());
        } else {


          addApplicationOnRecovery(appAddedEvent.getApplicationId(), queueName,
              appAddedEvent.getUser(), appAddedEvent.getApplicatonPriority());
        }
      }
    }
addApplication()In will submit the Application and send RMAppEventType.APP_ACCEPTEDthe event.
	queue.submitApplication(applicationId, user, queueName);
    rmContext.getDispatcher().getEventHandler()
        .handle(new RMAppEvent(applicationId, RMAppEventType.APP_ACCEPTED));
3) RMAppImpl - APP_ACCEPTED (emphasis)
Continue to return RMAppImpl, execute StartAppAttemptTransition(), create newAttempt, and send eventsRMAppAttemptEventType.START
    .addTransition(RMAppState.SUBMITTED, RMAppState.ACCEPTED,
        RMAppEventType.APP_ACCEPTED, new StartAppAttemptTransition())
  private static final class StartAppAttemptTransition extends RMAppTransition {


    @Override
    public void transition(RMAppImpl app, RMAppEvent event) {


      app.createAndStartNewAttempt(false);
    };
  }
  private void
      createAndStartNewAttempt(boolean transferStateFromPreviousAttempt) {


    createNewAttempt();
    handler.handle(new RMAppStartAttemptEvent(currentAttempt.getAppAttemptId(),
      transferStateFromPreviousAttempt));
  }
RMAppAttemptImplThis event will be captured in and executed, AttemptStartedTransition()and SchedulerEventType.APP_ATTEMPT_ADDEDthe event , which will be processed by the AbstractYarnScheduler implementation class
      .addTransition(RMAppAttemptState.NEW, RMAppAttemptState.SUBMITTED,
          RMAppAttemptEventType.START, new AttemptStartedTransition())
If addApplicationAttempthandled , will submit ApplicationAttempt, and send RMAppAttemptEventType.ATTEMPT_ADDEDthe event
private synchronized void addApplicationAttempt() {


    // 提交 attempt
	queue.submitApplicationAttempt(attempt, application.getUser());
    // 发送 RMAppAttemptEventType.ATTEMPT_ADDED 事件
	rmContext.getDispatcher().getEventHandler().handle(
    		new RMAppAttemptEvent(applicationAttemptId,
            RMAppAttemptEventType.ATTEMPT_ADDED));
}
RMAppAttemptImplContinue to process after receiving the event, and ScheduleTransitionthen allocate am container resources.
      .addTransition(RMAppAttemptState.SUBMITTED,
          EnumSet.of(RMAppAttemptState.LAUNCHED_UNMANAGED_SAVING,
                     RMAppAttemptState.SCHEDULED),
          RMAppAttemptEventType.ATTEMPT_ADDED,
          new ScheduleTransition())
        // AM resource has been checked when submission
        Allocation amContainerAllocation =
            appAttempt.scheduler.allocate(
                appAttempt.applicationAttemptId,
                Collections.singletonList(appAttempt.amReq),
                EMPTY_CONTAINER_RELEASE_LIST,
                amBlacklist.getBlacklistAdditions(),
                amBlacklist.getBlacklistRemovals(), null, null);
Before the ResourceScheduler returns resources to it, it sends an RMContainerEventType.ACQUIREDevent .
On RMContainerImplreceive RMContainerEventType.START, send RMAppAttemptEventType.CONTAINER_ALLOCATEDevent .
    .addTransition(RMContainerState.NEW, RMContainerState.ALLOCATED,
        RMContainerEventType.START, new ContainerStartedTransition())
  private static final class ContainerStartedTransition extends
      BaseTransition {


    @Override
    public void transition(RMContainerImpl container, RMContainerEvent event) {


      container.eventHandler.handle(new RMAppAttemptEvent(
          container.appAttemptId, RMAppAttemptEventType.CONTAINER_ALLOCATED));
    }
  }
Going back to RMAppAttemptImplthe follow-up state machine and executing AMContainerAllocatedTransitionit, it is am allocate again, and the only parameter of allocate in the previous state is different, and I don’t understand why. Here, if it is found that the allocate container resource is still 0, it will return to the previous step, and the state is still RMAppAttemptState.SCHEDULEDwaiting obtain resources again. If the resource is obtained normally, it will change to RMAppAttemptState.ALLOCATED_SAVINGthe state .
      .addTransition(RMAppAttemptState.SCHEDULED,
          EnumSet.of(RMAppAttemptState.ALLOCATED_SAVING,
            RMAppAttemptState.SCHEDULED),
          RMAppAttemptEventType.CONTAINER_ALLOCATED,
          new AMContainerAllocatedTransition())
      Allocation amContainerAllocation =
          appAttempt.scheduler.allocate(appAttempt.applicationAttemptId,
            EMPTY_CONTAINER_REQUEST_LIST, EMPTY_CONTAINER_RELEASE_LIST, null,
            null, null, null);
When logging is complete, sendRMStateStore an event to . Subsequent sends the event to (actual execution is in ) and transitions the state from ALLOCATED_SAVING to ALLOCATED.RMAppAttemptImplRMAppAttemptEventType.ATTEMPT_NEW_SAVED
RMAppAttemptImplApplicationMasterLauncherAMLauncherEventType.LAUNCHAMLauncher
      .addTransition(RMAppAttemptState.ALLOCATED_SAVING,
          RMAppAttemptState.ALLOCATED,
          RMAppAttemptEventType.ATTEMPT_NEW_SAVED, new AttemptStoredTransition())
ApplicationMasterLauncherAfter receiving AMLauncherEventType.LAUNCHthe event , it will put the event in the event queue and wait for AMLauncherthe thread in the thread pool to process the event. It will communicate with the corresponding NodeManager, start the ApplicationMaster, and once successfully started, will RMAppAttemptImplsend RMAppAttemptEventType.LAUNCHEDan event to the .
  public void run() {


    switch (eventType) {


    case LAUNCH:
      try {


        LOG.info("Launching master" + application.getAppAttemptId());
        launch();
        handler.handle(new RMAppAttemptEvent(application.getAppAttemptId(),
            RMAppAttemptEventType.LAUNCHED));
RMAppAttemptImplAfter receiving RMAppAttemptEventType.LAUNCHEDthe event , it will AMLivelinessMonitorregister with to monitor the running status. RMAppAttemptImplStatus ALLOCATEDtransitioned to LAUNCHED.
Afterwards, the NodeManager reports through the heartbeat mechanism that the Container where the ApplicationMaster resides has been successfully started. After receiving the information, the ResourceScheduler will send an RMContainerEventType.LAUNCHEDevent . RMContainerImplAfter receiving the event, it will be removed from the ContainerAllocationExpirer monitoring list.
The started ApplicationMaster registers ApplicationMasterProtocol#registerApplicationMasterwith , and ApplicationMasterServicethe service in the ResourceManager sends RMAppAttemptEventType.REGISTEREDan event .
// ApplicationMasterService#registerApplicationMaster

	LOG.info("AM registration " + applicationAttemptId);
      this.rmContext
        .getDispatcher()
        .getEventHandler()
        .handle(
          // 这里发送 RMAppAttemptEventType.REGISTERED 事件
          new RMAppAttemptRegistrationEvent(applicationAttemptId, request
            .getHost(), request.getRpcPort(), request.getTrackingUrl()));
RMAppAttemptImplAfter receiving the event, it first saves the basic information of the ApplicationMaster (such as its host, enabled RPC port number, etc.), and then RMApplmplsends an RMAppEventType.ATTEMPT_REGISTEREDevent to . RMAppAttemptImplStatus LAUNCHEDtransitioned to RUNNING.
      .addTransition(RMAppAttemptState.LAUNCHED, RMAppAttemptState.RUNNING,
          RMAppAttemptEventType.REGISTERED, REGISTERED_TRANSITION)
// AMRegisteredTransition
	appAttempt.eventHandler.handle(new RMAppEvent(appAttempt
          .getAppAttemptId().getApplicationId(),
          RMAppEventType.ATTEMPT_REGISTERED));
四)RMAppImpl - ATTEMPT_REGISTERED
RMAppImplTransitions the state from ACCEPTED to RUNNING upon receipt of RMAppEventType.ATTEMPT_REGISTEREDthe event .
    .addTransition(RMAppState.ACCEPTED, RMAppState.RUNNING,
        RMAppEventType.ATTEMPT_REGISTERED, new RMAppStateUpdateTransition(
            YarnApplicationState.RUNNING))
At this point, the analysis of the overall process of starting ApplicationMaster is completed!
3. Summary
This article analyzes the whole process from application submission to starting ApplicationMaster. It may be a bit cumbersome to analyze the specific process. But as long as you grasp the core essence, it is easy to figure it out. The focus is on event processing and state machine. If these two components are clearly understood, it is easy to understand the flow of the program.
The actual logic is nothing more than several services sending corresponding events to each other. After receiving the event, they will start the service, record the log, monitor the status, and then send a new event.
It's not difficult in itself, but you need to be patient and sort out a little bit.