1. Flume cluster installation and deployment
1.1. Installation address
- Flume official website address: http://flume.apache.org/
- Document viewing address: http://flume.apache.org/FlumeUserGuide.html
- Download address: http://archive.apache.org/dist/flume/
1.2. Installation and deployment
- Upload apache-flume-1.9.0-bin.tar.gz to the /opt/software directory of linux

2. Unzip apache-flume-1.9.0-bin.tar.gz to the /opt/model/ directory
[song@hadoop102 software]$ tar -zxf /opt/software/apache-flume-1.9.0-bin.tar.gz -C /opt/model/
- Modify the name of apache-flume-1.9.0-bin to flume
[song@hadoop102 model]$ mv /opt/model/apache-flume-1.9.0-bin /opt/model/flume
- Delete guava-11.0.2.jar in the lib folder to be compatible with Hadoop 3.1.3
[song@hadoop102 model]$ rm /opt/model/flume/lib/guava-11.0.2.jar
Note: To delete the server node of guava-11.0.2.jar, be sure to configure hadoop environment variables. Otherwise, the following exception will be reported.
Caused by: java.lang.ClassNotFoundException: com.google.common.collect.Lists
        at java.net.URLClassLoader.findClass(URLClassLoader.java:382)
        at java.lang.ClassLoader.loadClass(ClassLoader.java:424)
        at sun.misc.Launcher$AppClassLoader.loadClass(Launcher.java:349)
        at java.lang.ClassLoader.loadClass(ClassLoader.java:357)
        ... 1 more
- Modify the log4j.properties configuration file in the conf directory to configure the log file path
[song@hadoop102 conf]$ vim log4j.properties

flume.log.dir=/opt/module/flume/logs
2. Kafka cluster installation and deployment
2.1. Cluster planning

2.2. Cluster deployment
- Official download address: http://kafka.apache.org/downloads.html
- Unzip the installation package
[song@hadoop102 software]$ tar -zxvf kafka_2.12-3.0.0.tgz -C /opt/model/
- Modify the decompressed file name
[song@hadoop102 model]$ mv kafka_2.12-3.0.0/ kafka
- Go to the /opt/model/kafka directory and modify the configuration file
[song@hadoop102 kafka]$ cd config/
[song@hadoop102 config]$ vim server.properties
#输入以下内容:
#broker的全局唯一编号,不能重复,只能是数字。
broker.id=0
#处理网络请求的线程数量
num.network.threads=3
#用来处理磁盘IO的线程数量
num.io.threads=8
#发送套接字的缓冲区大小
socket.send.buffer.bytes=102400
#接收套接字的缓冲区大小
socket.receive.buffer.bytes=102400
#请求套接字的缓冲区大小
socket.request.max.bytes=104857600
#kafka运行日志(数据)存放的路径,路径不需要提前创建,kafka自动帮你创建,可以配置多个磁盘路径,路径与路径之间可以用","分隔
log.dirs=/opt/model/kafka/datas
#topic在当前broker上的分区个数
num.partitions=1
#用来恢复和清理data下数据的线程数量
num.recovery.threads.per.data.dir=1
# 每个topic创建时的副本数,默认时1个副本
offsets.topic.replication.factor=1
#segment文件保留的最长时间,超时将被删除
log.retention.hours=168
#每个segment文件的大小,默认最大1G
log.segment.bytes=1073741824
# 检查过期数据的时间,默认5分钟检查一次是否数据过期
log.retention.check.interval.ms=300000
#配置连接Zookeeper集群地址(在zk根目录下创建/kafka,方便管理)
zookeeper.connect=hadoop102:2181,hadoop103:2181,hadoop104:2181/kafka
- distribution package
[song@hadoop102 model]$ xsync kafka/
- Modify broker.id=1 and broker.id=2 in the configuration file /opt/model/kafka/config/server.properties on hadoop103 and hadoop104 respectively
Note: broker.id must not be repeated and is unique in the entire cluster.
[song@hadoop103 model]$ vim kafka/config/server.properties
Revise:
# The id of the broker. This must be set to a unique integer for each broker.
broker.id=1

[atguigu@hadoop104 model]$ vim kafka/config/server.properties
修改:
# The id of the broker. This must be set to a unique integer for each broker.
broker.id=2
- Configure environment variables
(1) Add kafka environment variable configuration in /etc/profile.d/my_env.sh file
[song@hadoop102 module]$ sudo vim /etc/profile.d/my_env.sh
Add the following content:
#KAFKA_HOME
export KAFKA_HOME=/opt/model/kafka
export PATH=$PATH:$KAFKA_HOME/bin
(2) Refresh the environment variables.
[song@hadoop102 model]$ source /etc/profile
(3) Distribute the environment variable file to other nodes and source it.
[song@hadoop102 model]$ sudo /home/atguigu/bin/xsync /etc/profile.d/my_env.sh
[song@hadoop103 model]$ source /etc/profile
[song@hadoop104 model]$ source /etc/profile
- Start the cluster
(1) Start the Zookeeper cluster first, and then start Kafka.
[song@hadoop102 kafka]$ zk.sh start
(2) Start Kafka on hadoop102, hadoop103, hadoop104 nodes in turn.
[song@hadoop102 kafka]$ bin/kafka-server-start.sh -daemon config/server.properties
[song@hadoop103 kafka]$ bin/kafka-server-start.sh -daemon config/server.properties
[song@hadoop104 kafka]$ bin/kafka-server-start.sh -daemon config/server.properties
Note: The path of the configuration file must be able to reach server.properties.
- Shut down the cluster
[song@hadoop102 kafka]$ bin/kafka-server-stop.sh
[song@hadoop103 kafka]$ bin/kafka-server-stop.sh
[song@hadoop104 kafka]$ bin/kafka-server-stop.sh
2.3. Cluster start and stop script
- Create the file mykafka.sh script file in the /home/song/bin directory
[song@hadoop102 bin]$ vim kf.sh
#! /bin/bash

case $1 in
"start"){


    for i in hadoop102 hadoop103 hadoop104
    do
        echo " --------启动 $i Kafka-------"
        ssh $i "/opt/module/kafka/bin/kafka-server-start.sh -daemon /opt/module/kafka/config/server.properties"
    done
};;
"stop"){


    for i in hadoop102 hadoop103 hadoop104
    do
        echo " --------停止 $i Kafka-------"
        ssh $i "/opt/module/kafka/bin/kafka-server-stop.sh "
    done
};;
esac
- Add execute permission
[song@hadoop102 bin]$ chmod +x kf.sh
- Start the cluster command
[song@hadoop102 ~]$ kf.sh start
- stop cluster command
[song@hadoop102 ~]$ kf.sh stop
Note: When stopping the Kafka cluster, be sure to wait for all Kafka node processes to stop before stopping the Zookeeper cluster. Because the Zookeeper cluster records the relevant information of the Kafka cluster, once the Zookeeper cluster is stopped first, the Kafka cluster has no way to obtain the information of the stopped process, and can only manually kill the Kafka process.
3. Maxwell installation and deployment
3.1 Introduction to Maxwell
3.1.1. Overview of Maxwell
Maxwell is an open source MySQL change data capture software written in Java by Zendesk. It will monitor the data change operations (including insert, update, delete) of the Mysql database in real time, and send the changed data to Kafka, Kinesi and other streaming data processing platforms in JSON format. Official website address: http://maxwells-daemon.io/
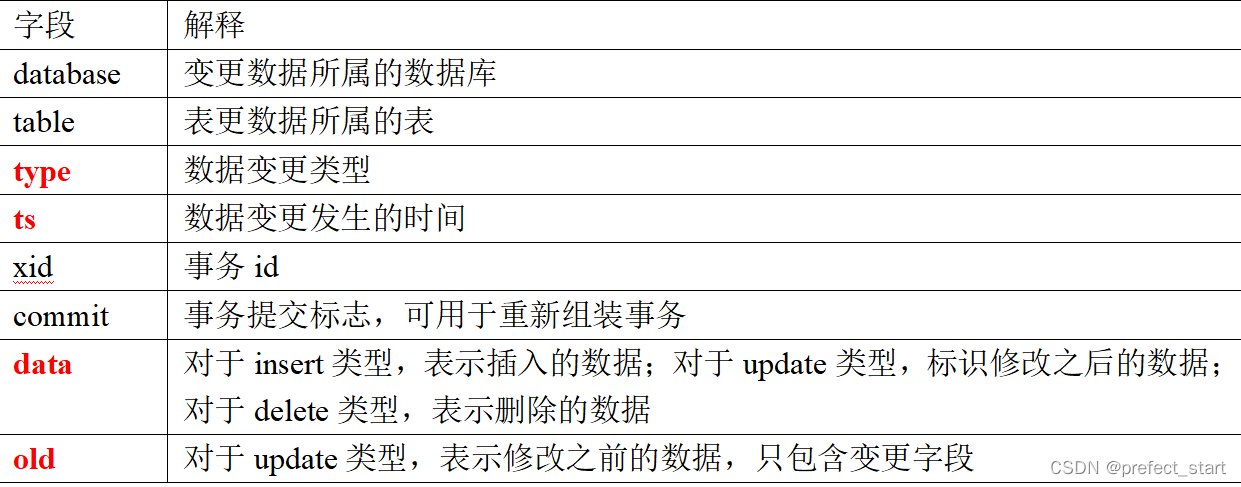
3.1.2, Maxwell output data format
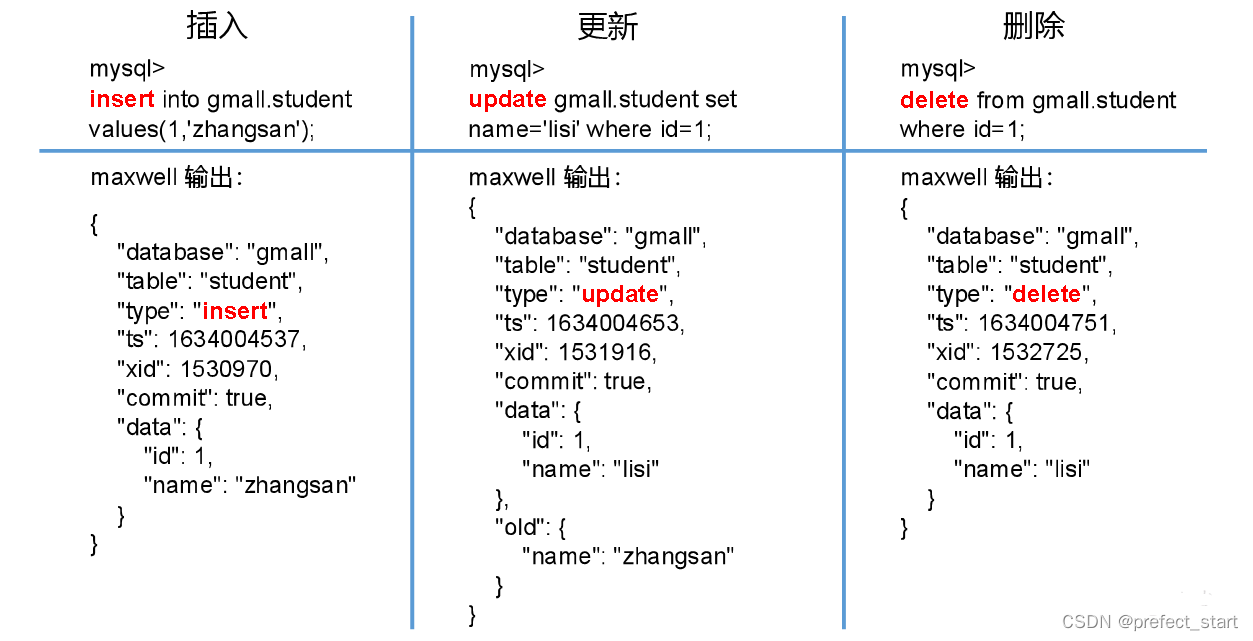
Note: The json field description output by Maxwell:
3.2, Maxwell principle
The working principle of Maxwell is to read the binary log (Binlog) of the MySQL database in real time, obtain the change data from it, and then send the change data to stream processing platforms such as Kafka in JSON format.
3.2.1, MySQL binary log
Binary log (Binlog) is a very important log of the MySQL server, which will save all data change records of the MySQL database. The main functions of Binlog include master-slave replication and data recovery. The working principle of Maxwell is closely related to master-slave replication.
3.2.2, MySQL master-slave replication
MySQL's master-slave replication is used to create a database environment exactly the same as the master database, which is called a slave database.
- The application scenarios of master-slave replication are as follows:
- Do database hot backup: After the master database server fails, you can switch to the slave database to continue working.
- Separation of reading and writing: the master database is only responsible for the write operation of business data, while multiple slave databases are only responsible for the query of business data. In the scenario of more reads and less writes, the work efficiency of the database can be improved.
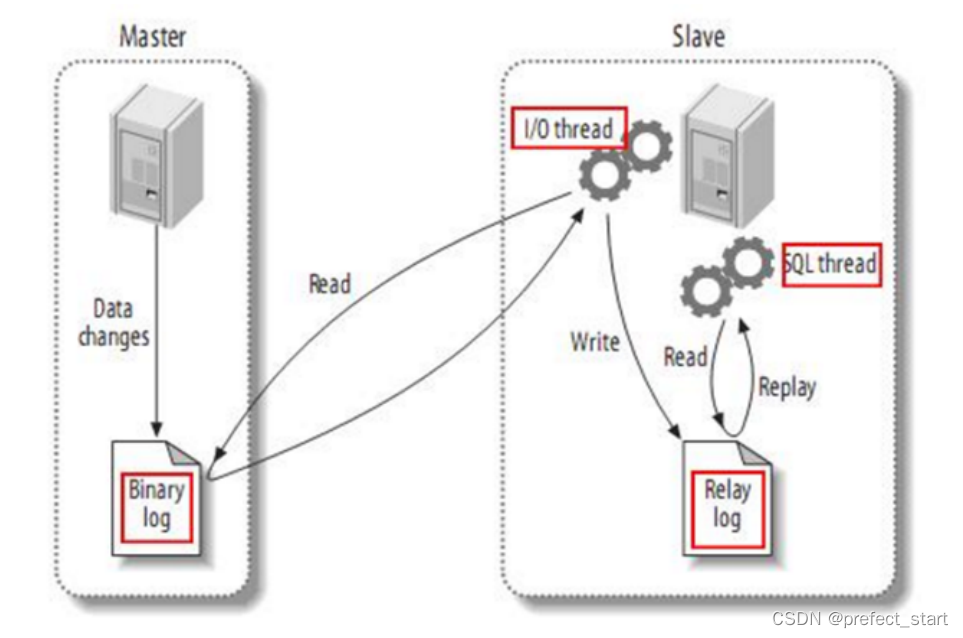
- Master-slave replication works as follows:
- The Master main library records the data changes and writes them to the binary log (binary log)
- Slave sends a dump protocol from the library to the mysql master, and copies the binary log events of the master main library to its relay log (relay log)
- Slave reads and replays the events in the relay log from the library, and synchronizes the changed data to its own database.
3.2.3 Maxwell principle
Disguise yourself as a slave, and follow the MySQL master-slave replication protocol to synchronize data from the master.
3.3, Maxwell deployment
3.3.1. Install Maxwell
- Download the installation package
地址:https://github.com/zendesk/maxwell/releases/download/v1.29.2/maxwell-1.29.2.tar.gz
Note: Maxwell-1.30.0 and above versions no longer support JDK1.8.- Upload the installation package to the /opt/software directory of the hadoop102 node.
Note: The installation package of the teaching version is used here. The teaching version has modified the original version and added the parameter of customizing the ts timestamp in the Maxwell output data. Please use the original version in the production environment .
- Extract the installation package to /opt/model
[song@hadoop102 maxwell]$ tar -zxvf maxwell-1.29.2.tar.gz -C /opt/model/
- modify name
[song@hadoop102 model]$ mv maxwell-1.29.2/ maxwell
3.3.2. Configure MySQL
3.3.2.1, enable MySQL Binlog
The Binlog of the MySQL server is not enabled by default. If you need to synchronize, you need to enable it first.
- Modify the MySQL configuration file /etc/my.cnf
[song@hadoop102 ~]$ sudo vim /etc/my.cnf
- Add the following configuration
[mysqld]

#数据库id
server-id = 1
#启动binlog,该参数的值会作为binlog的文件名
log-bin=mysql-bin
#binlog类型,maxwell要求为row类型
binlog_format=row
#启用binlog的数据库,需根据实际情况作出修改
binlog-do-db=gmall
Note: MySQL Binlog mode
- Statement-based: Based on statements, Binlog will record all SQL statements for write operations, including insert, update, delete, etc.
Advantages: Save space
Disadvantages: It may cause data inconsistency, for example, the insert statement contains the now() function. - Row-based: Based on rows, Binlog will record the changes of the row record after each write operation.
Advantages: Maintain absolute consistency of data.
Disadvantages: Take up a lot of space. - mixed: Mixed mode, the default is Statement-based, if the SQL statement may cause data inconsistency, it will automatically switch to Row-based.
Note: Maxwell requires Binlog to adopt Row-based mode.
- Restart the MySQL service
[song@hadoop102 ~]$ sudo systemctl restart mysqld
3.3.2.2. Create the database and user required by Maxwell
Maxwell needs to store some data required during its operation in MySQL, including the breakpoint position of binlog synchronization (Maxwell supports breakpoint resume), etc., so it is necessary to create a database and user for Maxwell in MySQL.
- create database
msyql> CREATE DATABASE maxwell;
- Adjust the MySQL database password level
mysql> set global validate_password_policy=0;
mysql> set global validate_password_length=4;
- Create a Maxwell user and give it the necessary permissions
mysql> CREATE USER 'maxwell'@'%' IDENTIFIED BY 'maxwell';
mysql> GRANT ALL ON maxwell.* TO 'maxwell'@'%';
mysql> GRANT SELECT, REPLICATION CLIENT, REPLICATION SLAVE ON *.* TO 'maxwell'@'%';
3.3.2.2, configure Maxwell
- Modify the Maxwell configuration file name
[song@hadoop102 maxwell]$ cd /opt/model/maxwell
[song@hadoop102 maxwell]$ cp config.properties.example config.properties
- Modify the Maxwell configuration file
[song@hadoop102 maxwell]$ vim config.properties

#Maxwell数据发送目的地,可选配置有stdout|file|kafka|kinesis|pubsub|sqs|rabbitmq|redis
producer=kafka
#目标Kafka集群地址
kafka.bootstrap.servers=hadoop102:9092,hadoop103:9092
#目标Kafka topic,可静态配置,例如:maxwell,也可动态配置,例如:%{database}_%{table}
kafka_topic=maxwell

#MySQL相关配置
host=hadoop102
user=maxwell
password=maxwell
jdbc_options=useSSL=false&serverTimezone=Asia/Shanghai
4. Use of Maxwell
4.1. Start the Kafka cluster
If the destination of data sent by Maxwell is the Kafka cluster, you need to ensure that the Kafka cluster is started.
4.2, Maxwell start and stop
- Start Maxwell
[song@hadoop102 ~]$ /opt/model/maxwell/bin/maxwell --config /opt/model/maxwell/config.properties --daemon
- Stop Maxwell
[song@hadoop102 ~]$ ps -ef | grep maxwell | grep -v grep | grep maxwell | awk '{print $2}' | xargs kill -9
- Maxwell start and stop script
- Create and edit Maxwell start and stop scripts
[song@hadoop102 bin]$ vim mxw.sh
- The script content is as follows
#!/bin/bash

MAXWELL_HOME=/opt/module/maxwell

status_maxwell(){


    result=`ps -ef | grep com.zendesk.maxwell.Maxwell | grep -v grep | wc -l`
    return $result
}


start_maxwell(){


    status_maxwell
    if [[ $? -lt 1 ]]; then
        echo "启动Maxwell"
        $MAXWELL_HOME/bin/maxwell --config $MAXWELL_HOME/config.properties --daemon
    else
        echo "Maxwell正在运行"
    fi
}


stop_maxwell(){


    status_maxwell
    if [[ $? -gt 0 ]]; then
        echo "停止Maxwell"
        ps -ef | grep com.zendesk.maxwell.Maxwell | grep -v grep | awk '{print $2}' | xargs kill -9
    else
        echo "Maxwell未在运行"
    fi
}


case $1 in
    start )
        start_maxwell
    ;;
    stop )
        stop_maxwell
    ;;
    restart )
       stop_maxwell
       start_maxwell
    ;;
esac
4.3. Incremental data synchronization
- Start the Kafka consumer
[atguigu@hadoop102 kafka]$ bin/kafka-console-consumer.sh --bootstrap-server hadoop102:9092 --topic maxwell
- simulation generated data
[atguigu@hadoop102 db_log]$ java -jar gmall2020-mock-db-2021-01-22.jar
- Observe Kafka consumers
{

    "database":"gmall","table":"comment_info","type":"insert","ts":1634023510,"xid":1653373,"xoffset":11998,"data":{

    "id":1447825655672463369,"user_id":289,"nick_name":null,"head_img":null,"sku_id":11,"spu_id":3,"order_id":18440,"appraise":"1204","comment_txt":"评论内容:12897688728191593794966121429786132276125164551411","create_time":"2020-06-16 15:25:09","operate_time":null}}
{

    "database":"gmall","table":"comment_info","type":"insert","ts":1634023510,"xid":1653373,"xoffset":11999,"data":{

    "id":1447825655672463370,"user_id":774,"nick_name":null,"head_img":null,"sku_id":25,"spu_id":8,"order_id":18441,"appraise":"1204","comment_txt":"评论内容:67552221621263422568447438734865327666683661982185","create_time":"2020-06-16 15:25:09","operate_time":null}}
4.4. Full synchronization of historical data
Use the function of Maxwell real-time incremental synchronization of MySQL changed data. But sometimes only incremental data is not enough, we may need to use a complete data set from the history to the present in the MySQL database. This requires us to perform a full synchronization of historical data before incremental synchronization. This ensures a complete dataset.
4.4.1、Maxwell-bootstrap
Maxwell provides the bootstrap function to perform full synchronization of historical data. The command is as follows:
[song@hadoop102 maxwell]$ /opt/model/maxwell/bin/maxwell-bootstrap --database gmall --table user_info --config /opt/model/maxwell/config.properties
4.4.2, boostrap data format
The format of output data synchronized by bootstrap is as follows:
{


    "database": "fooDB",
    "table": "barTable",
    "type": "bootstrap-start",
    "ts": 1450557744,
    "data": {

    }
}
{


    "database": "fooDB",
    "table": "barTable",
    "type": "bootstrap-insert",
    "ts": 1450557744,
    "data": {


        "txt": "hello"
    }
}
{


    "database": "fooDB",
    "table": "barTable",
    "type": "bootstrap-insert",
    "ts": 1450557744,
    "data": {


        "txt": "bootstrap!"
    }
}
{


    "database": "fooDB",
    "table": "barTable",
    "type": "bootstrap-complete",
    "ts": 1450557744,
    "data": {

    }
}
Precautions:
- The first piece of data whose type is bootstrap-start and the last piece of data whose type is bootstrap-complete are the signs of the start and end of bootstrap and do not contain data. Only the data whose type is bootstrap-insert in the middle contains data.
- The ts of all records output by a bootstrap are the same, which is the time when the bootstrap starts.