Introduce pixel-level image processing based on Bitmap in System.Drawing in .NET library.
Briefly describe the implementation of input and output of applets based on the Windows Form desktop application framework. (using pictureBox control)
-
Visual Studio 2015 (08/10/12/13/17 are available)
-
Based on .NET 2.0 by default (higher versions are also available)
-
Any image file
Method steps
1. Note: If you have a WinForm foundation, you can go directly to step 5 or 7.
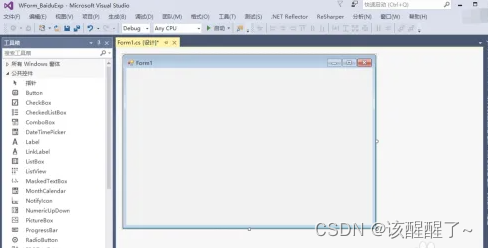
First, open Visual Studio and create a Windows Forms application in C# language .
(i.e. using the classic WinForm framework)
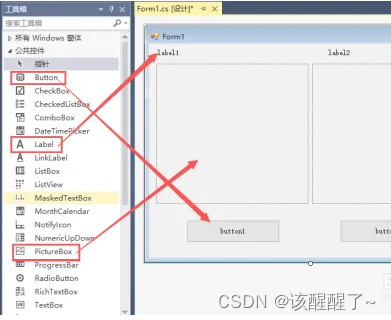
2. From the toolbox on the left (if there is no need to call it out), drag the label label, pictureBox picture box, and button button to the design window.
Third, modify the names of these controls in the property pane on the right (the name of the control object when programming), and the Text property (display content).
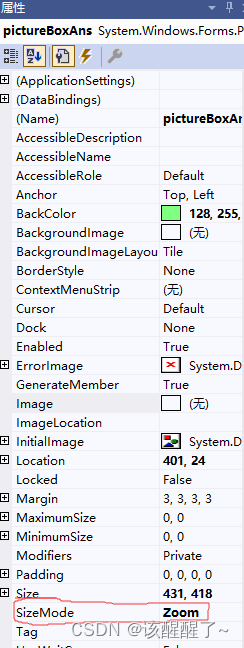
pictureBox can also modify the BorderStyle to make the border visible
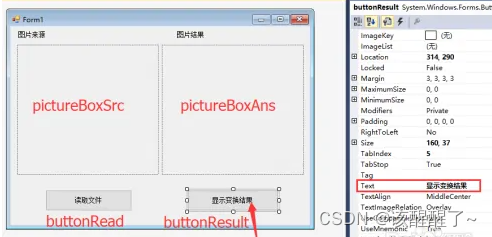
Fourth, double-click the "Read File" button (buttonRead), and the buttonRead_Click event processing function is automatically added to the code.
Write the code in it as shown in the figure:
1. Open the file name acquisition window and prompt the user to select a file;
2. Then get the file name;
3. Read the picture and set it to the picture frame.
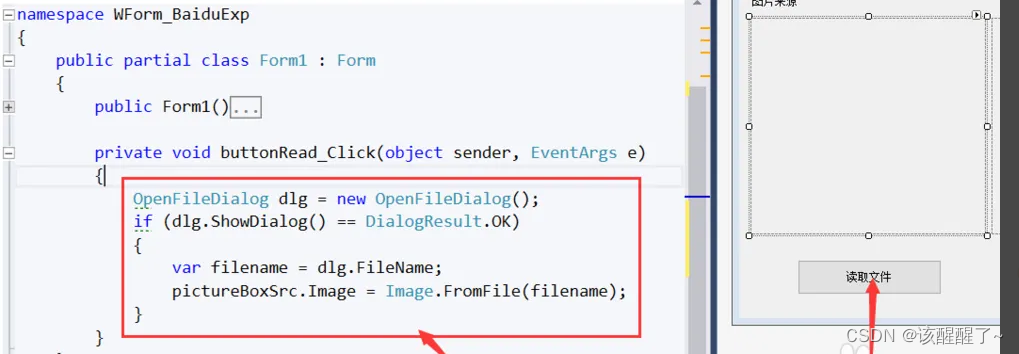
            OpenFileDialog dlg = new OpenFileDialog();
            if (dlg.ShowDialog()==DialogResult.OK)
            {
                var filename = dlg.FileName;
                pictureBoxSrc.Image = Image.FromFile(filename);
            }
The red box is the condition code of the read file button
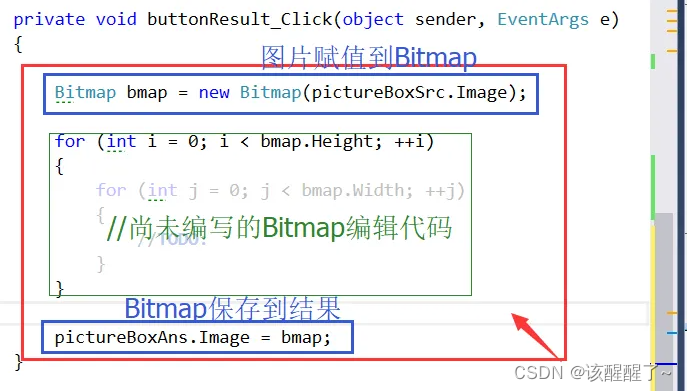
5. Next, double-click the "Show Transformation Result" (buttonResult) button, and also write the code in the corresponding event function:
1. Copy the image to a new Bitmap object
2. Empty Bitmap object processing code
3. Set the processed Bitmap object to the result picture box
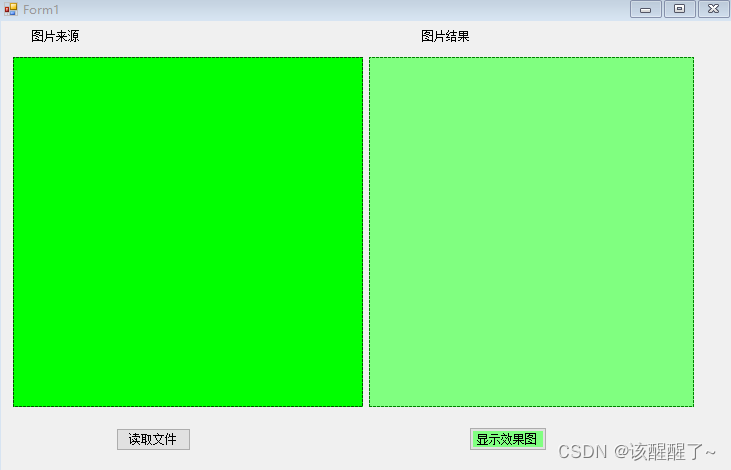
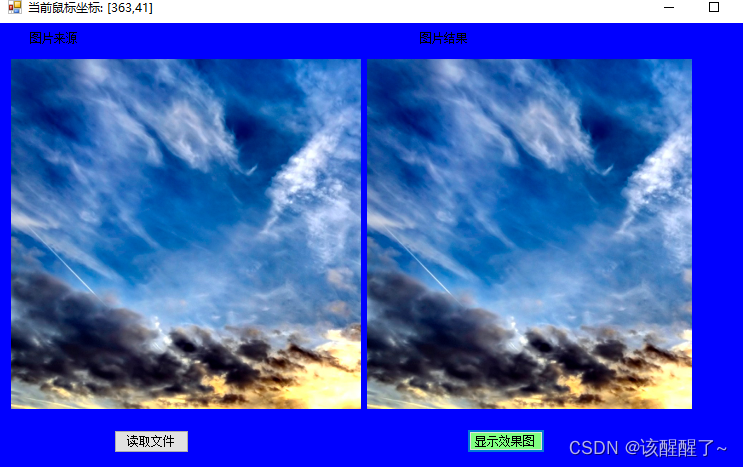
Sixth, run the program now, click the button on the left to select the file, and click the button on the right to display the result, as shown in the figure, the program framework is OK.
Next, we can solve the processing code of Bitmap.
Don't care about the background color and the coordinates of the upper right corner, these can be added to the window program in the code
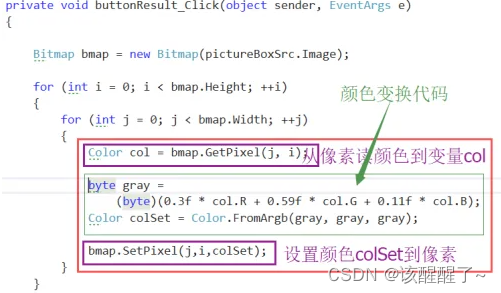
Seven, Bitmap processing code part writing:
In the double for loop,
1. Use getPixel(x coordinate, y coordinate) to get the Color of each pixel and save it to the variable col.
2. <Calculate the transformed color colSet according to col>
3. Use setPixel(x coordinate, y coordinate, Color object) to set back to Bitmap.
Note: Part 2 color transformation code is modifiable as needed
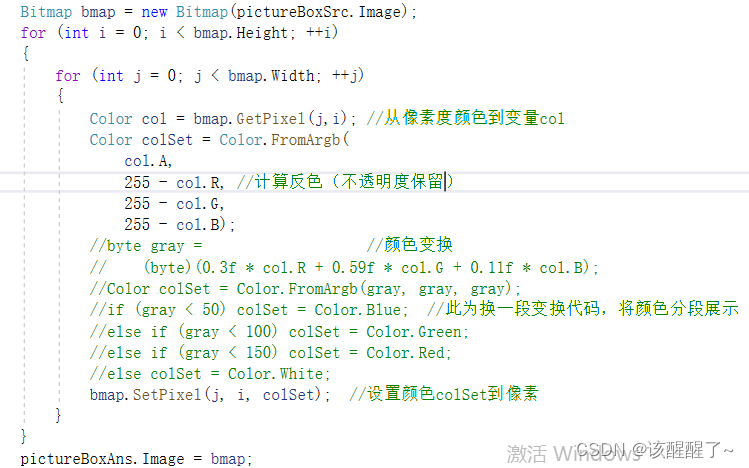
        private void buttonBoxAns_Click(object sender, EventArgs e)
        {
            Bitmap bmap = new Bitmap(pictureBoxSrc.Image);
            for (int i = 0; i < bmap.Height; ++i)
            {
                for (int j = 0; j < bmap.Width; ++j)
                {
                    Color col = bmap.GetPixel(j,i); //从像素度颜色到变量col
                    byte gray =                   //颜色变换
                        (byte)(0.3f * col.R + 0.59f * col.G + 0.11f * col.B);
                    Color colSet = Color.FromArgb(gray, gray, gray);
                    bmap.SetPixel(j, i, colSet);  //设置颜色colSet到像素
                }
            }
            pictureBoxAns.Image = bmap;
        }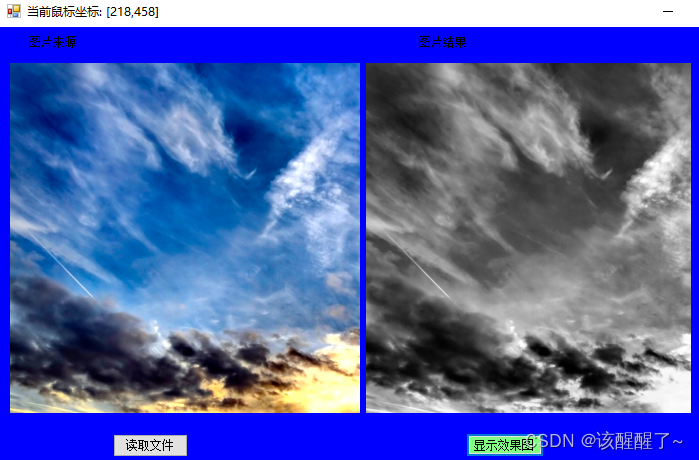
Eighth, according to the above color transformation code (grayscale calculation and grayscale color setting), the execution result obtained is shown in the figure.
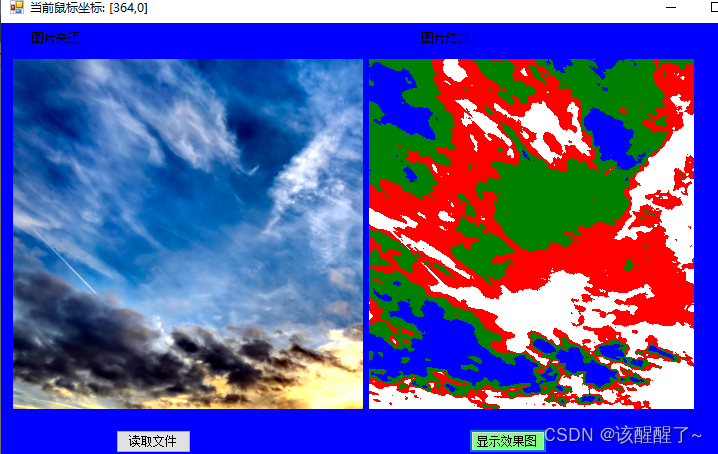
Nine, similarly, the color transformation code in the figure below (grayscale calculation and then if-else segmented color setting), the execution result is shown in the figure.

                for (int j = 0; j < bmap.Width; ++j)
                {
                    Color col = bmap.GetPixel(j,i); //从像素度颜色到变量col
                    byte gray =                   //颜色变换
                        (byte)(0.3f * col.R + 0.59f * col.G + 0.11f * col.B);
                    Color colSet = Color.FromArgb(gray, gray, gray);
                    if (gray < 50) colSet = Color.Blue;  //此为换一段变换代码,将颜色分段展示
                    else if (gray < 100) colSet = Color.Green;
                    else if (gray < 150) colSet = Color.Red;
                    else colSet = Color.White;
                    bmap.SetPixel(j, i, colSet);  //设置颜色colSet到像素
} 
Ten, the following color transformation code (calculate inverse color), the execution result is shown in the figure. It can be seen that the color transformation code is very flexible, we can modify this part/add a variety of options to achieve rich image processing effects.
                        Color colSet = Color.FromArgb(
                        col.A,
                        255 - col.R, //计算反色(不透明度保留)
                        255 - col.G,
                        255 - col.B);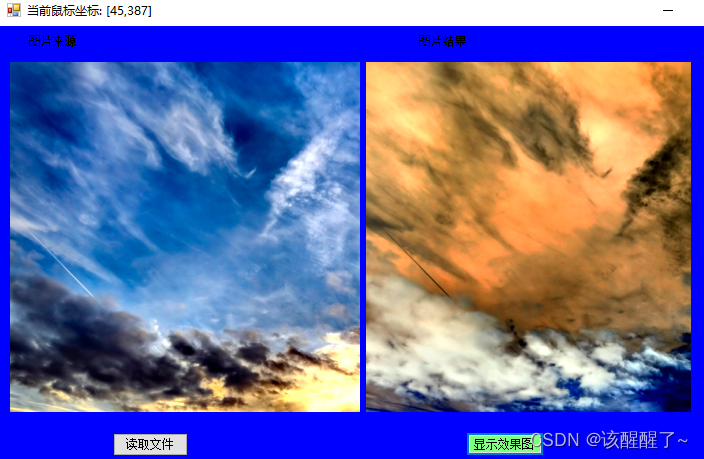
Notice
-
The input and output of this program use the controls in the WinForm framework in the .NET library, such as pictuteBox, which are not available in other frameworks.
-
The image processing of this program uses the Bitmap type in the .NET library, which belongs to System.Drawing, and the usage is the same in other frameworks.
-
If there is only a part of the output picture at the end, or if the complete picture cannot be displayed, just change the mode of one of the window controls to zoom.
-