Preparation
Verify AWS
You can manually start an EC2 instance to verify the VPC, subnet, internet gateway and routetable you created, to ensure that the connection will not fail after the instance is created. You can follow the link below to configure to avoid connection
timeout
https://docs.aws .amazon.com/zh_cn/AWSEC2/latest/UserGuide/TroubleshootingInstancesConnecting.html#TroubleshootingInstancesConnectionTimeout
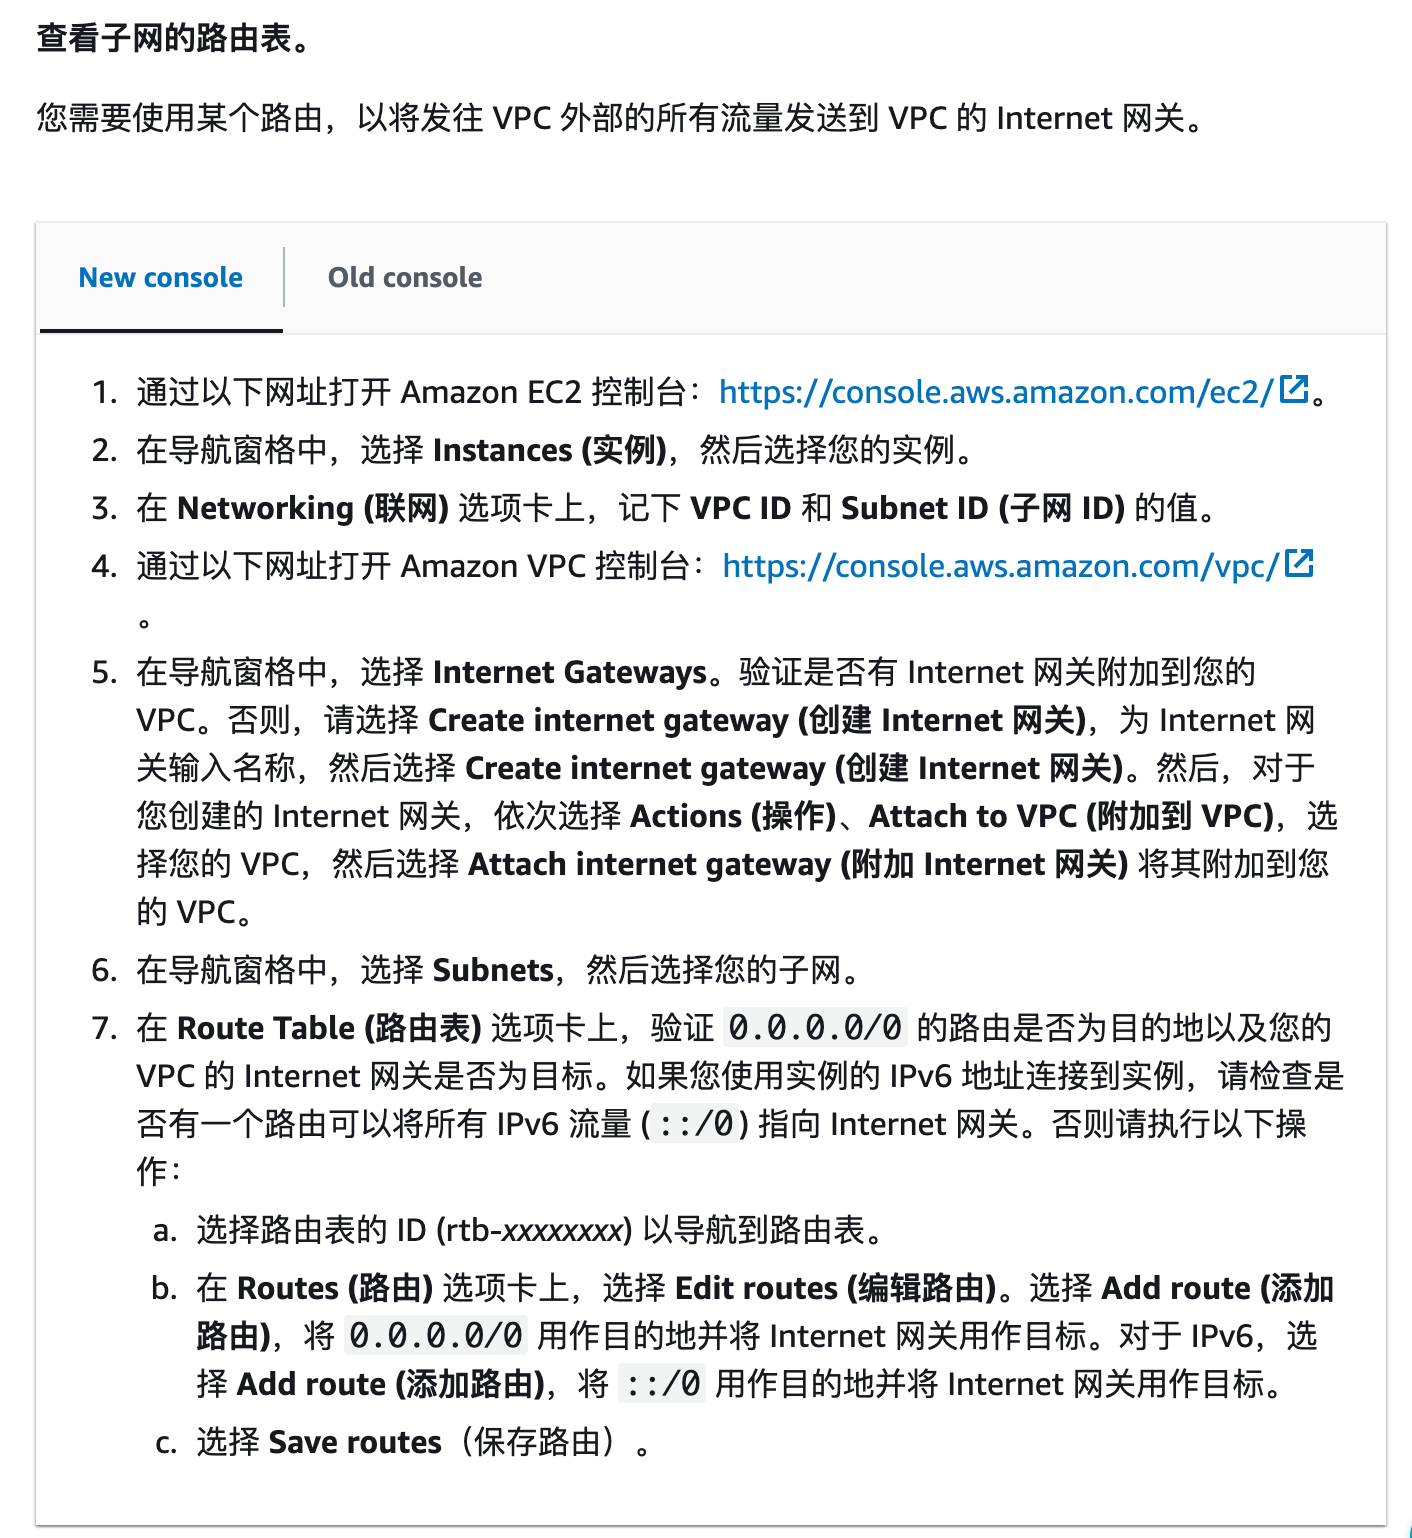
When the manually started instance can start and connect normally, it means that there is no problem with the VPC, subnet and other configurations, which can be recorded for subsequent steps
packer operation
Create HCL file
Refer to the official document and save the following content aws-ubuntu.pkr.hcl as Note: vpc_id, subnet_id, ssh_keypair_name, ssh_private_key_file These parameters should be replaced with their own corresponding parameters or commented out
packer {


	required_plugins {


		amazon = {


			version = ">= 1.2.1"
			source = "github.com/hashicorp/amazon"
		}
	}
}

source "amazon-ebs" "ubuntu" {


	#AMI名称
	ami_name = "learn-packer-linux-aws"
	instance_type = "t2.micro"
	#可用区域
	region = "eu-central-1"
	source_ami_filter {


		filters = {


			#name = "ubuntu/images/*ubuntu-xenial-16.04-amd64-server-*"
			#packer示例的镜像已经不可用,可以在AWS的AMI里面找到可用镜像
			name = "ubuntu/images/hvm-ssd/ubuntu-jammy-22.04-amd64-server-20230208"
			root-device-type = "ebs"
			virtualization-type = "hvm"
		}
		most_recent = true
		owners = ["099720109477"]
	}
	#用户名
	ssh_username = "ubuntu"
	skip_region_validation = true
	ssh_agent_auth = false
	#是否分配公网ip
	associate_public_ip_address = true

	#ssh登录连接超时设置, public_ip表示通过公网ip连接,private_ip表示通过局域网ip连接
	ssh_interface = "public_ip"
	ssh_timeout = "5m"

	#AWS的VPC和subnet,不指定的话会使用默认的VPC和subnet, 这里必须替换成自己的
	vpc_id = "vpc-015962cc334246a68"
	subnet_id = "subnet-038a40d7d3eac7"


	#AWS keypair,可以用已经存在的keypair,不设置keypair相关参数的话packer会自动生成keypair, 这里必须替换成自己的或者注释掉
	ssh_keypair_name = "keypair"
	ssh_private_key_file = "packer_tutorial/keypair.pem"
}


build {


	name = "learn-packer"
	sources = [
	"source.amazon-ebs.ubuntu"
	]
}
If you need to specify when starting the instance, tagyou can sourceadd tagsand run_tagsthese two parameters in the module to specify, for example:
source "amazon-ebs" "ubuntu" {


	tags = {

     appname = "app1" }
	run_tags = {

     appname = "app1" }
	#AMI名称
	ami_name = "learn-packer-linux-aws"
	instance_type = "t2.micro"
	#可用区域
	region = "eu-central-1"
	source_ami_filter {


		filters = {


			name = "ubuntu/images/hvm-ssd/ubuntu-jammy-22.04-amd64-server-20230208"
			root-device-type = "ebs"
			virtualization-type = "hvm"
		}
		most_recent = true
		owners = ["099720109477"]
	}
}
For more parameters, please refer to https://developer.hashicorp.com/packer/plugins/builders/amazon/ebs
set environment variables
AWS_ACCESS_KEY_IDSet and AWS_SECRET_ACCESS_KEYenvironment variables in the following way
export AWS_ACCESS_KEY_ID="<YOUR_AWS_ACCESS_KEY_ID>"
export AWS_SECRET_ACCESS_KEY="<YOUR_AWS_SECRET_ACCESS_KEY>"
It can also builderbe specified in modules, for example:
 "builders": [{


    "type": "amazon-ebs",
    "access_key": "YOUR_AWS_ACCESS_KEY_ID",
    "secret_key": "YOUR_AWS_SECRET_ACCESS_KEY"
     }]
Create AMIs
Execute the following command, and then observe the instance status in aws
packer init .
packer fmt .
packer validate .
packer build aws-ubuntu.pkr.hcl
reference
1. https://developer.hashicorp.com/packer/tutorials/aws-get-started/aws-get-started-build-image
2. https://developer.hashicorp.com/packer/plugins/builders/amazon/ebs
3. https://thefirstapril.com/2019/07/03/Using-Packer-to-create-AMI-Amazon-Machine-Images
4. https://stackoverflow.com/questions/59440394/where-does-packer-store-the-private-key