Table of contents
The use of WIFI is already very common. Although mobile phones, tablets, cars, etc. can use wired networks, sometimes many devices have difficulties in wiring. At this time, WIFI is a good choice. The punctual atom I.MX6U-ALPHA development board supports WIFI with USB and SDIO interfaces. In this chapter, we will learn how to
use USB and SDIO WIFI on the I.MX6U-ALPHA development board.
Add and compile WIFI driver
The I.MX6U-ALPHA development board of Punctual Atom currently supports two kinds of WIFI interfaces: USB and SDIO . Among them, the chip used by USB WIFI is RTL8188EUS or TL8188CUS, and the chip used by SDIO interface WIFI is RTL8189FS, also known as RTL8189FTV. Both of these are WIFI chips produced by realtek.
We do not need to write the WIFI driver, because realtek provides the WIFI driver source code, so we only need to add the WIFI driver source code to the Linux kernel, and then configure it through the graphical interface and choose to compile it into a module .
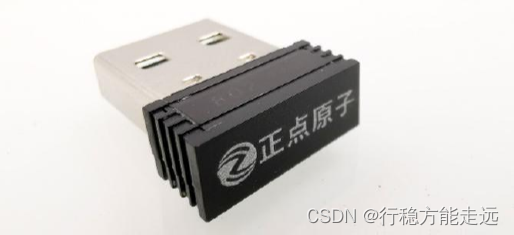
The punctual atom I.MX6U-ALPHA development board will give a RTL8188EUS/CUS USB WIFI by default, as shown in Figure 70.1.1:
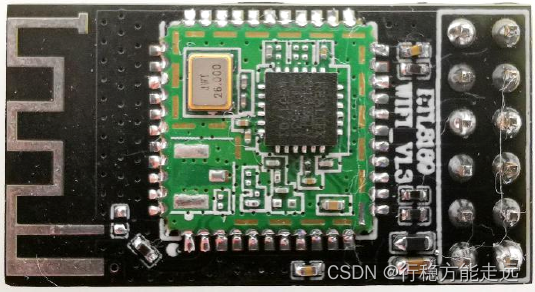
In addition, Zhengdian Atom also has a SDIO WIFI using RTL8189FTV chip, as shown in Figure 70.1.2:
Add WIFI driver to Linux kernel
1. rtl81xx driver file browsing
The WIFI driver source code has been placed in the development board CD, the path is: 1. Routine source code -> 5. Module driver source code -> 1. RTL8XXX WIFI driver source code -> realtek. The driver source codes of RTL8188EUS and RTL8189FS are stored in the realtek directory, as shown in Figure 70.1.1.1:

The RTL8188EUS driver is stored under rtl8188EUS, the driver files of RTL8189FS/FTV are stored under RTL8189FS, and the drivers of RTL8188CUS and RTL8192CU are stored under rtl8192CU. Note! The USB WIFI module provided by the punctual atomic ALPHA development board is divided into two types: RTL8188EUS and RTL8188CUS. These two USB WIFI drivers are different!
The Kconfig file is the configuration interface document of the WIFI driver. In this way, you can choose whether to compile the WIFI driver through the Linux kernel graphical configuration interface. The content of the Kconfig file is as follows:
示例代码70.1.1.1 Kconfig 文件内容
1 menuconfig REALTEK_WIFI
2 tristate "Realtek wifi"
3
4 if REALTEK_WIFI
5
6 choice
7 prompt "select wifi type"
8 default RTL8189FS
9
10 config RTL8189FS
11 depends on REALTEK_WIFI
12 tristate "rtl8189fs/ftv sdio wifi"
13
14 config RTL8188EUS
15 depends on REALTEK_WIFI
16 tristate "rtl8188eus usb wifi"
17
18 config RTL8192CU
19 depends on REALTEK_WIFI
20 tristate "Realtek 8192C USB WiFi"
21
22 endchoice
23 endif
The content of the Makefile file is as follows
示例代码70.1.1.2 Makefile 文件内容
1 obj-$(CONFIG_RTL8188EUS) += rtl8188EUS/
2 obj-$(CONFIG_RTL8189FS) += rtl8189FS/
3 obj-$(CONFIG_RTL8192CU) += rtl8192CU/
2. Delete the RTL8192CU driver that comes with the linux kernel
The linux kernel used in this tutorial has its own RTL8192CU/8188CUS driver, but after testing, the driver that comes with the linux kernel is unstable! Therefore, it is not recommended for everyone to use. It is better to use the rtl8192CU driver we provide in Figure 70.1.1.1. Before compiling, you must first shield the driver that comes with the kernel, otherwise it may cause compilation errors. The method is very simple. Open drivers/net/wireless/rtlwifi/Kconfig, find the content shown below and delete it:
示例代码70.1.1.3 drivers/net/wireless/rtlwifi/Kconfig 文件内容
1 config RTL8192CU
2 tristate "Realtek RTL8192CU/RTL8188CU USB Wireless Network Adapter"
3 depends on USB
4 select RTLWIFI
5 select RTLWIFI_USB
6 select RTL8192C_COMMON
7 ---help---
8 This is the driver for Realtek RTL8192CU/RTL8188CU 802.11n USB
9 wireless network adapters.
10
11 If you choose to build it as a module, it will be called rtl8192cu
Delete lines 1~11 in the sample code 70.1.1.2 from drivers/net/wireless/rtlwifi/Kconfig.
Continue to open drivers/net/wireless/rtlwifi/Makefile and find the following:
示例代码70.1.1.4 drivers/net/wireless/rtlwifi/Makefile 文件内容
1 obj-$(CONFIG_RTL8192CU) += rtl8192cu/
Shield this line in the sample code 70.1.1.3 from drivers/net/wireless/rtlwifi/Makefile, so far, the RTL8192CU/8188CU driver that comes with the linux kernel is shielded.
3. Add the rtl81xx driver to the Linux kernel
Copy the entire directory of realtek to the drivers/net/wireless directory in the Linux kernel source code under ubuntu, where all WIFI driver files are stored. After the copy is completed, the directory is shown in Figure 70.1.1.1:

The box selected in Figure 70.1.1.1 is the realtek directory we just copied in.
4. Modify drivers/net/wireless/Kconfig
Open drivers/net/wireless/Kconfig, and add the following line in it:
source "drivers/net/wireless/realtek/Kconfig"
The content of the Kconfig file after adding is as follows:
示例代码70.1.1.5 drivers/net/wireless/Kconfig 文件内容
1 #
2 # Wireless LAN device configuration
3 #
4
5 menuconfig WLAN
......
286 source "drivers/net/wireless/rsi/Kconfig"
287 source "drivers/net/wireless/realtek/Kconfig"
286
289 endif # WLAN
Line 287 is the content added to drivers/net/wireless/Kconfig, so that the WIFI driver configuration interface will appear on the Linux kernel configuration interface.
5. Modify drivers/net/wireless/Makefile
Open drivers/net/wireless/Makefile and add the following line in it:
obj-y += realtek/
The content of the Makefile file after modification is as follows:
示例代码70.1.1.6 drivers/net/wireless/Makefile 文件内容
1 #
2 # Makefile for the Linux Wireless network device drivers.
3 #
4
5 obj-$(CONFIG_IPW2100) += ipw2x00/
......
62 obj-$(CONFIG_CW1200) += cw1200/
63 obj-$(CONFIG_RSI_91X) += rsi/
64
65 obj-y += realtek/
Line 65, compile the content in realtek, so far, all the content to be modified in the Linux kernel is completed.
Configure the Linux kernel
It is necessary to configure the Linux kernel before compiling the RTL8188 and RTL8189 drivers.
1. Configure USB support device
The configuration path is as follows:
-> Device Drivers
	-> <*> USB support
		-> <*> Support for Host-side USB
		-> <*> EHCI HCD (USB 2.0) support
		-> <*> OHCI HCD (USB 1.1) support
		-> <*> ChipIdea Highspeed Dual Role Controller
			-> [*] ChipIdea device controller
			-> [*] ChipIdea host controller
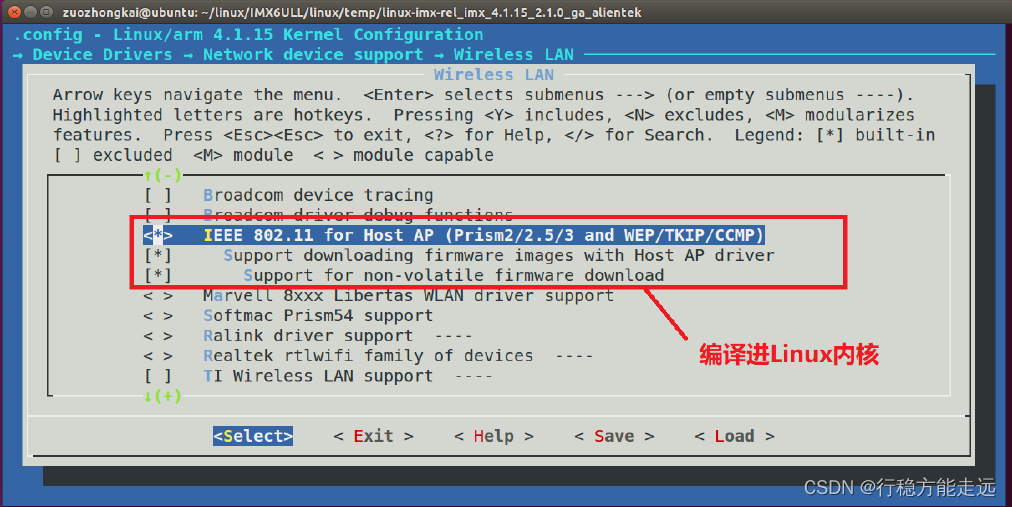
2. Configuration supports WIFI devices
The configuration path is as follows:
-> Device Drivers
	-> [*] Network device support
		-> [*] Wireless LAN
			-> <*> IEEE 802.11 for Host AP (Prism2/2.5/3 and WEP/TKIP/CCMP)
				-> [*] Support downloading firmware images with Host AP driver
				-> [*] Support for non-volatile firmware download
After configuration, it is shown in Figure 70.1.2.1:
3. Configuration supports IEEE 802.11
The configuration path is as follows:
-> Networking support
	-> -*- Wireless
		-> [*] cfg80211 wireless extensions compatibility
		-> <*> Generic IEEE 802.11 Networking Stack (mac80211)
The configuration is shown in Figure 70.1.2.2:

After configuration, recompile the Linux kernel to get a new zImage, and then use the newly compiled zImage to start the system.
Compile WIFI driver
Execute the "make menuconfig" command to open the Linux kernel configuration interface, and then choose to compile the rtl81xx driver into a module according to the following path:
-> Device Drivers
	-> Network device support (NETDEVICES [=y])
		-> Wireless LAN (WLAN [=y])
			-> Realtek wifi (REALTEK_WIFI [=m])
				-> rtl8189ftv sdio wifi
					-> rtl8188eus usb wifi
					-> Realtek 8192C USB WiFi
The configuration result is shown in Figure 70.1.3.1:
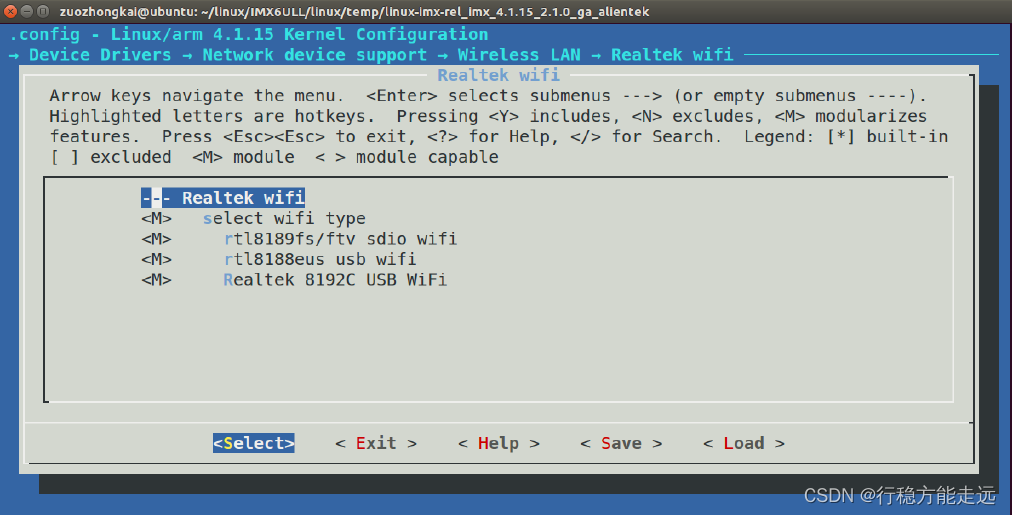
The configuration interface in Figure 70.1.3.1 is the WIFI configuration interface we added. Select "rtl8189fs/ftv sdio wifi", "rtl8188eus usb wifi" and "Realtek 8192C USB WiFi" to compile them into modules. Execute the following command to compile the module:
make modules -j12 //编译驱动模块
After compiling, three .ko files, 8188eu.ko, 8189fs.ko and 8192cu.ko, will be generated in the rtl8188EUS, rtl8189FS and rtl8192CU folders respectively. The result is shown in Figure 70.1.3.2: 8188eu in Figure

70.1.3.2 .ko, 8189fs.ko and 8192cu.ko are the driver module files of RTL8188EUS, RTL8189FS and RTL8188CUS/8192CU we need, copy these three files to the rootfs/lib/modules/4.1.15 directory, the command is as follows:
sudo cp 8189fs.ko /home/zuozhongkai/linux/nfs/rootfs/lib/modules/4.1.15/ -rf
sudo cp 8188eu.ko /home/zuozhongkai/linux/nfs/rootfs/lib/modules/4.1.15/ -rf
sudo cp 8192cu.ko /home/zuozhongkai/linux/nfs/rootfs/lib/modules/4.1.15/ -rf
Because we have reconfigured the Linux kernel, we also need to use a new zImage to start, copy the newly compiled zImage image file to the tftpboot directory in Ubuntu, and the command is as follows:
cp arch/arm/boot/zImage /home/zuozhongkai/linux/tftpboot/ -f
Then reboot the board! ! !
Driver Load Test
1. RTL8188 USB WIFI driver test
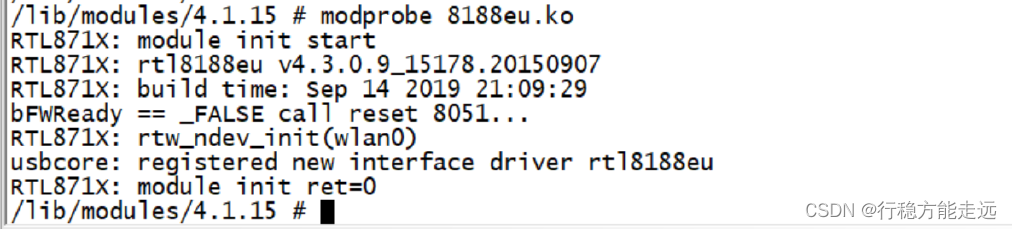
After restarting, we try to load the three driver files 8188eu.ko, 8189fs.ko and 8192cu.ko, first test the driver file of RTL8188, and insert the RTL8188 WIFI module into the USB HOST interface of the development board. Enter the directory lib/modules/4.1.15, and enter the following command to load the driver module 8188eu.ko:
depmod //第一次加载驱动的时候需要运行此命令
modprobe 8188eu.ko //RTL8188EUS 模块加载8188eu.ko 模块
modprobe 8192cu.ko //RTL8188CUS 模块加载8192cu.ko 模块
If the driver is loaded successfully, as shown in Figure 70.1.4.1:
Enter the "ifconfig -a" command to check whether the wlanX (X=0….n) network card exists, generally it is wlan0, unless there are multiple WIFI modules working on the board, the result is shown in Figure 70.1.4.2:
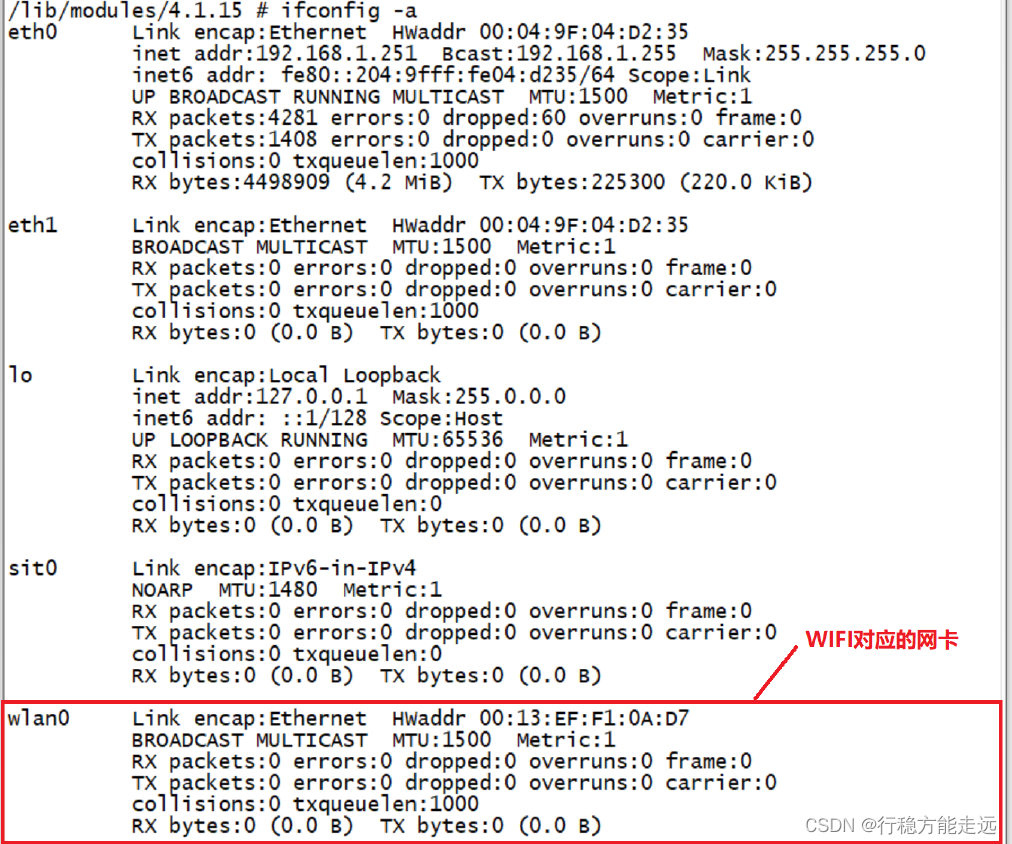
As can be seen from Figure 70.1.4.2, the current development board has a network card called “wlan0”, which is the network card corresponding to RTL8188.
2. RTL8189 SDIO WIFI driver test
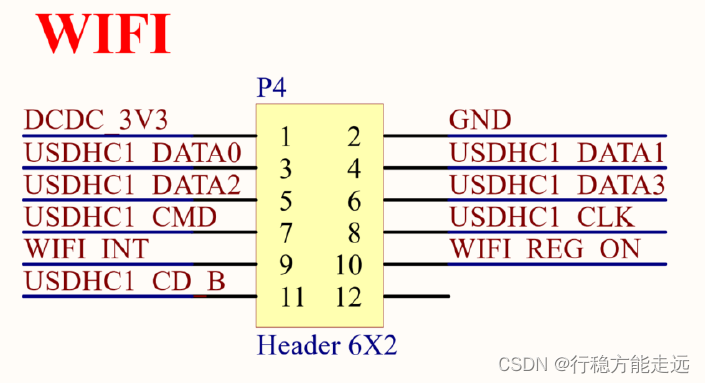
After testing RTL8188, test the SDIO WIFI of RTL8189 again, because the SDIO WIFI interface of the I.MX6U-ALPHA development board shares the same SDIO interface with the SD card. Therefore, SD card and SDIO WIFI can only be selected, and only one can work at a time, so when testing RTL8189 SDIO WIFI, it is necessary to unplug and insert the SD card. The schematic diagram of SDIO WIFI interface
is shown in Figure 70.1.4.3:
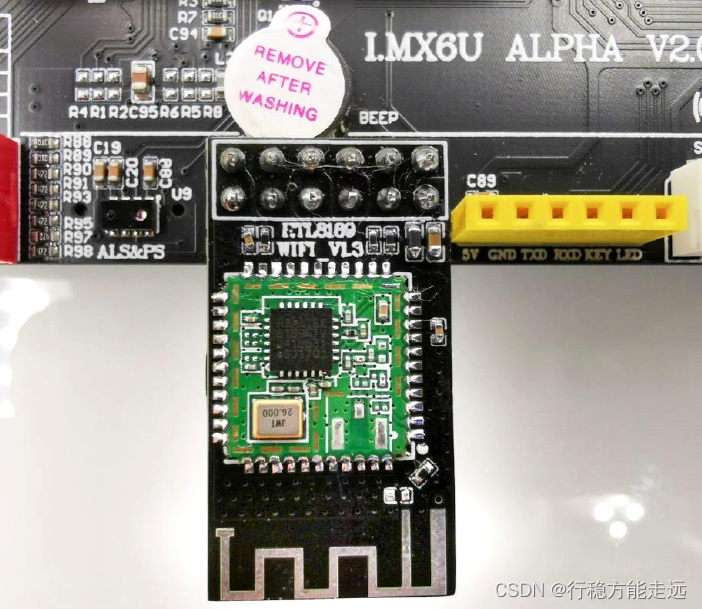
Before the test starts, pull out the SD card first, and then insert the RTL8189 SDIO WIFI module into the SDIO WIFI socket, as shown in Figure 70.1.4.4:
After the SDIO WIFI is connected to the development board, you can test it. Enter the following command to load the 8189fs.ko driver module:
depmod //第一次加载驱动的时候需要运行此命令
modprobe 8189eu.ko //加载驱动模块
If the driver is loaded successfully, as shown in Figure 70.1.4.5:

It can be seen from 70.1.4.5 that the RTL8189 SDIO WIFI driver is loaded successfully. Also use the "ifconfig -a" command to check whether there is a wlanX (X=0...n) network card. If there is, it means that the RTL8189 SDIO WIFI driver is working normally .
Regardless of whether it is RTL8188 USB WIFI or RTL8189 SDIO WIFI, the driver test works normally, but we must be able to connect to the Internet. What is the use of him if we cannot connect to the Internet? If WIFI wants to connect to the Internet, some other third-party components need to be transplanted, otherwise the router cannot be connected. Next, we will transplant these third-party components.
wireless tools porting and testing
wireless tools porting
wireless tools is a collection of tools for operating WIFI, including the following tools:
- ①, iwconfig : Set wireless network related parameters.
- ②, iwlist : Scan the current wireless network information to obtain WIFI hotspots.
- ③, iwspy: Get the quality of each node link.
- ④, iwpriv: operate WirelessExtensions specific driver.
- ⑤, ifrename: naming interfaces based on various static standards.
The two tools we most commonly use are iwlist and iwconfig. First, we have obtained the corresponding source code package. Here we have put it in the development board CD. The path is: 1. Routine source code-"7. Third-party library source code-"iwlist_for_visteon -master.tar.bz2.
Copy iwlist_for_visteon-master.tar.bz2 to the previously created tool directory in Ubuntu, unzip it after the copy is complete, and generate the iwlist_for_visteon-master folder. Go to the iwlist_for_visteon-master folder, open the Makefile, and modify the three variables CC, AR and RANLIB in the Makefile. The modified values are shown in Figure 70.2.1.1:

The three variables CC, AR and RANLIB in Figure 70.2.1.1 are the compiler tools used, just change them to the arm-linux-gnueabihf-xxx tools we use. After the modification is complete, you can use the following command to compile:
make clean //先清理一下工程
make //编译
After the compilation is completed, five tools, iwlist, iwconfig, iwspy, iwpriv, and ifrename, will be generated in the current directory, and there is also a very important library file libiw.so.29. Copy these 5 tools to the /usr/bin directory under the root file system of the development board, and copy the libiw.so.29 library file to the /usr/lib directory under the root file system of the development board, the command is as follows:
sudo cp iwlist iwconfig iwspy iwpriv ifrename /home/zuozhongkai/linux/nfs/rootfs/usr/bin/ -f
sudo cp libiw.so.29 /home/zuozhongkai/linux/nfs/rootfs/usr/lib/ -f
After the copy is complete, you can test whether iwlist works normally.
wireless tools test
Here we mainly test the iwlist tool. To test the iwlist tool, first test whether the iwlist tool can work. Input the iwlist command. If the information shown in Figure 70.2.2.1 is output, it means that the iwlist tool works normally.
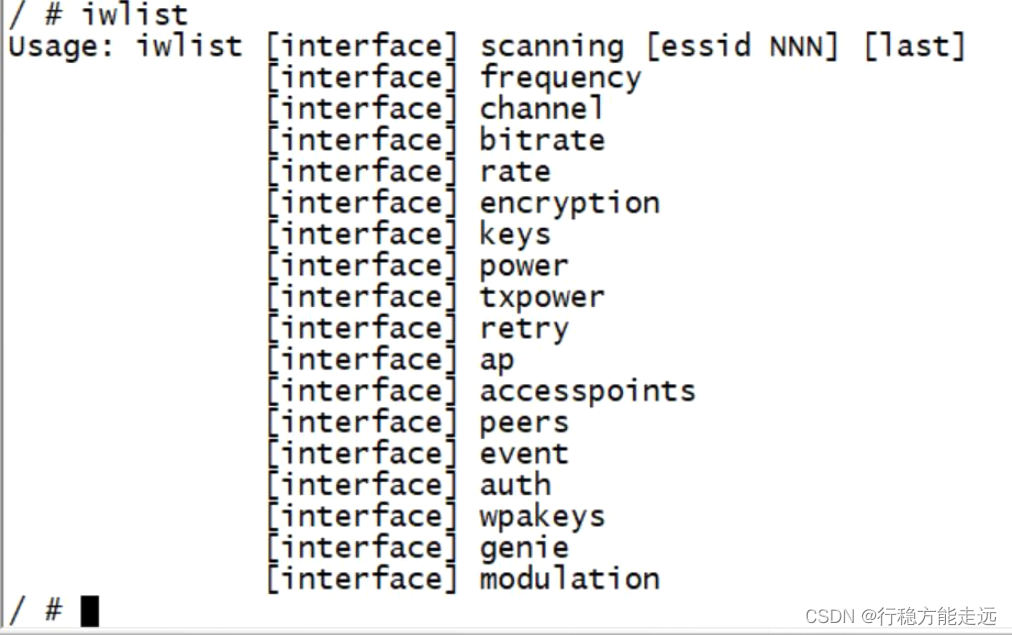
Make the WIFI module work before formally testing iwlist. RTL8188 or RTL8189 are both available. Take RTL8188 USB WIFI as an example, first insert the RTL8188 WIFI module into the USB HOST interface of the development board, and then load the RTL8188 driver module 8188eu.ko. After the driver is loaded successfully, open the wlan0 network card, and the command is as follows:
modprobe 8188eu.ko //加载RTL8188 驱动模块
ifconfig wlan0 up //打开wlan0 网卡
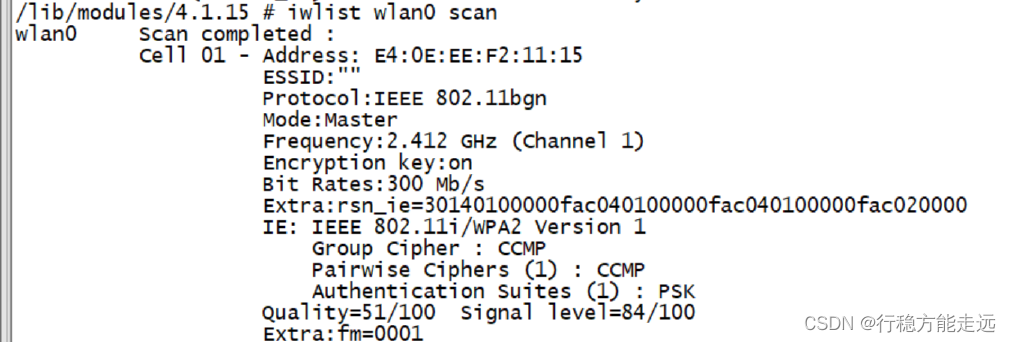
After the wlan0 network card is turned on, you can use the iwlist command to find the WIFI hotspot information in the current environment, that is, the wireless router, and enter the following command:
iwlist wlan0 scan
The above command will search for all WIFI hotspots in the current environment, and then allow the information of these hotspots, including MAC address, ESSID (WIFI name), frequency, speed, signal quality, etc., as shown in Figure 70.2.2.2:
Find the WIFI hotspot you want to connect to in all the hotspot information scanned. For example, I want to connect to the hotspot "ZZK". The WIFI hotspot information is shown in Figure 70.2.2.3:
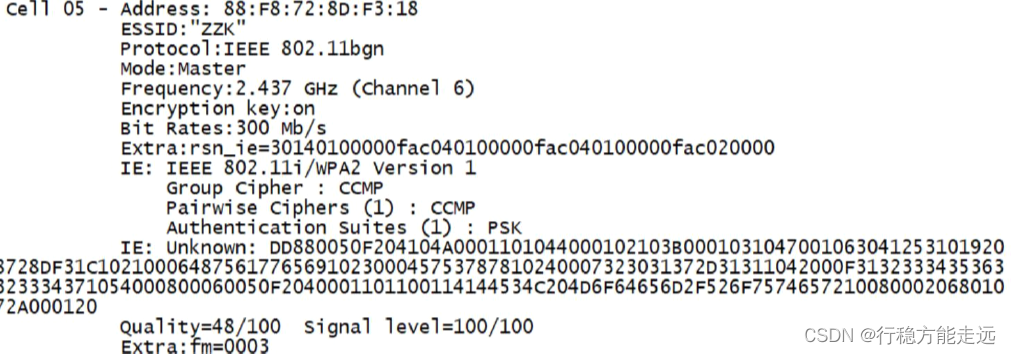
It can be seen that the hotspot information "ZZK" has been scanned, so it can be connected. If you want to connect to the specified WIFI hotspot, you need to use the wpa_supplicant tool, so the next step is to transplant this tool.
wpa_supplicant porting
openssl port
wpa_supplicant depends on openssl, so openssl needs to be transplanted first. The openssl source code has been placed in the development board CD, and the path is: 1. Routine source code - "7. Third-party library source code - "openssl-1.1.1d.tar.gz. Copy the openssl source compressed package to the previously created tool directory in Ubuntu, and then use the following command to decompress it:
tar -vxzf openssl-1.1.1d.tar.gz
After the decompression is completed, a directory named openssl-1.1.1d will be generated, and then a new folder named "openssl" will be created to store the compiled results of openssl. Go to the unzipped openssl-1.1.1d directory, and then execute the following command to configure:
./Configure linux-armv4 shared no-asm --prefix=/home/zuozhongkai/linux/IMX6ULL/tool/openssl CROSS_COMPILE=arm-linux-gnueabihf-
In the above configuration, "linux-armv4" means 32-bit ARM receipt, and there is no option of "linux-armv7".
CROSS_COMPILE is used to specify a cross compiler. After the configuration is successful, a Makefile will be generated, enter the following command to compile:
make
make install
The content of the openssl directory after compiling and installing is shown in Figure 70.3.1.1:

The lib directory in Figure 70.3.1.1 is what we need, copy the libcrypto and libssl libraries in the lib directory to the /usr/lib directory in the root file system of the development board, the command is as follows:
sudo cp libcrypto.so* /home/zuozhongkai/linux/nfs/rootfs/lib/ -af
sudo cp libssl.so* /home/zuozhongkai/linux/nfs/rootfs/lib/ -af
libnl library porting
Install biosn and flex before compiling libnl, the command is as follows:
sudo apt-get install bison
sudo apt-get install flex
wpa_supplicant also depends on libnl, so it is necessary to transplant the libnl library. The libnl source code has been placed in the development board CD, the path is: 1. Routine source code-"7, third-party library source code-"libnl-3.2.23.tar. gz. Copy the libnl source code compressed package to the previously created tool directory in Ubuntu, and then use the following command to decompress it:
tar -vxzf libnl-3.2.23.tar.gz
After the decompression is completed, you will get the libnl-3.2.23 folder, and then create a new folder named "libnl" to store the compiled results of libnl. Enter the libnl-3.2.23 folder, and then execute the following command to configure:
./configure --host=arm-linux-gnueabihf --prefix=/home/zuozhongkai/linux/IMX6ULL/tool/libnl/
–host is used to specify the prefix of the cross compiler, here it is set to “arm-linux-gnueabihf”, –prefix is used to specify the compilation result storage directory, here must be set to the libnl folder we just created. After the configuration is complete, you can execute the following commands to compile and install the libnl library:
make -j12 //编译
make install //安装
The libnl directory after compiling and installing is shown in Figure 70.3.2.1:
We need the libnl library files under the lib directory in Figure 70.3.2.1, and copy all the files in the lib directory to the /usr/lib directory of the root file system of the development board. The command is as follows:
sudo cp lib/* /home/zuozhongkai/linux/nfs/rootfs/usr/lib/ -rf
wpa_supplicant porting
Next transplant wpa_supplicant, we have put the source code of wpa_supplicant in the development board CD, the path is:
1. Routine source code->7, third-party library source code->wpa_supplicant-2.7.tar.gz, wpa_supplicant-2.7.tar.gz Copy it to Ubuntu, and enter the following command to decompress:
tar -vxzf wpa_supplicant-2.7.tar.gz
After the decompression is completed, you will get the wpa_supplicant-2.7 folder, enter this folder,
the content of the wpa_supplicant-2.7 directory is shown in Figure 70.3.3.1:

Enter the wpa_supplicant directory in Figure 70.3.3.1, and then configure. The configuration of wpa_supplicant is special. You need to copy the defconfig file under wpa_supplicant and rename it to .config. The command is as follows:
cd wpa_supplicant/
cp defconfig .config
After completion, open the .config file and specify the path of the cross compiler, openssl, libnl library and header file in it, the settings are as follows:
示例代码70.3.3.1 .config 文件需要添加的内容
1 CC = arm-linux-gnueabihf-gcc
2
3 #openssl库和头文件路径
4 CFLAGS += -I/home/zuozhongkai/linux/IMX6ULL/tool/openssl/include
5 LIBS += -L/home/zuozhongkai/linux/IMX6ULL/tool/openssl/lib -lssl
		-lcrypto
6
7 #libnl库和头文件路径
8 CFLAGS += -I/home/zuozhongkai/linux/IMX6ULL/tool/libnl/include/libnl3
9 LIBS += -L/home/zuozhongkai/linux/IMX6ULL/tool/libnl/lib
The CC variable is used to specify the cross compiler, here is arm-linux-gnueabihf-gcc, CFLAGS specifies the library header file path to be used, and LIBS specifies the library path to be used. When compiling wap_supplicant, you need to use openssl and libnl library, so the sample code 70.3.3.1 specifies the library path and header file path of these two. The position of the above content in .config is shown in Figure 70.3.3.2:

After the .config file is configured, you can compile wpa_supplicant, use the following command to compile:
export PKG_CONFIG_PATH=/home/zuozhongkai/linux/IMX6ULL/tool/libnl/lib/pkgconfig:
		$PKG_CONFIG_PATH 	//指定libnl 库pkgconfig 包位置
make -j12 					//编译
First, we use export to specify the pkgconfig path of the libnl library, and the environment variable PKG_CONFIG_PATH saves the pkgconfig package path. There is a directory named "pkgconfig" under tool/libnl/lib/, as shown in Figure 70.3.3.3:
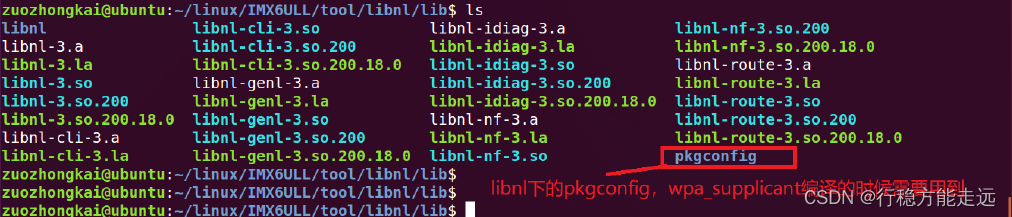
When compiling wpa_supplicant, it is necessary to specify the pkgconfig path of libnl, otherwise it will prompt errors such as "libnl-3.0" or "libnl-3.0.pc" not found. After compiling, two softwares, wpa_supplicant and wpa_cli, will be generated in this directory, as shown in Figure 70.3.3.3:
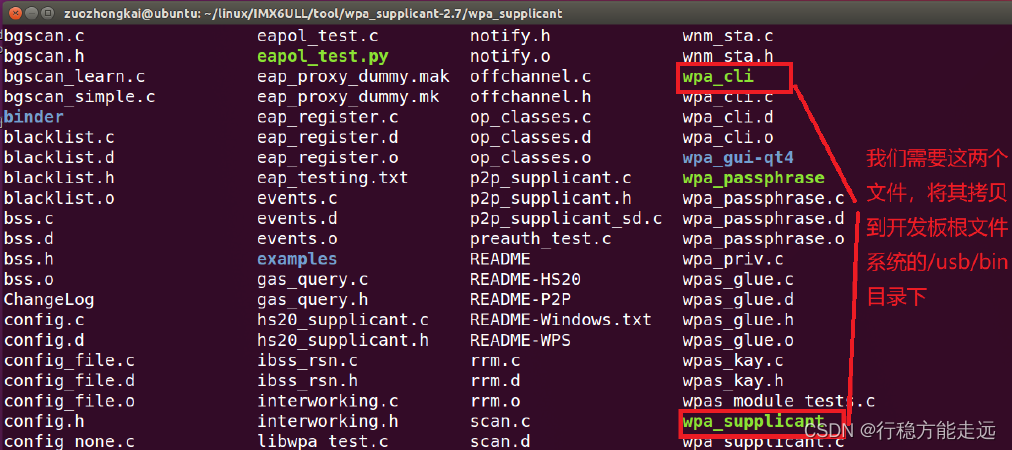
Copy the two files wpa_cli and wpa_supplicant in Figure 70.3.3.3 to the /usr/bin directory of the root file system of the development board, the command is as follows:
sudo cp wpa_cli wpa_supplicant /home/zuozhongkai/linux/nfs/rootfs/usr/bin/ -f
Restart the development board after the copy is complete! Enter the "wpa_supplicant -v" command to check the version number of wpa_supplicant. If wpa_supplicant works normally, the version number will be printed out, as shown in Figure 70.3.3.4:

It can be seen from Figure 70.3.3.4 that the output of the wpa_supplicant version number is normal, indicating that the wpa_supplicant has been transplanted successfully. The next step is to use wpa_supplicant to connect the WIFI of the development board to the router to realize the WIFI Internet access function.
WIFI networking test
Whether it is USB WIFI or SDIO WIFI, the operation steps of networking are as follows:
- ①. Plug in the WIFI module. If it is integrated on the board, this step is not needed. If it is SDIO WIFI, make sure that the SDIO interface used by WIFI is not plugged into other modules, such as SD cards, to prevent other modules from affecting SDIO WIFI.
- ②. Load the RTL8188 or RTL8189 driver module.
- ③. Use the ifconfig command to open the corresponding wireless network card, such as wlan0 or wlan1...
- ④、无线网卡打开以后使用iwlist 命令扫描一下当前环境下的WIFI 热点,一来测试一下WIFI 工作是否正常。二来检查一下自己要连接的WIFI 热点能不能扫描到,扫描不到的话肯定就没法连接了。
当上述步骤确认无误以后就可以使用wpa_supplicant 来将WIFI 连接到指定的热点上,实现联网功能。
RTL8188 USB WIFI 联网测试
注意!RTL8188EUS 请使用8188eu.ko 驱动,RTL8188CUS 请使用8192cu.ko 驱动!
首先测试一下RTL8188 USB WIFI 联网测试,确保RTL8188 能扫描出要连接的WIFI 热点,比如我要连接“ZZK”这个WIFI,iwlist 扫描到的此WIFI 热点信息如图70.4.1.1 所示:

要连接的WIFI 热点扫描到以后就可以连接了,先在开发板根文件系统的/etc 目录下创建一个名为“wpa_supplicant.conf”的配置文件,此文件用于配置要连接的WIFI 热点以及WIFI 秘密,比如我要连接到“ZZK”这个热点上,因此wpa_supplicant.conf 文件内容如下所示:
示例代码70.4.1.1 wpa_supplicant.conf 文件内容
1 ctrl_interface=/var/run/wpa_supplicant
2 ap_scan=1
3 network={


4 ssid="ZZK"
5 psk="xxxxxxxx"
6 }
第4 行,ssid 是要连接的WIFI 热点名字,这里我要连接的是“ZZK”这个WIFI 热点。
第5 行,psk 就是要连接的WIFI 热点密码,根据自己的实际情况填写即可。
注意,wpa_supplicant.conf 文件对于格式要求比较严格,“=”前后一定不能有空格,也不要用TAB 键来缩进,比如第4 行和5 行的缩进应该采用空格,否则的话会出现wpa_supplicant.conf文件解析错误!最重要的一点!wpa_supplicant.conf 文件内容要自己手动输入,不要偷懒复制粘贴!!!
After the wpa_supplicant.conf file is written, create a "/var/run/wpa_supplicant" directory under the root file system of the development board, which is used by the wpa_supplicant tool! The command is as follows:
mkdir /var/run/wpa_supplicant -p
After everything is ready, you can use the wpa_supplicant tool to connect the RTL8188 USB WIFI to the hotspot, and enter the following command:
wpa_supplicant -D wext -c /etc/wpa_supplicant.conf -i wlan0 &
When the RTL8188 is connected to the WIFI hotspot, it will output the information shown in Figure 70.4.1.2:

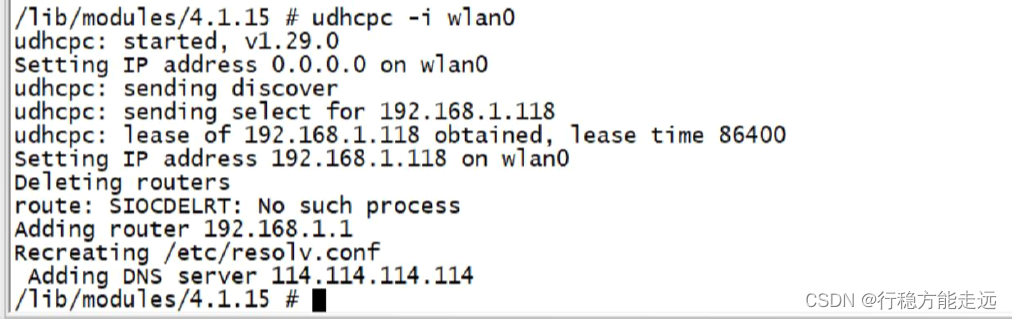
As can be seen from Figure 70.4.1.2, when RTL8188 is connected to a WIFI hotspot, it will output the words “wlan0: CTRL-EVENT-CONNECTED”. Next is the last step, set the IP address of wlan0, here use the udhcpc command to apply for an IP address from the router, enter the following command:
udhcpc -i wlan0 //从路由器获取IP 地址
After the IP address is obtained successfully, the information shown in Figure 70.4.2.2 will be output:
It can be seen from Figure 70.4.2.2 that the IP address of wlan0 is obtained successfully, and the IP address is 192.168.1.126. You can enter the following command to view the detailed information of the wlan0 network card:
ifconfig wlan0
The result is shown in Figure 70.4.2.3:
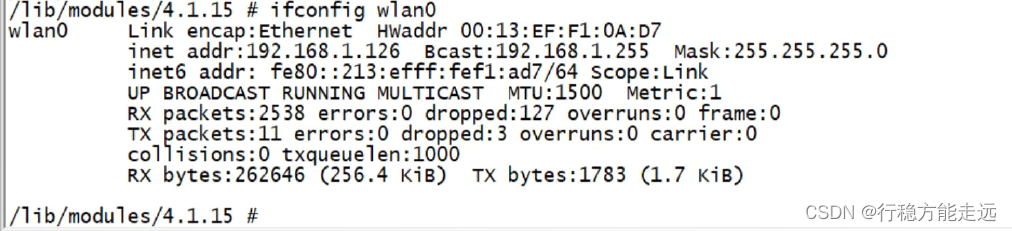
You can ping the IP address 192.168.1.126 of wlan0 through the computer. If you can ping it, it means that the RTL8188 USB WIFI is working normally. You can also use wlan0 directly on the development board to ping the Baidu website, and enter the following command:
ping -I 192.168.1.126 www.baidu.com
-I is to specify the IP address of the network card that performs the ping operation. We want to use wlan0 to ping the Baidu website, so we need to specify the IP address of wlan0 through "-I". If the WIFI works normally, you can ping the Baidu website, as shown in Figure 70.4.2.4:

So far we have fully driven the RTL8188 USB WIFI, and everyone can use WIFI for network communication.
RTL8189 SDIO WIFI networking test
The test method of RLT8189 SDIO WIFI is basically the same as that of RTL8188 USB WIFI. If the SD card is inserted, first pull out the SD card from the I.MX6U-ALPHA development board, because the SD card and SDIO of the I.MX6U-ALPHA development board WIFI share one SDIO interface. Insert the RTL8189 SDIO WIFI module, then load the RTL8189 driver, and
open the corresponding wlan0 (if there is only one WIFI for RTL8189) network card, use the iwlist command to search whether the WIFI hotspot to be connected exists, and if so, you can connect.
RTL8189 SDIO WIFI also uses wpa_supplicant to complete the hotspot connection work, so it is also necessary to create /etc/wpa_supplicant.conf file, the specific process refers to section 70.4.1. After everything is ready, enter the following command to complete the WIFI hotspot connection:
wpa_supplicant -Dnl80211 -c /etc/wpa_supplicant.conf -i wlan0 &
Pay attention to the red font, if you use RTL8189, you should use "-Dnl80211", don't make a mistake here! After the WIFI hotspot is successfully connected, the information shown in Figure 70.4.2.1 will be output:

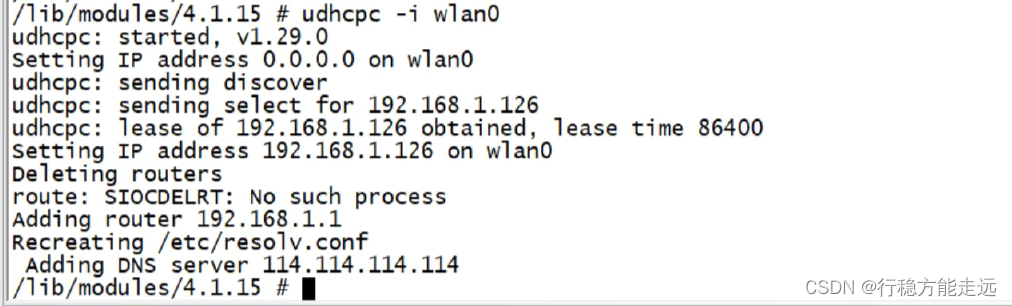
Use the udhcpc command to obtain the IP address, the command is as follows:
udhcpc -i wlan0
The IP address acquisition process is shown in Figure 70.4.2.2:
As can be seen from Figure 70.4.2.2, the IP address of wlan0 is 192.168.1.118, you can use "ifconfig wlan0" to check the detailed information of wlan0 network card. You can ping 192.168.1.118 through the computer to test whether the WIFI is working normally, or use the wlan0 network card on the development board to ping the Baidu website to test whether the WIFI is working normally, and enter the following command
:
ping -I 192.168.1.118 www.baidu.com
If the ping is successful, the result is shown in Figure 70.4.2.3:

So far, how to use WIFI on the I.MX6U-ALPHA development board has been fully explained, including USB WIFI and SDIO WIFI. In fact, whether it is on I.MX6U or other SOCs, the drivers of USB WIFI and SDIO WIFI are similar. You can refer to the tutorial in this chapter to talk about how to transplant the two WIFI drivers of RTL8188 and RTL8189 to chips or development boards. .