
About the author: A cloud computing network operation and maintenance personnel, sharing the technology and dry goods of network and operation and maintenance every day.
Motto: Keep your head down and hurry on your way, be respectful
Personal homepage: Homepage of Netdou
Table of contents
3) Open the New Delegation Wizard
4) Create a new delegated domain name
6) Create a new name server record
8) Complete the delegation configuration
9) Establish the DNS district city of Shanghai
1) Open the properties window of the source area
3) Enter the address of the secondary server
4) Complete the zone transfer settings
5) Create a new auxiliary area
6) Set the auxiliary area name
7 ) Enter the primary DNS server address
8) Complete the New Auxiliary Area Wizard
foreword
This chapter will continue to explain the previous review of "Windows server - Deploy DNS service" Windows server - Deploy DNS service , Windows server - Deploy DNS service (2)
1. Manage DNS service
1. Subregion
There may be many resource records in the area, which will seriously affect the efficiency and quality of administrator maintenance. At this time, the resource records can be logically classified under the area by "sub-domain".
the case
A certain company has branches in Beijing, Shanghai, Guangzhou and other places. The branches are connected by dedicated lines. The company network is directly managed by the Beijing headquarters. The Beijing branch and the Beijing headquarters share the same DNS server. DNS server. Due to the large amount of resources, the administrator wants to manage DNS records according to the department. How to configure the DNS server?
The steps to create a subdomain for the Beijing branch are as follows
(1) Open the "DNS Manager" window.
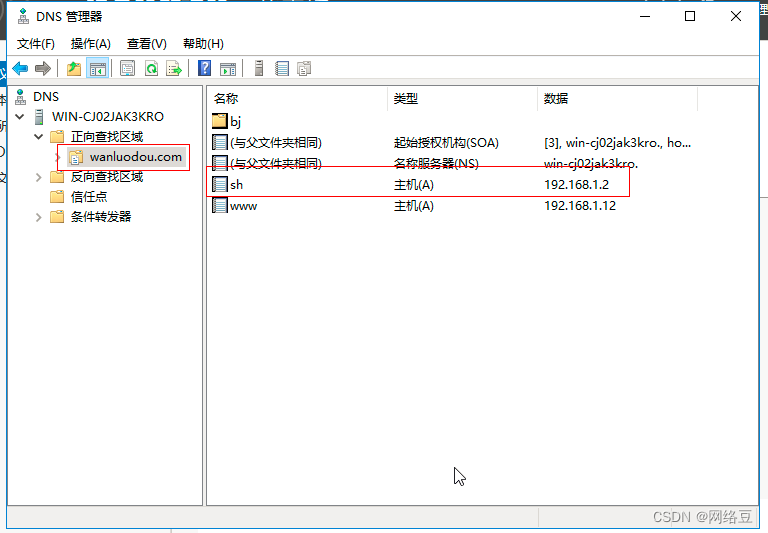
(2) Expand the node tree in the "DNS Manager" window, right-click the created "benet.com", and select "New Domain" in the pop-up shortcut menu, as shown in the figure

(3) Enter the domain name "bj" to be created in the "Please enter a new DNS domain name" text box in the "New DNS Domain" dialog box and click the "OK" button. The subdomain is created successfully, as shown in the figure

(4) Create resource records such as host records, pointer records, and alias records in the subdomain as needed.
2. Delegation
The subdomain information is stored in the parent zone file. When there are too many subdomains in the zone, it is very inconvenient to maintain, and it will also encounter the bottleneck of domain name queries. By creating a new delegation in the zone, subdomains can be delegated to other servers, for example, the relationship between the root domain DNS server and the top-level domain DNS server is delegation. The root domain DNS server delegates all top-level domains and does not receive recursive queries to reduce its access load and maintenance costs.
Both creating a subdomain and creating a delegation will create a new domain, but the difference between the two is that when creating a subdomain, the authoritative domain of the subdomain is the authoritative domain in the parent zone, and when creating a delegation, you need to specify the authority for the new domain server.
the case
A company has a DNS server, and its internal LAN uses benet.com as the domain name. Now, the company has established a branch in Shanghai. The Shanghai branch uses a dedicated line to connect to the head office. The Shanghai branch plans to use "sh.benet.com" as the domain name and resolve it locally, how should it be implemented?
1) Add host record
Add a host record on the DNS server where the parent zone is located, and the IP address of the host record is the DNS server of the Shanghai subdomain
2) Create a new delegation
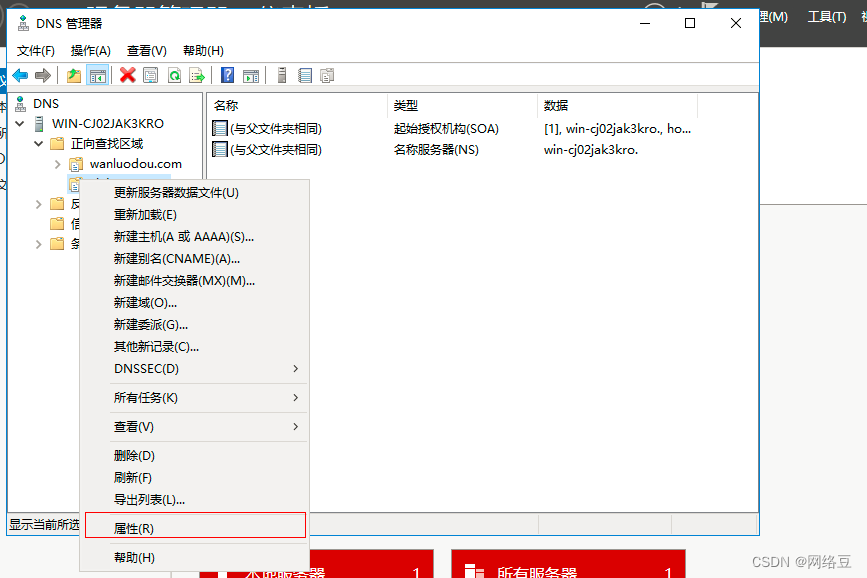
Right-click "benet.com", and select "New Delegation" in the pop-up shortcut menu, as shown in the figure

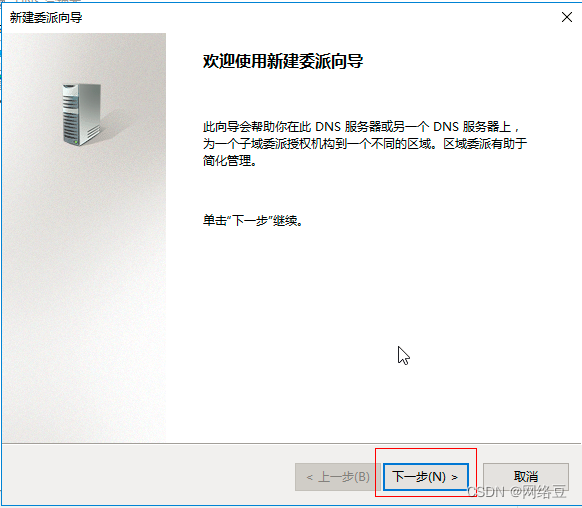
3) Open the New Delegation Wizard
In the "Welcome to the New Delegation Wizard" dialog box of the "New Delegation Wizard", click the "Next" button, as shown in the figure.
4) Create a new delegated domain name
In the "Delegated Domain Name" dialog box, enter the delegated domain name as "sh", and click the "Next" button, as shown in the figure.

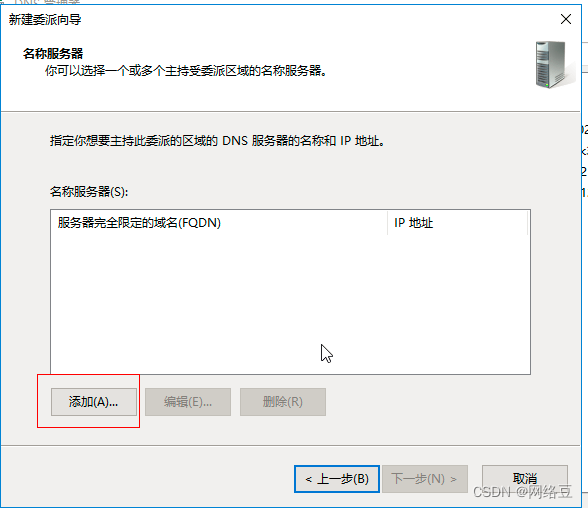
5) Add nameservers
In the "Name Servers" dialog box, click the "Add" button to specify the DNS server names that can host the delegation, as shown.
6) Create a new name server record
In the "New Name Server Record" dialog box, enter the FQDN of the server and click the "Resolve" button. After the resolution is successful, the server P address will appear. Click the "OK" button, as shown in the figure.

7) Specify nameservers
After the addition is complete, the DNS server FQDN and IP address of the subdomain will be displayed in the "Name Server" dialog box, click the "Next" button as shown in the figure.

8) Complete the delegation configuration
Click the "Finish" button to complete the new delegation, as shown in the figure.

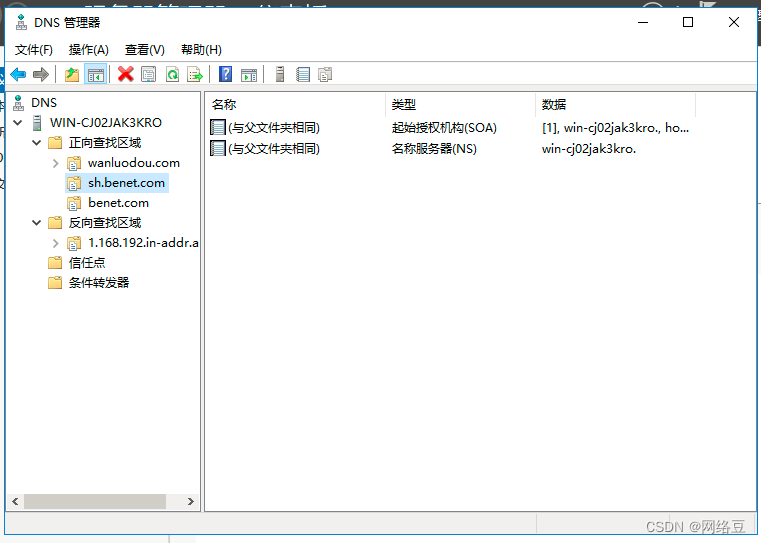
9) Establish the DNS district city of Shanghai
Create a new "main district" on the ONS server in Shanghai, and the name of the district is "sh,benet.com", as shown in the figure. In the "New Area Wizard", click the "Next" button in turn to complete the new area. After the establishment is completed, the Shanghai branch can manage the domain name records locally, and the head office can also access the Shanghai branch through the city name extension "sh.benet.com".

3. Zone transfer
In order to reduce the load of a single DNS server and provide fault tolerance, it is necessary to save the content of the same DNS server in multiple DNS servers. At this time, the zone transfer function of DNS is required. Simply put, a zone transfer is the copying of zone file information from a primary server to a secondary server.
The main server is the source server of the zone transfer. It can be either the main zone or the auxiliary zone. If the main server is the main district city, the zone transfer will directly obtain the zone file from the main zone. If the main server is the auxiliary zone, the zone transfer then only a read-only copy of the zone file is transferred.
The steps to configure "City Transfer" are as follows
1) Open the properties window of the source area
On the first DNS server, open the "DNS Manager" window, expand the node material, right-click the area to be copied, and select "Properties" in the pop-up shortcut menu, as shown in the figure.
2) No zone transfer
In the "benet.com Properties" dialog box, select the "Zone Transfer" tab, select the "Allow only to the following servers" radio button under "Allow Zone Transfer", and click the "Edit" button, as shown in the figure.

3) Enter the address of the secondary server
In the "Allow zone transfer" dialog box, enter the P address of the secondary server, and click the "OK" button after verification, as shown in the figure.

4) Complete the zone transfer settings
In the "benet.com Properties" dialog box, confirm the configured P address and server FQDN, and click the "OK" button to complete the zone transfer settings, as shown in the figure.

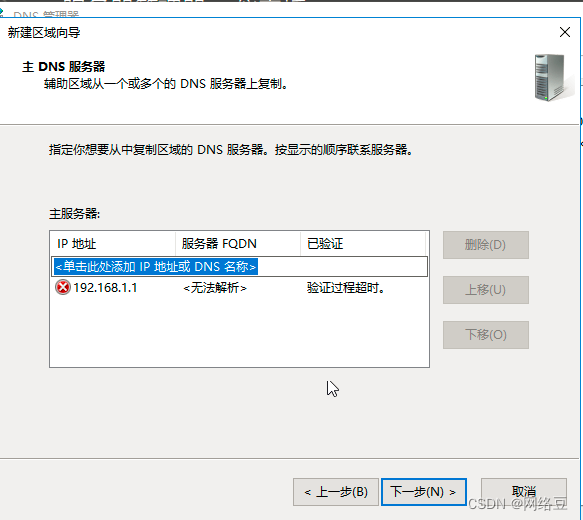
5) Create a new auxiliary area
Create a new zone on the secondary server (the second DNS server), in the "Zone Type" dialog box, select the "Secondary Zone" radio button, and click the "Next" button, as shown in the figure

6) Set the auxiliary area name
In the "Area Name" dialog box, enter the name of the auxiliary area, which must be exactly the same as the source area, and click the "Next" button, as shown in the figure.

7) Enter the primary DNS server address
In the "Primary DNS Server" dialog box, enter the P address of the source zone server, and click the "Next" button, as shown in the figure.
8) Complete the New Auxiliary Area Wizard
In the "Completing the New Area Wizard" dialog box, click the "Finish" button, as shown.

9) Area transfer succeeded
As shown in the figure, expand the node tree in the "DNS Manager" window of the secondary server, and check the benet.com zone. The data has been copied successfully.
4. DNS Forwarder
(1). Introduction to DNS Forwarder
DNS forwarder (DNS Forwarder) refers to the DNS server with special functions and applications. When the DNS server receives the query request from the DNS client, it will look for the client's data in the database under its jurisdiction. If the DNS There is no data of the client in the area of the server (the host name queried by the DNS client does not exist in the domain database of the DNS server), then the DNS server needs to turn to other DNS servers for query, as shown in the figure.

(2). Configure DNS forwarder
The DNS server can resolve domain names in its own zone files. For domain names that cannot be queried by this server, the query request will be directly forwarded to the root domain DNS server by default. In addition to this, there is another method: set a forwarder on the DNS server to forward the request to other DNS servers.
A forwarder is a DNS server on the network that forwards queries for external FODNs to DNS servers outside the network. Conditional forwarders can also be used to forward queries by specific domain names.
5. Root prompt
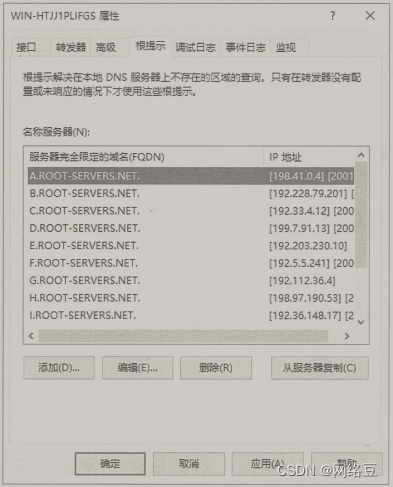
Root hints enable DNS servers in non-root domains to find DNS servers in the root domain. There are many root domain DNS servers distributed all over the world on the Internet. To locate these root domain DNS servers, you need to configure root hints on non-root domain DNS servers. The way to configure root hints is to right-click a DNS server, select "Properties" in the pop-up shortcut menu, and select the "Root Hints" tab in its properties dialog box. In the "Name Server" list, there are 13 root servers in total, as shown in the figure. Root hints generally keep the default configuration and should not be modified easily. If the DNS server is configured with a forwarder, the forwarder will be queried first.
Creation is not easy, please pay attention, like, collect, thank you~