1. SharedPreferences storage.
SharedPreferences is a lightweight storage auxiliary class, which is used to save some common configurations of the application. It uses key-value pairs to store data.
SharedPreferences storage is implemented in three steps:
1. Call the edit() method of the getSharedPreferences object to obtain the SharedPreferences.Editor object.
2. Use the putXXX() method to add data to the SharedPreferences.Editor object.
3. Call the apply() or commit() method to submit the data.
        //添加数据
        Button button=findViewById(R.id.button);
        button.setOnClickListener(new View.OnClickListener() {
            @Override
            public void onClick(View view) {
                //sp增加、修改数据
                //MODE_PRIVATE 别的程序不能读  "user"是文件名
                SharedPreferences sp=getSharedPreferences("user",MODE_PRIVATE);  //接口
                SharedPreferences.Editor editor=sp.edit(); //拿到接口方法的引用
                editor.putString("username1","湖南中医药大学!!");
                editor.putBoolean("isLogin",true);
                //editor.remove("username");删除
                editor.commit();
            }
        });
        //读取数据
        Button button2=findViewById(R.id.button2);
        button2.setOnClickListener(new View.OnClickListener() {
            @Override
            public void onClick(View view) {
                //sp读取数据
                //MODE_PRIVATE 别的程序不能读 只有当前应用程序才能对 SharedPreferences 文件进行读写
                SharedPreferences sp=getSharedPreferences("user",MODE_PRIVATE);  //接口
                String username1=sp.getString("username1","");//第二个参数是默认值
                Boolean isLogin=sp.getBoolean("isLogin",false);
                Log.i("sp","username1=" + username1 + "isLogin=" + isLogin);
            }
        });
2. Welcome page and automatic login.
Idea: Just use SharedPreferences to store the login status, and read the login status when you log in next time.
1. Login page:
                if(name.equals("千丘星")&&password.equals("123456")){
                    //跳转主页面+保存用户名+登录状态
                    SharedPreferences sp=getSharedPreferences("user",MODE_PRIVATE);  //接口
                    SharedPreferences.Editor editor=sp.edit(); //拿到接口方法的引用
                    editor.putString("username",name);
                    editor.putBoolean("isLogin",true);
                    editor.commit();

                    Intent intent=new Intent(Login_Activity.this,MainActivity.class);
                    startActivity(intent);
                }
                else {
                    Toast.makeText(Login_Activity.this,"登录失败",Toast.LENGTH_SHORT).show();
                }
It is worth noting that the data storage should be placed before the Intent jump. If the jump is made first, the activity will be killed and the data may not have time to be stored.
2. The welcome page and judge the login transition, and automatically log in.
public class WelcomeActivity extends AppCompatActivity {

    @Override
    protected void onCreate(Bundle savedInstanceState) {
        super.onCreate(savedInstanceState);
        setContentView(R.layout.activity_welcome);
        //要看到界面 onCreate需要执行完
        //线程
        Thread thread = new Thread() {
            @Override
            public void run() {
                super.run();
                //休眠
                try {
                    Thread.sleep(5000);
                } catch (InterruptedException e) {
                    e.printStackTrace();
                }
                SharedPreferences sp = getSharedPreferences("user", MODE_PRIVATE);
                Boolean isLogin = sp.getBoolean("isLogin", false);
                Intent intent;
                if(isLogin) {
                    intent = new Intent(WelcomeActivity.this, MainActivity.class);
                } else {
                    intent = new Intent(WelcomeActivity.this, Login_Activity.class);
                }
                startActivity(intent);
            }
        };
        thread.start();
    }

}
The reason for the white screen problem is that if you want to see the welcome interface, onCreate must be executed, and if the delay is placed in the main thread of this activity, the problem of white screen will appear when the main thread runs and the delay has not finished running . The solution is to add a thread, put the delay and judge the behavior of login transition in this thread, and the sub-thread and the main thread can be synchronized to solve the white screen phenomenon and display the welcome interface.
3. Immersive status bar.
The immersive status bar involves third-party frameworks.
Third-party URL:
http:// https://github.com/gyf-dev/ImmersionBar
    //https://github.com/gyf-dev/ImmersionBar
    // 基础依赖包,必须要依赖
    implementation 'com.geyifeng.immersionbar:immersionbar:3.2.2'
    // kotlin扩展(可选)
    implementation 'com.geyifeng.immersionbar:immersionbar-ktx:3.2.2'
    // fragment快速实现(可选)已废弃
    implementation 'com.geyifeng.immersionbar:immersionbar-components:3.2.2'
Call it in which activity on which page is used:
        ImmersionBar.with(this)
      //          .statusBarColor(R.color.purple_200)  //状态栏颜色,不写默认透明
                .init();
It should be noted that if the immersive status bar is used, then the top of the activity page is the top of the entire phone screen (battery, etc.). If transparency is not set, pay attention to adjust the position of the control to avoid being covered by the top status bar.

4. MaterialCardView (rounded corners, shadows).
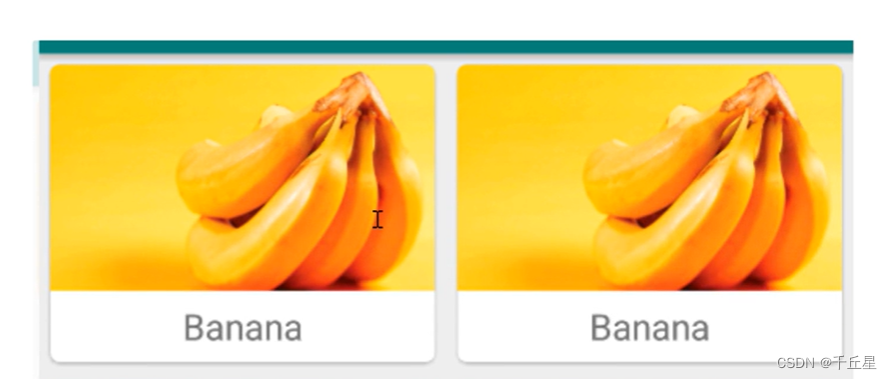
Call the MaterialCardView control directly. Note that adding a layer of layout inside and adding controls.
  <!--    app:cardElevation="10dp" 设置阴影范围-->
    <com.google.android.material.card.MaterialCardView
        android:layout_width="350dp"
        android:layout_height="300dp"
        android:layout_marginBottom="20dp"
        android:elevation="8dp"
        app:cardCornerRadius="15dp"
        app:cardElevation="10dp"
        app:layout_constraintBottom_toBottomOf="parent"
        app:layout_constraintLeft_toLeftOf="parent"
        app:layout_constraintRight_toRightOf="parent">

        <LinearLayout
            android:layout_width="match_parent"
            android:layout_height="match_parent"
            android:orientation="vertical">

            <ImageView
                android:layout_width="match_parent"
                android:layout_height="230dp"
                android:background="@drawable/i1" />

            <TextView
                android:layout_width="wrap_content"
                android:layout_height="wrap_content"
                android:layout_gravity="center"
                android:text="先生名叫秦霄贤"
                android:textColor="#000000"
                android:textSize="17sp" />
        </LinearLayout>
    </com.google.android.material.card.MaterialCardView>