Application of various design patterns in practical work
Question 1: What is the difference between the factory pattern and the builder pattern? Have you ever used the builder pattern in your work?
1. What is the builder pattern
The builder pattern , also known as the generator pattern , is a creational design pattern.
- Definition: Separate the construction and representation of a complex object so that the same construction process can create different representations.
Problems to be solved by the builder pattern
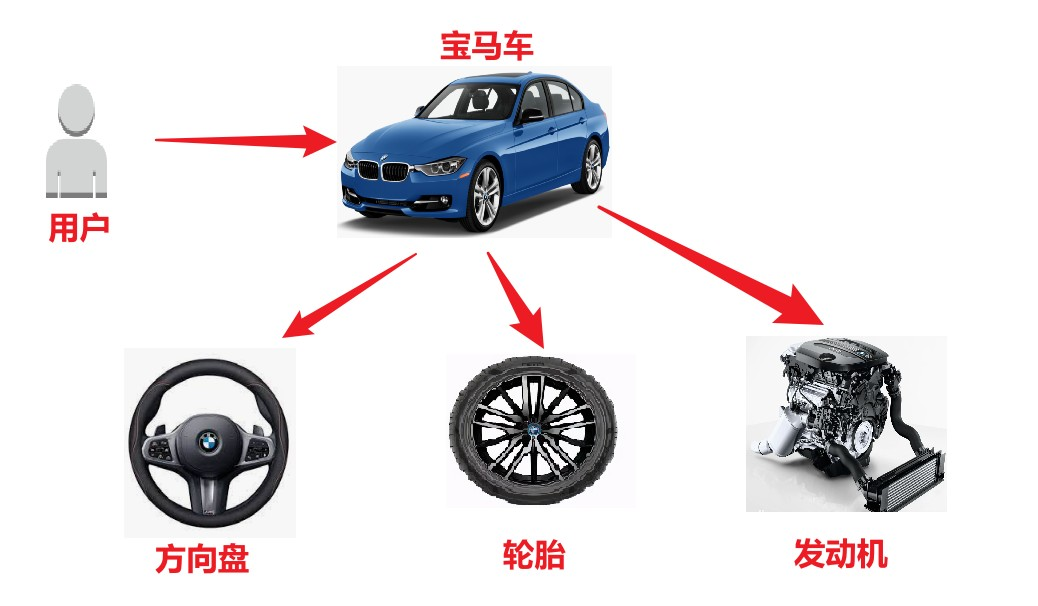
- The builder pattern can separate parts from their assembly process and create a complex object step by step. The user only needs to specify the type of the complex object to get the object without knowing the details of its internal construction.
2. The structure of the builder mode
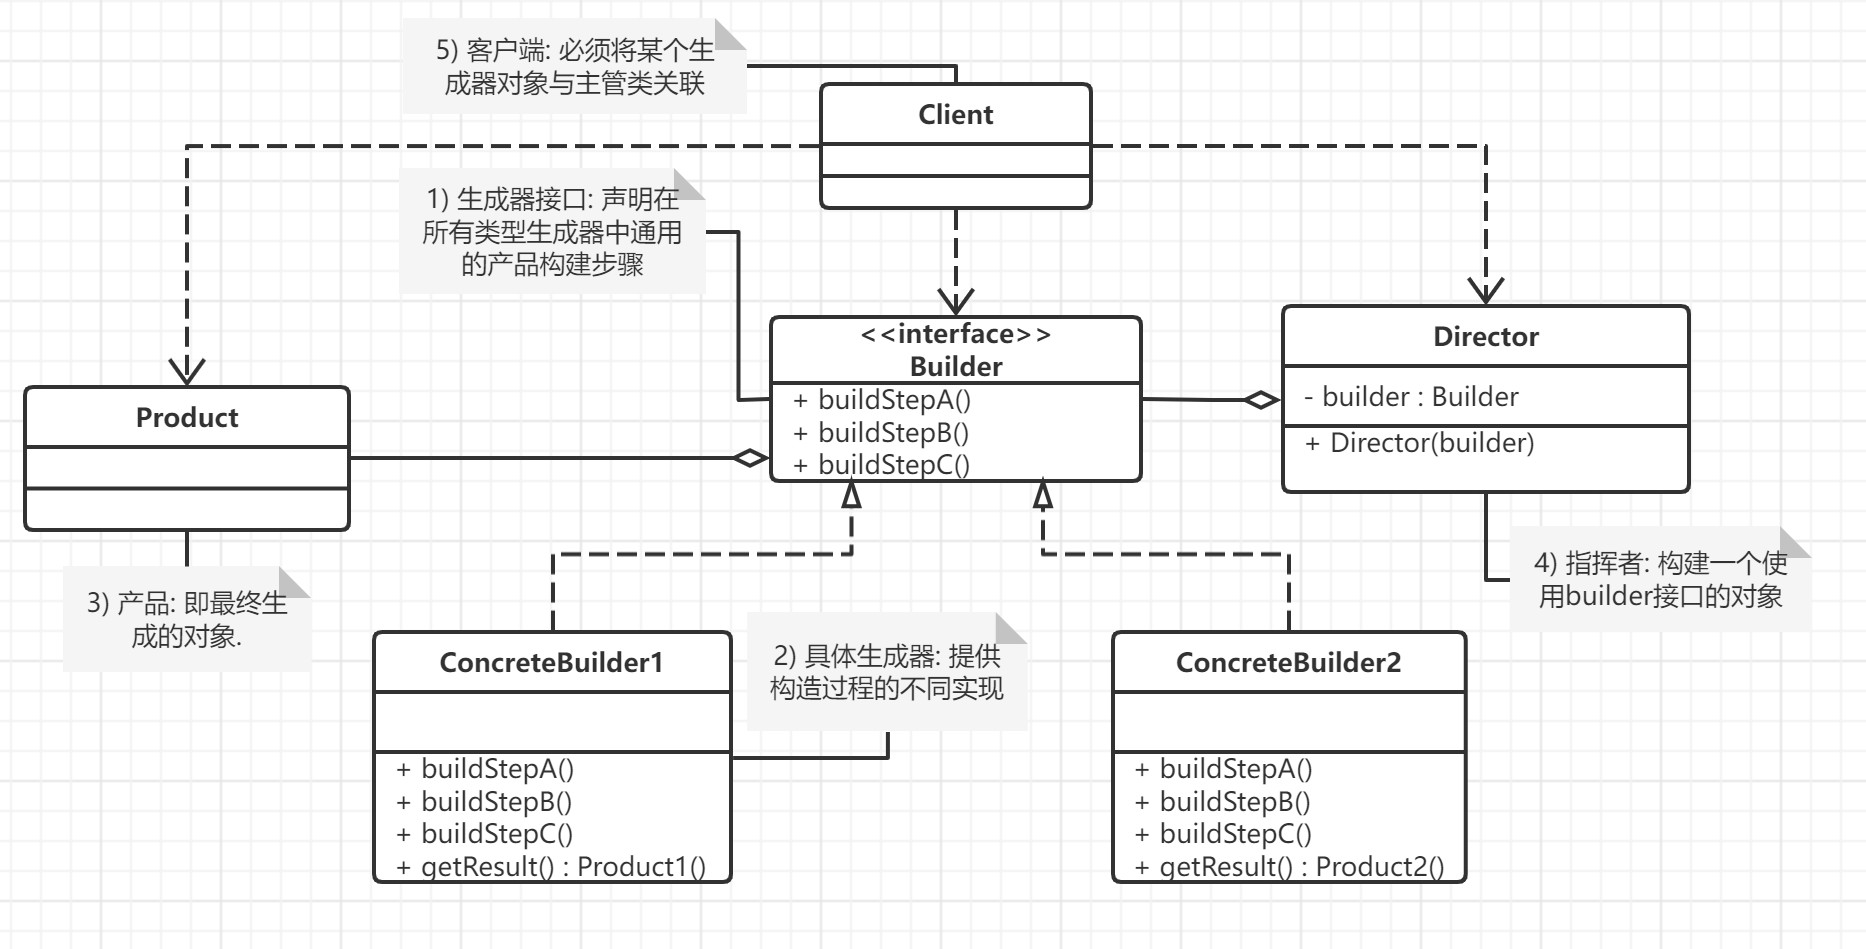
The Builder mode includes the following 4 roles:
- Abstract builder class (Builder): This interface specifies which parts of the complex object are to be created, and does not involve the creation of specific component objects.
- Concrete Builder Class (ConcreteBuilder): implements the Builder interface to complete the specific creation methods of each component of a complex product. After the construction process is completed, provide a method to return the created responsible product object.
- Product class (Product): complex object to be created (contains multiple components).
- Director class (Director): Call the specific builder to create each part of the complex object. The director does not involve specific product information, and is only responsible for ensuring that each part of the object is created completely or in a certain order (clients generally only need interact with the commander).
3. Application of builder mode in actual development
demand analysis:
- Front-end user operations, select query conditions, grouping, sorting, paging and other parameters SQL —> Oracle, MySQL
- The system needs to operate databases of different products: Oracle,MySQL,DB2…
- Write a specific Builder class for each database, and let the commander splice select, where, order, group, and paging in order according to the parameters
- Generate String-type SQL statements and parameter lists
- product category
 // 产品类
 public class SqlQuery {


     private String select;
     private String from;
     private String where;
     private String groupBy;
     private String orderBy;
     private String limit;

     public SqlQuery(String select, String from) {


         this.select = select;
         this.from = from;
     }

     public String getSelect() {


         return select;
     }

     public void setSelect(String select) {


         this.select = select;
     }

     public String getFrom() {


         return from;
     }

     public void setFrom(String from) {


         this.from = from;
     }

     public String getWhere() {


         return where;
     }

     public String getGroupBy() {


         return groupBy;
     }

     public String getOrderBy() {


         return orderBy;
     }

     public String getLimit() {


         return limit;
     }

     public void setWhere(String where) {


         this.where = where;
     }

     public void setGroupBy(String groupBy) {


         this.groupBy = groupBy;
     }

     public void setOrderBy(String orderBy) {


         this.orderBy = orderBy;
     }

     public void setLimit(String limit) {


         this.limit = limit;
     }

     @Override
     public String toString() {


         StringBuilder sb = new StringBuilder();

         sb.append("SELECT ").append(select).append(" FROM ").append(from);

         if (where != null && !where.isEmpty()) {


             sb.append(" WHERE ").append(where);
         }

         if (groupBy != null && !groupBy.isEmpty()) {


             sb.append(" GROUP BY ").append(groupBy);
         }

         if (orderBy != null && !orderBy.isEmpty()) {


             sb.append(" ORDER BY ").append(orderBy);
         }

         if (limit != null && !limit.isEmpty()) {


             sb.append(" LIMIT ").append(limit);
         }

         return sb.toString();
     }
 }
- abstract builder
 /**
  * 抽象建造者类
  * @author zxl
  * @date 2023/4/20
  **/
 public abstract class SqlQueryBuilder {


     protected SqlQuery sqlQuery;

     public void createSqlQuery(String select, String from) {


         sqlQuery = new SqlQuery(select, from);
     }

     public SqlQuery getSqlQuery() {


         return sqlQuery;
     }

     //抽取共性步骤
     public abstract void buildWhere();
     public abstract void buildGroupBy();
     public abstract void buildOrderBy();
     public abstract void buildLimit();

 }
- concrete builder
 /**
  * 具体建造者类:用于创建MySQL数据库的SQL查询语句
  * @author zxl
  * @date 2023/4/20
  **/
 public class MySqlQueryBuilder extends SqlQueryBuilder {


     @Override
     public void buildWhere() {


         sqlQuery.setWhere("1 = 1"); // MySQL不需要限制行数
     }

     @Override
     public void buildGroupBy() {


         sqlQuery.setGroupBy("deptno, ename, hiredate");
     }

     @Override
     public void buildOrderBy() {


         sqlQuery.setOrderBy("hiredate DESC");
     }

     @Override
     public void buildLimit() {


         sqlQuery.setLimit("0, 10"); // MySQL分页从0开始
     }
 }

 /**
  * 用于创建Oracle数据库的SQL查询语句
  * @author zxl
  * @date 2023/4/20
  **/
 public class OracleQueryBuilder extends SqlQueryBuilder {


     @Override
     public void buildWhere() {


         sqlQuery.setWhere("rownum <= 1000"); // Oracle查询最多返回1000行数据
     }

     @Override
     public void buildGroupBy() {


         // Oracle需要将GROUP BY字段放到SELECT字段中
         sqlQuery.setGroupBy("deptno, ename, hiredate");
         sqlQuery.setSelect(sqlQuery.getSelect() + ", deptno, ename, hiredate");
     }

     @Override
     public void buildOrderBy() {


         sqlQuery.setOrderBy("hiredate");
     }

     @Override
     public void buildLimit() {


         sqlQuery.setLimit("10");
     }

 }
- client
 public class Client {


     public static void main(String[] args) {


         // 创建MySQL建造者
         SqlQueryBuilder mySqlQueryBuilder = new MySqlQueryBuilder();

         // 创建Oracle建造者
         SqlQueryBuilder oracleQueryBuilder = new OracleQueryBuilder();

         // 指导者
         SqlQueryDirector sqlQueryDirector = new SqlQueryDirector();

         // 构建MySQL查询语句
         sqlQueryDirector.setSqlQueryBuilder(mySqlQueryBuilder);
         sqlQueryDirector.buildSqlQuery("*", "table1");

         SqlQuery mySqlQuery = mySqlQueryBuilder.getSqlQuery();
         System.out.println("MySQL Query: " + mySqlQuery);

         // 构建Oracle查询语句
         sqlQueryDirector.setSqlQueryBuilder(oracleQueryBuilder);
         sqlQueryDirector.buildSqlQuery("*", "table2");
         SqlQuery oracleQuery = oracleQueryBuilder.getSqlQuery();
         System.out.println("Oracle Query: " + oracleQuery);
     }
 }
5. The difference between the builder mode and the factory mode
- The factory pattern is used to create different but related types of objects (a group of subclasses that inherit the same parent class or interface), and the given parameters determine which type of object to create. To abstract the product --> specific product
- The builder mode is used to create a type of complex object . By setting different optional parameters, different objects can be created "customized", and the tool builder can be extended and changed.
Fundamentals of Software Design
- The most important thing is to analyze the commonality and variability
The meaning of design patterns
- Use abstraction to fix commonality (principle of closure)
- Encapsulate variability with concrete classes (open principle)
Question 2: Tell me about the chain of responsibility model. Is the chain of responsibility model useful in your work?
1. What is the chain of responsibility model
chain of responsibility pattern definition
- Avoid coupling the sender and receiver of a request, allowing multiple objects to have a chance to process the request.
- Connect the objects receiving the request into a chain, and pass the request along the chain until an object can handle it.

2. The role of the chain of responsibility model
- Decouple the request and the processing of the request to improve the scalability of the code.
3. Structure of Chain of Responsibility Model

The Chain of Responsibility pattern mainly includes the following roles:
- Abstract handler (Handler) role: define an interface for processing requests, including abstract processing methods and a subsequent connection (each handler on the chain has a member variable to hold a reference to the next handler, such as in the above figure successor).
- Concrete Handler (Concrete Handler) role: implement the processing method of the abstract handler, judge whether the request can be processed, if it can handle the request, process it, otherwise transfer the request to its successor.
- Client class (Client) role: Create a processing chain and submit a request to the specific processor object at the head of the chain. It does not care about the processing details and the delivery process of the request.
Note that in actual development, this standard chain of responsibility structure will not be adopted, but some changes will be made, such as adding a chain of responsibility manager to manage these specific processors
4. Application of chain of responsibility model in actual development
In SpringBoot, there are several ways to practice the responsibility chain mode. Today we mainly introduce three ways to practice.
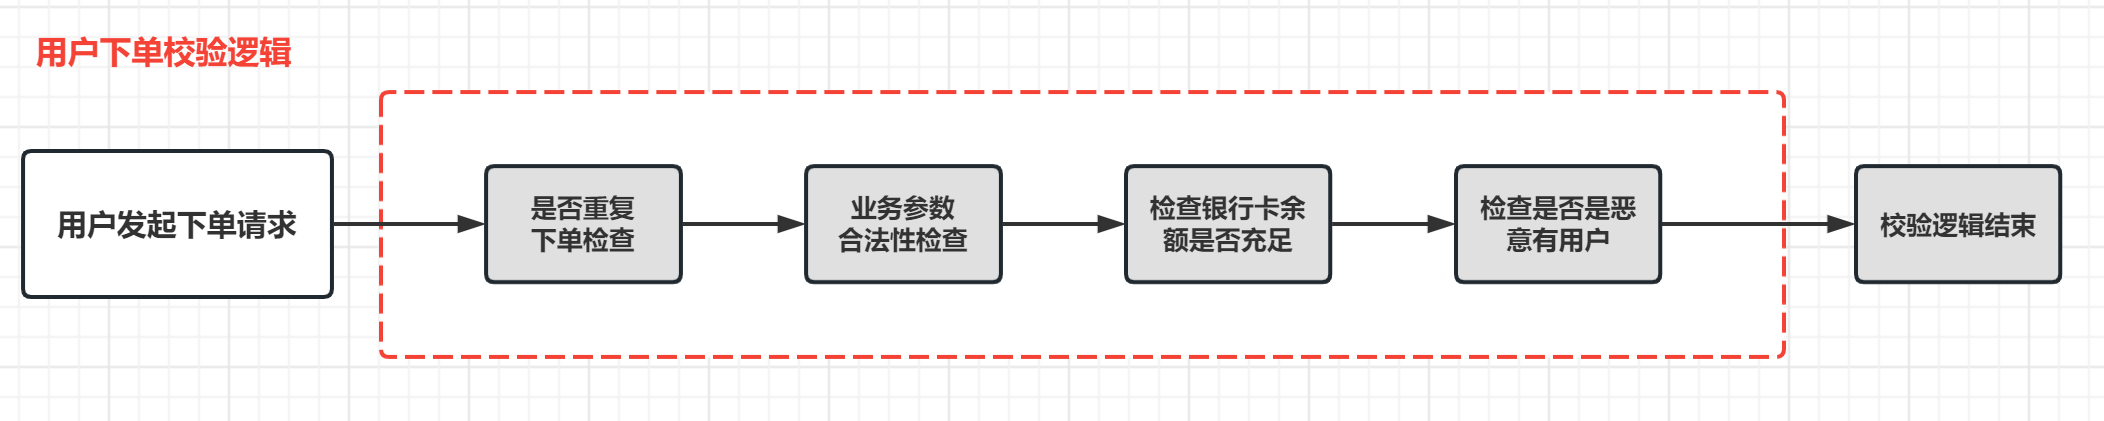
Let's take an order process as an example and divide it into multiple independent inspection logics. The possible data verification process is as follows:
4.1 Implementation method 1
- Create Pojo, order object
public class OrderContext {


    /**
     * 请求唯一序列ID
     */
    private String seqId;

    /**
     * 用户ID
     */
    private String userId;

    /**
     * 产品skuId
     */
    private Long skuId;

    /**
     * 下单数量
     */
    private Integer amount;

    /**
     * 用户收货地址ID
     */
    private String userAddressId;

}
- To create a processor interface, we define a data processing interface OrderHandleIntercept for standardized execution!
public interface OrderHandleIntercept {


    /**
     * 指定执行顺序
     * @return
     */
    int sort();

    /**
     * 对参数进行处理
     * @param context
     * @return
     */
    OrderContext handle(OrderContext context);
}
- To create a specific handler class, we create three different interface implementation classes and specify the execution order
/**
 * 处理器1 重复下单逻辑验证
 * @author zxl
 * @date 2023/4/18
 **/
@Component
public class RepeatOrderHandleInterceptService implements OrderHandleIntercept {


    @Override
    public int sort() {


        //执行顺序为 1
        return 1;
    }

    @Override
    public OrderContext handle(OrderContext context) {


        System.out.println("通过seqId,检查客户是否重复下单");
        return context;
    }
}

/**
 * 处理器2: 用于验证请求参数是否合法
 * @author zxl
 * @date 2023/4/18
 **/
@Component
public class ValidOrderHandleInterceptService implements OrderHandleIntercept {


    @Override
    public int sort() {


        //执行顺序为 2
        return 2;
    }

    @Override
    public OrderContext handle(OrderContext context) {


        System.out.println("检查请求参数是否合法,并且获取客户的银行账户");
        return context;
    }
}

/**
 * 处理器3: /用于检查客户账户余额是否充足
 * @author zxl
 * @date 2023/4/18
 **/
@Component
public class BankOrderHandleInterceptService implements OrderHandleIntercept {


    @Override
    public int sort() {


        //执行顺序为 3
        return 3;
    }

    @Override
    public OrderContext handle(OrderContext context) {


        System.out.println("检查银行账户是否合法,调用银行系统检查银行账户余额是否满足下单金额");
        return context;
    }
}
-
For the processor chain class, we also need to create an order data verification manager OrderHandleChainService to manage the above implementation classes.
The entire processing process for the request is managed through HandleChain. For the client that sends the request, it only needs to call HandleChain and hand over the request to HandleChain for processing.
For the client, it does not know how the request is processed, in other words, whether the logic in the request processing has changed, the client is unaware.
/**
 * 实现ApplicationContextAware,方便获取Spring容器ApplicationContext,从而可以获取容器内的Bean
 * @author zxl
 * @date 2023/4/18
 **/
@Component
public class OrderHandleChainService implements ApplicationContextAware {


    //保存责任链中的处理者
    private List<OrderHandleIntercept> handleList = new ArrayList<>();

    @Override
    public void setApplicationContext(ApplicationContext applicationContext) throws BeansException {


        //获取指定接口实现类,并按照sort进行排序,放入List
        //getBeansOfType这个方法能返回一个接口的全部实现类(前提是所有实现类都必须由Spring IoC容器管理)
        Map<String, OrderHandleIntercept> serviceMap = applicationContext.getBeansOfType(OrderHandleIntercept.class);

        handleList = serviceMap.values().stream()
                .sorted(Comparator.comparing(OrderHandleIntercept::sort))
                .collect(Collectors.toList());
    }


    /**
     * 执行处理
     */
    public OrderContext execute(OrderContext context){


        for (OrderHandleIntercept handleIntercept : handleList) {


             context = handleIntercept.handle(context);
        }

        return context;
    }

}
- run unit tests
@Autowired
private OrderHandleChainService orderHandleChainService;

@Test
public void test02(){


    orderHandleChainService.execute(new OrderContext());
}
- The execution results are as follows
通过seqId,检查客户是否重复下单
检查请求参数是否合法,并且获取客户的银行账户
检查银行账户是否合法,调用银行系统检查银行账户余额是否满足下单金额
If you need to continue to add the verification process or processing process, you only need to re-implement the OrderHandleIntercept interface, and other codes do not need to be changed!
4.2 Implementation 2
If we don't want to use sort() to specify the execution order of the processor class, we can also use annotations to specify the order.
Specify sorting by annotating @Order
/**
 * 指定注入顺序为1
 *
 */
@Order(1)
@Component
public class RepeatOrderHandleInterceptService implements OrderHandleIntercept {


    //...省略
}

/**
 * 指定注入顺序为2
 *
 */
@Order(2)
@Component
public class ValidOrderHandleInterceptService implements OrderHandleIntercept {


    //...省略
}

/**
 * 指定注入顺序为3
 *
 */
@Order(3)
@Component
public class BankOrderHandleInterceptService implements OrderHandleIntercept {


    //...省略
}
Modify OrderHandleChainService, add @Autowired to automatically inject objects into each responsibility chain
/**
 * 责任链管理类
 *  实现ApplicationContextAware,获取IOC容器
 * @author zxl
 * @date 2023/4/18
 **/
@Component
public class OrderHandleChainService {


    //保存责任链中的处理者
    @Autowired
    private List<OrderHandleIntercept> handleList;


    /**
     * 执行处理
     */
    public OrderContext execute(OrderContext context){


        for (OrderHandleIntercept handleIntercept : handleList) {


             context = handleIntercept.handle(context);
        }

        return context;
    }
}
The print result is as follows
检查银行账户是否合法,调用银行系统检查银行账户余额是否满足下单金额
通过seqId,检查客户是否重复下单
检查请求参数是否合法,并且获取客户的银行账户
4.3 Implementation method 3
To implement the chain of responsibility design pattern by defining an abstract class, or taking the above case as an example, we need to define an abstract class first, such as AbstractOrderHandle.
/**
 * @author zxl
 * @date 2023/4/18
 **/
public abstract class AbstractOrderHandle {


    /**
     * 责任链中的下一个节点
     */
    private AbstractOrderHandle next;

    public AbstractOrderHandle getNext() {


        return next;
    }

    public void setNext(AbstractOrderHandle next) {


        this.next = next;
    }

    /**
     * 对参数进行处理, 具体参数拦截逻辑,给子类去实现
     * @param orderContext
     * @return: com.mashibing.designboot.responsibility.pojo.OrderContext
     */
    public abstract OrderContext handle(OrderContext orderContext);


    /**
     * 执行入口
     * @param context
     * @return: com.mashibing.designboot.responsibility.pojo.OrderContext
     */
    public OrderContext execute(OrderContext context){


        //每个处理器 要执行的处理逻辑
        context= handle(context);

        //判断是否还有下一个责任链节点,没有的话,说明是最后一个节点
        if(getNext() != null){


            getNext().execute(context);
        }

        return context;
    }
}
Then, create three processing classes respectively, and arrange the serial numbers.
@Component
@Order(1)
public class RepeatOrderHandle extends AbstractOrderHandle {


    @Override
    public OrderContext handle(OrderContext context) {


        System.out.println("通过seqId,检查客户是否重复下单");
        return context;
    }
}

@Component
@Order(2)
public class ValidOrderHandle extends AbstractOrderHandle {


    @Override
    public OrderContext handle(OrderContext context) {


        System.out.println("检查请求参数,是否合法,并且获取客户的银行账户");
        return context;
    }
}

@Component
@Order(3)
public class BankOrderHandle extends AbstractOrderHandle {


    @Override
    public OrderContext handle(OrderContext context) {


        System.out.println("检查银行账户是否合法,调用银行系统检查银行账户余额是否满足下单金额");
        return context;
    }
}
Create a chain of responsibility manager, such as OrderHandleManager
@Component
public class OrderHandleManager {


    @Autowired
    private List<AbstractOrderHandle> orderHandleList;

    /**
     * 实现Bean初始化之前的自定义操作
     *     Constructor(构造方法) -> @Autowired(依赖注入) -> @PostConstruct(注释的初始化方法)
     *     @PostConstruct注解的功能:当依赖注入完成后用于执行初始化的方法,并且只会被执行一次
     * @return: null
     */
    @PostConstruct
    public void initChain(){


        int size = orderHandleList.size();

        for (int i = 0; i < size; i++) {


            if(i == size -1){


                //责任链上,最后一个处理者
                orderHandleList.get(i).setNext(null);
            } else {


                //进行链式连接
                orderHandleList.get(i).setNext(orderHandleList.get(i + 1));
            }
        }

    }

    /**
     * 执行处理
     * @param context
     * @return: com.mashibing.designboot.responsibility.pojo.OrderContext
     */
    public OrderContext execute(OrderContext context){


        OrderContext execute = orderHandleList.get(0).execute(context);

        return context;
    }
}
test
    @Autowired
    private OrderHandleManager orderHandleManager;

    @Test
    public void test02(){


//        orderHandleChainService.execute(new OrderContext());
        orderHandleManager.execute(new OrderContext());
    }
The running results are consistent with expectations!
通过seqId,检查客户是否重复下单
检查请求参数,是否合法,并且获取客户的银行账户
检查银行账户是否合法,调用银行系统检查银行账户余额是否满足下单金额
The above explains how SpringBoot introduces the responsibility chain mode and introduces three implementation methods.
The second type is used the most, then the second type, and the third type is used less. The third type is essentially a chain writing method, but it is not as intuitive to understand as the first type. The readability is checked, but the effect is the same.
5. Summary of Chain of Responsibility Model
1) Advantages of the chain of responsibility model:
- Reduced coupling between objects
- Enhanced flexibility in delegating responsibilities to objects
- The connection between objects is simplified, and the responsibility sharing is clearer
2) Disadvantages of the chain of responsibility model:
- There is no guarantee that no request will be processed
- System performance may be affected
- Increased client complexity
3) Use scene analysis
- To use multiple objects to process a request at runtime
- I don't want users to know the specific processing logic.
Question 3: What is the difference between the observer mode and the publish-subscribe mode? Have you ever used the observer mode in your work?
1. Observer pattern
1.1 What is the observer pattern
Observer mode is used to establish a dependency relationship between objects. When an object changes, it will automatically notify other objects, and other objects will respond accordingly.
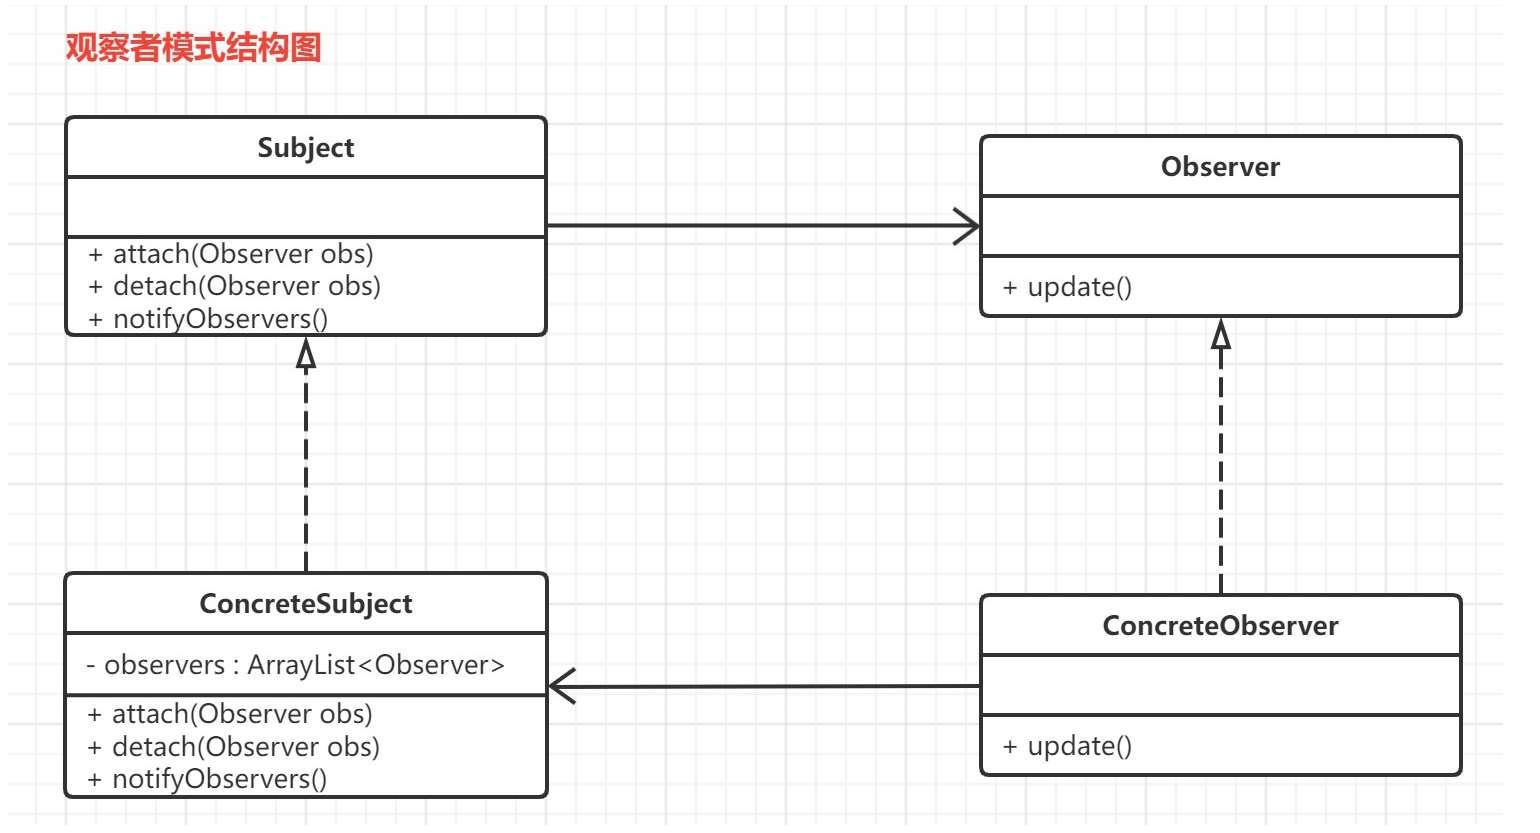
In the observer mode, there are the following roles:
- Subject: abstract subject (abstract observed), the abstract subject role saves all observer objects in a collection, each subject can have any number of observers, abstract subject provides an interface, you can add and delete observer objects .
- ConcreteSubject: Specific subject (specific observer), this role stores the relevant state into the specific observer object, and sends a notification to all registered observers when the internal state of the specific subject changes.
- Observer: Abstract observer is an abstract class of observer, which defines an update interface, so that it updates itself when it is notified of theme changes.
- ConcrereObserver: Concrete observer, which implements the update interface defined by the abstract observer, so as to update its own state when it is notified of topic changes. Maintain a reference to the specific target object in the specific observer, which stores the relevant state of the specific observer, and these states need to be consistent with the specific target.
1.2 Observer mode implementation
- observer
/**
 * 抽象观察者
 * @author zxl
 * @date 2022/10/11
 **/
public interface Observer {


    //update方法: 为不同观察者的更新(响应)行为定义相同的接口,不同的观察者对该方法有不同的实现
    public void update();
}

/**
 * 具体观察者
 * @author zxl
 * @date 2022/10/11
 **/
public class ConcreteObserverOne implements Observer {


    @Override
    public void update() {


        //获取消息通知,执行业务代码
        System.out.println("ConcreteObserverOne 得到通知!");
    }
}

/**
 * 具体观察者
 * @author zxl
 * @date 2022/10/11
 **/
public class ConcreteObserverTwo implements Observer {


    @Override
    public void update() {


        //获取消息通知,执行业务代码
        System.out.println("ConcreteObserverTwo 得到通知!");
    }
}
- Observed
/**
 * 抽象目标类
 * @author zxl
 * @date 2022/10/11
 **/
public interface Subject {


     void attach(Observer observer);
     void detach(Observer observer);
     void notifyObservers();
}

/**
 * 具体目标类
 * @author zxl
 * @date 2022/10/11
 **/
public class ConcreteSubject implements Subject {


    //定义集合,存储所有观察者对象
    private ArrayList<Observer> observers = new ArrayList<>();


    //注册方法,向观察者集合中增加一个观察者
    @Override
    public void attach(Observer observer) {


        observers.add(observer);
    }

    //注销方法,用于从观察者集合中删除一个观察者
    @Override
    public void detach(Observer observer) {


        observers.remove(observer);
    }

    //通知方法
    @Override
    public void notifyObservers() {


        //遍历观察者集合,调用每一个观察者的响应方法
        for (Observer obs : observers) {


            obs.update();
        }
    }
}
- test class
public class Client {


    public static void main(String[] args) {


        //创建目标类(被观察者)
        ConcreteSubject subject = new ConcreteSubject();

        //注册观察者类,可以注册多个
        subject.attach(new ConcreteObserverOne());
        subject.attach(new ConcreteObserverTwo());

        //具体主题的内部状态发生改变时,给所有注册过的观察者发送通知。
        subject.notifyObservers();
    }
}
2. The difference between the publish-subscribe mode and the observer mode
2.1 Differences in definitions
The publish-subscribe model belongs to the observer model in a broad sense
- The publish-subscribe mode is the most commonly used implementation of the observer mode, and from the perspective of decoupling and reuse, it is better than the typical observer mode
2.2 The difference between the two
Let's take a look at the structural differences between the observer mode and the publish-subscribe mode
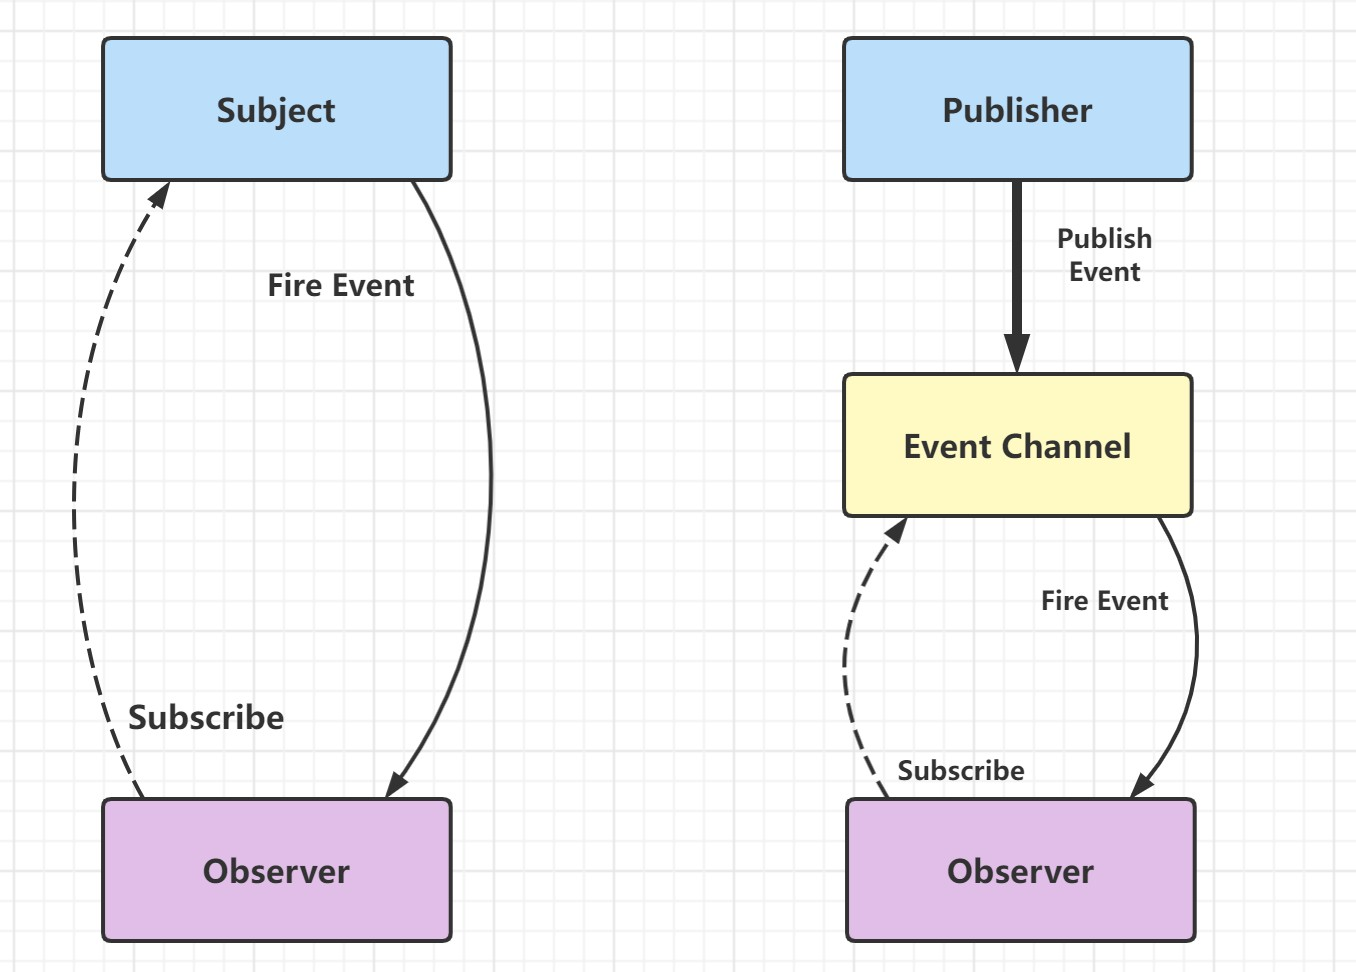
The difference in the operation process
- Observer mode: The data source directly notifies the subscribers of changes.
- Publish-subscribe mode: The data source tells the third party (event channel) that a change has occurred, and the third party notifies the subscriber that the change has occurred.
3. Application of observer mode in actual development
3.1 Demand scenarios in actual development
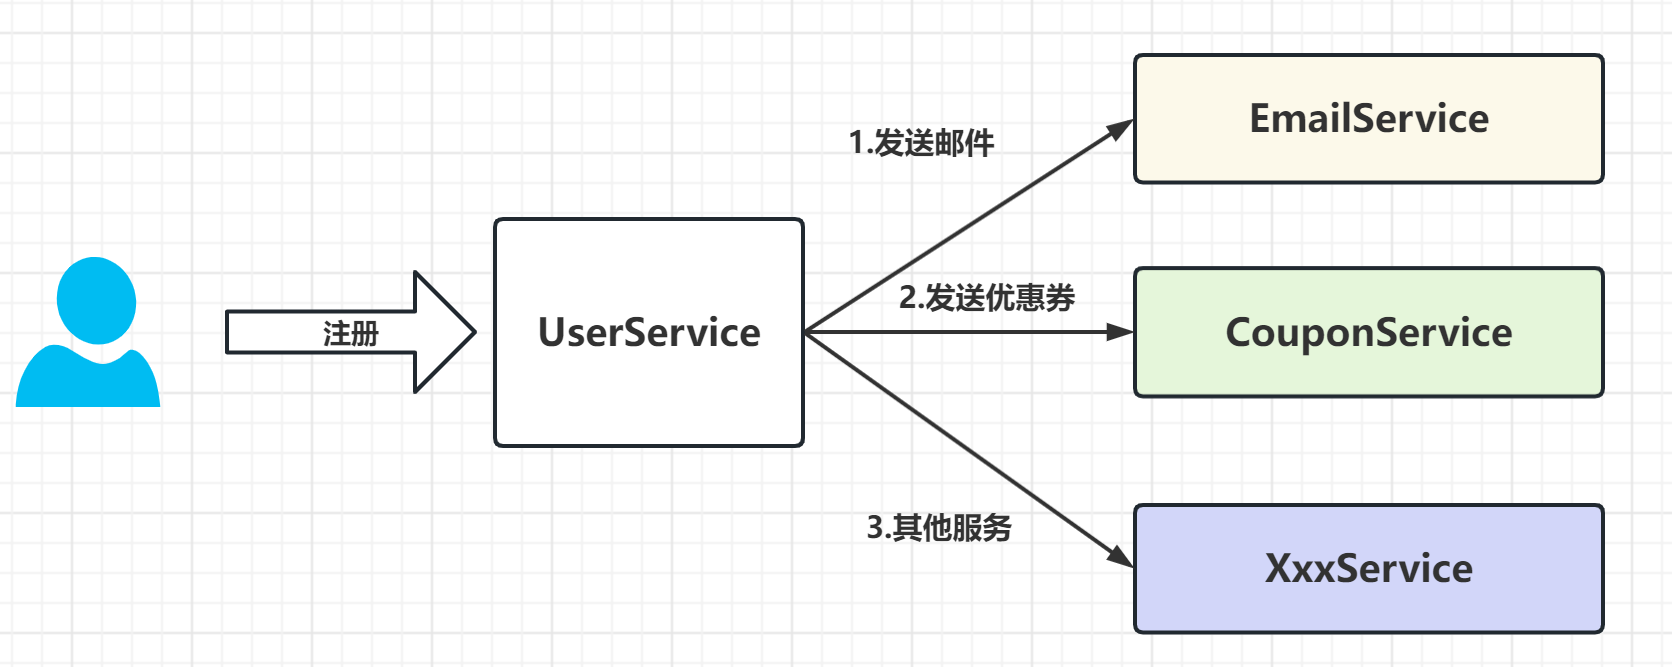
In our daily business development, the observer mode plays a big role in realizing the decoupling of business . Take the user registration scenario as an example. Suppose that when the user registration is completed, it is necessary to send emails, coupons, etc. to the user, as shown in the following figure:
After using the observer pattern
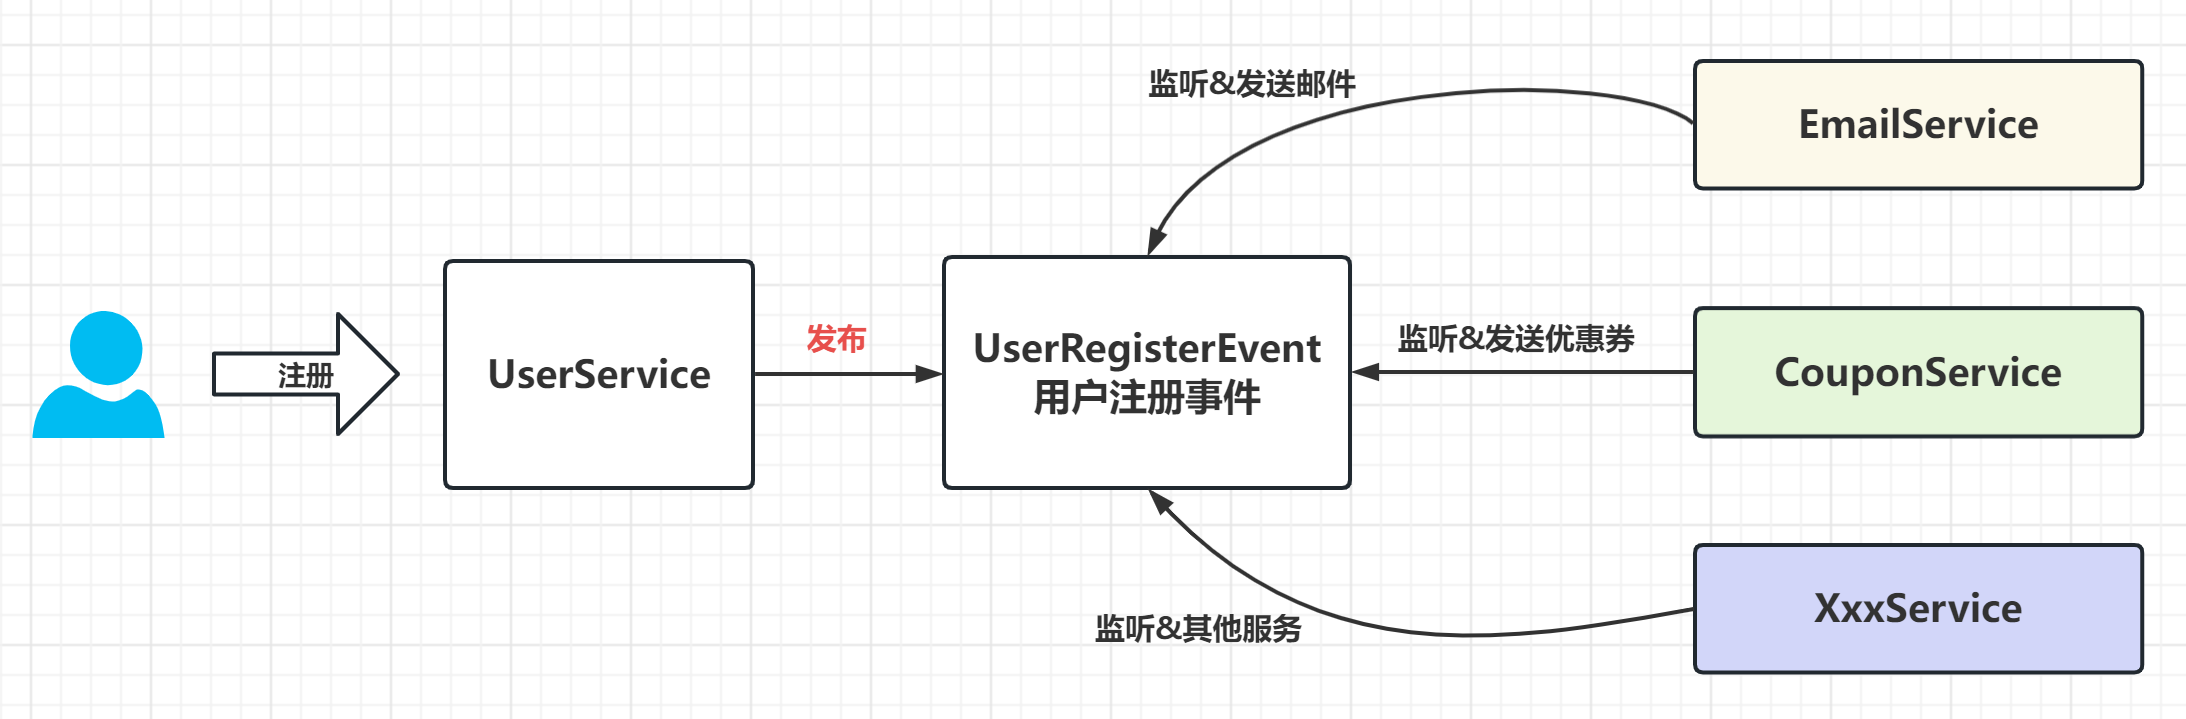
- After UserService completes its own user registration logic, it only needs to publish a UserRegisterEvent event without paying attention to other expansion logic.
- Other Services can subscribe to the UserRegisterEvent event to implement custom expansion logic.
3.2 Spring event mechanism
Based on the observer pattern, Spring implements its own event mechanism, which consists of three parts:
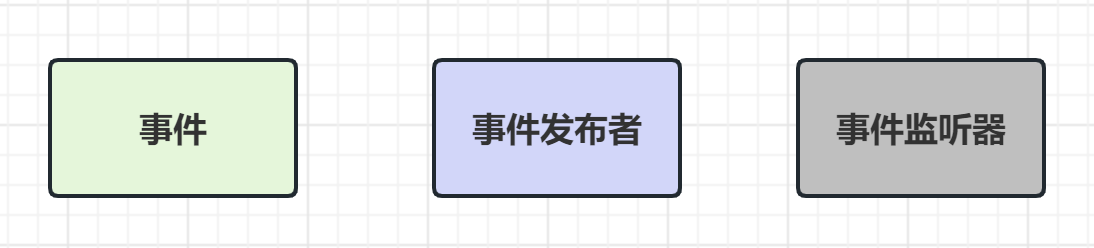
- Event
ApplicationEvent: Implement custom events by inheriting it. In addition, the event source can be obtained through itssourceproperties , and the occurrence time can be obtained through the properties.timestamp - Event publisher
ApplicationEventPublisher: Through it, events can be published. - Event listener
ApplicationListener: By implementing it, the specified type of event is monitored.
3.3 Code implementation
(1) UserRegisterEvent
- Create the UserRegisterEvent event class, inherit the ApplicationEvent class, and register the event for the user. code show as below:
/**
 * 用户注册事件
 * @author zxl
 * @date 2023/4/19
 **/
public class UserRegisterEvent extends ApplicationEvent {


    /**
     * 用户名
     */
    private String username;

    public UserRegisterEvent(Object source) {


        super(source);
    }

    public UserRegisterEvent(Object source,String  username) {


        super(source);
        this.username = username;
    }

    public String getUsername() {


        return username;
    }

    public void setUsername(String username) {


        this.username = username;
    }
}
(2) UserService (event source + event publishing)
- Create a UserService class with the following code:
/**
 * 事件源角色+事件发布
 * @author zxl
 * @date 2023/4/19
 **/
@Service
public class UserService implements ApplicationEventPublisherAware {


    private Logger logger = LoggerFactory.getLogger(getClass());


    private ApplicationEventPublisher applicationEventPublisher;

    @Override
    public void setApplicationEventPublisher(ApplicationEventPublisher applicationEventPublisher) {


        this.applicationEventPublisher = applicationEventPublisher;
    }

    public void register(String username){


        //... 执行注册逻辑
        logger.info("[register][执行用户{}的注册逻辑]",username);

        /**
         * publishEvent方法, 参数是: ApplicationEvent的实现类对象
         * 每当事件发布时,所有的ApplicationListener就会被自动的触发.
         */
        //... 发布用户注册事件
        applicationEventPublisher.publishEvent(new UserRegisterEvent(this,username));
    }
}
- Implements
ApplicationEventPublisherAwarethe interface ,ApplicationEventPublisherinjecting into it. - After executing the registration logic,
ApplicationEventPublishercallpublishEvent(ApplicationEvent event)the method of and publishUserRegisterEventthe event . - The implementation of the event mechanism requires three parts, the event source, the event, and the event listener. The ApplicationEvent described above is equivalent to the event, and the ApplicationListener is equivalent to the event listener. The event source here refers to the ApplicationEventPublisher.
(3) Create EmailService
/**
 * 事件监听角色
 * @author zxl
 * @date 2023/4/19
 **/
@Service  //实现 ApplicationListener 接口,通过 E 泛型设置感兴趣的事件。
public class EmailService implements ApplicationListener<UserRegisterEvent> {


    private Logger logger = LoggerFactory.getLogger(getClass());


    //实现 #onApplicationEvent(E event) 方法,针对监听的 UserRegisterEvent 事件,进行自定义处理。
    @Override
    public void onApplicationEvent(UserRegisterEvent event) {


        logger.info("[onApplicationEvent][给用户({}) 发送邮件]", event.getUsername());
    }
}
- Implement the ApplicationListener interface, and set interested events through
Egenerics . - After implementing the ApplicationListener interface, you need to implement the method onApplicationEvent() to perform custom processing on the monitored UserRegisterEvent event. This method will be executed after the container initializes all the beans.
(4) CouponService
@Service
public class CouponService {


    private Logger logger = LoggerFactory.getLogger(getClass());

    //添加 @EventListener 注解,并设置监听的事件为 UserRegisterEvent。
    @EventListener
    public void addCoupon(UserRegisterEvent event) {


        logger.info("[addCoupon][给用户({}) 发放优惠劵]", event.getUsername());
    }
}
(5) DemoController
- Provide
/demo/registerregistration interface
@RestController
@RequestMapping("/demo")
public class DemoController {


    @Autowired
    private UserService userService;

    @GetMapping("/register")
    public String register(String username) {


        userService.register(username);
        return "success";
    }

}
3.4 Code Testing
① Execute the DemoApplication class to start the project.
② Call http://127.0.0.1:8080/demo/register?username=mashibing interface to register. The IDEA console prints the log as follows:
// UserService 发布 UserRegisterEvent 事件
2023-04-19 16:49:40.628  INFO 9800 --- [nio-8080-exec-1] c.m.d.o.demo02.service.UserService       : [register][执行用户mashibing的注册逻辑]

//EmailService 监听处理该事件
2023-04-19 16:49:40.629  INFO 9800 --- [nio-8080-exec-1] c.m.d.o.demo02.listener.EmailService     : [onApplicationEvent][给用户(mashibing) 发送邮件]

//CouponService 监听处理该事件
2023-04-19 16:49:40.629  INFO 9800 --- [nio-8080-exec-1] c.m.d.o.demo02.listener.CouponService    : [addCoupon][给用户(mashibing) 发放优惠劵]
4. Observer pattern summary
1) Advantages of the observer pattern
- Reduce coupling between target classes and observers
- A broadcast mechanism can be implemented
2) Disadvantages of the observer pattern
- Sending notifications will take a certain amount of time
- Observers have circular dependencies, which can lead to system crashes
*3) Common usage scenarios of observer mode
- When one object changes, other objects need to be changed
- When an object changes, it needs to be notified
Question 4: How to apply the adapter pattern in actual work?
1. Introduction to adapter mode
1.1 Introduction to Adapter Mode
The original definition of the adapter pattern (adapter pattern) is: to convert the interface of a class into another interface that customers expect, and the adapter can make two incompatible classes work together.
The main function of the adapter mode is to unify the originally incompatible interfaces through adaptation and modification, making it convenient for users to use, just like the universal charging and multi-interface data lines we mentioned, they are all for adapting to various The interface is compatible.

Why switch interfaces?
- Both the original interface and the target interface already exist, and it is not easy to modify the interface code
- The abstract interface hopes to reuse the logic of existing components
1.2 Adapter pattern structure
Adapter pattern (Adapter) contains the following main roles:
- Target (Target) interface: the interface expected by the current system business, which can be an abstract class or an interface.
- Adapter (Adaptee) class: The adapter is the role to be adapted, which is the component interface in the existing component library to be accessed and adapted.
- Adapter (Adapter) class: It is a converter that converts the adapter interface into the target interface by inheriting or referencing the adapter object, allowing customers to access the adapter in the format of the target interface.
The adapter pattern is divided into:
-
class adapter
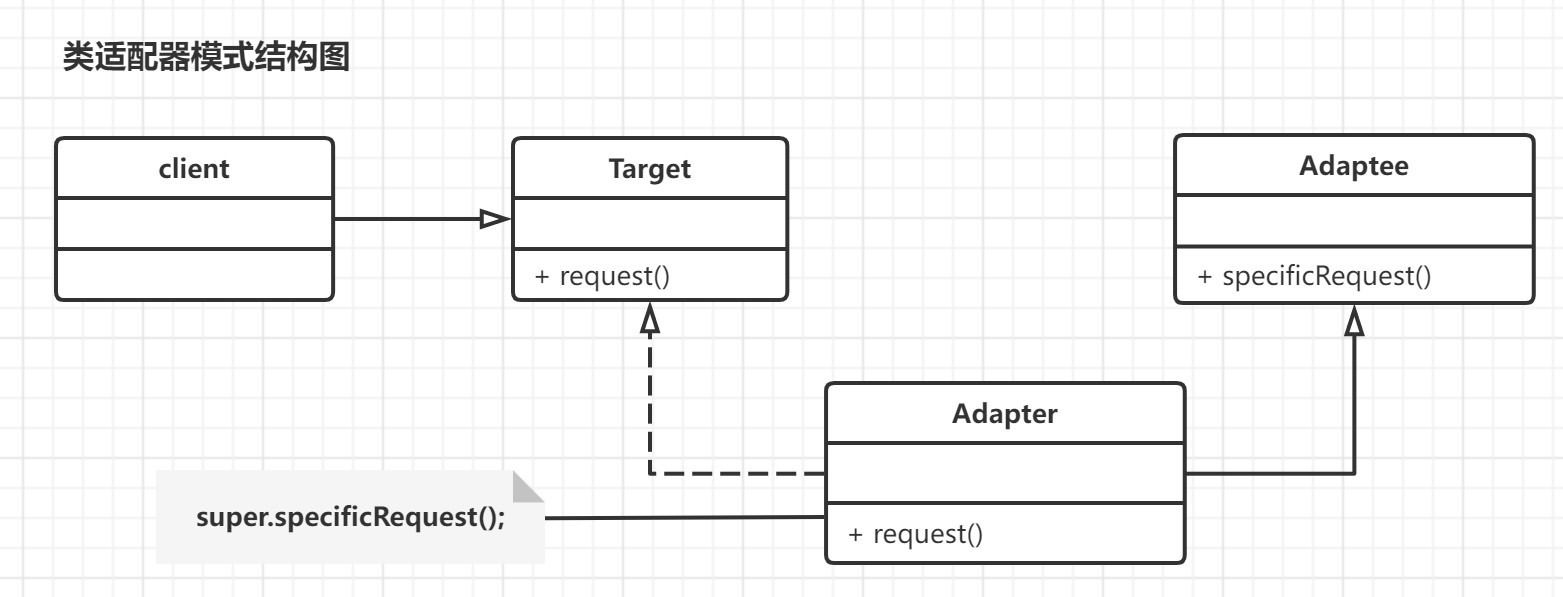
-
object adapter
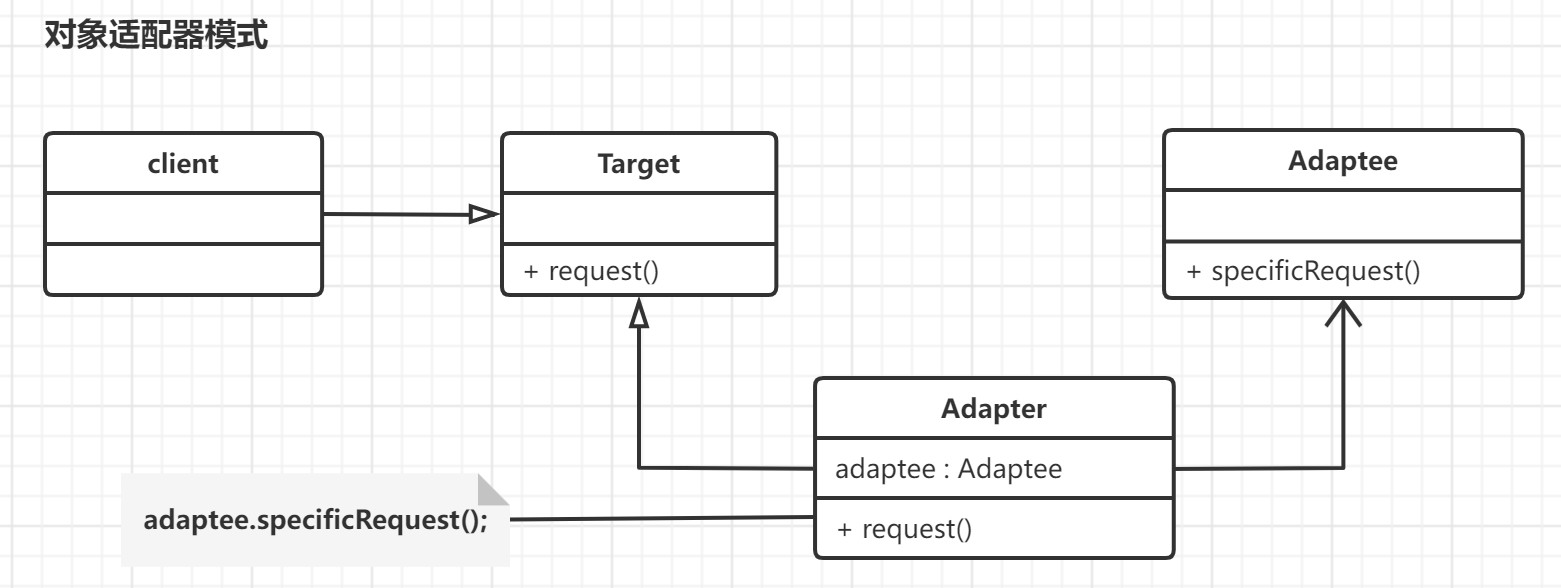
The difference between the two is: the relationship between the adapter and the adapter, the class adapter is an inheritance relationship, and the object adapter is an aggregation relationship. According to the design principle, aggregation takes precedence over inheritance, and object adapters should be used more.
2. Application of adapter mode in actual development
2.1 Requirements description
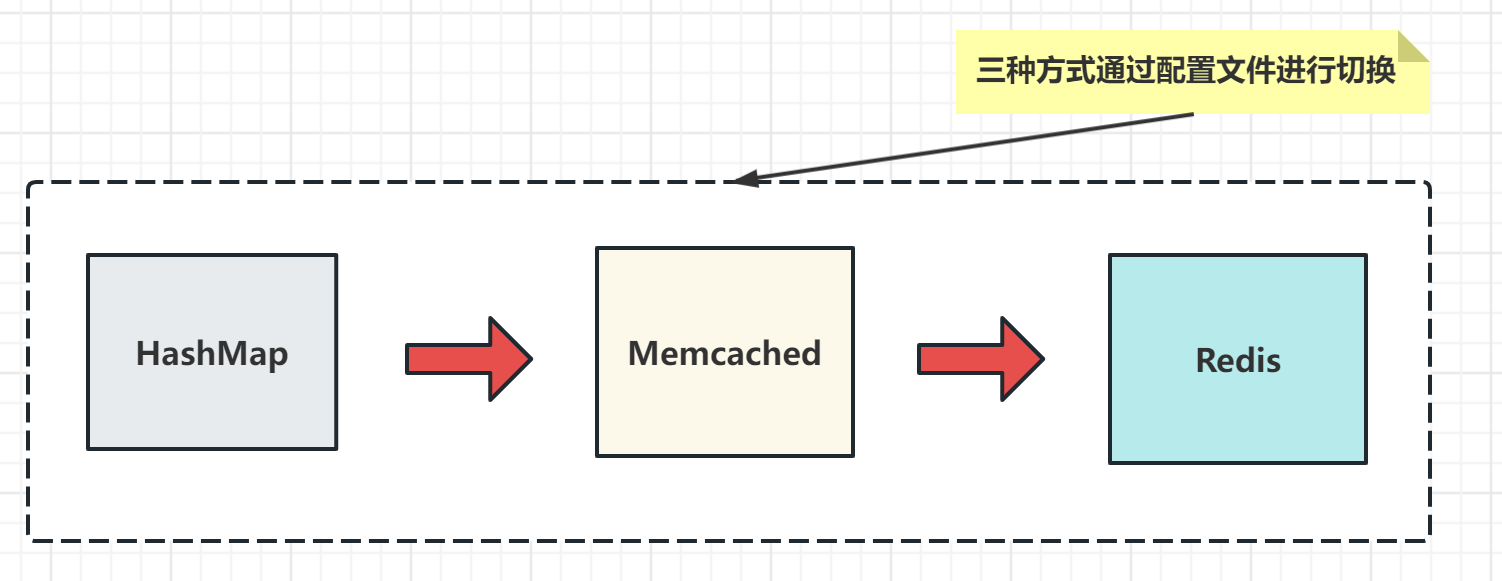
In order to improve the speed of the system, some data is cached in the memory in the form of KV, and the platform provides get, put, remove and other APIs and related management mechanisms.
The iterative process of function realization, from HashMap to Memcached and then to Redis, must ensure that when adding new cache components later, it can be switched freely and conform to the principle of opening and closing.
Design question:
- How to realize the expansion of functions under the premise of conforming to the principle of opening and closing
- The two client APIs are different, how to ensure free switching
Use the adapter pattern
2.2 Function realization
Use the adapter mode to unify various third-party components (implementation schemes) with similar functions into the API you need, and the business code only depends on the unified API, not on the third-party API.
(1) First define a cache interface, including get, put, remove and other operation methods. For example:
public interface Cache {


    void put(String key, Object value);
    Object get(String key);
    void remove(String key);
}
(2) Then implement the three adapters of the interface, corresponding to the three cache schemes of HashMap, Memcached, and Redis respectively. For example:
public class HashMapCacheAdapter implements Cache {


    private Map<String, Object> cache = new HashMap<>();

    @Override
    public void put(String key, Object value) {


        cache.put(key, value);
    }

    @Override
    public Object get(String key) {


        return cache.get(key);
    }

    @Override
    public void remove(String key) {


        cache.remove(key);
    }
}

public class MemcachedCacheAdapter implements Cache {


    private MemcachedClient memcachedClient;

    public MemcachedCacheAdapter(MemcachedClient memcachedClient) {


        this.memcachedClient = memcachedClient;
    }

    @Override
    public void put(String key, Object value) {


        memcachedClient.set(key, 0, value);
    }

    @Override
    public Object get(String key) {


        return memcachedClient.get(key);
    }

    @Override
    public void remove(String key) {


        memcachedClient.delete(key);
    }
}


public class RedisCacheAdapter implements Cache {


    private Jedis jedis;

    public RedisCacheAdapter(Jedis jedis) {


        this.jedis = jedis;
    }

    @Override
    public void put(String key, Object value) {


        jedis.set(key, value.toString());
    }

    @Override
    public Object get(String key) {


        return jedis.get(key);
    }

    @Override
    public void remove(String key) {


        jedis.del(key);
    }
}
Finally, we need a factory class to create the corresponding cache adapter according to the configuration in the configuration file. For example:
public class CacheAdapterFactory {


    public static Cache createCacheAdapter(String type) {


        if ("HashMap".equals(type)) {


            return new HashMapCacheAdapter();
        } else if ("Memcached".equals(type)) {


            MemCachedClient memCachedClient = new MemCachedClient();
            return new MemcachedCacheAdapter(memCachedClient);
        } else if ("Redis".equals(type)) {


            Jedis jedis = new Jedis("localhost", 6379);
            return new RedisCacheAdapter(jedis);
        } else {


            throw new IllegalArgumentException("Invalid cache type: " + type);
        }
    }
}
When using, you only need to call the createCacheAdapter method of the factory class, and pass in the cache type to obtain the corresponding cache adapter. For example:
Cache cache = CacheAdapterFactory.createCacheAdapter("Redis");
cache.put("key", "value");
Object result = cache.get("key");
cache.remove("key");
3. Adapter mode summary
1) Advantages of Adapter Mode
- Allows two unrelated classes to run together
- Improve the reusability of classes, and can unify multiple different interfaces
- Hide the implementation class of the existing interface
- High flexibility, can be freely adapted
2) Disadvantages of adapter mode
- Using class adapters, at most one adapter class can be adapted at a time
- Excessive use of adapters will increase the complexity of the system
3) Scenarios where the adapter mode is applicable
- Unify the interface of multiple classes
- When the original interface cannot be modified, but there is a need for compatibility
Question 5: Tell me the difference between the decorator mode and the proxy mode? How to use the decorator mode in your work?
1. Respective definitions
Decorator mode: The decorator mode enhances the function of the original class without changing the interface of the original class, and supports the nested use of multiple decorators .
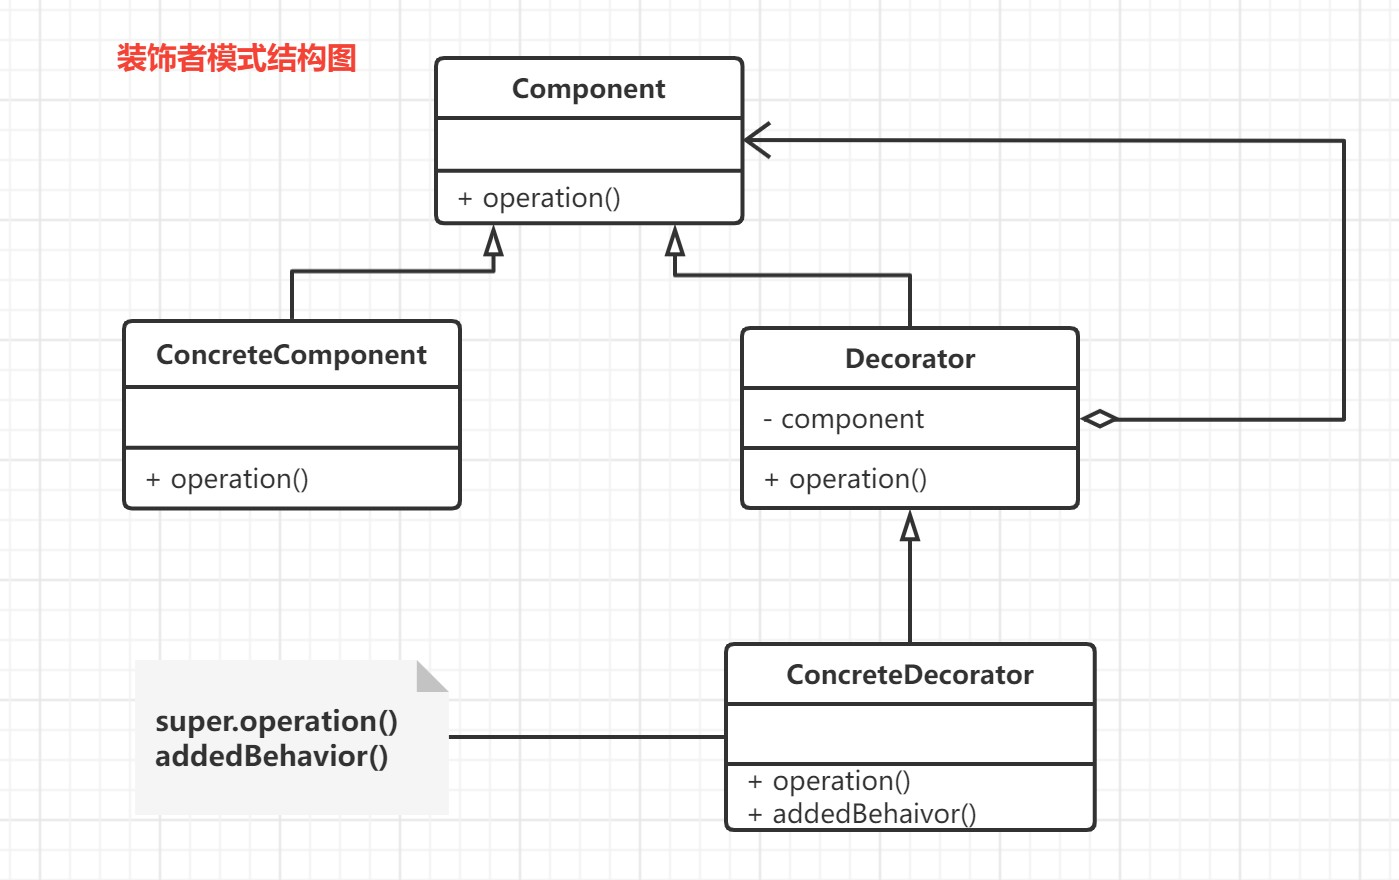
- Component abstract component role: It is the parent class of concrete components and abstract decoration classes, and declares the business methods implemented in concrete components, so that the client can handle undecorated and decorated objects in a consistent manner.
- Concrete Component Concrete component role: It is a subclass of the abstract component class, which defines the specific construction object and implements the methods declared in the abstract construction. A decorator class can add additional responsibilities (methods) to it.
- Decorator Abstract decoration role: It is a subclass of the abstract component class, which is used to add responsibilities to specific components and maintain a reference to the abstract component object to achieve the purpose of decoration.
- Concrete Decorator Concrete decoration role: It is a subclass of the abstract decoration class, responsible for adding new responsibilities to components. Each concrete decoration class defines some new behaviors, which can call the defined methods and add new methods.
code example
/**
 * 抽象构件类
 * @author zxl
 * @date 2022/9/27
 **/
public abstract class Component {


    //抽象方法
    public abstract void operation();
}

/**
 * 具体构建类
 * @author spikeCong
 * @date 2022/9/27
 **/
public class ConcreteComponent extends Component {


    @Override
    public void operation() {


        //基础功能实现(复杂功能通过装饰类进行扩展)
    }
}
/**
 * 抽象装饰类-装饰者模式的核心
 * @author zxl
 * @date 2022/9/27
 **/
public abstract class Decorator extends Component{


    //维持一个对抽象构件对象的引用
    private Component component;

    //注入一个抽象构件类型的对象
    public Decorator(Component component) {


        this.component = component;
    }


    @Override
    public void operation() {


        //调用原有业务方法(这里并没有真正实施装饰,而是提供了一个统一的接口,将装饰过程交给子类完成)
        component.operation();
    }
}


/**
 * 具体装饰类
 * @author zxl
 * @date 2022/9/27
 **/
public class ConcreteDecorator extends Decorator {


    public ConcreteDecorator(Component component) {


        super(component);
    }

    @Override
    public void operation() {


        super.operation(); //调用原有业务方法
        addedBehavior(); //调用新增业务方法
    }

    //新增业务方法
    public void addedBehavior(){


        //......
    }
}
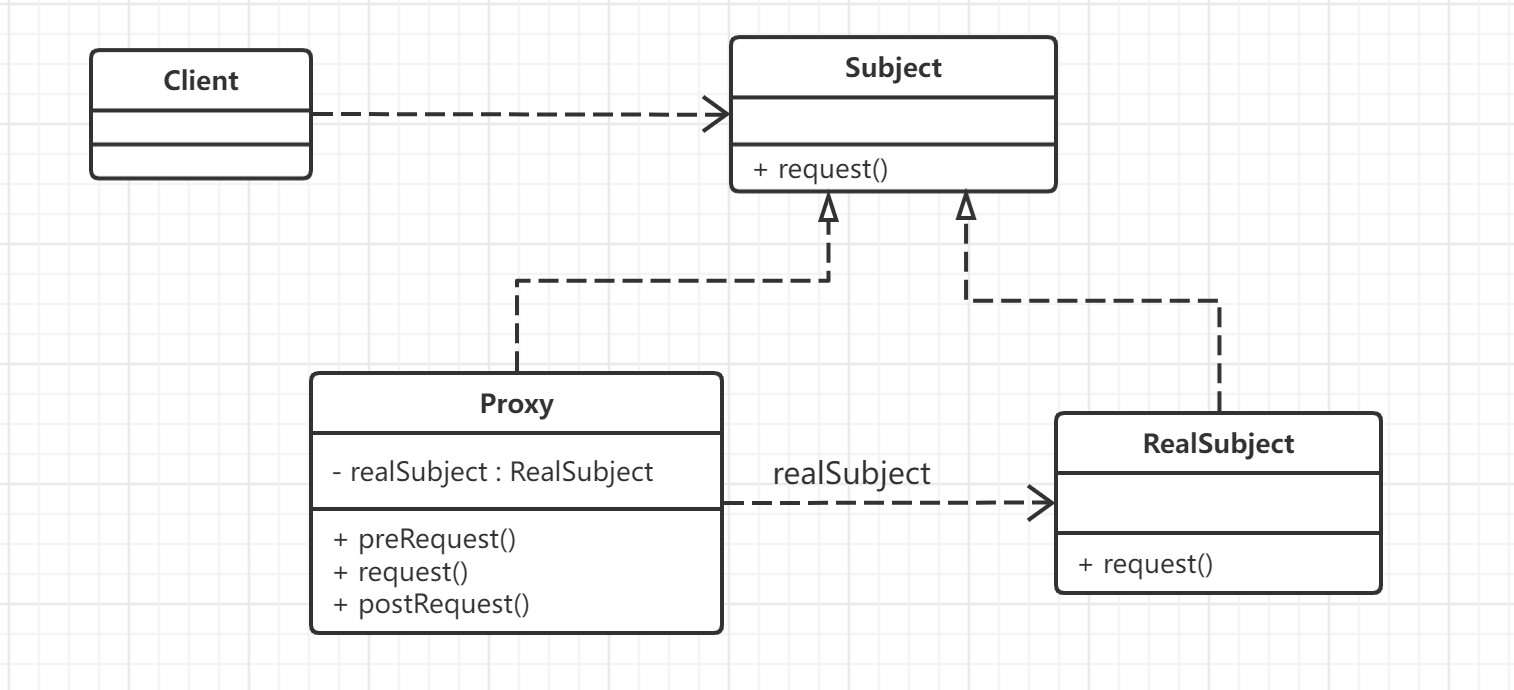
Proxy mode: The proxy mode defines a proxy class for the original class without changing the interface of the original class. The main purpose is to control access, not to enhance functions . This is the biggest difference between it and the decorator mode.
2. Main difference
different purpose
- Proxy mode: control —> for yourself
- Decorator Pattern: Enhancement —> For Target Class
use difference
- Proxy mode: have absolute control over the proxied object, can execute or not
- Decorator mode: without control, it will definitely execute, adding a layer of decoration function
for client
- Proxy mode: more concerned about the function of the proxy object
- Decorator mode: more concerned with enhancing the functionality of the decorator
3. Application of decorator pattern in actual development
Requirement: When there are multiple decorations, how to ensure that the latter decoration is decorated on the basis of the previous decoration. For example, characters need to be encrypted + compressed. How to make compression, compression based on encryption?
- Create a character component interface
public interface StringComponent {


    String transform(String str);
}
- Implement character components
//字符组件
public class StringEncryptor implements StringComponent {


    @Override
    public String transform(String str) {


        //base64编码
        String encoderStr = Base64.getEncoder().encodeToString(str.getBytes());
        return encoderStr;
    }
}
- character encryption decorator
public class StringEncryptorDecorator implements StringComponent {


    private StringComponent component;

    public StringEncryptorDecorator(StringComponent component) {


        this.component = component;
    }

    @Override
    public String transform(String str) {


        String encrypted = component.transform(str); // 先调用前面一个装饰器或组件的方法
        // 这里演示一个简单的压缩方法,将字符串压缩成一行
        return encrypted.replaceAll("\\s+", "");
    }
}
- Decorator for character compression
public class StringCompressorDecorator implements StringComponent {


    private StringComponent component;

    public StringCompressorDecorator(StringComponent component) {


        this.component = component;
    }

    @Override
    public String transform(String str) {


        String compressed = component.transform(str); // 先调用前面一个装饰器或组件的方法
        // 这里演示一个简单的压缩方法,将字符串压缩成一行
        return compressed.replaceAll("\\s+", "");
    }
}
- client
public class Client {


    public static void main(String[] args) {


        StringComponent component = new StringEncryptor(); // 创建字符加密组件
        component = new StringEncryptorDecorator(component); // 用字符加密装饰器装饰它
        component = new StringCompressorDecorator(component); // 用字符压缩装饰器再次装饰它

        String original = "Hello, world!"; // 原始字符串
        String transformed = component.transform(original); // 转换后的字符串
        System.out.println(transformed);
    }
}
The output is: Ifmmp-!xpsme", which is the result of encrypting and compressing the original string. It can be seen that the compression operation is performed on the basis of the encryption operation.
4. Summary of decorator pattern
1) Advantages of the decorator pattern:
- The decorator pattern is more flexible than inheritance .
- It can be decorated multiple times, and different decoration orders can achieve different behaviors
2) Disadvantages of decorator mode:
- would produce too many small objects
- Decorator mode, more error-prone
3) Applicable scenarios of the decorator pattern
- Dynamic extension
- The scenario of inheriting extended classes is not supported