1. Introduction
1.1. What is a dead letter switch
What is dead letter?
When a message in a queue meets one of the following conditions, it can become a dead letter:
-
The consumer uses basic.reject or basic.nack to declare consumption failure, and the requeue parameter of the message is set to false
-
The message is an expired message, no one consumes after timeout
-
The queue message to be delivered is full and cannot be delivered
If the queue containing dead letters is configured with dead-letter-exchangeattributes and an exchange is specified, the dead letters in the queue will be delivered to this exchange, and this exchange is called a dead letter exchange (Dead Letter Exchange, check DLX).
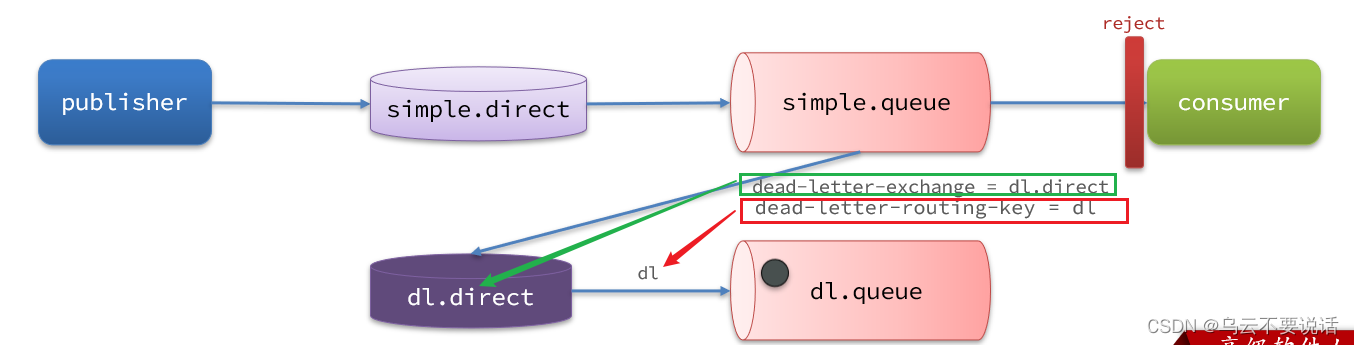
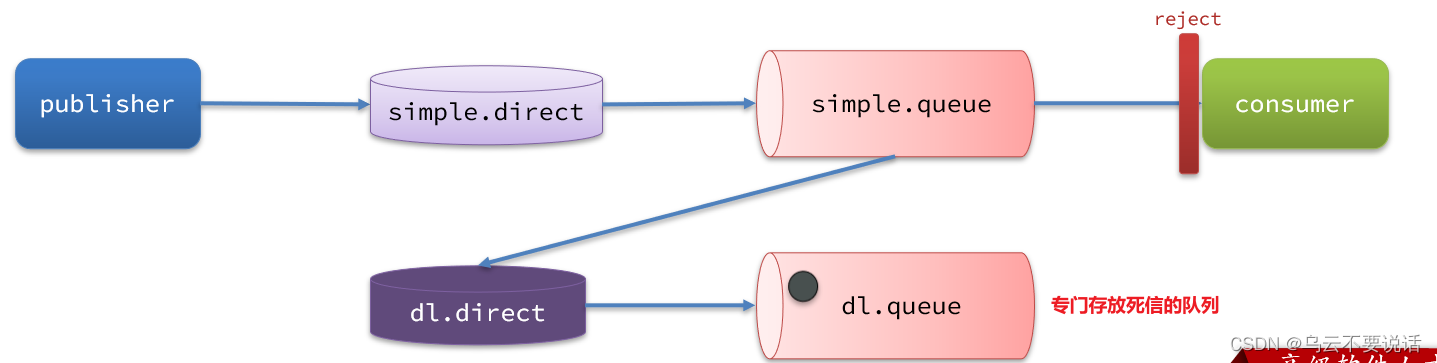
As shown in the figure, a message is rejected by the consumer and becomes a dead letter:

Because simple.queue is bound to the dead letter exchange dl.direct, the dead letter will be delivered to this exchange:

If the dead letter switch is also bound to a queue, the message will eventually enter the queue where the dead letter is stored:

In addition, when the queue delivers the dead letter to the dead letter exchange, it must know two pieces of information:
-
dead letter switch name
-
The RoutingKey bound to the dead letter exchange and the dead letter queue
Only in this way can we ensure that the delivered message can reach the dead letter exchange and be correctly routed to the dead letter queue.
1.2. Using the dead letter switch to receive dead letters (expansion)
In the failure retry strategy, the default RejectAndDontRequeueRecoverer will send reject to RabbitMQ after the number of local retries is exhausted, and the message becomes a dead letter and is discarded.
We can add a dead letter switch to simple.queue and bind a queue to the dead letter switch. In this way, the message will not be discarded after it becomes a dead letter, but will be finally delivered to the dead letter exchange and routed to the queue bound to the dead letter exchange.
In the consumer service, we define a set of dead letter switches and dead letter queues:
// 声明普通的 simple.queue队列,并且为其指定死信交换机:dl.direct
@Bean
public Queue simpleQueue2(){
    return QueueBuilder.durable("simple.queue") // 指定队列名称,并持久化
        .deadLetterExchange("dl.direct") // 指定死信交换机
        .build();
}
// 声明死信交换机 dl.direct
@Bean
public DirectExchange dlExchange(){
    return new DirectExchange("dl.direct", true, false);
}
// 声明存储死信的队列 dl.queue
@Bean
public Queue dlQueue(){
    return new Queue("dl.queue", true);
}
// 将死信队列 与 死信交换机绑定
@Bean
public Binding dlBinding(){
    return BindingBuilder.bind(dlQueue()).to(dlExchange()).with("simple");
}
1.3. Summary
What kind of message becomes dead letter?
-
The message is rejected by the consumer or returns nack
-
Message timed out and not consumed
-
queue is full
What is the usage scenario of the dead letter exchange?
-
If the queue is bound to a dead letter exchange, the dead letter will be delivered to the dead letter exchange;
-
The dead letter switch can be used to collect all messages (dead letters) that consumers fail to process and hand them over to manual processing to further improve the reliability of the message queue.
Two, TTL
If a message in a queue is not consumed after a timeout, it will become a dead letter. There are two cases of timeout:
-
The queue where the message is located has a timeout set
-
The message itself sets a timeout
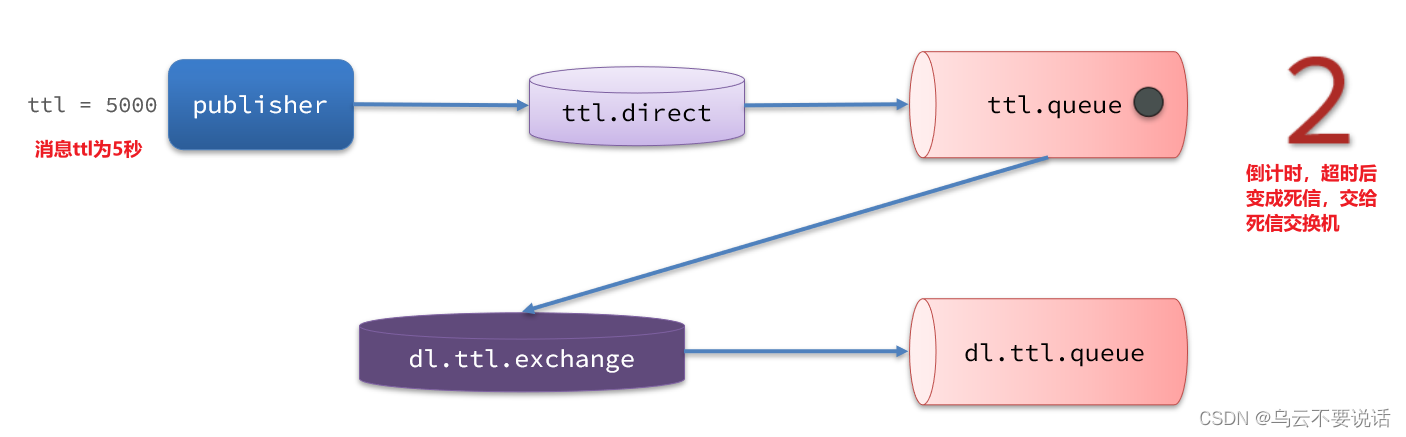
2.1. A dead letter switch that receives a timeout dead letter
In the SpringRabbitListener of the consumer service, define a new consumer, and declare the dead letter switch and dead letter queue:
@RabbitListener(bindings = @QueueBinding(
    value = @Queue(name = "dl.ttl.queue", durable = "true"),
    exchange = @Exchange(name = "dl.ttl.direct"),
    key = "ttl"
))
public void listenDlQueue(String msg){
    log.info("接收到 dl.ttl.queue的延迟消息:{}", msg);
}
2.2. Declare a queue and specify TTL
To set a timeout for a queue, you need to configure the x-message-ttl attribute when declaring the queue:
@Bean
public Queue ttlQueue(){
    return QueueBuilder.durable("ttl.queue") // 指定队列名称,并持久化
        .ttl(10000) // 设置队列的超时时间,10秒
        .deadLetterExchange("dl.ttl.direct") // 指定死信交换机
        .build();
}
Note that this queue sets the dead-letter switch todl.ttl.direct
Declare the switch and bind the ttl to the switch:
@Bean
public DirectExchange ttlExchange(){
    return new DirectExchange("ttl.direct");
}
@Bean
public Binding ttlBinding(){
    return BindingBuilder.bind(ttlQueue()).to(ttlExchange()).with("ttl");
}
Send a message, but don't specify a TTL:
@Test
public void testTTLQueue() {
    // 创建消息
    String message = "hello, ttl queue";
    // 消息ID,需要封装到CorrelationData中
    CorrelationData correlationData = new CorrelationData(UUID.randomUUID().toString());
    // 发送消息
    rabbitTemplate.convertAndSend("ttl.direct", "ttl", message, correlationData);
    // 记录日志
    log.debug("发送消息成功");
}
Log of sent message:

View the log of the received message:

Because the TTL value of the queue is 10000ms, which is 10 seconds. You can see that the time difference between message sending and receiving is exactly 10 seconds.
2.3. When sending a message, set TTL
When sending a message, it is also possible to specify a TTL:
@Test
public void testTTLMsg() {
    // 创建消息
    Message message = MessageBuilder
        .withBody("hello, ttl message".getBytes(StandardCharsets.UTF_8))
        .setExpiration("5000")
        .build();
    // 消息ID,需要封装到CorrelationData中
    CorrelationData correlationData = new CorrelationData(UUID.randomUUID().toString());
    // 发送消息
    rabbitTemplate.convertAndSend("ttl.direct", "ttl", message, correlationData);
    log.debug("发送消息成功");
}
View sent message log:

Receive message log:

This time, the delay between sending and receiving was only 5 seconds. Note that when TTL is set for both the queue and the message, any expired one will become a dead letter.
2.4. Summary
What are the two ways of message timeout?
-
Set the ttl attribute for the queue, and the messages that exceed the ttl time after entering the queue become dead letters
-
Set the ttl attribute for the message, and the queue will become a dead letter after receiving the message exceeding the ttl time
How to realize that the consumer receives the message 20 seconds after sending a message?
-
Specify a dead-letter exchange for the message's destination queue
-
Bind the queue listened by the consumer to the dead letter exchange
-
When sending a message, set the timeout period for the message to 20 seconds
3. Delay Queue
Using TTL combined with dead-letter switches, we realize the effect that consumers delay receiving messages after messages are sent. This message mode is called the delay queue (Delay Queue) mode.
Use cases for delay queues include:
-
Delay in sending SMS
-
The user places an order, if the user does not pay within 15 minutes, it will be automatically canceled
-
Schedule a work meeting and automatically notify all participants 20 minutes later
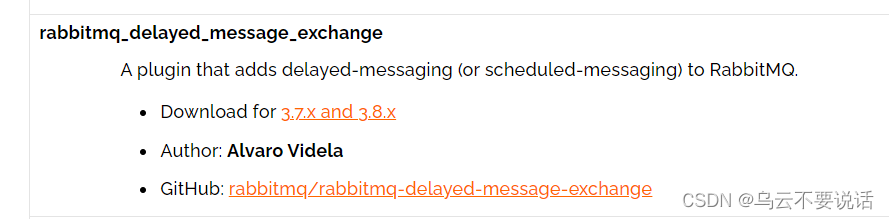
Because there are so many demands for delay queues, RabbitMQ officially launched a plug-in that natively supports delay queue effects.
This plugin is the DelayExchange plugin. Refer to RabbitMQ's plugin list page: Community Plugins — RabbitMQ
For usage, please refer to the official website address: Scheduling Messages with RabbitMQ | RabbitMQ - Blog
3.1. Install the DelayExchange plug-in
Install MQ
Execute the following command to run the MQ container:
docker run \
 -e RABBITMQ_DEFAULT_USER=itcast \
 -e RABBITMQ_DEFAULT_PASS=123321 \
 -v mq-plugins:/plugins \
 --name mq \
 --hostname mq1 \
 -p 15672:15672 \
 -p 5672:5672 \
 -d \
 rabbitmq:3.8-management
Install the DelayExchange plugin
The official installation guide address is: Scheduling Messages with RabbitMQ | RabbitMQ - Blog
The above document is based on installing RabbitMQ natively on linux, and then installing the plug-in.
Because we installed RabbitMQ based on Docker before, we will explain how to install the RabbitMQ plugin based on Docker.
download plugin
RabbitMQ has an official plugin community at: Community Plugins — RabbitMQ
It contains various plugins, including the DelayExchange plugin we're going to use:
You can go to the corresponding GitHub page to download the 3.8.9 version of the plug-in, the address is Release v3.8.9 · rabbitmq/rabbitmq-delayed-message-exchange · GitHub This corresponds to RabbitMQ version 3.8.5 and above.

upload plugin
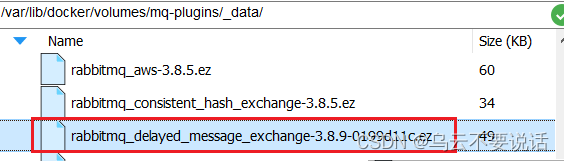
Because we are installing based on Docker, we need to check the data volume corresponding to the RabbitMQ plugin directory first. If not Docker-based, re-create the Docker container.
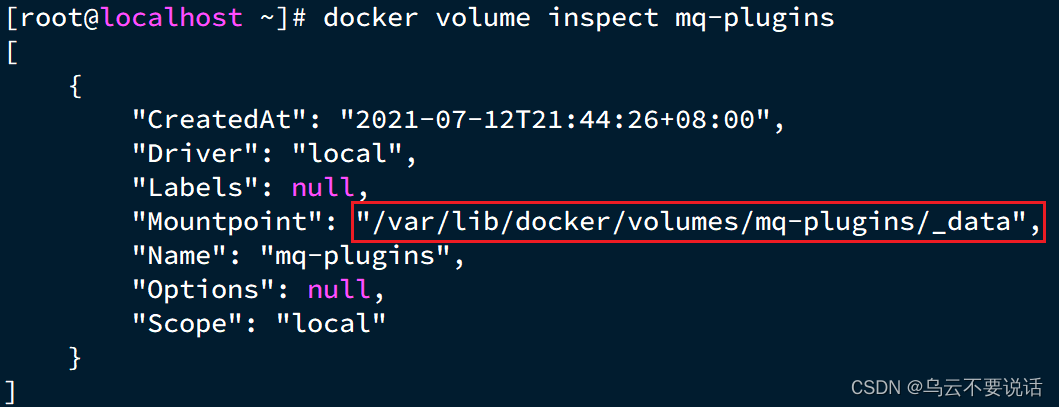
The data volume name of RabbitMQ we set before is
mq-plugins, so we use the following command to view the data volume:docker volume inspect mq-pluginsThe following results can be obtained:
Next, upload the plugin to this directory:
install plugin
Finally, it is installed, and you need to enter the inside of the MQ container to perform the installation. My container is named
mq, so execute the following command:docker exec -it mq bashWhen executing,
-itpleasemqreplace the following with your own container name.After entering the container, execute the following command to enable the plugin:
rabbitmq-plugins enable rabbitmq_delayed_message_exchange

3.2. Principle of DelayExchange
DelayExchange requires an exchange to be declared as delayed. When we send a message to delayExchange, the flow is as follows:
-
receive message
-
Determine whether the message has the x-delay attribute
-
If there is an x-delay attribute, it means that it is a delayed message, which is persisted to the hard disk, and the x-delay value is read as the delay time
-
Return the routing not found result to the message sender
-
After the x-delay time expires, re-deliver the message to the specified queue
3.3. Using DelayExchange
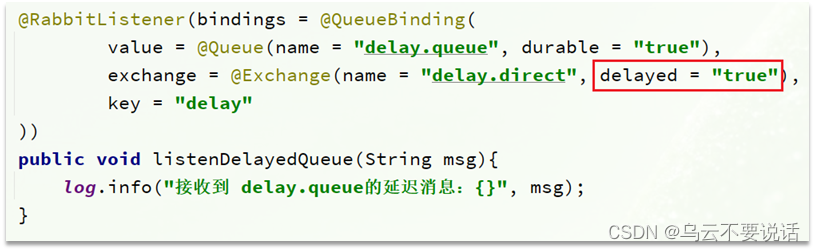
The use of the plug-in is also very simple: declare a switch, the type of the switch can be any type, just set the delayed attribute to true, and then declare the queue to bind it.
1) Declare the DelayExchange switch
Annotation-based (recommended):
It can also be based on @Bean:

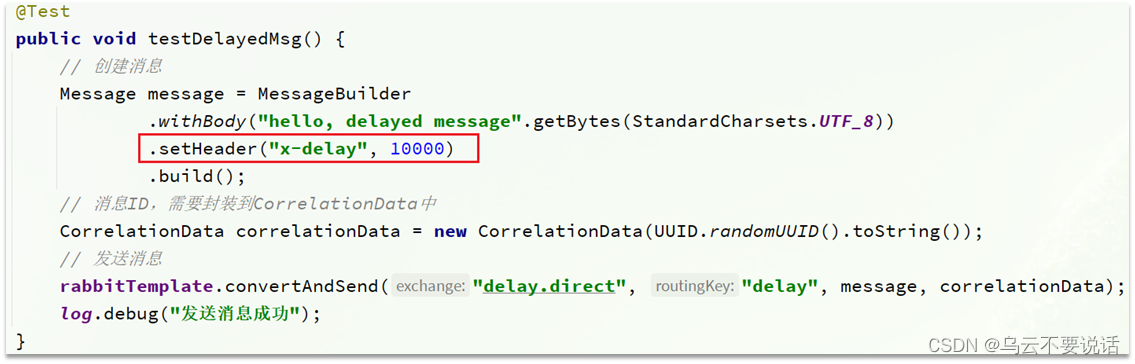
2) Send a message
When sending a message, be sure to carry the x-delay attribute to specify the delay time:
3.4. Summary
What are the steps to use the delay queue plugin?
• Declare a switch and add the delayed attribute to true
• When sending a message, add the x-delay header, the value is the timeout time