Origins
In today's production environment, the traceability system is mainly used in the fields of food traceability, imported product traceability, and brand product traceability, because there are often some counterfeit and shoddy products in these fields, which are shoddy, so it is very important to use the blockchain to realize product traceability. Extra important.
The problem that the case we are going to solve: We can solve some renting chaos in real life through the house traceability project, so that users can have a general understanding of the house they will rent before signing the rental contract. Of course, our small project is only a demo level after all, with limited functions. We aim to use it to learn our fabric.
Program Architecture Design
As shown below:
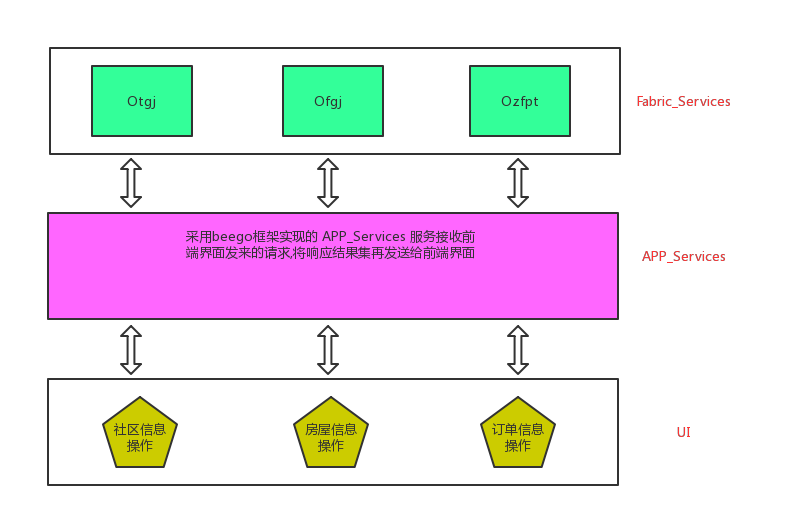
The APP_Service of this project is implemented using the beego framework, and calls the native Fabric-SDK-Go to complete the purpose of accessing the ledger data.
Before the business of the program starts, we need to complete the construction of the Fabric_Services environment, and then use the SDK to upload the chain code we have written to the Fabric environment we configured earlier.
Fabric-Services environment preparation
Install the software environment
This project is deployed in a Linux environment:
1、安装git
2. Install golang
3. Install docker
4、docker-compose
Write a configuration file
agreement
Three organizations are set up in this project: the Land Management Bureau, the Housing Management Bureau, and the rental platform
Number of peer nodes in each organization: 2
Each organization corresponds to a separate channel: tgjchannel , fgjchannel , zfptchannel
The three organizations have a common channel: unionchannel
Use the root domain name: itcast.cn
1. crypto-config.yaml
switch working directory
$ cd $GOPATH/origin_fabric_servic
Use the following command to generate a file template
cryptogen showtemplate > crypto-config.yaml
Modify the content according to the actual definition, the final result is:
OrdererOrgs:
  - Name: Orderer
    Domain: itcast.cn

    Specs:
      - Hostname: orderer

PeerOrgs:
    # 房管局组织
  - Name: Ofgj
    Domain: ofgj.itcast.cn
    # 是否支持 Nodejs
    EnableNodeOUs: true
    # 组织下面peer节点的个数
    Template:
      Count: 2
    # 创建的普通用户的个数
    Users:
      Count: 1

    # 土管局组织
  - Name: Otgj
    Domain: otgj.itcast.cn
    # 是否支持 Nodejs
    EnableNodeOUs: true
    # 组织下面peer节点的个数
    Template:
      Count: 2
    # 创建的普通用户的个数
    Users:
      Count: 1

    # 租房平台组织
  - Name: Ozfpt
    Domain: ozfpt.itcast.cn
    # 是否支持 Nodejs
    EnableNodeOUs: true
    # 组织下面peer节点的个数
    Template:
      Count: 2
    # 创建的普通用户的个数
    Users:
      Count: 1
- Generate a certificate directory under the crypto-config directory:
$ cryptogen generate --config=./crypto-config.yaml
2. configtx.yaml - genesis block/channel file
Get the template from the fabric configuration file example
$ cp $GOPATH/src/github.com/hyperledger-fabric/fabric-samples/first-network/configtx.yaml ./
Modified color content:
Profiles:
  ThreeOrgsOrdererGenesis:
    Capabilities:
      <<: *ChannelCapabilities
    Orderer:
      <<: *OrdererDefaults
      Organizations:
        - *Orderer
      Capabilities:
        <<: *OrdererCapabilities
	# 联盟
    Consortiums:
      # 三个组织的联盟
      ThreeOrgsConsortium:   # 名字可改
        Organizations:
          - *Ofgj
          - *Otgj
          - *Ozfpt
      # 房管局私有链
      OfgjConsortium:
        Organizations:
          - *Ofgj
      # 土改局私有链
      OtgjConsortium:
        Organizations:
          - *Otgj
      #租房平台私有链
      OzfptConsortium:
        Organizations:
          - *Ozfpt

  # 生成 unionchannel
  unionOrgschannel:
    Consortium: ThreeOrgsConsortium
    Application:
      <<: *ApplicationDefaults
      Organizations:
        - *Ofgj
        - *Otgj
        - *Ozfpt
      Capabilities:
        <<: *ApplicationCapabilities
   #生成 fgjchannel
  fgjOrgchannel:
   	Consortium:OfgjConsortium
   	Application:
      <<: *ApplicationDefaults
      Organizations:
        - *Ofgj
      Capabilities:
        <<: *ApplicationCapabilities

    #生成 tgjchannel
  tgjOrgchannel:
   	Consortium:OtgjConsortium
   	Application:
      <<: *ApplicationDefaults
      Organizations:
        - *Otgj
      Capabilities:
        <<: *ApplicationCapabilities

     #生成 zfptchannel
  zfptOrgchannel:
   	Consortium:OzfptConsortium
   	Application:
      <<: *ApplicationDefaults
      Organizations:
        - *Ozfpt
      Capabilities:
        <<: *ApplicationCapabilities

Organizations:				# 固定的,不能改
  - &Orderer				# 相当于定义了一个变量,其他地方可以引用它
    Name: Orderer			# 排序节点的组织名
    ID: itcast.cn			# 排序节点组织的ID
    MSPDir: crypto-config/ordererOrganizations/itcast.cn/msp # 组织的 MSP 账号

  - &Ofgj					# 房管局组织
    Name: OfgjMSP			# 组织名称
    ID: ofgj.itcast.cn		# 组织ID,该属性在设置背书策略时需要使用
    MSPDir: crypto-config/peerOrganizations/ofgj.itcast.cn/msp	#组织的 MSP 账号
    AnchorPeers:			# 锚节点
      - Host: peer0.ofgj.itcast.cn
        Port: 7051

  - &Otgj
    Name: OtgjMSP
    ID: otgj.itcast.cn
    MSPDir: crypto-config/peerOrganizations/otgj.itcast.cn/msp
    AnchorPeers:
    - Host: peer0.otgj.itcast.cn
      Port: 7051

  - &Ozfpt
    Name: OzfptMSP
    ID: ozfpt.itcast.cn
    MSPDir: crypto-config/peerOrganizations/ozfpt.itcast.cn/msp
    AnchorPeers:
    - Host: peer0.ozfpt.itcast.cn
      Port: 7051

Orderer: &OrdererDefaults
  # 共识机制 == 排序算法
  OrdererType: solo	  # 共识机制 - solo 算法之支持一个排序节点
  Addresses:          # orderer 节点的网络位置
    - orderer.itcast.cn:7050
  BatchTimeout: 5s    # 产生一个区块的时间单位
  BatchSize:
    MaxMessageCount: 10		# 交易的最大数量,交易数量达到之后会产生一个区块
    AbsoluteMaxBytes: 98 MB # 数据量达到该制定的值,也会产生一个区块
    PreferredMaxBytes: 512 KB # 首选 MaxBytes

  Kafka:			  # 本例中的排序算法指定的是solo,此项可以不指定
    Brokers:
      - 127.0.0.1:9092   	# 指定 Kafka 排序集群所在的网络位置
  MaxChannels: 0
  Organizations:

# 此处不需要修改,默认即可
Application: &ApplicationDefaults
  Organizations:

# Fabric_v1.1 之后的内容,全部设为true,是为了兼容 1.1 前面的版本
Capabilities:
    Global: &ChannelCapabilities
        V1_1: true
    Orderer: &OrdererCapabilities
        V1_1: true
    Application: &ApplicationCapabilities
        V1_1: true
-
Execute the command to generate the file:
-
Generate genesis block file
$ mkdir channel-artifacts $ configtxgen -profile ThreeOrgsOrdererGenesis -outputBlock ./channel-artifacts/genesis.block -
Generate channel file
# 生成 unionchannel 文件 $ echo "---------------- Create unionchannel.tx file BEGIN -------------------" $ configtxgen -profile UnionOrgsChannel -outputCreateChannelTx ./channel-artifacts/unionchannel.tx -channelID unionchannel $ echo "---------------- Create unionchannel.tx file END -------------------" # 生成 fgjchannel $ echo "---------------- Create fgjchannel.tx file BEGIN -------------------" $ configtxgen -profile fgjOrgchannel -outputCreateChannelTx ./channel-artifacts/fgjchannel.tx -channelID fgjchannel $ echo "---------------- Create fgjchannel.tx file END -------------------" # 生成 tgjchannel $ echo "---------------- Create tgjchannel.tx file BEGIN -------------------" $ configtxgen -profile tgjOrgchannel -outputCreateChannelTx ./channel-artifacts/tgjchannel.tx -channelID tgjchannel $ echo "---------------- Create tgjchannel.tx file END -------------------" # 生成 tgjchannel $ echo "---------------- Create zfptchannel.tx file BEGIN -------------------" $ configtxgen -profile zfptOrgchannel -outputCreateChannelTx ./channel-artifacts/zfptchannel.tx -channelID zfptchannel $ echo "---------------- Create zfptchannel.tx file END -------------------" -
Generate anchor node update file
This action is optional
$ echo "---------------- Create AnchorPeerUpdate.tx file BEGIN -----------------"
$ configtxgen -profile UnionOrgsChannel -outputAnchorPeersUpdate ./channel-artifacts/OfgjMSPanchors.tx -channelID unionchannel -asOrg OfgjMSP
$ configtxgen -profile UnionOrgsChannel -outputAnchorPeersUpdate ./channel-artifacts/OtgjMSPanchors.tx -channelID unionchannel -asOrg OtgjMSP
$ configtxgen -profile UnionOrgsChannel -outputAnchorPeersUpdate ./channel-artifacts/OzfptMSPanchors.tx -channelID unionchannel -asOrg OzfptMSP
$ echo "---------------- Create AnchorPeerUpdate.tx file BEGIN ------------------"
After the above command is executed, check the generated results. If you ask about it, it can be generated successfully, indicating that the above operations are all right:
channel-artifacts/ ├── fgjchannel.tx ├── OfgjMSPanchors.tx ├── OtgjMSPanchors.tx ├── OzfptMSPanchors.tx ├── unionchannel.tx └── zfptchannel.tx -
3. docker-compose.yaml file
Copy the template file, and then modify it based on the go template file
$ cp $GOPATH/src/github.com/hyperledger-fabric/fabric-samples/first-network/docker-compose-cli.yaml
Modified result:
version: '2'

networks:
  ZFW_suyuan:

services:
  orderer.itcast.cn:
    image: hyperledger/fabric-orderer:latest
    container_name: orderer.itcast.cn
    environment:
      - ORDERER_GENERAL_LOGLEVEL=debug			# 日志级别
      - ORDERER_GENERAL_LISTENADDRESS=0.0.0.0 	# orderer节点监听的地址
      - ORDERER_GENERAL_LISTENPORT=7050			# orderer 默认监听7050,监听的端口号可以修改
      - ORDERER_GENERAL_GENESISPROFILE=Orderer
      - ORDERER_GENERAL_GENESISMETHOD=file		# 创世块的来源,file表示来自于文件
      # 指定创世块文件的路径
      - ORDERER_GENERAL_GENESISFILE=/var/hyperledger/orderer/orderer.genesis.block
      - ORDERER_GENERAL_LOCALMSPID=itcast.cn	# Orderer组织的ID[Organizations -> Orderer -> ID]
      # 当前节点的 MSP 账号路径
      - ORDERER_GENERAL_LOCALMSPDIR=/var/hyperledger/orderer/msp
      - ORDERER_GENERAL_TLS_ENABLED=true		# 通信的时候是否使用 TLS 加密
      - ORDERER_GENERAL_TLS_PRIVATEKEY=/var/hyperledger/orderer/tls/server.key		# 私钥文件
      - ORDERER_GENERAL_TLS_CERTIFICATE=/var/hyperledger/orderer/tls/server.crt		# 证书文件
      - ORDERER_GENERAL_TLS_ROOTCAS=[/var/hyperledger/orderer/tls/ca.crt]			# 根证书文件

    working_dir: /opt/gopath/src/github.com/hyperledger/fabric
    command: orderer
    volumes:
      - ./channel-artifacts/genesis.block:/var/hyperledger/orderer/orderer.genesis.block
      - ./crypto-config/ordererOrganizations/itcast.cn/orderers/orderer.itcast.cn/msp:/var/hyperledger/orderer/msp
      - ./crypto-config/ordererOrganizations/itcast.cn/orderers/orderer.itcast.cn/tls:/var/hyperledger/orderer/tls
    ports:
      - 7050:7050
    networks:
      default:
        aliases:
          - orderer.itcast.cn

  # ofgj
  peer0.ofgj.itcast.cn:
    image: hyperledger/fabric-peer:latest
    container_name: peer0.ofgj.itcast.cn
    environment:
      - CORE_VM_ENDPOINT=unix:///host/var/run/docker.sock
      - CORE_PEER_ID=peer0.ofgj.itcast.cn			# peer 节点的名字
      - CORE_PEER_ADDRESS=peer0.ofgj.itcast.cn:7051 # 当前 peer 节点的地址信息
      - CORE_VM_DOCKER_ATTACHSTDOUT=true
      - CORE_LOGGING_LEVEL=DEBUG
      - CORE_PEER_ADDRESSAUTODETECT=true
      # 为了别其他节点感知到,如果不设置,其他节点不知道该节点的存在
      - CORE_PEER_GOSSIP_EXTERNALENDPOINT=peer0.ofgj.itcast.cn:7051
      - CORE_PEER_GOSSIP_USELEADERELECTION=true		# leader 节点自动选举机制
      - CORE_PEER_GOSSIP_ORGLEADER=false			# 当前节点是不是 leader 节点,结果应由选举得出所以此处给出 false
      - CORE_PEER_GOSSIP_SKIPHANDSHAKE=true
      # 当前组织的ID[Organizations -> ID]
      - CORE_PEER_LOCALMSPID=ofgj.itcast.cn
      - CORE_PEER_PROFILE_ENABLED=true
      - CORE_PEER_MSPCONFIGPATH=/var/hyperledger/msp
      - CORE_PEER_TLS_ENABLED=true
      - CORE_PEER_TLS_SERVERHOSTOVERRIDE=peer0.ofgj.itcast.cn
      - CORE_PEER_TLS_CERT_FILE=/var/hyperledger/tls/server.crt
      - CORE_PEER_TLS_KEY_FILE=/var/hyperledger/tls/server.key
      - CORE_PEER_TLS_ROOTCERT_FILE=/var/hyperledger/tls/ca.crt
    working_dir: /opt/gopath/src/github.com/hyperledger/fabric/peer
    command: peer node start
    volumes:
      - /var/run/:/host/var/run/
      - ./crypto-config/peerOrganizations/ofgj.itcast.cn/peers/peer0.ofgj.itcast.cn/msp:/var/hyperledger/msp
      - ./crypto-config/peerOrganizations/ofgj.itcast.cn/peers/peer0.ofgj.itcast.cn/tls:/var/hyperledger/tls
    ports:
      - 7051:7051
      - 7053:7053
    depends_on:
      - orderer.itcast.cn
    links:
      - orderer.itcast.cn
    networks:
      default:
        aliases:
          - peer0.ofgj.itcast.cn

  peer1.ofgj.itcast.cn:
    image: hyperledger/fabric-peer:latest
    container_name: peer1.ofgj.itcast.cn
    environment:
      - CORE_VM_ENDPOINT=unix:///host/var/run/docker.sock
      - CORE_VM_DOCKER_ATTACHSTDOUT=true
      - CORE_LOGGING_LEVEL=DEBUG
      - CORE_PEER_PROFILE_ENABLED=true
      - CORE_PEER_TLS_ENABLED=true
      - CORE_PEER_TLS_CERT_FILE=/var/hyperledger/tls/server.crt
      - CORE_PEER_TLS_KEY_FILE=/var/hyperledger/tls/server.key
      - CORE_PEER_TLS_ROOTCERT_FILE=/var/hyperledger/tls/ca.crt
      - CORE_PEER_ID=peer1.ofgj.itcast.cn
      - CORE_PEER_ADDRESSAUTODETECT=true
      - CORE_PEER_ADDRESS=peer1.ofgj.itcast.cn:7051
      - CORE_PEER_GOSSIP_EXTERNALENDPOINT=peer1.ofgj.itcast.cn:7051
      - CORE_PEER_GOSSIP_USELEADERELECTION=true
      - CORE_PEER_GOSSIP_ORGLEADER=false
      - CORE_PEER_GOSSIP_SKIPHANDSHAKE=true
      - CORE_PEER_LOCALMSPID=ofgj.itcast.cn
      - CORE_PEER_MSPCONFIGPATH=/var/hyperledger/msp
      - CORE_PEER_TLS_SERVERHOSTOVERRIDE=peer1.ofgj.itcast.cn
    working_dir: /opt/gopath/src/github.com/hyperledger/fabric/peer
    command: peer node start
    volumes:
      - /var/run/:/host/var/run/
      - ./crypto-config/peerOrganizations/ofgj.itcast.cn/peers/peer1.ofgj.itcast.cn/msp:/var/hyperledger/msp
      - ./crypto-config/peerOrganizations/ofgj.itcast.cn/peers/peer1.ofgj.itcast.cn/tls:/var/hyperledger/tls
    ports:
      - 8051:7051
      - 8053:7053
    depends_on:
      - orderer.itcast.cn
    links:
      - orderer.itcast.cn
    networks:
      default:
        aliases:
          - peer1.ofgj.itcast.cn

  # otgj
  peer0.otgj.itcast.cn:
    image: hyperledger/fabric-peer:latest
    container_name: peer0.otgj.itcast.cn
    environment:
      - CORE_VM_ENDPOINT=unix:///host/var/run/docker.sock
      - CORE_VM_DOCKER_ATTACHSTDOUT=true
      - CORE_LOGGING_LEVEL=DEBUG
      - CORE_PEER_PROFILE_ENABLED=true
      - CORE_PEER_TLS_ENABLED=true
      - CORE_PEER_TLS_CERT_FILE=/var/hyperledger/tls/server.crt
      - CORE_PEER_TLS_KEY_FILE=/var/hyperledger/tls/server.key
      - CORE_PEER_TLS_ROOTCERT_FILE=/var/hyperledger/tls/ca.crt
      - CORE_PEER_ID=peer0.otgj.itcast.cn
      - CORE_PEER_ADDRESSAUTODETECT=true
      - CORE_PEER_ADDRESS=peer0.otgj.itcast.cn:7051
      - CORE_PEER_GOSSIP_EXTERNALENDPOINT=peer0.otgj.itcast.cn:7051
      - CORE_PEER_GOSSIP_USELEADERELECTION=true
      - CORE_PEER_GOSSIP_ORGLEADER=false
      - CORE_PEER_GOSSIP_SKIPHANDSHAKE=true
      - CORE_PEER_LOCALMSPID=otgj.itcast.cn
      - CORE_PEER_MSPCONFIGPATH=/var/hyperledger/msp
      - CORE_PEER_TLS_SERVERHOSTOVERRIDE=peer0.otgj.itcast.cn
    working_dir: /opt/gopath/src/github.com/hyperledger/fabric/peer
    command: peer node start
    volumes:
      - /var/run/:/host/var/run/
      - ./crypto-config/peerOrganizations/otgj.itcast.cn/peers/peer0.otgj.itcast.cn/msp:/var/hyperledger/msp
      - ./crypto-config/peerOrganizations/otgj.itcast.cn/peers/peer0.otgj.itcast.cn/tls:/var/hyperledger/tls
    ports:
      - 9051:7051
      - 9053:7053
    depends_on:
      - orderer.itcast.cn
    links:
      - orderer.itcast.cn
    networks:
      default:
        aliases:
          - peer0.otgj.itcast.cn

  peer1.otgj.itcast.cn:
    image: hyperledger/fabric-peer:latest
    container_name: peer1.otgj.itcast.cn
    environment:
      - CORE_VM_ENDPOINT=unix:///host/var/run/docker.sock
      - CORE_VM_DOCKER_ATTACHSTDOUT=true
      - CORE_LOGGING_LEVEL=DEBUG
      - CORE_PEER_PROFILE_ENABLED=true
      - CORE_PEER_TLS_ENABLED=true
      - CORE_PEER_TLS_CERT_FILE=/var/hyperledger/tls/server.crt
      - CORE_PEER_TLS_KEY_FILE=/var/hyperledger/tls/server.key
      - CORE_PEER_TLS_ROOTCERT_FILE=/var/hyperledger/tls/ca.crt
      - CORE_PEER_ID=peer1.otgj.itcast.cn
      - CORE_PEER_ADDRESSAUTODETECT=true
      - CORE_PEER_ADDRESS=peer1.otgj.itcast.cn:7051
      - CORE_PEER_GOSSIP_EXTERNALENDPOINT=peer1.otgj.itcast.cn:7051
      - CORE_PEER_GOSSIP_USELEADERELECTION=true
      - CORE_PEER_GOSSIP_ORGLEADER=false
      - CORE_PEER_GOSSIP_SKIPHANDSHAKE=true
      - CORE_PEER_LOCALMSPID=otgj.itcast.cn
      - CORE_PEER_MSPCONFIGPATH=/var/hyperledger/msp
      - CORE_PEER_TLS_SERVERHOSTOVERRIDE=peer1.otgj.itcast.cn
    working_dir: /opt/gopath/src/github.com/hyperledger/fabric/peer
    command: peer node start
    volumes:
      - /var/run/:/host/var/run/
      - ./crypto-config/peerOrganizations/otgj.itcast.cn/peers/peer1.otgj.itcast.cn/msp:/var/hyperledger/msp
      - ./crypto-config/peerOrganizations/otgj.itcast.cn/peers/peer1.otgj.itcast.cn/tls:/var/hyperledger/tls
    ports:
      - 10051:7051
      - 10053:7053
    depends_on:
      - orderer.itcast.cn
    links:
      - orderer.itcast.cn
    networks:
      default:
        aliases:
          - peer1.otgj.itcast.cn

  # ozfpt
  peer0.ozfpt.itcast.cn:
    image: hyperledger/fabric-peer:latest
    container_name: peer0.ozfpt.itcast.cn
    environment:
      - CORE_VM_ENDPOINT=unix:///host/var/run/docker.sock
      - CORE_VM_DOCKER_ATTACHSTDOUT=true
      - CORE_LOGGING_LEVEL=DEBUG
      - CORE_PEER_PROFILE_ENABLED=true
      - CORE_PEER_TLS_ENABLED=true
      - CORE_PEER_TLS_CERT_FILE=/var/hyperledger/tls/server.crt
      - CORE_PEER_TLS_KEY_FILE=/var/hyperledger/tls/server.key
      - CORE_PEER_TLS_ROOTCERT_FILE=/var/hyperledger/tls/ca.crt
      - CORE_PEER_ID=peer0.ozfpt.itcast.cn
      - CORE_PEER_ADDRESSAUTODETECT=true
      - CORE_PEER_ADDRESS=peer0.ozfpt.itcast.cn:7051
      - CORE_PEER_GOSSIP_EXTERNALENDPOINT=peer0.ozfpt.itcast.cn:7051
      - CORE_PEER_GOSSIP_USELEADERELECTION=true
      - CORE_PEER_GOSSIP_ORGLEADER=false
      - CORE_PEER_GOSSIP_SKIPHANDSHAKE=true
      - CORE_PEER_LOCALMSPID=ozfpt.itcast.cn
      - CORE_PEER_MSPCONFIGPATH=/var/hyperledger/msp
      - CORE_PEER_TLS_SERVERHOSTOVERRIDE=peer0.ozfpt.itcast.cn
    working_dir: /opt/gopath/src/github.com/hyperledger/fabric/peer
    command: peer node start
    volumes:
      - /var/run/:/host/var/run/
      - ./crypto-config/peerOrganizations/ozfpt.itcast.cn/peers/peer0.ozfpt.itcast.cn/msp:/var/hyperledger/msp
      - ./crypto-config/peerOrganizations/ozfpt.itcast.cn/peers/peer0.ozfpt.itcast.cn/tls:/var/hyperledger/tls
    ports:
      - 11051:7051
      - 11053:7053
    depends_on:
      - orderer.itcast.cn
    links:
      - orderer.itcast.cn
    networks:
      default:
        aliases:
          - peer0.ozfpt.itcast.cn

  peer1.ozfpt.itcast.cn:
    image: hyperledger/fabric-peer:latest
    container_name: peer1.ozfpt.itcast.cn
    environment:
      - CORE_VM_ENDPOINT=unix:///host/var/run/docker.sock
      - CORE_VM_DOCKER_ATTACHSTDOUT=true
      - CORE_LOGGING_LEVEL=DEBUG
      - CORE_PEER_PROFILE_ENABLED=true
      - CORE_PEER_TLS_ENABLED=true
      - CORE_PEER_TLS_CERT_FILE=/var/hyperledger/tls/server.crt
      - CORE_PEER_TLS_KEY_FILE=/var/hyperledger/tls/server.key
      - CORE_PEER_TLS_ROOTCERT_FILE=/var/hyperledger/tls/ca.crt
      - CORE_PEER_ID=peer1.ozfpt.itcast.cn
      - CORE_PEER_ADDRESSAUTODETECT=true
      - CORE_PEER_ADDRESS=peer1.ozfpt.itcast.cn:7051
      - CORE_PEER_GOSSIP_EXTERNALENDPOINT=peer1.ozfpt.itcast.cn:7051
      - CORE_PEER_GOSSIP_USELEADERELECTION=true
      - CORE_PEER_GOSSIP_ORGLEADER=false
      - CORE_PEER_GOSSIP_SKIPHANDSHAKE=true
      - CORE_PEER_LOCALMSPID=ozfpt.itcast.cn
      - CORE_PEER_MSPCONFIGPATH=/var/hyperledger/msp
      - CORE_PEER_TLS_SERVERHOSTOVERRIDE=peer1.ozfpt.itcast.cn
    working_dir: /opt/gopath/src/github.com/hyperledger/fabric/peer
    command: peer node start
    volumes:
      - /var/run/:/host/var/run/
      - ./crypto-config/peerOrganizations/ozfpt.itcast.cn/peers/peer1.ozfpt.itcast.cn/msp:/var/hyperledger/msp
      - ./crypto-config/peerOrganizations/ozfpt.itcast.cn/peers/peer1.ozfpt.itcast.cn/tls:/var/hyperledger/tls
    ports:
      - 12051:7051
      - 12053:7053
    depends_on:
      - orderer.itcast.cn
    links:
      - orderer.itcast.cn
    networks:
      default:
        aliases:
          - peer1.ozfpt.itcast.cn
4. Start the network
Since the name of the configuration file used is docker-compose.yaml, which is the default value of docker-compose, the following command can be used to start the network:
-
$ docker-compose up -d
In this example, we have 1 orderer node and 6 peer nodes, so if all 7 docker containers can be started successfully, then our fabric network environment has been started successfully, as shown in the following figure:
$ docker-compose ps
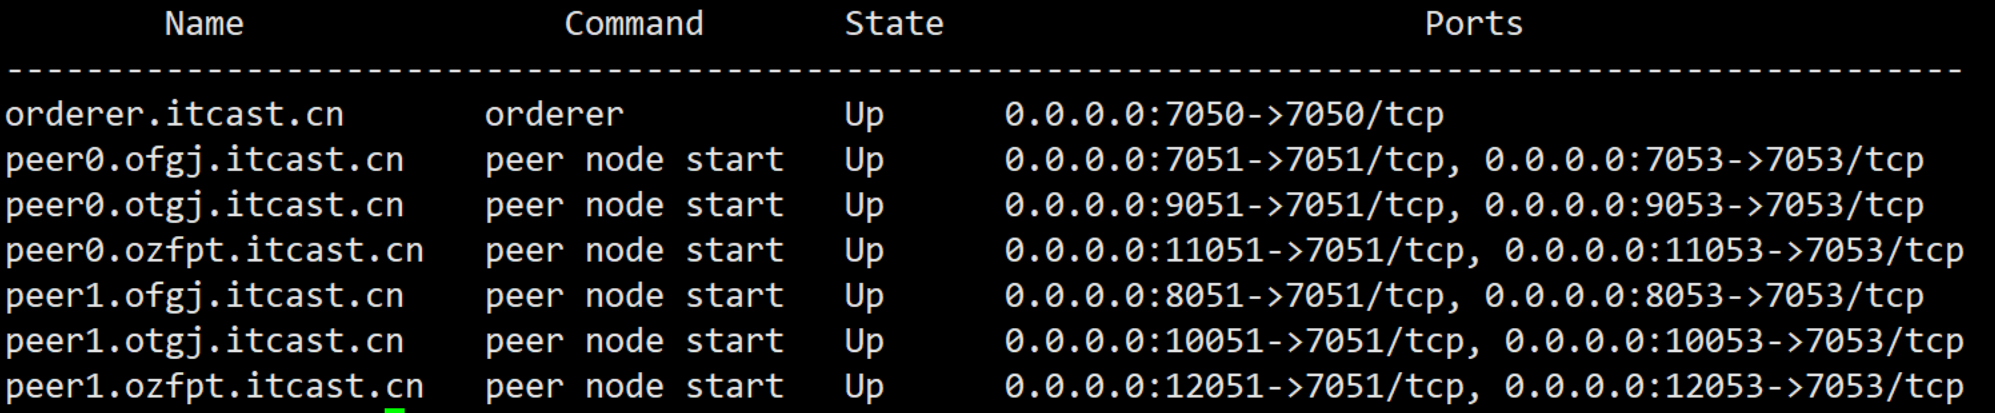
So far, the entire fabric network environment has been running. When we were learning Fabric, when we started the docker container, we started a cli container at the same time. It can use the CLI tool to complete some operations of channel and chaincode, as follows:
-
Create channels, done by client nodes
-
Add each node of each organization to the channel -> client to complete
- A client can only connect to one peer node at the same time
-
Install smart contract -> chain code for each peer node (program: go, node.js, java)
-
Initialize the smart contract, corresponding to the Init function in the smart contract
- It only needs to be initialized once on any node, and the data will be automatically synchronized with each node of each organization
-
Query data -> read
-
call to data -> write
After the previous explanation, we all know that a client can only connect to one specified node. If you want the client to connect to other nodes, you must modify the relevant environment variables in the current client
In this project, we do not use the cli tool, but use Fabric_SDK_go to complete the corresponding work.
APP_Service application development
At the application layer, the first thing we need to do is to design and write the chain code, we need to use the hyperledger/fabric framework. So, first we need to download the fabric source code to the $GOPATH/src/github.com/hyperledger directory
If you have already downloaded it before, this step can be ignored
Next we can write our chaincode. So before that, we need to design our chain code in advance.
Chaincode Design
As shown in the figure below, in the ledger, we must at least save the following data:
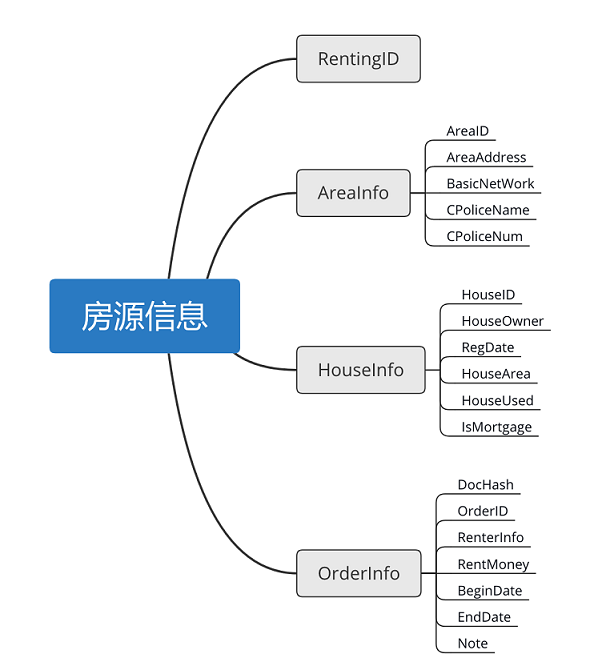
As shown in the figure, the listing information includes housing information, community information around the housing, and order information related to the housing listing. These information are stored in our hyperledger by using RentingID as the key, so we need to declare the corresponding structure in our chain code to store the corresponding information.
The corresponding structure declaration is as follows:
- HouseInfo is used to store some data related to housing information. In this project scenario, this data should be maintained by the "House Management Bureau Organization", so the operation of this data can go through fgjchannel.
// 房屋信息  ofgj
type HouseInfo struct {


	HouseID    string `json:"house_id"`    // 房产证编号
	HouseOwner string `json:"house_owner"` // 房主
	RegDate    string `json:"reg_date"`    // 登记日期
	HouseArea  string `json:"house_area"`  // 住房面积
	HouseUsed  string `json:"house_used"`  // 房屋设计用途
	IsMortgage string `json:"is_mortgage"` // 是否抵押
}
- AreaInfo is used to store some community information related to the housing source, through which users can learn some external information, infrastructure and other information that can affect the rental housing source. This data should be maintained by the "Land Management Bureau", so , the operation on the data can go through tgjchannel.
// 社区信息 otgj
type AreaInfo struct {


	AreaID       string `json:"area_id"`        // 社区编号
	AreaAddress  string `json:"area_address"`   // 房源所在区域
	BasicNetWork string `json:"basic_net_work"` // 区域基础网络编号
	CPoliceName  string `json:"c_police_name"`  // 社区民警姓名
	CPoliceNum   string `json:"c_police_num"`   // 社区民警工号
}
- OrderInfo is used to store historical rental information related to housing sources, through which users can learn about the previous rent of the housing and other information. This data should be maintained by the "rental platform organization", so the operation of this data can go through zfptchannel.
// 订单信息	ozfpt
type OrderInfo struct {


	DocHash   string `json:"doc_hash"`   // 电子合同Hash
	OrderID   string `json:"order_id"`   // 订单编号
	RenterID  string `json:"renter_id"`  // 承租人信息
	RentMoney string `json:"rent_money"` // 租金
	BeginDate string `json:"begin_date"` // 开始日期
	EndDate   string `json:"end_date"`   // 结束日期
	Note      string `json:"note"`       // 备注
}
From this, we can get the declaration prototype of the "property information" structure:
// 房源信息
type RentingHouseInfo struct {


	RentingID        string    `json:"renting_id"`         // 统一编码
	RentingHouseInfo HouseInfo `json:"renting_house_info"` // 房屋信息
	RentingAreaInfo  AreaInfo  `json:"renting_area_info"`  //区域信息
	RentingOrderInfo OrderInfo `json:"renting_order_info"` //订单信息
}
Chaincode implementation
Now that we have cleared some data models that chaincode needs to operate, we can write our chaincode below. Before we start writing chaincode, we need to declare a chaincode structure and overload its Init and Invoke methods, where the Init method parses out the content of the request and invokes different requests. This is our template for writing chaincode.
type HouseChainCode struct {


   // 房屋溯源链代码
}
// Init 方法
func (this *HouseChainCode) Init(stub shim.ChaincodeStubInterface) peer.Response {

    }
// Invoke 方法
func (this *HouseChainCode) Invoke(stub shim.ChaincodeStubInterface) peer.Response {


   // 获取 函数名 和 参数列表
   fn, parameters := stub.GetFunctionAndParameters()

   // 通过函数名匹配对应的链代码函数调用
   if fn == "addHouseInfo" {


   	// 添加房源信息
   	return this.addHouseInfo(stub, parameters)
   } else if fn == "getHouseInfo" {


   	// 获取房源信息
   	return this.getHouseInfo(stub, parameters)
   } else if fn == "addOrderInfo" {


   	// 添加订单信息
   	return this.addOrderInfo(stub, parameters)
   } else if fn == "getOrderInfo" {


   	// 获取订单信息
   	return this.getOrderInfo(stub, parameters)
   } else if fn == "addAreaInfo" {


   	// 添加社区信息
   	return this.addAreaInfo(stub, parameters)
   } else if fn == "getAreaInfo" {


   	// 获取社区信息
   	return this.getAreaInfo(stub, parameters)
   }

   // 没有任何函数被匹配到,返回错误消息
   fmt.Println("==== fn = ", fn)
   return shim.Error("Received unknow function invocation")
}
Through the display of the project, we have basically understood the general model of the project. The following piece of code is the implementation of the addHouseCode function. Its main function is to write the house information entered by the user into the hyperbook. It receives user parameters and Write the data into the ledger in the form of rentingID as key and args transfer encoding data as value.
// 添加房屋信息
func (this *HouseChainCode) addHouseInfo(stub shim.ChaincodeStubInterface, args []string) peer.Response {


	// 定义一个房屋信息结构体
	var HouseInfos RentingHouseInfo

	if len(args) != 7 {


		return shim.Error("Incorrect number oof arguments.")
	}

	HouseInfos.RentingID = args[0]
	if HouseInfos.RentingID == "" {


		return shim.Error("RentingId can't be empty.")
	}

	HouseInfos.RentingHouseInfo.HouseID = args[1]
	HouseInfos.RentingHouseInfo.HouseOwner = args[2]
	HouseInfos.RentingHouseInfo.RegDate = args[3]
	HouseInfos.RentingHouseInfo.HouseArea = args[4]
	HouseInfos.RentingHouseInfo.HouseUsed = args[5]
	HouseInfos.RentingHouseInfo.IsMortgage = args[6]

	HouseInfosJsonBytes, err := json.Marshal(HouseInfos)
	if err != nil {


		return shim.Error(err.Error())
	}

	err = stub.PutState(HouseInfos.RentingID, HouseInfosJsonBytes)
	if err != nil {


		return shim.Error(err.Error())
	}

	return shim.Success([]byte("ok"))
}
Earlier, we have written the housing information into the blockchain, and the following piece of code is to read out the data just written into the blockchain, so as to achieve the purpose of data reference.
// 查看房屋信息
func (this *HouseChainCode) getHouseInfo(stub shim.ChaincodeStubInterface, args []string) peer.Response {


	// 判断参数个数
	if len(args) != 1 {


		return shim.Error("Incorrect number of arguments.")
	}
	// 获取唯一标识码
	rentingID := args[0]

	// 获得查询结果迭代器
	resultItreator, err := stub.GetHistoryForKey(rentingID)
	if err != nil {


		return shim.Error(err.Error())
	}

	// 释放迭代器资源
	defer resultItreator.Close()

	var rentHouseInfo HouseInfo

	// 使用迭代器遍历查询结果集
	for resultItreator.HasNext() {


		var HouseInfos RentingHouseInfo
		// 取一条结果
		response, err := resultItreator.Next()
		if err != nil {


			return shim.Error(err.Error())
		}

		err = json.Unmarshal(response.Value, &HouseInfos)
		if err != nil {


			return shim.Error(err.Error())
		}

		if HouseInfos.RentingHouseInfo.HouseOwner != "" {


			rentHouseInfo = HouseInfos.RentingHouseInfo
			continue
		}
	}

	jsonAsBytes, err := json.Marshal(rentHouseInfo)
	if err != nil {


		return shim.Error(err.Error())
	}

	// 返回数据查询结果
	return shim.Success(jsonAsBytes)
}
The above two ends of the code are only information related to the house, and we can refer to these two to write the other two.
Framework construction of APP_Service
So far, we should have finished the work related to Fabric_Services, and then we need to implement the functions for APP_Services. Our APP_Services uses the beego framework, so the first thing we need to do is to set up our routing, and then implement the corresponding processing function once according to the routing.
1. route configuration
According to the Invoke function branch call model in the chain code, the routing design is as follows:
func init() {


    beego.Router("/", &controllers.MainController{

    })
	beego.Router("/form_area",&controllers.MainController{

    },"get:FormArea")
	beego.Router("/form_house",&controllers.MainController{

    },"get:FormHouse")
	beego.Router("/form_orderer",&controllers.MainController{

    },"get:FormOrderer")
	beego.Router("/area_search",&controllers.MainController{

    },"get:AreaSearch")
	beego.Router("/house_search",&controllers.MainController{

    },"get:HouseSearch" )
	beego.Router("/orderer_search",&controllers.MainController{

    },"get:OrdererSearch")
}
2. Controller function prototype
According to the designed route, the corresponding function in the controllers module is implemented:
// 发布房源信息
func (this *MainController) FormHouse() {

    }
// 查询房源信息
func (this *MainController) HouseSearch() {

    }
// 发布社区信息
func (this *MainController) FormArea() {

    }
// 查询社区信息
func (this *MainController) AreaSearch() {

    }
// 发布订单信息
func (this *MainController) FormOrderer() {

    }
// 查询订单信息
func (this *MainController) OrdererSearch() {

    }
Let’s take “property information” as an example. We need to obtain the input of the front-end user inside the function, and call the business logic of the models layer to complete the entry of the data into the ledger. The specific implementation is as follows:
// 发布房源信息
func (this *MainController) FormHouse() {


	// 响应 /form_house 请求,将 form_house.html 页面返回给客户端
	this.TplName = "form_house.html"

	rentingID := this.GetString("rentingID")
	if rentingID == "" {


		return
	} else {


		// 获取用户输入
		fczbh := this.GetString("fczbh")
		fzxm := this.GetString("fzxm")
		djrq := this.GetString("djrq")
		zfmj := this.GetString("zfmj")
		fwsjyt := this.GetString("fwsjyt")
		sfdy := this.GetString("sfdy")

		// 组织参数
		var args []string
		args = append(args, "addHouseInfo")
		args = append(args, rentingID)
		args = append(args, fczbh)
		args = append(args, fzxm)
		args = append(args, djrq)
		args = append(args, zfmj)
		args = append(args, fwsjyt)
		args = append(args, sfdy)

		//TODO  调用models 层业务逻辑,把数据记入超级账本
	}
	// 最后返回在首页
	this.TplName = "index.html"
}
The above TODO needs to rely on the business logic of the models layer, so next we will write the implementation of the models layer to support the development of the upper layer
3. Write the SDK configuration file
We can refer to $GOPATH/src/github.com/hyperledger/fabric-sdk-go/pkg/core/config/testdata/template/config.yamlthe template file to complete the writing of our SDK configuration file. At the same time, fabric-sdk-go provides us with two demo programs. We can also take their configuration files for reference. These two files are in the following directory.
$GOPATH/src/github.com/hyperledger/fabric-sdk-go/test/fixtures/config/config_test.yaml
$GOPATH/src/github.com/hyperledger/fabric-sdk-go/pkg/core/config/testdata/config_test.yaml
The relevant configuration is as follows:
# 配置文件的名字,可以不写
name: "suyuan-service-network"

version: 1.0.0

# client 相关配置
client:
  # 此 SDK 实例属于哪个组织
  organization: Ofgj
  # 日志级别
  logging:
    level: info
  # 证书所在目录
  cryptoconfig:
    path: /home/stu/workspace/src/origins/conf/crypto-config
  # 这种方式就是把用户名和密码直接存储在本地的一个文件中,而用户和密码对通过一个别名来引用,这样可以避免密码明文格式可能会存在的安全问题
  credentialStore:
    path: /tmp/suyuan-service-store

  # 区块链密码服务提供者,指定加密策略
  BCCSP:
    security:
      enabled: true
      default:
        provider: "SW"
      hashAlgorithm: "SHA2"
      softVerify: true
      level: 256

  tlsCerts:
  	# 证书池策略,默认为false,提高身份认证速率
    systemCertPool: true
    client:
      keyfile: /home/stu/workspace/src/origins/conf/crypto-config/peerOrganizations/ofgj.itcast.cn/users/[email protected]/tls/client.key
      certfile: /home/stu/workspace/src/origins/conf/crypto-config/peerOrganizations/ofgj.itcast.cn/users/[email protected]/tls/client.crt


# channel 相关配置
channels:
  # channelID
  fgjchannel:
    # orderer 组织必须指定
    orderers:
      - orderer.itcast.cn
	# 添加到该 channel 中的组织的 peer 列表
    peers:
      peer0.ofgj.itcast.cn:
        endorsingPeer: true
        chaincodeQuery: true
        ledgerQuery: true
        eventSource: true

      peer1.ofgj.itcast.cn:
        endorsingPeer: true
        chaincodeQuery: true
        ledgerQuery: true
        eventSource: true


    policies:
      queryChannelConfig:
        minResponses: 1
        maxTargets: 1
        retryOpts:
          attempts: 5
          initialBackoff: 500ms
          maxBackoff: 5s
          backoffFactor: 2.0

# organizations 相关配置
organizations:
  ofgj:
    # configtx.yaml organizations -> ID
    mspid: ofgj.itcast.cn

    cryptoPath: /home/stu/workspace/src/origins/conf/crypto-config/peerOrganizations/ofgj.itcast.cn/users/{

    userName}@ofgj.itcast.cn/msp
    peers:
    - peer0.ofgj.itcast.cn
    - peer1.ofgj.itcast.cn


  ordererorg:
    mspID: itcast.cn
    cryptoPath: /home/stu/workspace/src/origins/conf/crypto-config/ordererOrganizations/itcast.cn/users/[email protected]/msp

# orderer 相关配置
orderers:
  orderer.itcast.cn:
    url: localhost:7050
    grpcOptions:
      ssl-target-name-override: orderer.itcast.cn
      keep-alive-time: 0s
      keep-alive-timeout: 20s
      keep-alive-permit: false
      fail-fast: false
      allow-insecure: false

    tlsCACerts:
      path: /home/stu/workspace/src/origins/conf/crypto-config/ordererOrganizations/itcast.cn/tlsca/tlsca.itcast.cn-cert.pem

# peer 相关配置
peers:
  peer0.ofgj.itcast.cn:
    url: grpc://localhost:7051
    eventUrl: localhost:7053
    grpcOptions:
      ssl-target-name-override: peer0.ofgj.itcast.cn
      keep-alive-time: 0s
      keep-alive-timeout: 20s
      keep-alive-permit: false
      fail-fast: false
      allow-insecure: false

    tlsCACerts:
      path: /home/stu/workspace/src/origins/conf/crypto-config/peerOrganizations/ofgj.itcast.cn/tlsca/tlsca.ofgj.itcast.cn-cert.pem

  peer1.ofgj.itcast.cn:
    url: localhost:8051
    eventUrl: localhost:8053
    grpcOptions:
      ssl-target-name-override: peer1.ofgj.itcast.cn
      keep-alive-time: 0s
      keep-alive-timeout: 20s
      keep-alive-permit: false
      fail-fast: false
      allow-insecure: false

    tlsCACerts:
      path: /home/stu/workspace/src/origins/conf/crypto-config/peerOrganizations/ofgj.itcast.cn/tlsca/tlsca.ofgj.itcast.cn-cert.pem
4. Model design
We need to use Fabric_SDK to operate at the models layer, so the first thing we need to do is to get the SDK handle, create a channel, add nodes, install the chain code, and instantiate the hand of the chain code before performing data operations. First, we define a structure, which stores some configuration information related to creating Fabric-SDK. The format is as follows:
// FabricSetup implementation
type FabricSetup struct {


	ConfigFile      string				// 初始化 SDK 对应的配置文件
	OrdererID       string				// orderer节点
	ChannelID       string				// ChannelID
	ChainCodeID     string				// ChainCodeID
	ChannelConfig   string				// 与channel相关的配置文件
	ChaincodeGoPath string				// GOPATH 环境变量
	ChaincodePath   string				// ChainCode 存放路径
	OrgAdmin        string				// Admin 用户名
	OrgName         string				// 组织名称
	UserName        string				// 普通用户名
	eventID         string				// eventID

	client          *channel.Client
	admin           *resmgmt.Client
	sdk             *fabsdk.FabricSDK
	event           *event.Client
}
We create a new SDK_Init.go file, define our structure variable in it, and initialize it:
	fSetup := FabricSetup{


		// Network parameters
		OrdererID: "orderer.itcast.cn",

		// Channel parameters
		ChannelID:     "fgjchannel",
		ChannelConfig: os.Getenv("GOPATH") + "/src/origins/conf/channel-artifacts/fgjchannel.tx",

		// Chaincode parameters
		ChainCodeID:     "mycc",
		ChaincodeGoPath: os.Getenv("GOPATH"),
		ChaincodePath:   "origins/chaincode",
		OrgAdmin:        "Admin",
		OrgName:         "ofgj",
		ConfigFile:      "conf/config.yaml",

		// User parameters
		UserName: "User1",
		eventID:"eventInvoke",
	}
So far, we have only set up some configuration information related to the SDK, we also need to call the SDK-AP to complete what we said above, create a new setup.go file, and the displayed content is as follows:
package models

import (
	"fmt"
	"github.com/hyperledger/fabric-sdk-go/pkg/client/resmgmt"
	"github.com/hyperledger/fabric-sdk-go/pkg/common/errors/retry"
	"github.com/hyperledger/fabric-sdk-go/pkg/core/config"
	mspclient "github.com/hyperledger/fabric-sdk-go/pkg/client/msp"
	"github.com/hyperledger/fabric-sdk-go/pkg/common/providers/msp"
	"github.com/hyperledger/fabric-sdk-go/pkg/fabsdk"
	"github.com/pkg/errors"
)

// SDK 初始化
func (setup *FabricSetup) Initialize() error{


	// 1> 利用配置文件初始化一个 SDK,我们使用 fabsdk.New 方法
	sdk,err := fabsdk.New(config.FromFile(setup.ConfigFile))
	if err!=nil{


		return errors.WithMessage(err,"failed to create SDK")
	}
	fmt.Println("SDK created")
	setup.sdk = sdk

	// 2> 利用第一步得到的 SDK ,创建 channel
	// 在创建channel之前我们需要创建一个资源管理客户端
	// 创建上下文
	resourceManagerClientContext := setup.sdk.Context(fabsdk.WithUser(setup.OrgAdmin),fabsdk.WithOrg(setup.OrgName))
	// 创建资源管理客户端
	resMgmtClient,err := resmgmt.New(resourceManagerClientContext)
	if err!=nil{


		return errors.WithMessage(err,"failed to chreate channel manager client from Admin identity!")
	}
	setup.resMgmtClient = resMgmtClient
	fmt.Println("Resource managerment client created!")


	// 3> 创建一个 MSP 客户端,相当于创建一个组织的句柄
	// 创建 ofgj 组织的 MSP client
	mspClient, err := mspclient.New(sdk.Context(), mspclient.WithOrg(setup.OrgName))
	if err != nil {


		return errors.WithMessage(err, "failed to create MSP client")
	}
	// 对该组织中的 Admin 用户进行身份签署
	adminIdentity, err := mspClient.GetSigningIdentity(setup.OrgAdmin)
	if err != nil {


		return errors.WithMessage(err, "failed to get admin signing identity")
	}
	req := resmgmt.SaveChannelRequest{

    ChannelID:setup.channelID,ChannelConfigPath:setup.channelConfigPath,SigningIdentities:[]msp.SigningIdentity{

    adminIdentity}}

	txID,err := setup.resMgmtClient.SaveChannel(req,resmgmt.WithOrdererEndpoint(setup.OrdererID))
	if err!=nil||txID.TransactionID==""{


		return errors.WithMessage(err,"Failed to create channel!")
	}
	fmt.Println("Channel Created!")

	// 4> 将 MSP 句柄对应的组织节点加入到先前创建的 channel,默认会讲所有的组织添加到channel中
	err = setup.resMgmtClient.JoinChannel(setup.channelID,resmgmt.WithRetry(retry.DefaultResMgmtOpts),resmgmt.WithOrdererEndpoint(setup.OrdererID))
	if err!=nil{


		return errors.WithMessage(err,"Failed to join channel!")
	}

	fmt.Println("Joined channel!")

	fmt.Println("Initialization Successful!")

	return nil
}

// chaincode 的安装和实例化
func (setup *FabricSetup) InstallAndInstantiateCC() error {


	// Create the chaincode package that will be sent to the peers
	ccPkg, err := packager.NewCCPackage(setup.ChaincodePath, setup.ChaincodeGoPath)
	if err != nil {


		return errors.WithMessage(err, "failed to create chaincode package")
	}
	fmt.Println("ccPkg created")

	// Install example cc to org peers
	installCCReq := resmgmt.InstallCCRequest{

    Name: setup.ChainCodeID, Path: setup.ChaincodePath, Version: "0", Package: ccPkg}
	_, err = setup.admin.InstallCC(installCCReq, resmgmt.WithRetry(retry.DefaultResMgmtOpts))
	if err != nil {


		return errors.WithMessage(err, "failed to install chaincode")
	}
	fmt.Println("Chaincode installed")

	// Set up chaincode policy
	ccPolicy := cauthdsl.SignedByAnyMember([]string{

    "ofgj.itcast.cn"})


	resp, err := setup.admin.InstantiateCC(setup.ChannelID, resmgmt.InstantiateCCRequest{

    Name: setup.ChainCodeID, Path: setup.ChaincodeGoPath, Version: "0", Args: [][]byte{

    []byte("init")}, Policy: ccPolicy})
	if err != nil || resp.TransactionID == "" {


		return errors.WithMessage(err, "failed to instantiate the chaincode")
	}
	fmt.Println("Chaincode instantiated")

	// Channel client is used to query and execute transactions
	clientContext := setup.sdk.ChannelContext(setup.ChannelID, fabsdk.WithUser(setup.UserName))
	setup.client, err = channel.New(clientContext)
	if err != nil {


		return errors.WithMessage(err, "failed to create new channel client")
	}
	fmt.Println("Channel client created")

	// Creation of the client which will enables access to our channel events
	setup.event, err = event.New(clientContext)
	if err != nil {


		return errors.WithMessage(err, "failed to create new event client")
	}

	fmt.Println("Event client created")

	fmt.Println("Chaincode Installation & Instantiation Successful")
	return nil
}

func (setup *FabricSetup) CloseSDK() {


	setup.sdk.Close()
}
Now, our chaincode has been installed on Fabric_Service, then we can call the SDK in the models layer to complete the data operation, we also take FormHouse as an example, create a new addHouseItem.go file in the models layer to record the house information Into the blockchain, the implementation is as follows:
func (this *Application)AddHouseItem(args[]string)(string,error){


	tempDataMap := make(map[string][]byte)
	tempDataMap["result"]=[]byte("Transient data in AddHouseItem")

	reg,_,err := this.FabricSetup.event.RegisterChaincodeEvent(this.FabricSetup.ChainCodeID,this.FabricSetup.eventID)
	if err!=nil{


		errors.WithMessage(err,"RegisterChaincodeEvent err...")
		return "",err
	}

	defer this.FabricSetup.event.Unregister(reg)

	var tempArgs [][]byte
	for i:=1;i<len(args);i++{


		tempArgs = append(tempArgs,[]byte(args[i]))
	}

	request := channel.Request{

    ChaincodeID:this.FabricSetup.ChainCodeID,Fcn:args[0],Args:[][]byte{

    []byte(args[1]),[]byte(args[2]),[]byte(args[3]),[]byte(args[4]),[]byte(args[5]),[]byte(args[6]),[]byte(args[7])},TransientMap:tempDataMap}
	response ,err := this.FabricSetup.client.Execute(request)
	if err!=nil{


		// 资产转移失败
		return "",err
	}

	return string(response.TransactionID),nil
}
At this time, our FormHouse() function in the controller layer can be written as follows:
// 发布房源信息
func (this *MainController) FormHouse() {


	// 响应 /form_house 请求,将 form_house.html 页面返回给客户端
	this.TplName = "form_house.html"

	rentingID := this.GetString("rentingID")
	if rentingID == "" {


		return
	} else {


		// 获取用户输入
		fczbh := this.GetString("fczbh")
		fzxm := this.GetString("fzxm")
		djrq := this.GetString("djrq")
		zfmj := this.GetString("zfmj")
		fwsjyt := this.GetString("fwsjyt")
		sfdy := this.GetString("sfdy")

		// 组织参数
		var args []string
		args = append(args, "addHouseInfo")
		args = append(args, rentingID)
		args = append(args, fczbh)
		args = append(args, fzxm)
		args = append(args, djrq)
		args = append(args, zfmj)
		args = append(args, fwsjyt)
		args = append(args, sfdy)

		// 调用models 层业务逻辑,把数据记入超级账本
		ret, err := models.App.AddHouseItem(args)
		if err != nil {


			fmt.Println("AddHouseItem err...")
		}

		fmt.Println("<--- 添加房源信息结果 --->:", ret)
	}
	// 最后返回在首页
	this.TplName = "index.html"
}
args[1]),[]byte(args[2]),[]byte(args[3]),[]byte(args[4]),[]byte(args[5]),[]byte( args[6]),[]byte(args[7])},TransientMap:tempDataMap}
response ,err := this.FabricSetup.client.Execute(request)
if err!=nil{ // Execute the default value return “”; ,err }
return string(response.TransactionID),nil
}
这时我们在 controller 层的 FormHouse() 函数就可以写成如下形式:

```go
// 发布房源信息
func (this *MainController) FormHouse() {
	// 响应 /form_house 请求,将 form_house.html 页面返回给客户端
	this.TplName = "form_house.html"

	rentingID := this.GetString("rentingID")
	if rentingID == "" {
		return
	} else {
		// 获取用户输入
		fczbh := this.GetString("fczbh")
		fzxm := this.GetString("fzxm")
		djrq := this.GetString("djrq")
		zfmj := this.GetString("zfmj")
		fwsjyt := this.GetString("fwsjyt")
		sfdy := this.GetString("sfdy")

		// 组织参数
		var args []string
		args = append(args, "addHouseInfo")
		args = append(args, rentingID)
		args = append(args, fczbh)
		args = append(args, fzxm)
		args = append(args, djrq)
		args = append(args, zfmj)
		args = append(args, fwsjyt)
		args = append(args, sfdy)

		// 调用models 层业务逻辑,把数据记入超级账本
		ret, err := models.App.AddHouseItem(args)
		if err != nil {
			fmt.Println("AddHouseItem err...")
		}

		fmt.Println("<--- 添加房源信息结果 --->:", ret)
	}
	// 最后返回在首页
	this.TplName = "index.html"
}
Now, we have a complete process running through, and we can implement the remaining functions in the same way.