illustrate:
Modules and software used in this chapter: windows10 + Pycharm Professional Edition + python3.10 + opencv-python (version 4.6.0.66) module + Numpy (version 1.24.0) module
The module can be downloaded through the file > settings > project > python interpreter > plus sign in the upper left corner > search opencv-python and Numpy under the pycharm software
Generally, when installing OpenCV (opencv-python), Numpy will be installed at the same time, because some face recognition operations need to use the data type of Numpy's mathematical function library
All the pictures used in this chapter are from Baidu. If there is any infringement, please delete it by private message
We will start from the basic operation of opencv to face recognition step by step, suitable for beginners
Table of contents
1. Create an OpenCV image window and set the waiting time
2. Read image and display window
1. Download the feature file for face recognition
3. Read the face recognized by the camera
5. Complete face recognition project:
1. Read and display images
1. Create an OpenCV image window and set the waiting time
You can use namedWindow() to create a window to display images in the future
grammar:
cv2.namedWindow("窗口标题", 窗口旗标参数)Window flag parameter values:
WINDOW_AUTOSIZE: The system will adjust the window size according to the image size
WINDOW_NORMAL: The user can adjust the window size by himself
WINDOW_OPENGL: The window will be opened with OpenGL support
Time to wait:
cv2.waitKey(n) waits for running time , n unit is milliseconds , if you do not write n value, it will wait indefinitely by default
Demo:
import cv2

cv2.namedWindow("abc", cv2.WINDOW_AUTOSIZE)  # 建立标题为 abc 的窗口
cv2.waitKey(1000)  # 设置窗口等待时间 注意这里是毫秒 如果不设定会秒退
2. Read image and display window
You can use cv2.imread() to read the image, and set the image in a variable after reading. Currently OpenCV supports most image formats, such as: jpg, jpeg, png, bmp, tiff and other image formats
grammar:
image = cv2.imread(图像文件,图像旗标)Image flag parameters:
cv2.IMREAD_COLOR: This is the default value, read in color image, the value is 1
cv2.IMREAD_GRAYSCALE: read in gray image, value is 0
cv2.IMREAD_UNCHANGED: Read an image with an alpha value in color, with a value of -1
Show window:
通过cv2.imread(窗口名称,图像对象)的方式就可以显示窗口了For example:
import cv2

cv2.namedWindow("abc", cv2.WINDOW_AUTOSIZE)  # 随图片大小改变窗口改变
img1 = cv2.imread("C:\image\\test.png",1)  # 注意这里的路径不识别带中文的路径 这里可以用 1 ,0,-1 方式代替图像旗标
cv2.imshow("abc", img1)    # 显示窗口
cv2.waitKey()  # 设定等待时间,不设置具体时间 则为无限时间等待
# operation result

3. Close the OpenCV window
If you want to delete the window, you can use the following method
cv2.destroyAllWindows() # 删除所有OpenCV的图像窗口
cv2.destroyWindow("abc") # 关闭单一窗口
4. Store the image
grammar:
cv2.imwrite(文件路径,图像对象) # 存储图像For example:
import cv2

cv2.namedWindow("abc", cv2.WINDOW_AUTOSIZE)  # 创建窗口
img1 = cv2.imread("C:\image\\test.png")  # 默认使用彩色预设
cv2.imshow("abc", img1)  # 预览窗口
cv2.imwrite("C:\image\\image.png", img1)  # 将test.png的图片保存为 image.png 这里是另存为注意
cv2.waitKey(3000)  # 等待三秒
cv2.destroyAllWindows()  # 关闭所有窗口
operation result:

2. OpenCV's drawing function
1. Straight line drawing
grammar:
cv2.line(绘图对象,(x1,y1),(x2,y2),颜色,宽度)The drawing object can be thought of as a canvas, where (x1,y1) is the starting point of the line and (x2,y2) is the end point of the line. The upper left corner of the canvas is the coordinate of (0,0), the right is the x-axis, and the down is the y-axis, the unit is pixel, the color is RGB, the value is 0 to 255, the default is black, and the default line width is 1 px
#Example:
draw a line
import cv2

cv2.namedWindow("abc", cv2.WINDOW_AUTOSIZE)  # 创建窗口
img1 = cv2.imread("C:\image\\test.png")  # 默认使用彩色预设
cv2.line(img1, (0, 32), (311, 32), (121, 127, 211), 10)  # 绘制一个宽度为10 的粉色线条
cv2.imshow("abc", img1)  # 预览窗口
cv2.waitKey(3000)  # 等待三秒
# operation result

2. Draw a rectangle
grammar:
cv2.rectangle(绘图对象,(x1,y1),(x2,y2),颜色,宽度)The method of drawing a straight line is almost in the form of coordinates, except that (x1, y1) is the upper left corner , and (x2, y2) is the lower right corner . Note that the width here is the width of the rectangular line . If it is a negative value, it means it is a solid rectangle.
For example:
import cv2

cv2.namedWindow("abc", cv2.WINDOW_AUTOSIZE)  # 创建窗口
img1 = cv2.imread("C:\image\\test.png")  # 默认使用彩色预设
cv2.rectangle(img1, (645, 53), (1113, 473), (121, 127, 211), 10) # 绘制矩形,线条宽度为10 如果为负数则是实心矩形注意
cv2.imshow("abc", img1)  # 预览窗口
cv2.waitKey(3000)  # 等待三秒
# operation result
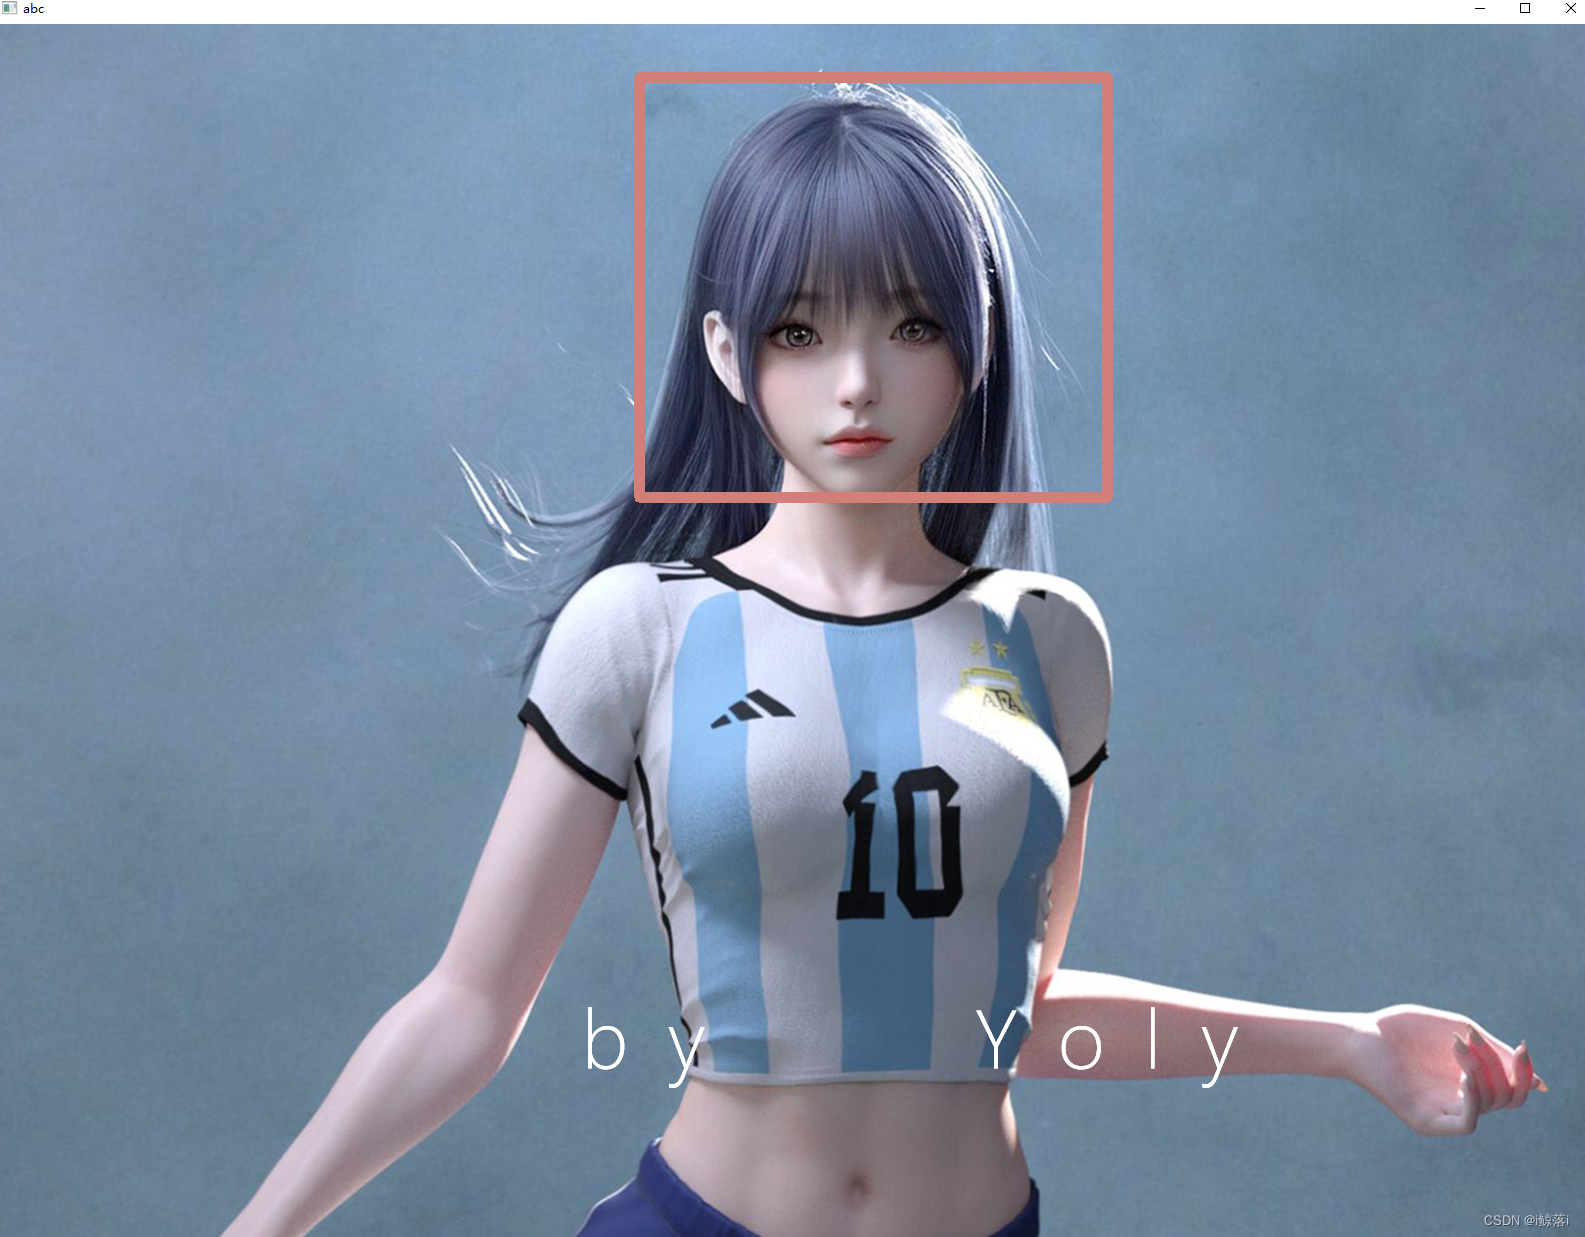
So far, we are tired of looking at the aesthetics. Let’s change to another girl~ Continue to explain
3. Draw the circle
grammar:
cv2.circle(绘制对象,(x,y),radius,颜色,宽度)Note: (x,y) here is expanded from the center of the circle, radius: is the radius , and the others are the same as drawing a rectangle
# For example:
import cv2

cv2.namedWindow("abc", cv2.WINDOW_AUTOSIZE)  # 创建窗口
img1 = cv2.imread("C:\image\\test.png")  # 默认使用彩色预设 # 当前图片大小为 1920 * 1080
cv2.circle(img1, (859, 352), 340, (121, 127, 211), 10)  # 绘制园,如果宽度为负数则为实心园
cv2.imshow("abc", img1)  # 预览窗口
cv2.waitKey(3000)  # 等待三秒后自动就关闭窗口 因为程序结束了
# operation result:

4. Output text
grammar:
cv2.putText(绘图对象,文字,位置,字体,字号大小,颜色,文字宽度)where the font is:
FONT_HERSHEY_SIMPLEX: sans-serif font normal size
FONT_HERSHEY_PLAY: Sans-serif smaller font size
FONT_HERSHEY_COMPLEX: serif font normal size
FONT_ITALIC: italic font
Position: Represents the coordinates of the lower left corner of the first word
# For example:
import cv2

cv2.namedWindow("abc", cv2.WINDOW_AUTOSIZE)  # 创建窗口
img1 = cv2.imread("C:\image\\test.png")  # 默认使用彩色预设 # 当前图片大小为 1920 * 1080
cv2.putText(img1, "This is a very pretty girl", (44, 89), cv2.FONT_ITALIC, 1, (64, 228, 211), 2)  # 编写字体
cv2.imshow("abc", img1)  # 预览窗口
cv2.waitKey(3000)  # 等待三秒后自动就关闭窗口 因为程序结束了
# operation result:

3. Face recognition
In the process of face recognition and detection, the most important thing is to match and compare with the image database. The technology used is the Harr feature. OpenCV has stored many feature files such as faces, expressions, and smiles that have been trained and tested.
1. Download the feature file for face recognition
We did not download the feature file when we downloaded opencv-python in pycharm. There are two download methods below, please download it yourself. It is recommended to go to the domestic website, and the foreign website is particularly slow
Domestic: opencv feature file # windows Please go here, after downloading, it is a tar package to decompress, double-click the opencv-3.3.0 program --- select the file location and click extract to download, please rest assured to use this is the official website when downloading downloader for

Foreign official website: OpenCV 3.3 - OpenCV non-windows, please go to the official website to download (the network is not good and very slow), there are several options below

2. Facial recognition
If it is not easy to understand, please also look at it by combining the actual combat procedures in this chapter
2.1 Face recognition
First we need to mark the face of the image, we can use the cv2.CascadeClassifier() category to perform face recognition
grammar:
face_cascade = cv2.CascadeClassifier(r'C:\Facial-feature-file\opencv\sources\data\haarcascades\haarcascade_frontalface_default.xml')
# haarcascade_frontalface_default.xml是常用的人脸特征识别的文件
2.2 Identify start
Second, you need to use the recognition object to start the detectMultiScale() method
grammar:
faces = face_cascade.detectMultiScale(img,参数1,参数2,.....)
parameter:
# face_cascade is the variable of the storage location of the feature file
Parameter 1 - N
# scaleFactor: If not specified, it is generally 1:1, mainly referring to the reduction factor of the image ratio in feature comparison
# minNeighbors: The characteristics of each block will be compared, and the number of characteristic comparisons can be set. After reaching it, it will be successful. The default is 3
# minSize: Minimum recognition block
# maxSize: Maximum recognition block
For example:
faces = face_cascade.detectMultiScale(img, 1.3 , 5)
1.3 for scaleFactor -- 5 for: minNeighbors
push in this order
After the above execution is successful, the return value is in the form of a list. The elements of the list are tuples, and each tuple contains four sets of numbers, which respectively represent the x and y axis coordinates of the upper corner of the face, the width w of the face, and the height of the face h
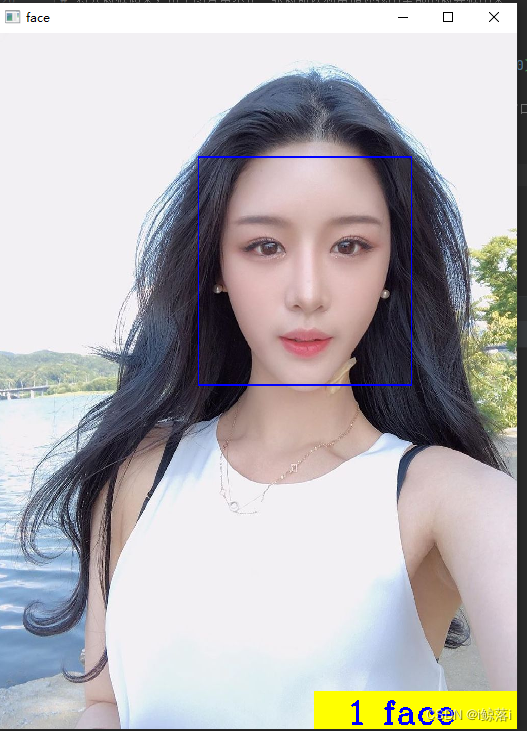
2.3 Program combat
Original image:

program:
import cv2

# 注意,因人脸识别无法识别太远或者太模糊的照片可能会出错,图片最好五官清晰的大头贴类
img1 = cv2.imread("C:\image\\6.jpg")  # 默认使用彩色预设 # 当前图片大小为 1280 * 1024
file_name = r'C:\Facial-feature-file\opencv\sources\data\haarcascades\haarcascade_frontalface_default.xml'  # 定位人脸识别特征文件
face_cascade = cv2.CascadeClassifier(file_name)  # 读取图像文件建立图像文件对象

faces = face_cascade.detectMultiScale(img1, scaleFactor=1.3, minNeighbors=3, minSize=(30, 30))  # 启动识别并设定参数

# 根据图片大小在右下角绘制一个矩形
cv2.rectangle(img1, (img1.shape[1] - 400, img1.shape[0] - 70), (img1.shape[1], img1.shape[0]), (0, 255, 255), -1)

# print(img1.shape)  # 该数值打印的是当前图片高,宽和图像通道

# 标注找到多少张脸,在图片内编写文字
cv2.putText(img1, f"  {int(len(faces))} face ", (img1.shape[1] - 400, img1.shape[0] - 10), cv2.FONT_HERSHEY_COMPLEX,
            2,
            (255, 0, 0), 3)

# 将人脸框起来,由于图片中不止一张脸所以利用循环找出全部的脸并框出来
for (x, y, w, h) in faces:
    print(x, y, w, h)
    cv2.rectangle(img1, (x, y), (x + w, y + h), (255, 0, 0), 2)

cv2.namedWindow("face", cv2.WINDOW_NORMAL)  # 建立图像对象窗口
cv2.imshow("face", img1)  # 显示图像
cv2.waitKey(3000)  # 等待 3 秒
# operation result:
2.4 Save the face capture
To complete image storage, you need to use the Pillow module to achieve
If you are not familiar with understanding the role of the Pillow module , please jump to : Python3 an article to learn the basic operations of "image processing"
code:
import cv2
from PIL import Image

# 注意,因人脸识别无法识别太远或者太模糊的照片可能会出错,图片最好五官清晰的大头贴类
img1 = cv2.imread("C:\image\\6.jpg")  # 默认使用彩色预设 # 当前图片大小为 1280 * 1024
file_name = r'C:\Facial-feature-file\opencv\sources\data\haarcascades\haarcascade_frontalface_default.xml'  # 定位人脸识别特征文件
face_cascade = cv2.CascadeClassifier(file_name)  # 读取图像文件建立图像文件对象

faces = face_cascade.detectMultiScale(img1, scaleFactor=1.3, minNeighbors=3, minSize=(30, 30))  # 启动识别并设定参数

# 根据图片大小在右下角绘制一个矩形
cv2.rectangle(img1, (img1.shape[1] - 400, img1.shape[0] - 70), (img1.shape[1], img1.shape[0]), (0, 255, 255), -1)

# print(img1.shape)  # 该数值打印的是当前图片高,宽和图像通道

# 标注找到多少张脸,在图片内编写文字
cv2.putText(img1, f"  {int(len(faces))} face ", (img1.shape[1] - 400, img1.shape[0] - 10), cv2.FONT_HERSHEY_COMPLEX,
            2,
            (255, 0, 0), 3)

# 将人脸框起来,由于图片中不止一张脸所以利用循环找出全部的脸并框出来
num = 1
for (x, y, w, h) in faces:
    # print(x, y, w, h)
    cv2.rectangle(img1, (x, y), (x + w, y + h), (255, 0, 0), 2)
    Picture_name = f"{num}_face.png"
    image = Image.open("C:\image\\6.jpg")  # 这里需要打开你识别的人脸图像
    imageCrop = image.crop((x, y, x + w, y + h))  # 剪裁  坐标就按绘画的识别的框 剪
    imageRresize = imageCrop.resize((150, 150), Image.ANTIALIAS)  # 设置图片存储质量
    imageRresize.save(Picture_name)  # 保存
    num += 1

cv2.namedWindow("face", cv2.WINDOW_NORMAL)  # 建立图像对象窗口
cv2.imshow("face", img1)  # 显示图像
cv2.waitKey(3000)  # 等待 3 秒
Key part:

# operation result:

3. Read the face recognized by the camera
OpenCV also has a syntax that can control the camera, as follows:
video = VideoCapture(n) # 笔记本电脑上内置摄像头, n的值是0Determine whether the camera is turned on:
video.isOpened() #结果为True 为打开,反之False是失败Read the image captured by the camera:
ret,img = cap.read()case:
Use the computer camera to recognize the face and try to realize the frame according to the face
illustrate:
The details can be viewed in combination with the above content and code comments
1. Realize the positioning coordinates according to the list coordinate values in the self-defined faces parameter and draw a box around the face according to this coordinates
2. The meaning of the parameters of the detectMultiScale function:
The first parameter: image--the picture to be detected, generally a grayscale image to speed up the detection;
The second parameter: objects--the rectangular frame vector group of the detected object; the
third parameter: scaleFactor--indicates the scale factor of the search window in two successive scans. The default is 1.1, that is, the search window is expanded by 10% each time;
the fourth parameter:
minNeighbors--Indicates the minimum number of adjacent rectangles that constitute the detection target (the default is 3).
If the sum of the number of small rectangles that make up the detection target is less than min_neighbors - 1, it will be excluded.
If min_neighbors is 0, the function will return all detected candidate rectangles without any operation.
This setting value is generally used in user-defined combination programs for detection results;
The fifth parameter:
flags--either use the default value, or use CV_HAAR_DO_CANNY_PRUNING, if set to CV_HAAR_DO_CANNY_PRUNING, then the function will use Canny edge detection to exclude areas with too many or too few edges, so these areas are usually not areas where faces are located;
sixth And seventh: minSize and maxSize are used to limit the range of the obtained target area
import cv2


file_name = r'C:\Facial-feature-file\opencv\sources\data\haarcascades\haarcascade_frontalface_default.xml'  # 定位人脸识别特征文件
face_cascade = cv2.CascadeClassifier(file_name)  # 读取图像文件建立图像文件对象
cv2.namedWindow('face recognition')

video = cv2.VideoCapture(0)
print(video.isOpened())
while (video.isOpened()):
    ret, img = video.read()
    img = cv2.flip(img, 1)
    grey = cv2.cvtColor(img, cv2.COLOR_BGR2GRAY) # 将图片转为灰度图片加速检测速度
    faces = face_cascade.detectMultiScale(grey, scaleFactor=1.3, minNeighbors=3, minSize=(30, 30))  # 启动识别并设定参数
    # print("faces", faces)
    if len(faces) == 1:  # 想要是被多张脸 请将 1 改大
        for faceRect in faces:
            # print(faceRect)
            x, y, w, h = faceRect
            cv2.rectangle(img, (x - 10, y - 10), (x + w + 10, y + h + 10), (0, 255, 0), 1)  # 实现实时定位人脸的绘图

    else:
        # 当未检测到人脸或者检测到大于1张脸的时候,给与提示
        cv2.putText(img, f"Multiple faces detected!", (200, 60), cv2.FONT_HERSHEY_COMPLEX, 1, (255, 0, 0), 1)


    key = cv2.waitKey(200)  # 200 是等待时间毫秒 key是用户的按键
    if key == ord("a") or key == ord("A"): # 如果按a或A
        cv2.imwrite("C:\image\\photo.jpg", img)  # 将图片写入c盘image下
        break

    cv2.imshow('face recognition', img)  # 左上角窗口名称
video.release()  # 关闭摄像头
cv2.destroyAllWindows()  # 销毁所有窗口
4. Face comparison
# Note that the way of comparison is the distance comparison between pictures and pictures
# Why use numpy for face comparison:
In face recognition, it is often necessary to convert a face image into a feature vector or feature descriptor, and then judge whether it is the same face by comparing the distance between the feature vectors of different faces. And this distance is usually represented by a norm (norm).
In this application, the 'numpy.linalg.norm function can conveniently calculate the distance between two feature vectors, usually using the Euclidean norm (also known as the L2 norm), and its formula is:
$$|x-y|2 = \sqrt{\sum{i=1}^{n}(x_i-y_i)^2}$$
Where $x$ and $y$ are two feature vectors respectively.
Therefore, when performing face recognition, the feature vector of each face can be stored. When a certain face needs to be recognized, the feature vector of the face is first extracted, and then the difference between the feature vector and all the stored feature vectors is calculated. Finding the face corresponding to the feature vector with the smallest distance is the most likely matching result.
In practical applications, in order to improve the matching accuracy, a variety of feature descriptors and distance calculation methods are often used, and some preprocessing and optimization techniques are used to speed up the calculation. The specific implementation methods and details may be different.
# illustrate:
The following code is to compare all the pictures in a folder to see if the result is the minimum value. If it is the minimum value, then we think that the two photos are very similar and are the same person.
Above code:
import dlib, numpy, glob, os
import cv2
from skimage import io

# 人脸关键点检测器
face_key_point_path = r".\shape_predictor.dat"
# 人脸识别模型,提取特征的数值
face_rec_model_path = r".\dlib_face_recognition.dat"

# 加载dilb模型
detector = dlib.get_frontal_face_detector()
sp = dlib.shape_predictor(face_key_point_path)  # 加载关键点检测器文件
facerec = dlib.face_recognition_model_v1(face_rec_model_path)  # 将照片转为dlib格式

# 存储人名
names = []
drill_number = []  # 存储特征点的距离
for f in glob.glob(os.path.join(r"D:\python练习专用目录\dilb模块\image", "*.jpg")):
    # print(f)
    # print("正在处理: {}".format(f))
    img = io.imread(f)  # 读取每张图片
    names.append(f.split('\\')[-1].split('.')[0])  # 这里取的是文件前面的姓名
    dets = detector(img, 1)
    for i in dets:
        # print(i)
        shape = sp(img, i)
        # facerec.compute_face_descriptor(图片对象, 特征点)
        face = facerec.compute_face_descriptor(img, shape)  # 计算特征向量
        # 将计算的距离存入一个列表中,为下面做对比用
        numpy_number = numpy.array(face)
        drill_number.append(numpy_number)

# print(drill_number)

# 这里写你要识别的图片
img = io.imread(r"D:\python练习专用目录\dilb模块\识别的图片\face.jpg")
dets = detector(img, 1)

# 对比后的数据存放点
contrast_list = []

for k, d in enumerate(dets):
    # print(k, d)  # 识别路径
    shape = sp(img, d)
    face_descriptor = facerec.compute_face_descriptor(img, shape)
    d_test = numpy.array(face_descriptor)
    for i in drill_number:  # 计算距离
        # 在人脸识别中,常常需要将人脸图像转换为一个特征向量或特征描述子,然后通过比较不同人脸的特征向量之间的距离来判断是否是同一个人脸。而这个距离通常使用范数(norm)来表示。
        dist_1 = numpy.linalg.norm(i - d_test)
        contrast_list.append(dist_1) # 将计算的量存入一个列表中

dict_names = dict(zip(names, contrast_list))  # 将名字和计算结果拼成一个结果
names_sorted = sorted(dict_names.items(), key=lambda d: d[1])  # 转成一个元组并排序
# 那么第一个就是最小值,那么我们认为他就是识别到的人
print("识别的照片可能是:", names_sorted[0][0]) # names_sorted[0][0]取出元组中的人名
5. Complete face recognition project:
Project Description:
This project is a relatively complete set of face recognition. It can recognize a face and automatically draw a frame around the recognized face. It can automatically recognize whether your face exists in the library. If it is not in the library, it will Prompt you to enter the name of the incoming picture and record it in the library. The next time the corresponding face is recognized, the input name will be recognized. At the end of the recognition, your face will be compared, and the probability of accurate recognition is very high. high.
Architecture introduction:
windows10 + pycharm + python3.6 + third-party function modules need to be downloaded separately: opencv + PTL + dlib + numpy + database: MySQL8
# Note that the database must be created first:
Create database statement:
# 创建数据库
CREATE DATABASE images;
# 进入创建的数据库
USE images;
# 创建存储表
CREATE TABLE face_picture1(
id INT NOT NULL AUTO_INCREMENT COMMENT 'ID',
names  VARCHAR(20) NOT NULL COMMENT"姓名",
image LONGBLOB NOT NULL COMMENT "人脸照片",
type VARCHAR(10) NOT NULL DEFAULT "JPG" COMMENT "图片格式",
PRIMARY KEY(id)
)
download link:
Pure back-end python face recognition complete project-Python Documentation Resources-CSDN Library