Reference URL: https://blog.csdn.net/qq_27889941/article/details/128443507
https://blog.csdn.net/Z960515/article/details/122330311
The common.py file was interpreted last time, and this time the code interpretation of the yolo.py file will be performed.
1 header file interpretation
The following is the interpretation and description of some libraries.
2 parse_model function
This function is used to build the network model. If you want to modify the framework of the network model, you need to make corresponding changes.
def parse_model(d, ch):  # model_dict, input_channels(3)
    # Parse a YOLOv5 model.yaml dictionary
    '''
    用在DetectionModel模块中
    解析模型文件(字典形式),并搭建网络结构
    该函数主要完成:
            更新当前层的args(参数),计算c2(当前层的输出channel)
            ->使用当前层的参数搭建当前层
            ->生成 layers + save
    参数 -- d: model_dict模型文件,字典形式{dice: 7}(yolov5s.yaml中的6个元素 + ch)
          ch: 记录模型每一层的输出channel,初始ch=[3],后面会删除
    返回 -- nn.Sequential(*layers): 网络的每一层的层结构
           sorted(save): 把所有层结构中的from不是-1的值记下,并排序[4,6,10,14,17,20,23]
    '''
    LOGGER.info(f"\n{'':>3}{'from':>18}{'n':>3}{'params':>10}  {'module':<40}{'arguments':<30}")
    # 读取模型文件(字典类型)的相关参数
    anchors, nc, gd, gw, act = d['anchors'], d['nc'], d['depth_multiple'], d['width_multiple'], d.get('activation')
    if act:
        Conv.default_act = eval(act)  # redefine default activation, i.e. Conv.default_act = nn.SiLU()
        LOGGER.info(f"{colorstr('activation:')} {act}")  # print
    # 每一个predict head上的anchor数
    na = (len(anchors[0]) // 2) if isinstance(anchors, list) else anchors  # number of anchors
    # 每一个predict head层的输出个数
    no = na * (nc + 5)  # number of outputs = anchors * (classes + 5)

    '''
    正式搭建网络部分
    layers: 保存每一层的层结构
    save: 记录下所有层结构中from不是-1的层结构序号
    c2: 保存当前层的输出channel
    '''
    layers, save, c2 = [], [], ch[-1]  # layers, savelist, ch out
    # f(from): 当前层输入来自哪些层
    # n(number): 当前层数,
    # m(module): 当前层类别
    # args: 当前层类参数列表,包括channel、kernel_size、stride、padding和bias等
    # 遍历backbone和head的每一层
    for i, (f, n, m, args) in enumerate(d['backbone'] + d['head']):  # from, number, module, args
        # 得到当前层的真实类名,例如:m = Focus -> <class 'models.common.Focus'>
        m = eval(m) if isinstance(m, str) else m  # eval strings
        for j, a in enumerate(args):
            with contextlib.suppress(NameError):
                args[j] = eval(a) if isinstance(a, str) else a  # eval strings

        # --------------------更新当前层的args(参数),计算c2(当前层的输出channel)--------------------
        # gd:depth gain 控制深度,如yolov5s: n*0.33,n: 当前模块的次数(间接控制深度)
        n = n_ = max(round(n * gd), 1) if n > 1 else n  # depth gain
        if m in {
                Conv, GhostConv, Bottleneck, GhostBottleneck, SPP, SPPF, DWConv, MixConv2d, Focus, CrossConv,
                BottleneckCSP, C2, C3, C3TR, C3SPP, C3Ghost, nn.ConvTranspose2d, DWConvTranspose2d, C3x}:
            # c1: 当前层的输入channel数; c2: 当前层的输出channel数(初定); ch: 记录着所有层的输出channel数
            c1, c2 = ch[f], args[0]
            # no=75,只有最后一层c2=no,最后一层不用控制宽度,输出channel必须是no
            if c2 != no:  # if not output
                # gw:width gain 控制宽度,如yolov5s: c2*0.5; c2: 当前层的最终输出channel数(间接控制宽度)
                c2 = make_divisible(c2 * gw, 8)

            # 在初始args的基础上更新,加入当前层的输入channel并更新当前层
            # [in_channels, out_channels, *args[1:]]
            args = [c1, c2, *args[1:]]
            # 如果当前层是BottleneckCSP/C2/C3/C3TR/C3Ghost/C3x,则需要在args中加入Bottleneck的个数
            # [in_channels, out_channels, Bottleneck个数, 原args[1:]]
            if m in {BottleneckCSP, C2, C3, C3TR, C3Ghost, C3x}:
                args.insert(2, n)  # number of repeats 在第二个位置插入Bottleneck的个数n
                n = 1 # 恢复默认值1
        elif m is nn.BatchNorm2d:
            # BN层只需要返回上一层的输出channel
            args = [ch[f]]
        elif m is Concat:
            # Concat层则将f中所有的输出累加得到这层的输出channel
            c2 = sum(ch[x] for x in f)
        # TODO: channel, gw, gd
        elif m in {Detect, Segment}:
            # Detect/Segment(YOLO Layer)层
            # 在args中加入三个Detect层的输出channel
            args.append([ch[x] for x in f])
            if isinstance(args[1], int):  # number of anchors
                args[1] = [list(range(args[1] * 2))] * len(f)
            if m is Segment:
                args[3] = make_divisible(args[3] * gw, 8)
        elif m is Contract:
            c2 = ch[f] * args[0] ** 2
        elif m is Expand:
            c2 = ch[f] // args[0] ** 2
        else:
            c2 = ch[f] # args不变

        # m_: 得到当前层的module,如果n>1就创建多个m(当前层结构),如果n=1就创建一个m
        m_ = nn.Sequential(*(m(*args) for _ in range(n))) if n > 1 else m(*args)  # module
        # 打印当前层结构的一些基本信息
        t = str(m)[8:-2].replace('__main__.', '')  # module type
        np = sum(x.numel() for x in m_.parameters())  # number params 计算这一层的参数量
        m_.i, m_.f, m_.type, m_.np = i, f, t, np  # attach index, 'from' index, type, number params
        LOGGER.info(f'{i:>3}{str(f):>18}{n_:>3}{np:10.0f}  {t:<40}{str(args):<30}')  # print
        # 把所有层结构中的from不是-1的值记下 [6,4,14,10,17,20,23]
        save.extend(x % i for x in ([f] if isinstance(f, int) else f) if x != -1)  # append to savelist
        # 将当前层结构module加入layers中
        layers.append(m_)
        if i == 0:
            ch = [] # 去除输入channel[3]
        # 把当前层的输出channel数加入ch
        ch.append(c2)
    return nn.Sequential(*layers), sorted(save)
3 Detect class
The Detect module is used to build the Detect layer, which calculates the input feature map to the shape we want through a convolution operation and formula, and prepares for the subsequent calculation of the loss rate or NMS.
'''
Detect模块是用来构建Detect层的
将输入的feature map通过一个卷积操作和公式计算到我们想要的shape,为后面的计算损失率或者NMS做准备
'''
class Detect(nn.Module):
    # YOLOv5 Detect head for detection models
    stride = None  # strides computed during build
    dynamic = False  # force grid reconstruction
    export = False  # export mode

    def __init__(self, nc=80, anchors=(), ch=(), inplace=True):  # detection layer
        '''
        detection layer 相当于yolov3中的YOLO Layer层
        参数 -- nc: number of classes
             -- anchors: 传入3个feature map上的所有anchor的大小(P3/P4/P5)
             -- ch: [128,256,512] 3个输出feature map的channel
        '''
        super().__init__()
        '''
        nc:类别数
        no:每个anchor的输出数,为(x,y,w,h,conf) + nc = 5 + nc 的总数
        nl:预测层数,此次为3
        na:anchors的数量,此次为3
        grid:格子坐标系,左上角为(1,1),右下角为(input.w/stride,input.h/stride)
        '''
        self.nc = nc  # number of classes
        self.no = nc + 5  # number of outputs per anchor
        self.nl = len(anchors)  # number of detection layers
        self.na = len(anchors[0]) // 2  # number of anchors
        self.grid = [torch.empty(0) for _ in range(self.nl)]  # init grid
        self.anchor_grid = [torch.empty(0) for _ in range(self.nl)]  # init anchor grid
        '''
        模型中需要保存的参数一般有两种:
        一种是反向传播需要被optimizer更新的,称为parameter;另一种不需要被更新,称为buffer
        buffer的参数更新是在forward中,而optim.step只能更新nn.parameter参数
        '''
        self.register_buffer('anchors', torch.tensor(anchors).float().view(self.nl, -1, 2))  # shape(nl,na,2)  将anchors(shape=[3,6])转为shape=[3,3,2]

        # output conv 对每个输出的feature map都要调用一次conv1 x 1
        # 将输出通过卷积到 self.no * self.na 的通道,达到全连接的作用
        self.m = nn.ModuleList(nn.Conv2d(x, self.no * self.na, 1) for x in ch)  # output conv
        # 一般都是True,默认不使用AWS,Inferentia加速
        self.inplace = inplace  # use inplace ops (e.g. slice assignment)

    '''
    返回: 一个tensor list,存放三个元素
    [bs, anchor_num, grid_w, grid_h, xywh+c+classes] bs-batch size即多少张图片
    分别是[1,3,80,80,25] [1,3,40,40,25] [1,3,20,20,25]
    inference: 0 [1,19200+4800+1200,25]=[bs,anchor_num*grid_w*grid_h,xywh+c+classes]
    '''
    def forward(self, x):
        z = []  # inference output
        # 对3个feature map分别进行处理
        for i in range(self.nl):
            x[i] = self.m[i](x[i])  # conv xi[bs,128/256/512,80,80] to [bs,75,80,80]
            bs, _, ny, nx = x[i].shape  # x(bs,255,20,20) to x(bs,3,20,20,85)
            # [bs,75,80,80] to [1,3,25,80,80] to [1,3,80,80,25]
            x[i] = x[i].view(bs, self.na, self.no, ny, nx).permute(0, 1, 3, 4, 2).contiguous()

            if not self.training:  # inference
                '''
                构造网格
                因为推理返回的不是归一化后的网络偏移量,需要加上网格的位置,得到最终的推理坐标,再送入NMS
                所以这里构建网络就是为了记录每个grid的网格坐标,方便后面使用
                即向前传播时需要将相对坐标转换到grid绝对坐标系中
                生成的grid坐标系
                grid[i].shape = [1,1,ny,nx,2]
                [[[[1,1],[1,2],...[1,nx]],
                 [[2,1],[2,2],...[2,nx]],
                     ...,
                 [[ny,1],[ny,2],...[ny,nx]]]]
                '''
                if self.dynamic or self.grid[i].shape[2:4] != x[i].shape[2:4]:
                    self.grid[i], self.anchor_grid[i] = self._make_grid(nx, ny, i)

                if isinstance(self, Segment):  # (boxes + masks)
                    xy, wh, conf, mask = x[i].split((2, 2, self.nc + 1, self.no - self.nc - 5), 4)
                    xy = (xy.sigmoid() * 2 + self.grid[i]) * self.stride[i]  # xy
                    wh = (wh.sigmoid() * 2) ** 2 * self.anchor_grid[i]  # wh
                    y = torch.cat((xy, wh, conf.sigmoid(), mask), 4)
                else:  # Detect (boxes only)
                    xy, wh, conf = x[i].sigmoid().split((2, 2, self.nc + 1), 4)
                    xy = (xy * 2 + self.grid[i]) * self.stride[i]  # xy 中心点
                    wh = (wh * 2) ** 2 * self.anchor_grid[i]  # wh 宽高
                    y = torch.cat((xy, wh, conf), 4) #conf 可信度
                # z是一个tensor list,有三个元素,分别是[1,19200,25] [1,4800,25] [1,1200,25]
                z.append(y.view(bs, self.na * nx * ny, self.no))

        return x if self.training else (torch.cat(z, 1),) if self.export else (torch.cat(z, 1), x)

    def _make_grid(self, nx=20, ny=20, i=0, torch_1_10=check_version(torch.__version__, '1.10.0')):
        ''' 构造网格 '''
        d = self.anchors[i].device
        t = self.anchors[i].dtype
        shape = 1, self.na, ny, nx, 2  # grid shape
        y, x = torch.arange(ny, device=d, dtype=t), torch.arange(nx, device=d, dtype=t)
        yv, xv = torch.meshgrid(y, x, indexing='ij') if torch_1_10 else torch.meshgrid(y, x)  # torch>=0.7 compatibility
        grid = torch.stack((xv, yv), 2).expand(shape) - 0.5  # add grid offset, i.e. y = 2.0 * x - 0.5
        anchor_grid = (self.anchors[i] * self.stride[i]).view((1, self.na, 1, 1, 2)).expand(shape)
        return grid, anchor_grid
4 Model class
This module is the building block of the whole model. In yolov5, this module not only includes model building, but also expands many functions, such as: feature visualization, printing model information, TTA reasoning enhancement, fusion Conv + BN accelerated reasoning, model equipped with NMS function, Autoshape function (model includes pre-processing , inference, post-processing modules (preprocessing + inference + NMS)). The 6.0 version of yolov5 includes the BaseModel class and the DetectionModel class, as shown below.
class BaseModel(nn.Module):
    # YOLOv5 base model
    def forward(self, x, profile=False, visualize=False):
        return self._forward_once(x, profile, visualize)  # single-scale inference, train

    '''
    参数 -- x: 输入图像
         -- profile: True 可以做一些性能评估
         -- visualize: True 可以做一些特征可视化
    返回 -- train: 一个tensor,存放三个元素 [bs, anchor_num, grid_w, grid_h, xywh+c+classes]
                    inference: 0 [1,19200+4800+1200,25]=[bs,anchor_num*grid_w*grid_h,xywh+c+classes]
    '''
    def _forward_once(self, x, profile=False, visualize=False):

        # y: 存放着self.save=True的每一层的输出,因为后面的层结构Concat等操作要用到
        # dt: 在profile中做性能评估时使用
        y, dt = [], []  # outputs
        for m in self.model:
            # 前向推理每一层结构 m.i=index; m.f=from; m.type=类名; m.np=number of parameters
            if m.f != -1:  # if not from previous layer 如果输入不是来自于上一层
                # 这里需要做4个Concat操作和一个Detect操作
                # Concat: 如m.f=[-1,6] x就有两个元素,一个是上一层的输出,一个是index=6的层的输出,再送到x=m(x)做Concat操作
                # Detect: 如m.f=[17, 20, 23] x就有三个元素,分别存放第17层第20层第23层的输出,再送到x=m(x)做Detect的forward
                x = y[m.f] if isinstance(m.f, int) else [x if j == -1 else y[j] for j in m.f]  # from earlier layers
            # 打印日志信息  FLOPs time等
            if profile:
                self._profile_one_layer(m, x, dt)
            x = m(x)  # run 正向推理
            # 存放着self.save的每一层的输出,因为后面需要用来做Concat等操作,不在self.save层的输出就为None
            y.append(x if m.i in self.save else None)  # save output
            # 特征可视化,可以自己改动想要那层的特征进行可视化
            if visualize:
                feature_visualization(x, m.type, m.i, save_dir=visualize)
        return x

    def _profile_one_layer(self, m, x, dt):
        c = m == self.model[-1]  # is final layer, copy input as inplace fix
        o = thop.profile(m, inputs=(x.copy() if c else x,), verbose=False)[0] / 1E9 * 2 if thop else 0  # FLOPs
        t = time_sync()
        for _ in range(10):
            m(x.copy() if c else x)
        dt.append((time_sync() - t) * 100)
        if m == self.model[0]:
            LOGGER.info(f"{'time (ms)':>10s} {'GFLOPs':>10s} {'params':>10s}  module")
        LOGGER.info(f'{dt[-1]:10.2f} {o:10.2f} {m.np:10.0f}  {m.type}')
        if c:
            LOGGER.info(f"{sum(dt):10.2f} {'-':>10s} {'-':>10s}  Total")

    def fuse(self):  # fuse model Conv2d() + BatchNorm2d() layers
        '''
        用在detect.py、val.py中
        fuse model Conv2d() + BatchNorm2d() layers
        调用torch_utils.py中的fuse_conv_and_bn函数和common.py中的forward_fuse函数
        '''
        LOGGER.info('Fusing layers... ') # 日志
        for m in self.model.modules(): # 遍历每一层结构
            # 如果当前层是卷积层Conv且有BN结构,那么就调用fuse_conv_and_bn函数将Conv和BN进行融合,加速推理
            if isinstance(m, (Conv, DWConv)) and hasattr(m, 'bn'):
                m.conv = fuse_conv_and_bn(m.conv, m.bn)  # update conv 融合
                delattr(m, 'bn')  # remove batchnorm 移除BN
                m.forward = m.forward_fuse  # update forward 更新前向传播(反向传播不用管,因为这个过程只用于推理阶段)
        self.info() # 打印Conv+BN融合后的模型信息
        return self

    def info(self, verbose=False, img_size=640):  # print model information
        '''
        用在上面的fuse函数上
        调用torch_utils.py下model_info函数打印模型信息
        '''
        model_info(self, verbose, img_size)

    def _apply(self, fn):
        # Apply to(), cpu(), cuda(), half() to model tensors that are not parameters or registered buffers
        self = super()._apply(fn)
        m = self.model[-1]  # Detect()
        if isinstance(m, (Detect, Segment)):
            m.stride = fn(m.stride)
            m.grid = list(map(fn, m.grid))
            if isinstance(m.anchor_grid, list):
                m.anchor_grid = list(map(fn, m.anchor_grid))
        return self


class DetectionModel(BaseModel):
    # YOLOv5 detection model
    def __init__(self, cfg='yolov5s.yaml', ch=3, nc=None, anchors=None):  # model, input channels, number of classes
        '''
        参数 -- cfg: 模型配置文件
             -- ch: input img channels 一般是3(RGB文件)
             -- nc: number of classes 数据集的类别个数
             -- anchors: 一般是None
        '''
        super().__init__()
        if isinstance(cfg, dict):
            self.yaml = cfg  # model dict
        else:  # is *.yaml 一般执行这里,因为我们输入参数是yaml文件
            import yaml  # for torch hub
            self.yaml_file = Path(cfg).name
            # 如果配置文件中有中文,打开时要加encoding参数
            with open(cfg, encoding='ascii', errors='ignore') as f:
                self.yaml = yaml.safe_load(f)  # model dict

        # Define model
        ch = self.yaml['ch'] = self.yaml.get('ch', ch)  # input channels
        # 设置类别数,一般不执行,因为nc=self.yaml['nc']恒成立
        if nc and nc != self.yaml['nc']:
            LOGGER.info(f"Overriding model.yaml nc={self.yaml['nc']} with nc={nc}")
            self.yaml['nc'] = nc  # override yaml value
        # 重写anchors,一般不执行,因为传进来的anchors一般都是None
        if anchors:
            LOGGER.info(f'Overriding model.yaml anchors with anchors={anchors}')
            self.yaml['anchors'] = round(anchors)  # override yaml value
        # 创建网络模型
        # self.model: 初始化的整个网络模型(包括Detect层结构)
        # self.save: 所有层结构中from不等于-1的序号,并排好序  [4,6,10,14,17,20,23]
        self.model, self.save = parse_model(deepcopy(self.yaml), ch=[ch])  # model, savelist
        # default class names ['0','1','2',...,'19']
        self.names = [str(i) for i in range(self.yaml['nc'])]  # default names
        # self.inplace=True  默认True,不使用加速推理
        # AWS Inferentia Inplace compatiability
        # https://github.com/ultralytics/yolov5/pull/2953
        self.inplace = self.yaml.get('inplace', True)

        # Build strides, anchors
        # 获取Detect模块的stride(相对输入图像的下采样率)
        # 和anchors在当前Detect输出的feature map的尺寸
        m = self.model[-1]  # Detect()
        if isinstance(m, (Detect, Segment)):
            s = 256  # 2x min stride
            m.inplace = self.inplace
            forward = lambda x: self.forward(x)[0] if isinstance(m, Segment) else self.forward(x)
            # 计算三个feature map的anchor大小,如[10,13]/8 -> [1.25,1.625]
            m.stride = torch.tensor([s / x.shape[-2] for x in forward(torch.zeros(1, ch, s, s))])  # forward
            # 检查anchor顺序与stride顺序是否一致
            check_anchor_order(m)
            m.anchors /= m.stride.view(-1, 1, 1)
            self.stride = m.stride
            self._initialize_biases()  # only run once 初始化偏置

        # Init weights, biases 调用torch_utils.py下initialize_weights初始化模型权重
        initialize_weights(self)
        self.info() # 打印模型信息
        LOGGER.info('')

    def forward(self, x, augment=False, profile=False, visualize=False):
        # 若需要进行数据增强则进行上下flip/左右flip
        if augment:
            return self._forward_augment(x)  # augmented inference, None
        # 默认执行,正常前向推理
        return self._forward_once(x, profile, visualize)  # single-scale inference, train

    def _forward_augment(self, x):
        ''' TTA Test Time Augmentation '''
        img_size = x.shape[-2:]  # height, width
        s = [1, 0.83, 0.67]  # scales 缩放程度
        f = [None, 3, None]  # flips (2-ud up-down上下, 3-lr left-right左右)
        y = []  # outputs
        for si, fi in zip(s, f):
            # 缩放图片尺寸(根据f先进行相应的翻转)
            xi = scale_img(x.flip(fi) if fi else x, si, gs=int(self.stride.max()))
            yi = self._forward_once(xi)[0]  # forward
            # cv2.imwrite(f'img_{si}.jpg', 255 * xi[0].cpu().numpy().transpose((1, 2, 0))[:, :, ::-1])  # save
            # 将推理结果恢复到相对原图图片尺寸
            yi = self._descale_pred(yi, fi, si, img_size)
            y.append(yi)
        y = self._clip_augmented(y)  # clip augmented tails
        return torch.cat(y, 1), None  # augmented inference, train

    def _descale_pred(self, p, flips, scale, img_size):
        # de-scale predictions following augmented inference (inverse operation)
        '''
        用在上面的_forward_augment函数上
        将推理结果恢复到原图图片尺寸上 TTA中用到
        参数 -- p: 推理结果
             -- flips: 翻转标记(2-ud上下, 3-lr左右)
             -- scale: 图片缩放比例
             -- img_size: 原图图片尺寸
        '''
        # 不同的方式前向推理使用公式不同,具体可看Detect函数
        if self.inplace: # 默认执行True,不使用AWS Inferentia
            p[..., :4] /= scale  # de-scale
            if flips == 2:
                p[..., 1] = img_size[0] - p[..., 1]  # de-flip ud
            elif flips == 3:
                p[..., 0] = img_size[1] - p[..., 0]  # de-flip lr
        else:
            x, y, wh = p[..., 0:1] / scale, p[..., 1:2] / scale, p[..., 2:4] / scale  # de-scale
            if flips == 2:
                y = img_size[0] - y  # de-flip ud
            elif flips == 3:
                x = img_size[1] - x  # de-flip lr
            p = torch.cat((x, y, wh, p[..., 4:]), -1)
        return p

    def _clip_augmented(self, y):
        # Clip YOLOv5 augmented inference tails
        nl = self.model[-1].nl  # number of detection layers (P3-P5)
        g = sum(4 ** x for x in range(nl))  # grid points
        e = 1  # exclude layer count
        i = (y[0].shape[1] // g) * sum(4 ** x for x in range(e))  # indices
        y[0] = y[0][:, :-i]  # large
        i = (y[-1].shape[1] // g) * sum(4 ** (nl - 1 - x) for x in range(e))  # indices
        y[-1] = y[-1][:, i:]  # small
        return y

    def _initialize_biases(self, cf=None):  # initialize biases into Detect(), cf is class frequency
        ''' 用在上面的__init__函数上 '''
        # https://arxiv.org/abs/1708.02002 section 3.3
        # cf = torch.bincount(torch.tensor(np.concatenate(dataset.labels, 0)[:, 0]).long(), minlength=nc) + 1.
        m = self.model[-1]  # Detect() module
        for mi, s in zip(m.m, m.stride):  # from
            b = mi.bias.view(m.na, -1)  # conv.bias(255) to (3,85)
            b.data[:, 4] += math.log(8 / (640 / s) ** 2)  # obj (8 objects per 640 image)
            b.data[:, 5:5 + m.nc] += math.log(0.6 / (m.nc - 0.99999)) if cf is None else torch.log(cf / cf.sum())  # cls
            mi.bias = torch.nn.Parameter(b.view(-1), requires_grad=True)
5 Modify the model
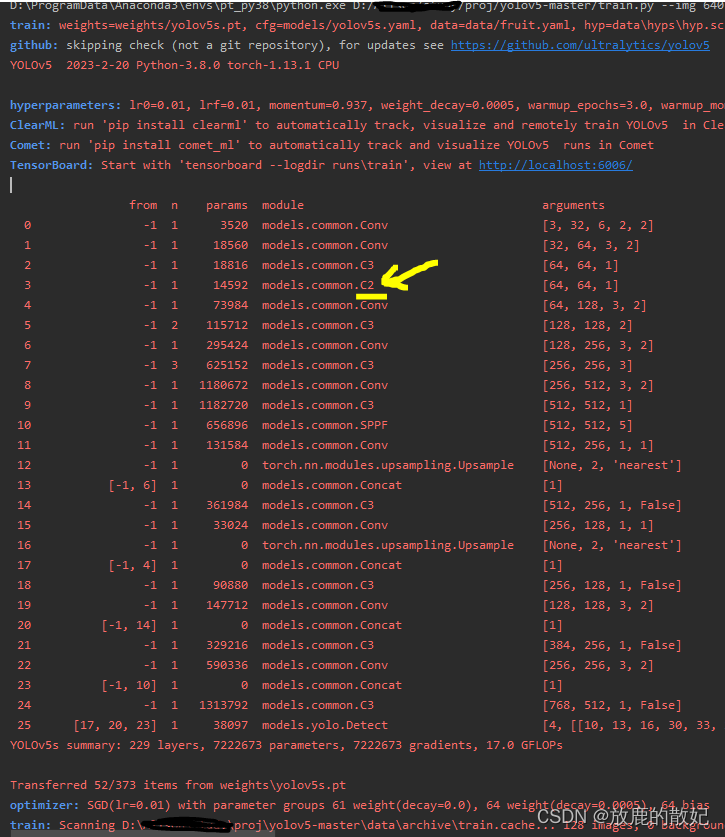
Now modify the C3 module as shown above, and insert the C2 module between the second layer and the third layer. The modification includes:
(1) Add the implementation of C2 in common.py
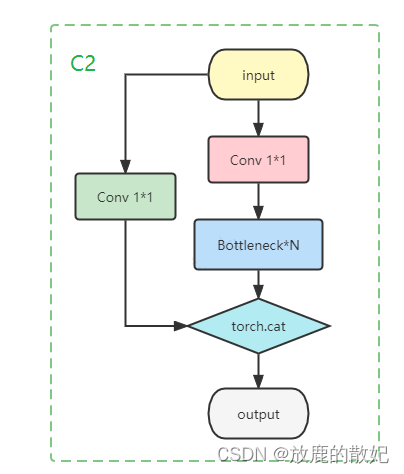
class C2(nn.Module):
    # CSP Bottleneck with 2 convolutions
    def __init__(self, c1, c2, n=1, shortcut=True, g=1, e=0.5):  # ch_in, ch_out, number, shortcut, groups, expansion
        super().__init__()
        c_ = int(c2 * 0.5)  # hidden channels
        self.cv1 = Conv(c1, c_, 1, 1)
        self.cv2 = Conv(c1, c_, 1, 1)
        self.m = nn.Sequential(*(Bottleneck(c_, c_, shortcut, g, e=1.0) for _ in range(n)))

    def forward(self, x):
        return torch.cat((self.m(self.cv1(x)), self.cv2(x)), 1)
(2) In yolov5s.yaml, insert the C2 module between the original layer 2 and layer 3
# YOLOv5 v6.0 backbone
backbone:
  # [from, number, module, args] args:channel、kernel_size、stride、padding、bias
  [[-1, 1, Conv, [64, 6, 2, 2]],  # 0-P1/2
   [-1, 1, Conv, [128, 3, 2]],  # 1-P2/4
   [-1, 3, C3, [128]],
   [-1, 3, C2, [128]], # 插入C2模块
   [-1, 1, Conv, [256, 3, 2]],  # 3-P3/8
   [-1, 6, C3, [256]],
   [-1, 1, Conv, [512, 3, 2]],  # 5-P4/16
   [-1, 9, C3, [512]],
   [-1, 1, Conv, [1024, 3, 2]],  # 7-P5/32
   [-1, 3, C3, [1024]],
   [-1, 1, SPPF, [1024, 5]],  # 9
  ]
(3) The parse_model function in yolo.py increases the processing of the C2 layer.

After the above modification, the data set is retrained, and the following is part of the output information. The output information in the yellow part shows that the added C2 module has been successfully inserted into the specified location.