Usually, when we use the carousel, we first think of the swiper plug-in, but when using the swiper in the vue-cli scaffolding, some functions of some versions will not be available, which will cause trouble.
In fact, using vant is also a good choice. This article is aimed at the specific and detailed usage of using vant in vue-cli scaffolding (take swipe as an example, the usage of other components is the same), you can read it carefully !
网址:https://vant-ui.github.io/vant/v2/
1. Installation package
//vant@latest-v2  在vue2中使用
npm i vant@latest-v2 -s
2. Import on demand
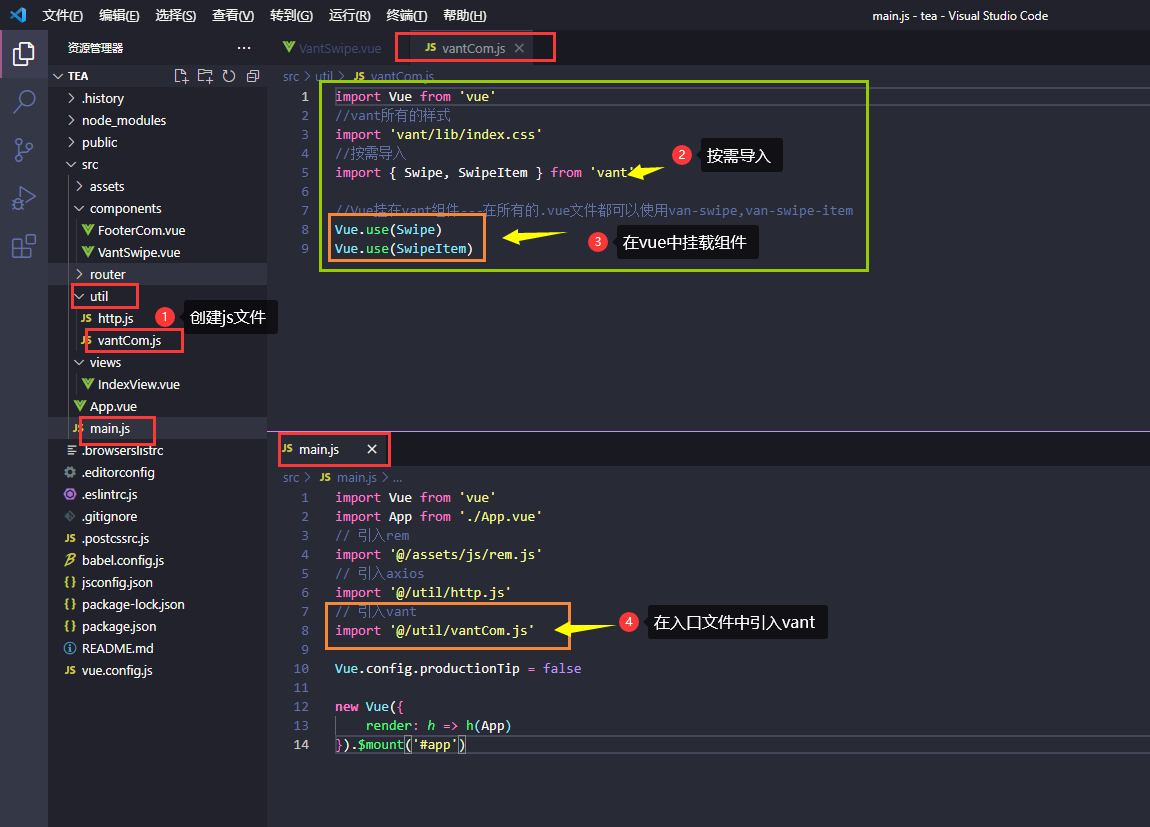
- Usually, we will create a js file under the util file under the src path, of course, it can also be imported directly in the entry file.
- In vant, there are many components that we can use, and we can import them as needed.
- For example, here, I am using swipe in vant, so I only need to import Swipe and SwipeItem components.
//在src路径下创建util文件下创建一个js文件(vantCom.js)
import Vue from 'vue'
//导入vant所有的样式
import 'vant/lib/index.css'
//按需导入(组件)
import {

    Swipe,SwipeItem} from 'vant'

//Vue挂在vant组件---在所有的.vue文件都可以使用van-swipe,van-swipe-item
Vue.use(Swipe)
Vue.use(SwipeItem)
3. Import in main.js
//在入口文件中导入vantCom.js文件
import '@/util/vantCom.js'
4. You can refer to the following figure
5. In the components component is used
<template>
<div class="">
<div class="Swiper">
<!-- 轮播图 -->
<!--
1. van-swipe相当于轮播图的容器
可以在容器上设置api
常用的api:
(1)autoplay:自动轮播间隔的事件1000,相当于1秒
(2)loop:是否开启循环播放
(3)vertical:是否为纵向滚动
(4)touchable:是否可以通过手势滑动
(5)show-indicators:是否显示指示器(分页器)
(6)indicator-color:指示器颜色
swipe Events事件
(1)change:每一页轮播结束后触发 || 回调参数:index,当前页的索引值
-->
<van-swipe ref="swipeRef" class="my-swipe" :autoplay="3000" indicator-color="white" @change="handleChange">
<!--
2. van-swipe-item代表每一张轮播的卡片(图片)
SwipeItem Events事件
(1)click:点击每一页的轮播图触发 || 回调参数:event:Event
例如:点轮播图可以跳转到新的页面
-->
<van-swipe-item v-for="(item,index) in swiperList" :key="index" @click="handleSwipeClick">
<img :src="item" alt="" class="pic">
</van-swipe-item>
<!--
3.自定义指示器 替换掉默认的小圆点指示器 indicator插槽
-->
<template v-slot:indicator>
<p class="myIndicator">{
{
current+1}}/{
{
swiperList.length}}</p>
</template>
</van-swipe>
<!--
4.通过按钮触发swipe组件的滚动
swipe方法:通过 ref 可以获取到 Swipe 实例并调用实例方法
(1)prev:切换到上一轮播
(2)next:切换到下一轮播
(3)swipeTo:切换到指定位置 || 参数:index: number, options: Options
-->
<a href="#" @click="handlePrev" class="prev"><</a>
<a href="#" @click="handleNext" class="next">></a>
<input type="button" value="跳转第二张" @click="handleSwipeTo">
</div>
</div>
</template>
<script>
export default {
components: {
},
data () {
return {
current:'',
swiperList:[]
}
},
methods: {
// 获取轮播图的数据
async getSwiperList (){
let {
data} = await this.$http('cate')
console.log(data.swipe)
this.swiperList=data.swipe
},
// 获取当前页的索引
handleChange(i){
this.current=i
},
// 点击跳转到其他的页面
handleSwipeClick(e){
console.log(e)//事件源
// this.$router.push({name:'/指定路由'})
},
// 点击跳转到上一页
handlePrev(){
this.$refs.swipeRef.prev()
},
// 点击跳转到下一页
handleNext(){
this.$refs.swipeRef.next()
},
// 跳转到指定页
handleSwipeTo(){
//true 取消动画
this.$refs.swipeRef.swipeTo(1,{
immediate:true})
}
},
created () {
this.getSwiperList()
}
}
</script>
<style lang="less" scoped>
.Swiper{
position: relative;
}
.my-swipe .van-swipe-item {
width: 37.5rem;
height: auto;
}
.my-swipe .van-swipe-item img {
width: 100%;
height: 100%;
}
.myIndicator{
position: absolute;
bottom: 10px;
left: 50%;
margin-left: -1rem;
color: #fff;
font-size: 1.6rem;
}
.prev,
.next{
font-size: 3rem;
color: #fff;
position: absolute;
top: 50%;
margin-top: -1.7rem;
}
.prev{
left: 1rem;
}
.next{
right: 1rem;
}
</style>
6. Rendering

Use vant carousel in vue-cli