The role of head and body tags:
<!DOCTYPE html>
<html lang="en">
<head>
    <!-- 注释: Ctrl + / -->
    <!-- 版本声明,声明当前HTML结构属于HTML5运行环境 -->
    <!--
    标签结构:两部分组成
    双标签:有开始<html>和结束</html>两个标签符号组成的标签,经常用来嵌套网页结构使用

    单标签: 标签只有一部分,属于自开闭标签,也被称为"空标签",在开始标签中就关闭的标签,不存在成对的情况,经常用来引入外部文件<link>
 -->
 <!-- 编码格式 -->
    <meta charset="UTF-8">
    <!-- 针对IE版本的兼容,X-UA-Compatible为IE版本指定不同页面的渲染模式,IE=edge:通知IE浏览器以最高级别的可用模式显示内容 -->
    <meta http-equiv="X-UA-Compatible" content="IE=edge">
        <!-- viewport:布局视口, content:代表属性值, width:可视区域的宽度,device-width:设备的宽度(单位缩放为100%是CSS的像素),initial-scale=1.0":页面首次被显示可视区域的缩放级别 1.0页面按实际尺寸显示.无任何缩放-->
    <meta name="viewport" content="width=device-width, initial-scale=1.0">
    <title>网页的标题</title>
    <!-- 为标签添加对应的CSS样式 -->
    <style>

    </style>
</head>
<body>
    在双标签中,可以直接标记文本数据内容,也可以嵌套一段HTML结构
    <br>
    <strong>这是一段加粗文本内容</strong>
</body>
<!--
    head和body标签的作用:
    head标签:一般用来设置当前网页的一些额外内容,head中内容不会在页面上显示,因此head标签一般在开发中经常用来设置网页的标题,描述信息,为网页添加CSS样式,编码格式,引入外部的CSS样式等
    body标签:body内部包含的内容代表网页的网页内容,因此网页的数据渲染全部写在body中
 -->
</html>
<!-- Add the corresponding CSS style for the label -->
<style></style>
Label structure: consists of two parts
(1) Double label: A label consisting of two label symbols, the start <html> and the end </html>, is often used to nest web page structures
(2) Single label: There is only one part of the label, which belongs to the self-opening and closing label, also known as "empty label". The label that is closed in the start label does not have a pairing situation, and is often used to introduce external files <link>
The role of head and body tags :
Head tag: It is generally used to set some additional content of the current web page. The content in the head will not be displayed on the page. Therefore, the head tag is often used in development to set the title of the web page, describe information, add CSS styles and encoding formats to the web page , introducing external CSS styles, etc.
Body tag: The content contained in the body represents the content of the web page, so the data rendering of the web page is all written in the body
The use of labels and the concept of the box model
<!DOCTYPE html>
<html lang="en">
<head>
    <meta charset="UTF-8">
    <meta http-equiv="X-UA-Compatible" content="IE=edge">
    <meta name="viewport" content="width=device-width, initial-scale=1.0">
    <title>标签的使用和盒模型的概念</title>
     <!-- css样式 -->
     <style>
      .txt{
        /* 设置标签宽度 */
    width: 250px;
    /* 标签高度 */
    height: 50px;
    /* 标签背景颜色 */
     background-color: red;
     /* 文字颜色 */
     color: white;
      /* 字体大小 */
      font-size: 14px;
      /* 盒模型的概念:浏览器在渲染每一个标签时,会把每一个标签都看成
      由外边距(margin),边框(border),内边距(padding),内容层(content)组成的矩形盒子
      内边距(padding):设置当前标签与标签中的内容之间的距离
      外边距(margin):设置当前标签与其他标签之间的距离
      边框(border):设置当前标签四个边界的厚度(默认为0)
      内容层:设置当前标签用来显示自己内容数据的范围(默认块属性标签可以直接通过
      width/height规定宽高,行属性标签内容层宽高由内容决定)

      margin:修改标签的外边距,padding修改标签的内边距
      margin属性值:
      一个值:代表上下左右
      两个值:1:上下2:左右
      三个值:1:上2:左右3:下
      四个值:上开始,逆时针设置(上右下左)
      设置某一方向的内边距:
      padding-left(左侧内边距)
      padding-right(右侧内边距)
      padding-top(上侧内边距)
      padding-bottom(下侧内边距)


      盒模型大小计算:
      宽度:外边距(左右)+边框厚度(左右)+内边距(左右)+内容层宽度
      高度:外边距(上下)+边框厚度(上下)+内边距(上下)+内容层高度*/
      border: 10px solid blue;
        border-right: 50px solid yellow;
        margin-top: 50px;
        /* 从上开始,逆时针方向设置 */
        padding: 50px 30px 40px 50px;
        /* 一个标签class属性对应的css样式若重复出现,后面的样式会将前面的样式覆盖(优先级)*/
        font-size: 20px;
        /* 怪异盒模型
        计算:width/height(content+border+padding)+margin*/
        /* 将标准盒模型转换为怪异盒模型 */
        box-sizing: border-box;
        /* 标准盒模型 */
        /* 将怪异盒模型转换为标准盒模型 */
        box-sizing: content-box;
      }
     </style>
</head>
<body>
    <!-- HTML结构 -->

<!-- 块属性标签
  1.可以设置宽高
  2.不可以和其他标签共处一行
  3.不设置宽度的情况下 默认100% -->
<!-- 常用的块属性标签div,p,ul>li,ol>li,button,h1~h6等 -->
普通文本
<h3>黄鹤楼送孟浩然之广陵</h3>
<div class="txt">
标签不会被渲染,只有内容会被渲染
</div>
</body>
</html>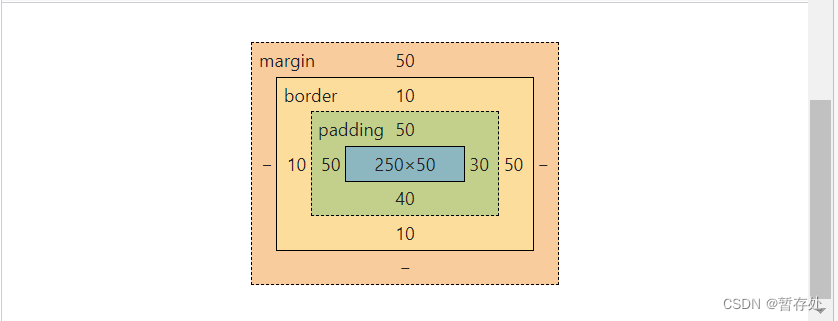
The concept of the box model
The concept of the box model: when the browser renders each tag, it will treat each tag as
A rectangular box composed of margin, border, padding, and content
Padding: Set the distance between the current label and the content in the label
Margin: Set the distance between the current label and other labels
border: set the thickness of the four borders of the current label (default is 0)
Content layer: set the scope of the current label to display its own content data (the default block attribute label can be directly passed
width/height specifies the width and height, and the width and height of the content layer of the row attribute label is determined by the content)
margin: Modify the outer margin of the label, and padding modifies the inner margin of the label
Margin attribute value:
One value: represents up, down, left, and right
Two values: 1: up and down 2: left and right
Three values: 1: up 2: left and right 3: down
Four values: start up, set counterclockwise (up right down left)
Set padding in one direction:
padding-left (left inner margin)
padding-right (right inner margin)
padding-top (top inner margin)
padding-bottom (bottom padding)
Box model size calculation:
Width: Margin (left and right) + border thickness (left and right) + inner margin (left and right) + content layer width
Height: Margin (top and bottom) + border thickness (top and bottom) + inner margin (top and bottom) + content layer height
/* weird box model
计算:width/height(content+border+padding)+margin*/
/* convert the standard box model to the weird box model */
box-sizing: border-box;
/* standard box model */
/* convert the weird box model to the standard box model */
box-sizing: content-box;
Block Properties Tab
1. You can set the width and height
2. It cannot be on the same line with other tags
3. If the width is not set, the default is 100%
Commonly used block attribute tags div, p, ul>li, ol>li, button, h1~h6, etc.
row attribute label
<!DOCTYPE html>
<html lang="en">
<head>
    <meta charset="UTF-8">
    <meta http-equiv="X-UA-Compatible" content="IE=edge">
    <meta name="viewport" content="width=device-width, initial-scale=1.0">
    <title>Document</title>
    <style>
        .mark{
            font-size: 20px;
            width: 500px;
        }
        .txt{
            color: blue;
        }
        .txt1{
            color: brown;
        }
        .try{
            background-color: aqua;
            color: black;
            /* 去除超链接标签默认样式 */
            text-decoration: none;
            font-size: 12px;
            padding: 50px 20px;
/* 问题:行属性标签调节内边距影响上下两个位置的元素,因为
    行属性标签调节内边距时是以文字内容为中心
解决方法:1.将行属性标签转换为块属性标签(人为调节宽度),
          注意:块属性标签的宽度默认与父级保持一致
        2.将行属性标签转换为行内块属性标签(保留行属性的特点:内容在一行显示,宽度由内容撑开),
        同时具备块属性标签的特点(调节内边距或外边距时,文字对网页的固定位置
        可以跟随内边距或外边距发生对应的改变) */

            display: inline-block;
            /* display: block; */
            padding: 50px 20px;
        }
        h4{
            background-color: chartreuse;
        }
    </style>
</head>
<body>
    <!-- 行属性标签:特点
    1.不可以设置宽高
    2.可以和其他标签共处一行
    3.宽高由内容撑开 -->
    <!-- 常见的行属性标签:span(包裹空格,页面会显示空格,无论多少个,
        只显示一个),a,img,strong(加粗) -->
    <div class="mark">
        <div>换行标签</div>
        <div>实现换行</div>
        <strong>加粗不换行</strong>
        <span class="txt">这是<span class="txt1">行属性</span>标签,<strong>不换行</strong></span>
    <!-- 超链接标签:

    herf(必须属性):在没有设置对应的跳转链接时,会跳转到当前页面
    不想让超链接标签被点击跳转时,可以使用‘#’代替链接-->
    <!-- target:设置新页面的打开方式
        1._blank:打开一个新窗口
        2._self:在当前页面打开
        3._top:新页面会在顶层窗口打开,一般指超链接标签所在的浏览器窗口
        4._parent:新页面会在超链接所在的父级窗口打开,即:新页面会把原页面覆盖-->
    <a href="http://www.baidu.com" target="_top"
    class="try">点击</a>
    <h4>行属性标签存在的问题</h4>
</div>
</body>
</html>
Problem: The adjustment of the inner margin of the row attribute label affects the elements at the upper and lower positions, because
When the row attribute label adjusts the inner margin, it is centered on the text content
Solution:
1. Convert row attribute labels to block attribute labels (artificially adjust the width),
Note: The width of the block attribute label is consistent with the parent by default
2. Convert the row attribute label to an inline block attribute label (retain the characteristics of the row attribute: the content is displayed in one line, and the width is expanded by the content),
At the same time, it has the characteristics of the block attribute label (when adjusting the inner margin or outer margin, the fixed position of the text on the web page
Can follow the corresponding changes in the inner or outer margins)
Row Properties Tab : Features
1. The width and height cannot be set
2. It can be on the same line with other tags
3. The width and height are expanded by the content
<!-- Common row attribute tags: span (wrapping spaces, the page will display spaces, no matter how many,
Only one), a, img, strong (bold) -->
Hyperlink label :
herf (required attribute): When the corresponding jump link is not set, it will jump to the current page
When you don't want the hyperlink tag to be clicked and jumped, you can use '#' instead of the link -->
<!-- target: set the opening method of the new page
1._blank: open a new window
2._self: open on the current page
3._top: The new page will be opened in the top-level window, which generally refers to the browser window where the hyperlink label is located
4._parent: The new page will be opened in the parent window where the hyperlink is located, that is: the new page will overwrite the original page -->
<a href="http://www.baidu.com" target="_top"
class="try">Click</a>
Mutual conversion between labels
<!DOCTYPE html>
<html lang="en">
<head>
    <meta charset="UTF-8">
    <meta http-equiv="X-UA-Compatible" content="IE=edge">
    <meta name="viewport" content="width=device-width, initial-scale=1.0">
    <title>Document</title>
    <style>
        .mark1{
            width: 200px;
            height: 100px;
            background-color: blue;
            /* 设置文本对齐方式 */
            text-align: center;
            /* 调节行高居中 */
            line-height: 200px;
            /* padding-top: 25px;
            box-sizing: border-box; */

            display: inline-block;
            /* 各种标签之间的转换: */
            /*1. 块级标签转为行内块属性标签(既具备行属性标签特点,又具备块属性标签特点)
            display: inline-block;*/
            /*2. 块级标签转为行内标签
            display: inline;*/
            /*3. 行内标签转换为块级标签
            display: block;*/
            /* 注意:块属性标签可以嵌套行属性标签,行属性标签不能嵌套块属性标签,p标签不要嵌套块属性标签,可以嵌套a,span */
        }
        .mark2{
            width: 200px;
            height: 100px;
            background-color:blueviolet;
            text-align: center;
            line-height: 200px;
            line-height: 200px;
            display: inline-block;
        }
    </style>
</head>
<body>
    <!-- 实现两个块属性标签在一行显示:display: inline-block; -->
    <div class="mark1">
        页面一
    </div>
    <div class="mark2">
        页面二
    </div>
    <!--公式:行高=两基线间的距离
                 =上间距+文本+下间距(上边距=下边距)
        line-height:上基线到下基线的距离
    基线:四条线中的第三条 -->
</body>
</html>
/* Conversion between various tags: */
/*1. Block-level tags are converted into in-line block attribute tags (with the characteristics of both row attribute tags and block attribute tags)
display: inline-block;*/
/*2. Convert block-level tags to inline tags
display: inline;*/
/*3. Convert inline tags to block-level tags
display: block;*/
/* Note: block attribute tags can nest row attribute tags, row attribute tags cannot nest block attribute tags, p tags do not nest block attribute tags, you can nest a, span */
Realize that two block attribute labels are displayed in one line : display: inline-block;
Formula: line height = distance between two baselines
= space above + text + space below (top margin = bottom margin)
line-height: the distance from the upper baseline to the lower baseline
Baseline: third of four lines
iframe picture in picture
<!DOCTYPE html>
<html lang="en">
<head>
    <meta charset="UTF-8">
    <meta http-equiv="X-UA-Compatible" content="IE=edge">
    <meta name="viewport" content="width=device-width, initial-scale=1.0">
    <title>Document</title>
</head>
<body>
    <div class="iframe">
        <!--iframe标签:在对应的页面中打开一个新窗口去加载其他页面,实现画中画,
        一般在需要加载插件或视频时使用  -->
        <!-- .在路径中代表当前文件的文件夹,
        ..代表在当前文件夹的文件夹,
    /代表下一级 -->
    <iframe src="./page1.html" frameborder="0" width="300px" height="300px"
    style="margin-top: 20px;background-color:yellow;"></iframe>
</div>
</body>
</html>
<!DOCTYPE html>
<html lang="en">
<head>
<meta charset="UTF-8">
<meta http-equiv="X-UA-Compatible" content="IE=edge">
<meta name="viewport" content="width=device-width, initial-scale=1.0">
<title>Document</title>
<style>
.iframe{
background-color: aqua;
}
</style>
</head>
<body>
<h3>欢迎来到一级页面</h3>
<iframe src="./page2.html" frameborder="0" width="300px"
height="200px" class="iframe"></iframe>
</body>
</html><!DOCTYPE html>
<html lang="en">
<head>
<meta charset="UTF-8">
<meta http-equiv="X-UA-Compatible" content="IE=edge">
<meta name="viewport" content="width=device-width, initial-scale=1.0">
<title>Document</title>
</head>
<body>
<h3>欢迎来到页面</h3>
<a href="http://www.baidu.com">点击</a>
</body>
</html>
<!-- iframe tag : open a new window in the corresponding page to load other pages, realize picture-in-picture,
Generally used when plugins or videos need to be loaded -->
<!-- .Represents the folder of the current file in the path,
.. represents a folder in the current folder,
/ represents the next level -->
a hyperlink label state
<!DOCTYPE html>
<html lang="en">
<head>
    <meta charset="UTF-8">
    <meta http-equiv="X-UA-Compatible" content="IE=edge">
    <meta name="viewport" content="width=device-width, initial-scale=1.0">
    <title>Document</title>
    <style>
        /* a超链接标签的4种状态
        1.link:超链接标签准备好但未被点击 */
        .mark:link{
            color: aqua;

        }
        /*hover:鼠标悬停状态,该状态不是超链接标签特有的,所有标签都能用  */
        .mark:hover{
            color: black;
        }
        /* active:鼠标在超链接标签上按下时触发 */
        .mark:active{
            font-size: 25px;
        }
        /* visited: 点击后显示灰色*/
        .mark:visited{
            color: gray;
        }
    </style>
</head>
<body>
    <a href="#" class="mark">click me!</a>
</body>
</html>
4 states of a hyperlink label:
1.link: The hyperlink label is ready but not clicked
2.hover: mouse hover state, this state is not unique to hyperlink tags, all tags can be used
3.active: Triggered when the mouse is pressed on the hyperlink label
4.visited: grayed out after clicking
a hyperlink anchor usage
<!DOCTYPE html>
<html lang="en">
<head>
    <meta charset="UTF-8">
    <meta http-equiv="X-UA-Compatible" content="IE=edge">
    <meta name="viewport" content="width=device-width, initial-scale=1.0">
    <title>Document</title>
    <style>
        /* 锚点:快速定位网页部分位置
        实现方式:
        1.在网页中设置唯一标识,即添加id属性值(唯一性)
        2.在网页中添加超链接标签,超链接标签存储不同的唯一标识
        3.查找对应内容时,通过点击对应的超链接标签完成锚点的导航 */
        .mark1{
            height: 300px;
            background-color: aquamarine;
        }
        .mark2{
            height: 400px;
            background-color:bisque;
        }
        .mark3{
            height: 200px;
            background-color:blue;
        }
        .mark4{
            height: 300px;
            background-color:brown;
        }
        .mark5{
            height: 200px;
            background-color:chocolate;
        }
        .mark6{
            height: 200px;
            background-color:cornflowerblue;
        }
        .mark7{
            background-color:chartreuse;
        }
        #mark3{
            background-color:deeppink;
        }
        /* 设置已经访问过的元素 */
        /* target:选取当前活动的目标元素(标签) */
        .mark3:target{
            color:aqua;
            font: size 35px; ;
        }
    </style>
</head>
<body>
    <div class="content">
        <!-- 通过id使用,# -->
        <a href="#mark3">mark3</a>
        <a href="#mark6">mark6</a>
    </div>
    <!-- 快捷键:div.mark${mark$}*6 -->
    <div class="mark1">mark1</div>
    <div class="mark2">mark2</div>
    <!-- id通过#使用,class通过.使用 -->
    <div class="mark3 mark7" id="mark3">mark3</div>
    <div class="mark4">mark4</div>
    <div class="mark5">mark5</div>
    <div class="mark6" id="mark6">mark6</div>
</body>
</html>
Anchor : Quickly locate part of the web page
Method to realize:
1. Set a unique identifier in the web page, that is, add the id attribute value (uniqueness)
2. Add hyperlink tags to web pages, and hyperlink tags store different unique identifiers
3. When searching for the corresponding content, click the corresponding hyperlink label to complete the navigation of the anchor point
<!-- id is used by #, class is used by .Use -->
<div class="mark3 mark7" id="mark3">mark3</div>
<div class="mark4">mark4</div>
<div class="mark5">mark5</div>
<div class="mark6" id="mark6">mark6</div>
Common tags
<!DOCTYPE html>
<html lang="en">
<head>
    <meta charset="UTF-8">
    <meta http-equiv="X-UA-Compatible" content="IE=edge">
    <meta name="viewport" content="width=device-width, initial-scale=1.0">
    <title>Document</title>
    <style>
        h1{
            color: aqua;
        }
        .txt_a{
            font-size: 28px;
            color: blueviolet;
            text-decoration: none;
            /* 下划线 */
            border-bottom: 1px solid red;

        }
    </style>
</head>
<body>
    <!-- 标题标签:h系列标签(h1~h6)
    h1:一级标题(最大)
    h6:六级标题(最小)
特点:1.都加粗
    2.标签文字大小从1到6逐渐小
    3.独占一行 -->
    <h1 class="h1">wwwwwww</h1>
    <h2>wwwwwww</h2>
    <!-- 段落标签:p,双标签
特点:1.段落间有间隔
    2.每个段落独占一行-->
    <p>qqqqqq</p>
    <p>qq<a href="#" class="txt_a">qq</a>qq</p>
    <!-- br:换行 -->
    <br>
    <!-- hr:分割不同主题的水平线 -->
    <hr>
<!-- 文本格式化标签:让文本加粗,下划线,倾斜,删除线的格式效果 -->
    <b>加粗</b>
    <u>下划线</u>
    <i>倾斜</i>
    <s style="color: red;">删除线</s>
<!-- 语义化强烈(推荐) -->
<br>
<strong>加粗</strong>
<ins>下划线</ins>
<em>倾斜</em>
<del>删除线</del>
</body>
</html>
<!-- Title tags : h series tags (h1~h6)
h1: Level 1 heading (maximum)
h6: Six-level headings (minimum)
Features: 1. All bold
2. The label text size gradually decreases from 1 to 6
3. Exclusive line -->
<!-- Paragraph tag : p, double tag
Features: 1. There are intervals between paragraphs
2. Each paragraph is on its own line -->
<!-- br: Newline -->
<!-- hr: Horizontal line separating different topics -->
<!-- Text formatting tags : Make the text bold, underline, italic, strikethrough formatting effects -->
<b>Bold</b>
<u>Underline</u>
<i>倾斜</i>
<s style="color: red;">strikethrough</s>
<!-- Semantic strong (recommended) -->
<br>
<strong>Bold</strong>
<ins>underline</ins>
<em>Tilt</em>
<del>Strikethrough</del>
img image tag
<!DOCTYPE html>
<html lang="en">
<head>
    <meta charset="UTF-8">
    <meta http-equiv="X-UA-Compatible" content="IE=edge">
    <meta name="viewport" content="width=device-width, initial-scale=1.0">
    <title>Document</title>
    <style>
    .img{
        width: 1000px;
        height: 800px;
    }
</style>
</head>
<body>
    <!-- 图片标签:img
    作用:在网页中显示一张图片
属性:
    1.src:路径,若图片和当前页面在同级目录,直接写图片名称,若不在同级目录下,使用相对路径
    2.alt:普通文本,当图片加载失败时,显示文字提示
    3.title:鼠标悬浮在图片上时,才显示文字
    设置图片宽高:width/height
    注意:若只设置图片的宽度(或高度),高度(或宽度)会自动等比例缩放,
    若同时设置宽高,可能失真变形
 -->
    <img src="./img/1.jpg" alt="图片加载失败" title="动图" class="img">
    <!-- div标签:无语义的布局标签,经常用来搭建html结构,
     充当标签的父元素-->
     <div>
        <p>
            div标签,无语义的布局标签,经常用来搭建html结构,
            充当标签的父元素
        </p>
     </div>
</body>
</html>
image tag : img
Function: display a picture in the web page
Attributes:
1. src: path, if the picture and the current page are in the same level directory, directly write the picture name, if not in the same level directory, use the relative path
2.alt: normal text, when the picture fails to load, a text prompt will be displayed
3.title: The text is only displayed when the mouse hovers over the picture
Set image width and height: width/height
Note: If you only set the width (or height) of the picture, the height (or width) will be automatically scaled proportionally,
If the width and height are set at the same time, it may be distorted
div tag : non-semantic layout tag, often used to build html structure, as the parent element of the tag