First of all, this section will start with DX. I hope that everyone can have a good grasp of the game program framework, mathematical foundation and rendering pipeline related content mentioned above. Then we officially start our journey today!
Here D3D needs environment configuration, because my environment is built according to the X_Jun tutorial, so you just follow the environment configuration written in his tutorial step by step and just create a new project (directx11.tech )
I emphasize a few points here:
First
If you want to learn according to the tutorial I wrote, don’t import X_Jun’s 01 project here, you can import the following code, the first project I give you here is to rewrite his 01 project , has been simplified, the purpose is not to give you so many additional functions.
second,
This must be paid attention to, and all the previously configured things must be cleaned up. The main thing is to delete your SDK, and then delete the things previously configured in the VS properties. Specifically,
thirdly, if you have some problems during the process, X_Jun will also help you step over the pits. The link below: DirectX11--The solution to the failure of the tutorial project to compile and run- X_Jun - Blog Garden (cnblogs.com)


1. Introduction to the upper structure of the program
When we wrote the first section of the program framework, we said that we will encapsulate the game-related function variables into a class in the future, and this is what we are going to do today.
But in fact, it is not a class that is encapsulated, but two classes, father and son. why? Because we are for the reuse of some codes, that is, when writing game programs with DirectX, there are many operations that are written in the same way in any game program, so we have the same things for these game programs, Encapsulate it into a class: D3DApp, every time you write a program in the future, just copy this directly and use it. Here, several pure virtual functions will be created in D3DApp for subclasses to rewrite, because some subclass functions may only have different internal implementations, but the framework is the same, so this part of the framework is also pulled out and placed in the parent class.
Then we encapsulate some unique and different things for each game, some functions specially designed for this game, etc., into a GameApp class, and then this class needs to inherit the above D3DApp.
After having two classes, in the WinMain program, create an object, and then call the function and the program will run ok. Let's take a peek at our code skeleton first!
2. Concept introduction
As a precaution, there will be many usages, concepts, etc. that you have never been exposed to in the following things.
But don't be afraid, in fact, when I was a beginner, I also saw many similar things like this, and I couldn't understand them at all. How did you understand it later? That is, you first understand the program from a macro perspective, and he has grasped the shelf of the program. For some functions, you only need to know why this function is designed or what it is used for. How to write and realize it, read it the first time We don't care about these when we program.
Then there is the second pass, and I start to try to dig into the details a little bit. At this time, there may be some finer things, you can still skip it first. As long as the second pass is a little deeper than the first pass, there will be progress. If you still don’t understand after this time, you need to see if you lack any pre-knowledge, search for some relevant information, and then take a look after supplementing it. In other words, you skip it first, because some things have to wait until you know more before you can understand them better.
That is, you don’t need to delve into the implementation, but you have to figure out what it is used for and why it is there. For example, there is a D3D initialization program in D3DApp, which can be said to be relatively complicated. When you read it for the first time, you will say, oh, this function called InitDirect3D is used to initialize the D3D program, and then you just treat it as printf. .
ah? ? Think of him as a printing function, of course not, haha. Because for printf, most people use it directly, and never worry about how it is implemented in it. Knowing that it is used for printing, just use it to print. There are even many people who don’t know that printf has a return value. It’s enough to know the function of the parameters, hahaha~~~
Of course, this is not to encourage everyone to always treat it as printf. You can think about it this way when you read it the first two times, but when you read it again, you have to start looking at the details. Here is an article for everyone: The only secret of a programming superstar
Device 和 DeviceContext
Let's officially start the code part. Here, I will first explain the framework to you. After understanding the framework and having an overall macroscopic understanding of the program, I will tell you about the implementation of specific functions.
Let me add the concept first. I will not give you a definition that is too written when I talk about concepts here, so it may not be so precise, but it is completely ok for you to understand the problem.
First of all, we talked about the GPU before . It is a hardware device that processes graphics to accelerate the drawing of images. And how to apply this GPU, let him help us accelerate graphics drawing in game programs. GPU acceleration is to transfer the rendering work from the CPU to the GPU, and then render through the rendering hardware of the GPU.
So our question becomes how to move the rendering work to the GPU? (This involves some interaction between the CPU and the GPU, as I said before, the specific content will be discussed later) How to use the rendering hardware of the GPU to render? GPU hardware rendering is a pipeline, so you need to know how to use and control this pipeline . That is today's topic DirectX, you use DirectX to control this pipeline.
As we said before, DirectX is a graphics API, so the graphics API is equivalent to a commander. He is used to command and control the work on the assembly line. Produce something that is drawn according to your ideas.
But here the X of DirectX is like a universal symbol (wildcard), it can represent 3D, it can also represent 2D, etc., that is to say, DirectX represents Direct 3D, Direct 2D and other various Direct. . Family members, so Direct is a big family.
So who is the most important person in the family? It is Direct3D , the guy who is called D3D for short. As can be seen from the name, he is used to draw 3D scenes. And the core tool of the 3D game program we wrote is him.
The above said that D3D is to command and control the assembly line . It mainly directs two things in the assembly line: one is the arrangement of materials, such as the production of lunch boxes. Put it in a basin and put it in a box later. The other is the production method, that is, how to arrange the personnel, how to pack the lunch boxes, and so on.
This also corresponds to the two core things of D3D: one is the ID3D11Device that arranges the assembly line materials . It is called a device, and it is used to create various resources. A basin to hold the rice (put it into the lunch box later), combined with the program, it is: you need to get the data of your vertex texture to the GPU, and you need to allocate a buffer on the GPU to store these resources. This allocation buffer Area is one of the tasks of ID3D11Device.
The other one is ID3D11DeviceContext , which is the device context and is used to direct the production method. It involves how to install your lunch box, how much is the amount of production and other production details. The combined program is: some rendering state settings, and some rendering commands, etc. (It’s okay if you don’t understand these two words, as long as you understand the previous production method). Here he will do one more thing, that is, the data is transferred from the CPU to the GPU, but it does not mean that it goes to the assembly line, which is similar: you have a lot of rice in a room with an assembly line, but next you have to serve some foreigners. The eating habits are different, so you have to serve the rice in the A basin instead of the B basin. So that means you have to specify which pot to serve the rice from. Corresponding to the program is: bind those resources that are already on the GPU to the pipeline! (For example, if you have two groups of vertices, group A is to draw a tree, and group B is to draw a triangle, both of which are in the buffer of the GPU. If you want to draw a forest scene, you must not use B. You must specify Use A, and then the pipeline operates on A)
Finally finished the two most core concepts. Let's take a look at how they are used in the code
ComPtr<ID3D11Device> m_pd3dDevice;                    // D3D11设备创建
m_pd3dDevice->CreateRenderTargetView();
m_pd3dDevice->CreateTexture2D();
m_pd3dDevice->CreateDepthStencilView();
dxgiFactory1->CreateSwapChain(m_pd3dDevice.Get());


ComPtr<ID3D11DeviceContext> m_pd3dImmediateContext;   // D3D11设备上下文创建
m_pd3dImmediateContext->OMSetRenderTargets();
m_pd3dImmediateContext->RSSetViewports();
Note that I omitted a lot of parameters in the function above, I just give you a feeling here, without looking at the details. (There are too many parameters to be written in one line, and they are all newlines, so I won’t show them here, I’m scaring you~~~:)
First of all, in the first line, he creates a pointer of ID3D11Device type, but ComPtr<ID3D11Device> is so scary, I can’t understand it at all, it’s okay, you can compare this sentence to int a; a variable of type int. Then here m_pd3dDevice is an object of type ComPtr<ID3D11Device>, which is what we call a pointer to ID3D11Device. Later I will explain why this type is so strange.
Then the following four lines are the application of this variable. You will find that the first three are the pointers calling some member functions in the class, all of which are CreateXXX, and the last is also a CreateXXX, but it is passed in as a parameter. up. So, the main function of this Device is to create something.
Look at the following three lines similarly, first create a device context, and then call XXSetXX to set something, what is set is the so-called command and control.
Just mentioned ComPtr<ID3D11Device>, such a strange type, let's conquer him now.
There are two things involved here, one is about the ID3D11Device type, because after you understand the particularity of this type, you can understand why there is such a thing as ComPtr, so as to understand how it is used.
Let me tell you in advance that the above ComPtr is written to help us, but you don't need it, and you need to do some other extra work if you don't use it. For example, it is also possible to define an object as follows.
ID3D11Device* m_pd3dDevice;Then the idea of our explanation is to explain clearly to you without ComPtr first, and then explain why ComPtr is added.
Then start to introduce the ID3D11Device type. First of all, not only him, but I will talk about it in conjunction with other types. look down
	ComPtr<ID2D1Factory> m_pd2dFactory;							// D2D工厂
	ComPtr<ID2D1RenderTarget> m_pd2dRenderTarget;				// D2D渲染目标
	ComPtr<IDWriteFactory> m_pdwriteFactory;					// DWrite工厂
	// Direct3D 11
	ComPtr<ID3D11Device> m_pd3dDevice;							// D3D11设备
	ComPtr<ID3D11DeviceContext> m_pd3dImmediateContext;			// D3D11设备上下文
	ComPtr<IDXGISwapChain> m_pSwapChain;						// D3D11交换链
	// Direct3D 11.1
	ComPtr<ID3D11Device1> m_pd3dDevice1;						// D3D11.1设备
	ComPtr<ID3D11DeviceContext1> m_pd3dImmediateContext1;		// D3D11.1设备上下文
	ComPtr<IDXGISwapChain1> m_pSwapChain1;						// D3D11.1交换链
	// 常用资源
	ComPtr<ID3D11Texture2D> m_pDepthStencilBuffer;				// 深度模板缓冲区
	ComPtr<ID3D11RenderTargetView> m_pRenderTargetView;			// 渲染目标视图
	ComPtr<ID3D11DepthStencilView> m_pDepthStencilView;			// 深度模板视图
You will find that they are not the only ones with such ugly things, there is a big pile here. Let's not look at the external ComPtr first, just look at the inside, you will find that they are all IXXX, that is to say, they all start with an I. Then there is D. In fact, this D means Direct, followed by 2D, Write, 3D, XGI. Remember that we said that the X of DirectX is a wildcard that can represent 2D, 3D, etc. In fact, this is it, the last one DXGI means DirectX Graphics Infrastructure, which will be discussed later.
It should be noted that they all have a common I beginning, that is, they are all COM interfaces . Next, start to explain the concept of COM interface.
COM interface
Since we said above that the original appearance of an object is defined as follows,
ID3D11Device* m_pd3dDevice;All of these starting with I are COM interfaces, you can use them as a C++ class, for example, someone encapsulates a class, you use it, how do you use it, create an object, and then let the object call the inside Various functions!
If you want to use the COM interface, which is something similar to C++, then create an object called the COM interface object, which we create is m_pd3dDevice. Then just use it to call the function inside, isn’t it what was written above?
m_pd3dDevice->CreateRenderTargetView();
m_pd3dDevice->CreateTexture2D();
m_pd3dDevice->CreateDepthStencilView();
According to C++, if you create a pointer to this class, you are supposed to use new, and then delete it when you are done using it. The COM interface is different, it has its own recycling mechanism, so how to create it, and how to recycle it?
For creation: we must obtain a pointer to the COM interface through a specific function or other COM interface method (this sentence comes from Dragon Book 11). Note that the creation here is not
ID3D11Device* m_pd3dDevice;Similar to the creation in the above sentence, the creation he said is mainly an assignment, which is clearly pointed to, and this is considered to be created, otherwise you just create a pointer to a void, and there is no difference between being unable to do anything and not creating . (You may wonder, I didn't write that it is equal to nullptr, why is it a null pointer, class members will be initialized in the constructor, then you can see that the initialization is nullptr). You may not feel much about this specific function, so I will post a code for you:
D3D11CreateDevice(
                  nullptr, d3dDriverType, nullptr, createDeviceFlags, featureLevels,
                  numFeatureLevels,
			      D3D11_SDK_VERSION, m_pd3dDevice.GetAddressOf(), &featureLevel,
                  m_pd3dImmediateContext.GetAddressOf()
                  );
The length here is just a function call with too many parameters. What I want to talk about is the last parameter and the penultimate parameter. Here they .GetAddressOf() performed an operation, and you can read English to know that it is to take out their addresses (for .GetAddressOf(), I will talk about it in detail later). So the function of this function here is to point the thing we created that was originally a null pointer to the correct position, instead of pointing to nothing, so that it can be used normally.
For recycling, let’s talk about its recycling mechanism first, that is, for such a pointer pointing to a COM object, first of all, you can create many pointers to it (you are equivalent to copying pointers here, you may need to call AddRef), They all point to an interface instance, and this interface instance will record how many people pointed at him. We will not manually release this interface instance, we will release the pointer, after you release the object will know that there is one less person referring to it, then when will this interface instance be released? When all the pointers to it are released, that is, the pointer points to him again, then his reference number (that is, how many people refer to him) becomes 0, and his memory will be released automatically.
What is it in summary? If you want to release the memory of the interface instance, you have to release all pointers to the interface instance. Otherwise, it will cause a memory leak, which is undoubtedly one of the most difficult bugs to tune. So what do we do with release? It is thought that these COM interfaces starting with I all inherit an interface class called IUnknown. There is a method in this class that is specially used for release, which is Release. We usually write a macro to call Release:
#define SAFE_RELEASE(p) { if(p) { (p)->Release(); (p)=NULL; } }That is to judge whether p is empty first, and then make a release call and make it empty. This is similar to C++ release. There was an article about whether to judge here before, you can take a look. Does C++ pointer delete need to be judged as empty?
But it will be a little troublesome to do this. An interface instance has three pointers pointing to it. If you release one less in the end, then the memory leaks, so it is a bit troublesome to release it manually, so we can adopt a new way, that is, for All of your types are covered with a ComPtr.
Before talking about ComPtr, first complete the COM content:
First of all, let me tell you a concept called interface: an interface is a memory structure that contains an array of function pointers, and each array element contains a function address implemented by a component. (The only bad thing about Mao Xingyun's book "Windows Game Programming from Zero" is that most of it talks about DX9, and DX9 is about to withdraw from the stage now).
To put it bluntly, the interface is an array, which contains many function addresses, and I can call the corresponding function with the function address. Then here is another concept called COM component: COM component is a collection of many small binary executable programs. Don’t you have COM interfaces one by one? The functions in the interface are the executable programs in COM components. This is where COM is awesome. It is binary and has nothing to do with language. so:
Component Object Model (COM) technology makes DirectX independent of any programming language and has the characteristics of backward compatible versions. (Dragon Book)
Want to know more: COM Component Development (1) - Objects and Interfaces . I think that when I first learned this subject, it was too deep to expand too much to understand, too shallow, and I felt that I didn’t say enough, I couldn’t understand everything he said, and it wasted a lot of time. It is enough for you to understand what I said above.
Let's start with the content of the smart pointer:
Smart Pointer ComPtr
ComPtr smart pointer (directx11.tech)
Here is a direct link to the ComPtr mentioned in the X_Jun tutorial. I learned a large part of this thing from this article.
Let me briefly talk about it here: First of all, what is this ComPtr used for, that is, if your pointer is set with ComPtr, it is a smart pointer, how smart is it? That is, when the pointer is out of its scope, it will be released automatically, so that we don't have to release it manually, we only need to set a ComPtr when creating it. You can tell from his name that this thing is designed to serve COM, and other people generally don't have such needs.
Next, let’s talk about how it is used: first of all, it is a template class, similarly you can compare vector, it is also a template class, usually vector<int> v; written like this. I define a container v, which contains int.
So how do you understand this ComPtr<ID3D11Device> m_pd3dDevice, that is, I define a smart pointer called m_pd3dDevice. It has some methods and operator overloads:
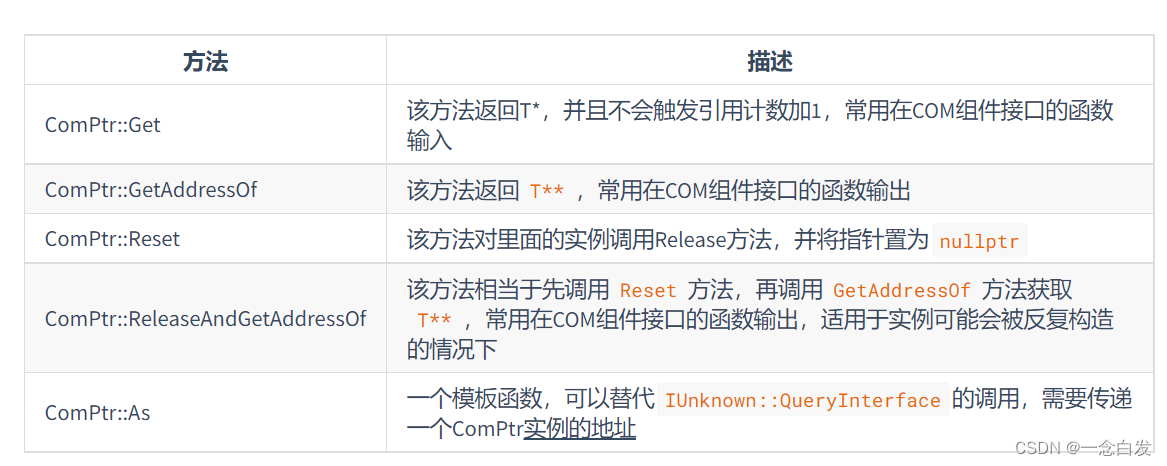
 (The picture is taken from X_Jun blog, with a link above)
Let me say a little more here, these extra methods are called with ., that is, m_pd3dDevice.Get() instead of m_pd3dDevice->Get(). Because what we define is the object of the ComPtr class, not the pointer of the ComPtr class, so these methods are called with .xx.
In fact, he maintains a pointer to ID3D11Device internally, thus overloading ->, and the ComPtr object uses -> which is equivalent to the internally maintained object to use ->. Here you can go to the ComPtr definition to take a look. Here indeed a pointer of type T is created inside the class, and -> is also overloaded.

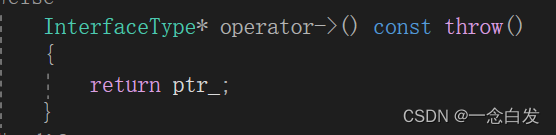
This piece makes a supplement to C++: when overloading ->, what is actually returned is a pointer type. And now you overload the ComPtr<ID3D11Device> type and return a certain pointer type, so should I use it like this when I use it: m_pd3dDevice->->CreateTexture2D(); [m_pd3dDevice->] This part gets a pointer, and then The pointer is then carried out ->, but in fact you can use one, just remember this point.
Here I also want to talk about the usage of using, here is the link directly: C++11 uses using to define aliases (instead of typedef) (biancheng.net)
So far, our COM interface and smart pointers have been introduced. Going back to the beginning question, is the type ComPtr<ID3D11Device> familiar now, can you know what it is and why?
3. Introduction of D3DApp class
Post the code first, and then explain it one by one. Some basic things may be involved in the explanation process, and I will also talk about it a little bit. More often, I will directly give you a link, or directly get down some tutorials from other websites and post them here. Ok, let's get started:
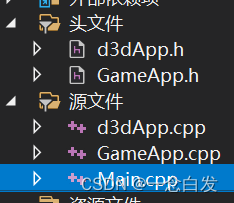
D3DApp class code overview
#ifndef D3DAPP_H
#define D3DAPP_H

#include <wrl/client.h>
#include <string>
#include <d3d11_1.h>
#include <DirectXMath.h>

class D3DApp
{
public:
	D3DApp(HINSTANCE hInstance);              // 在构造函数的初始化列表应当设置好初始参数
	virtual ~D3DApp();

	//利用函数对外开放数据!
	HINSTANCE AppInst()const;                 // 获取应用实例的句柄
	HWND      MainWnd()const;                 // 获取主窗口句柄
	float     AspectRatio()const;             // 获取屏幕宽高比

	int Run();                                // 运行程序,进行游戏主循环

	                                          // 框架方法。客户派生类需要重载这些方法以实现特定的应用需求
	virtual bool Init();                      // 该父类方法需要初始化窗口和Direct3D部分
	virtual void OnResize();                  // 该父类方法需要在窗口大小变动的时候调用
	virtual void UpdateScene(float dt) = 0;   // 子类需要实现该方法,完成每一帧的更新
	virtual void DrawScene() = 0;             // 子类需要实现该方法,完成每一帧的绘制
	virtual LRESULT MsgProc(HWND hwnd, UINT msg, WPARAM wParam, LPARAM lParam);
	// 窗口的消息回调函数
protected:
	bool InitMainWindow();      // 窗口初始化
	bool InitDirect3D();        // Direct3D初始化


protected:

	HINSTANCE m_hAppInst;        // 应用实例句柄
	HWND      m_hMainWnd;        // 主窗口句柄
	bool      m_Minimized;       // 应用是否最小化
	bool      m_Maximized;       // 应用是否最大化
	bool      m_Resizing;        // 窗口大小是否变化
	bool	  m_Enable4xMsaa;	 // 是否开启4倍多重采样
	UINT      m_4xMsaaQuality;   // MSAA支持的质量等级


	// 使用模板别名(C++11)简化类型名
	template <class T>
	using ComPtr = Microsoft::WRL::ComPtr<T>;
	// Direct3D 11
	ComPtr<ID3D11Device> m_pd3dDevice;                    // D3D11设备
	ComPtr<ID3D11DeviceContext> m_pd3dImmediateContext;   // D3D11设备上下文
	ComPtr<IDXGISwapChain> m_pSwapChain;                  // D3D11交换链
	// 常用资源
	ComPtr<ID3D11Texture2D> m_pDepthStencilBuffer;        // 深度模板缓冲区
	ComPtr<ID3D11RenderTargetView> m_pRenderTargetView;   // 渲染目标视图
	ComPtr<ID3D11DepthStencilView> m_pDepthStencilView;   // 深度模板视图
	D3D11_VIEWPORT m_ScreenViewport;                      // 视口

	// 派生类应该在构造函数设置好这些自定义的初始参数
	std::wstring m_MainWndCaption;                       // 主窗口标题
	int m_ClientWidth;                                   // 视口宽度
	int m_ClientHeight;                                  // 视口高度
};

#endif // D3DAPP_H
Code analysis module by module
defensive statement
Next, I will post a piece of code separately, and then explain it.
#ifndef D3DAPP_H
#define D3DAPP_H

。。。。

#endif // D3DAPP_H
The above section is a defensive statement.
head File
#include <wrl/client.h>
#include <string>
#include <d3d11_1.h>
#include <DirectXMath.h>
First of all, the first header file is the header file of ComPtr, just add it.
The second is related to strings. There will be various names in the program, and you will definitely use them.
The third one is about the header file of D3D11, because the tutorial will involve D3D11.1, so the header file of d3d11_1.h included here, you go to the definition of this header file and use the shortcut key of ctrl + f to search function, search #include, you will find that this header file contains the header file of d3d11.h.
The last header file is the math library. The matrix vectors we mentioned before, how to express them in the code are the things in this library. Let me say a little more about hardware-accelerated SIMD operations. First of all, this operation refers to: modern microprocessors can use one instruction to perform mathematical operations on multiple data in parallel. (This sentence comes from "Game Engine Architecture") That is to say, the hardware is awesome, and then it used to count one at a time and now counts multiple at a time, such as 4, which is especially suitable for 4D vector or 4x4 matrix operations, which is what we need in the game. s things. Our math library uses this hardware acceleration. learn more:
In fact, our first project did not use any math-related things, why include it? Because it contains the assert.h header file, we used the assert keyword.
If you are not familiar with this assert, then take this opportunity to check it out. How to assert (assert) | Rookie Tutorial (runoob.com)
Note that this thing is only used in Debug mode.
class structure
class D3DApp
{
public:
	//对外开放的函数
protected:
	//不对外开放的函数
protected:
    //数据
};
This is the overall structure of the class. First of all, some functions to be implemented are opened for use. Needless to say, the point to be said here is: why is protected here, because the son wants to access these data and functions. (Especially for data, functions can be written as private, because the functions in this block are served by the functions in the public class of the parent class, and the son finally wants the functions in the public class.) If you are not familiar with these, the following:
The difference between public, protected, and private in C++
At the beginning, I said that I was a porter, but now I am really proficient in porting, hahahaha:)~~~
structure between methods
//-------------------------------public方法------------------------------------------
    D3DApp(HINSTANCE hInstance);              // 在构造函数的初始化列表应当设置好初始参数
	virtual ~D3DApp();

	//利用函数对外开放数据!
	HINSTANCE AppInst()const;                 // 获取应用实例的句柄
	HWND      MainWnd()const;                 // 获取主窗口句柄
	float     AspectRatio()const;             // 获取屏幕宽高比

	int Run();                                // 运行程序,进行游戏主循环

    // 框架方法。客户派生类需要重载这些方法以实现特定的应用需求
	virtual bool Init();                      // 该父类方法需要初始化窗口和Direct3D部分
	virtual void OnResize();                  // 该父类方法需要在窗口大小变动的时候调用
	virtual void UpdateScene(float dt) = 0;   // 子类需要实现该方法,完成每一帧的更新
	virtual void DrawScene() = 0;             // 子类需要实现该方法,完成每一帧的绘制
	virtual LRESULT MsgProc(HWND hwnd, UINT msg, WPARAM wParam, LPARAM lParam);
//-------------------------------protected方法------------------------------------------
	bool InitMainWindow();      // 窗口初始化
	bool InitDirect3D();        // Direct3D初始化
Let’s not talk about the constructor here, because the constructor is mainly to initialize the data. If you want to understand what data is in the class, you have to understand what this class does, so let’s first explain what this class does, then That is to introduce the core functions in the class first.
Let me talk about the idea first. Now I want to encapsulate the game-related things into a class, and then write the knowledge into the class. The window should be created or the window should be created, which is still the same as the architecture we talked about before.
Since some things are encapsulated, I will help you to revisit the structure of the program here: first try to review the framework of the game mentioned before, if you forget, you must review it first. Some extra things are added here, because our next program needs to use DirectX to render, and requires initialization and use operations related to DirectX programs.
First look at initialization : Init will initialize the window and Direct3D. When initializing the window, you need to specify the window processing function. When initializing Direct3D, an OnResize will be called.
Then it starts to run : the Run call, which mainly contains the UpdateScene and DrawScene functions.
Before talking about the implementation, let’s take a look at the d3dApp.cpp file. In addition to various implementations, a header file is added, as follows
#include <sstream>Usage of c++ standard library sstream_svdalv's blog-CSDN blog_sstream
About why he was added, the link above has a look at the usage!
Let's explain the functions one by one:
initializer
bool D3DApp::Init()
{
	if (!InitMainWindow())
		return false;

	if (!InitDirect3D())
		return false;

	return true;
}
It is to call InitMainWindow and InitDirect3D, and the return value here is the initialization return value from the above two functions. In short, it returns true on success and false on failure.
The order is: create a window, and then initialize D3D, because this thing is for rendering for the window, so you have to specify the size of the window when initializing the window, and then let Direct3D compare it with what you created The properties of the window are used to initialize D3D. In fact, to put it bluntly, the D3D initialization process will use attributes such as the width, height and handle of the window. (If you don’t understand the handle, don’t worry, you just need to know that it is an attribute of the window, which will be introduced later.)
For this Init function, it is a virtual function, because the subclass may need to rewrite it, that is to say, the initialization of the subclass may not only be initialized by the parent class, but may also have its own additional content that needs to be initialized. Then it will be written as a virtual function at this time. But why not write it as a pure virtual function, because writing it as a pure virtual function is not defined in the parent class, and the parent class directly defines a pure virtual function to regulate the behavior of the derived class.
To sum up this little piece:
1. If the subclass has exactly the same thing, the parent class can be directly written as an ordinary member function (Run here).
2. If some of the subclasses are exactly the same, there may be some differences. The parent class writes the exact same parts as virtual functions (Init and OnResize here)
3. If there must be this thing in the subclass, but no deterministic public thing can be found, then the parent class is written as a pure virtual function. (UpdateScene and DrawScene here).
Initialize window
bool D3DApp::InitMainWindow()
{
   //----------------------------注册窗口-----------------------------
	WNDCLASS wc;
	wc.style = CS_HREDRAW | CS_VREDRAW;
	wc.lpfnWndProc = MainWndProc;
	wc.cbClsExtra = 0;
	wc.cbWndExtra = 0;
	wc.hInstance = m_hAppInst;
	wc.hIcon = LoadIcon(0, IDI_APPLICATION);
	wc.hCursor = LoadCursor(0, IDC_ARROW);
	wc.hbrBackground = (HBRUSH)GetStockObject(NULL_BRUSH);
	wc.lpszMenuName = 0;
	wc.lpszClassName = L"D3DWndClassName";

	if (!RegisterClass(&wc))
	{
		MessageBox(0, L"RegisterClass Failed.", 0, 0);
		return false;
	}
   //----------------------------创建窗口-----------------------------
	// Compute window rectangle dimensions based on client area dimensions requested.
	RECT R = { 0, 0, m_ClientWidth, m_ClientHeight };
	AdjustWindowRect(&R, WS_OVERLAPPEDWINDOW, false);
	int width = R.right - R.left;
	int height = R.bottom - R.top;

	m_hMainWnd = CreateWindow(L"D3DWndClassName", m_MainWndCaption.c_str(),
		WS_OVERLAPPEDWINDOW, CW_USEDEFAULT, CW_USEDEFAULT, width, height, 0, 0, m_hAppInst, 0);
	if (!m_hMainWnd)
	{
		MessageBox(0, L"CreateWindow Failed.", 0, 0);
		return false;
	}
   //----------------------------展示窗口-----------------------------
	ShowWindow(m_hMainWnd, SW_SHOW);
	UpdateWindow(m_hMainWnd);//send a message WM_PAINT to window.

	return true;
}
Here is almost the same as the previous code (the change is that the window size is specified according to the client area), let me say a few points:
1. When WinMain is created, there will be a parameter, hInstance, because WinMain represents the running of a program, so this handle is the handle of the program.
What about handles? The following quotes a Zhihu answer, which is quite popular!
--------------------------------------------------------------------------------------------------------------------------
The handle is a number, generally the same as the number of integers under the current system, for example, 4 bytes under the 32bit system.
This number is the unique identifier of an object, and corresponds to the object one by one.
This object can be a block of memory, a resource, or a service context (such as socket, thread), etc.
There can be many sources of this number, as long as it can guarantee a unique correspondence with the object it represents, for example, you can use the memory address, you can also use the serial number of the handle table, or simply use an auto-increment ID, or use the above Value to XOR a constant.
Traditionally, the operating system kernel and system service API are interfaced in C language, but its internal design concept is OO, so there is an object concept but no corresponding language syntax support.
The role of the handle is to replace the C++ object pointer in the C language environment.
Creating a handle is construction, destroying a handle is destructing, and calling a function with a handle is equivalent to passing in the this pointer.
If there is a system API with a C++ interface, then there is no handle, but an interface pointer, such as IXXXPtr, such as Windows comp ptr.
Author: Yao Dong
Link: https://www.zhihu.com/question/27656256/answer/37556901
Source: Zhihu
The copyright belongs to the author. For commercial reprint, please contact the author for authorization, for non-commercial reprint, please indicate the source.--------------------------------------------------------------------------------------------------------------------------
What is the relationship between the handle of this program and the creation of the window? This handle will be copied to the member variable m_hAppInst during the constructor. Then wait until the window is created and fill it in directly.
2. For the following code:
	RECT R = { 0, 0, m_ClientWidth, m_ClientHeight };
	AdjustWindowRect(&R, WS_OVERLAPPEDWINDOW, false);
	int width = R.right - R.left;
	int height = R.bottom - R.top;
I won’t talk about the function of AdjustWindowRect, but I will show you the link: AdjustWindowRect function (winuser.h) - Win32 apps | Microsoft Docs
Because the English in it is very simple, if you are determined to take the road of games, you must cultivate your English ability.
3. The return value of the created window is now stored in the member variable m_hMainWnd.
Let's talk about the rest
(78 messages) Create a Win32 window_douzhq's blog-CSDN blog_win32 window
message processing function
When initializing the window, you need to specify a message processing function, which we have written in the class:
virtual LRESULT MsgProc(HWND hwnd, UINT msg, WPARAM wParam, LPARAM lParam);You may think that when we wrote the program framework before, we directly assigned the function name, that is, the function address, to the corresponding member. But it is different here, because there is a requirement for the message processing function filled in when creating the window that it cannot be a member function. So here is to add the following code in d3dApp.cpp:
namespace
{
	D3DApp* g_pd3dApp = nullptr;
}

LRESULT CALLBACK
MainWndProc(HWND hwnd, UINT msg, WPARAM wParam, LPARAM lParam)
{
	return g_pd3dApp->MsgProc(hwnd, msg, wParam, lParam);
}
Then assign MainWndProc to the corresponding position when initializing the window.
Explain: He cannot use member functions, so I will write a global function, and then I can call members in the global function, but I need a member or pointer to call before I can call, then I can create A pointer, and then put him in the anonymous space, so that this pointer can only be accessed in the current file. It is similar to modifying with static. You can see the details below. By the way, static will also help you review:
C++ Anonymous Namespace - youxin - Blog Park (cnblogs.com)
Usage of static in C/C++ Global variables and local variables | rookie tutorial (runoob.com)
D3D initialization
Let's start to introduce the initialization of D3D:
There is still no introduction here.
OnResize function
For OnResize introduction:
There is no introduction here.
UpdateScene 和 DrawScene
Introduction to UpdateScene and DrawScene: These two functions are pure virtual functions in the base class, so there is no need to write implementation in the parent class, and the specific implementation is completely written by the subclass.
Let me talk about the parameters of UpdateScene here. In fact, this parameter is a parameter that will be used in later projects. It is useless at all now, so you should understand the situation and copy it when writing. Let’s talk about it later.
For more information on virtual functions, please refer to the link below:
The difference between C++ virtual function and pure virtual function | rookie tutorial (runoob.com)
Constructor
Now let's talk about the constructor. As for the parameters, it is to pass in the handle of the program, and then the implementation is the initialization of various things. There are many members involved here that we haven't mentioned yet.
D3DApp::D3DApp(HINSTANCE hInstance)
	: m_hAppInst(hInstance),
	m_MainWndCaption(L"DirectX11 Initialization"),
	m_ClientWidth(1280),
	m_ClientHeight(720),
	m_hMainWnd(nullptr),
	m_AppPaused(false),
	m_Minimized(false),
	m_Maximized(false),
	m_Resizing(false),
	m_Enable4xMsaa(true),
	m_4xMsaaQuality(0),
	m_pd3dDevice(nullptr),
	m_pd3dImmediateContext(nullptr),
	m_pSwapChain(nullptr),
	m_pDepthStencilBuffer(nullptr),
	m_pRenderTargetView(nullptr),
	m_pDepthStencilView(nullptr)
{
	ZeroMemory(&m_ScreenViewport, sizeof(D3D11_VIEWPORT));
	g_pd3dApp = this;
}
The initialization here uses the special syntax of the C++ constructor. C++ class constructor initialization list | rookie tutorial (runoob.com)
destructor
The destructor is written as a virtual function, that is, virtual destructor!
Detailed Explanation of C++ Virtual Destructor (biancheng.net)
The specific implementation code will not be mentioned for the time being.
Three Open Data Functions
    HINSTANCE AppInst()const;                 // 获取应用实例的句柄
	HWND      MainWnd()const;                 // 获取主窗口句柄
	float     AspectRatio()const;             // 获取屏幕宽高比
Introduction of some members:
    HINSTANCE m_hAppInst;        // 应用实例句柄
	HWND      m_hMainWnd;        // 主窗口句柄

    // 使用模板别名(C++11)简化类型名
	template <class T>
	using ComPtr = Microsoft::WRL::ComPtr<T>;
	// Direct3D 11
	ComPtr<ID3D11Device> m_pd3dDevice;                    // D3D11设备
	ComPtr<ID3D11DeviceContext> m_pd3dImmediateContext;   // D3D11设备上下文

    std::wstring m_MainWndCaption;                       // 主窗口标题
	int m_ClientWidth;                                   // 视口宽度
	int m_ClientHeight;                                  // 视口高度
1. The first two are two handles, they are handles of different things, so here are different types. The beginning of H means handle, which is the handle
2. The middle two, we have already introduced, are the device and the device context
3. Let’s talk about the last two first, indicating the size of the client area. Let’s talk about the client area of the window here: the part circled in blue in the figure below is the client area.
4. For the last one is a string, the title of the window, because of the encoding problem, you need to use the wstring type, please refer to the link below for details.

4. Introduction to GameApp class
GameApp class code overview
#ifndef GAMEAPP_H
#define GAMEAPP_H
#include "d3dApp.h"
class GameApp : public D3DApp
{
public:
	GameApp(HINSTANCE hInstance);
	~GameApp();

	bool Init();
	void OnResize();
	void UpdateScene(float dt);
	void DrawScene();
};

#endif
The content of the previous topic is that the D3DApp class is an abstract class that we generally use (that is, there is at least one pure virtual function in it). C++ Interface (Abstract Class) | Rookie Tutorial (runoob.com)
And the GameApp we want to talk about here is a class specially designed for each game. It inherits the abstract class mentioned before, and then realizes the specific content according to the specific needs of the game, mainly to fill in the content of DrawScene and UpdateScene.
The four functions here are actually functions rewritten from the parent class, so their main functions have been mentioned in the previous explanation, so I won’t repeat them here. By now you have to be in control of the relationship between these functions, and the inheritance and rewriting between subclass and parent class functions!
Ok, let's look at the specific details of the code.
GameApp class code analysis
This code is relatively simple, directly rewriting the four virtual functions of the parent class, and constructing fiction.
1. Tell me about the constructor: You may be a little strange about the appearance of the constructor.
GameApp::GameApp(HINSTANCE hInstance)
	: D3DApp(hInstance)
{
}
Why add D3DApp(hInstance) after the parentheses of the parameters?
His usage here is that the subclass directly calls the constructor of the parent class, which is similar to the initialization list of the constructor mentioned earlier.
2. For initialization, since the current first program has nothing, it is enough to call the initialization of the parent class here, and there is no need to add anything on this basis. If your program is complicated and needs to initialize some data in the early stage of operation, then put it here.
bool GameApp::Init()
{
	if (!D3DApp::Init())
		return false;

	return true;
}
3. OnResize is only enough to use the parent class. This is also similar to Init. When the program becomes complicated in the future, if you want to add some new operations when the window size changes, then you can add code to it.
void GameApp::OnResize()
{
	D3DApp::OnResize();
}
4. UpdateScene needs subclass rewriting, or because our program has not implemented anything, so there is no code written here. In the same way, if the program wants to update any content between two frames in the future, write it here!
void GameApp::UpdateScene(float dt)
{
}
5、DrawScene
void GameApp::DrawScene()
{
	assert(m_pd3dImmediateContext);
	assert(m_pSwapChain);

	static float blue[4] = { 1.0f, 0.0f, 0.0f, 1.0f };	// RGBA = (0,0,255,255)
	m_pd3dImmediateContext->ClearRenderTargetView(m_pRenderTargetView.Get(), blue);
	m_pd3dImmediateContext->ClearDepthStencilView(m_pDepthStencilView.Get(),
                            D3D11_CLEAR_DEPTH | D3D11_CLEAR_STENCIL, 1.0f, 0);

	m_pSwapChain->Present(0, 0);
}
Since there are many unfamiliar concepts involved here, I will not talk about it for the time being.
Five, the main function introduction
#include "GameApp.h"


int WINAPI WinMain(_In_ HINSTANCE hInstance, _In_opt_ HINSTANCE prevInstance,
	_In_ LPSTR cmdLine, _In_ int showCmd)
{
	GameApp theApp(hInstance);

	if (!theApp.Init())
		return 0;

	return theApp.Run();
}
If you have digested the previous content, then how to apply those functions in the main function here, you should be able to guess how to write the main function.
Here is to create a game class object first, then call the initialization function initialization program, and then enter the main loop of the game.
Six, code summary

The picture above is the result of our lesson. I didn't explain all the codes in it, because I plan to leave some of them in the next section.
In addition, I have marked the content in the code, for example:  first of all, you have seen the end of the article now, I hope you can understand all the above descriptions, if you don’t understand the content, please read the tutorial several times, or yourself Search for some relevant content on the Internet to supplement the basics. You must understand as much as possible. If you really don’t understand, you can skip it first, or leave a message in the comment area.
When you have a good understanding of the above content, I hope you download a copy of the code and get familiar with the code as a whole (it is best to download the code of this chapter before studying this lesson), because the above explanations are all piece by piece Said. After reading it, the task you have to do is to practice it. If you understand it, it doesn’t mean you really understand it. Only after you write it again, you will know where there are pitfalls and where you don’t understand well. So go and recreate a project by yourself, and then copy the parts that I mark you don’t need to master directly to the corresponding position, and then write silently from scratch, you go back to the shelf of the program, first write out the function framework, and then go to a Generally, you can’t write it down silently for the first time. At this time, you can go to see how it is written in the sample program, and then copy it, copying it silently. During this process, mark the parts you don’t understand with comments. It can be used for review later.
When looking at the code, some useful tools (VS):
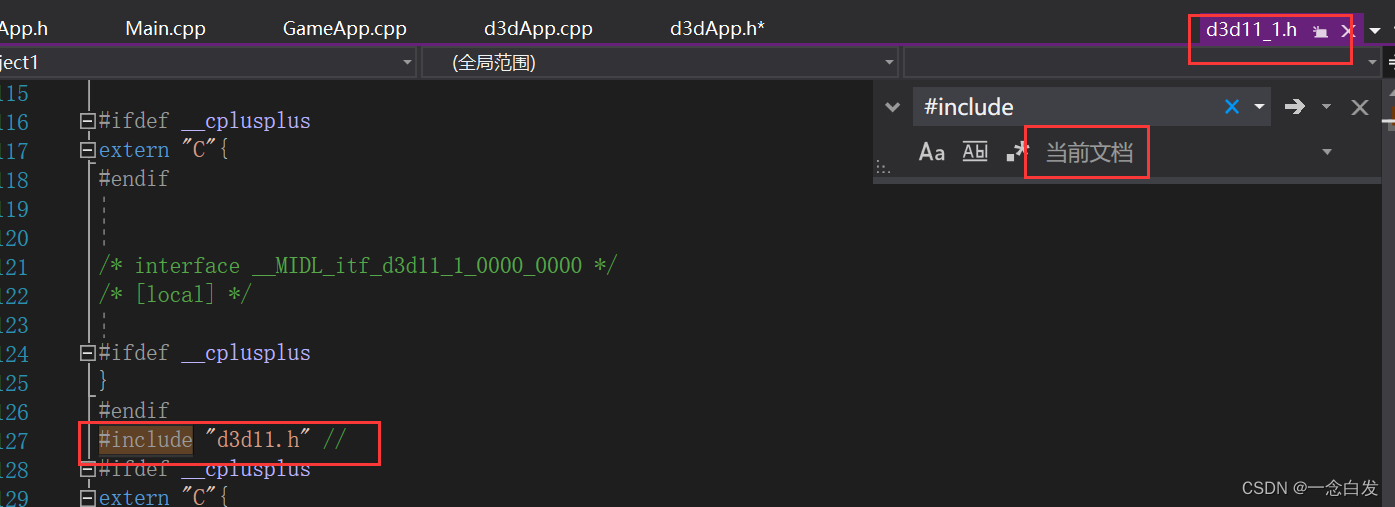
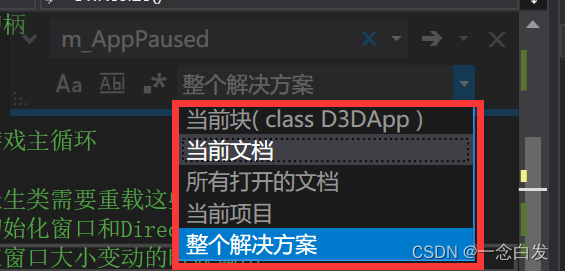
CTRL + F search function, when you see a variable or a function and want to see where it is called (especially when there are many codes and you are facing a new program), you can search like this , press Enter to switch to the next one. Here you can also limit the search area:
You can also use the following two functions, select a variable or function, and then right click, one is to go to the definition (this operation can also hold down the CTRL key and click the function name to go to the definition), one is to find all References (similar to search)


Do not build high platforms on floating sand
References: https://zhuanlan.zhihu.com/p/452013032