The term preference will not be unfamiliar to friends who are familiar with Android. It is often used to set the operating parameters of the software.
Android provides a robust and flexible framework for handling preferences. It provides simple API to hide preference reading and persistence, and provides an elegant preferences interface.
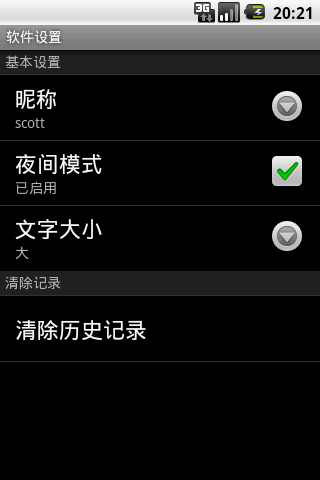
First, let’s look at the preferences interface of the software below:
This software uses several types of preferences, each of which has its own unique usage, let's take a look at a few common preferences:
CheckBoxPreference : used to turn on or off a function
ListPreference : used to select a value from multiple options;
EditTextPreference : used to configure a piece of text information;
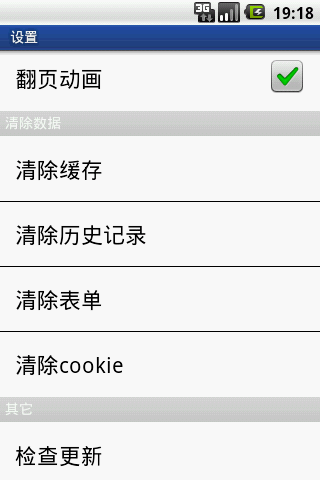
Preference : Used to perform related custom operations (clear cache, history, form, and cookie in the above figure all belong to this item);
RingtonePreference : It is specially used to set ringtones for users.
When we use the preference framework, every time the user changes the value of an item, the system will immediately generate a [PACKAGE_NAME]_preferences.xml file under /data/data/[PACKAGE_NAME]/shared_prefs , which will record the latest configuration information.
So how to use the preferred framework? We need the following steps:
1. Create a preference xml configuration file and place it under the /res/xml directory of the project;
2. Create a new Activity, inherit android.preference.PreferenceActivity , and then load our preference configuration file in the onCreate method.
Next, I will demonstrate the configuration and use of the preference framework for you:
We create a new prefs project, the project structure is as follows:
The function we want to achieve is very similar to that of the above software. Let me explain the overall process of this project:
1. Main interface. Display user nickname, there are three parameters, nickname text, font size and background color. When entering for the first time, use the default value.
2. Press the settings item in the menu button to jump to the preference page for parameter selection.
3. Press the return key to return to the main interface, and the set parameters will take effect.
First, let's take a look at the configuration file of the main interface, which is very simple, just a TextView:
- <? xml version = "1.0" encoding = "utf-8" ?>
- < LinearLayout xmlns:android = "http://schemas.android.com/apk/res/android"
- android:orientation = "vertical"
- android:layout_width = "fill_parent"
- android:layout_height = "fill_parent" >
- < TextView
- android:id = "@+id/textView"
- android:layout_width = "fill_parent"
- android:layout_height = "fill_parent"
- android:gravity = "center_horizontal"
- android:textColor = "#FF0000" />
- </ LinearLayout >
Then, we need to set the appearance and background of TextView according to the configuration parameters in the main interface. The MainActivity.java code is as follows:
- package com.scott.prefs;
- import android.app.Activity;
- import android.content.Context;
- import android.content.Intent;
- import android.content.SharedPreferences;
- import android.graphics.Color;
- import android.os.Bundle;
- import android.view.Menu;
- import android.view.MenuItem;
- import android.widget.TextView;
- public class MainActivity extends Activity {
- private static final int SETTINGS_ID = 0 ;
- private static final int EXIT_ID = 1 ;
- private TextView textView;
- @Override
- public void onCreate(Bundle savedInstanceState) {
- super .onCreate(savedInstanceState);
- setContentView(R.layout.main);
- textView = (TextView) findViewById(R.id.textView);
- showSettings();
- }
- @Override
- public boolean onCreateOptionsMenu(Menu menu) {
- super .onCreateOptionsMenu(menu);
- menu.add(0 , SETTINGS_ID, 0 , "Settings" );
- menu.add(0 , EXIT_ID, 0 , "Quit" );
- return true ;
- }
- @Override
- public boolean onOptionsItemSelected(MenuItem item) {
- if (item.getItemId() == SETTINGS_ID) {
- Intent intent = new Intent(MainActivity. this , PrefsActivity. class );
- //If requestCode >= 0, the onActivityResult() method will be called back when the result is returned
- startActivityForResult(intent, 1 );
- } else {
- finish();
- }
- return true ;
- }
- @Override
- protected void onActivityResult( int requestCode, int resultCode, Intent data) {
- super .onActivityResult(requestCode, resultCode, data);
- showSettings();
- }
- private void showSettings() {
- String prefsName = getPackageName() + "_preferences" ; //[PACKAGE_NAME]_preferences
- SharedPreferences prefs = getSharedPreferences(prefsName, Context.MODE_PRIVATE);
- String nickName = prefs.getString( "nickName" , "robot" );
- textView.setText( "Welcome:" + nickName);
- boolean nightMode = prefs.getBoolean( "nightMode" , false );
- textView.setBackgroundColor(nightMode ? Color.BLACK : Color.WHITE);
- String textSize = prefs.getString("textSize" , "0" );
- if (textSize.equals( "0" )) {
- textView.setTextSize(18f);
- } else if (textSize.equals( "1" )) {
- textView.setTextSize(22f);
- } else if (textSize.equals( "2" )) {
- textView.setTextSize(36f);
- }
- }
- }
It can be seen that after entering the main interface, the preference configuration information will be obtained according to [PACKAGE_NAME]_preferences. If it is the first time to enter, the default value will be used. The following is the screen when we enter the main interface for the first time:
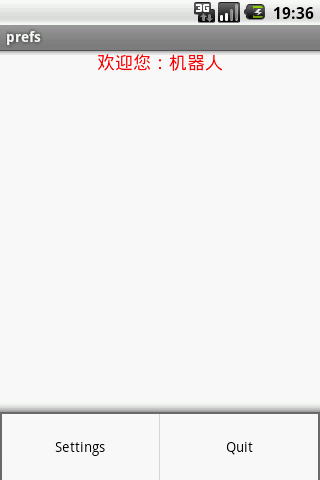
It can be seen that when we first entered the interface, the nickname was "Robot", the background of the characters was white, and the size of the characters was 18 points.
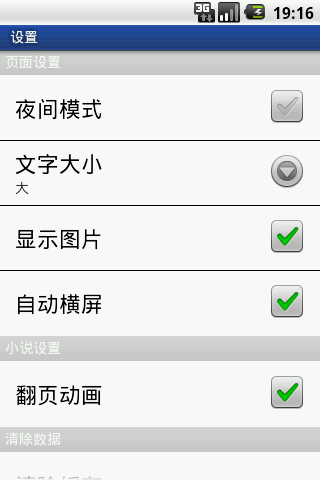
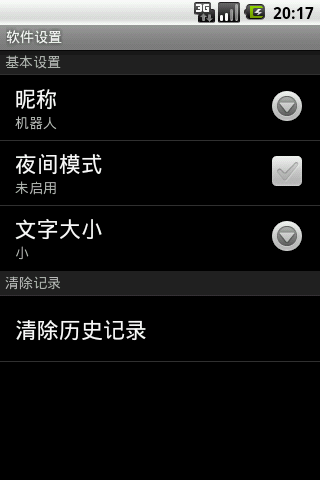
Then after pressing Settings, we can configure the preferences. Let's take a look at the configuration of settings.xml:
- <? xml version = "1.0" encoding = "utf-8" ?>
- < PreferenceScreen xmlns:android = "http://schemas.android.com/apk/res/android"
- android:key = "settings"
- android:title = "Software Settings" >
- < PreferenceCategory
- android:key = "basic"
- android:title = "Basic Settings" >
- < EditTextPreference
- android:key = "nickName"
- android:title = "Nickname"
- android:defaultValue = "robot" />
- < CheckBoxPreference
- android:key = "nightMode"
- android:title = "Night Mode"
- android:summaryOn = "Enabled"
- android:summaryOff = "Not enabled" />
- < ListPreference
- android:key = "textSize"
- android:title = "Text Size"
- android:dialogTitle = "Text Size"
- android:entries = "@array/textSize_entry"
- android:entryValues = "@array/textSize_entry_value"
- android:defaultValue = "0" />
- </ PreferenceCategory >
- < PreferenceCategory
- android:key = "clean"
- android:title = "Clear Records" >
- < Preference
- android:key = "cleanHistory"
- android:title = "Clear History" />
- </ PreferenceCategory >
- </ PreferenceScreen >
Among them, the outermost layer is the PreferenceScreen tag, which represents a collection of preferences; then, we noticed the item PreferenceCategory , which represents a category and can contain multiple preferences; the last is the preference we use to configure parameters up. What needs to be understood is that PreferenceScreen can also be nested , which means that the above PreferenceCategory can be replaced by PreferenceScreen.
In addition, we also need to understand several common tag attributes that appear in the file:
The name or key of the android:key option
The title of the android:title option
A short summary of the android:summary option
The text of the android:entries list item
The value of each item in the android:entryValues list
android:dialogTitle dialog box title
The default value of the options in the android:defaultValue list
There are two special properties for CheckBoxPreference
The summary displayed when the android:summaryOn option is selected
The summary displayed when the android:summaryOff option is unchecked
We can also see that in ListPreference, entries come from textSize_entry, and entryValues comes from textSize_entry_value, both of which are configured in text_size.xml in the /res/values directory:
- <? xml version = "1.0" encoding = "utf-8" ?>
- < resources >
- < string-array name = "textSize_entry" >
- < item > 小 </ item >
- < item > 中 </ item >
- < item > 大 </ item >
- </ string-array >
- < string-array name = "textSize_entry_value" >
- < item > 0 </ item >
- < item > 1 </ item >
- < item > 2 </ item >
- </ string-array >
- </ resources >
After the configuration is complete, we are left with the last step, creating an Activity, inheriting PreferenceActivity, loading the preference resource file, and processing the corresponding option event.
PrefsActivity.java code is as follows:
- package com.scott.prefs;
- import android.app.AlertDialog;
- import android.content.DialogInterface;
- import android.os.Bundle;
- import android.preference.EditTextPreference;
- import android.preference.ListPreference;
- import android.preference.Preference;
- import android.preference.PreferenceActivity;
- import android.preference.PreferenceScreen;
- import android.widget.Toast;
- public class PrefsActivity extends PreferenceActivity implements Preference.OnPreferenceChangeListener {
- private EditTextPreference nickName;
- private ListPreference textSize;
- private Preference cleanHistory;
- @Override
- public void onCreate(Bundle savedInstanceState) {
- super .onCreate(savedInstanceState);
- addPreferencesFromResource(R.xml.setttings);
- nickName = (EditTextPreference) findPreference("nickName" );
- textSize = (ListPreference) findPreference("textSize" );
- cleanHistory = findPreference("cleanHistory" );
- //Register Preference.OnPreferenceChangeListener listener event for nickName and textSize
- // We can update the summary immediately when the value changes
- nickName.setOnPreferenceChangeListener(this );
- textSize.setOnPreferenceChangeListener(this );
- initSummary();
- }
- //Initialize summary
- private void initSummary() {
- nickName.setSummary(nickName.getText());
- setTextSizeSummary(textSize.getValue());
- }
- private void setTextSizeSummary(String textSizeValue) {
- if (textSizeValue.equals( "0" )) {
- textSize.setSummary("小" );
- } else if (textSizeValue.equals( "1" )) {
- textSize.setSummary("中" );
- } else if (textSizeValue.equals( "2" )) {
- textSize.setSummary("大" );
- }
- }
- /**
- * Rewrite the onPreferenceTreeClick method of PreferenceActivity
- * When the preference is clicked, make corresponding processing operations
- */
- @Override
- public boolean onPreferenceTreeClick(PreferenceScreen preferenceScreen, Preference preference) {
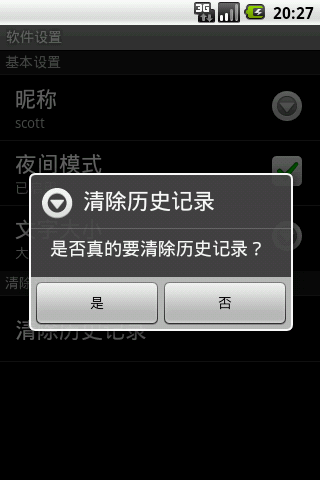
- if (preference == cleanHistory) {
- new AlertDialog.Builder( this )
- .setTitle( "Clear History" )
- .setMessage( "Do you really want to clear the history?" )
- .setPositiveButton("是" , new DialogInterface.OnClickListener() {
- @Override
- public void onClick(DialogInterface dialog, int which) {
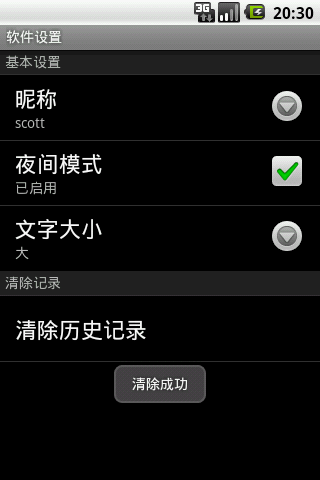
- //cleaning history...
- Toast.makeText(PrefsActivity.this , "Clear Successfully" , Toast.LENGTH_SHORT).show();
- }
- }).setNegativeButton("否" , new DialogInterface.OnClickListener() {
- @Override
- public void onClick(DialogInterface dialog, int which) {
- dialog.dismiss();
- }
- }).create().show();
- }
- return true ;
- }
- /**
- * Rewrite the onPreferenceChange method of Preference.OnPreferenceChangeListener
- * When the value of the preference changes, make corresponding operations
- */
- @Override
- public boolean onPreferenceChange(Preference preference, Object newValue) {
- if (preference == nickName) {
- nickName.setSummary(newValue.toString());
- } else if (preference == textSize) {
- setTextSizeSummary(newValue.toString());
- }
- return true ;
- }
- }
Finally, don't forget to add this Activity configuration information in AndroidManifest.xml:
- < activity android:name = ".PrefsActivity" />
Of course, we can also configure the <intent-filter></intent-filter> attribute.
After the above steps, our preference configuration is complete, and the interface entered for the first time is as follows:
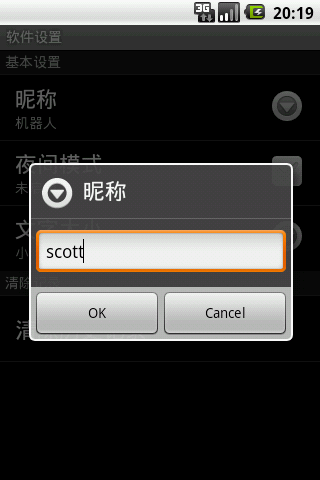
Then we change the nickname, night mode, and text size respectively, as follows:
It can be seen that after we change the value of the option, the summary part has been set to the latest value. At this time, a com.scott.prefs_preferences.xml file is generated in the shared_prefs directory under our application, as shown in the figure:

The content is as follows:
- <? xml version = '1.0' encoding = 'utf-8' standalone = 'yes' ?>
- < map >
- < boolean name = "nightMode" value = "true" />
- < string name = "nickName" > scott </ string >
- < string name = "textSize" > 2 </ string >
- </ map >
At this point, we press the back button to return to the main interface, and find that the settings just now have taken effect:

It can be seen that the nickname has been changed to "scott", the background of the characters has been changed to black, and the size of the characters has been changed to 36 points.
If we press Clear History on the preferences interface, the following interface will appear: