Rolling update, use kubectl rolloutto realize application upgrade and downgrade without user perception.
1. Define the application version
KubernetesIn , the version update does not use APIthe object, but two commands: kubectl applyand , of course, they also need to match the , etc. files kubectl rolloutrequired for deploying the application .DeploymentDaemonSetYAML
We often simply think that "version" is the "version number" of the application, or the "label" of the container image, but don't forget that the application Kubernetesin byPod etc. To manage, so the "version update" of the application actually updates the entire application .PodDeploymentPod
PodThen what is the decision?
PodIs determined by the YAMLdescription file, more precisely, Deploymentfields in objects such as template.
Therefore, the version change applied Kubernetesin is the change intemplate , even if only one field is changed in , it will form a new version, which is also a version change.Podtemplate
But templatethere is too much content in , it is not realistic to use such a long string as the "version number", so Kubernetesthe "summary" function is used, templateand Hashthe value of is calculated by the digest algorithm as the "version number", although it is not easy to identify , but very practical.

PodThe string of random numbers "6796..." in the name Podis Hashthe value of the template, which is the "version number" Podof . If you change Pod YAMLthe description , such as changing the image to nginx:stable-alpine, or changing the container name to nginx-test, a new application version will be generated and kubectl applythen recreated Pod:

You can see that the valuePod in the name has changed to "7c6c...", which means that the version of is updated.HashPod
2. Implement app updates
To take a closer look at the application update process Kubernetesof the , let's modify Nginx Deploymentthe object slightly to Kubernetessee how the version update is implemented.
First modify it ConfigMapso that it Nginxoutputs the version number so that we can curlview the version with:
# ngx-conf.yml

apiVersion: v1
kind: ConfigMap
metadata:
  name: ngx-conf

data:
  default.conf: |
    server {
      listen 80;
      location / {
        default_type text/plain;
        return 200
          'ver : $nginx_version\nsrv : $server_addr:$server_port\nhost: $hostname\n';
      }
    }
Then we modify Podthe image to explicitly specify that the version number is 1.21-alpine, and the number of instances is set to 4:
# ngx-v1.yml

apiVersion: apps/v1
kind: Deployment
metadata:
  name: ngx-dep

spec:
  replicas: 4
  selector:
    matchLabels:
      app: ngx-dep

  template:
    metadata:
      labels:
        app: ngx-dep
    spec:
      volumes:
      - name: ngx-conf-vol
        configMap:
          name: ngx-conf

      containers:
      - image: nginx:1.21-alpine
        name: nginx
        ports:
        - containerPort: 80

        volumeMounts:
        - mountPath: /etc/nginx/conf.d
          name: ngx-conf-vol
Name it ngx-v1.yml, and execute the command kubectl applyto deploy the application:
kubectl apply -f ngx-conf.yml
kubectl apply -f ngx-v1.yml
# ngx-svc.yml
apiVersion: v1
kind: Service
metadata:
  name: ngx-svc

spec:
  selector:
    app: ngx-dep

  ports:
  - port: 80
    targetPort: 80
    protocol: TCP
We can also create Servicean object , and then use kubectl port-forwardthe forward request to check the status:
kubectl apply -f ngx-svc.yml

kubectl port-forward svc/ngx-svc 8080:80 &
curl 127.1:8080
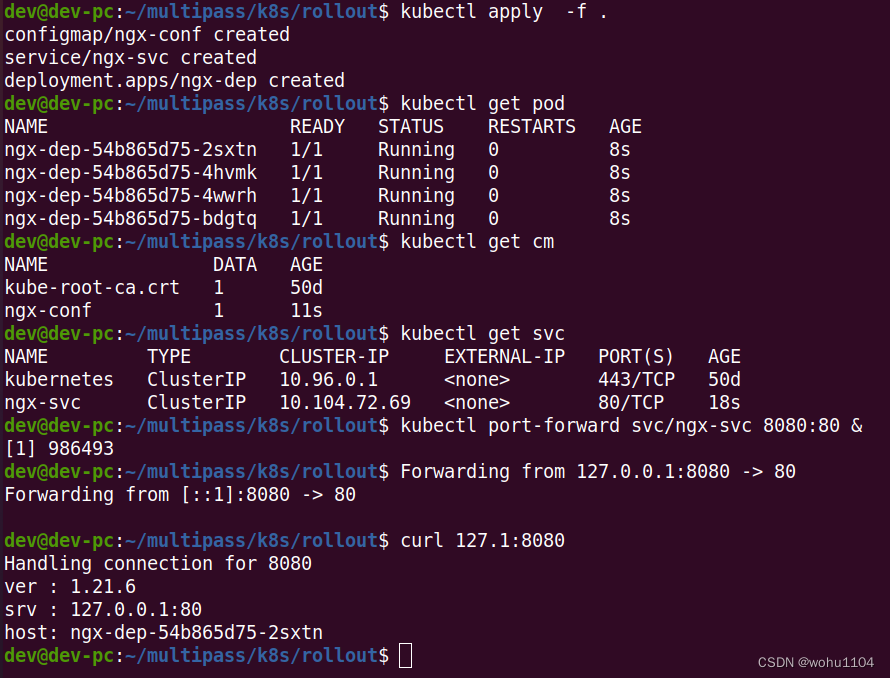
As you can see from the output of curlthe command , the version being applied is 1.21.6. Now, let's write a new version object ngx-v2.yml, upgrade the image to nginx:1.22-alpine, and keep everything else the same.
Because the action Kubernetesof is too fast, in order to be able to observe the process of applying the update, we also need to add a field minReadySecondsto let Wait for a while Kubernetesduring the update process, confirm Podthat there is no problem before continuing the rest Podof the creation work.
As a reminder, minReadySecondsthis field doesn't belong to Podthe template , so it doesn't affect Podthe version:
apiVersion: apps/v1
kind: Deployment
metadata:
  name: ngx-dep

spec:
  minReadySeconds: 15      # 确认Pod就绪的等待时间
  replicas: 4
  ... ...
      containers:
      - image: nginx:1.22-alpine
  ... ...
Now we execute the command kubectl applyto update the application, because the image name is changed and Podthe template is changed, it will trigger "version update", and then use a new command: kubectl rollout status, to view the status of the application update:
kubectl apply -f ngx-v2.yml
kubectl rollout status deployment ngx-dep
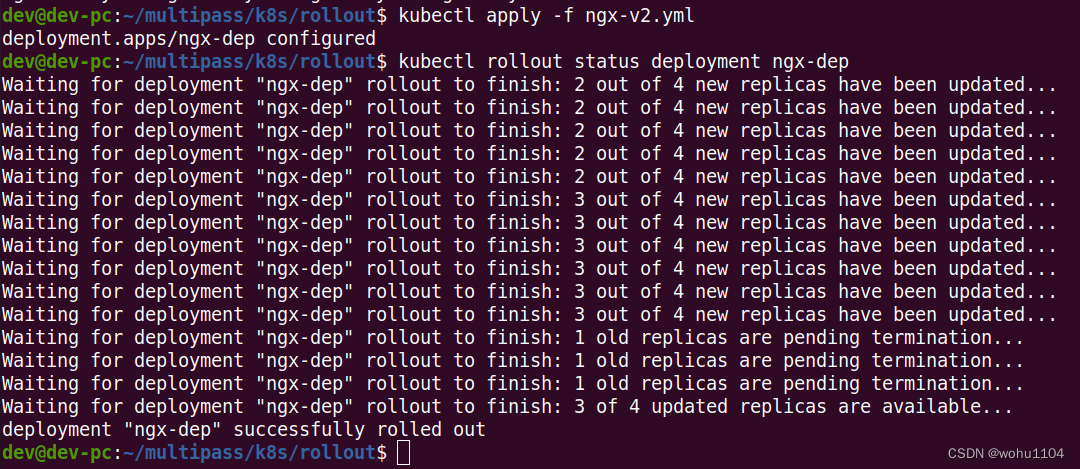
After the update is complete, if you execute it again kubectl get pod, you will see that all Podhave been replaced with the new version "d575...", curlaccessed with Nginx, the output information also becomes "1.22.0":

If you look carefully kubectl rollout statusat the output information of , you can find that Kubernetesinstead of destroying all the old Podones and creating new ones at once Pod, you are creating new ones one by one Pod, and destroying the old ones at the same time Pod, so as to ensure that there are always enough Podrunning , and there will be no The "empty window period" interrupts the service.
The process of increasing the number of new Poddata is a bit like "snowballing", starting from zero and getting bigger and bigger, so this is the so-called "rolling update" ( rolling update).
Use the command kubectl describeto see Podthe changes more clearly:
kubectl describe deploy ngx-dep
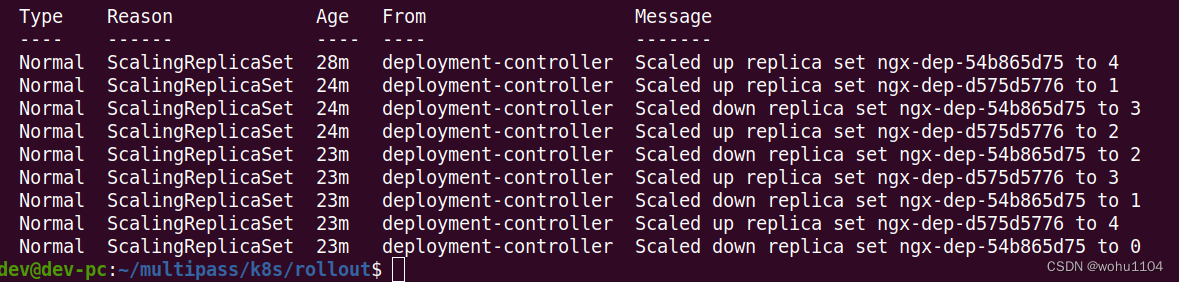
1. At the beginning, the number of V1 Pods (ie ngx-dep-54b865d75) is 4;
2. When the "rolling update" starts, Kubernetescreate 1 V2 Pod (ie ngx-dep-d575d5776), and put the V1 Pod The number is reduced to 3;
3. Then increase the number of V2 Pods to 2, and the number of V1 Pods becomes 1;
4. Finally, the number of V2 Pods reaches the expected value of 4, and the number of V1 Pods becomes 0. The entire update The process is over.
Seeing this, do you understand a little bit? In fact, "rolling update" is two simultaneous "application scaling" operations Deploymentcontrolled . The old version shrinks to 0, and the new version expands to the specified value at the same time. The process of ebb and flow".
I drew a picture of this rolling update process, you can refer to it for further experience:

3. Manage App Updates
KubernetesThe "rolling update" function of the . ?
To solve these two problems, we still have to use kubectl rolloutthe command .
In the process of applying the update, you can use kubectl rollout pauseto , check, modify Pod, or test and verify, and use it kubectl rollout resumeto .
These two commands are relatively simple, so I won't introduce them more. It should be noted that they are only supported Deploymentand cannot be used on DaemonSetand StatefulSetabove (the latest 1.24 supports the rolling update of StatefulSet).
For the problems after the update, Kuberneteswe provide us with "regret medicine", that is, the update history. You can check the previous update records and roll back to any position, which is very similar to the version control software we develop commonly used such as Git.
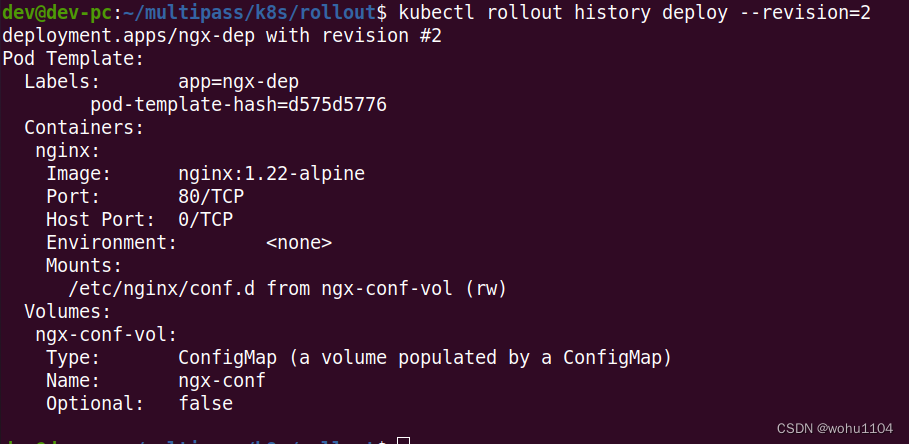
The command to view the update history is kubectl rollout history:
kubectl rollout history deploy ngx-dep

It will output a version list, because we Nginx Deploymentcreate a version and update another version, so there will be two historical records here.
kubectl rollout historyBut the useful information output by the list is too little, you can add parameters --revisionafter the command to view the detailed information of each version, including labels, image names, environment variables, storage volumes, etc., through which you can get a general understanding of each version Which key fields have changed:
kubectl rollout history deploy --revision=2
Suppose we think that the newly updated nginx:1.22-alpine is not good, and if we want to roll back to the previous version, we can use the command kubectl rollout undoor add parameters --to-revisionto roll back to any historical version:
kubectl rollout undo deploy ngx-dep
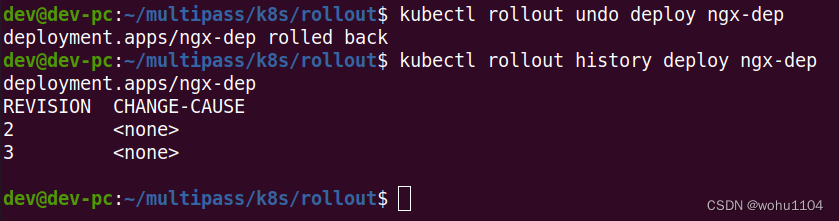
kubectl rollout undoThe operation process of is actually kubectl applythe same as that of , and the implementation is still "rolling update", except that the old version Podtemplate is used to shrink Podthe number of to 0, and at the same time Podexpand the old version to the specified value.
I also drew a picture of the "version downgrade" process from V2 to V1, which is exactly the same as the "version upgrade" process from V1 to V2, the only difference is the change direction of the version number:

4. Add update description
Do you feel kubectl rollout historythat the list of versions of is a bit too simple? There is only one version update sequence number, but CHANGE-CAUSEwhy is always displayed as? Can you add explanation information every time you update it like Git?
This is of course possible, and the method is very simple, we only need Deploymentto metadataadd a new field to the annotations.
annotationsThe meaning of the field is "comment" and "comment". The form is labelsthe same as Key-Value, both add some extra information to APIthe object , but the usage is very different.
annotationsThe added information is generally used for variousKubernetesinternal objects, a bit like "extended attributes";labelsIt mainly facesKubernetesexternal users and is used to screen and filter objects.
If we use a simple metaphor, annotationsit is the product manual inside the box, labelsbut the label sticker outside the box.
With the help of OCP annotations, any additional information Kubernetescan be added to APIthe object . This is the typical OCP "opening and closing principle" in object-oriented design, which makes the object more extensible and flexible.
annotationsThe value in can be written arbitrarily, and Kubernetesthe incomprehensible ones will be ignored automatically Key-Value, but a specific field needs to be used to write an update description kubernetes.io/change-cause.
Let's do it, we create 3 versions of Nginxthe application , and add update instructions at the same time:
apiVersion: apps/v1
kind: Deployment
metadata:
  name: ngx-dep
  annotations:
    kubernetes.io/change-cause: v1, ngx=1.21
... ...
apiVersion: apps/v1
kind: Deployment
metadata:
  name: ngx-dep
  annotations:
    kubernetes.io/change-cause: update to v2, ngx=1.22
... ...
apiVersion: apps/v1
kind: Deployment
metadata:
  name: ngx-dep
  annotations:
    kubernetes.io/change-cause: update to v3, change name
... ...
It should be YAMLnoted metadatathat the part in is used to annotations.kubernetes.io/change-causedescribe the version update situation, which kubectl rollout history --revisionis easier to understand than to list a large amount of information in .
After using sequentially kubectl applyto create and update objects, take a little time in between to ensure that Podall have been established, and then use kubectl rollout historyto look at the update history:

5. Summary
Rolling update, it will automatically scale Podthe number , and can realize service upgrade or downgrade without user perception, making the originally complicated and difficult operation and maintenance work simple and easy.
KubernetesThe version applied in is not just the container image, but the entirePodtemplate. In order to facilitate processing, a digest algorithm is used to calculateHashthe value as the version number.KubernetesThe update application adopts a rolling update strategy, reducing the oldPodversion adding the new version at the same timePod, ensuring that the service is always available during the update process.- The commands used to manage application updates are
kubectl rollout, and the subcommands includestatus,history, andundoso on. KubernetesThe update history of the application will be recorded. You can use tohistory --revisionview the detailed information of each version, and you can also add notes for each updatekubernetes.io/change-cause.
In addition, Deploymentthere are other fields in which can control the rolling update process in more detail. They are all in spec.strategy.rollingUpdate, such as maxSurge, maxUnavailableand other fields, which respectively control the maximum Podnumber of and maximum unavailable Podnumbers. Generally, the default value is enough .
DeploymentWhen the version is updated, ReplicaSetthe object , and different versions are created ReplicaSet, and ReplicaSetthen Podthe number is scaled by .
In addition to using kubectl applyto trigger the application update, you can also use any other APIway to modify the object, such as kubectl edit, kubectl patch, kubectl set imageand other commands.
kubenetesIt will not record all the update history, which is too wasteful of resources. By default, it will only keep the latest 10 operations, but this value can be revisionHistoryLimitadjusted .
6. Q&A
KubernetesWhat are the similarities and differences between the "rolling update" learned today and the "grayscale release" we often say?
"Rolling release" is a capability, and "grayscale release" is a function. k8sBased on the "rolling release" capability, it can podachieve "horizontal expansion/contraction", so as to provide similar "grayscale release" and "canary release" This function.
Gray scale release should be the coexistence of multiple application versions, distributed according to a certain ratio;
Rolling update is a release method that gradually replaces the "old" version with the "new" version; grayscale release is also called canary release. During the grayscale period, the "new" and "old" versions will exist at the same time. The publishing method can be used to implement A/B testing
YAMLVersion rollback can also be implemented by directly deploying the old version .kubectl rollout undoWhat are the benefits of the command?
In fact, before discussing this issue, we must first understand the controller model k8sof , and we also need to introduce a concept ReplicaSet, what does it mean? In fact, Deploymentit is not directly controlled Pod, Podbut the attribution object of is ReplicaSet, that is to say, what is Deploymentcontrolled ReplicaSet(the concept of version is actually We can equate to ReplicaSet), and then ReplicaSetcontrol Podthe number of . We can look at the specific content kubectl get rsthrough :

So at this time, it is easy for us to understand the difference between "version rollback" and "direct deployment of the old version of YAML". The version here is just taglike , this snapshot information can correctly help us record the most original information of the scene at that time, so we can ensure the correctness to the greatest extent by rolling back the version (this is k8s has already guaranteed this for us), otherwise if we pass The old yamldeployment does not necessarily guarantee whether the current yamlfile has been changed. The variables here are quite large, so directly deploying through yamlthe deployment greatly increases the risk of our deployment.
In the experimental environment, I do not have YAMLfiles . Sometimes I just make a small adjustment and release it. At this time undo, it is easier to use, and the version rollback/return is really realized.