How to finally implement the design into the code
Hi, I am 阿昌, what I learned to record today is about 如何将设计最终落地到代码content.
This requires splitting each component into an independent module project, and finally implementing the architecture design into the code.
The five key steps of componentized architecture reconstruction are:
- design
- guard
- decoupling
- move
- acceptance
Among them, design and maintenance are usually aimed at the entire system, while decoupling, moving and acceptance are performed on components.
The work of the previous design phase has been completed, so the next step is to complete the guarding steps to supplement the basic function automation test for the Sharing project as a safety net for refactoring.
1. Supplementary automated testing
The step of supplementary automated testing can 用户的核心使用场景be covered by following.
Taking the Sharing project as an example, the user's main operation is to log in to the system, and then view messages, files, and personal account information.
Comb these main scenarios into a large-scale test of 4 UIs as the basic 冒烟测试. Following are 4 use cases.
- The user opens the application and enters the correct account password to log in successfully.
- When the user enters the main page and switches to the message page, the message list information can be displayed normally.
- When the user enters the main page and switches to the file page, the file list information can be displayed normally.
- When the user enters the main page and switches to the account page, the logged-in personal information can be displayed normally.
Next, turn these 4 core use cases into automated test cases.
@Test
public void show_login_success_when_input_correct_username_and_password() {


    ActivityScenario.launch(LoginActivity.class);
    onView(withId(R.id.username)).perform(typeText("[email protected]"));
    onView(withId(R.id.password)).perform(typeText("123456"));
    Intents.init();
    onView(withId(R.id.login)).perform(click());
    intended(allOf(
            toPackage("com.jkb.junbin.sharing"),
            hasComponent(hasClassName(MainActivity.class.getName()))));
}

@Test
public void show_message_ui_when_click_tab_messsage() {


    //given
    ActivityScenario<MainActivity> scenario = ActivityScenario.launch(MainActivity.class);
    scenario.onActivity(activity -> {


        //when
        onView(withText("消息")).perform(click());
        //then
        onView(withText("张三共享文件到消息中...")).check(isVisible());
        onView(withText("1.pdf")).check(isVisible());
        onView(withText("2021-03-17 14:47:55")).check(isVisible());
        onView(withText("李四共享视频到消息中...")).check(isVisible());
        onView(withText("2.pdf")).check(isVisible());
        onView(withText("2021-03-17 14:48:08")).check(isVisible());
    });
}

@Test
public void show_show_file_ui_when_click_tab_file() {


    //given
    ActivityScenario<MainActivity> scenario = ActivityScenario.launch(MainActivity.class);
    scenario.onActivity(activity -> {


        //when
        onView(withText("文件")).perform(click());
        //then
        onView(withText("Android遗留系统重构.pdf")).check(isVisible());
        onView(withText("100.00K")).check(isVisible());
        onView(withText("研发那些事第一季.mp4")).check(isVisible());
        onView(withText("9.67K")).check(isVisible());
    });
}

@Test
public void show_account_ui_when_click_tab_account() {


    //given
    ActivityScenario<MainActivity> scenario = ActivityScenario.launch(MainActivity.class);
    scenario.onActivity(activity -> {


        //when
        onView(withText("个人")).perform(click());
        //then
        onView(withText("test")).check(isVisible());
    });
}
For detailed use case design and writing, you can refer to the method of writing automated tests in Automated Testing and How to Improve the Testability of Legacy System Code .
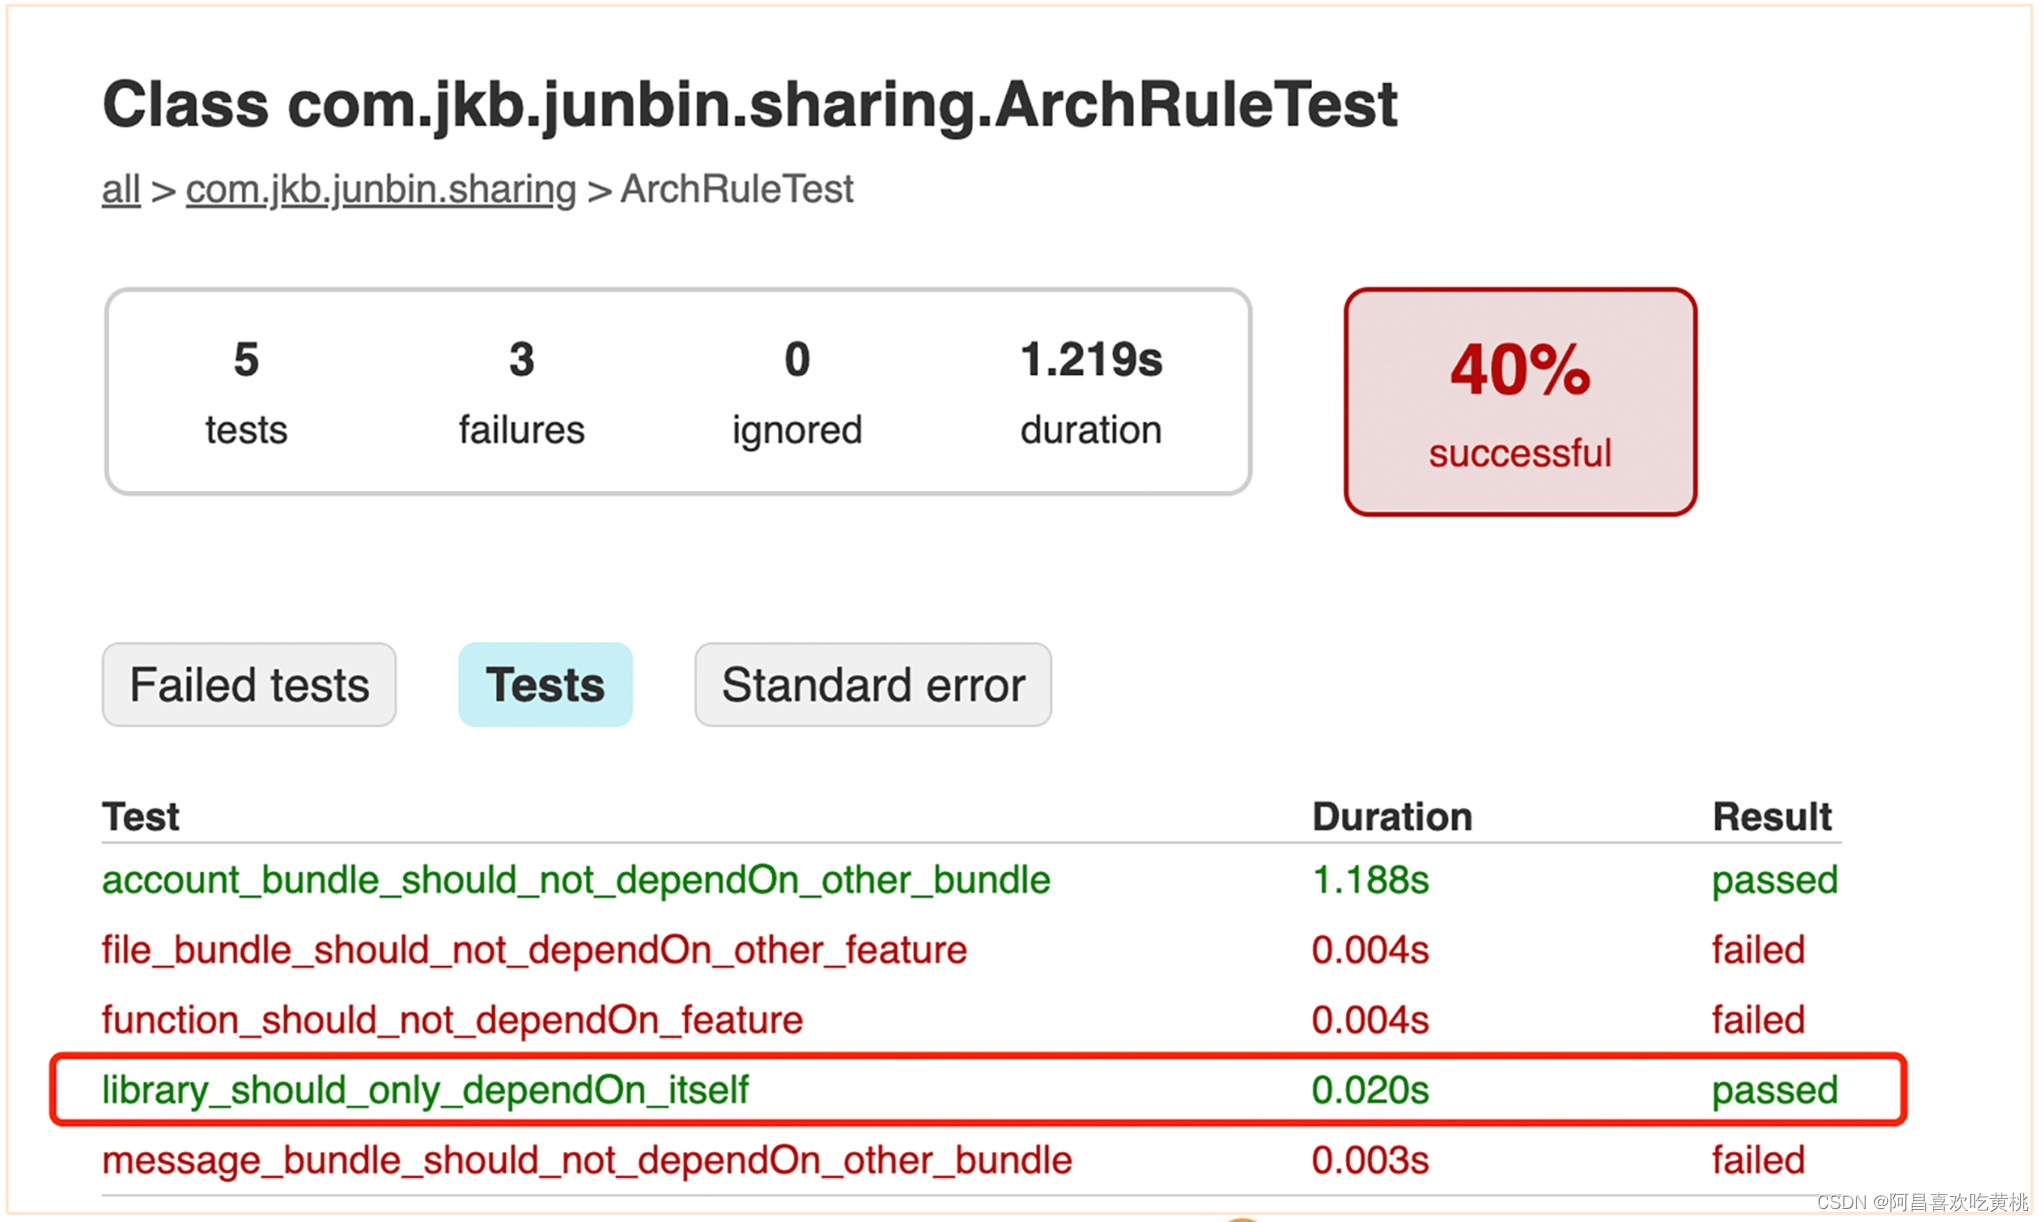
The execution result of the use case is as follows.
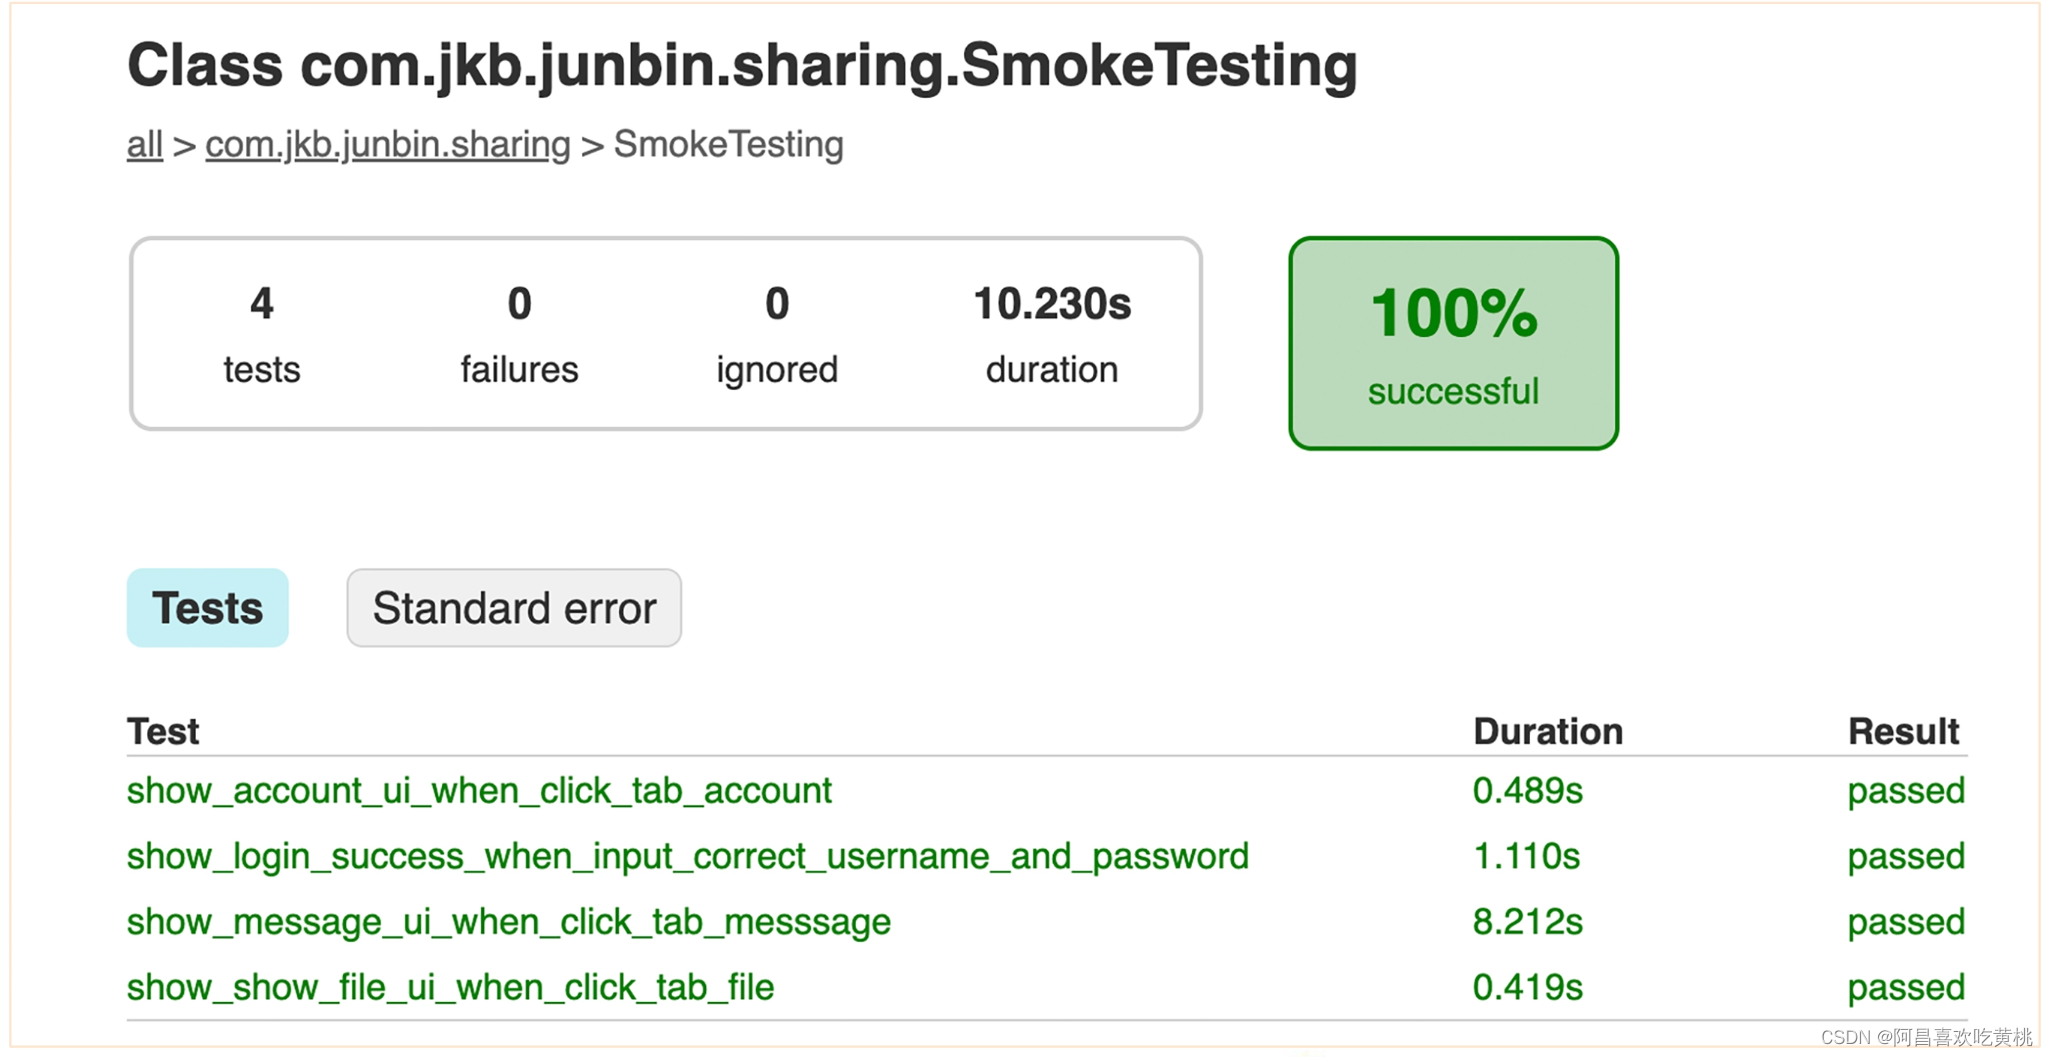
From the execution of the report, it can be seen that the execution time of a round of basic smoke tests is about 10s, and these tests can be run frequently to get feedback during the refactoring process. Once it is found that the code modification has broken the original logic, it can be repaired immediately.
In the step of covering the guard test, in theory, the more scenes are covered, the higher the quality of the guard will be. However, the cost of doing so will also increase, so it is recommended to at least cover the user's core usage scenarios and operation paths in this step.
With the basic smoke guard test in place, it's time to start 动手解耦.
With so many components, which components should we start with?
The suggestion is to press 从下往上的优先级开始解耦, because 上层的组件依赖下层的组件, it must be 下层组件独立released first.
2. Log component decoupling
Following the principle of decoupling from bottom to top, let's first look at the decoupling of log components.
The following screenshots are the results of scanning based on dependency analysis.
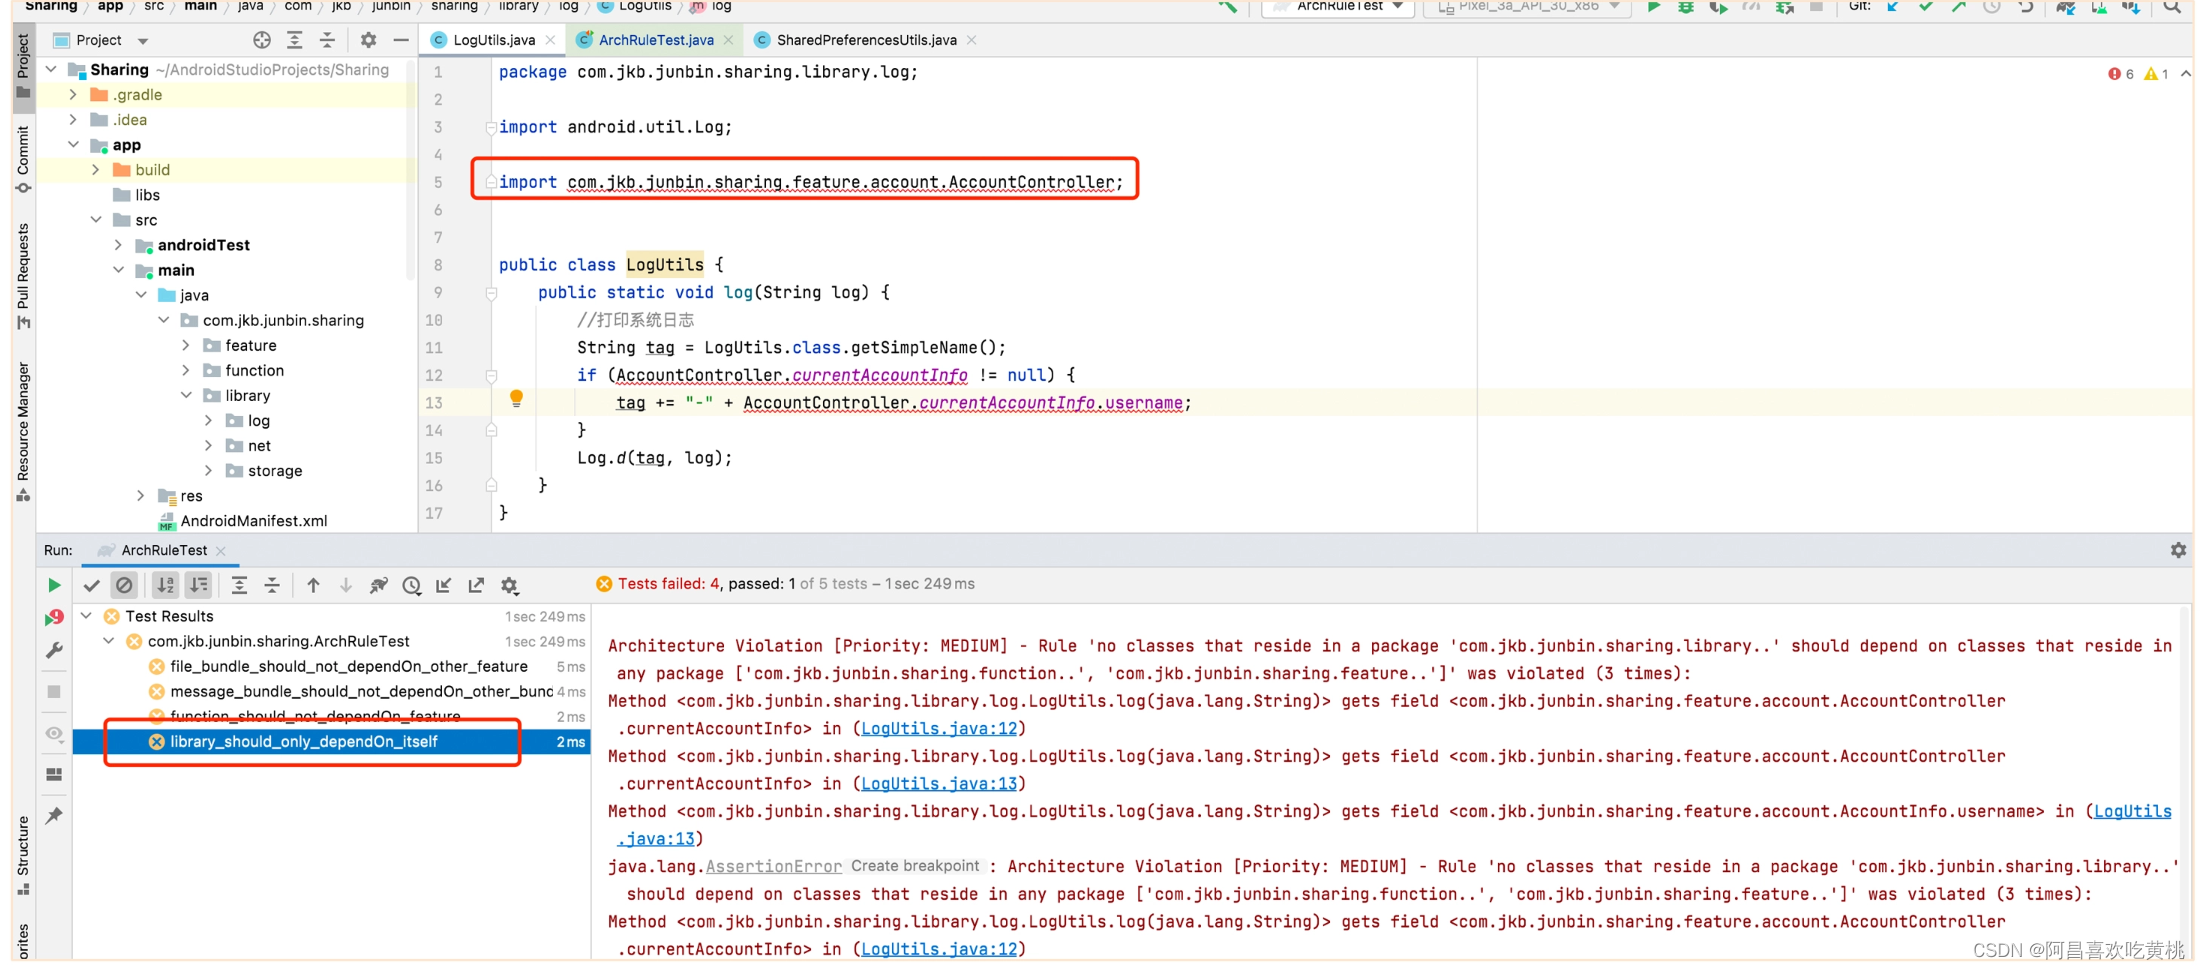
As can be seen from the figure, the main problem of the current log component is 依赖了账户组件账户信息.
The LogUtils class relies on the username property in the AccountController class.
For this abnormal dependency, you can use the method of extracting parameters to decouple, so that the log component only depends on the username of the string type. The specific security reconstruction is as follows.

After the decoupling is complete, you need to re-run the dependency analysis tool to confirm that the architecture constraints are met, and then you can move the file.
If you have not created a corresponding module, you need to create a new module first.
After the establishment is complete, you need to add the module's dependencies in the gradle configuration file.
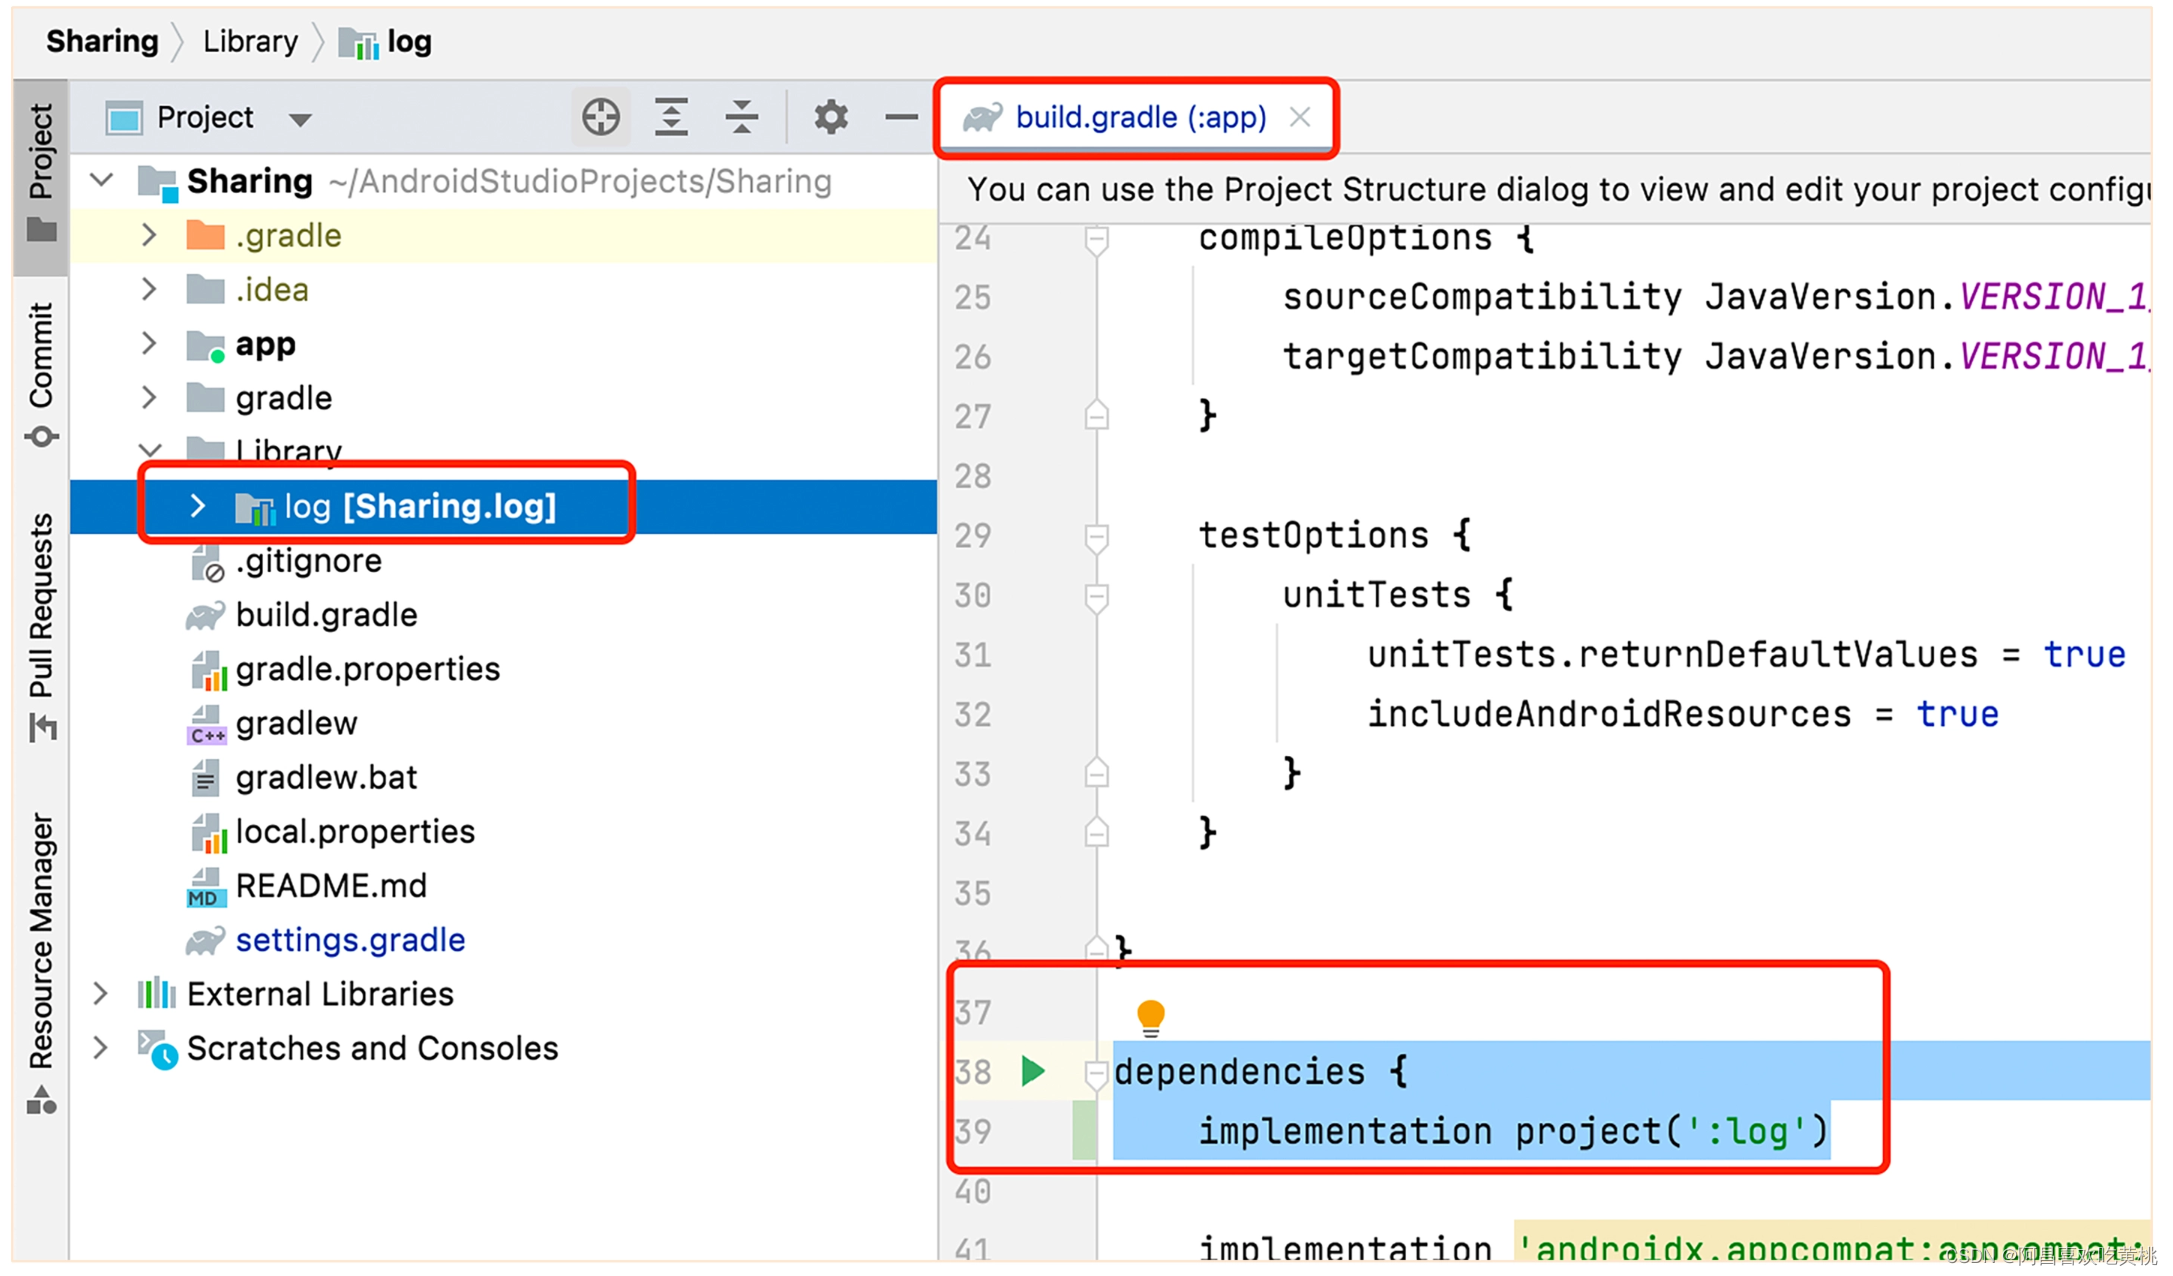
Next, you can use the Modularize function to move files.

After the move is complete, the last step is 验收阶段to ensure that the compilation passes and the automated guard test runs.
The following screenshots show that the execution of the technical component architecture guard case has passed, and the basic smoke test function has passed the acceptance.

Because the moving and acceptance steps of each component are similar to the log component mentioned here, the difference is mainly in the analysis of decoupling and release of dependencies, so when learning how to decouple other components later, the main demonstration of the decoupling process.
3. Decoupling of base components
Let's look at the decoupling of the base components , and analyze it in conjunction with the screenshots of the scan results of the dependency analysis.
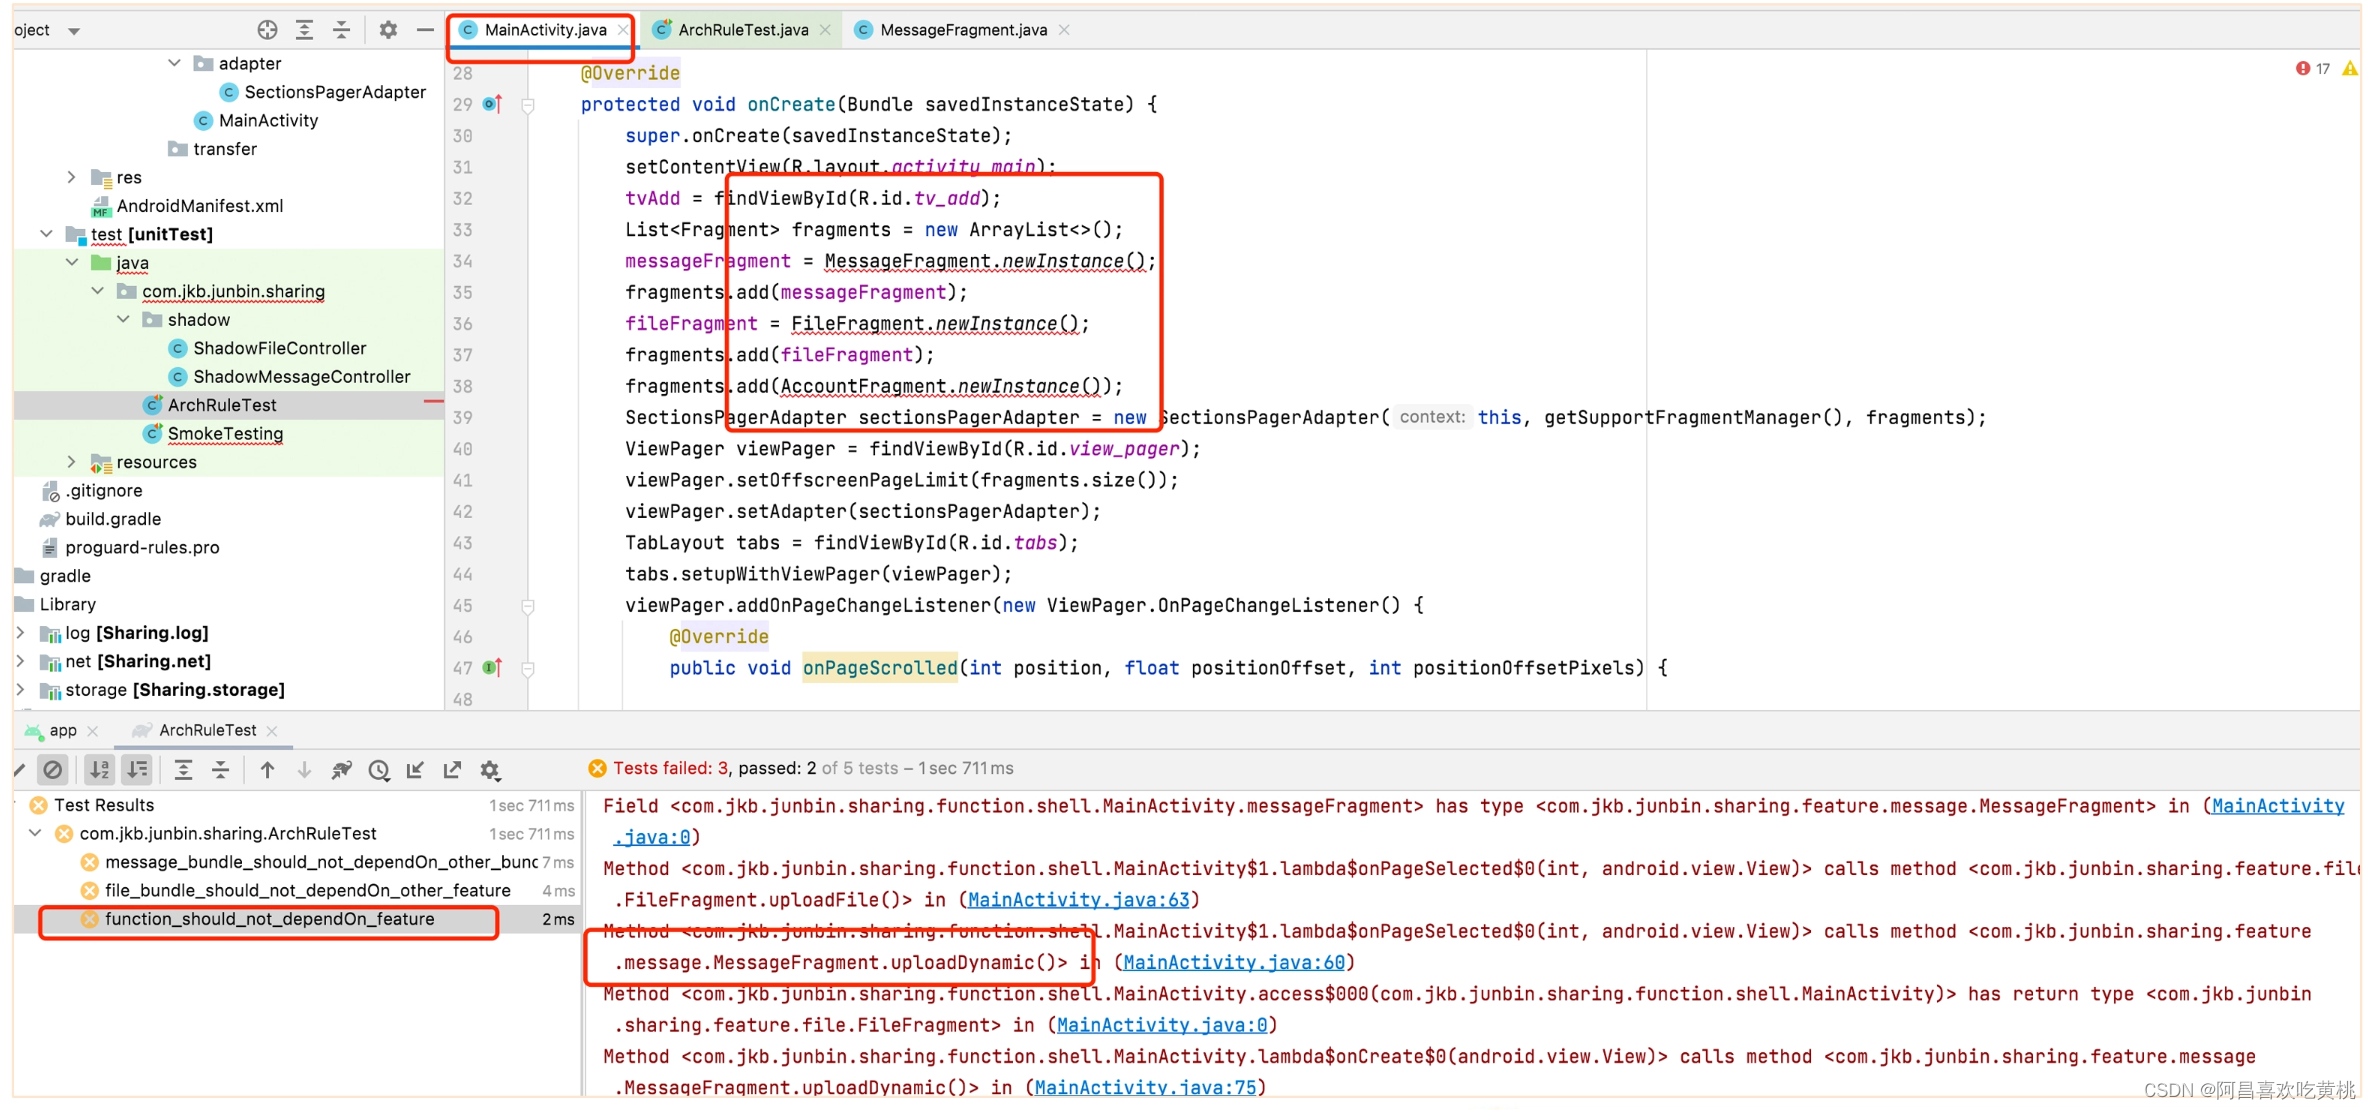
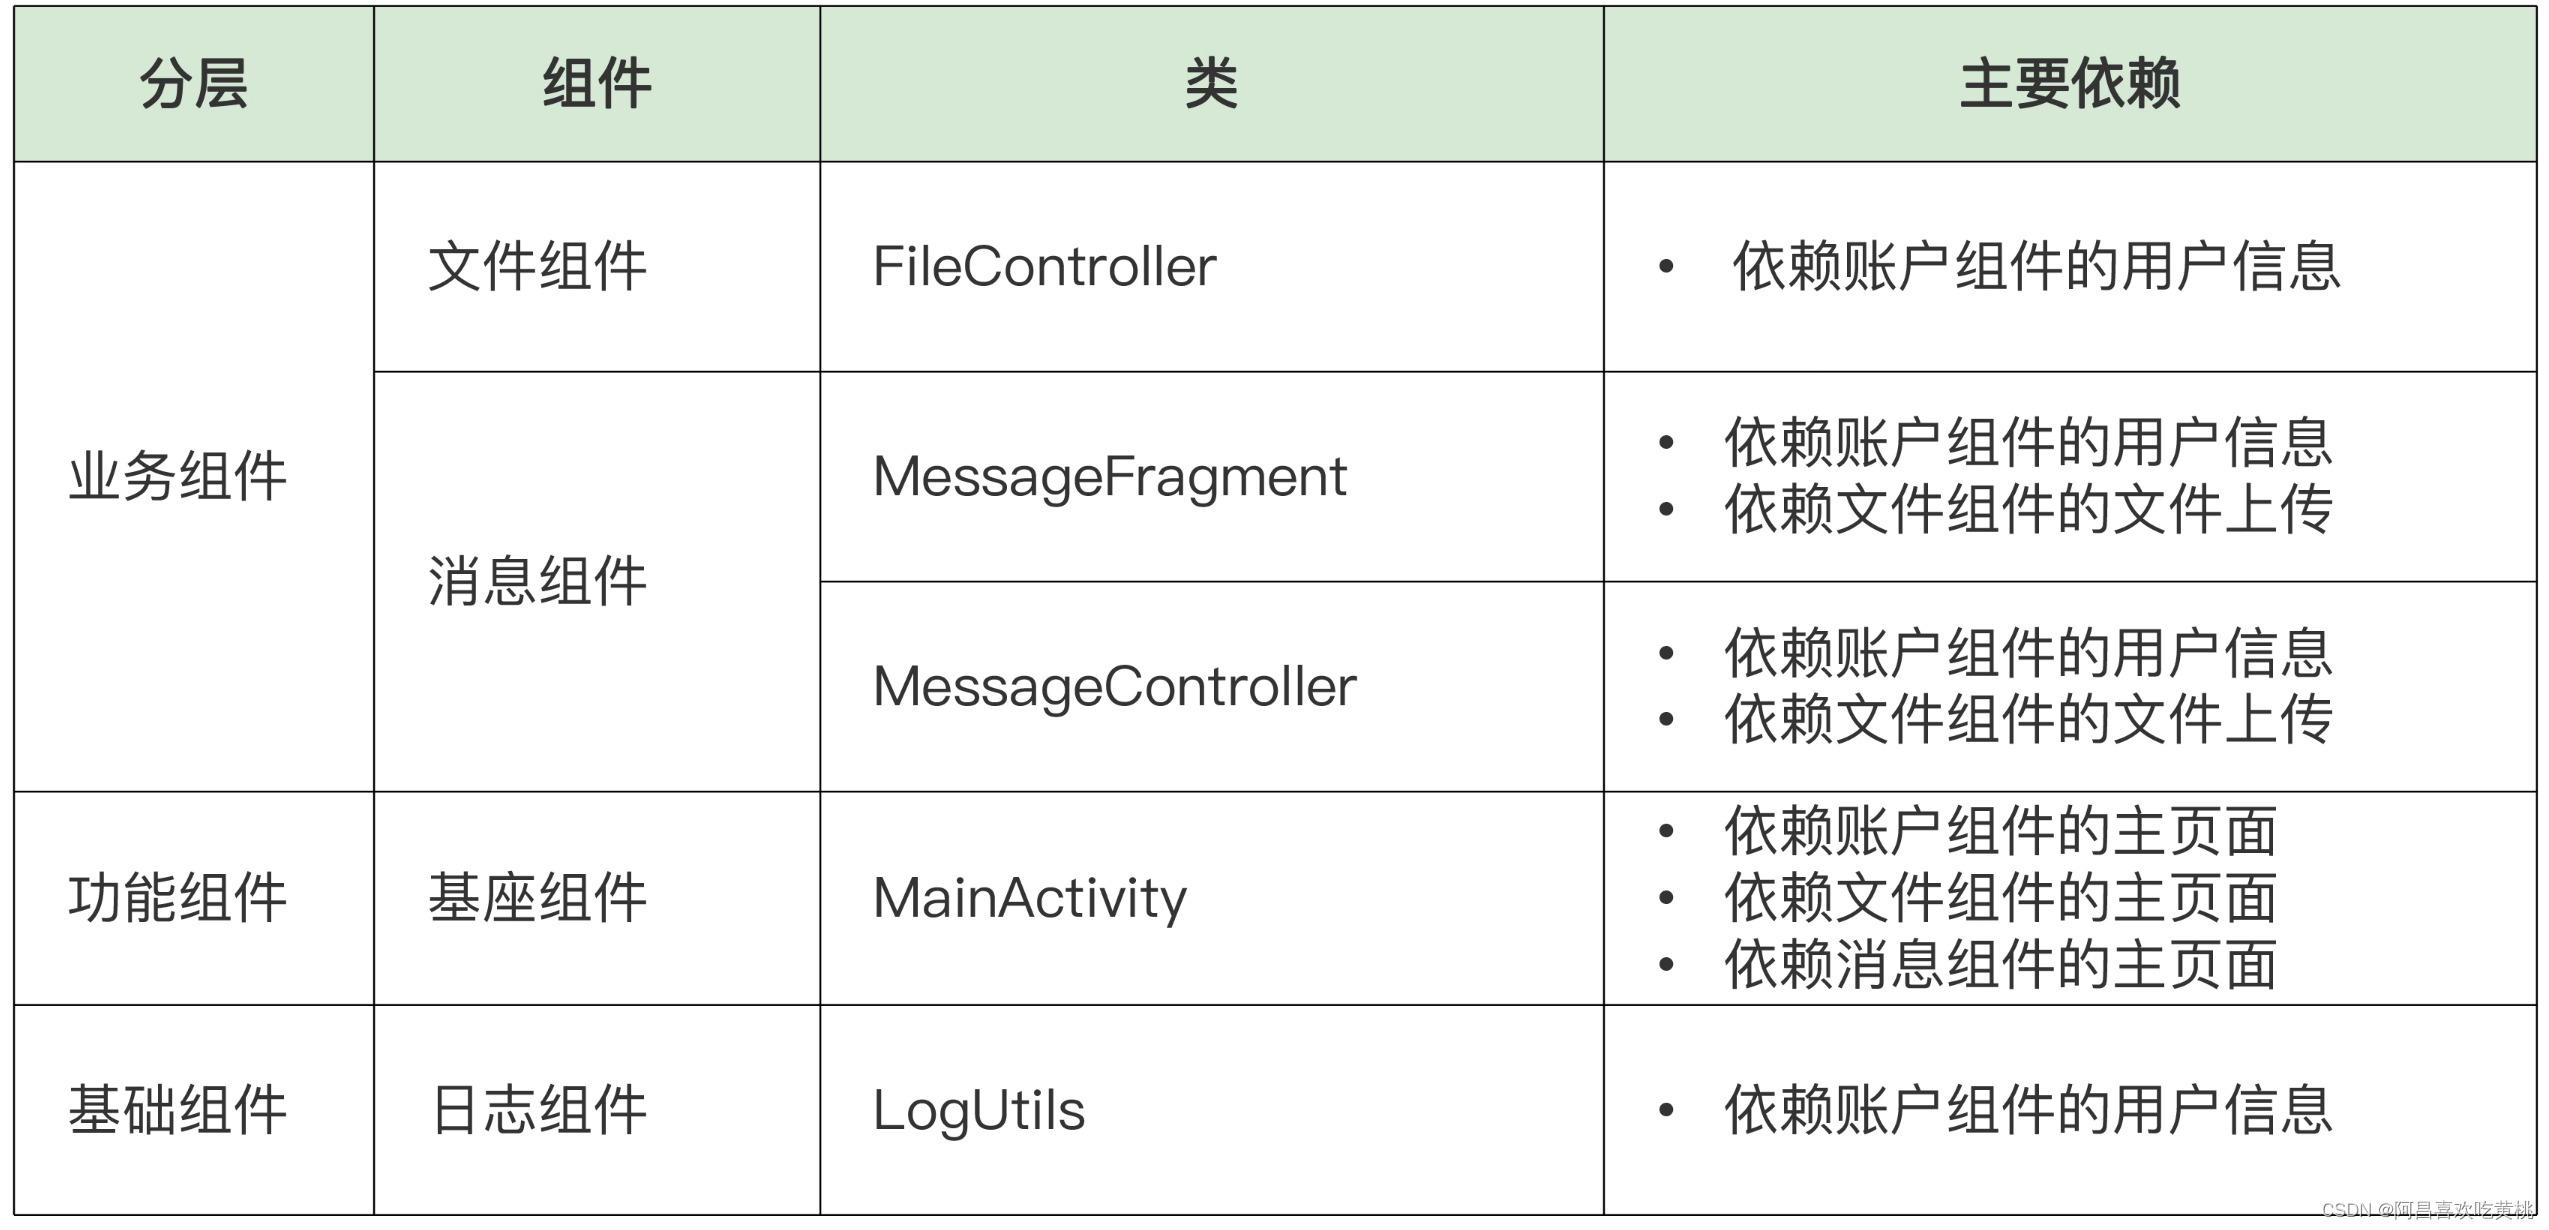
According to the scanning results of dependency analysis, it can be seen that the current base component mainly depends on the pages of various business components and some related publishing functions.
MainActivity relies on Message Fragment, FileFragment and AccountFragment. In addition, it also relies on the uploadDynamic method in MessageFragment and the uploadFile method in FileFragmnet. For page dependencies, you can use 路由的方式to decouple the coupling.
Here it is first 反射的形式used for processing, specifically using the routing framework.

For the base component to rely on the specific behavior of the feature component, it can be used here 倒置的方式to let the feature component inject the behavior into the base component, so as to comply with the constraints of the architecture.
Take MainActivity calling the uploadDynamic method of MessageFragment as an example to deepen understanding.
First define the interface that triggers the click upload of the message module.
public interface IMessageAddClickListener {


    public void onClick();
}
Then adjust the place that originally relied on uploadDynamic to call the IMessageAddClickListener interface.

Finally, inject the concrete implementation into the base component in the message module.
//消息页面
((MainActivity) getActivity()).setMessageAddClickListener(() -> uploadDynamic());
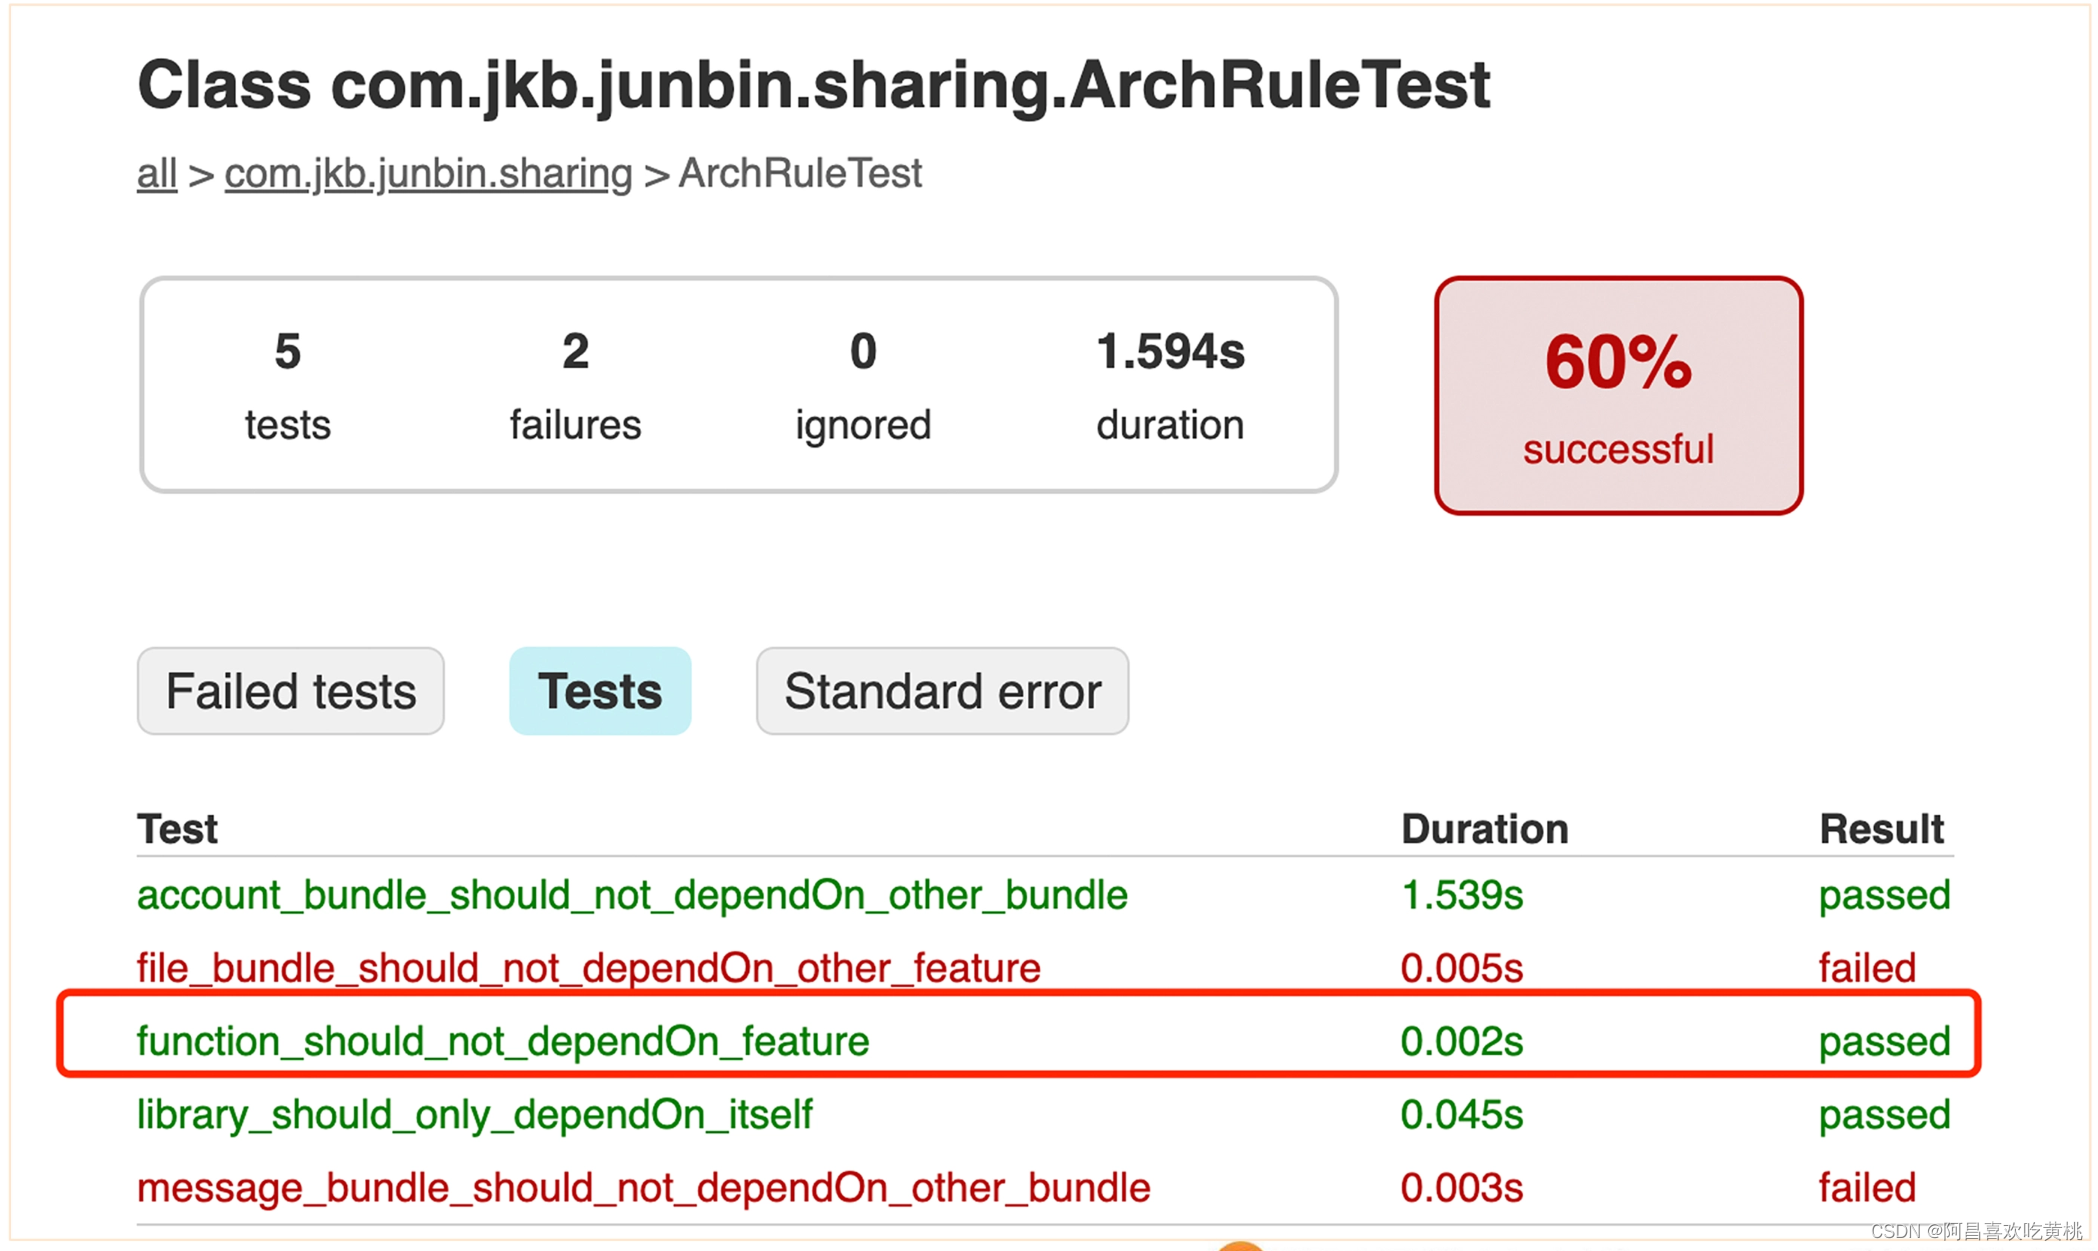
After the decoupling is complete, use the tool again to check. The result is shown in the figure below. It can be seen that the use case of the base component dependent feature component has passed.
4. Decoupling of file components
Take a look at the coupling of file components .
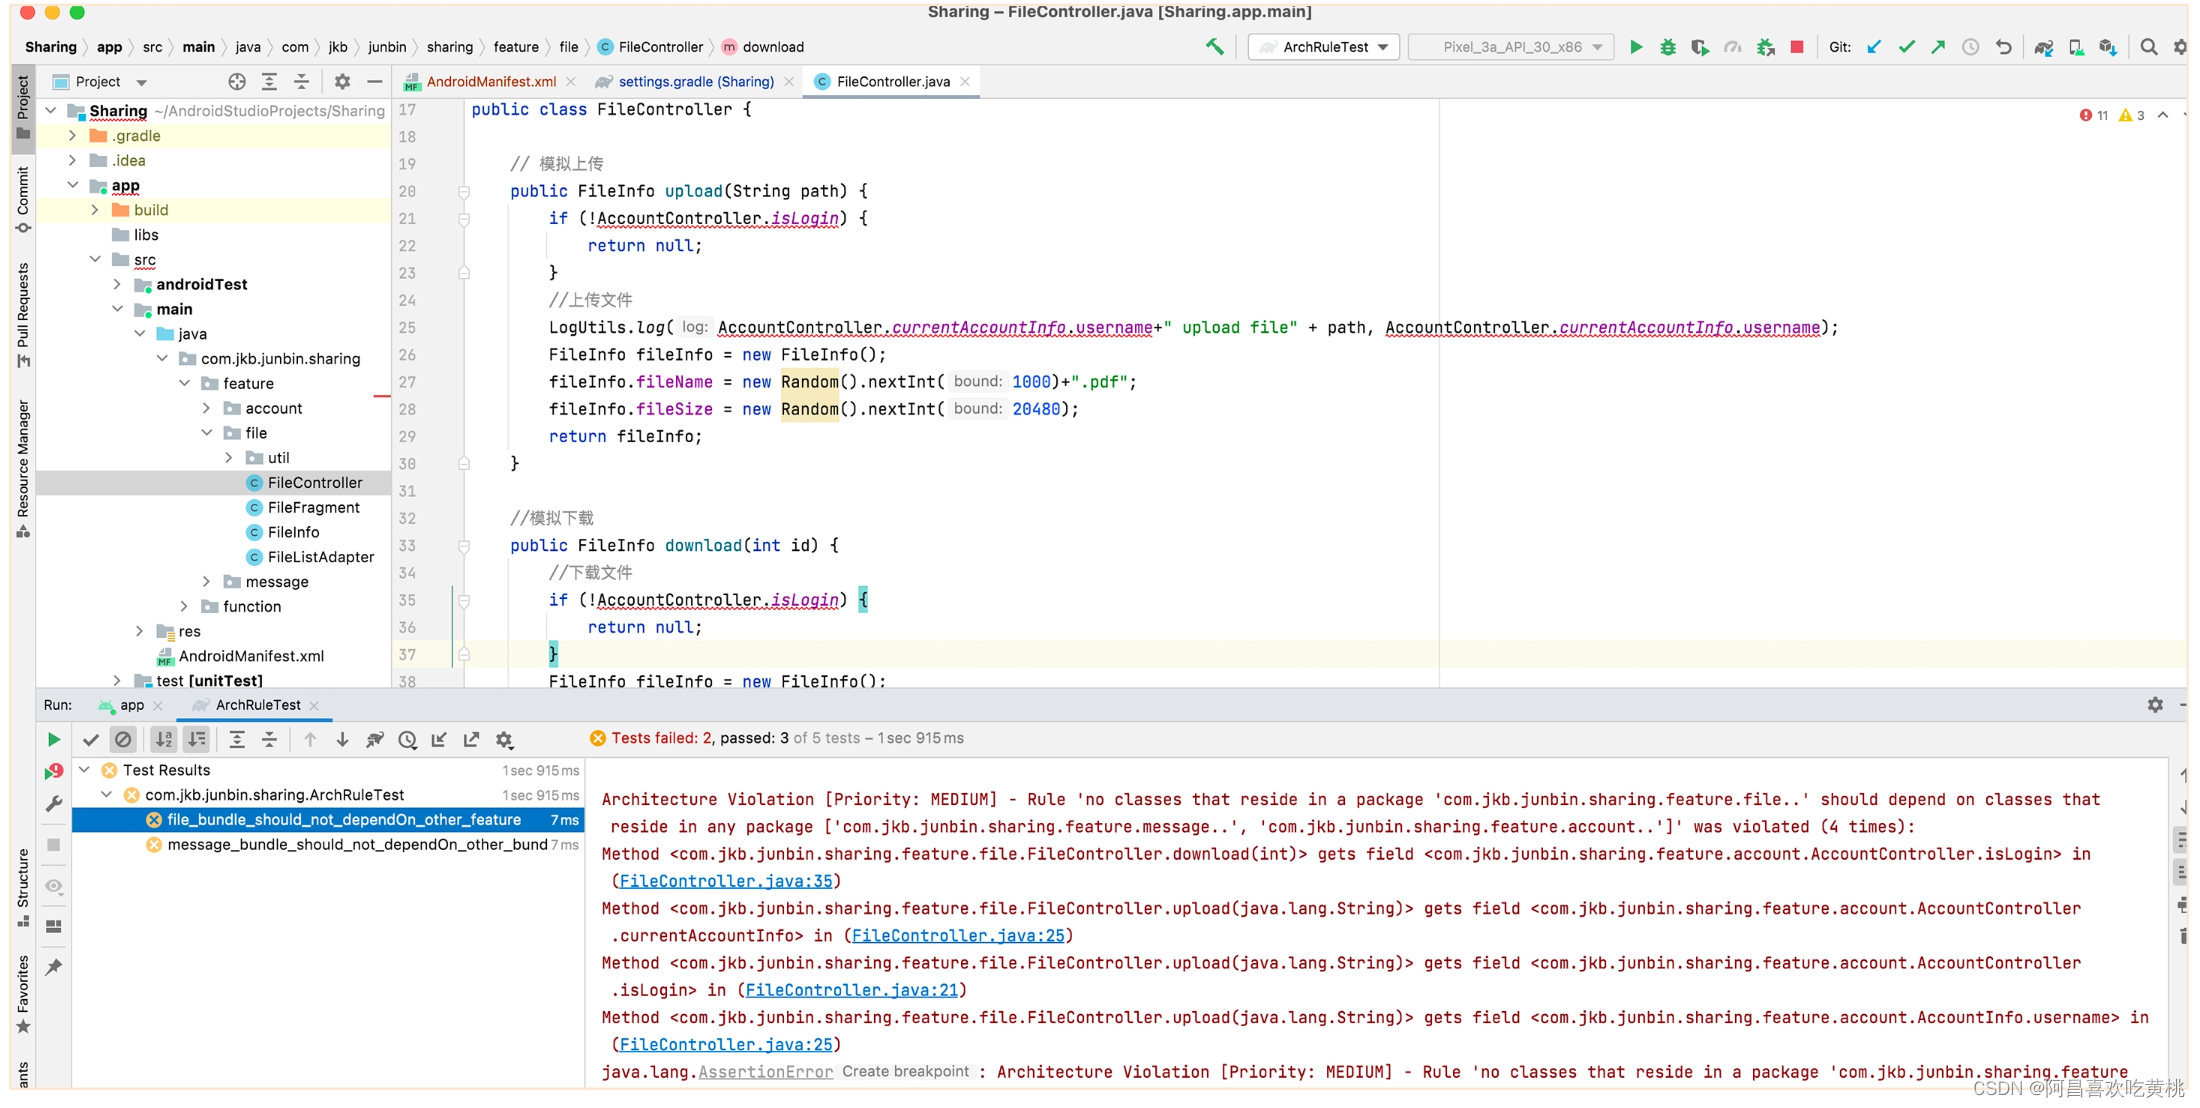
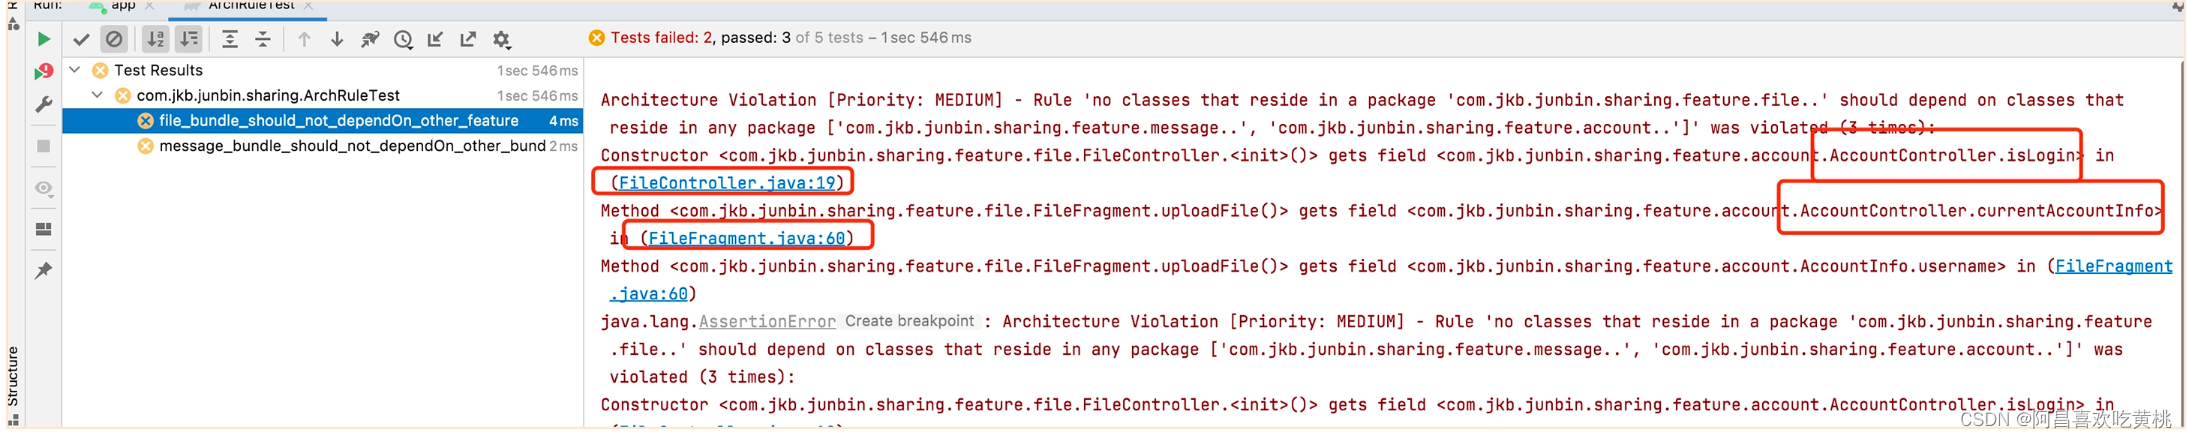
Similarly, according to the scanning results of dependency analysis, it can be seen that the upload and download functions of the current file component mainly rely on the personal information of the account component.
The FileController class depends on the username and isLogin properties in the AccountController class, and the FileFragment class also depends on the username property in the AccountController class.
When we talked about architecture design earlier (review how to carry out component analysis and design component division), it was mentioned that the file transfer function will be used by multiple feature components, so here we need to remove the dependency of the file component and account module, and also put The upload and download function of the file module is independent into a separate functional component.
The idea of refactoring here is to extract the code related to uploading and downloading into an independent FileTransfer class, then decouple it from the account module by extracting parameters, and finally move it into an independent functional component.
The specific reconstruction process is as follows.

After extracting the file transfer component, let's look at the dependencies of the file module again.
As shown in the figure below, currently FileController mainly relies on the isLogin login status of the account module, and FileFragmnet relies on the usename information of the account module.
For the coupling between feature components, you can use the method of extracting interfaces to decouple, and the specific operation is as follows.

Note that after the refactoring is completed, the injection of the interface should be implemented using the injection framework. Here, the reflection mechanism is also used to complete the injection of the implementation.
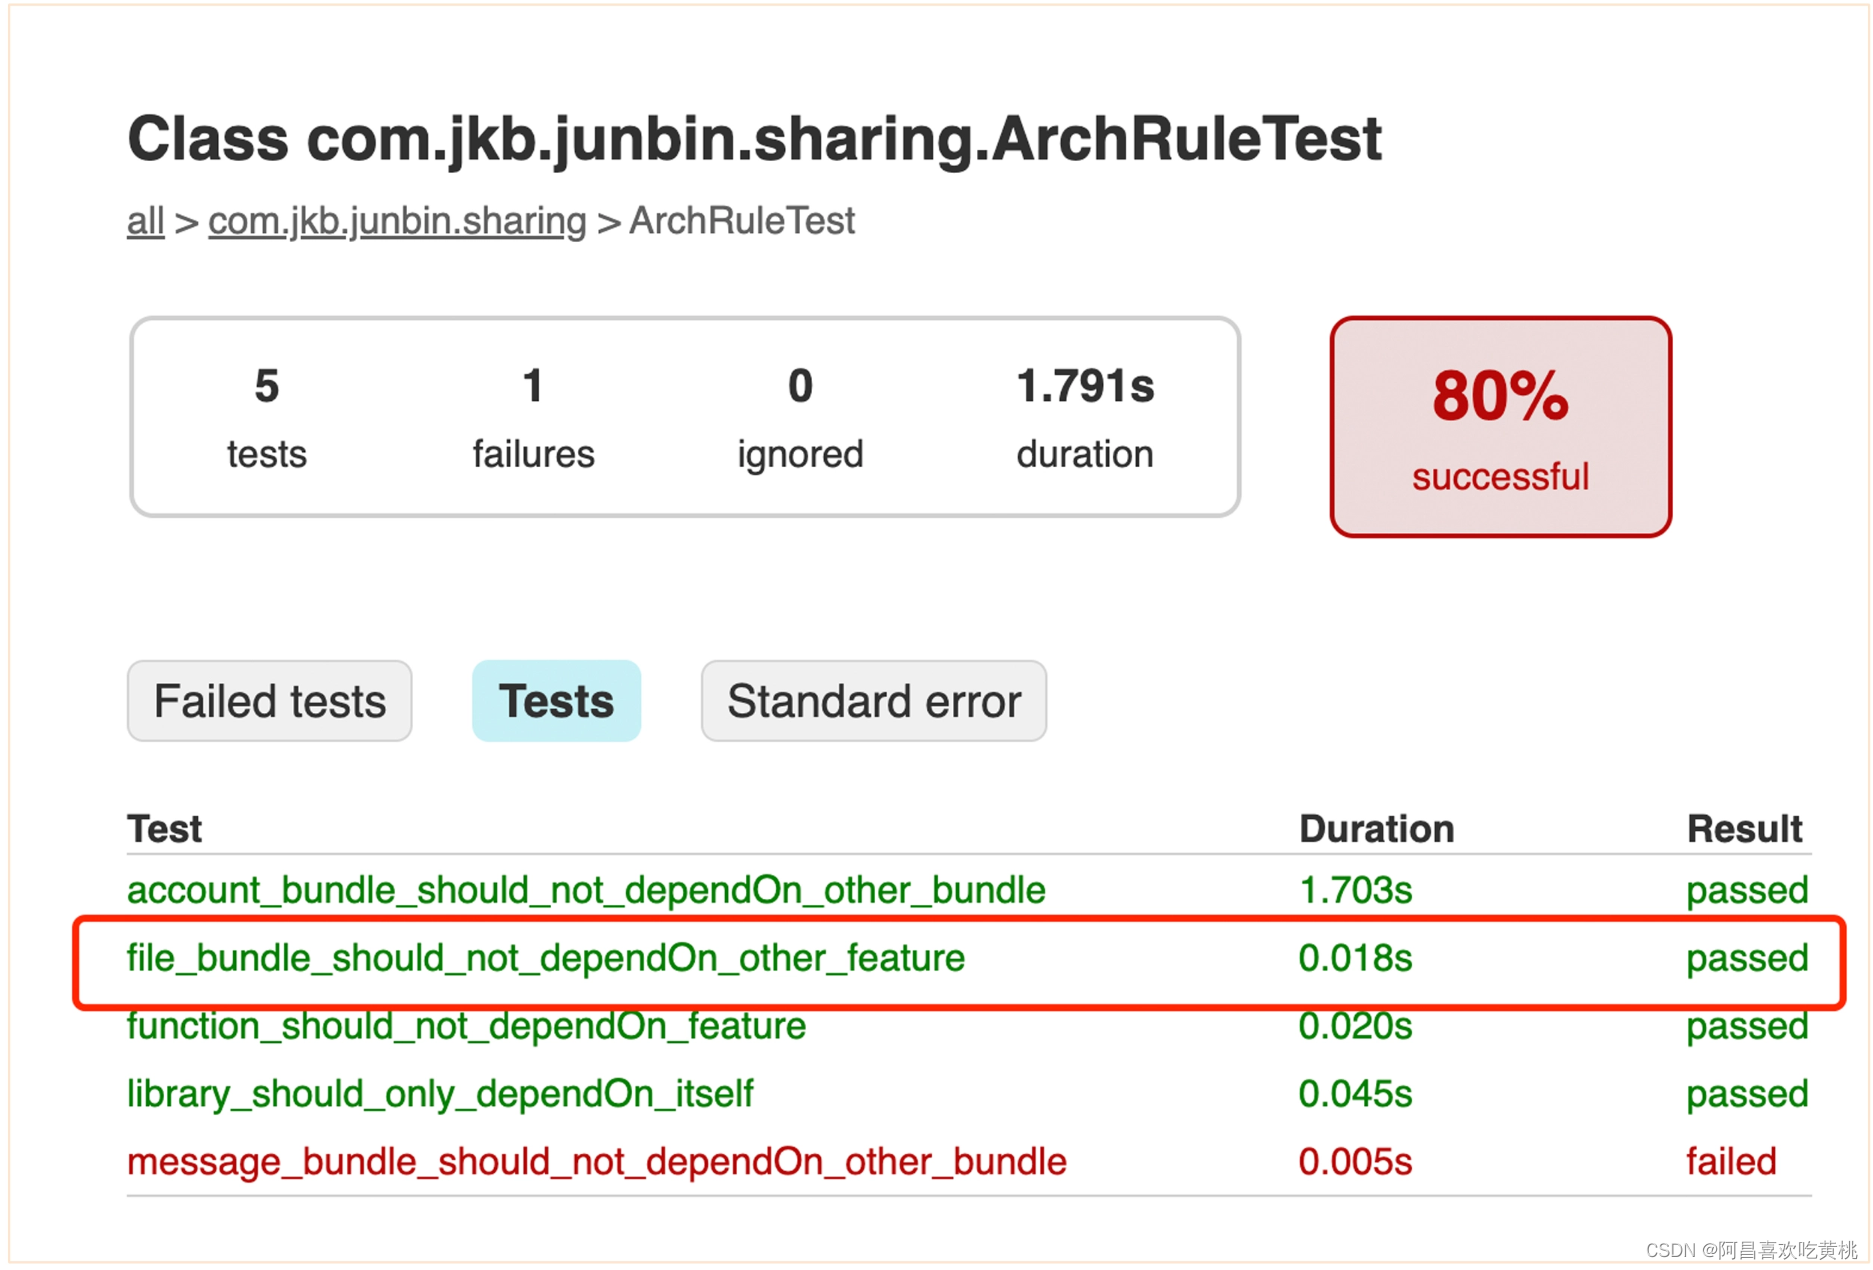
After the decoupling is complete, continue to use the tool to check. As shown in the figure below, the use case that the file feature component cannot depend on the account feature component has been run.
5. Decoupling of message components
See the coupling analysis of message components .
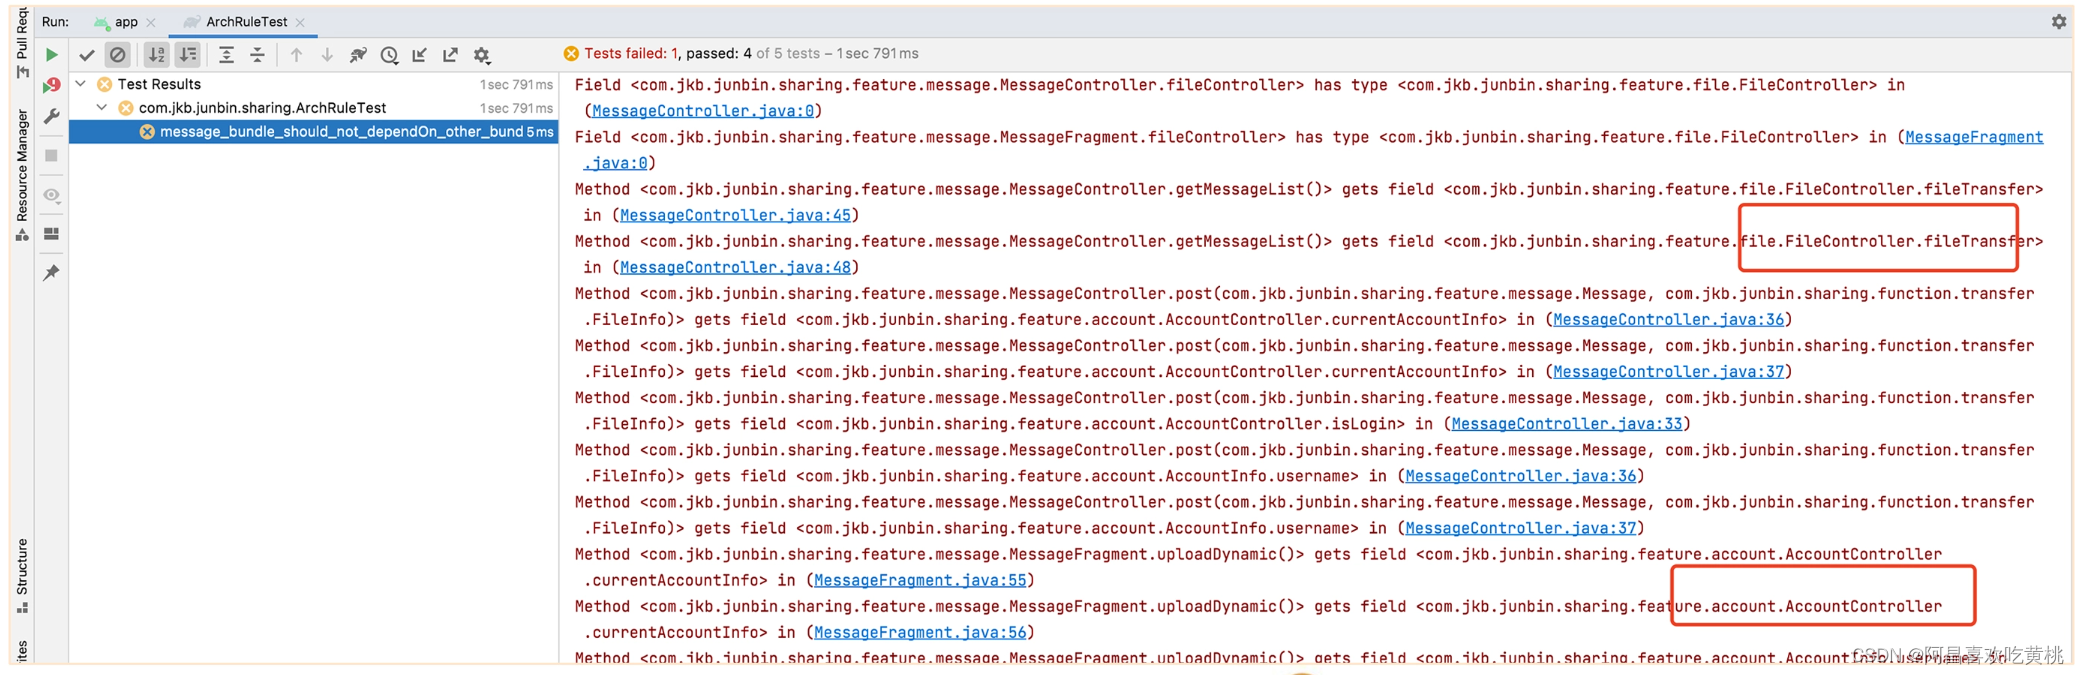
From the dependency analysis results in the figure above, it can be seen that the message module mainly depends on the upload and download function of the file module, and similar to the file module, it also depends on the account information of the account module. For the coupling with the file module, you can directly use the functional component of the file transfer module to decouple.
For the coupling of the account module, you can refer to the decoupling method of the file component, and use the IAccountState interface to decouple. The operation is similar to the previous components, and the demonstration will not be repeated here.
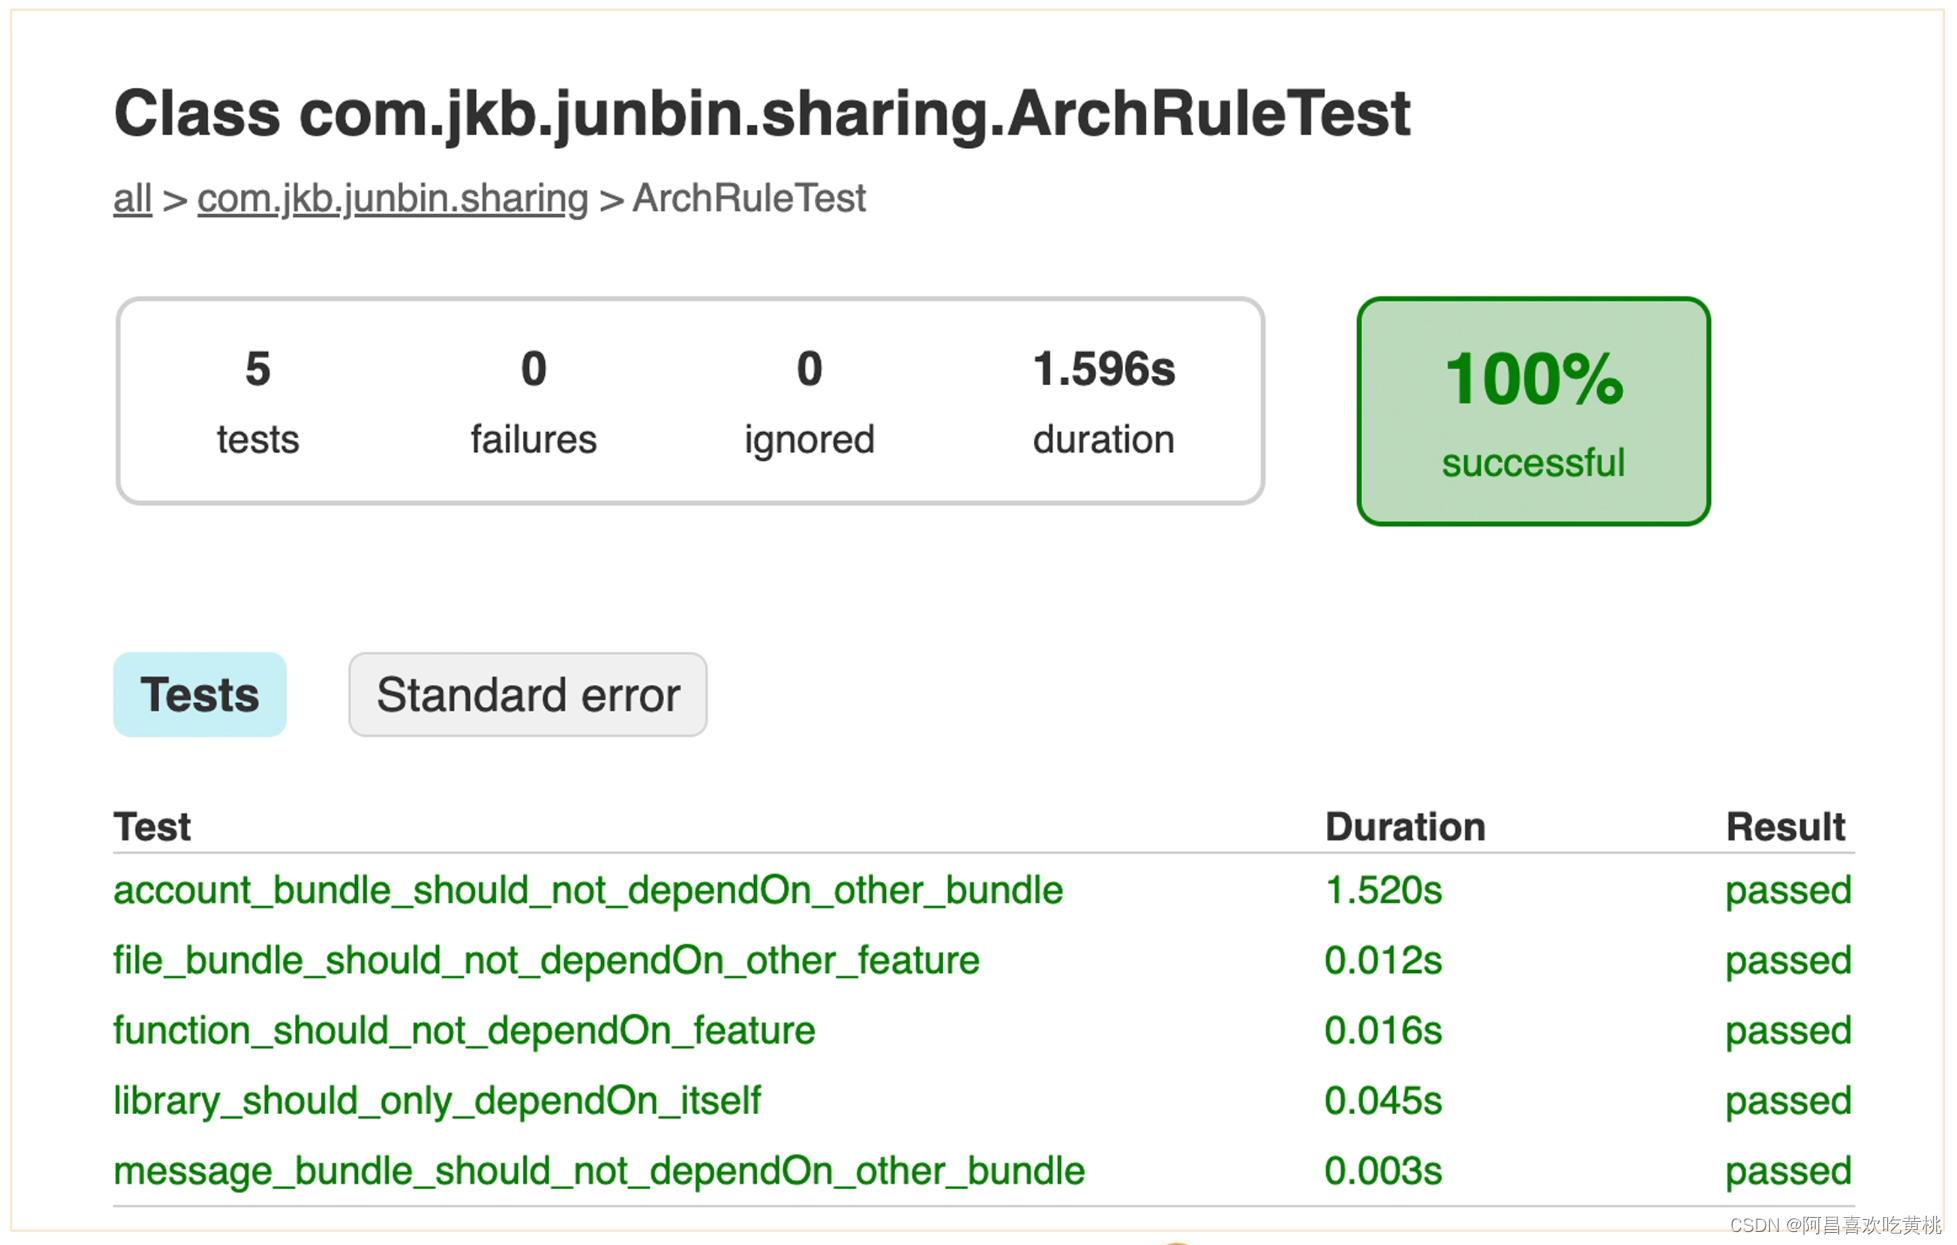
Finally, it can be seen that with the completion of the decoupling work, all the guardian use cases are finally executed.
6. Summary
The five steps of componentized architecture reconstruction will finally implement Sharing into the code according to the new architecture design.
Because the upper-level components depend on the lower-level components, in the process of refactoring, follow the order of the architecture from the lower layer to the upper layer, in order 结耦组件解耦.
Finally, let's take a look at the implementation of the architectural design diagram in the code.
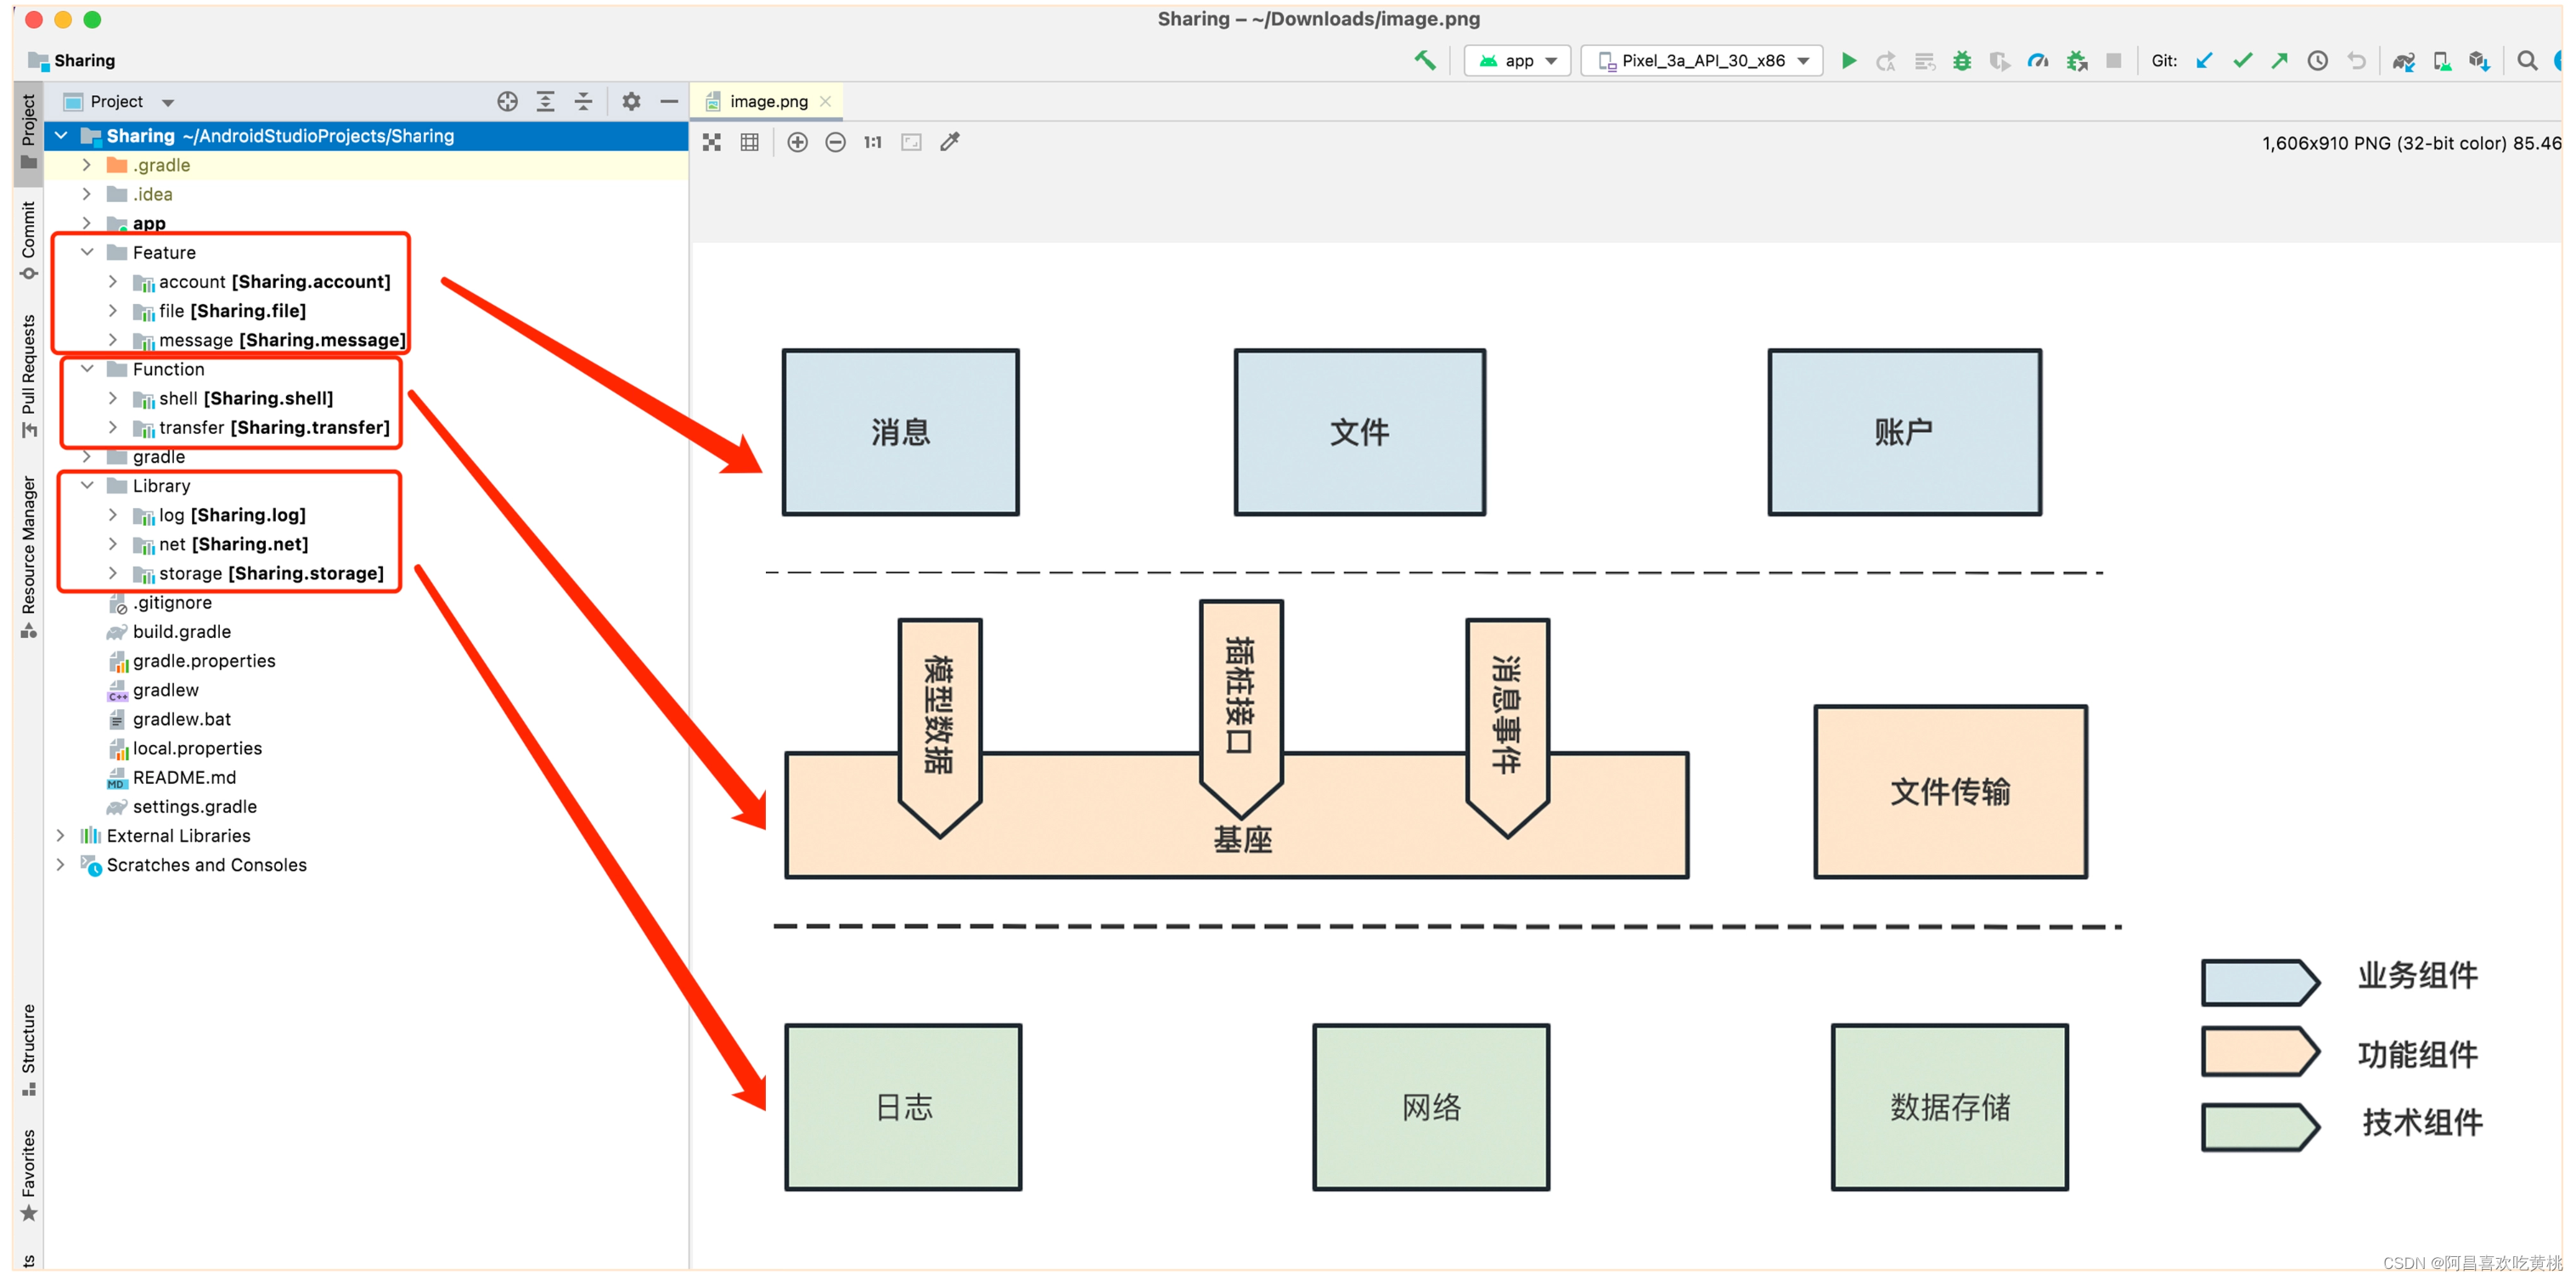
So far, let’s summarize the comparison before and after the refactoring of the component architecture.
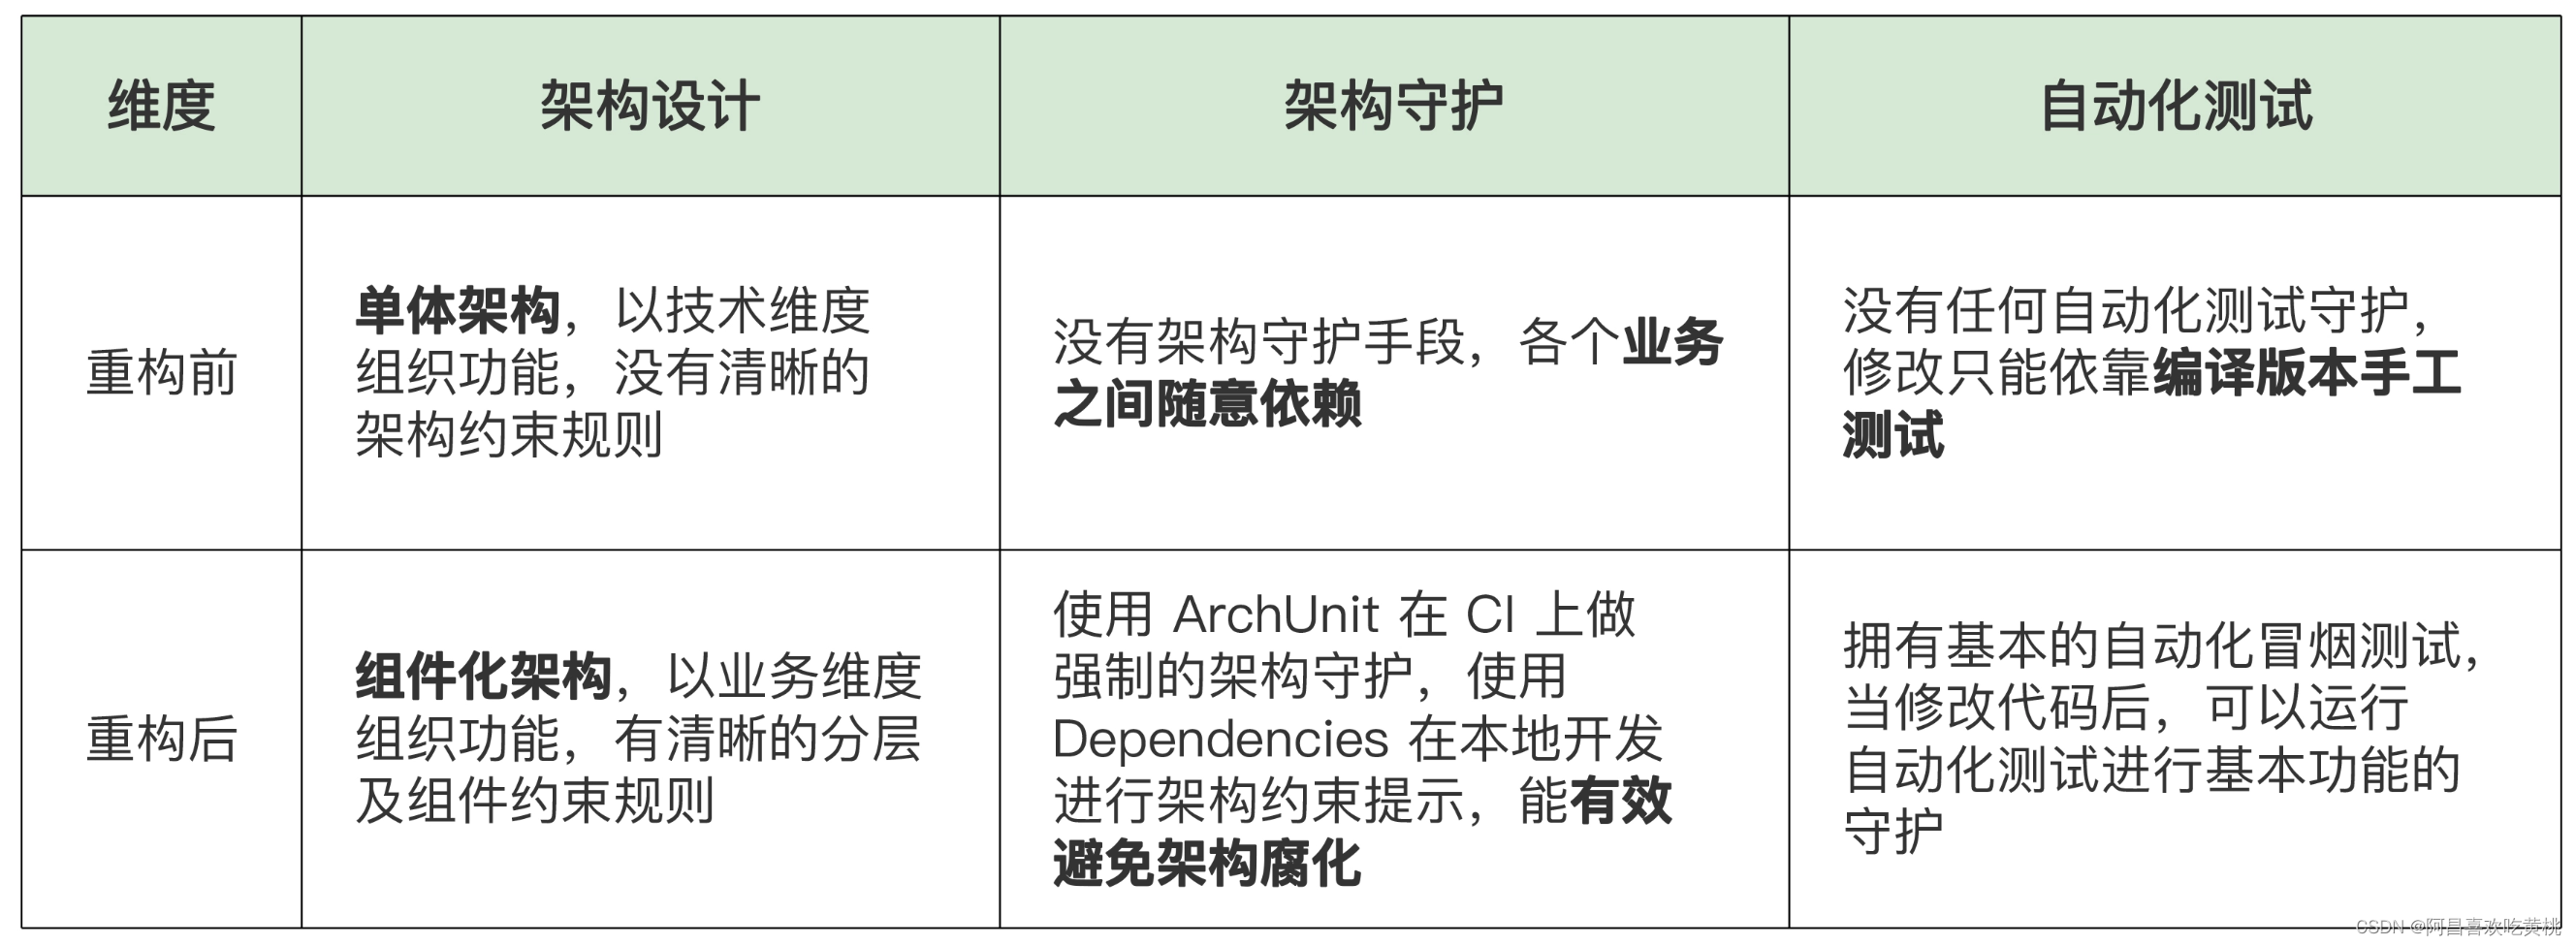
Through comparison, we found that the architecture design of the refactored Sharing project is clearer, and because of the addition of automated means to guard the architecture, architecture corruption can be effectively avoided.
At the same time, the addition of automated testing can also help us find problems earlier and realize the left shift of testing. When the base component is decoupled, it is used 反射to achieve decoupling of dependencies between pages.
When the file component is decoupled, reflection is also used to solve the problem of interface implementation injection. Although the use of reflection can achieve the purpose of decoupling, there are also a lot of repeated codes in the code.