Ant Design Vue2 calendar component a-calendar customizes the header to realize the previous month and the next month, and customize the cell content
foreword
The vue2 version adopted by Ant Design.
a-calendarComponent official document: https://1x.antdv.com/components/calendar-cn/
The original calendar component is in full-screen mode, and there is no quick switch between the previous month and the next month in the head. So it needs a makeover.
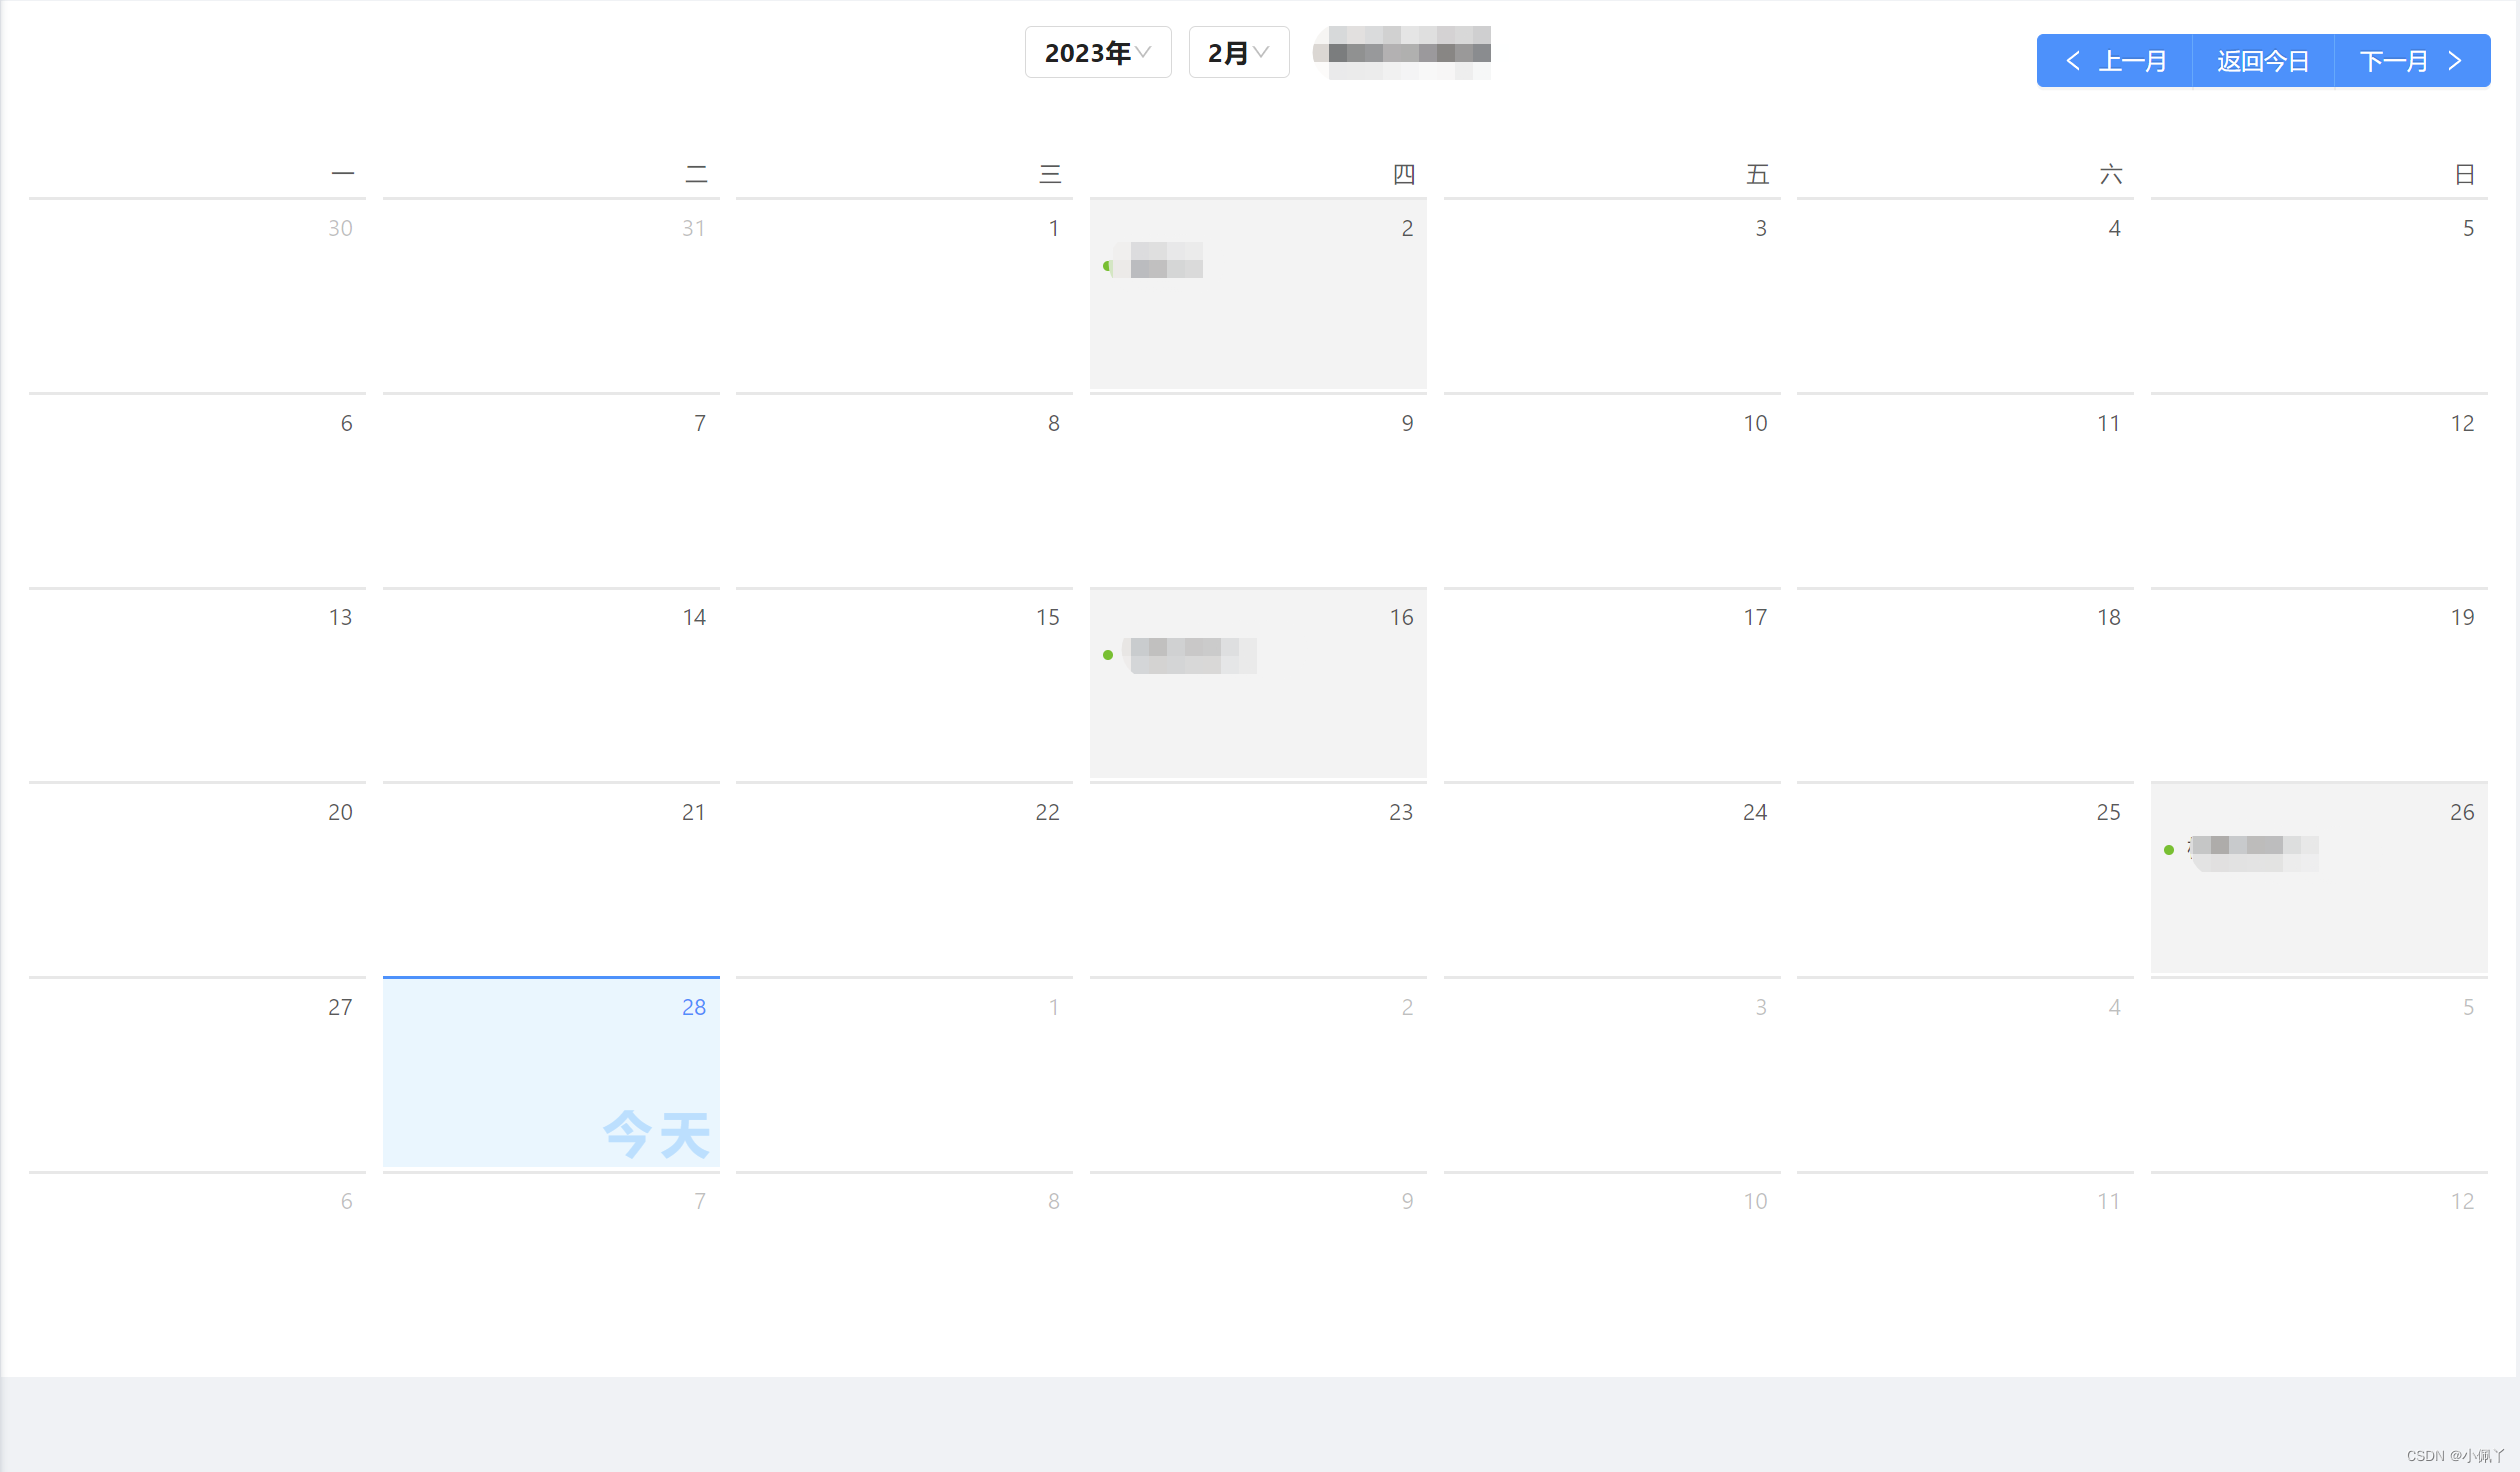
Transformation goals:
- Add shortcut buttons for previous month, back to today, and next month in the header
- Content area, if there is content, add a background color highlight.
- Highlight the cell for "Today"
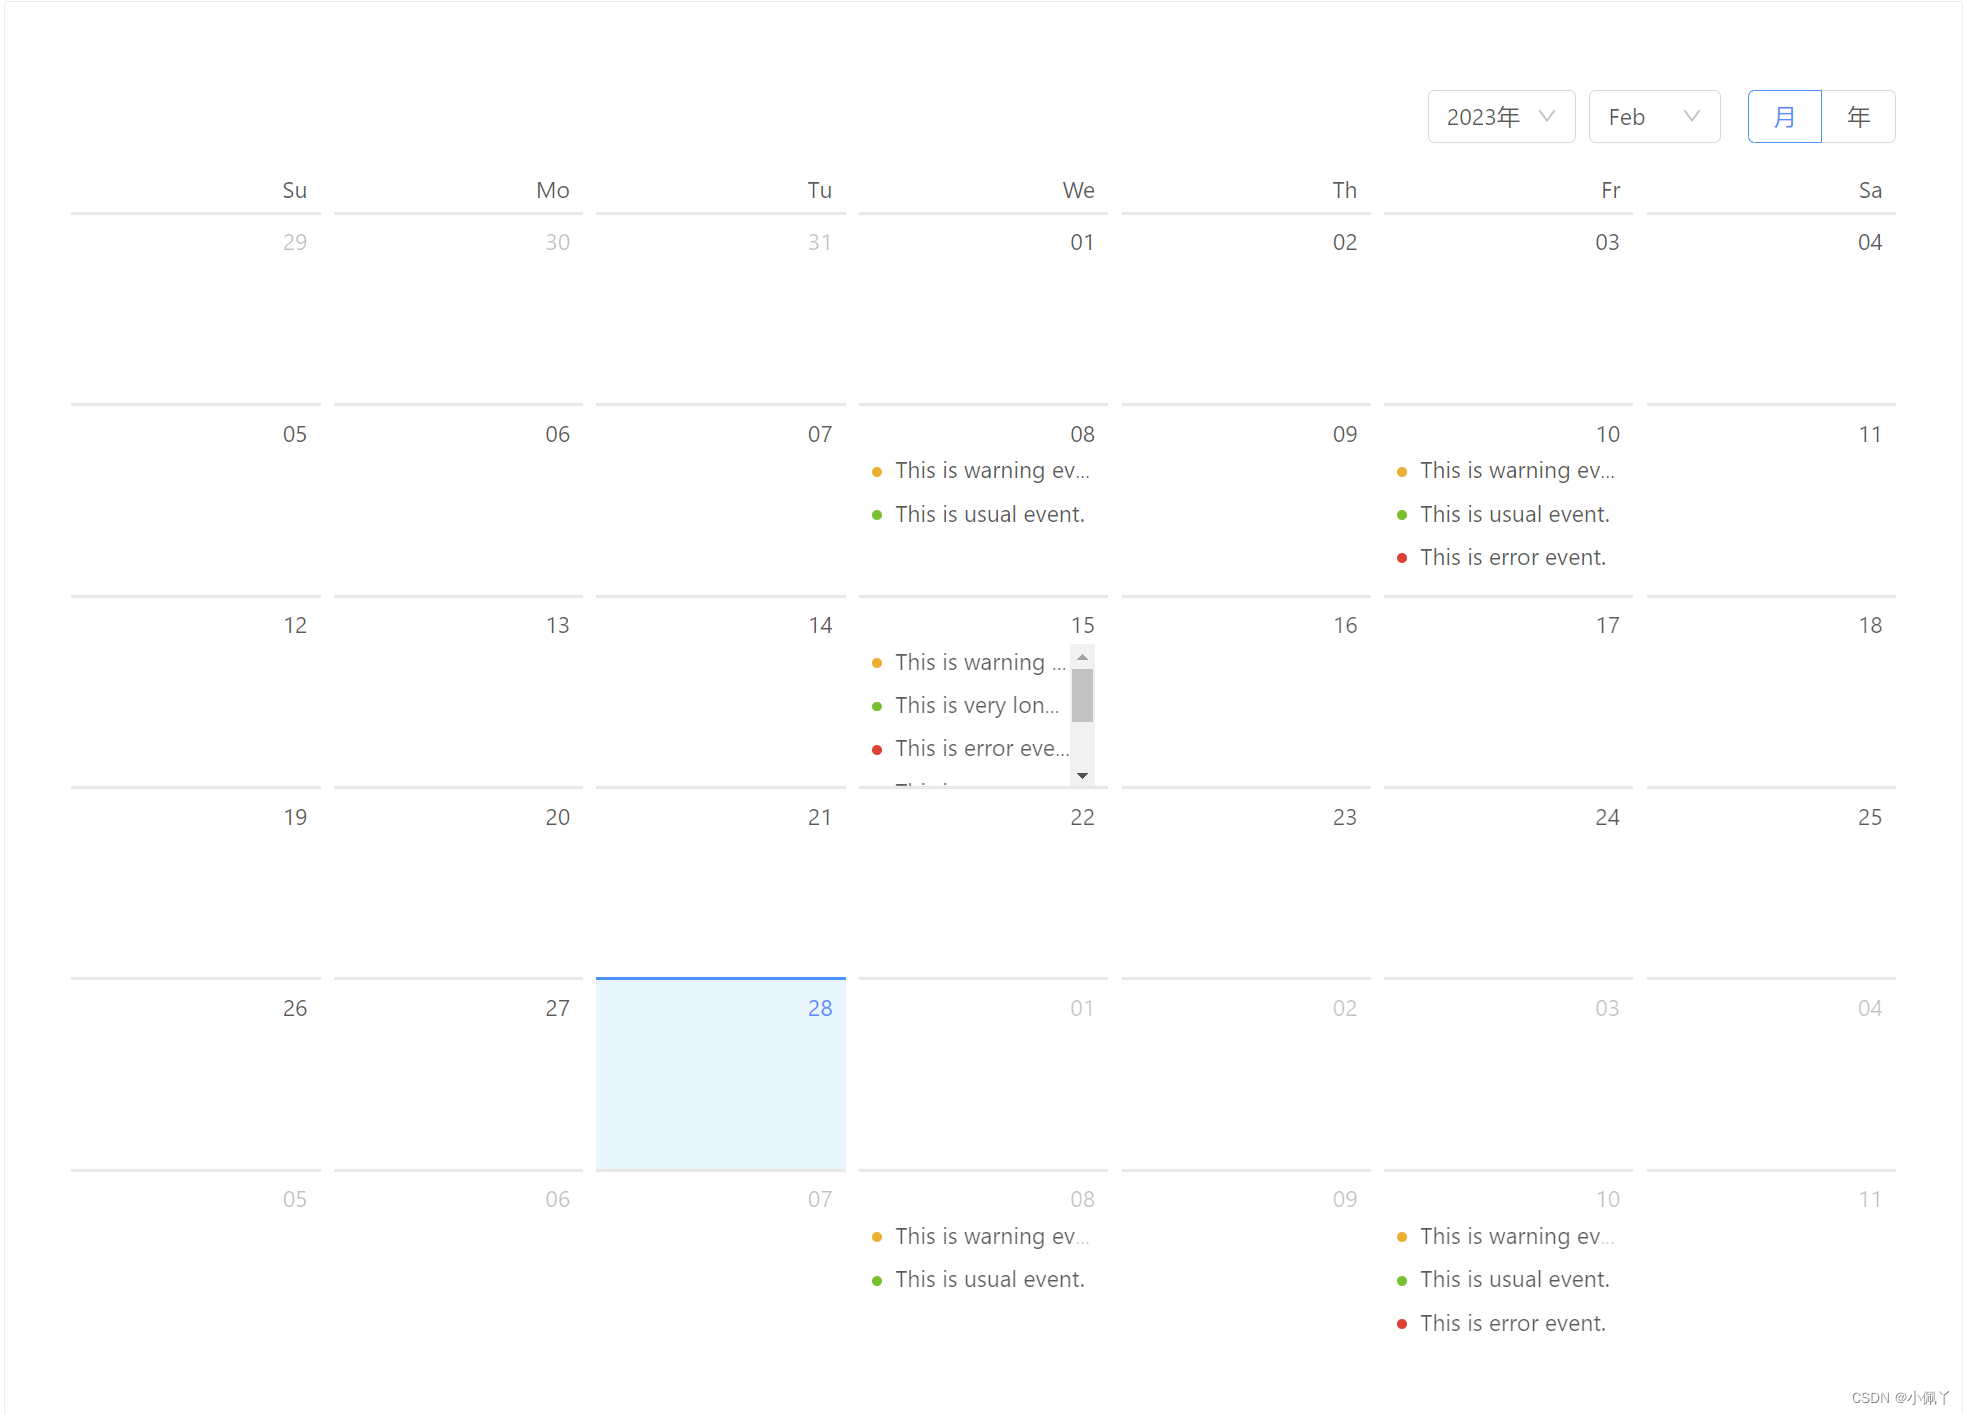
1. Rendering
2. Code implementation
1. DOM structure
code show as below:
<a-calendar style="background: #fff" @select="handleSelecrt" @panelChange="onPanelChange" :header-render="headerRender">
  <div slot="dateFullCellRender" slot-scope="value" class="ant-fullcalendar-date" :class="{'ant-fullcalendar-date-has-content':getListData(value).length>0}">
    <div class="ant-fullcalendar-value">{

   {getCaledarDate(value)}}</div>
    <div class="ant-fullcalendar-content">
      <ul class="events">
        <li v-for="item in getListData(value)" :key="item.content">
          <a-badge :status="'success'" :text="item.classify_rname +'('+item.num+')'" />
        </li>
      </ul>
    </div>
  </div>
</a-calendar>
Related property description:
@select					点击选择日期回调,用来处理点击某一天的动作。可以是弹出一个模态框,对这天进行数据录入。
@panelChange 			日期面板变化回调,用来处理年份/月份切换时的动作。一般是加载选中年月的数据。
header-render			自定义头部内容
dateFullCellRender		作用域插槽,自定义渲染日期单元格,返回内容覆盖单元格
dateCellRender			作用域插槽,用来自定义渲染日期单元格,返回内容会被追加到单元格
illustrate:
-
This is used
dateFullCellRenderbecause I want to customize the cell (add a background color). -
If you don't need to cover the cells, you can use
dateCellRenderslots to implement it.
2. js code
code show as below:
	//点击某天
    handleSelecrt(value) {


      let selectDate = value.format('YYYY-MM-DD HH:mm:ss') // 当前选中的日历时间
      this.selectDateValue = selectDate
      this.visible = true; //打开模态框
    },
    //切换年月
    onPanelChange(val) {


      this.starT = dayjs(val).format('YYYY-MM-01 00:00:00')
      this.endT = dayjs(val).add(1, 'month').format('YYYY-MM-01 00:00:00')
      this.loadData(this.starT, this.endT)//重新加载数据
    },
    //获取日历的日期
    getCaledarDate(value){


      let str = value.format('YYYY-MM-DD').substring(8, 10);
      if(str[0]=='0'){


        str = str.substring(1,2)
      }
      return str
    },
    //日历自定义头部
    headerRender ({

      value, type, onChange, onTypeChange }) {


      const start = 0
      const end = 12
      const monthOptions = []

      const current = value.clone()
      const localeData = value.localeData()
      const months = []
      for (let i = 0; i < 12; i++) {


        current.month(i)
        months.push(localeData.monthsShort(current))
      }

      for (let index = start; index < end; index++) {


        monthOptions.push(
          <a-select-option class="month-item" key={

    `${

      index}`}>
          {

    months[index]}
          </a-select-option>
        )
      }
      const month = value.month()

      const year = value.year()
      const options = []
      for (let i = year - 10; i < year + 10; i += 1) {


        options.push(
          <a-select-option key={

    i} value={

    i} class="year-item">
            {

    i + '年'}
          </a-select-option>
        )
      }
      /* 上个月 */
      const prevMonth = () => {


        let newMonth = moment(value).subtract(1, 'months');
        onChange(newMonth);
      };
      /* 下个月 */
      const nextMonth = () => {


        let newMonth = moment(value).add(1, 'months');
        onChange(newMonth);
      };
      // 返回今天
      const showTotay = () => {


        const today = moment(new Date())
        onChange(today)
      }
      return (
        <div style={

    {

     padding: ' 15px 15px 40px 15px', textAlign: 'center', position: 'relative'}}>
          <div style={

    {

    display: 'inline-block', textAlign: 'center'}}>
            <a-select
              dropdownMatchSelectWidth={

    false}
              class="header-select"
              onChange={

    newYear => {


                const now = value.clone().year(newYear)
                onChange(now)
              }}
              value={

    Number(year)}
            >
              {

    options}
            </a-select>
            <a-select
              dropdownMatchSelectWidth={

    false}
              class="header-select"
              value={

    String(month)}
              onChange={

    selectedMonth => {


                const newValue = value.clone()
                newValue.month(parseInt(selectedMonth, 10))
                onChange(newValue)
              }}
            >
              {

    monthOptions}
            </a-select>
            <span class="header-title">XXX标题</span>
          </div>
          <div style={

    {

    position: 'absolute',right: '15px',top: '20px'}}>
            <a-button-group>
              <a-button type="primary" onClick={

    () => prevMonth()}><a-icon type="left" />上一月</a-button>
              <a-button type="primary" onClick={

    () => showTotay()}>返回今日</a-button>
              <a-button type="primary" onClick={

    () => nextMonth()}>下一月<a-icon type="right" /></a-button>
            </a-button-group>
          </div>
        </div>
      )
    },
3. css code
/*日历头部*/
.header-select{


  margin-right: 10px;
}
/deep/ .header-select .ant-select-selection-selected-value {


  color: #222;
  font-weight: bold;
  font-size: 16px;
}
.header-title{


  font-weight: bold;
  font-size: 17px;
  margin-left: 10px;
  color: #222;
}
/*日历单元格,存在内容时,背景为灰色*/
/deep/ .ant-fullcalendar-date-has-content {


  background-color: #f3f3f3;
}
/*日历单元格-今天 背景*/
/deep/ .ant-fullcalendar-fullscreen .ant-fullcalendar-today .ant-fullcalendar-date::after {


  content: '今天';
  font-size: 30px;
  position: absolute;
  width: 100%;
  text-align: right;
  right: 6px;
  bottom: 0;
  color: rgba(145, 211, 255, 0.65);
  letter-spacing: 5px;
  font-weight: bold;
}
Summarize
- Use
headerRenderthe custom header to realize the shortcut functions of the previous month, the next month, and returning to today - Using
dateFullCellRenderslots to implement custom cells (covering the original calendar cells) can achieve more flexible calendar content.