Series Article Directory
Android builds proprietary hooks to kill non-standard codes in the bud
The second part of Android creating proprietary hooks, the first step into the specification
Hello, everyone, it’s long overdue. The first four chapters roughly outline the implementation process and the final effect display. It can be said responsibly that it can basically meet our actual needs. After all, they are all basic Specification verification, but to achieve 100% accuracy, this is not yet achieved. After all, it is an alternative specification verification that is separated from the project and language. To achieve the current situation, I feel that it is already very good. , Of course, there must be room for optimization.
Based on the first four chapters, we have developed related functions, and we can also use them locally, but how can others use the developed set of specifications? Copy to others? Put it in a link for others to download and use? Of course it is possible, but in the 21st century, this method is indeed a bit low. Is there a simple and fast method? Yes, there must be. Today, we will publish the functions implemented earlier to npm, and provide them for others to download and use through simple npm commands.
Today's content is roughly as follows
1. Simple understanding of npm
2. Existing project release process
3. New project release process
4. Update and delete components
5. Common commands of npm
6. Problem summary
Simple understanding of npm
Official website: https://www.npmjs.com/
npm is a package management tool for JavaScript and is the default package management tool for the Node.js platform. Through npm, you can install, share, distribute code, and manage project dependencies. In fact, it is similar to Maven dependencies in Android. It is nothing more than hosting functions to remote locations. You can download and install them locally, which is convenient for developers to use. This is nothing. Well explained.
Existing project release process
Our current project is a project that has already been developed. Let's look at the project directory and the specific file content. You can review the contents of the previous chapters.

1. Register an account
Since you want to publish to npm, you must first register an account, which is similar to publishing aar in Android to remote Maven. Without a platform account, you cannot perform the next step.
You can go to the official website, or directly click on the registration page below, and fill in the relevant information to register.

This email address is very important, because every time you publish relevant information, a notification will be sent to you through the email address. Similarly, logging in to obtain the verification code, retrieving the password, etc. is also through this email address.
I recommend this registration method, which is visual and intuitive. Of course, in addition to this registration method, there is another way to register through commands.
Order:
npm adduserSpecific execution:

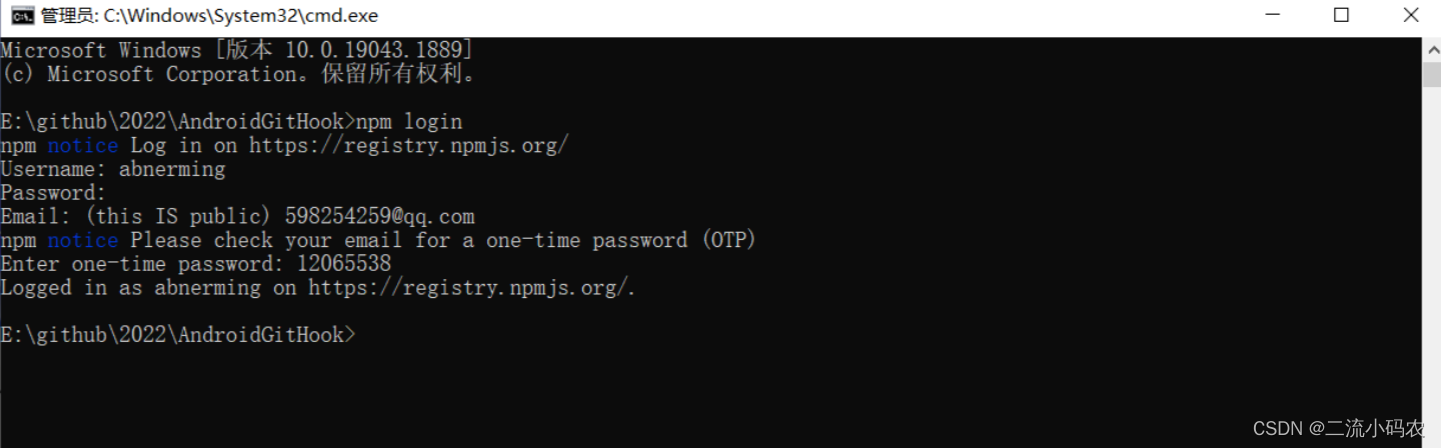
2. Login account
After registering an account, just log in, enter the user name, password, email address you registered, and then enter the verification code.
Order:
npm loginSpecific execution:
3. Publish the package to the npm package server
Order:
npm publishSpecific execution:

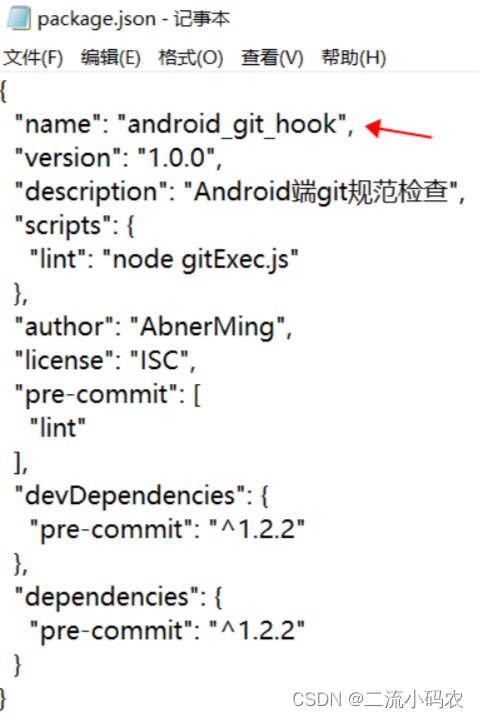
The above execution process is a screenshot after the successful release. When the last line appears, your component name and version number mean that the release is successful. The name of this component is the name in your package.json file.
After the release is successful, log in to the npm official website, and you can view the components you have just released successfully, as shown in the figure below:

After clicking, some basic information will be displayed on the right, such as download and installation commands, version number, size, etc.

So far, our project has been successfully published on the npm official website. Others can easily install it by downloading and installing commands based on the node.js environment.
npm i android_git_hookNew project release process
The release process of the new project is actually the same as the basic process of the existing project. It is nothing more than the process of creating the project. The creation of the project has been outlined in the second chapter above. Here is a brief display.
Initialize npm
A new project must be empty at the beginning, find an empty directory, and execute the initialization command:
npm initWhen executing npm init, it will follow the steps to enter a lot of things. If you don’t want to enter step by step, just press Enter every time, and it can be modified anyway.
If you want to enter step by step, the specific process is as follows, if you don’t want to enter in the middle, you can press Enter to skip:
package name 包名,也就是工程名,默认是括号中的内容
version:版本号,默认是括号中的内容
description:描述信息
entry point:入口文件名,默认是括号中的内容
test command:测试命令
git repository:git仓库地址
keywords: 密码
author: 作者名字
license: (ISC)许可证
I won’t take screenshots of the specific execution. It is executed step by step. The subsequent package.json can also be changed at will. Let’s take an example of the previous project execution and show you:

After the project is initialized, you will find that a package.json file appears in your empty directory, which contains a lot of crucial information. You can review the content of Chapter 2, so I won’t go into details here.
After npm is initialized, the rest is the process of writing the code. After writing the code and publishing it to npm, it is the same as the release process of existing projects. You can just look at the release process of existing projects.
Update and remove components
The completion of the component is definitely not achieved overnight, and it may last for several versions. So, how do we update the code and how do users update to the latest version?
After changing the latest code, the developer needs to change the version number of the package.json file, and then re-issue the package, that is, re-execute the npm publish command.

To update the user to the latest version, just execute the following command, android_git_hook is the name in your package.json file.
npm update android_git_hook --save-devIf the user does not want to use it, he can perform the following uninstallation operation.
npm uninstall android_git_hook --save-devYou can also delete the specified version
npm unpublish 包名@版本号or remove the whole package with
npm unpublish 包名 --forcenpm common commands
The commonly used npm commands have been introduced more or less before, and here is a brief summary.
初始化npm
npm init

登录与退出登录npm(先注册)
npm login //登录要用户名密码邮箱及验证码
npm logout

安装包
npm i 包名
npm i 包名 -D  //开发模式

安装包某一个包
npm install pre-commit

卸载某一个包
npm uninstall 包名
npm i 包名@1.1.1(指定版本号,可以一个数字表示大版本)
npm i 包名 -g //表示全局模式安装,卸载时也要-g

更新某一个包
npm update android_git_hook

发布包与将发布包删除
npm publish //在该包的终端下运行
npm unpublish 包名 -force

查看包版本和所有版本
npm view 包名 version
npm view 包名 versions
conclusion of issue
According to the normal execution process, everyone should be able to get through. However, there must be some accidents. Here are a few common mistakes that you can avoid during the release process.
1. Use the npm command to register: npm adduser
If the user name has been registered by others, the following error will be reported: Unable to authenticate, need: Basic

The solution is to change the user name.
2、npm publish
如果报错:'You do not have permission to publish "mypackage1". Are you logged in as the correct user?'
![]()
Indicates that the package 'mypackage1' already exists in the package manager and has been used by others. It is necessary to change the name of the package, that is, to change the name in the package.json file.
The Android-specific GitHook series is temporarily over, and I will do some optimization later when I have time, because there are some detailed specification matches that are not perfect. Well, old guys, this article will be shared here, and we will see you in the next article .