1. Property animation
Property Animation
Animation General animation is the frame animation and tween animation we learned earlier ! Animator is the attribute animation to be discussed in this section !
1.1 Introduction to property animation
1.1.1 Why introduce attribute animation?
- The tween animation function is relatively monotonous, and there are only four animations (transparency, rotation, tilt and displacement)
- The object of tween animation is only UI control
- The tween animation only changes the display effect of the View, and does not change the properties of the View
eg: The button on the left is moved to the right, but the button is still on the left at this time. If you click the button on the right, the click event of the button will not be triggered~
1.1.2 What is attribute animation?
- The introduction of Android 3.0 can be said to be an enhanced version of tween animation. It can not only realize four kinds of animation effects, but also define any property changes;
- Objects that perform animation are not just U controls. Can animate any object (whether displayed on screen or not)
- Attribute animation modifies its attributes by assigning values to the target object, and the above button problem does not exist~
1.1.3 API related to attribute animation
| API | illustrate |
|---|---|
| Animator | The base class for creating attribute animations is generally not used directly, and its two subclasses are generally used! |
| ValueAnimator | As mentioned above, attribute animation is realized by continuously modifying the value, and the transition animation between the initial value and the end value is calculated by this class. Internally, a time loop mechanism is used to calculate the animation transition between values. We only need to provide the initial value and the end value to this class, and tell it the duration of the animation, and the class will automatically complete the animation for us. The effect of smooth transition from the initial value to the end value! In addition, this class is also responsible for managing the number of times the animation is played, the playback mode, and setting listeners for the animation, etc.! |
| ObjectAnimator | The subclass of ValueAnimator allows us to animate the properties of the specified object, which is easier to use and is used more in practice. Of course, in some cases, you may still need to use ValueAnimator |
| AnimatorSet | A subclass of Animator, used to combine multiple Animators, and specify whether multiple Animators are played in sequence or simultaneously |
| Evaluator | To tell the animation system how to transition from the initial value to the end value, the following Evaluators are provided: - IntEvaluator: a calculator for calculating the value of an int type attribute - FloatEvaluator: a calculator for calculating the value of a float type attribute - ArgbEvaluator: use Calculator for calculating the color value expressed in hexadecimal form - TypeEvaluator: the interface of the calculator, we can implement this interface to complete the custom calculator |
1.2 Simple use of ValueAnimator
1.2.1 Use process:
- Call ValueAnimator's ofInt (), ofFloat () or ofObject () static method to create a ValueAnimator instance
- Call the setXxx method of the instance to set the animation duration, interpolation method, number of repetitions, etc.
- Call the addUpdateListener of the instance to add the AnimatorUpdateListener listener, in which the value calculated by the ValueAnimator can be obtained, and you can apply the value to the specified object
- Call the **start()** method of the instance to start the animation! In addition, we can see that both ofInt and ofFloat have such a parameter: float/int... values represent multiple values!
Code implementation :
Layout file: activity_main.xml , very simple, four buttons, one ImageView
<LinearLayout xmlns:android="http://schemas.android.com/apk/res/android"
    android:id="@+id/ly_root"
    android:layout_width="match_parent"
    android:layout_height="match_parent"
    android:orientation="vertical">

    <Button
        android:id="@+id/btn_one"
        android:layout_width="wrap_content"
        android:layout_height="wrap_content"
        android:text="动画1" />

    <Button
        android:id="@+id/btn_two"
        android:layout_width="wrap_content"
        android:layout_height="wrap_content"
        android:text="动画2" />

    <Button
        android:id="@+id/btn_three"
        android:layout_width="wrap_content"
        android:layout_height="wrap_content"
        android:text="动画3" />

    <Button
        android:id="@+id/btn_four"
        android:layout_width="wrap_content"
        android:layout_height="wrap_content"
        android:text="动画4" />

    <ImageView
        android:id="@+id/img_babi"
        android:layout_width="wrap_content"
        android:layout_height="wrap_content"
        android:layout_gravity="center"
        android:background="@mipmap/img_babi" />

</LinearLayout>
Then go to MainActivity.java , first you need a method to modify the View position, here call moveView () to set the starting coordinates and width and height of the left and top!
Then four animations are defined, namely: linear movement, scaling, rotation plus transparency, and circular rotation!
Then trigger the corresponding animation through the button~
public class MainActivity extends AppCompatActivity implements View.OnClickListener {


    private Button btn_one;
    private Button btn_two;
    private Button btn_three;
    private Button btn_four;
    private LinearLayout ly_root;
    private ImageView img_babi;
    private int width;
    private int height;

    @Override
    public void onCreate(Bundle savedInstanceState) {


        super.onCreate(savedInstanceState);
        setContentView(R.layout.activity_main);
        bindViews();
    }

    private void bindViews() {


        ly_root = (LinearLayout) findViewById(R.id.ly_root);
        btn_one = (Button) findViewById(R.id.btn_one);
        btn_two = (Button) findViewById(R.id.btn_two);
        btn_three = (Button) findViewById(R.id.btn_three);
        btn_four = (Button) findViewById(R.id.btn_four);
        img_babi = (ImageView) findViewById(R.id.img_babi);

        btn_one.setOnClickListener(this);
        btn_two.setOnClickListener(this);
        btn_three.setOnClickListener(this);
        btn_four.setOnClickListener(this);
        img_babi.setOnClickListener(this);
    }

    @Override
    public void onClick(View v) {


        switch (v.getId()) {


            case R.id.btn_one:
                lineAnimator();
                break;
            case R.id.btn_two:
                scaleAnimator();
                break;
            case R.id.btn_three:
                raAnimator();
                break;
            case R.id.btn_four:
                circleAnimator();
                break;
            case R.id.img_babi:
                Toast.makeText(MainActivity.this, "不愧是你", Toast.LENGTH_SHORT).show();
                break;
        }
    }


    //定义一个修改ImageView位置的方法
    private void moveView(View view, int rawX, int rawY) {


        int left = rawX - img_babi.getWidth() / 2;
        int top = rawY - img_babi.getHeight();
        int width = left + view.getWidth();
        int height = top + view.getHeight();
        view.layout(left, top, width, height);
    }


    //定义属性动画的方法:

    //按轨迹方程来运动
    private void lineAnimator() {


        width = ly_root.getWidth();
        height = ly_root.getHeight();
        ValueAnimator xValue = ValueAnimator.ofInt(height,0,height / 4,height / 2,height / 4 * 3 ,height);
        xValue.setDuration(3000L);
        xValue.addUpdateListener(new ValueAnimator.AnimatorUpdateListener() {


            @Override
            public void onAnimationUpdate(ValueAnimator animation) {


                // 轨迹方程 x = width / 2
                int y = (Integer) animation.getAnimatedValue();
                int x = width / 2;
                moveView(img_babi, x, y);
            }
        });
        xValue.setInterpolator(new LinearInterpolator());
        xValue.start();
    }

    //缩放效果
    private void scaleAnimator(){


        //这里故意用两个是想让大家体会下组合动画怎么用而已~
        final float scale = 0.5f;
        AnimatorSet scaleSet = new AnimatorSet();
        ValueAnimator valueAnimatorSmall = ValueAnimator.ofFloat(1.0f, scale);
        valueAnimatorSmall.setDuration(500);

        ValueAnimator valueAnimatorLarge = ValueAnimator.ofFloat(scale, 1.0f);
        valueAnimatorLarge.setDuration(500);

        valueAnimatorSmall.addUpdateListener(new ValueAnimator.AnimatorUpdateListener() {


            @Override
            public void onAnimationUpdate(ValueAnimator animation) {


                float scale = (Float) animation.getAnimatedValue();
                img_babi.setScaleX(scale);
                img_babi.setScaleY(scale);
            }
        });
        valueAnimatorLarge.addUpdateListener(new ValueAnimator.AnimatorUpdateListener() {


            @Override
            public void onAnimationUpdate(ValueAnimator animation) {


                float scale = (Float) animation.getAnimatedValue();
                img_babi.setScaleX(scale);
                img_babi.setScaleY(scale);
            }
        });

        scaleSet.play(valueAnimatorLarge).after(valueAnimatorSmall);
        scaleSet.start();

        //其实可以一个就搞定的
//        ValueAnimator vValue = ValueAnimator.ofFloat(1.0f, 0.6f, 1.2f, 1.0f, 0.6f, 1.2f, 1.0f);
//        vValue.setDuration(1000L);
//        vValue.addUpdateListener(new ValueAnimator.AnimatorUpdateListener() {


//            @Override
//            public void onAnimationUpdate(ValueAnimator animation) {


//                float scale = (Float) animation.getAnimatedValue();
//                img_babi.setScaleX(scale);
//                img_babi.setScaleY(scale);
//            }
//        });
//        vValue.setInterpolator(new LinearInterpolator());
//        vValue.start();
    }


    //旋转的同时透明度变化
    private void raAnimator(){


        ValueAnimator rValue = ValueAnimator.ofInt(0, 360);
        rValue.setDuration(1000L);
        rValue.addUpdateListener(new ValueAnimator.AnimatorUpdateListener() {


            @Override
            public void onAnimationUpdate(ValueAnimator animation) {


                int rotateValue = (Integer) animation.getAnimatedValue();
                img_babi.setRotation(rotateValue);
                float fractionValue = animation.getAnimatedFraction();
                img_babi.setAlpha(fractionValue);
            }
        });
        rValue.setInterpolator(new DecelerateInterpolator());
        rValue.start();
    }

    //圆形旋转
    protected void circleAnimator() {


        width = ly_root.getWidth();
        height = ly_root.getHeight();
        final int R = width / 4;
        ValueAnimator tValue = ValueAnimator.ofFloat(0,
                (float) (2.0f * Math.PI));
        tValue.setDuration(1000);
        tValue.addUpdateListener(new ValueAnimator.AnimatorUpdateListener() {


            @Override
            public void onAnimationUpdate(ValueAnimator animation) {


                // 圆的参数方程 x = R * sin(t) y = R * cos(t)
                float t = (Float) animation.getAnimatedValue();
                int x = (int) (R * Math.sin(t) + width / 2);
                int y = (int) (R * Math.cos(t) + height / 2);
                moveView(img_babi, x, y);
            }
        });
        tValue.setInterpolator(new DecelerateInterpolator());
        tValue.start();
    }
}
Ok, the process is very simple. First create a ValueAnimator object, call ValueAnimator.ofInt/ofFloat to get it, then set the animation duration, addUpdateListener to add AnimatorUpdateListener event listener, and then use getAnimatedValue () of the parameter animation to get the current value, and then we can Use this value to modify some properties of the View to form the so-called animation effect, then set the setInterpolator animation rendering mode, and finally call start() to start the animation playback
1.3 Simple use of ObjectAnimator
Compared with ValueAnimator, ObjectAnimator is easier to use. Through this class, we can directly animate any property of any object ! That's right, it's any object, not just a View object. Constantly assign a value to a property in the object, and then decide how to display it according to the change of the property value of the object! For example, set the following animation for TextView: ObjectAnimator.ofFloat(textview, “alpha”, 1f, 0f);
here is to constantly change the value of alpha, from 1f to 0f, and then the object refreshes the interface display according to the change of the property value, thus showing The effect of fading in and fading out, and there is no alpha attribute in the TextView class. The internal mechanism of ObjectAnimator is: find the get and set methods corresponding to the transmitted attribute name~, not the attribute value! If you don't believe it, you can go to the source code of TextView to find out if there is an alpha attribute! Ok, let's use ObjectAnimator to realize the effects of four kinds of tween animation~
Code implementation :
The above layout is directly used in the layout, and a button is added, and the ImageView is replaced with a TextView. The code is not posted here, and the code in the MainActivity.java part is actually the same~
public class MainActivity5 extends AppCompatActivity implements View.OnClickListener {


    private Button btn_one;
    private Button btn_two;
    private Button btn_three;
    private Button btn_four;
    private Button btn_five;
    private LinearLayout ly_root;
    private TextView tv_show;
    private int height;
    private ObjectAnimator animator1;
    private ObjectAnimator animator2;
    private ObjectAnimator animator3;
    private ObjectAnimator animator4;
    private AnimatorSet animSet;

    @Override
    protected void onCreate(Bundle savedInstanceState) {


        super.onCreate(savedInstanceState);
        setContentView(R.layout.activity_main5);
        bindViews();
        initAnimator();
    }

    private void bindViews() {


        ly_root = (LinearLayout) findViewById(R.id.ly_root);
        btn_one = (Button) findViewById(R.id.btn_one);
        btn_two = (Button) findViewById(R.id.btn_two);
        btn_three = (Button) findViewById(R.id.btn_three);
        btn_four = (Button) findViewById(R.id.btn_four);
        btn_five = (Button) findViewById(R.id.btn_five);
        tv_pig = (TextView) findViewById(R.id.tv_pig);

        height = ly_root.getHeight();
        btn_one.setOnClickListener(this);
        btn_two.setOnClickListener(this);
        btn_three.setOnClickListener(this);
        btn_four.setOnClickListener(this);
        btn_five.setOnClickListener(this);
        tv_pig.setOnClickListener(this);
    }

    //初始化动画
    private void initAnimator() {


        animator1 = ObjectAnimator.ofFloat(tv_pig, "alpha", 1f, 0f, 1f, 0f, 1f);
        animator2 = ObjectAnimator.ofFloat(tv_pig, "rotation", 0f, 360f, 0f);
        animator3 = ObjectAnimator.ofFloat(tv_pig, "scaleX", 2f, 4f, 1f, 0.5f, 1f);
        animator4 = ObjectAnimator.ofFloat(tv_pig, "translationY", height / 8, -100, height / 2);
    }

    @Override
    public void onClick(View v) {


        switch (v.getId()) {


            case R.id.btn_one:
                animator1.setDuration(3000l);
                animator1.start();
                break;
            case R.id.btn_two:
                animator2.setDuration(3000l);
                animator2.start();
                break;
            case R.id.btn_three:
                animator3.setDuration(3000l);
                animator3.start();
                break;
            case R.id.btn_four:
                animator4.setDuration(3000l);
                animator4.start();
                break;
            case R.id.btn_five:
                //将前面的动画集合到一起~
                animSet = new AnimatorSet();
                animSet.play(animator4).with(animator3).with(animator2).after(animator1);
                animSet.setDuration(5000l);
                animSet.start();
                break;
            case R.id.tv_pig:
                Toast.makeText(MainActivity.this, "不愧是你", Toast.LENGTH_SHORT).show();
                break;
        }
    }
}
1.4 Using XML to write animations
Using XML to write animations may take a little longer to draw than Java code, but it is much easier to reuse! The corresponding XML tags are: < animator >< objectAnimator >< set > The related attributes are explained as follows:
- android:ordering : Specify the playback order of the animation: sequentially (sequential execution), together (simultaneous execution)
- android:duration : the duration of the animation
- android:propertyName = "x": x here, remember the "alpha" above? The object that loads the animation needs to define the getx and setx methods, and objectAnimator uses this to modify the value in the object!
- android:valueFrom ="1" : the initial value of the animation start
- android:valueTo ="0" : the final value at the end of the animation
- android:valueType ="floatType": the data type of the changing value
Examples of use are as follows :
animator/property_animator.xml
<?xml version="1.0" encoding="utf-8"?>
<set xmlns:android="http://schemas.android.com/apk/res/android"
    android:ordering="together" >

    <objectAnimator
        android:duration="3000"
        android:propertyName="translationX"
        android:valueFrom="-500"
        android:valueTo="0"
        android:valueType="floatType" >
    </objectAnimator>
    <objectAnimator
        android:duration="3000"
        android:propertyName="rotation"
        android:repeatCount="3"
        android:valueFrom="0"
        android:valueTo="360"
        android:valueType="floatType" >
    </objectAnimator>

</set>
Load our animation file :
Animator animator = AnimatorInflater.loadAnimator(MainActivity5.this, R.animator.property_animator);
animator.setTarget(tv_show);
animator.start();
    android:duration="3000"
    android:propertyName="rotation"
    android:repeatCount="3"
    android:valueFrom="0"
    android:valueTo="360"
    android:valueType="floatType" >
</objectAnimator>
Load our animation file :
Animator animator = AnimatorInflater.loadAnimator(MainActivity5.this, R.animator.property_animator);
animator.setTarget(tv_show);
animator.start();
1.5 Basic use of Butterknife butter knife
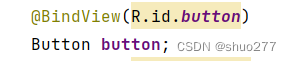
1.5.1 According to the picture
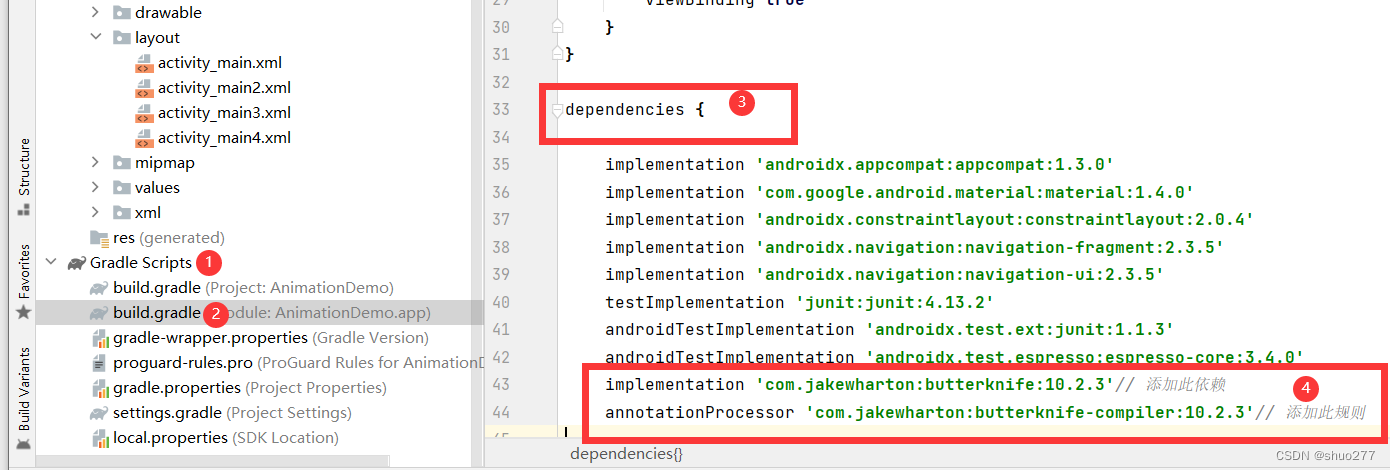
1.5.2 Two sentences in the fourth step of the above figure
implementation 'com.jakewharton:butterknife:10.2.3'// Add this dependency
annotationProcessor 'com.jakewharton:butterknife-compiler:10.2.3'// Add this rule
1.5.3 Get id
1.5.4 Binding initialization
