Unity project summary
- written in front
-
- Painting graffiti (image processing, ray detection)
- Unity common framework (object pool framework, state machine framework, UI framework)
- Video playback (Lua calls UnityAPI)
- AB package use (asynchronously load AB package)
- Editor mode operation (Editor editor development)
- Phong lighting model (vertex fragment Shader, surface body Shader)
- Character lighting effects (surface body Shader)
- Image Gradient (Fixed Pipeline Shader)
- Mall system (SQLite access)
- 3D tower defense (AI pathfinding)
- A* Pathfinding Algorithm
- Animation system (animation state machine)
- Backpack system (item dragging)
- Level selection UI interface (UGUI)
- 3D tank battle (object system)
- Brickbreaker (ray detection)
- Pick up gold coins (collision detection)
- planets orbiting stars
- Personal scene construction
- Rolling ball game (input and output shaft)
- written in the back
written in front
Personal interest + project needs, learn the Unity engine, and record the small projects I made here.
Project address: https://github.com/hahahappyboy/UnityProjects
Overview
Drawing graffiti (image processing, ray detection)
Unity common framework (object pool framework, state machine framework, UI framework)
video playback (Lua calls UnityAPI)
AB package use ( Load AB package asynchronously)
Run in editor mode (Editor editor development)

Phong lighting model (vertex fragment Shader, surface body Shader)

character lighting effects (surface body Shader)
image gradient (fixed pipeline Shader)
mall system (SQLite access)
3D Tower defense (AI pathfinding)
A* pathfinding algorithm
Animation system (animation state machine)
backpack system (item dragging)
level selection UI interface (UGUI)
3D tank battle (physics system)
brick breaking (ray detection)
pick up gold coins ( Collision detection)

Planets rotate around the stars
Personal scene construction
Rolling ball game (input and output shaft)
Painting graffiti (image processing, ray detection)
See https://blog.csdn.net/iiiiiiimp/article/details/129590527
Unity common framework (object pool framework, state machine framework, UI framework)
Object Pool Framework
You can see that when a ball is generated from the air, a new GameObjcet is not created but the previous ball is reused. Although this will increase memory consumption, it reduces the consumption of CPU scheduling support.
The key explanation of the object pool framework
uses a dictionary to store the Name and GameObjcet of the object
Dictionary<string, List<GameObject>> gameObjectPool;
When creating an object, first judge whether some object pools have the object, if so, directly re-initialize its parameters and use it, if not, just Instantiateone
//生成游戏对象
public GameObject CreatGameObject(string gameObjectName) {


    GameObject gameObject = null;
    //判断池子里有没有该对象
    if (gameObjectPool.ContainsKey(gameObjectName) && gameObjectPool[gameObjectName].Count > 0) {

    //有
        gameObject = gameObjectPool[gameObjectName][0];
        gameObject.SetActive(true);
        gameObjectPool[gameObjectName].RemoveAt(0);
    } else {

    //没有
        Object prefabs = Resources.Load(PREFABS_PATH + gameObjectName);
        gameObject = Object.Instantiate(prefabs) as GameObject;
        gameObject.name = gameObject.name.Replace("(Clone)", "");
    }
    gameObject.GetComponent<SphereController>().WhenCreate();
    return gameObject;
}
Objects that are not in use are directly recycled into the object pool instead of being destroyed
//回收游戏对象
public void RecycleGameObject(GameObject gameObject) {


    gameObject.SetActive(false);
    if (gameObjectPool.ContainsKey(gameObject.name)) {


        gameObjectPool[gameObject.name].Add(gameObject);
    } else {


        gameObjectPool.Add(gameObject.name,new List<GameObject>(){

    gameObject});
    }
    gameObject.GetComponent<SphereController>().WhenRecycle();
State machine framework
The state machine framework is similar to the animation state machine in Unity, but it is a general framework. Multiple states in a state machine can also contain other state machines. Each state machine has transition conditions, which can be met to transition from one state to another.
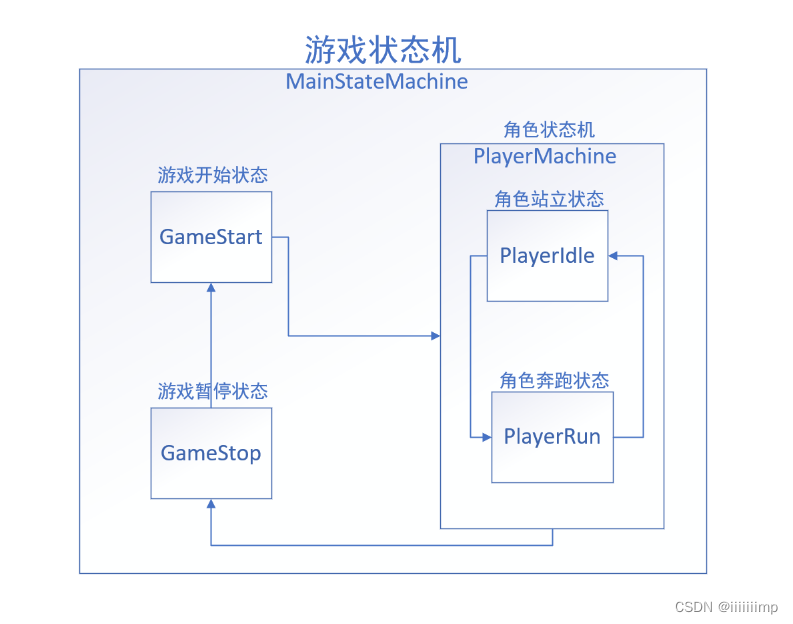
The key explanation of the state machine framework
(1) In the State state class, use private Dictionary<string, Func<bool>> canTransitionStateDic;the state name and state condition to store the state to which the state can transition. Note that it is the state name and state condition of the state that this state can transition to, not the condition that can transition to this state.
In the CheckTransition method, detect whether a certain state transition condition is met, and if so, return the name of the state
public virtual string CheckTransition() {


    foreach (var item in canTransitionStateDic) {


        if (item.Value()) {

    //满足
            return item.Key;
        }
    }
    return null;
}
There are three events in the State class public event Action OnStateEnter;, public event Action OnStateUpdate;, public event Action OnStateExit;which trigger events when entering a state, trigger events continuously while the state is executing, and trigger events when the state leaves. Therefore, the CheckTransition method must be executed in the OnStateUpdate method, so as to continuously detect whether there is a transitional state.
//进入状态触发事件
public event Action OnStateEnter;
//状态执行中触发事件
public event Action OnStateUpdate;
//状态离开时触发事件
public event Action OnStateExit;
(2) In the StateMachine state machine class: This class inherits the State class, because the state machine class is also equivalent to a state. Use Dictionary<string, State> controlStatesDic;to store state. State defaultStateRepresents the state that the state machine will run by default. State currentStateRepresents the state in which the current state machine is running.
The CheckCanTransition method continuously checks whether there is a state that can be transitioned in the current state of motion, and transitions if there is one.
private void CheckCanTransition()
{


    if(currentState == null)
        return;
    // 不断检测当前状态能过渡的状态有哪些
    string canTransitionState = currentState.CheckTransition();
    if (canTransitionState != null) {


        //过渡到这个状态
        TransitionState(canTransitionState);
    }
}
(3) UpdateEventTrigger class: This class inherits the MonoBehaviour class, which is to continuously detect whether the current running state has a transitional state in the Update function. actionEventsInside is the OnStateUpdate function of the current running state.
void Update() {


     for (int i = 0; i < actionEvents.Length; i++)
     {


          //执行事件
          actionEvents[i]();
     }
}
The OnStateUpdate function of the current running state is bound to actionEventsthe
//进入该状态调用的函数
public virtual void EnterState() {


    //执行进入事件
    OnStateEnter();
    //TODO:与触发器绑定,进入跟新状态
    UpdateEventTrigger.GetInstance().AddUpdateEvent(stateName,OnStateUpdate);
}
(4) Finally, add transition conditions for the state and state machine in the Demo class, and then execute it.
The UI framework
is similar to how Android uses a stack to manage activities. When an interface is displayed, it will be pushed into the stack, and the previous interface will be pushed down, and all click events of the previous interface will be unavailable. When an interface exits, it pops the stack. We use the same idea in Unity to manage the UI interface.
Key explanations of the UI framework:
(1) The UIModuleBase class is used as the base class of all interfaces, and [RequireComponent(typeof(CanvasGroup))]the CanvasGroup component is bound. The CanvasGroup component can set whether to block the mouse ray from continuing to emit downwards, so that when a certain interface is displayed on the top layer, the blocked UI cannot be displayed.
//第一次加载该界面,显示在最上面时
public virtual void UIEnter() {


    _canvasGroup.blocksRaycasts = true;
    _canvasGroup.alpha = 1;
}
//当前界面被其他界面遮挡时
public virtual void UIPause() {


    _canvasGroup.blocksRaycasts = false;
    _canvasGroup.alpha = 0.5f;
}
//其他界面退出,该页面处于最上面时
public virtual void UIResume() {


    _canvasGroup.blocksRaycasts = true;
    _canvasGroup.alpha = 1;
}
public virtual void UIExit() {


    _canvasGroup.blocksRaycasts = false;
    _canvasGroup.alpha = 0;
}
(2) The UIModuleBase component that stores the UI interface is used in the UIManager class private Stack<UIModuleBase> _uiModuleStackto realize the stacking and popping of the UI interface.
 //界面压栈
 public void PushUI(string uiName) {


     //先让本来在栈最上面的ui给暂停
     if (_uiModuleStack.Count > 0) {


         _uiModuleStack.Peek().UIPause();
     }
     //没有该生成过该界面,就生成
     if (!uiNameGameObjectDic.ContainsKey(uiName)) {


         GameObject uiPrefab = GetUIGameObject(uiName);
         //压栈
         _uiModuleStack.Push(uiPrefab.GetComponent<UIModuleBase>());
     }
     //执行进入触发事件
     _uiModuleStack.Peek().UIEnter();

 }

 //界面出栈
 public void PopUI() {


     if (_uiModuleStack.Count>0) {


         //当前模块离开
         _uiModuleStack.Peek().UIExit();
         _uiModuleStack.Pop();
         if (_uiModuleStack.Count>0) {


             _uiModuleStack.Peek().UIResume();
         }
     }
 }
Video playback (Lua calls UnityAPI)
Note:
(1) XLua uses singleton mode and custom Loader. The custom Loader is to relocate the path of the Lua file, because the default path is the StreamingAssets directory. Custom Load function parameters and return values are written in a fixed way private byte[] CustomLoader(ref string filePath). Then use DoString()the function to call the lua statement.
public class XluaEnv {


    //单例
    private static XluaEnv _Instance = null;
    public static XluaEnv Instance {


        get {


            if (_Instance == null) {


                _Instance = new XluaEnv();
            }
            return _Instance;
        }
    }

    private LuaEnv _luaEnv;

    private XluaEnv() {


        _luaEnv = new LuaEnv();
        _luaEnv.AddLoader(CustomLoader);
    }
    //自定义Loader
    private byte[] CustomLoader(ref string filePath) {


        string path = Application.dataPath;
        path = path.Substring(0,path.Length-7) + "/DataPath/Lua/" + filePath + ".lua";
        Debug.Log(path);
        if (File.Exists(path)) {


            return File.ReadAllBytes(path);
        } else {


            return null;
        }
    }
    //调用Lua
    public object[] DoString(string code) {


        return _luaEnv.DoString(code);
    }
    //释放
    public void Free() {


        _luaEnv.Dispose();
        _Instance = null;
    }
   //获取Lua中的全局变量
    public LuaTable Global {


        get {


            return _luaEnv.Global;
        }
    }
}
(2) In the startup script, Bootstrap.csuse XluaEnv.Instance.DoString("require('Bootstrap')");the startup script that executes lua to Bootstrap.luause the table _luaBootstrap = XluaEnv.Instance.Global.Get<LuaBootstrap>("BootStrap");in Bootstrap.luathe BootStrapmap to the structure in the custom Unity LuaBootstrap, and call the delegate and method of the structure in the method, so that the life of lua is realized cycle.Start()Update()Start()Update()
// lua表映射
[CSharpCallLua]
public delegate void LifeCycle();
[GCOptimize()]
public class LuaBootstrap {


    public LifeCycle Start;
    public LifeCycle Update;
}

public class Bootstrap : MonoBehaviour {


    // private GameObject _button;

    //lua得Boosstrap
    public LuaBootstrap _luaBootstrap;
    private void Start() {


        //防止切换场景时,脚本对象丢失
        DontDestroyOnLoad(gameObject);

        XluaEnv.Instance.DoString("require('Bootstrap')");
        _luaBootstrap = XluaEnv.Instance.Global.Get<LuaBootstrap>("BootStrap");
        _luaBootstrap.Start();

    }
    private void Update() {


        _luaBootstrap.Update();
    }
}
(3) Lua mainly calls the API in Unity. Remember to require()load this lua file when using other lua file variables. Since lua has no generics, when calling UnityAPI, it generally uses its corresponding overloaded method with too many Type parameters. For example, this code when loading the AB package ABManager.Manifest = mainAssetBundle:LoadAsset("AssetBundleManifest", typeof(CS.UnityEngine.AssetBundleManifest)) . The writing method of lua is actually similar to that of Unity, and the rule is CS. Namespace. Corresponding variables. Here is the way to write the UI interface of the project
--[[UI界面]]

UIManager = {

    }
function UIManager:Start()
    -- print('ui_manager:Start')
    ABManager:LoadFile("prefabs")
    local buttonPrefab = ABManager:LoadAsset("prefabs","Button")
    local buttonGameObject = UIManager:Instantiate(buttonPrefab)
    buttonGameObject:GetComponent(typeof(CS.UnityEngine.UI.Button)).onClick:AddListener(buttonListener)
end


function UIManager:Update()
    -- print('ui_manager:Update')
end

-- 初始化预制体
function UIManager:Instantiate(prefab)
    local gameObject =  CS.UnityEngine.Object.Instantiate(prefab)
    gameObject.transform:SetParent(CS.UnityEngine.GameObject.Find("Canvas").transform);
    gameObject.transform.localRotation = CS.UnityEngine.Quaternion.identity;
    gameObject.transform.localPosition = CS.UnityEngine.Vector3.zero;
    gameObject.transform.localScale = CS.UnityEngine.Vector3.one;
    gameObject.name = gameObject.name
    return gameObject
end
-- button的监听
function buttonListener()
    local vidioPlayerPrefab = ABManager:LoadAsset("prefabs","VideoPlayer")
    local vidioGameObject = UIManager:Instantiate(vidioPlayerPrefab)
    local rectTransform = vidioGameObject:GetComponent("RectTransform");
    rectTransform.offsetMax = CS.UnityEngine.Vector2.zero;
    rectTransform.offsetMin = CS.UnityEngine.Vector2.zero;
end
AB package use (asynchronously load AB package)
Note:
see https://blog.csdn.net/iiiiiiimp/article/details/128304154
Editor mode operation (Editor editor development)
Notes:
(1) The CubeManager script component must implement features [ExecuteInEditMode]so that its Update()methods can be called when the mouse moves/clicks in the Scene.
(2) The CubeManagerEditor editor script is used to edit what the CubeManager script component displays in the Inspector panel, so it needs to be [CustomEditor(typeof(CubeManager))]associated with the CubeManager script component and OnEnable()obtain the CubeManager script object in the method cubeManager = (CubeManager)target . OnInspectorGUI()Describe the buttons to be drawn in the CubeManager component in the method, and this method will be executed every time the value of the CubeManager script component changes or the GameObject mounted by the CubeManager script component is clicked .
public override void OnInspectorGUI() {


    Debug.Log("CubeManagerEditor:OnInspectorGUI");
    //显示cubeList
    serializedObject.Update();
    SerializedProperty serializedProperty = serializedObject.FindProperty("cubes");
    EditorGUILayout.PropertyField(serializedProperty, new GUIContent("节点"), true);
    serializedObject.ApplyModifiedProperties();
    //开始编辑按钮显示
    if (isEditor==false && GUILayout.Button("开始连线")) {


        Windows.OpenWindow(cubeManager.gameObject);
        isEditor = true;
    }
    //关闭编辑
    else if (isEditor && GUILayout.Button("结束连线"))
    {


        Windows.CloseWindow();
        isEditor = false;
    }
    //删除最后一个节点
    if (GUILayout.Button("删除最后一个连线"))
    {


        RemoveAtLast();
    }//删除所以节点
    else if (GUILayout.Button("删除所有连线"))
    {


        RemoveAll();
    }
}
OnSceneGUI()The method will be executed when the mouse changes in the Scene view, such as mouse movement and click. The launch ray is also inside, because Input.GetMouseButtonDown(0)it needs to be executed when the game is running, but the game is not running under the editor, so the mouse monitoring is used
Event.current.button == 0 && Event.current.type == EventType.MouseDown
Similarly, emitting rays from the screen cannot be Camera.main.ScreenPointToRay(Input.mousePosition)used but instead
Ray ray = HandleUtility.GUIPointToWorldRay(Event.current.mousePosition);
the code
//当选中关联的脚本挂载的物体
//当鼠标在Scene视图下发生变化时,执行该方法,比如鼠标移动,比如鼠标的点击
private void OnSceneGUI() {


    if (!isEditor)return;
    //点击了鼠标左键
    //非运行时,使用Event类 , 不能用Input.GetMouseButtonDown(0)
    //Event.current.button 判断鼠标是哪个按键的
    //Event.current.type 判断鼠标的事件方式的
    if (Event.current.button == 0 && Event.current.type == EventType.MouseDown) {


        RaycastHit hit;
        //从鼠标的位置需要发射射线了
        //因为是从Scene视图下发射射线,跟场景中的摄像机并没有关系,所以不能使用相机发射射线的方法
        //从GUI中的一个点向世界定义一条射线, 参数一般都是鼠标的坐标
        Ray ray = HandleUtility.GUIPointToWorldRay(Event.current.mousePosition);
        if (Physics.Raycast(ray, out hit))
        {


            if (hit.transform.tag == "Plane") {

    //点到的是地板
                GameObject prefab = Resources.Load<GameObject>("Prefabs/Cube");
                GameObject cube = Instantiate(prefab, hit.point+ Vector3.up, prefab.transform.rotation);
                cubeManager.cubes.Add(cube);

            }else if (hit.transform.tag == "Cube") {

    //点到的是Cube
                cubeManager.cubes.Add(hit.transform.gameObject);                }

        }
    }
}
(3) The reason why a window needs to pop up is because when a Cube is created, Unity will automatically select and focus on the Cube, and create a window and use it to Update()let Selection.activeGameObject = _planeUnity focus on the Plane where the CubeManager script component is hung.
private void Update() {


    Debug.Log("Windows:Update");
    //让选中焦点一直处于plan上,不是处于创建的cube上
    if (Selection.activeGameObject!= null) {


        Selection.activeGameObject = _plane;
    }
}
Phong lighting model (vertex fragment Shader, surface body Shader)
Note:
the left is the vertex fragment shader effect, and the right is the surface body shader effect
(1) The vertex fragment shader implements Phong lighting.
The main texture and normal texture use the same one float4 texcoodr:TEXCOORD0;, because the main texture and normal The uv coordinates of the texture are the same
r.uvMainTexture = o.texcoodr.xy * _MainTexture_ST.xy +  _MainTexture_ST.zw;
r.uvNormalTexture = o.texcoodr.xy * _BumpTexture_ST.xy +  _BumpTexture_ST.zw;
Use float3 matrixRow1 : TEXCOORD4;float3 matrixRow2 : TEXCOORD5;float3 matrixRow3 : TEXCOORD6;to store the transformation matrix from tangent space to world space
float3 worldNormal = mul((float3x3)unity_ObjectToWorld,o.normal);
float3 worldTangent = mul((float3x3)unity_ObjectToWorld,o.tangent.xyz);
float3 worldBinormal = cross(worldNormal,worldTangent)*o.tangent.w;
r.matrixRow1 = float3(worldTangent.x,worldBinormal.x,worldNormal.x);
r.matrixRow2 = float3(worldTangent.y,worldBinormal.y,worldNormal.y);
r.matrixRow3 = float3(worldTangent.z,worldBinormal.z,worldNormal.z);
Use UnpackNormal()the normal texture to get the normal in the tangent space, and then dot-multiply the transformation matrix to convert the tangent space of the normal to the world space.
fixed4 bumpColor = tex2D(_BumpTexture,o.uvNormalT
fixed3 bump = UnpackNormal(bumpColor);
bump *= _BumpScale;
bump.z = sqrt(1 - max(0, dot(bump.xy, bump.xy)));
bump = fixed3(
    dot(o.matrixRow1,bump),
    dot(o.matrixRow2,bump),
    dot(o.matrixRow3,bump)
    );
The normals of diffuse and specular reflections use the normal bump of the normal texture
//漫反射光照
fixed4  mainTextureColor = tex2D(_MainTexture,o.uvMainTexture)* _MainColor;
fixed3 diffuseColor = _LightColor0.rgb*mainTextureColor.rgb*  (dot(normalize(bump),normalize(_WorldSpaceLightPos0.xyz))*0.5+0.5);
//高光反射
fixed3 viewDir = normalize(_WorldSpaceCameraPos.xyz-o.worldPos.xyz);
fixed3 reflectDir = normalize(reflect(normalize(-_WorldSpaceLightPos0.xyz),normalize(bump)));
fixed3 specularColor = _LightColor0.rgb*_SpecularColor.rgb*pow(max(0,dot(viewDir,reflectDir)),_Gloss);
Finally add self-illumination
fixed3 color = UNITY_LIGHTMODEL_AMBIENT.xyz * mainTextureColor.rgb + diffuseColor + specularColor;
return fixed4(color,1);
(2) The surface volume shader implements Phong lighting.
The surface volume shader is relatively simple.
Use Lambert lighting directly in pragma
#pragma surface surf Standard Lambert
Give the normal to Normal and the texture to Albedo.
struct Input
{


    float2 uv_MainTex;
    float2 uv_BumpTex;
};
void surf (Input IN, inout SurfaceOutputStandard o)
{


    fixed4 c = tex2D (_MainTex, IN.uv_MainTex) * _Color;
    half3 n = UnpackNormal(tex2D(_BumpTex,IN.uv_BumpTex));
    o.Albedo = c.rgb;
    o.Alpha = c.a;
    o.Normal = n;
    o.Smoothness = _Glossiness;
Character lighting effects (surface body Shader)
Note:
see https://blog.csdn.net/iiiiiiimp/article/details/127251001?
Image Gradient (Fixed Pipeline Shader)
Note:
see https://blog.csdn.net/iiiiiiimp/article/details/127170580?
Mall system (SQLite access)
Points to note:
(1) Design of database tables
Mall table: store items and the number of items
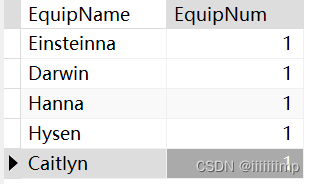
Equipment information table: store various attribute information of equipment
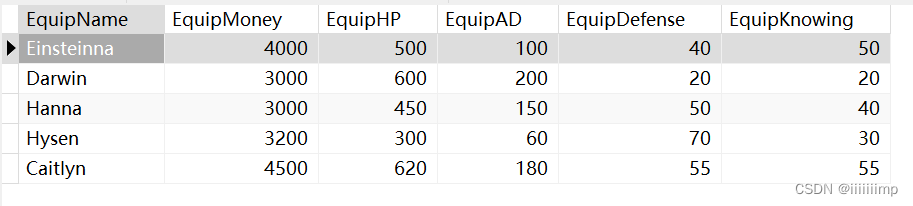
Character information table: store character information of characters

Character equipment table: store character equipment

(2) Database Access,
update, ExecuteNonQuery
return a single result, ExecuteScalar
return multiple results ExecuteReader, here I save ExecuteReaderthe result with one List<Dictionary<string, string>>for later calling, note that ExecuteReaderit must be called after execution _sqliteDataReader.Close();
    public List<Dictionary<string, string>> ExecuteReaderSQL(string sql) {


        List<Dictionary<string, string>> list = new List<Dictionary<string, string>>();
        _sqliteCommand.CommandText = sql;
        _sqliteDataReader = _sqliteCommand.ExecuteReader();
        while (_sqliteDataReader.Read()) {

    //读一行
            Dictionary<string, string> dictionary = new Dictionary<string, string>();
            for (int i = 0; i < _sqliteDataReader.FieldCount; i++) {

    //读这一行得一列
                Debug.Log(_sqliteDataReader.GetName(i)+":"+_sqliteDataReader.GetValue(i).ToString());
                dictionary.Add(_sqliteDataReader.GetName(i),_sqliteDataReader.GetValue(i).ToString());
            }
            list.Add(dictionary);
        }
        //关闭读取器
        _sqliteDataReader.Close();
        return list;
    }
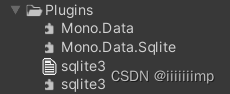
(3) Resource access
Assets/Plugins path is used to store dynamic link libraries imported from the outside, and sqlite3 is placed under the
Assets/Resources file to store image prefabs, so that they can be Resources.Load<>accessed through, such as get the prefab
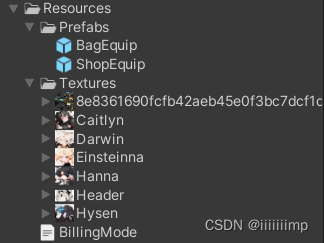
	private void GetGameObject() {


        bagEquipPrefab = Resources.Load<GameObject>("Prefabs/BagEquip");
        shopEquipPrefab = Resources.Load<GameObject>("Prefabs/ShopEquip");
    }
The database is placed under the Assets/StreamingAssets file and then Application.streamingAssetsPathaccessed by
string dataPath = "Data Source = " + Application.streamingAssetsPath + "/" + "UnitySQLite.db";
(4) Placement of equipment
Use Instantiateto directly create the equipment on the sub-object corresponding to the Box
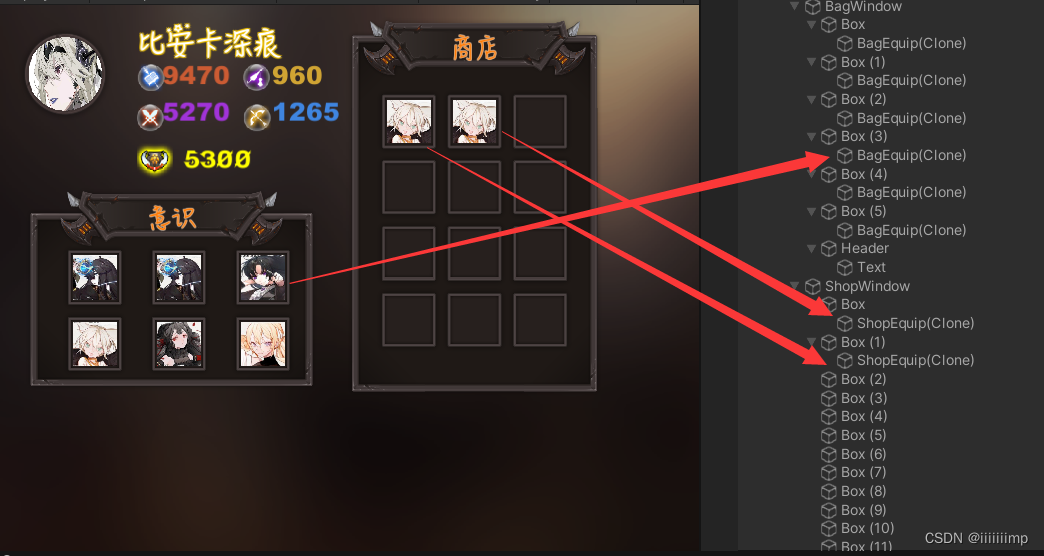
GameObject bagGameObject = Instantiate(shopEquipPrefab, shopWindowTransform.GetChild(shopEquipCount));
(5) The monitoring of the equipment
is implemented _button.onClick.AddListener(方法名);, so that there is no need to drag and drop
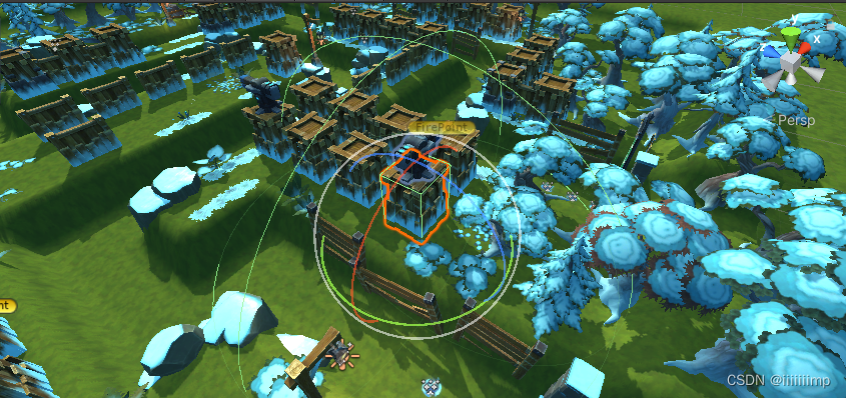
3D tower defense (AI pathfinding)
Notes:
1. Monster generation
The core idea is to use a class MonsterWaveMessageto store the information of each wave of monsters, put the objects of this class in an array MonsterWaveMessage[], and finally generate monsters by traversing the array. [System.Serializable]It is to allow the Inspector panel to display this class.
	[System.Serializable]
    public class MonsterWaveMessage {


        [Header("每波的时间间隔")]
        public float waveInterval = 1f;
        [Header("当前波怪物生成时间间隔")]
        public float monsterCreateInterval = 1f;
        [Header("当前波怪物数量")]
        public int monsterCount = 3;
        [Header("当前波怪物预设体")]
        public GameObject monsterPrefab;
        [Header("当前波怪物血量倍率")]
        public int monsterHPRate = 1;
        [Header("当前波怪物移动速度倍率")]
        public int monsterSpeedRate = 1;
    }
2. The shooting range of the turret
is made with BoxCollider. OnTriggerEnterWhen the monster enters the call, the monster will be added to a list, and the first one will be attacked by default. Remove the List when the monster leaves or dies OnTriggerExit. Therefore, the monster also needs to use a List to store the turret, so that it can notify the turret to remove it when it dies.
into range
   private void OnTriggerEnter(Collider other) {


        if (other.gameObject.tag == "Monster") {


            MonsterController monster = other.GetComponent<MonsterController>();
            if (!_monsterList.Contains(monster)) {


                //添加攻击目标
                _monsterList.Add(monster);
                //Monster添加攻击炮塔
                monster.AddTowerController(this);
            }
        }
    }
out of range
	private void OnTriggerExit(Collider other) {


        if (other.gameObject.tag == "Monster") {


            MonsterController monster = other.GetComponent<MonsterController>();
            if (_monsterList.Contains(monster)) {


                _monsterList.Remove(monster);
                //移除被锁定的炮塔
                monster.RemoveTowerController(this);
            }
        }
    }
3. Only when you turn to the monster can you shoot
	private float turn2Moster(MonsterController monster) {


        Vector3 i2monster = monster.transform.position-turretTransform.position + Vector3.up * 1f + Vector3.forward * 0.5f;
        Quaternion targetRoate = Quaternion.LookRotation(i2monster);
        turretTransform.rotation = Quaternion.Lerp(turretTransform.rotation,targetRoate,turnSmoothSpeed * Time.deltaTime);
        return Vector3.Angle(turretTransform.forward, i2monster);
    }
4. The monster is attacked and died.
The shell created by the turret judges the distance to the monster. If it is less than 0.5 meters, it is judged as a hit, and the following script is destroyed, leaving the shell in place. And notify the hit monster to reduce the blood volume, and play the injury animation or death animation.
It should be noted that when the monster dies, you need to close the rigid body, navigation, and collision body. You can’t just close the collision body, because the navigation system also has collision bodies. If you don’t close it, it will Let the monster behind think it is an obstacle.
    private void Die() {


        //关闭导航碰撞和碰撞体和刚体
        Destroy(_rigidbody);
        _navMeshAgent.isStopped = true;
        _navMeshAgent.enabled = false;
        _capsuleCollider.enabled = false;
        this.liveState = LiveState.Die;
        //通知Tower将自己移除
        TowerRemoveMe();
        _towerControllerList.Clear();
    }
5. Generation of turrets
Set all turrets to the Tower layer, and then use the mouse to shoot rays. The layerMask only detects the Tower layer.
if (Input.GetMouseButtonDown(0)) {


	Ray ray = Camera.main.ScreenPointToRay(Input.mousePosition);
	LayerMask layerMask = LayerMask.GetMask("Tower");
	//只检测Tower层的射线
	if (Physics.Raycast(ray,out _raycastHit,100,layerMask) && currentChioceTowrtID != -1) {


	Transform tower = _raycastHit.transform;
	if (tower.childCount == 0) {

    //还没有放置炮塔
		GameObject tow = Instantiate(towerPrefab[currentChioceTowrtID], Vector3.zero, Quaternion.identity);
		tow.transform.parent = tower.transform;
		tow.transform.localPosition = Vector3.up * 2.7f;
		}
	}
}
6. The movement of the lens
is to use the current moving position of the camera plus the current direction of the mouse movement, and then Mathf.Clamplimit the lens within a certain range.
if (Input.GetMouseButton(0))
{


	Vector3 transPosition = cameraTrans.position
							- Vector3.right * Input.GetAxisRaw("Mouse X") * sensitivityDrag * Time.timeScale
                            - Vector3.forward * Input.GetAxisRaw("Mouse Y") * sensitivityDrag * Time.timeScale;
	cameraTrans.position = transPosition;
	cameraTrans.position = new 	Vector3(
							Mathf.Clamp(cameraTrans.position.x,20,40),
                           	cameraTrans.position.y,
                            Mathf.Clamp(cameraTrans.position.z,2, 30));
}
A* Pathfinding Algorithm
Notes:
1. Algorithm flow 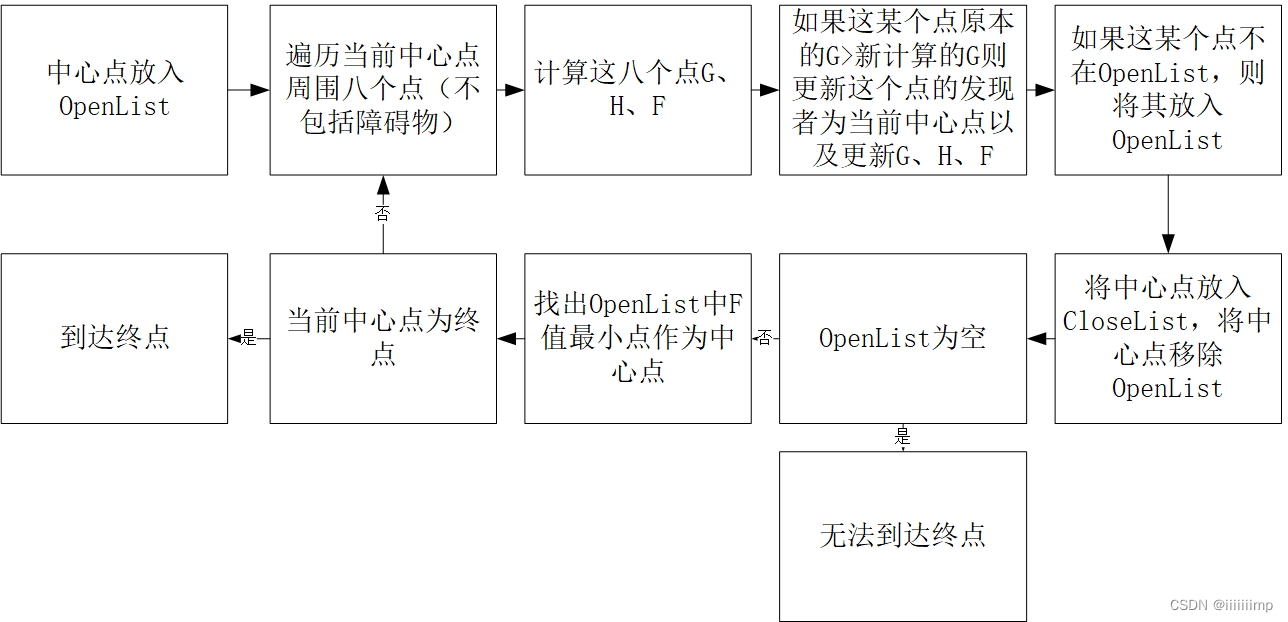
2. G is the estimated cost of the current point from the starting point
 if (i==0 || j == 0) {


	G = 10;
	} else {


	G = 14;
}
G += centerCube.G;
H is the estimated cost from the current point to the end point, (the coordinates of the end point - the coordinates of the current point) * 10
H = (cubeEnd.X - currentCube.X + cubeEnd.Z - currentCube.Z) * 10;
F is F=G+H
3. The center point is used to determine the next step forward route, because the selection of the center point is related to H. The finder finder is used to determine the route to mark back, because the selection of the finder finder is related to G and the current center point is selected.
Animation system (animation state machine)
Points to note:
1. From standing to running, the fusion tree makes the transition more natural.
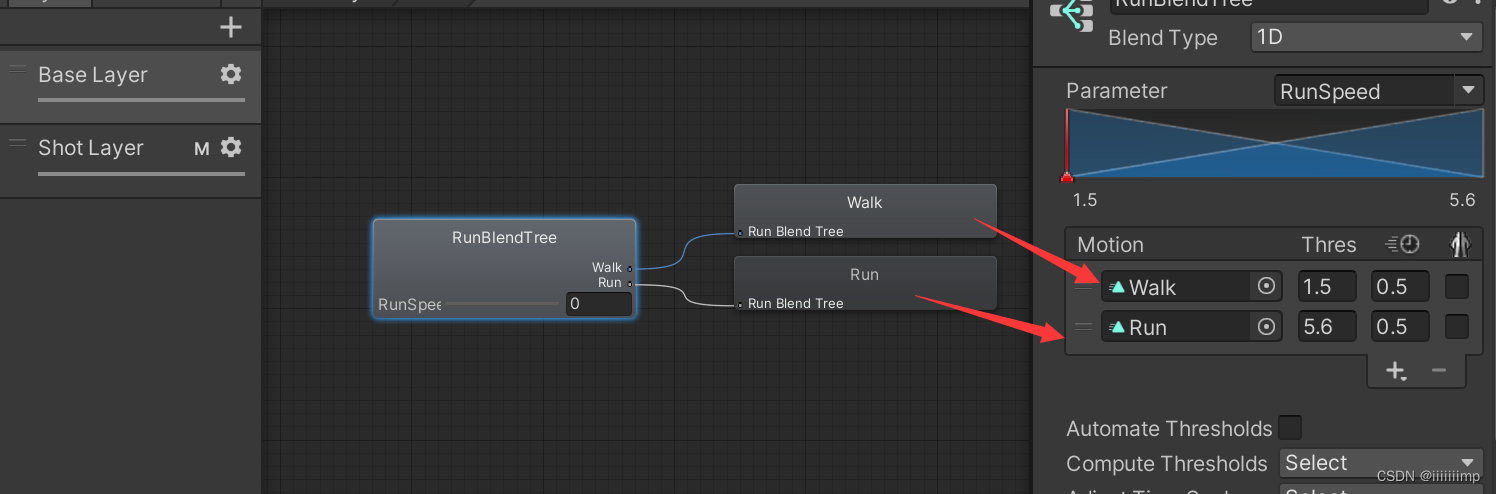
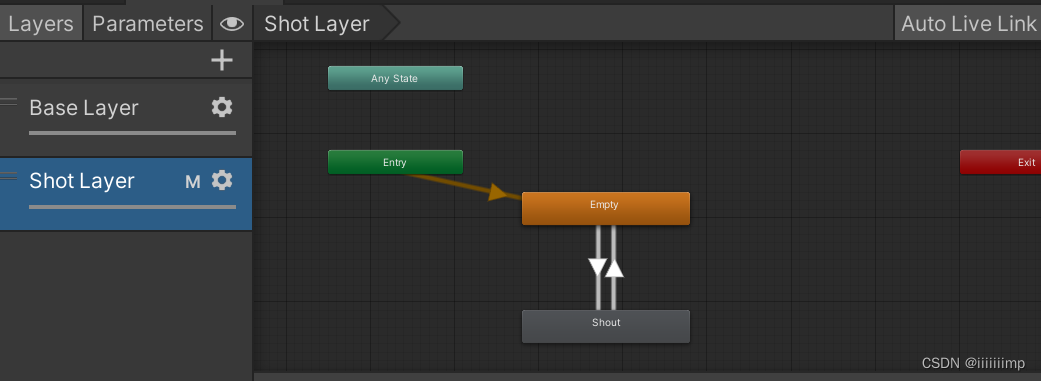
The animation state machine is as follows. Use the RunSpeed(float)>0.1 parameter to control whether the character is standing or running.
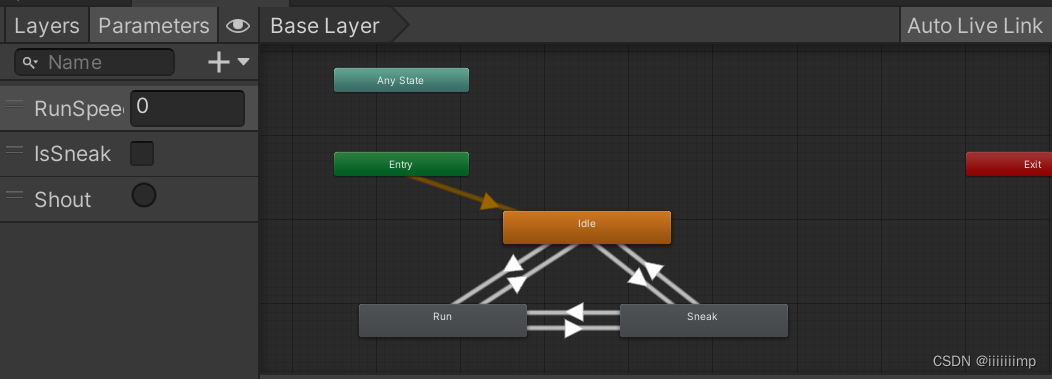
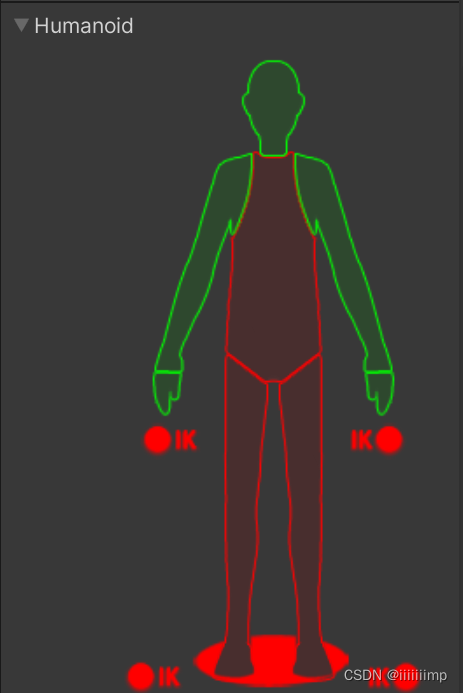
2. The shouting animation is placed on the second level , use the Trigger to control the shout playback. The bone mask only selects the hands and head. It should be noted that when the character shouts, the trigger condition is empty and HasExitTime must be checked (usually unchecked), otherwise it will not be possible to return to Empty.
3. The character's silent step and shout are both virtual buttons set, and it is Input.GetButton("Sneak")judged Input.GetButton("Shout")whether to press and hold the virtual button.
4. The character turning code, that is, first obtain the direction of the character's movement, moveDir = new Vector3(horAxis, 0, virAxis);then convert this direction into a quaternion moveQua = Quaternion.LookRotation(moveDir);, and finally let the character move in this direction.transform.rotation = Quaternion.Lerp(transform.rotation, moveQua, Time.deltaTime * turnSpeed);
virAxis = Input.GetAxis("Vertical");
horAxis = Input.GetAxis("Horizontal");
runSpeedParameter = Animator.StringToHash("RunSpeed");
if (virAxis != 0 || horAxis!= 0) {


	//播放动画
	_animator.SetFloat(runSpeedParameter,MOVE_MAX_SPEED,0.3f,Time.deltaTime);
	//获取移动方向
	moveDir = new Vector3(horAxis, 0, virAxis);
	//将方向转化为四元数
	moveQua = Quaternion.LookRotation(moveDir);
	//角色转身
	transform.rotation = Quaternion.Lerp(transform.rotation, moveQua, Time.deltaTime * turnSpeed);
	} else {


	_animator.SetFloat(runSpeedParameter,0,0.1f,Time.deltaTime);
}
5. The camera follows the code
Vector3 followDir =cameraTransform.position - this.transform.position;
Vector3 moveDir = originalPlayer2Camera - followDir;
float moveSpeed = 3f;
cameraTransform.position =
	Vector3.Lerp(cameraTransform.position, moveDir + cameraTransform.position, Time.deltaTime * moveSpeed);
Backpack system (item dragging)
Notes:
1. Detection when equipment is dragged. In order to detect where the equipment is dragged, is it the equipment bar? Inventory? Wait, you need to detect the position of the mouse movement when dragging the equipment. Therefore, in the equipment script, turn off the properties OnBeginDragof the equipment , and then turn it on again, so that when you drag the equipment, you will get the UI controls under the equipment. Because if the property is not turned off, the dragged equipment UI is always detected.raycastTargetOnEndDrageventData.pointerEnterraycastTargeteventData.pointerEnter
    public void OnBeginDrag(PointerEventData eventData) {


        equipmentImageGetComponent.raycastTarget = false;
    }
    public void OnDrag(PointerEventData eventData) {


        this.transform.position = Input.mousePosition;
        Debug.Log(eventData.pointerEnter);
    }
    public void OnEndDrag(PointerEventData eventData) {


        equipmentImageGetComponent.raycastTarget = true;
    }
OnBeginDrag2. In order to make the dragged object displayed on the top layer, so that it is not covered by other objects when dragging, it is necessary to reset its parent object to the canvas before dragging , and record the parent object before dragging
public void OnBeginDrag(PointerEventData eventData) {


    //关闭射线
	equipmentImageGetComponent.raycastTarget = false;
   	//拖动前的位置
   	beginDragParentTransform = this.transform.parent;
   	//更改变父对象,让其能显示在最上层
   	this.transform.SetParent(canvasTransform);
}
3. After dragging, OnEndDragpass in eventDatato tagjudge whether it is dragged to the grid or equipment, if not, return to the original position
public void OnEndDrag(PointerEventData eventData) {


	    GameObject eventDataGameObject = eventData.pointerEnter;
        //放入空的装备栏 或则 空的背包栏 或则 已经装备了的背包栏或装备栏
        if ((eventDataGameObject.tag == "EquipBox"||
            eventDataGameObject.tag == "BagBox"||
            eventDataGameObject.tag == "Equipment") &&
            eventDataGameObject.transform != beginDragParentTransform
            ) {


            if (eventDataGameObject.tag == "Equipment") {

    //已经装备了的背包栏或装备栏
                eventDataGameObject.GetComponent<EquipmentController>().ReceiveEquipment(this.gameObject);
            } else {

    //空的装备栏 或则 空的背包栏
                eventDataGameObject.GetComponent<BaseBox>().ReceiveEquipment(this.gameObject);
            }
        } else {


            BackToOriginalPosition();
        }
        equipmentImageGetComponent.raycastTarget = true;
    }
4. It is very simple for the grid to accept equipment, just set the equipment as its child object, and then let it localPositionreturn to zero.
    public override void ReceiveEquipment(GameObject equipment) {


        // Debug.Log(this);
        equipment.transform.SetParent(this.transform);
        equipment.transform.localPosition = Vector3.zero;
        equipment.GetComponent<EquipmentController>().equipmentState = BaseEquipment.EquipmentState.BagBoxing;
    }
Level selection UI interface (UGUI)
Notes:
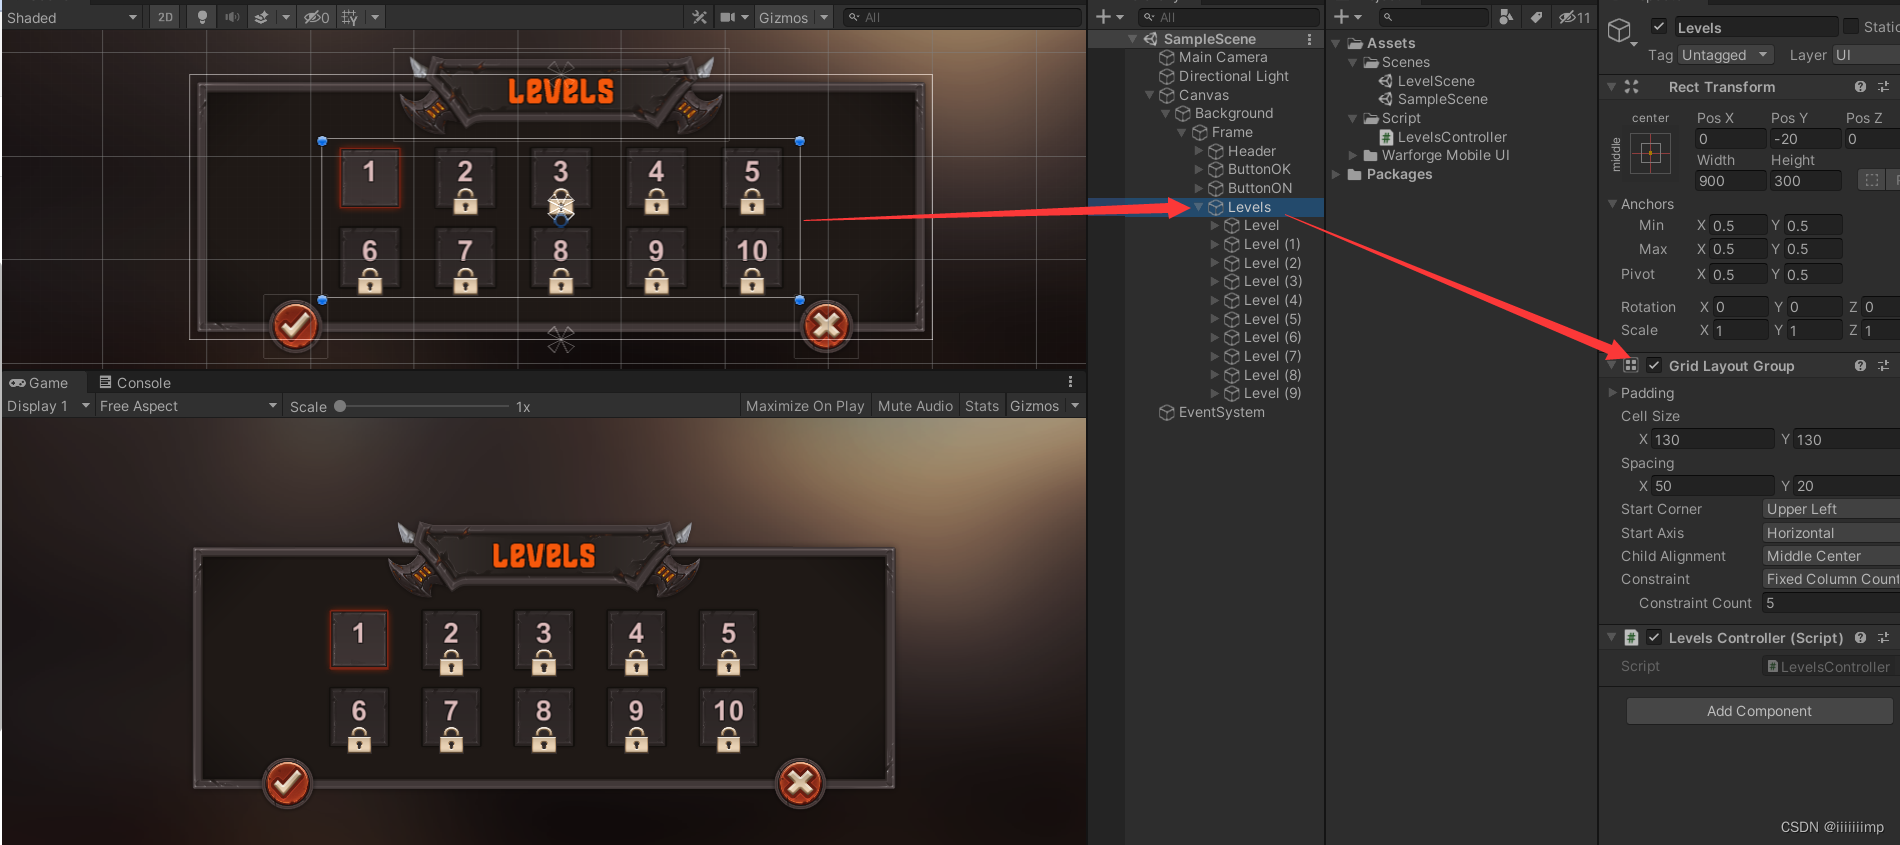
1. The layout of the level uses grid layout, first create an empty object, and add grid layout components. Then set each tube clip as its child. The initialization of each level is initialized using code, and GetChildfunctions are used to hide or display the UI.
2. The red selection frame on the edge of the level is moved using selectFrame.SetParent(this.transform,false);the method, and false means that the property value of the Transform component of the selectFrame will not be changed.
3. The interface jump uses the singleton mode to save SceneManager.LoadScene(sceneName);the data that needs to be saved after the jump
public class SceneDataManager {


   //单例
   private static SceneDataManager ins;
   //传输数据
   private Dictionary<string, object> sceneOneshotData = null;
   //管理星星的数量
   private Dictionary<int, int> starDic;

   public Dictionary<int, int> StarDic {


      get {

     return starDic; }
   }

   public SceneDataManager() {


      starDic = new Dictionary<int, int>();
   }


   public static SceneDataManager GetInstance() {


      if (ins == null) {


         ins = new SceneDataManager();
      }
      return ins;
   }
}
4. To find objects, FindWithTag、GetChild、Findthese functions are generally used
5.
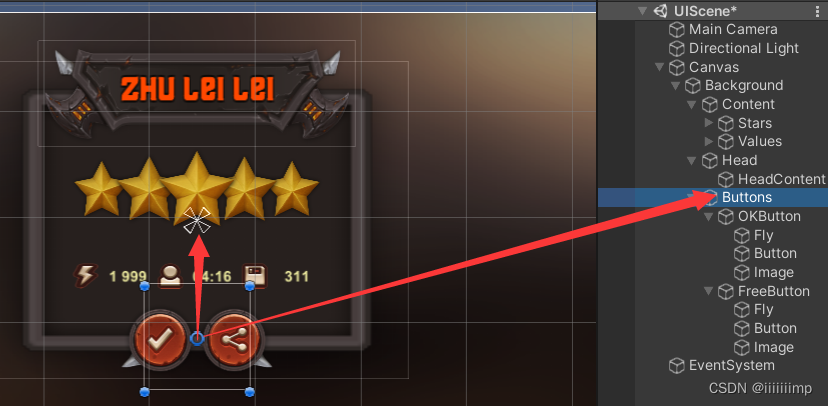
The level of the UI interface of the level should be clear. If you want to use one to create an empty object, set the anchor point of the empty object at the center of the screen, and then put the UI in the empty object.
Note that the higher the level panel is, the lower the UI level will be blocked.
3D tank battle (object system)
Note:
see https://blog.csdn.net/iiiiiiimp/article/details/125588752
Brickbreaker (ray detection)
Points to note:
1. cameraTransform = Camera.main.transformGet the position of the camera.
2. Camera.main.ScreenPointToRay(Input.mousePosition)Convert the mouse coordinates into a ray.
3. Get Physics.Raycast(mouseRay,out hit,rayDistance)the collider of the ray, and then hit.pointsubtract the camera position from the collider's position cameraTransform.positionto get the ball launch method, and then Rigidbody.velocityuse this Just one speed in one direction
Pick up gold coins (collision detection)
Note:
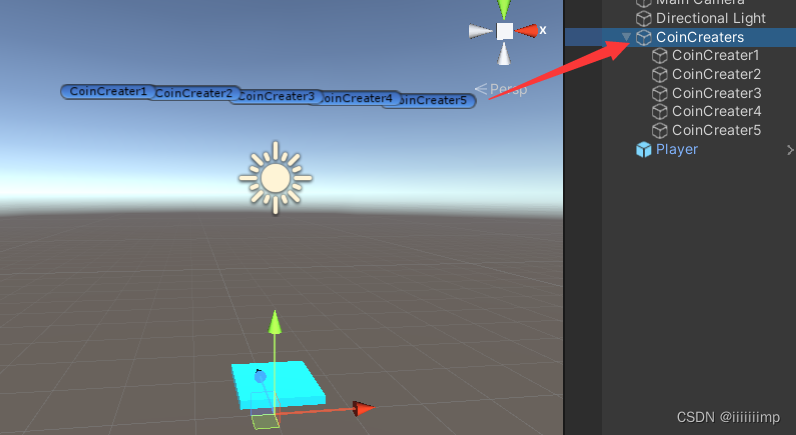
1. The grid collider used for the gold coin collider and the trigger are turned on, and the gravity is turned on for the rigid body component. In OnTriggerEnterthe method, the name of the triggerer is used to judge whether there is a penalty with the player (blue tablet). 2. The five empty objects CoinCreater1-5 used to create gold coins are set as sub-objects of an empty object CoinCreaters, so that sub-objects can be obtained
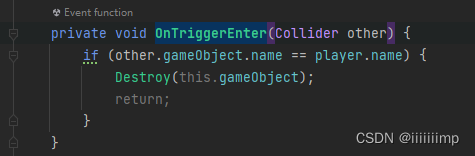
through the CoinCreaters script . this.transform.GetChild(i)Be careful not to use it this.gameObject.GetComponentsInChildren<Transform>(), because this function will also get the parent object CoinCreaters.
planets orbiting stars
Notes:
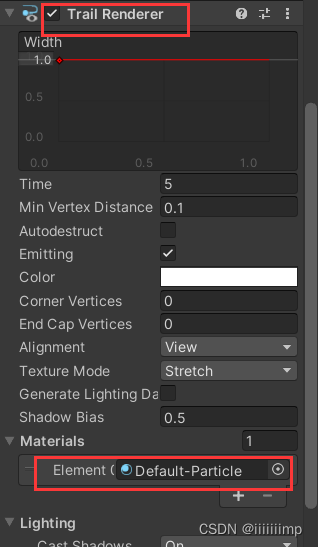
1. The white artifact behind the sphere
2. In order to make the planet revolve around the star (the red ball in the middle), the Vector3.Crosscross product is used to find the normal vector, and then this.transform.RotateAroundthe function is used.

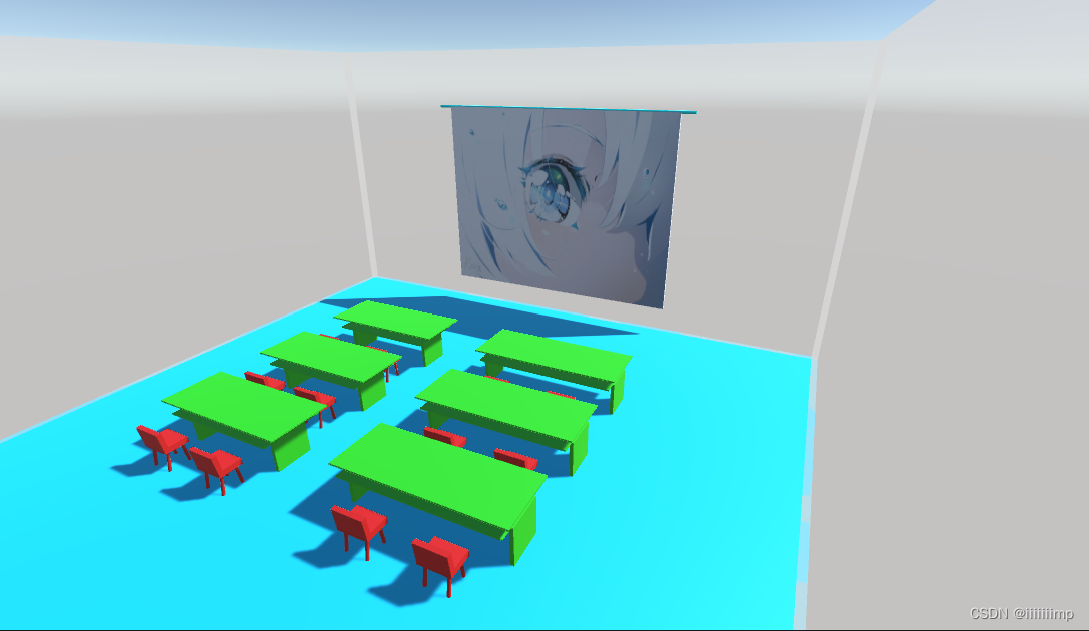
Personal scene construction
Notes:
1. Select the camera and press Ctrl+Shift+F to quickly move the camera to the position of the Scene.
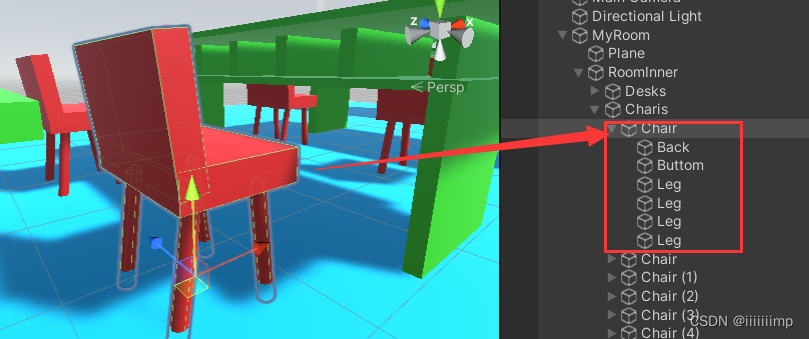
2. Generally, if you want to create a composite object (parent-child object), then it is best to use an empty object as the root object, and set this composite object as a child object of the empty object. The advantage of this is that the center point of the entire object is the empty object The center point, and avoid deformation when the sub-object is stretched and rotated.
For example, a chair can be divided into legs, chair back, and chair cushion.
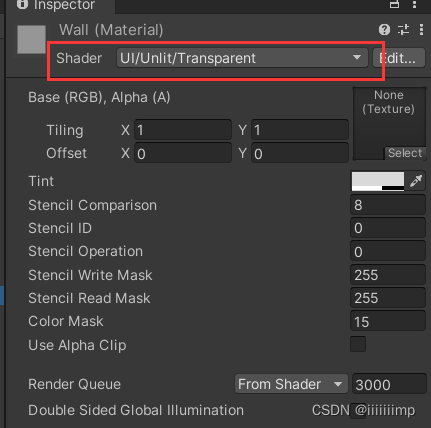
3. The transparent material of the wall.
4. Press W to shift the selected object and then press V to fit it.
Rolling ball game (input and output shaft)
written in the back
Everyone's time interval is different, don't care too much about other people's eyes, do more things you want to do while you are young and have nothing and start all over again.
