Article Directory
1. Introduction to QR Code
Let’s take a look at one-dimensional codes and two-dimensional codes first, and then have a deeper understanding of QR codes. Simply put, QR codes are a type of two-dimensional codes! ! !

Two-Dimensional Bar Code (2-Dimensional Bar Code) is a black and white pattern distributed on a plane (two-dimensional direction) according to certain rules to record data symbol information. It refers to the extension of another dimensional readable barcode on the basis of a one-dimensional barcode, using black and white rectangular patterns to represent binary data, and the information contained in it can be obtained after being scanned by the device. The width of a one-dimensional barcode records data, but its length does not record data. Data is recorded in both the length and width of the two-dimensional barcode. Two-dimensional barcodes have "locating points" and "fault tolerance mechanisms" that one-dimensional barcodes do not have. The fault-tolerant mechanism can correctly restore the information on the barcode even if all the barcodes are not recognized or the barcode is defaced.
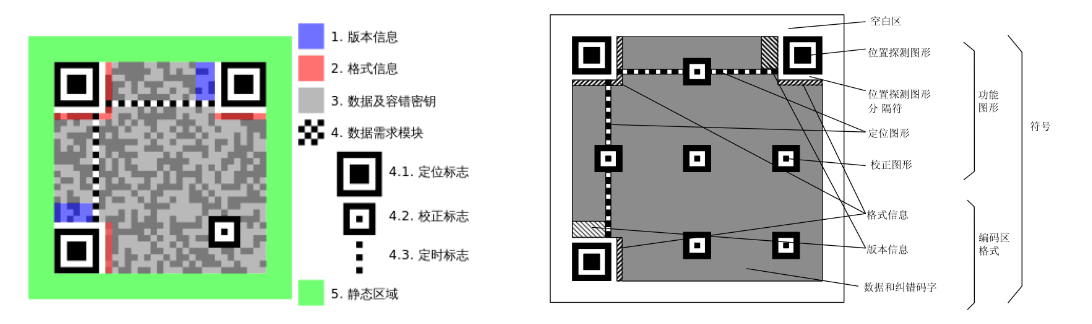
QR码呈正方形,常见的是黑白两色。在3个角落,印有较小,像“回”字的正方图案。这3个是帮助解码软件定位的图案,用户不需要对准,无论以任何角度扫描,数据仍然可以正确被读取。
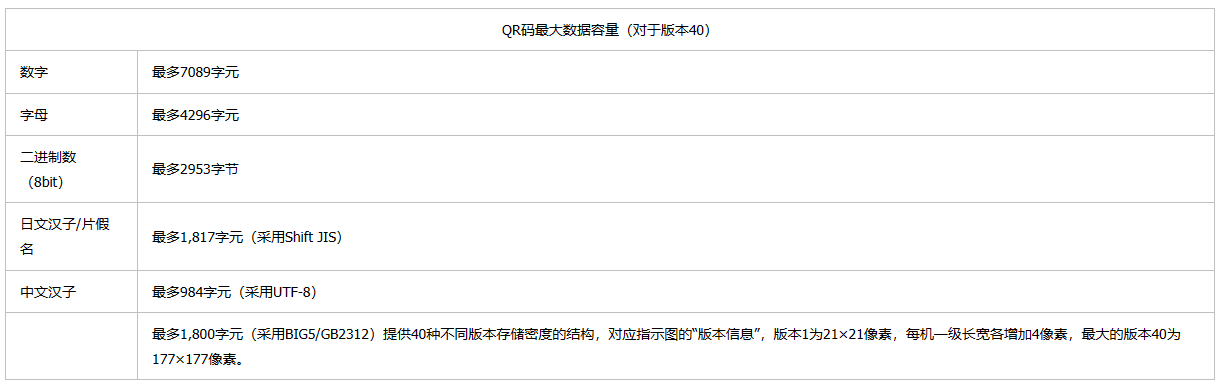
For different versions of QR codes, the capacity is also different. Theoretically, the compressed content can store 7089 numbers, 4296 mixed letters and numbers, 2953 8-bit data, and 1817 Chinese characters; as we can see above, the QR Code of different Versions is a different matrix, The version version exceeds, which means that the capacity is larger.
We just need to understand the details of QR codes. Today we mainly learn how to use the library in python to generate the QR codes we want. If you are more interested in this, you can click on this portal for in-depth learning! Hats off to the big guy.
2. Introduction to qrcode library
1 Introduction
The qrcode module is an open source project on Github, which provides an interface for generating QR codes. By default, qrcode uses the PIL library for image generation. Since the generation of qrcode images needs to rely on the Python image library, it is necessary to install the Python image library PIL (Python Imaging Library) first. When using the PIL library, because PIL is somewhat updated, the following error will be reported directly using the pip install PIL command, which can be changed ModuleNotFoundError: No module named 'PIL'. Install the PIL library with the following command.
pip install pillow
Commonly used library functions:
- add_data(str,optimize=20): Add the text to be converted to the data parameter; if the optimize optimization parameter is used, the data will be split into multiple blocks for optimization, in order to find a length at least this value is concise enough way to generate a QR code. Set to "0" to avoid optimization.
- make(fit=True): When the fit parameter is true or the version parameter is not given, the best_fit method will be called to find the minimum size suitable for the data.
- make_image(ill color=None, back_color=None, image_factory=None): Create the image of the QR code and return it, the default is the PIL image.
parameter configuration
- version: an integer, ranging from 1 to 40, indicating the size of the QR code (the minimum value is 1, which is a 12×12 matrix). If you want the program to generate it automatically, set the value to None and use the fit=True parameter. Can.
- error_correction: The error correction range of the QR code, you can choose 4 constants:
1. ERROR_CORRECT_L Errors below 7% will be corrected
2. ERROR_CORRECT_M (default) Errors below 15% will be corrected
3. ERROR_CORRECT_Q Errors below 25% will be corrected
4. ERROR_CORRECT_H. Errors below 30% will be corrected - boxsize: the number of pixels in each point (square)
- border: The distance between the QR code and the border of the image, the default is 4, and the minimum is 4
In general, the steps to generate a QR code:
- Create a QRCode object
- add_data() adds data
- make_image() creates a QR code (returns an im type image object)
- Automatically open the picture, im.show()
Let's see an example:
import qrcode

data = 'http://www.baidu.com/'
img_file = r'保存路径'

# 实例化QRCode生成qr对象
qr = qrcode.QRCode(
    version=1,
    error_correction=qrcode.constants.ERROR_CORRECT_H,
    box_size=10,
    border=4
)
# 传入数据
qr.add_data(data)

qr.make(fit=True)

# 生成二维码
img = qr.make_image()

# 保存二维码
img.save(img_file)
# 展示二维码
img.show()
It can be found that by adjusting parameters, QR codes with different appearances but the same stored information can be generated:

2. Preliminary preparation
ModuleNotFoundError: No module named 'qrcode', if this error occurs, it proves that we have not installed the qrcode library, you can use the following command to install qrcode. Then import and use!
pip3 install qrcode
After installation, you can happily generate a QR code! ! !
3. Change the style
1. Generate a QR code with a picture in the middle
The effect is as shown in the figure below. In fact, the information is still hidden in the QR code, but the style of the QR code is changed! ! !

The code used is as follows:
import qrcode
from PIL import Image
import matplotlib.pyplot as plt


def getQRcode(data, file_name):
    qr = qrcode.QRCode(
        version=1,
        error_correction=qrcode.constants.ERROR_CORRECT_H,
        box_size=5,
        border=4,
    )

    # 添加数据
    qr.add_data(data)
    # 填充数据
    qr.make(fit=True)
    # 生成图片
    img = qr.make_image(fill_color="green", back_color="white")

    # 添加logo,打开logo照片
    icon = Image.open("1.jpg")
    # 获取图片的宽高
    img_w, img_h = img.size
    # 参数设置logo的大小
    factor = 6
    size_w = int(img_w / factor)
    size_h = int(img_h / factor)
    icon_w, icon_h = icon.size
    if icon_w > size_w:
        icon_w = size_w
    if icon_h > size_h:
        icon_h = size_h
    # 重新设置logo的尺寸
    icon = icon.resize((icon_w, icon_h), Image.ANTIALIAS)
    # 得到画图的x,y坐标,居中显示
    w = int((img_w - icon_w) / 2)
    h = int((img_h - icon_h) / 2)
    # 黏贴logo照
    img.paste(icon, (w, h), mask=None)
    # 终端显示图片
    plt.imshow(img)
    plt.show()
    # 保存img
    img.save(file_name)
    return img


if __name__ == '__main__':
    getQRcode("http://oj.aiecp.cn", 'my1.png')
2. Generate colorful QR code
This is what it looks like after generation! Of course, this style needs to use another library myqr, just use pip install myqrthe download directly, if there is no mirror source configured, the download may be slower!

code show as below:
from MyQR import myqr

myqr.run(
    words='https://blog.csdn.net/apple_51931783?type=blog', # 扫描二维码后,显示的内容,或是跳转的链接
    version=5,# 设置容错率
    level='H',# 控制纠错水平,范围是L、M、Q、H,从左到右依次升高
    picture='1.gif',# 图片所在目录,可以是动图
    colorized=True, # 黑白(False)还是彩色(True)
    contrast=1.0, # 用以调节图片的对比度,1.0 表示原始图片。默认为1.0。
    brightness=1.0, # 用来调节图片的亮度,用法同上。
    save_name='Python.gif' # 控制输出文件名,格式可以是 .jpg, .png ,.bmp ,.gif
)
For the rest of the styles, you can refer to them yourself after encountering them or if you are interested in them. You can get a very nice-looking QR code by simply adjusting the parameters. I won't go into details here!
This is the end of the knowledge of QR codes. The introduction of this blog is relatively basic, and colorful QR codes are not commonly used, so everyone should master the generation of ordinary QR codes, and gradually move to complex QR codes after becoming proficient. Dimensional code step forward! ! !
