Table of contents
I. Introduction
- As the title says, I want to run a
TensorFlowbuilt model recently. After I installed the corresponding versionTensorFlowand the corresponding version according to the requirementsKeras, I found that the training model was extremely slow. The GPU memory was only used a little and the utilization rate was always zero, and it was prompted to find Less than some libraries, the tips are as follows.
2022-06-10 13:06:14.299058: I tensorflow/stream_executor/platform/default/dso_loader.cc:53] Could not dlopen library 'libcudart.so.10.0'; dlerror: libcudart.so.10.0: cannot open shared object file: No such file or directory; LD_LIBRARY_PATH: /usr/local/cuda-10.0/lib64:/usr/local/cuda-10.0/extras/CUPTI/lib64
2022-06-10 13:06:14.299110: I tensorflow/stream_executor/platform/default/dso_loader.cc:53] Could not dlopen library 'libcublas.so.10.0'; dlerror: libcublas.so.10.0: cannot open shared object file: No such file or directory; LD_LIBRARY_PATH: /usr/local/cuda-10.0/lib64:/usr/local/cuda-10.0/extras/CUPTI/lib64
2022-06-10 13:06:14.299155: I tensorflow/stream_executor/platform/default/dso_loader.cc:53] Could not dlopen library 'libcufft.so.10.0'; dlerror: libcufft.so.10.0: cannot open shared object file: No such file or directory; LD_LIBRARY_PATH: /usr/local/cuda-10.0/lib64:/usr/local/cuda-10.0/extras/CUPTI/lib64
2022-06-10 13:06:14.299198: I tensorflow/stream_executor/platform/default/dso_loader.cc:53] Could not dlopen library 'libcurand.so.10.0'; dlerror: libcurand.so.10.0: cannot open shared object file: No such file or directory; LD_LIBRARY_PATH: /usr/local/cuda-10.0/lib64:/usr/local/cuda-10.0/extras/CUPTI/lib64
2022-06-10 13:06:14.299239: I tensorflow/stream_executor/platform/default/dso_loader.cc:53] Could not dlopen library 'libcusolver.so.10.0'; dlerror: libcusolver.so.10.0: cannot open shared object file: No such file or directory; LD_LIBRARY_PATH: /usr/local/cuda-10.0/lib64:/usr/local/cuda-10.0/extras/CUPTI/lib64
2022-06-10 13:06:14.299281: I tensorflow/stream_executor/platform/default/dso_loader.cc:53] Could not dlopen library 'libcusparse.so.10.0'; dlerror: libcusparse.so.10.0: cannot open shared object file: No such file or directory; LD_LIBRARY_PATH: /usr/local/cuda-10.0/lib64:/usr/local/cuda-10.0/extras/CUPTI/lib64
2022-06-10 13:06:14.299326: I tensorflow/stream_executor/platform/default/dso_loader.cc:53] Could not dlopen library 'libcudnn.so.7'; dlerror: libcudnn.so.7: cannot open shared object file: No such file or directory; LD_LIBRARY_PATH: /usr/local/cuda-10.0/lib64:/usr/local/cuda-10.0/extras/CUPTI/lib64
2022-06-10 13:06:14.299336: W tensorflow/core/common_runtime/gpu/gpu_device.cc:1663] Cannot dlopen some GPU libraries. Skipping registering GPU devices...
2022-06-10 13:06:14.299421: I tensorflow/core/common_runtime/gpu/gpu_device.cc:1181] Device interconnect StreamExecutor with strength 1 edge matrix:
- Observing the prompt information and some phenomena, the author concluded that
CUDAthecuDNNversion is not installed properly, because the program will go to/usr/local/cuda-10.0/lib64the folder to find the library, but I did not install itCUDA 10.0. After searching for some information on the Internet, the author found that it was indeed a version problemCUDAwith the version, and there is actually a corresponding relationship between the version and the version, which made me feel even more difficult to use. But this machine is not exclusive to the author, and the machine has already been installed . The operation of coexistence and free switching is now sorted out as follows.cuDNNTensorFlowCUDATensorFlowCUDA 11.2cuDNN 8.4.0 任务描述:Install and on a machine whereCUDA 11.2and are installed , so that the two do not interfere with each other and can be switched freely.cuDNN 8.4.0CUDA 10.0cuDNN 7.4.1CUDAAndcuDNNthe version selection refers to this blog .
2. Install CUDA
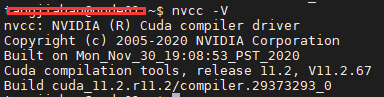
-
View existing CUDA environment
-
Download CUDA 10.0 from the official website
runfileto the server.
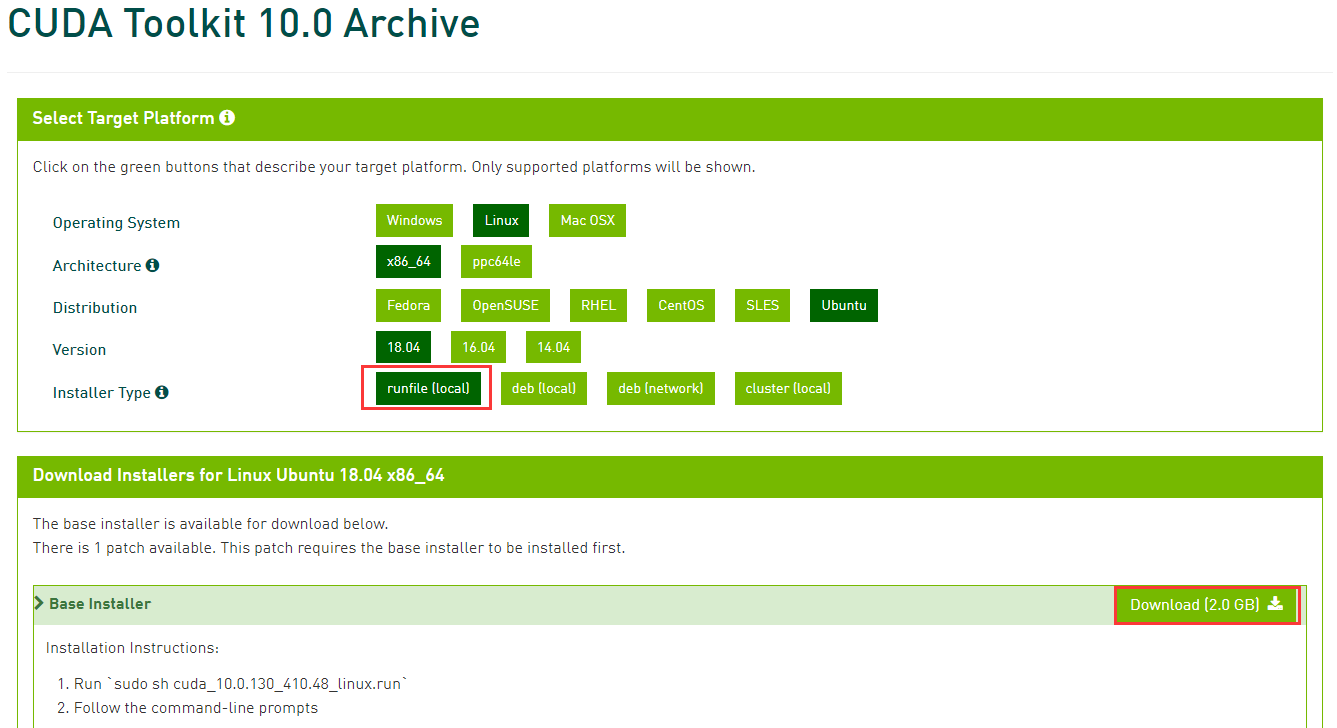
-
Install
CUDA 10.0
Execute the following commandsudo sh cuda_10.0.130_410.48_linux.run
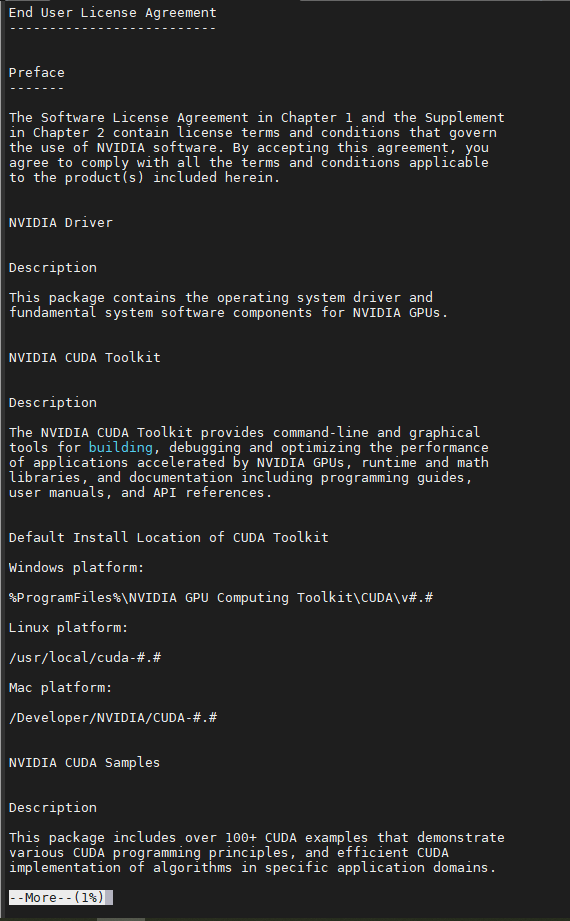
-
A protocol description appears, which can be
qskipped by pressing .
- 出现问题`Do you accept the previously read EULA?`
	- 输入`accept`+回车,继续安装。

- 出现不支持配置的提醒:`You are attempting to install on an unsupported configuration. Do you wish to continue?`
	- 输入`y`,继续安装。

- 出现是否安装显卡驱动的提醒,我们已经装过了:`Install NVIDIA Accelerated Graphics Driver for Linux-x86_64 410.48?`
	- 输入`n`,继续安装。

- 出现是否安装CUDA工具包:`Install the CUDA 10.0 Toolkit?`
	- 输入`y`,开始安装。

- 出现工具包安装地址:`Enter Toolkit Location`
	- 回车

- 出现是否添加符号链接,现在已经有一个了,为了不影响现有的CUDA环境,选择否:`Do you want to install a symbolic link at /usr/local/cuda?`
	- 输入`n`,继续安装。

- 出现是否安装样例,选择是:`Install the CUDA 10.0 Samples?`
	- 输入`y`,继续安装

- 出现安装样例位置,默认即可:`Enter CUDA Samples Location`
	- 回车
Not surprisingly, the installation should be completed at this time, but if you also report
Error: unsupported compiler: 9.4.0. Use --override to override this check.an error at this time, we will add the option to skip the inspection as he said--override.
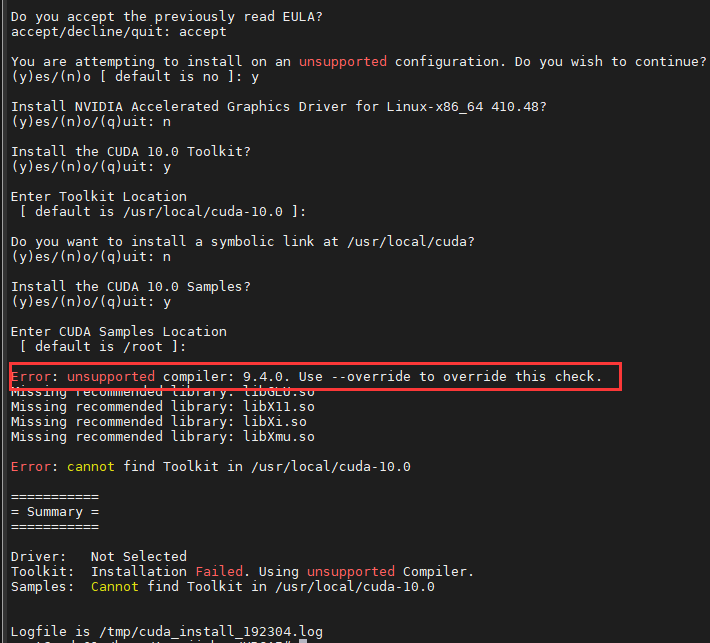
Execute the new command, the options are consistent with the above picture:
sudo sh cuda_10.0.130_410.48_linux.run --overrideIf the installation is successful, the following prompt will appear:
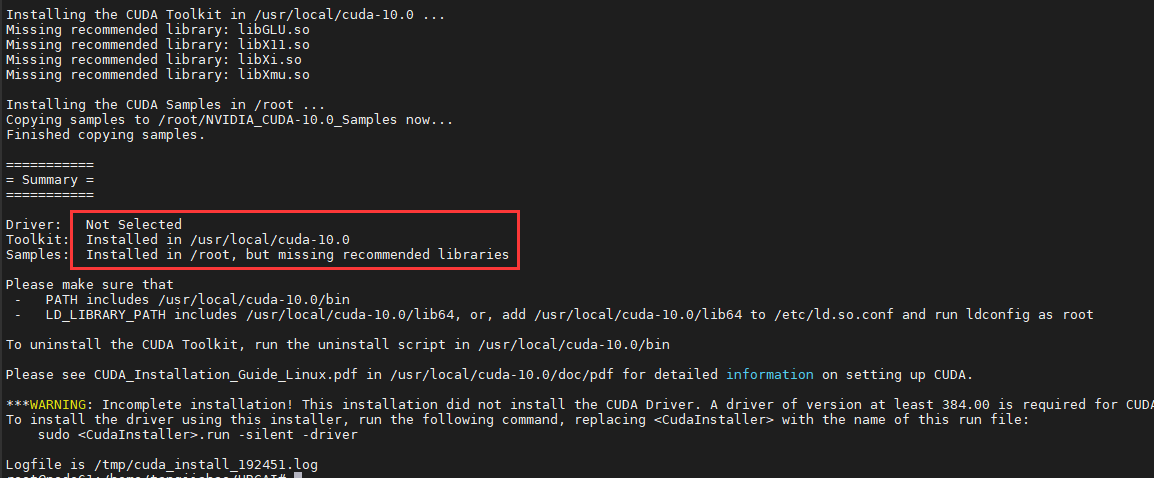
- In order not to affect the existing CUDA environment, the environment variables will not be modified. The following will describe in detail how to use the newly installed CUDA 10.0.
3. Install cuDNN
-
According to the version of the installed CUDA toolkit, select the appropriate version of cuDNN on the official website . The CUDA version installed in this article is 10.0, so select the one corresponding to TensorFlow 1.14.0
cuDNN 7.4.1and selectLocal Installer for Linux x86_64 (Tar).
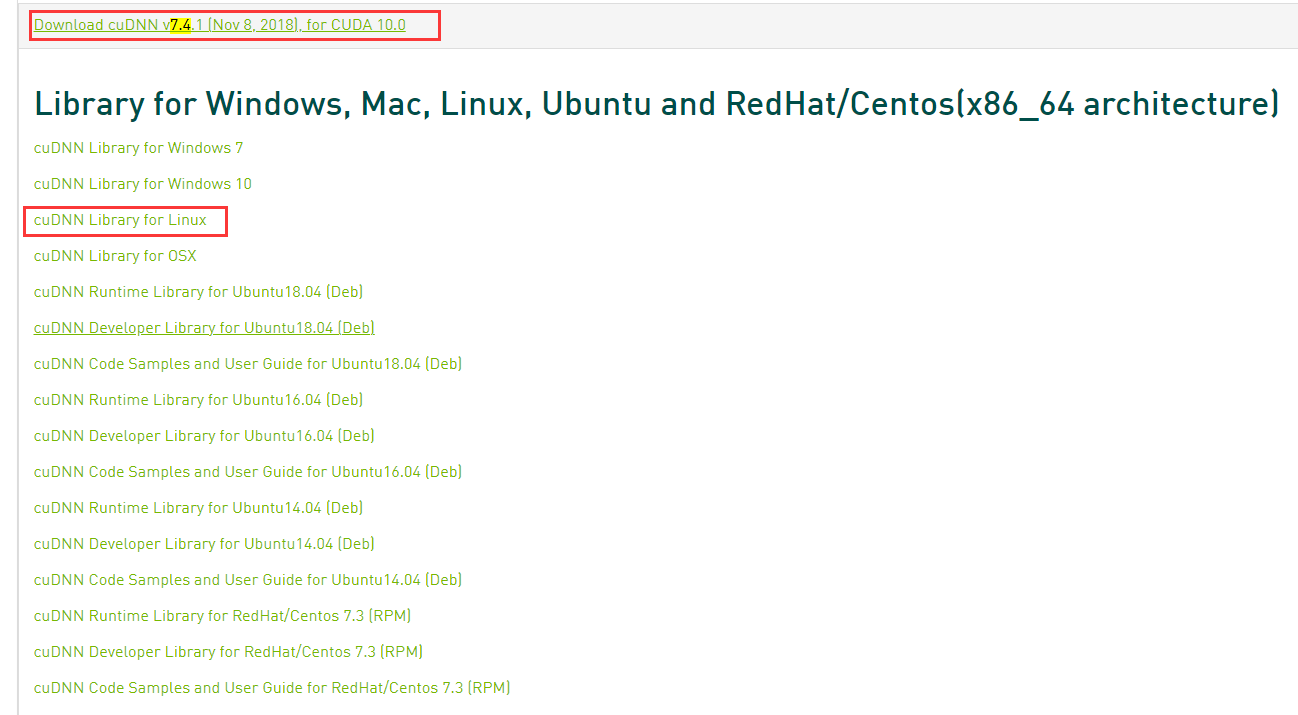
-
Copy the link of the cuDNN library, use wget to download or download it to your computer and then upload it to the server.
After downloading, the file name iscudnn-10.0-linux-x64-v7.4.1.5.solitairetheme8, you need to rename it and change it tocudnn-10.0-linux-x64-v7.4.1.5.tgz:mv cudnn-10.0-linux-x64-v7.4.1.5.solitairetheme8 cudnn-10.0-linux-x64-v7.4.1.5.tgz -
Unzip the cuDNN file, enter the extracted folder, and copy the file to /usr/local/cuda-10.0.
tar -xvf cudnn-10.0-linux-x64-v7.4.1.5.tgz cd cuda sudo cp lib64/* /usr/local/cuda-10.0/lib64/ sudo cp include/* /usr/local/cuda-10.0/include/ sudo chmod a+r /usr/local/cuda-10.0/lib64/* sudo chmod a+r /usr/local/cuda-10.0/include/* -
To check the cuDNN version, the command is
cat /usr/local/cuda-10.0/include/cudnn.h | grep CUDNN_MAJOR -A2.

-
Update the soft link, if you are not installing 7.4.1, remember to update the number in the command below.
cd /usr/local/cuda-10.0/lib64/ sudo rm -rf libcudnn.so libcudnn.so.7 sudo ln -s libcudnn.so.7.4.1 libcudnn.so.7 sudo ln -s libcudnn.so.7 libcudnn.so sudo ldconfig -v -
Finally, to avoid affecting the original CUDA environment, execute it again
source /etc/profileAt this time, another version of CUDA and cuDNN has been "sneaky" installed.
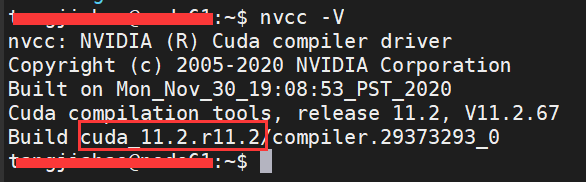
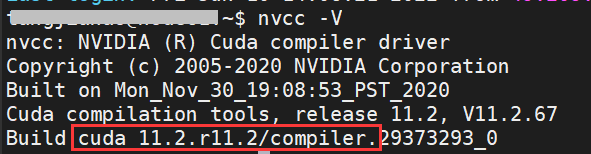
But
nvcc -Vthe version is still 11.2 at this time, how to implement CUDA version conversion, please see the next section.
4. Switch CUDA version
- Switch to a normal user, check the CUDA version, you can see it is still
11.2.
- Next we will use a script. The CUDA version switching script written by
phoheneckerthe great god
: hereby attach the code:
	#!/usr/bin/env bash

	# Copyright (c) 2018 Patrick Hohenecker
	#
	# Permission is hereby granted, free of charge, to any person obtaining a copy
	# of this software and associated documentation files (the "Software"), to deal
	# in the Software without restriction, including without limitation the rights
	# to use, copy, modify, merge, publish, distribute, sublicense, and/or sell
	# copies of the Software, and to permit persons to whom the Software is
	# furnished to do so, subject to the following conditions:
	#
	# The above copyright notice and this permission notice shall be included in all
	# copies or substantial portions of the Software.
	#
	# THE SOFTWARE IS PROVIDED "AS IS", WITHOUT WARRANTY OF ANY KIND, EXPRESS OR
	# IMPLIED, INCLUDING BUT NOT LIMITED TO THE WARRANTIES OF MERCHANTABILITY,
	# FITNESS FOR A PARTICULAR PURPOSE AND NONINFRINGEMENT. IN NO EVENT SHALL THE
	# AUTHORS OR COPYRIGHT HOLDERS BE LIABLE FOR ANY CLAIM, DAMAGES OR OTHER
	# LIABILITY, WHETHER IN AN ACTION OF CONTRACT, TORT OR OTHERWISE, ARISING FROM,
	# OUT OF OR IN CONNECTION WITH THE SOFTWARE OR THE USE OR OTHER DEALINGS IN THE
	# SOFTWARE.

	# author:   Patrick Hohenecker <[email protected]>
	# version:  2018.1
	# date:     May 15, 2018


	set -e


	# ensure that the script has been sourced rather than just executed
	if [[ "${

     BASH_SOURCE[0]}" = "${0}" ]]; then
	    echo "Please use 'source' to execute switch-cuda.sh!"
	    exit 1
	fi

	INSTALL_FOLDER="/usr/local"  # the location to look for CUDA installations at
	TARGET_VERSION=${1}          # the target CUDA version to switch to (if provided)

	# if no version to switch to has been provided, then just print all available CUDA installations
	if [[ -z ${TARGET_VERSION} ]]; then
	    echo "The following CUDA installations have been found (in '${INSTALL_FOLDER}'):"
	    ls -l "${INSTALL_FOLDER}" | egrep -o "cuda-[0-9]+\\.[0-9]+$" | while read -r line; do
	        echo "* ${line}"
	    done
	    set +e
	    return
	# otherwise, check whether there is an installation of the requested CUDA version
	elif [[ ! -d "${INSTALL_FOLDER}/cuda-${TARGET_VERSION}" ]]; then
	    echo "No installation of CUDA ${TARGET_VERSION} has been found!"
	    set +e
	    return
	fi

	# the path of the installation to use
	cuda_path="${INSTALL_FOLDER}/cuda-${TARGET_VERSION}"

	# filter out those CUDA entries from the PATH that are not needed anymore
	path_elements=(${

    PATH//:/ })
	new_path="${cuda_path}/bin"
	for p in "${path_elements[@]}"; do
	    if [[ ! ${p} =~ ^${INSTALL_FOLDER}/cuda ]]; then
	        new_path="${new_path}:${p}"
	    fi
	done

	# filter out those CUDA entries from the LD_LIBRARY_PATH that are not needed anymore
	ld_path_elements=(${LD_LIBRARY_PATH//:/ })
	new_ld_path="${cuda_path}/lib64:${cuda_path}/extras/CUPTI/lib64"
	for p in "${ld_path_elements[@]}"; do
	    if [[ ! ${p} =~ ^${INSTALL_FOLDER}/cuda ]]; then
	        new_ld_path="${new_ld_path}:${p}"
	    fi
	done

	# update environment variables
	export CUDA_HOME="${cuda_path}"
	export CUDA_ROOT="${cuda_path}"
	export LD_LIBRARY_PATH="${new_ld_path}"
	export PATH="${new_path}"

	echo "Switched to CUDA ${TARGET_VERSION}."

	set +e
	return
- Create a new
switch-cuda.shfile and write the above code into it;vi switch-cuda.sh source switch-cuda.sh source switch-cuda.sh 10.0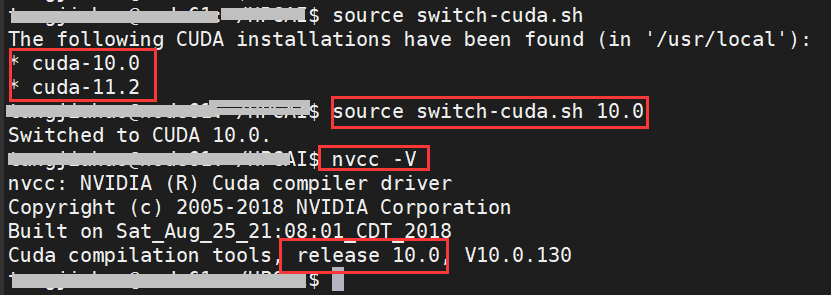
It can be seen thatsource switch-cuda.shwhen executed, the script will scan all installed CUDA and list them. Users only need to select the desired CUDA version number to switch easily. For example, you can see that the abovesource switch-cuda.sh 10.0picturenvccalso successfully switched versions.
And the script is based onexportstatements. After restarting the terminal, the CUDA environment will still be restored to the default 11.2, which will not affect the next use, and there is no need to manually switch back to the CUDA version. The picture below shows the effect after restarting the terminal.
V. Summary
The above is what I will talk about today. This article introduces how to install multiple versions of CUDA on one machine at the same time, and introduces a simple operation to switch CUDA versions.
如果本文能给你带来帮助的话,点个赞鼓励一下作者吧!
6. Reference
- [1] CUDA Toolkit: https://developer.nvidia.com/cuda-toolkit-archive
- [2] cuDNN library: https://developer.nvidia.com/rdp/cudnn-archive
- [3] CUDA switch script: https://github.com/phohenecker/switch-cuda
- [4] Install multiple versions of CUDA: https://blog.csdn.net/sinat_30545761/article/details/107709468