Abstract: This project mainly introduces how to use convolutional neural network to detect remake pictures, mainly moiré pictures; its main innovation lies in the network structure, which separates the high and low frequency information of the picture.
This article is shared from the HUAWEI CLOUD Community " A Brief Description and Code Implementation of Moiré Removal of Images ", author: Li Changan.
1 Introduction
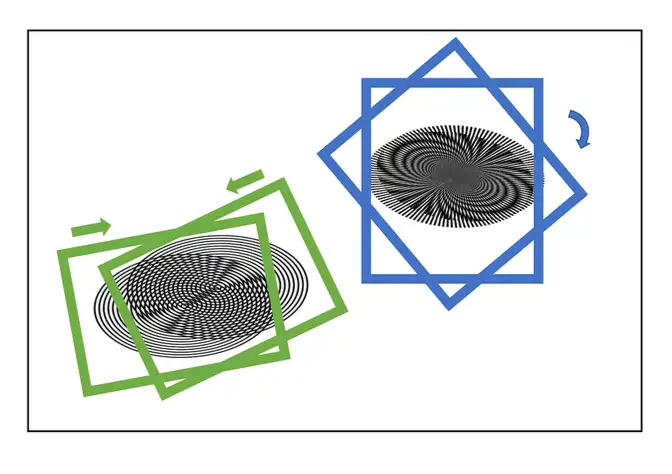
When the spatial frequency of the photosensitive element pixels is close to the spatial frequency of the stripes in the image, a new wavy interference pattern, the so-called moiré, may be generated. The grid-like texture of the sensor forms one such pattern. This effect also produces noticeable disturbances in the image when the thin strip-like structures in the pattern intersect the structures of the sensor at small angles. This phenomenon is very common in some fine texture situations, such as cloth in fashion photography. This moiré pattern may be displayed through brightness or color. But here, we only deal with the image moiré produced in the remake process.
Recap is capturing a picture from a computer screen, or taking a picture pointed at the screen; this method produces moiré on the picture
The main processing ideas of the paper
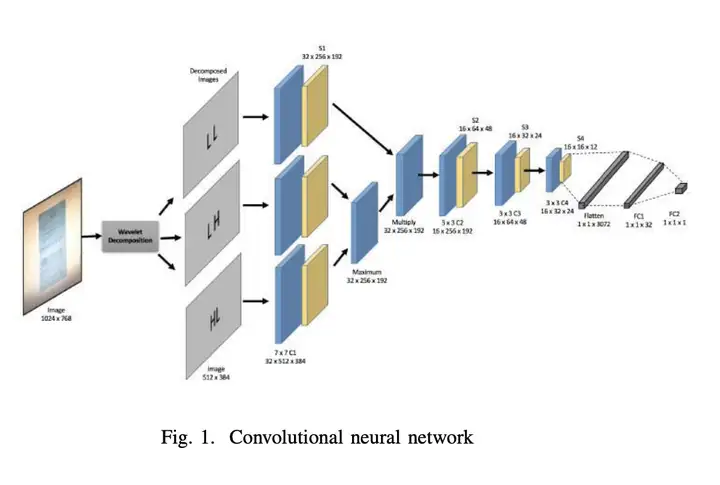
- Haar transformation is performed on the original image to obtain four downsampled feature maps (the second sampling cA of the original image, the Horizontal high frequency cH, the Vertical vertical high frequency cV, and the Diagonal oblique high frequency cD)
- Then use four independent CNNs to convolute and pool the four downsampled feature maps to extract feature information
- The original text then compares each channel and each pixel of the results of the three high-frequency information convolution pools, and takes max
- Cartesian product of the result obtained in the previous step and the result of cA convolution pooling
2. Reappearance of network structure
As shown in the figure below, this project reproduces the image moiré removal method of the paper, and modifies the data processing part, and the network structure also refers to the structure in the source code, and generates four down-sampled feature maps for the image, while Not the three in the paper, you can refer to the network structure for specific processing methods.
import math
import paddle
import paddle.nn as nn
import paddle.nn.functional as F
# import pywt
from paddle.nn import Linear, Dropout, ReLU
from paddle.nn import Conv2D, MaxPool2D
class mcnn(nn.Layer):
 def __init__(self, num_classes=1000):
 super(mcnn, self).__init__()
 self.num_classes = num_classes
 self._conv1_LL = Conv2D(3,32,7,stride=2,padding=1,)
 # self.bn1_LL = nn.BatchNorm2D(128)
 self._conv1_LH = Conv2D(3,32,7,stride=2,padding=1,)
 # self.bn1_LH = nn.BatchNorm2D(256)
 self._conv1_HL = Conv2D(3,32,7,stride=2,padding=1,)
 # self.bn1_HL = nn.BatchNorm2D(512)
 self._conv1_HH = Conv2D(3,32,7,stride=2,padding=1,)
 # self.bn1_HH = nn.BatchNorm2D(256)
 self.pool_1_LL = nn.MaxPool2D(kernel_size=2,stride=2, padding=0)
 self.pool_1_LH = nn.MaxPool2D(kernel_size=2,stride=2, padding=0)
 self.pool_1_HL = nn.MaxPool2D(kernel_size=2,stride=2, padding=0)
 self.pool_1_HH = nn.MaxPool2D(kernel_size=2,stride=2, padding=0)
 self._conv2 = Conv2D(32,16,3,stride=2,padding=1,)
 self.pool_2 = nn.MaxPool2D(kernel_size=2,stride=2, padding=0)
 self.dropout2 = Dropout(p=0.5)
 self._conv3 = Conv2D(16,32,3,stride=2,padding=1,)
 self.pool_3 = nn.MaxPool2D(kernel_size=2,stride=2, padding=0)
 self._conv4 = Conv2D(32,32,3,stride=2,padding=1,)
 self.pool_4 = nn.MaxPool2D(kernel_size=2,stride=2, padding=0)
 self.dropout4 = Dropout(p=0.5)
 # self.bn1_HH = nn.BatchNorm1D(256)
 self._fc1 = Linear(in_features=64,out_features=num_classes)
 self.dropout5 = Dropout(p=0.5)
 self._fc2 = Linear(in_features=2,out_features=num_classes)
 def forward(self, inputs1, inputs2, inputs3, inputs4):
        x1_LL = self._conv1_LL(inputs1)
        x1_LL = F.relu(x1_LL)
        x1_LH = self._conv1_LH(inputs2)
        x1_LH = F.relu(x1_LH)
        x1_HL = self._conv1_HL(inputs3)
        x1_HL = F.relu(x1_HL)
        x1_HH = self._conv1_HH(inputs4)
        x1_HH = F.relu(x1_HH)
        pool_x1_LL = self.pool_1_LL(x1_LL)
        pool_x1_LH = self.pool_1_LH(x1_LH)
        pool_x1_HL = self.pool_1_HL(x1_HL)
        pool_x1_HH = self.pool_1_HH(x1_HH)
        temp = paddle.maximum(pool_x1_LH, pool_x1_HL)
 avg_LH_HL_HH = paddle.maximum(temp, pool_x1_HH)
 inp_merged = paddle.multiply(pool_x1_LL, avg_LH_HL_HH)
        x2 = self._conv2(inp_merged)
        x2 = F.relu(x2)
        x2 = self.pool_2(x2)
        x2 = self.dropout2(x2)
        x3 = self._conv3(x2)
        x3 = F.relu(x3)
        x3 = self.pool_3(x3)
        x4 = self._conv4(x3)
        x4 = F.relu(x4)
        x4 = self.pool_4(x4)
        x4 = self.dropout4(x4)
        x4 = paddle.flatten(x4, start_axis=1, stop_axis=-1)
        x5 = self._fc1(x4)
        x5 = self.dropout5(x5)
        out = self._fc2(x5)
 return out
model_res = mcnn(num_classes=2)
paddle.summary(model_res,[(1,3,512,384),(1,3,512,384),(1,3,512,384),(1,3,512,384)])
---------------------------------------------------------------------------
 Layer (type)     Input Shape          Output Shape         Param #
===========================================================================
   Conv2D-1 [[1, 3, 512, 384]] [1, 32, 254, 190] 4,736
   Conv2D-2 [[1, 3, 512, 384]] [1, 32, 254, 190] 4,736
   Conv2D-3 [[1, 3, 512, 384]] [1, 32, 254, 190] 4,736
   Conv2D-4 [[1, 3, 512, 384]] [1, 32, 254, 190] 4,736
  MaxPool2D-1 [[1, 32, 254, 190]] [1, 32, 127, 95] 0
  MaxPool2D-2 [[1, 32, 254, 190]] [1, 32, 127, 95] 0
  MaxPool2D-3 [[1, 32, 254, 190]] [1, 32, 127, 95] 0
  MaxPool2D-4 [[1, 32, 254, 190]] [1, 32, 127, 95] 0
   Conv2D-5 [[1, 32, 127, 95]] [1, 16, 64, 48] 4,624
  MaxPool2D-5 [[1, 16, 64, 48]] [1, 16, 32, 24] 0
   Dropout-1 [[1, 16, 32, 24]] [1, 16, 32, 24] 0
   Conv2D-6 [[1, 16, 32, 24]] [1, 32, 16, 12] 4,640
  MaxPool2D-6 [[1, 32, 16, 12]] [1, 32, 8, 6] 0
   Conv2D-7 [[1, 32, 8, 6]] [1, 32, 4, 3] 9,248
  MaxPool2D-7 [[1, 32, 4, 3]] [1, 32, 2, 1] 0
   Dropout-2 [[1, 32, 2, 1]] [1, 32, 2, 1] 0
   Linear-1 [[1, 64]] [1, 2] 130
   Dropout-3 [[1, 2]] [1, 2] 0
   Linear-2 [[1, 2]] [1, 2] 6
===========================================================================
Total params: 37,592
Trainable params: 37,592
Non-trainable params: 0
---------------------------------------------------------------------------
Input size (MB): 9.00
Forward/backward pass size (MB): 59.54
Params size (MB): 0.14
Estimated Total Size (MB): 68.68
---------------------------------------------------------------------------
{'total_params': 37592, 'trainable_params': 37592}
3. Data preprocessing
The difference from the source code is that this project integrates the wavelet decomposition part of the image into the data reading part, that is, the wavelet decomposition is performed online instead of the offline wavelet decomposition in the source code and the picture is saved. First, define the wavelet decomposition function
!pip install PyWavelets
import numpy as np
import pywt
def splitFreqBands(img, levRows, levCols):
 halfRow = int(levRows/2)
 halfCol = int(levCols/2)
    LL = img[0:halfRow, 0:halfCol]
    LH = img[0:halfRow, halfCol:levCols]
    HL = img[halfRow:levRows, 0:halfCol]
    HH = img[halfRow:levRows, halfCol:levCols]
 return LL, LH, HL, HH
def haarDWT1D(data, length):
    avg0 = 0.5;
    avg1 = 0.5;
    dif0 = 0.5;
    dif1 = -0.5;
    temp = np.empty_like(data)
 # temp = temp.astype(float)
    temp = temp.astype(np.uint8)
    h = int(length/2)
 for i in range(h):
        k = i*2
        temp[i] = data[k] * avg0 + data[k + 1] * avg1;
 temp[i + h] = data[k] * dif0 + data[k + 1] * dif1;
 data[:] = temp
# computes the homography coefficients for PIL.Image.transform using point correspondences
def fwdHaarDWT2D(img):
 img = np.array(img)
 levRows = img.shape[0];
 levCols = img.shape[1];
 # img = img.astype(float)
 img = img.astype(np.uint8)
 for i in range(levRows):
        row = img[i,:]
        haarDWT1D(row, levCols)
 img[i,:] = row
 for j in range(levCols):
        col = img[:,j]
        haarDWT1D(col, levRows)
 img[:,j] = col
 return splitFreqBands(img, levRows, levCols)
!cd "data/data188843/" && unzip -q 'total_images.zip'
import os
recapture_keys = [ 'ValidationMoire']
original_keys = ['ValidationClear']
def get_image_label_from_folder_name(folder_name):
 """
 :param folder_name:
 :return:
    """
 for key in original_keys:
 if key in folder_name:
 return 'original'
 for key in recapture_keys:
 if key in folder_name:
 return 'recapture'
 return 'unclear'
label_name2label_id = {
 'original': 0,
 'recapture': 1,}
src_image_dir = "data/data188843/total_images"
dst_file = "data/data188843/total_images/train.txt"
image_folder = [file for file in os.listdir(src_image_dir)]
print(image_folder)
image_anno_list = []
for folder in image_folder:
 label_name = get_image_label_from_folder_name(folder)
 # label_id = label_name2label_id.get(label_name, 0)
 label_id = label_name2label_id[label_name]
 folder_path = os.path.join(src_image_dir, folder)
 image_file_list = [file for file in os.listdir(folder_path) if
 file.endswith('.jpg') or file.endswith('.jpeg') or
 file.endswith('.JPG') or file.endswith('.JPEG') or file.endswith('.png')]
 for image_file in image_file_list:
 # if need_root_dir:
 #     image_path = os.path.join(folder_path, image_file)
 # else:
 image_path = image_file
 image_anno_list.append(folder +"/"+image_path +"\t"+ str(label_id) + '\n')
dst_path = os.path.dirname(src_image_dir)
if not os.path.exists(dst_path):
 os.makedirs(dst_path)
with open(dst_file, 'w') as fd:
 fd.writelines(image_anno_list)
import paddle
import numpy as np
import pandas as pd
import PIL.Image as Image
from paddle.vision import transforms
# from haar2D import fwdHaarDWT2D
paddle.disable_static()
# 定义数据预处理
data_transforms = transforms.Compose([
 transforms.Resize(size=(448,448)),
 transforms.ToTensor(), # transpose操作 + (img / 255)
 # transforms.Normalize(      # 减均值 除标准差
 #     mean=[0.31169346, 0.25506335, 0.12432463],
 #     std=[0.34042713, 0.29819837, 0.1375536])
 #计算过程:output[channel] = (input[channel] - mean[channel]) / std[channel]
])
# 构建Dataset
class MyDataset(paddle.io.Dataset):
 """
 步骤一:继承paddle.io.Dataset类
    """
 def __init__(self, train_img_list, val_img_list, train_label_list, val_label_list, mode='train', ):
 """
 步骤二:实现构造函数,定义数据读取方式,划分训练和测试数据集
        """
 super(MyDataset, self).__init__()
 self.img = []
 self.label = []
 # 借助pandas读csv的库
 self.train_images = train_img_list
 self.test_images = val_img_list
 self.train_label = train_label_list
 self.test_label = val_label_list
 if mode == 'train':
 # 读train_images的数据
 for img,la in zip(self.train_images, self.train_label):
 self.img.append('/home/aistudio/data/data188843/total_images/'+img)
 self.label.append(paddle.to_tensor(int(la), dtype='int64'))
 else:
 # 读test_images的数据
 for img,la in zip(self.test_images, self.test_label):
 self.img.append('/home/aistudio/data/data188843/total_images/'+img)
 self.label.append(paddle.to_tensor(int(la), dtype='int64'))
 def load_img(self, image_path):
 # 实际使用时使用Pillow相关库进行图片读取即可,这里我们对数据先做个模拟
        image = Image.open(image_path).convert('RGB')
 # image = data_transforms(image)
 return image
 def __getitem__(self, index):
 """
 步骤三:实现__getitem__方法,定义指定index时如何获取数据,并返回单条数据(训练数据,对应的标签)
        """
        image = self.load_img(self.img[index])
        LL, LH, HL, HH = fwdHaarDWT2D(image)
        label = self.label[index]
 # print(LL.shape)
 # print(LH.shape)
 # print(HL.shape)
 # print(HH.shape)
        LL = data_transforms(LL)
        LH = data_transforms(LH)
        HL = data_transforms(HL)
        HH = data_transforms(HH)
 print(type(LL))
 print(LL.dtype)
 return LL, LH, HL, HH, np.array(label, dtype='int64')
 def __len__(self):
 """
 步骤四:实现__len__方法,返回数据集总数目
        """
 return len(self.img)
image_file_txt = '/home/aistudio/data/data188843/total_images/train.txt'
with open(image_file_txt) as fd:
    lines = fd.readlines()
train_img_list = list()
train_label_list = list()
for line in lines:
 split_list = line.strip().split()
 image_name, label_id = split_list
 train_img_list.append(image_name)
 train_label_list.append(label_id)
# print(train_img_list)
# print(train_label_list)
# 测试定义的数据集
train_dataset = MyDataset(mode='train',train_label_list=train_label_list, train_img_list=train_img_list, val_img_list=train_img_list, val_label_list=train_label_list)
# test_dataset = MyDataset(mode='test')
# 构建训练集数据加载器
train_loader = paddle.io.DataLoader(train_dataset, batch_size=2, shuffle=True)
# 构建测试集数据加载器
valid_loader = paddle.io.DataLoader(train_dataset, batch_size=2, shuffle=True)
print('=============train dataset=============')
for LL, LH, HL, HH, label in train_dataset:
 print('label: {}'.format(label))
 break
4. Model training
model2 = paddle.Model(model_res)
model2.prepare(optimizer=paddle.optimizer.Adam(parameters=model2.parameters()),
              loss=nn.CrossEntropyLoss(),
              metrics=paddle.metric.Accuracy())
model2.fit(train_loader,
 valid_loader,
        epochs=5,
        verbose=1,
 )
Summarize
This project mainly introduces how to use convolutional neural network to detect remake pictures, mainly moiré pictures; its main innovation lies in the network structure, which separates the high and low frequency information of the picture.
In this project, CNN is trained using only level 1 wavelet decomposition. The effect on the accuracy of multilevel wavelet decomposition networks can be explored. CNN models can be trained with more and harder examples and deeper networks.
Click to follow and learn about Huawei Cloud's fresh technologies for the first time~