Lecture 08: How to divide the sample application into microservices
After introducing the basic concepts of Domain-Driven Design in Lesson 07, this lesson will introduce how to apply the ideas related to Domain-Driven Design in the division of microservices.
Microservice division
In the design and implementation of microservice architecture applications, if you want to find out the most important task, it must be the division of non-microservices . The core of the microservice architecture is a distributed system composed of multiple cooperating microservices. Only after the division of microservices is completed, can the responsibilities of each microservice be clarified, and the interaction mode between microservices be determined, and then proceed The API design of each microservice is the final implementation, testing and deployment of each microservice.
As can be seen from the above process, microservice division is the first link in the entire chain of application design and implementation. Changes in each link in the chain will have an impact on the subsequent links. As the first link of the microservice division, if there is a change, it will affect all subsequent links. The last thing you want is to realize that some functionality should be migrated to other microservices during the implementation of microservices. If this happens, both the API and implementation of the associated microservice will need to be modified.
Of course, in actual development, it is unrealistic to completely avoid changes to the division of microservices. In the stage of microservice division, if you spend enough energy on analysis, the benefits you get are absolutely huge.
Microservices and Bounded Contexts
In the 07th class, we introduced the concept of defined context in domain-driven design. If the idea of domain-driven design is applied to the microservice architecture, we can make a one-to-one correspondence between microservices and defined context. Each bounded context directly corresponds to a microservice, and then uses the pattern of context mapping to define the way of interaction between microservices.
In this way, the problem of dividing microservices is transformed into the problem of dividing the context defined in domain-driven design. If you already have a solid understanding of Domain Driven Design, that will be an advantage; if not, the content of Lesson 07 can get you started quickly.
Let's take the sample application in this column as an example for specific explanation.
Microservice partitioning of the sample application
Lesson 06 introduces the user scenarios of the sample application, based on these scenarios, the domain of the application can be determined. In actual application development, domain experts and business personnel are usually required to participate. Through communication with business personnel, we can have a clearer understanding of the domain. As for the example application, since the application domain is relatively close to life, and in order to simplify the related introduction, we will conduct domain analysis by ourselves. However, this has a disadvantage, that is, the domain analysis done by developers does not necessarily reflect the real business process. However, for the sample application, this is good enough.
Domain-driven design takes the domain as the core, and the domain is divided into problem space and solution space .
The problem space helps us think at the business level and is the part of the domain upon which the core domain depends, which includes the core domain, and other subdomains as needed. The core domain has to be created from scratch, because that is the core of the software system we will develop; other sub-domains may already exist, or may also need to be created from scratch. The core issue of the problem space is how to identify and divide subfields.
The solution space then consists of one or more bounded contexts, and the models within the contexts. Ideally, there is a one-to-one correspondence between defined contexts and subdomains. In this way, the division can be started from the business level, and then the same division method can be adopted at the implementation level, so that the perfect integration of the problem space and the solution space can be realized. In real practice, there is unlikely to be a one-to-one correspondence between defined contexts and subfields. In the implementation of a software system, it usually needs to be integrated with existing legacy systems and external systems, and these systems have their own defined contexts. In practice, it is more realistic that multiple bounded contexts belong to the same sub-field, or one bounded context corresponds to multiple sub-fields.
The idea of domain-driven design is to start from the domain, first divide the sub-domain, and then abstract the defined context and the model in the context from the sub-domain. Each defined context corresponds to a microservice.
core areas
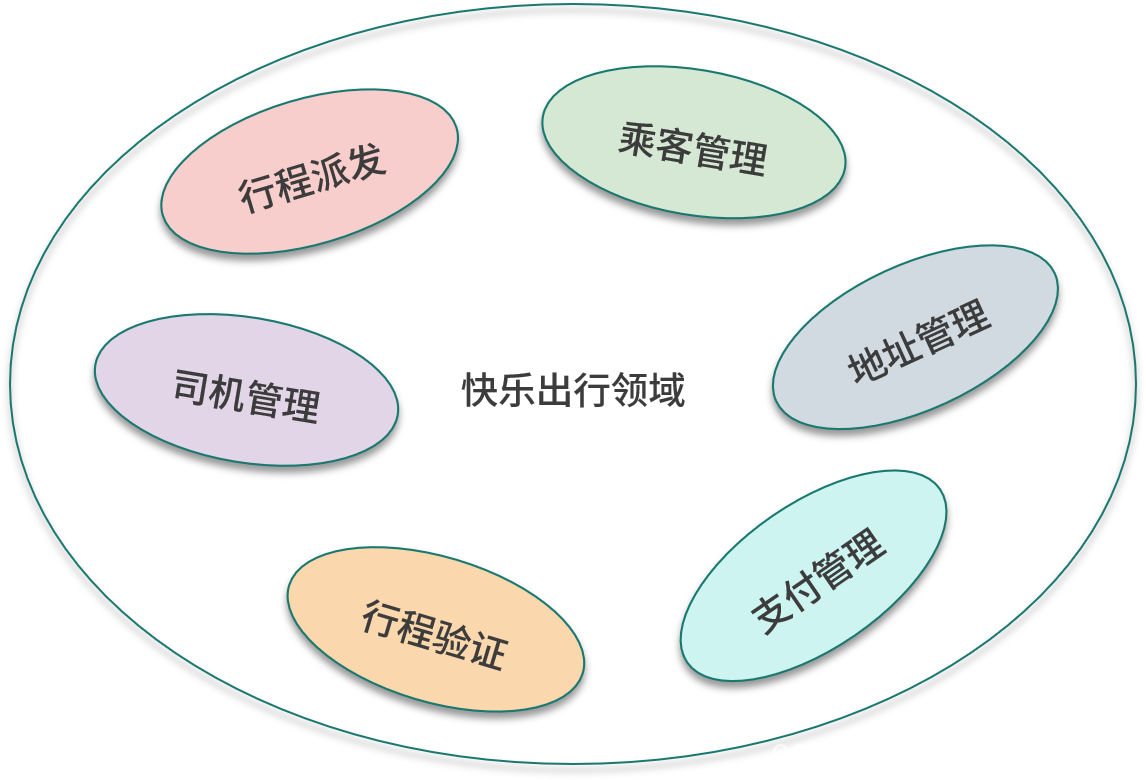
The core domain is where the value of the software system exists, and it is also the starting point of design. Before starting the software system, you should have a clear understanding of the core value of the software system. If not, then you first need to consider the selling points of the software system. Different software systems have different core areas. As a taxi-hailing application, its core area is how to make passengers travel quickly, comfortably and safely, which is also the core area of taxi-hailing applications such as Didi Taxi and Uber. For the happy travel application as an example, such a core area is a bit too large. The happy travel application simplifies the core area and only focuses on how to make passengers travel quickly.
We need to give the core domain an appropriate name. The core area of happy travel is how to quickly match between passengers who need to call a car and drivers who provide travel services. After the user creates the itinerary, the system distributes it to available drivers. After the driver receives the itinerary, the system selects a driver to distribute the itinerary. The core area focuses on dispatching itineraries, hence the name itinerary distribution .
concepts in the field
We then enumerate the concepts in the domain. This is a brainstorming process that can be carried out on a whiteboard to list all related concepts that come to mind one by one. Concepts are nouns. The earliest concept is itinerary, which means a journey from a certain starting point to an ending point. Starting from the itinerary, the concept of passengers and drivers can be derived. The passenger is the initiator of the itinerary, and the driver is the completer of the itinerary. Each itinerary has a starting point and an ending point, and the corresponding concept is the address. Drivers use personal vehicles to complete trips, so vehicles are another concept.
We find other subfields based on concepts, and the concept of travel belongs to the core field. Drivers and passengers should belong to various independent sub-domains and then be managed separately, which results in two sub-domains of passenger management and driver management . The concept of address belongs to the subfield of address management ; the concept of vehicle belongs to the subfield of driver management.
After dividing the sub-domains by the concepts in the domain, the next step is to continue to discover new sub-domains from the operations in the domain. In the user scenario, it is mentioned that the itinerary needs to be verified, and this operation has its corresponding sub-field itinerary verification . After the trip is completed, the passenger needs to make a payment, and this operation has its corresponding sub-field payment management .
The following figure shows the sub-realms in the sample application.

bounded context
After identifying the core domain and other sub-domains, the next step can be to move from the problem space to the solution space. Firstly, the sub-domains are mapped to the delimited context, and the delimited context has the same name as the sub-domain; then, the delimited context is modeled, and the main task of modeling is to concretize the related concepts.
Itinerary distribution
The important entity in the itinerary dispatch model is the itinerary, which is also the root of the aggregate in which the itinerary resides. A trip has its start and end locations, expressed as value object addresses. The itinerary is initiated by the passenger, so the itinerary entity needs to have a reference to the passenger. When the system selects a driver to accept the itinerary, the itinerary entity has a reference to the driver. During the entire life cycle, the trip may be in different states, and there is an attribute and its corresponding enumeration type to describe the state of the trip.
The figure below shows the entities and value objects in the model.
 

passenger management
The important entity in the Passenger Management model is the Passenger, which is also the root of the Aggregate in which the Passenger resides. The attributes of the passenger entity include name, email address, contact number, etc. The passenger entity has a list of saved addresses associated with it, and the address is an entity.
The figure below shows the entities in the model.
 

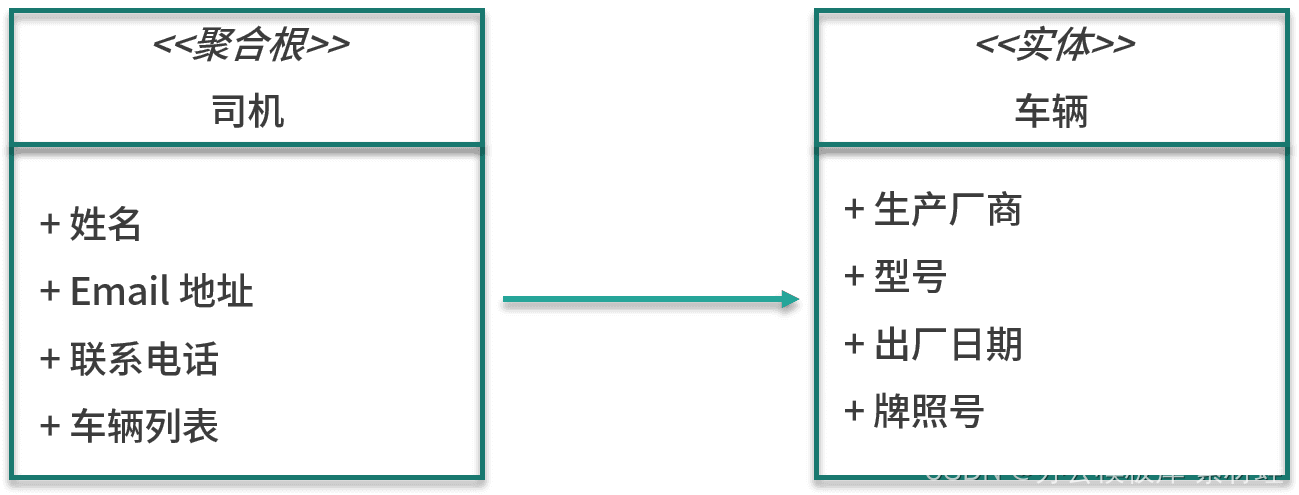
driver management
The important entity in the driver management model is the driver, which is also the root of the aggregate in which the driver resides. The attributes of the driver entity include name, email address, contact number, etc. In addition to the driver entity, the aggregation also includes the vehicle entity. The attributes of the vehicle entity include the manufacturer, model, date of manufacture, and license plate number.
The figure below shows the entities in the model.

address management
The important entity in the address management model is the address, which is hierarchical, ranging from provinces, municipalities, and autonomous regions to villages and streets. In addition to the hierarchical address, there is another important piece of information, that is, the geographic location coordinates, including longitude and latitude.
itinerary verification
The itinerary verification model does not contain specific entities, but services and related algorithm implementations that verify the itinerary.
payment management
An important entity in the payment management model is the payment record, which contains information such as references to itineraries and payment status.
Interaction between bounded contexts
In the model of our defined context, the itinerary entity of the itinerary dispatch model needs to refer to the root entity of the aggregate "passenger" in the passenger management model, and the root entity of the aggregate "driver" in the driver management model. In Lesson 07, we mentioned that external objects can only refer to the root entity of the aggregate, and when referencing, the identifier of the root entity of the aggregate should be referenced, not the entity itself. The identifiers of the Passenger entity and the Driver entity are both string types, so the Trip entity contains two properties of type String to refer to the Passenger entity and the Driver entity respectively.
When the same concept appears in models in different delimited contexts, mapping is required, and we can use the context mapping mode mentioned in Lesson 07 for mapping.
In both address management and itinerary dispatch contexts, there is the notion of an address. The address entity in address management is a complex structure, including geographical names of different levels, which is to realize multi-level address selection and address query. In the context of an itinerary dispatch, an address simply consists of a full name, and geographic location coordinates. In order to map between the two contexts, we can add an anti-corrosion layer to the travel dispatch context for model conversion.
Migration of existing monolithic applications
The sample application in this column is a new application created from scratch, so there is no existing implementation to refer to when dividing microservices. When migrating an existing monolithic application to a microservice architecture, the division of microservices will be more traceable. From the existing implementation of the monolithic application, you can learn about the actual interaction of each part of the system, which will help you understand more It is good to divide them according to their responsibilities. The microservices divided in this way are closer to the actual operation situation.
Sam Newman of ThoughtWorks shared his experience in the microservice division of the product SnapCI in his book "Building Microservices". Due to the relevant experience of the open source project GoCD, the SnapCI team quickly divided the microservices of SnapCI. However, there are some differences between the user scenarios of GoCD and SnapCI. After a period of time, the SnapCI team found that the current microservice division has brought many problems. They often need to make some changes across multiple microservices, resulting in high overhead. .
What the SnapCI team did was to merge these microservices back into a single monolith, giving them more time to understand how the system was actually running. A year later, the SnapCI team re-divided this monolithic system into microservices. After this division, the boundaries of microservices became more stable. This example from SnapCI illustrates that domain knowledge is critical when partitioning microservices.
Summarize
Microservice partitioning is crucial in the application development of microservice architecture. By applying the idea of domain-driven design, the division of microservices is transformed into the division of sub-domains in domain-driven design, and then the concepts in the domain are modeled through the defined context. Model transformations can be performed through mapping patterns between defined contexts.
Lecture 09: Rapid Deployment Development Environment and Framework
This class will introduce the content related to "rapid deployment development environment and framework".
In the previous class hours, we introduced the background knowledge related to the cloud-native microservice architecture, and the next class hours will enter the actual microservice development. This class is the first class related to microservice development. It will focus on how to prepare the local development environment, and introduce the framework, third-party libraries and tools used in the sample application.
Necessary for development
Development prerequisites refer to those necessary for the development environment.
Java
The microservices of the sample application are developed based on Java 8. Even though Java 14 has been released, the sample application still uses the older Java 8 version, because that version is still widely used, and new features added after Java 8 are not useful to the sample application. If JDK 8 is not installed, it is recommended that you go to the AdoptOpenJDK website to download the OpenJDK 8 installer. On MacOS and Linux, you can use SDKMAN! to install JDK 8 and manage different versions of JDK.
The following is the output of java -version:
openjdk version "1.8.0_242"
OpenJDK Runtime Environment (AdoptOpenJDK)(build 1.8.0_242-b08)
OpenJDK 64-Bit Server VM (AdoptOpenJDK)(build 25.242-b08, mixed mode)
Maven
The build tool used by the sample application is Apache Maven. You can manually install Maven 3.6, or use the built-in Maven in the IDE to build the project. HomeBrew is recommended for MacOS and Linux , and Chocolatey is recommended for Windows .
Integrated Development Environment
A good IDE can greatly improve developer productivity. In terms of IDE, there are mainly two choices: IntelliJ IDEA and Eclipse; in terms of IDE choice, there is not much difference between the two. I use IntelliJ IDEA Community Edition 2020.
Docker
The local development environment needs to use Docker to run the supporting services required by the application, including database and message middleware. Through Docker, the installation problem of different software services is solved, making the configuration of the development environment very simple. On the other hand, the production and running environment of the application is Kubernetes, which is also deployed using containerization, which ensures the consistency between the development environment and the production environment. In order to simplify the local development process, Docker Compose is used in the local environment for container orchestration.
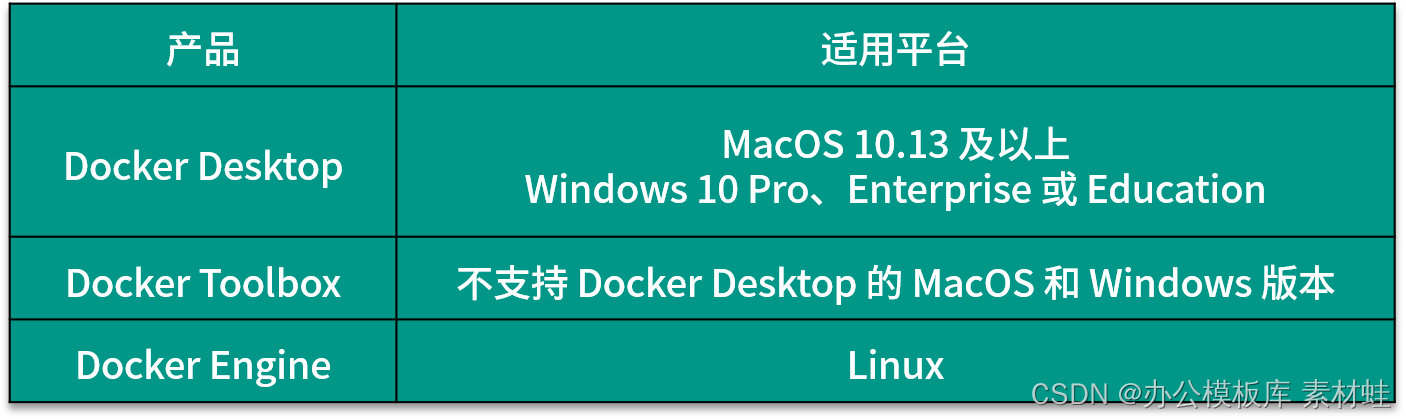
Depending on the operating system of the development environment, the way to install Docker is different. There are 3 different Docker products that can be used to install Docker, namely Docker Desktop, Docker Toolbox and Docker Engine. The following table shows the applicable platforms of these 3 products. For MacOS and Windows, if the version supports it, Docker Desktop should be installed first, and then Docker Toolbox should be considered.

The Docker Desktop product consists of many components, including Docker Engine, Docker Command Line Client, Docker Compose, Notary, Kubernetes, and Credential Helper. The advantage of Docker Desktop is that it can directly use the virtualization support provided by the operating system, which can provide better integration. In addition, Docker Desktop also provides a graphical management interface. Most of the time, we operate Docker through the docker command line. If the docker -v command can display the correct version information, it means that Docker Desktop is installed successfully.
The figure below shows the version information of Docker Desktop.
 

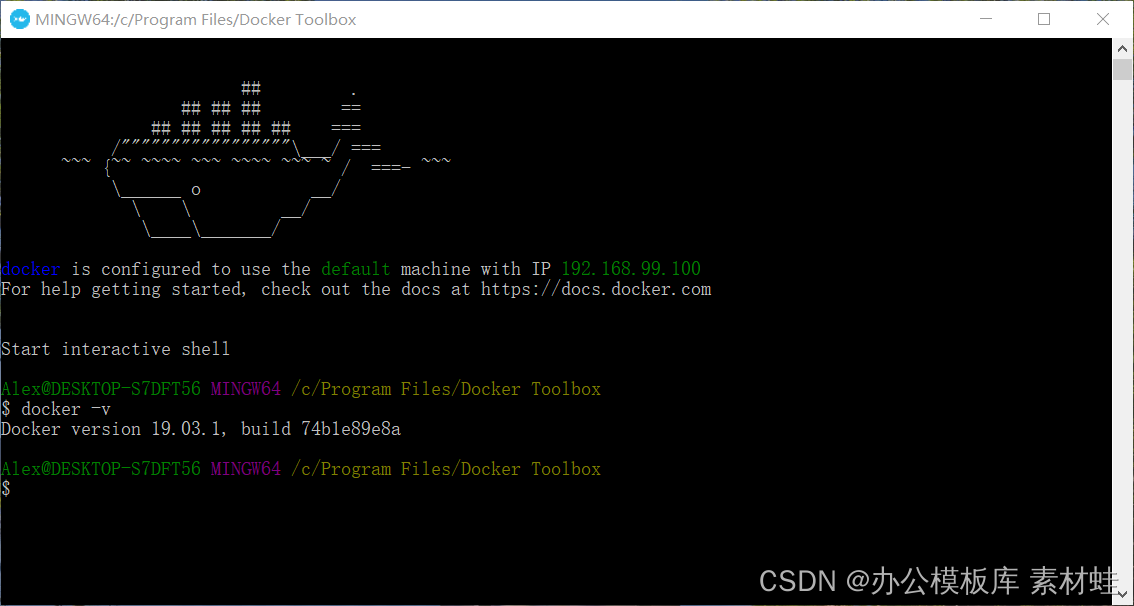
Docker Toolbox is the predecessor to Docker Desktop. Docker Toolbox uses VirtualBox for virtualization, which has low system requirements. Docker Toolbox consists of Docker Machine, Docker Command Line Client, Docker Compose, Kitematic, and Docker Quickstart Terminal. After the installation is complete, launch a terminal via Docker Quickstart to execute docker commands.
The figure below is the running effect of the Docker Quickstart terminal.

On Linux, we can only install Docker Engine directly, and also need to manually install Docker Compose.
There is a significant difference in the use of Docker Desktop and Docker Toolbox. The container running on Docker Desktop can use the network on the current development environment host, and the port exposed by the container can be accessed using localhost; the container running on Docker Toolbox actually runs on a virtual machine of VirtualBox, which needs to be accessed through the virtual machine IP address to access. We can get the IP address through the docker-machine ip command on the terminal started by Docker Quickstart, such as 192.168.99.100. The port exposed by the container needs to be accessed using this IP address, which is not fixed. The recommended practice is to add a hostname called dockervm in the hosts file and point to this IP address. Always use the dockervm hostname when accessing services in containers. When the IP address of the virtual machine changes, only the hosts file needs to be updated.
Kubernetes
When deploying applications, we need an available Kubernetes cluster. Generally, there are three ways to create a Kubernetes cluster.
The first way is to use the cloud platform to create . Many cloud platforms provide support for Kubernetes. The cloud platform is responsible for the creation and management of Kubernetes clusters. You only need to use the web interface or command line tools to quickly create Kubernetes clusters. The advantage of using the cloud platform is that it saves time and effort, but it is expensive.
The second way is to install a Kubernetes cluster on a virtual machine or physical bare metal . The virtual machine can be provided by the cloud platform, or it can be created and managed by itself, and it is also possible to use the physical bare-metal cluster maintained by itself. There are many open source Kubernetes installation tools available, such as RKE , Kubespray , Kubicorn , etc. The advantage of this method is that the overhead is relatively small, but the disadvantage is that it requires pre-installation and post-maintenance.
The third way is to install Kubernetes on the local development environment . Docker Desktop already comes with Kubernetes, you just need to enable it. In addition, you can also install Minikube . The advantage of this approach is that it has the lowest overhead and is highly controllable. The disadvantage is that it will take up a lot of resources in the local development environment.
Among the above three methods, the cloud platform method is suitable for the deployment of the production environment. For the testing and delivery preparation (staging) environment, you can choose a cloud platform, or you can choose to build the environment yourself from the perspective of cost. Kubernetes on the local development environment is also necessary in many cases.
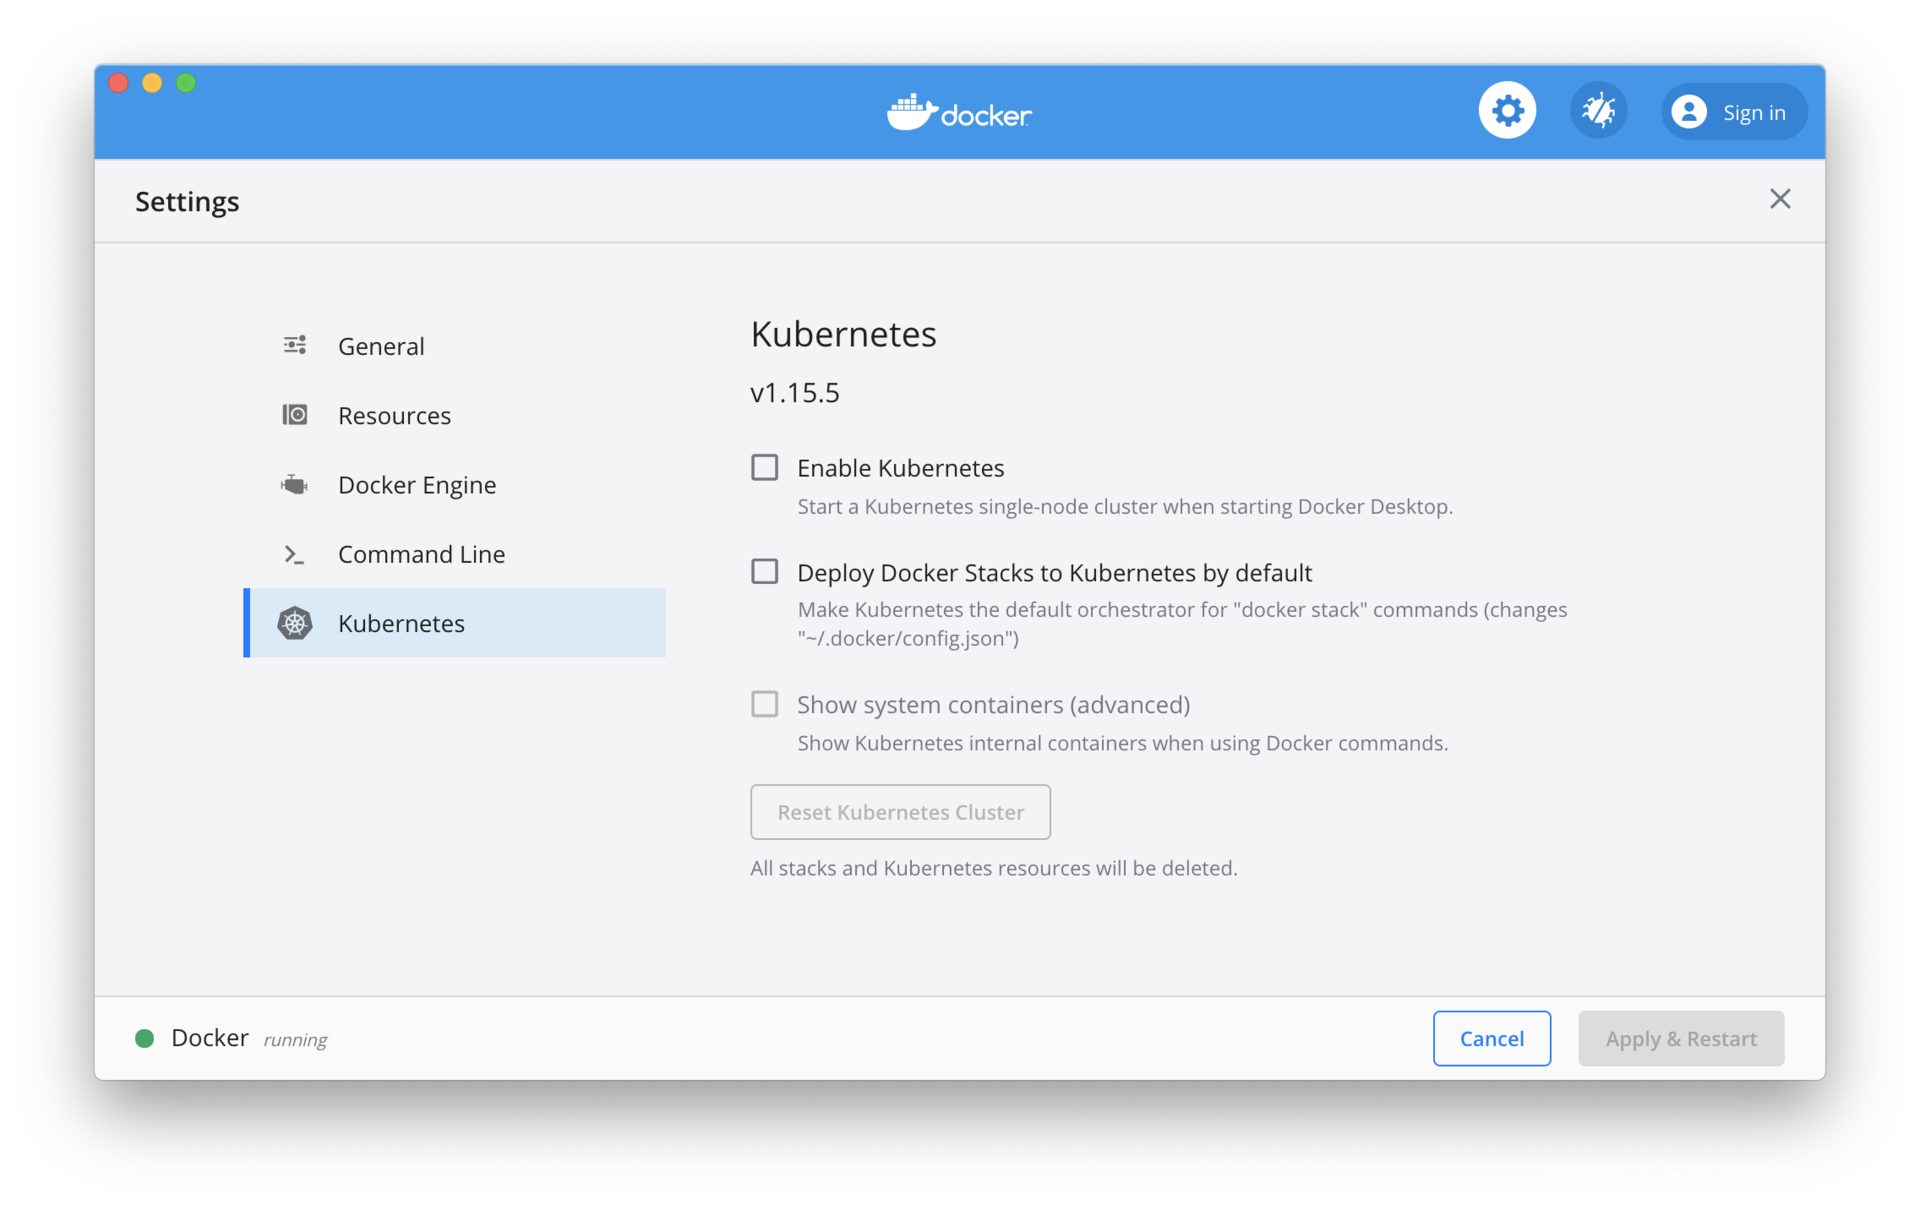
In a local development environment, Kubernetes for Docker Desktop needs to be manually enabled. For Minikube, you can refer to the official documentation to install it. The difference between the two is that the version of Kubernetes that comes with Docker Desktop is generally a few minor versions behind. As shown in the figure below, check the "Enable Kubernetes" option to start the Kubernetes cluster. The Kubernetes version that comes with Docker Desktop is 1.15.5, and the latest Kubernetes version is 1.18.

Frameworks and third-party libraries
The sample application uses some frameworks and third-party libraries, which are briefly introduced below.
Spring Framework and Spring Boot
It is difficult to develop Java applications without the Spring framework. Spring Boot is also one of the popular choices for developing microservices in Java at present. The introduction of Spring and Spring Boot is beyond the scope of this column. The microservices of the sample application will use some sub-projects in the Spring framework, including Spring Data JPA, Spring Data Redis, and Spring Security.
Eventuate Tram
Eventuate Tram is a transactional message framework used by the sample application. The transactional message mode plays an important role in maintaining data consistency. Eventuate Tram provides support for transactional messaging patterns and also includes support for asynchronous messaging. Eventuate Tram integrates with PostgreSQL and Kafka.
Axon server and framework
The sample application also uses event sourcing and CQRS technology, and the event sourcing implementation uses Axon server and Axon framework. Axon server provides event storage; Axon framework connects to Axon server and provides CQRS support.
Support Services and Tools
The supporting services of the sample application are necessary at runtime, and the related tools may be used in development.
Apache Kafka and ZooKeeper
The sample application uses asynchronous messages between different microservices to ensure the final consistency of data, so message middleware is required. Apache Kafka is the message middleware used in the sample application, and ZooKeeper is required to run Kafka.
PostgreSQL
Some of the sample application's microservices use a relational database to store data. Among many relational databases, PostgreSQL is chosen as the database for some microservices in the example application.
database management tool
In development, we may need to view data in a relational database. There are many PostgreSQL clients available, including DBeaver , pgAdmin 4 , OmniDB, etc. You can also use IDE plug-ins, such as the Database Navigator plug-in on IntelliJ IDEA.
Postman
In development and testing, we often need to send HTTP requests to test REST services. There are many tools related to testing REST services, such as Postman , Insomnia and Advanced REST Client . I recommend using Postman because it can directly import OpenAPI specification files and generate corresponding REST request templates. Since our microservices adopt an API-first design approach, each microservice API has a corresponding OpenAPI specification file. During development, we only need to import the OpenAPI file into Postman, and then we can start testing, saving the work of manually creating requests.
Summarize
Before explaining the actual combat, we first need to prepare the local development environment. This class first introduces how to install and configure Java, Maven, integrated development environment, Docker and Kubernetes; then briefly introduces the framework and third-party libraries used in the sample application; finally introduces the supporting services used by the sample application, and the tools needed for development.
Lecture 10: API-first design with OpenAPI and Swagger
Starting from this class, we will enter the actual development of cloud-native microservice architecture applications. Before introducing the specific implementation of microservices, the first task is to design and determine the open API of each microservice . Open API has been widely popular in recent years, and many online services and government agencies have provided open API, which has become a standard function of online services. Developers can use the open API to develop various applications.
Although there is a certain relationship between the open API in the microservice application and the open API in the online service, their functions are different. In the application of microservice architecture, microservices can only interact through inter-process communication, generally using REST or gRPC. Such an interaction method needs to be fixed in a formalized way, forming an open API. An open API of a microservice shields the internal implementation details of the service from external users, and is also the only way for external users to interact with it (of course , here refers to the integration between microservices only through API, if asynchronous events are used for integration, these events are also interactive). From this we can see the importance of the microservice API. From the perspective of the audience, the users of microservice APIs are mainly other microservices, that is to say, mainly internal users of the application, which is different from the API of online services, which are mainly oriented to external users. In addition to other microservices, the application's web interface and mobile clients also need to use the microservice's API, but they usually use the microservice's API through an API gateway.
Due to the importance of the microservice API, we need to design the API very early, that is, the API-first strategy.
An API-first strategy
If you have experience in developing online service APIs, you will find that usually the implementation comes first, followed by the public API. This is because the public API was not considered before the design, but was added later. The result of this approach is that the open API only reflects the current actual implementation, not what the API should be. The design method of API first (API First) is to put the design of the API before the specific implementation. API first emphasizes that the design of the API should be considered more from the perspective of API users.
Before writing down the first line of implementation code, the API provider and user should have a full discussion on the API, combine the opinions of the two sides, finally determine all the details of the API, and fix it in a formal format to become an API specification. After that, the provider of the API ensures that the actual implementation meets the requirements of the API specification, and the user writes the client implementation according to the API specification. The API specification is a contract between the provider and the user, and the API-first strategy has been applied in the development of many online services. After the API is designed and implemented, the web interface and mobile application of the online service itself, like other third-party applications, are implemented using the same API.
The API-first strategy plays a more important role in the application implementation of the microservice architecture. Here it is necessary to distinguish two types of APIs: one is the API provided for other microservices, and the other is the API provided for the web interface and mobile clients. When introducing domain-driven design in the 07th class, I mentioned the open host service and public language in the mapping mode of the bounded context, and the microservices correspond to the bounded context one-to-one. If you combine the open host service with the common language, you get the API of the microservice, and the common language is the specification of the API.
From here we can know that the purpose of the first type of microservice API is context mapping, which is significantly different from the role of the second type of API. For example, the passenger management microservice provides functions for managing passengers, including passenger registration, information update, and query. For the passenger App, these functions require the support of the API. If other microservices need to obtain passenger information, they must also call the API of the passenger management microservice. This is to map the concept of passengers between different microservices.
API implementation
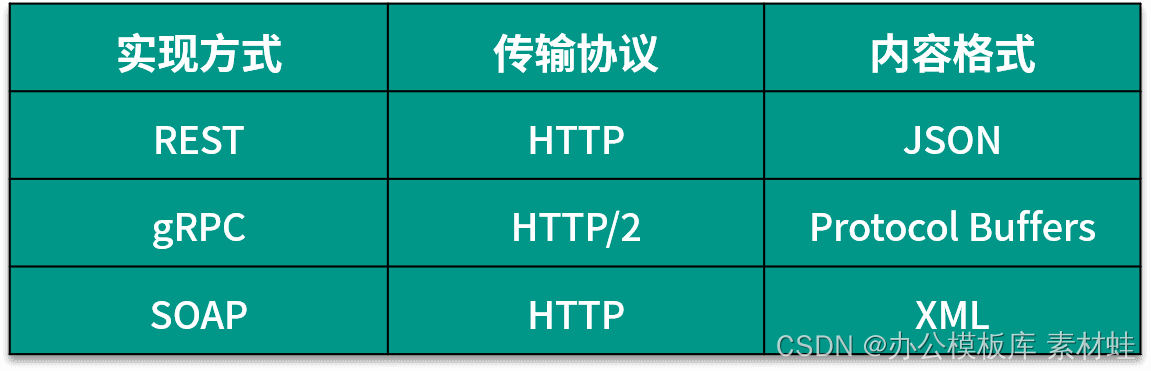
In API implementation, one of the first problems is to choose the implementation method of API. In theory, the internal APIs of microservices do not have high requirements for interoperability and can use private formats. However, in order to use the service grid, it is recommended to use a common standard format. The following table shows the common API format. Generally choose between REST and gRPC except using less SOAP. The difference between the two is that REST uses a text format and gRPC uses a binary format; the two differ in popularity, implementation difficulty, and performance. In short, REST is relatively more popular and less difficult to implement, but its performance is not as good as gRPC.

The API for the sample application in this column is implemented using REST, although there will be a class devoted to gRPC. The following describes the OpenAPI specification related to REST API.
OpenAPI specification
In order to better communicate between API providers and users, we need a standard format for describing APIs. For REST APIs, this standard format is defined by the OpenAPI specification.
The OpenAPI Specification (OAS) is an open API specification managed by the OpenAPI Initiative (OAI) under the Linux Foundation. The goal of the OAI is to create, evolve, and promote a vendor-neutral API description format. The OpenAPI specification is based on the Swagger specification, donated by SmartBear Corporation.
The OpenAPI document describes or defines the API, and the OpenAPI document must meet the OpenAPI specification. The OpenAPI specification defines the content format of an OpenAPI document, that is, the objects and their attributes that can be contained in it. An OpenAPI document is a JSON object that can be represented in JSON or YAML file format. The following is an introduction to the format of the OpenAPI document. The code examples in this lesson all use the YAML format.
Several basic types are defined in the OpenAPI specification, namely integer, number, string and boolean. For each basic type, the specific format of the data type can be specified through the format field, for example, the format of the string type can be date, date-time or password.
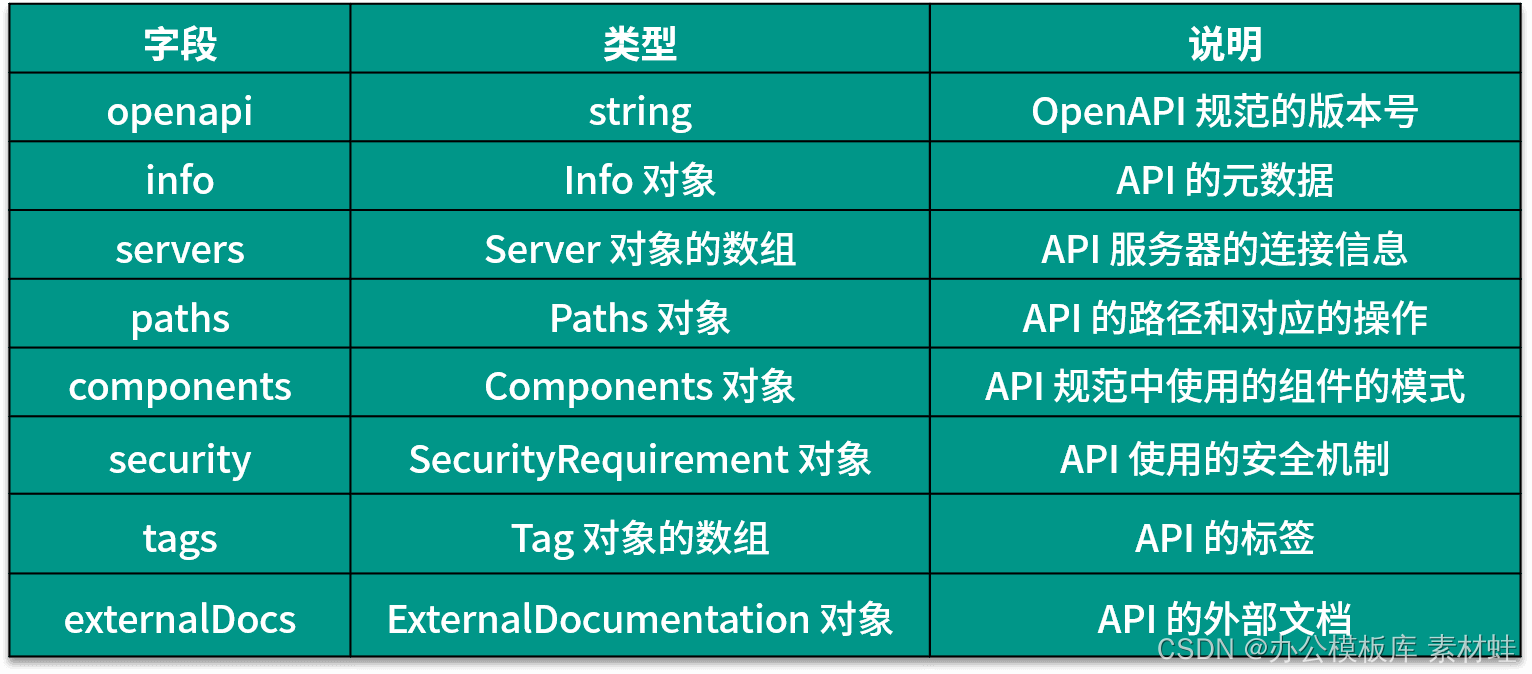
The fields and their descriptions that can appear in the root object of the OpenAPI document are given in the table below. The latest version of the OpenAPI specification is 3.0.3.

Info object
The Info object contains the metadata of the API, which can help users better understand the relevant information of the API. The following table shows the fields that can be included in the Info object and their descriptions.
 

The following code is an example of using the Info object.
title: Test service
description: This service is used for simple testing
termsOfService: http://myapp.com/terms/
contact:
  name: administrator
  url: http://www.myapp.com/support
  email: support@myapp .com
license:
  name: Apache 2.0
  url: https://www.apache.org/licenses/LICENSE-2.0.html
version: 2.1.0
Server object
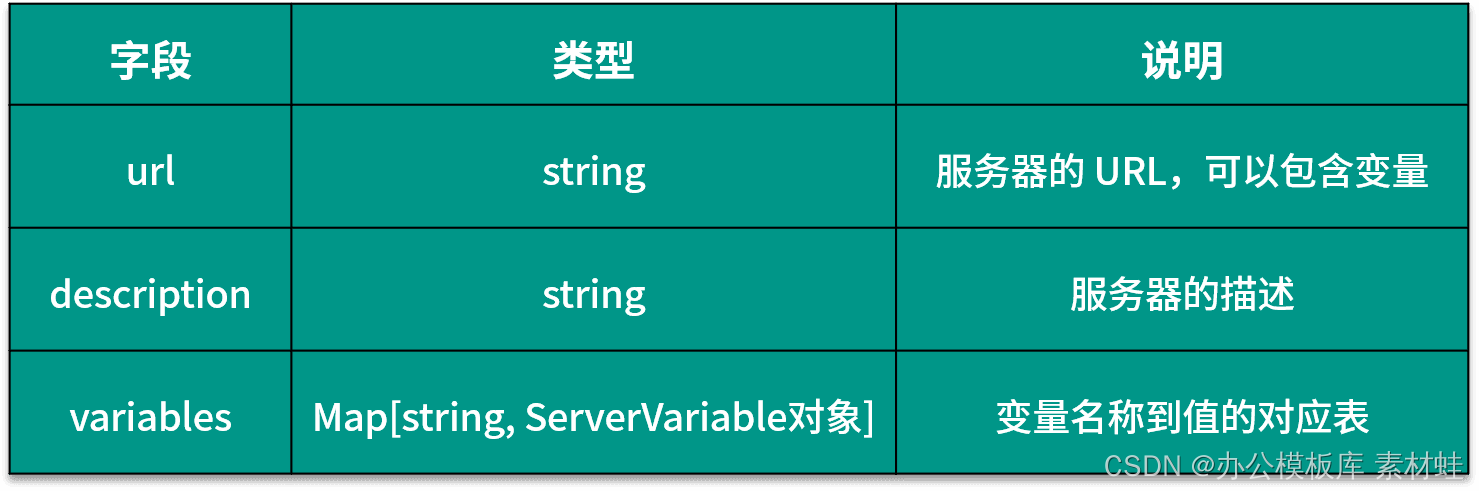
The Server object represents the server of the API. The following table shows the fields that can be included in the Server object and their descriptions.

The following code is an example of using the Server object, where the URL of the server contains two parameters, port and basePath, port is an enumeration type, and the optional values are 80 and 8080.
url: http://test.myapp.com:{port}/{basePath}
description: Test server
variables:
  port:
    enum:
      - '80'
      - '8080'
    default: '80'
  basePath:
    default: v2
Paths object
The fields in the Paths object are dynamic. Each field represents a path, starting with "/", the path can be a string template containing variables. The value of the field is a PathItem object, in which you can use common fields such as summary, description, servers, and parameters, and HTTP method names, including get, put, post, delete, options, head, patch, and trace, which The method name field defines the HTTP methods supported by the corresponding path.
Operation object
In the Paths object, the value type of the field corresponding to the HTTP method is an Operation object, representing an HTTP operation. The following table shows the fields and their descriptions that can be included in the Operation object. Among these fields, parameters, requestBody and responses are more commonly used.
 

Parameter object
A Parameter object represents an operation's parameters. The following table shows the fields that can be included in a Parameter object and their descriptions.
 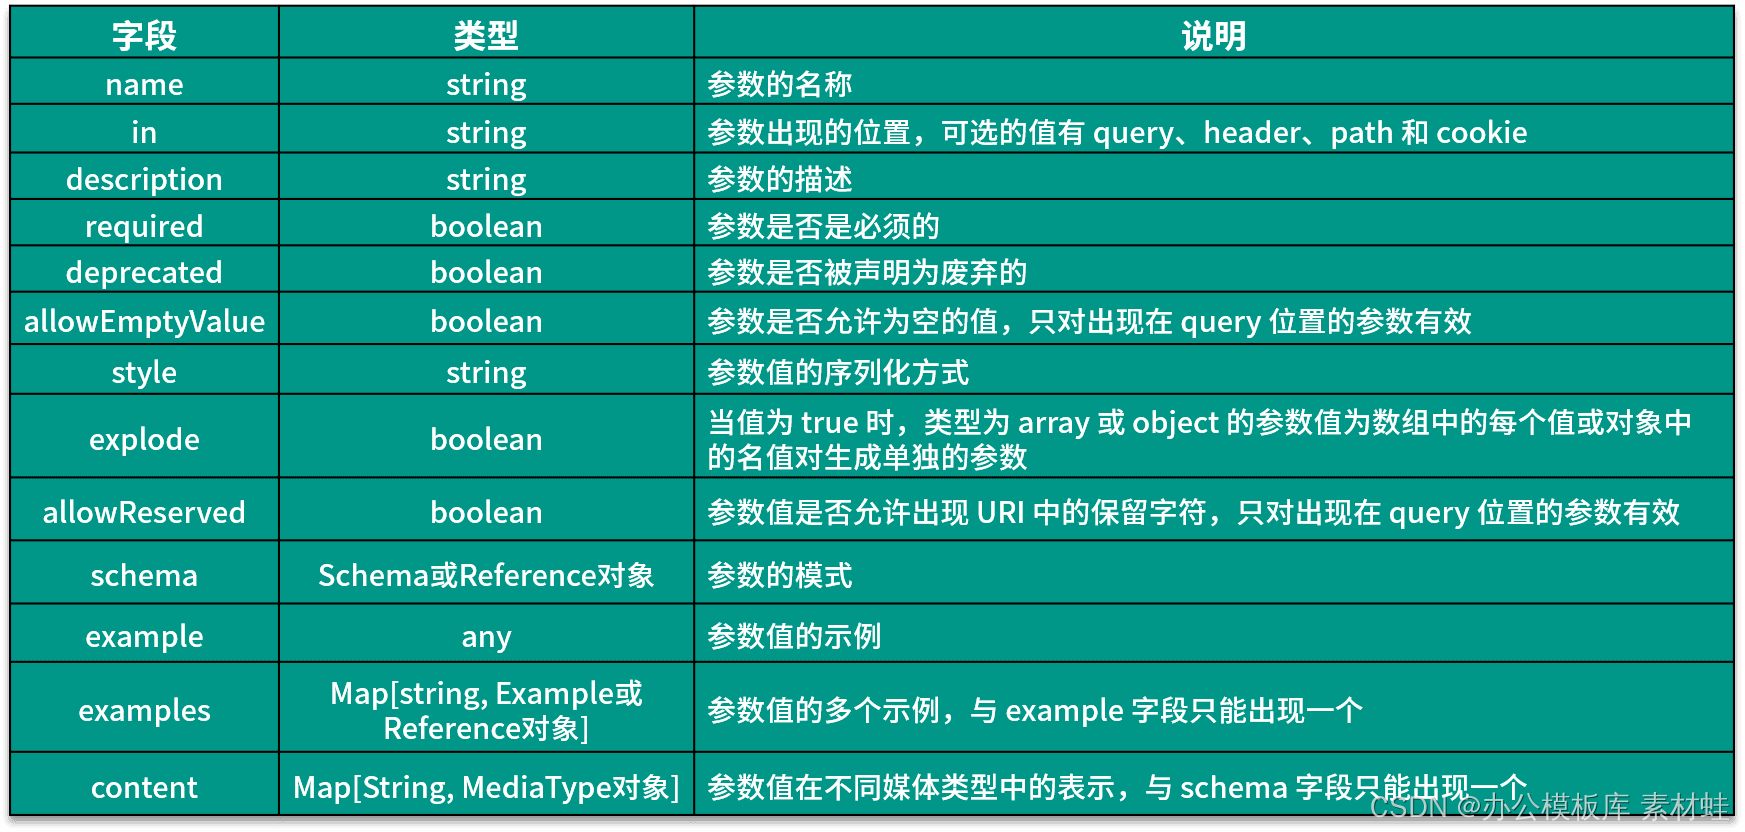

The following code is an example of using the Parameter object. The parameter id appears in the path and its type is string.
name: id
in: path
description: 乘客ID
required: true
schema:
  type: string
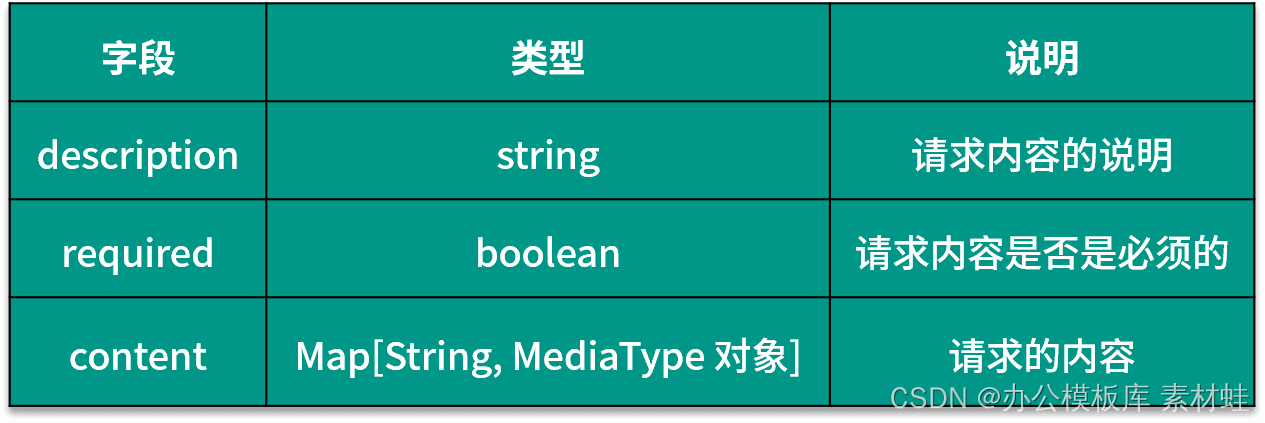
RequestBody object
The RequestBody object represents the content of the HTTP request. The following table shows the fields that can be included in the RequestBody object and their descriptions.

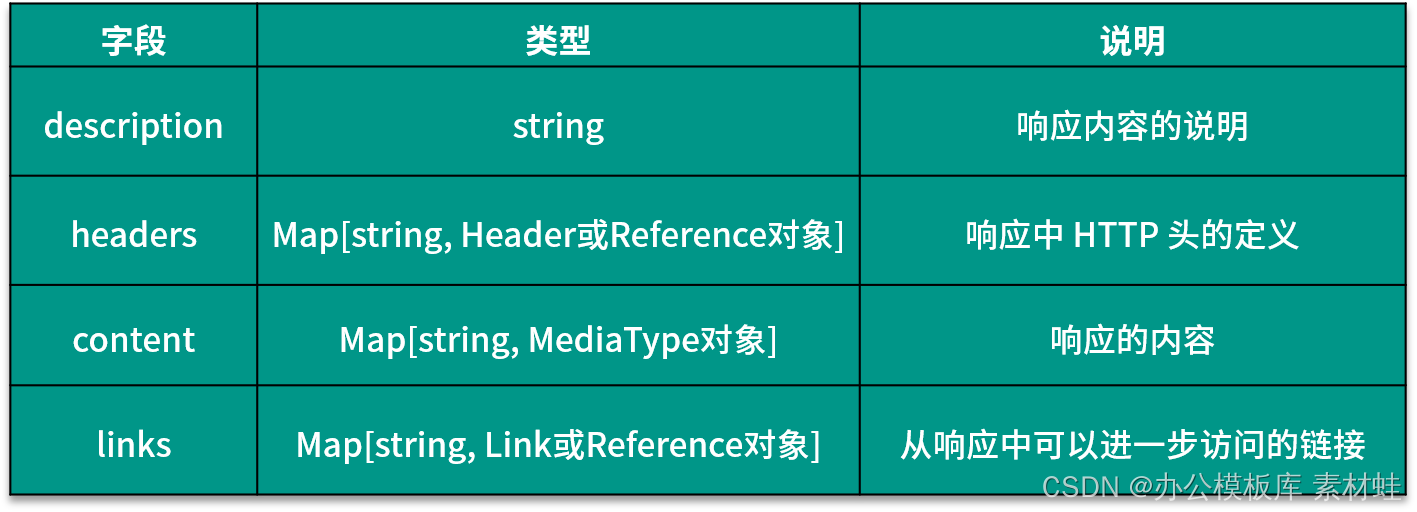
Responses object
The Responses object represents the response to the HTTP request, and the fields in this object are dynamic. The name of the field is the status code of the HTTP response, and the type of the corresponding value is a Response or Reference object. The following table shows the fields that can be included in the Response object and their descriptions.

Reference object
In the description of different types of objects, the type of the field can be a Reference object, which represents a reference to other components, which only contains a $ref field to declare the reference. References can be to components within the same document, or from external files. Inside the document, different types of reusable components can be defined in the Components object and referenced by the Reference object; the reference inside the document is an object path starting with #, such as #/components/schemas/CreateTripRequest.
Schema object
The Schema object is used to describe the definition of the data type. The data type can be a simple type, an array or an object type. The type can be specified through the field type, and the format field indicates the format of the type. If it is an array type, that is, the value of type is array, you need to use the field items to represent the type of elements in the array; if it is an object type, that is, the value of type is object, you need to use the field properties to represent the type of properties in the object.
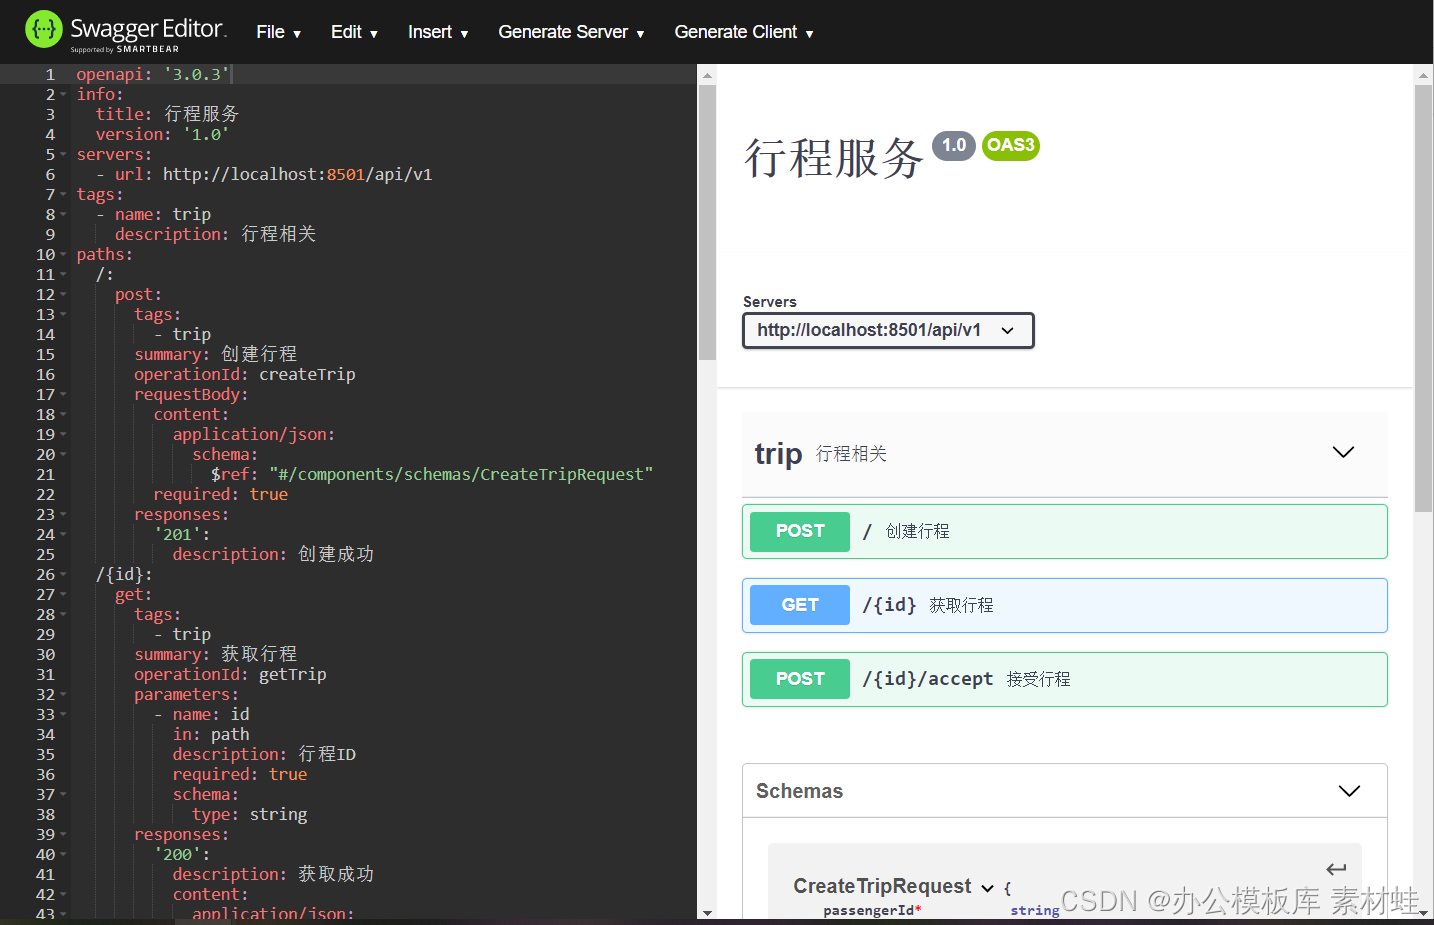
Full Documentation Example
Below is an example of a complete OpenAPI document. In the paths object, three operations are defined, and the type definition of the operation's request content and response format is defined in the schemas field of the Components object. Both the requestBody and responses fields of an operation are referenced using a Reference object.
openapi: '3.0.3'
info:
  title: Trip service
  version: '1.0'
servers:
  - url: http://localhost:8501/api/v1
tags:
  - name: trip
    description: Trip related
paths:
  /:
    post:
      tags:
        - trip
      summary: create trip
      operationId: createTrip
      requestBody:
        content:
          application/json:
            schema:
              $ref: "#/components/schemas/CreateTripRequest"
        required: true
      responses:
        '201':
          description: created successfully
  /{tripId} :
    get:
      tags:
        - trip
      summary: get trip
      operationId: getTrip
      parameters:
        - name: tripId
          in: path
          description: trip ID
          required: true
          schema:
            type: string
      responses:
        '200':
          description: get success
          content:
            application/json:
              schema:
                $ref: "#/components/schemas/TripVO"
        '404':
          description: Trip not found
  /{tripId}/accept:
    post:
      tags:
        - trip
      summary: accept trip
      operationId: acceptTrip
      parameters:
        - name: tripId
          in: path
          description: 行程ID
          required: true
          schema:
            type: string
      requestBody:
        content:
          application/json:
            schema:
              $ref: "#/components/schemas/AcceptTripRequest"
        required: true
      responses:
        '200':
          description: 接受成功
components:
  schemas:
    CreateTripRequest:
      type: object
      properties:
        passengerId:
          type: string
        startPos:
          $ref: "#/components/schemas/PositionVO"
        endPos:
          $ref: "#/components/schemas/PositionVO"
      required:
        - passengerId
        - startPos
        - endPos
    AcceptTripRequest:
        type: object
        properties:
          driverId:
            type: string
          posLng:
            type: number
            format: double
          posLat:
            type: number
            format: double
        required:
          - driverId
          - posLng
          - posLat
    TripVO:
      type: object
      properties:
        id:
          type: string
        passengerId:
          type: string
        driverId:
          type: string
        startPos:
          $ref: "#/components/schemas/PositionVO"
        endPos:
          $ref: "#/components/schemas/PositionVO"
        state:
          type: string
    PositionVO:
      type: object
      properties:
        lng:
          type: number
          format: double
        lat:
          type: number
          format: double
        addressId:
          type: string
      required:
        -lng
        -lat
OpenAPI tools
We can use some tools to assist the development related to the OpenAPI specification. As the predecessor of the OpenAPI specification, Swagger provides many tools related to OpenAPI.
Swagger editor
Swagger Editor is a web version of the Swagger and OpenAPI documentation editor. On the left side of the editor is the editor, and on the right is a preview of the API documentation. The Swagger editor provides many useful functions, including syntax highlighting, quickly adding different types of objects, generating server code and generating client code, etc.
When using the Swagger editor, you can use the online version directly or run it locally. The easiest way to run it locally is to use the Docker image swaggerapi/swagger-editor.
The following code starts the Docker container of the Swagger editor. After the container is started, it can be accessed through localhost:8000.
docker run -d -p 8000:8080 swaggerapi/swagger-editor
The figure below is the interface of the Swagger editor.

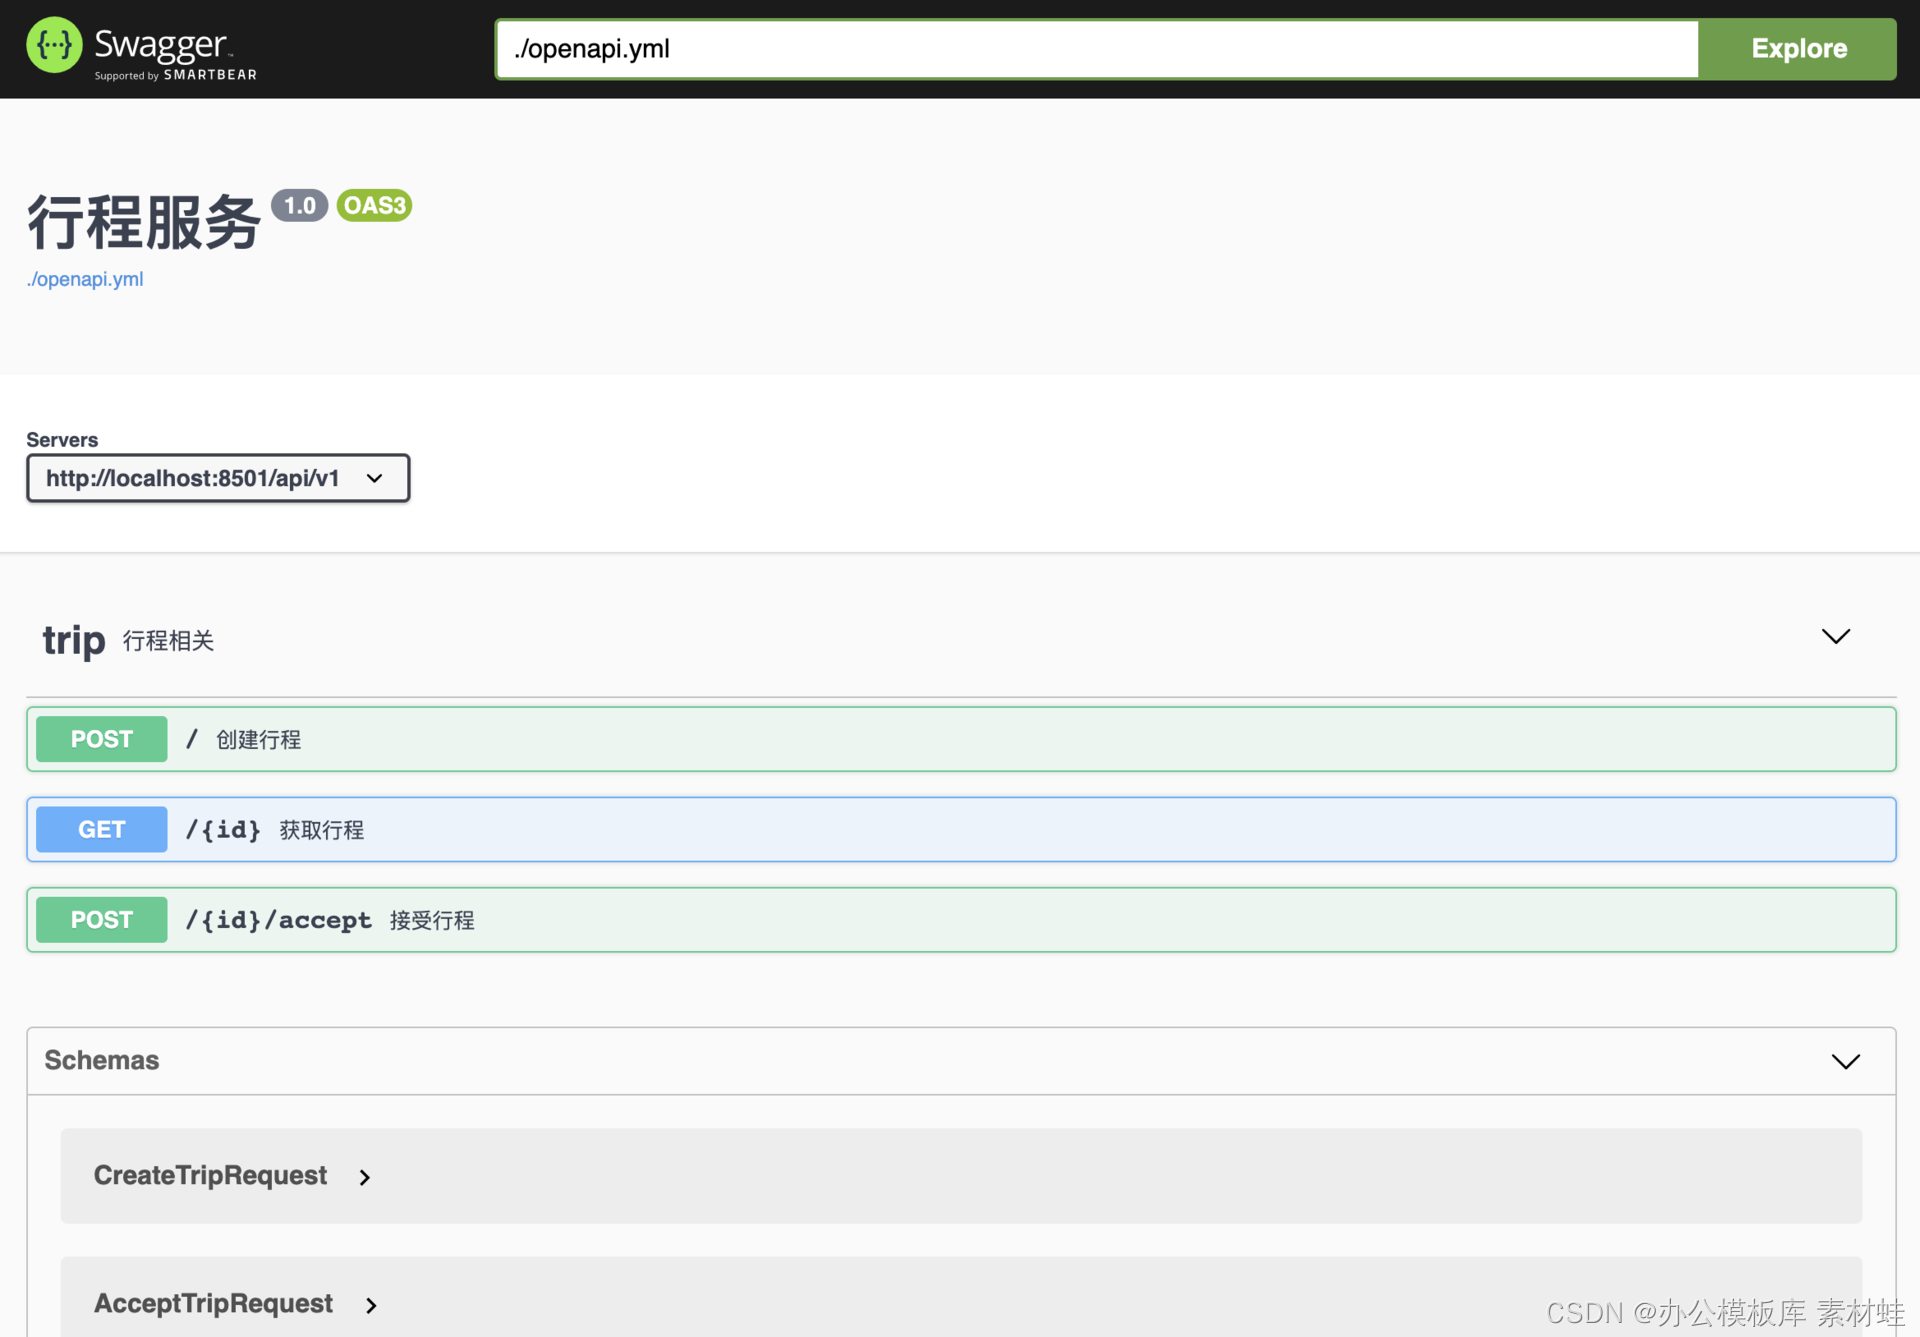
Swagger interface
The Swagger interface provides an intuitive way to view and interact with API documentation. Through this interface, you can directly send HTTP requests to the API server and view the response results.
Likewise, we can use Docker to start the Swagger interface as shown in the command below. After the container is started, it can be accessed through localhost:8010.
docker run -d -p 8010:8080 swaggerapi/swagger-ui
For local OpenAPI documentation, a Docker image can be configured to use that documentation. Assuming that there is an OpenAPI document openapi.yml in the current directory, you can use the following command to start the Docker image to display the document.
docker run -p 8010:8080 -e SWAGGER_JSON=/api/openapi.yml -v $PWD:/api swaggerapi/swagger-ui
The figure below is a screenshot of the Swagger interface.

code generation
Through the OpenAPI document, you can use the code generation tool provided by Swagger to automatically generate server stub code and client. Different programming languages and frameworks can be used for code generation.
The programming languages and frameworks supported by the code generation tools are given below.
aspnetcore, csharp, csharp-dotnet2, go-server, dynamic-html, html, html2, java, jaxrs-cxf-client,
 jaxrs-cxf, inflector, jaxrs-cxf-cdi, jaxrs-spec, jaxrs-jersey, jaxrs-di, jaxrs-resteasy-eap, jaxrs-resteasy, micronaut
, spring, nodejs-server, openapi, openapi-yaml, kotlin-client, kotlin-server, php, python, python-flask, r, scala, scal
a-akka-http-server, swift3, swift4, swift5, typescript-angular, javascript
The code generation tool is a Java program that can be run directly after downloading. After downloading the JAR file swagger-codegen-cli-3.0.19.jar , you can use the following command to generate the Java client code, where the -i parameter specifies the input OpenAPI document, -l specifies the generated language, and -o specifies the output Table of contents.
java -jar swagger-codegen-cli-3.0.19.jar generate -i openapi.yml -l java -o /tmp
In addition to generating client code, server stub code can also be generated. The following code is to generate NodeJS server stub code:
java -jar swagger-codegen-cli-3.0.19.jar generate -i openapi.yml -l nodejs-server -o /tmp
Summarize
The API-first strategy ensures that the microservice API is designed with full consideration of the needs of API users, making the API a good contract between the provider and the user. This class first introduces the design strategy of API first, then introduces the different implementation methods of API, then introduces the OpenAPI specification of REST API, and finally introduces the related tools of OpenAPI.