Table of contents
1.2.1 Install mockjs dependencies
1.2.2 Introducing mockjs into the project
1.2.3 Create directories and files
1.2.4 Prepare simulation data for each component
1.2.7 mockjs generates random response data
1.2.8 Give different prompts according to different responses
2. Jump between login and registration
2.1 Add login and registration buttons
2.2 Add registration components
3.4 Editing the Login Component
3.5 The top component displays a fold or display icon
3.6 Realize the folding effect of the left column
1. mockjs
1.1 Introduction to mockjs
Mock.js is a generator of simulated data, which is used to help front-end debugging and development, to separate the front-end and back-end prototypes, and to improve the efficiency of automated testing . It is well known that Mock.js has swept the front end because of two important features:
- Rich data types
Support generating random text, numbers, Boolean values, dates, emails, links, pictures, colors, etc.- Intercepting Ajax Requests
You can intercept Ajax requests and return simulated response data without modifying existing code.
Official website ![]() http://mockjs.com
http://mockjs.com
Note: easy-mock, a data platform that simulates the background online
1.2 Mockjs usage steps
1.2.1 Install mockjs dependencies
# -D表示只在开发环境中使用
npm install mockjs -D
1.2.2 Introducing mockjs into the project
In order to only use mock in the development environment, and automatically not use mock when packaging into the production environment, we can make a configuration in env.
There are two configuration files in the config directory, namely dev.env.js (development environment) and prod.env.js (production environment).
The development environment configuration is as follows :
module.exports = merge(prodEnv, {
  NODE_ENV: '"development"',
  //增加配置
  MOCK:'true'
})
The production environment configuration is as follows :
module.exports = {
  NODE_ENV: '"production"',
  //新增mockjs配置
  MOCK:'false'
}
Modify main.js :
import ElementUI from 'element-ui'
import 'element-ui/lib/theme-chalk/index.css'

//开发环境下才会引入mockjs,新增
//import是ES6标准中的模块化解决方案,require是node中遵循CommonJS规范的模块化解决方案
//后者支持动态引入,也就是require(${path}/xx.js)
process.env.MOCK && require('@/mock')
......
Note: import is a modular solution in the ES6 standard, and require is a modular solution in node that follows the CommonJS specification, which supports dynamic import, that is, require(${path}/xx.js)
1.2.3 Create directories and files
1) Create a mock directory in the src directory, define the mock main file index.js, and define the interception routing configuration in this file, /src/mock/index.js.
The content of index.js is as follows:
//引入mockjs,npm已安装
import Mock from 'mockjs'

//引入封装的请求地址
import action from '@/api/action'

//全局设置:设置所有ajax请求的超时时间,模拟网络传输耗时
Mock.setup({
  //延时400s请求到数据
  // timeout: 400
  //延时200-400s请求到数据
  timeout: 200 - 400
})
1.2.4 Prepare simulation data for each component
Prepare mock data for each component (*.vue). Then import into mock/index.js
Import in mock/index.js, set the request url, and simulate sending data
。。。。。。
//将模拟数据导入到这里。
import loginData from '@/mock/json/login-mock.js'

//获取请求的url
let url = action.getFullPath("SYSTEM_USER_DOLOGIN");

//通过mockjs模拟发送请求
//url  请求url
//post 请求方式
//loginData  模拟数据
//mockjs会拦截发送的请求,并使用模拟数据充当真实返回的响应数据
//Mock.mock(url, "post", loginData);

//如果请求既可以是get又可以是post的请求方式可以使用如下方式:
Mock.mock(url, /post|get/i, loginData);
Set mock data, edit login-mock.js
//为增加可读性loginData与mack/index.js中导入的名称对应
const loginData = {
  "success": true,
  "msg": "密码正确"
}

//将当前模块导出,导出后index.js才可以导入
export default loginData
1.2.5 Testing
Start the nodejs service, close the background service, and test the login . Mock data testing is now available through mockjs.
The mock request set in mock/index.js can be either a post or a get method. If you want to test the get request method, you can modify the send request part in Login.vue to the get method.
//修改url的获取方式,url已经配置在了action.js中
//post请求方式
/* let url = this.axios.urls.SYSTEM_USER_DOLOGIN;
this.axios.post(url, params).then(resp => {
  console.log(resp);
}).catch(resp => {}); */

//get请求方式,注意:与post请求不同的是参数的设置方式
let url = this.axios.urls.SYSTEM_USER_DOLOGIN;
this.axios.post(url, {params: params}).then(resp => {
  console.log(resp);
}).catch(resp => {});
Note: When using mockjs for front-end testing, the front-end prompt must define the interface with the back-end developer, otherwise the test is meaningless.
Click submit when no value is entered, and the intercepted request directly returns the simulated data, so that you don't need to call the background and jump to the home page directly
1.2.6 Front-end debugging
Modify the configuration in the mock/index.js file:
//如果请求既可以是get又可以是post的请求方式可以使用如下方式:
//Mock.mock(url, /post|get/i, loginData);

//前端调试模式
Mock.mock(url, /post|get/i, (options) => {
  // 最佳实践,
  debugger;
  return Mock.mock(loginData);
});
After modification, click Submit, and under the premise of opening the developer tools, it will enter the debugging mode.
1.2.7 mockjs generates random response data
Edit the login-mock.js file:
//静态响应
/* const loginData = {
  "success": true,
  "msg": "密码正确"
} */

//随机响应
const loginData = {
  //1表示50%概率
  "success|1": true,
  //2-3指重复2到3次
  "msg|2-3": "msg"
}
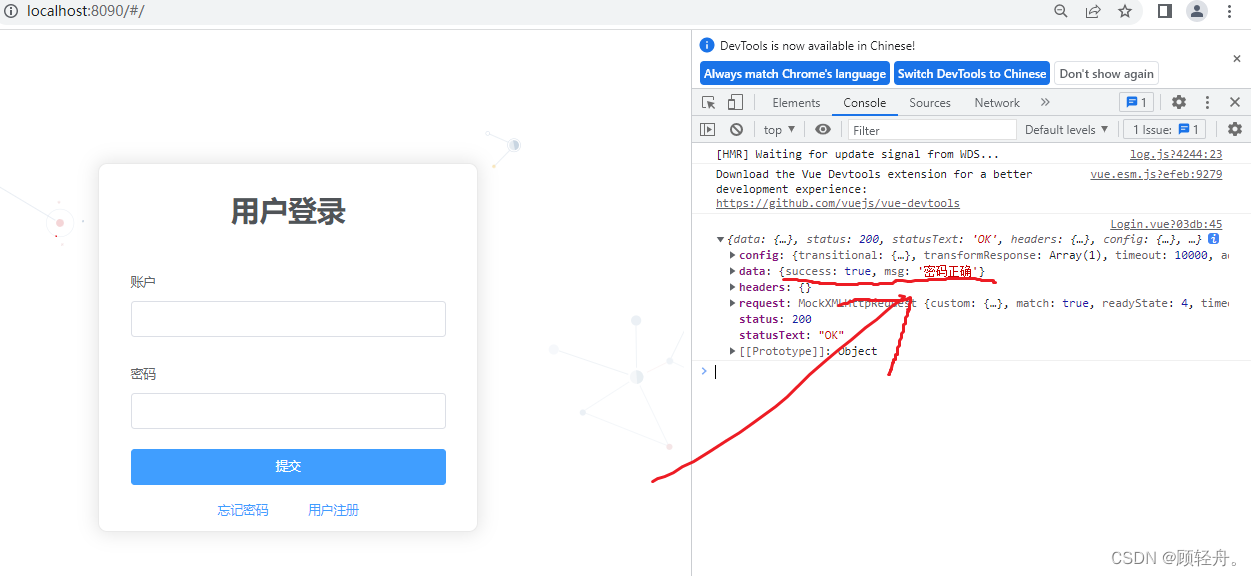
1.2.8 Give different prompts according to different responses
Edit the Login.vue file
//get请求方式
let url = this.axios.urls.SYSTEM_USER_DOLOGIN;
this.axios.post(url, {
  params: params
}).then(resp => {

  //提示成功和失败,主要演示获取响应数据的方法
  if (resp.data.success) {
    //可以到element-ui官网查看用法
    this.$message({
      message: '登录成功',
      type: 'success'
    });
  }else{
    this.$message({
      message: '登录失败',
      type: 'error'
    });

  }

  console.log(resp);
}).catch(resp => {});
Show results:
2. Jump between login and registration
2.1 Add login and registration buttons
Edit Login.vue, add forgotten password, register button
<!-- 加入忘记密码和注册链接 -->
<el-row style="text-align:center;margin-top: -5px;">
    <el-link type="primary" style="margin-right: 40px;">忘记密码</el-link>
    <el-link type="primary">用户注册</el-link>
</el-row>
2.2 Add registration components
Register.vue
<template>
<div class="login-wrap">
<el-form class="login-container">
  <h1 class="title">用户登录</h1>
  <el-form-item label="账户">
    <el-input type="text" v-model="userNo" placeholder="账户" autocomplete="off"></el-input>
  </el-form-item>
  <el-form-item label="密码">
    <el-input type="password" v-model="userPwd" placeholder="密码" autocomplete="off"></el-input>
  </el-form-item>
  <el-form-item label="确认密码">
    <el-input type="password" v-model="userPwd2" placeholder="确认密码" autocomplete="off"></el-input>
  </el-form-item>
  <el-form-item>
    <el-button type="primary" @click="register()" style="width:48%">注册</el-button>
    <el-button type="primary" @click="cancel()" style="width:48%">返回</el-button>
  </el-form-item>
</el-form>
</div>
</template>
export default {
    name: 'Register',
    data: function() {
          return {
            userNo: '',
            userPwd: '',
            userPwd2: ''
          }
    },
    methods: {
          register: function() {

          },
          gotoLogin: function() {
            //获取路由,转换到根路径,及登录组件
            this.$router.push('/');
          }
    }
}
Jump through routing, commonly used methods :
字符串: this.$router.push('/home/first')

对象: this.$router.push({ path: '/home/first' })

命名的路由:
this.$router.push({ name: 'home', params: { userId: wise }})
params为传递的参数
The difference between this.$router.push, replace, and go :
this.router.push(): Jump to a different url, this method will add a record to the history stack, click Back to return to the previous page this.router.replace(): Also jump to the specified url, But this method will not add a new record to the history, click return, it will jump to the previous page. The previous record does not exist.
this.$router.go(n): How many pages to jump forward or backward relative to the current page, similar to window.history.go(n). n can be positive or negative. Negative numbers return to the previous page
2.3 Configure routing
router/index.js
//首先导入组件
import Login from '@/views/Login'
import Register from '@/views/Register'

Vue.use(Router)

export default new Router({
  routes: [
    {
      //配置路由,根路径访问Login组件
      path: '/',
      name: 'Login',
      component: Login
    },
    {
      //增加注册组件路由
      path: '/Register',
      name: 'Register',
      component: Register
    }
  ]
})
3. System Home
3.1 Preparation
- There are pictures (assets directory) in the directory provided with the courseware, copy into the assets directory of the project
- Put a copy of Main.vue into the project's views directory (home page)
- LeftAside.vue (left side column component), TopNav.vue (top component) copy and put into the components directory
3.2 Main.view
<template>
	<el-container class="main-container">
      <!-- 侧边栏有折叠效果,通过class控制折叠还是显示的效果 -->
		<el-aside v-bind:class="asideClass">
			<LeftAside></LeftAside>
		</el-aside>
		<el-container>
			<el-header class="main-header">
				<TopNav></TopNav>
			</el-header>
			<el-main class="main-center">Main</el-main>
		</el-container>
	</el-container>
</template>
   // 导出模块
   export default {

   //组件名称
   name: 'Main',

   data: function() {
     return {
       asideClass: 'main-aside',
     }
   },

   //将import的组件定义的Main中以便于使用
   components:{
     TopNav, LeftAside
   }

   };
3.3 Configure routing
router/index.js, import the Main component before configuring the route
....
{
  //增加Main组件路由
  path: '/Main',
  name: 'Main',
  component: Main
}
3.4 Editing the Login Component
When the login is successful, the system home page is displayed:
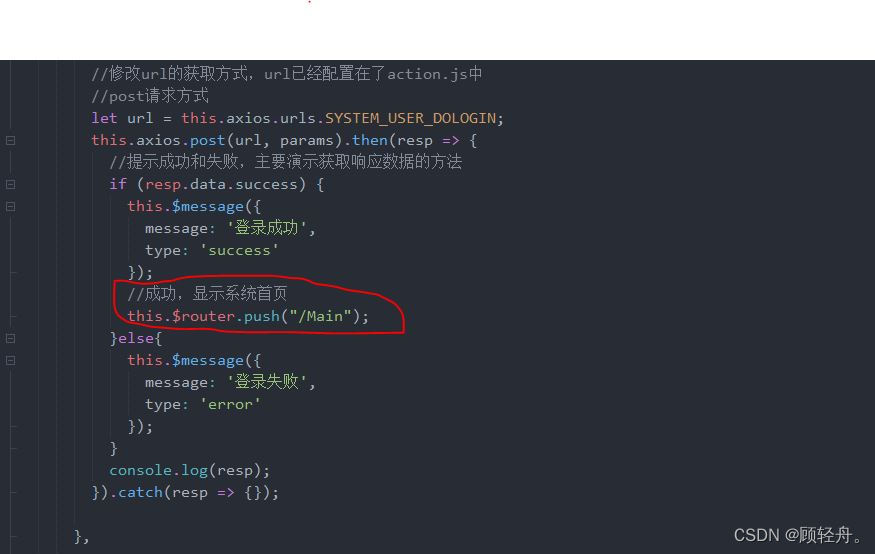
The interface after the system is running:
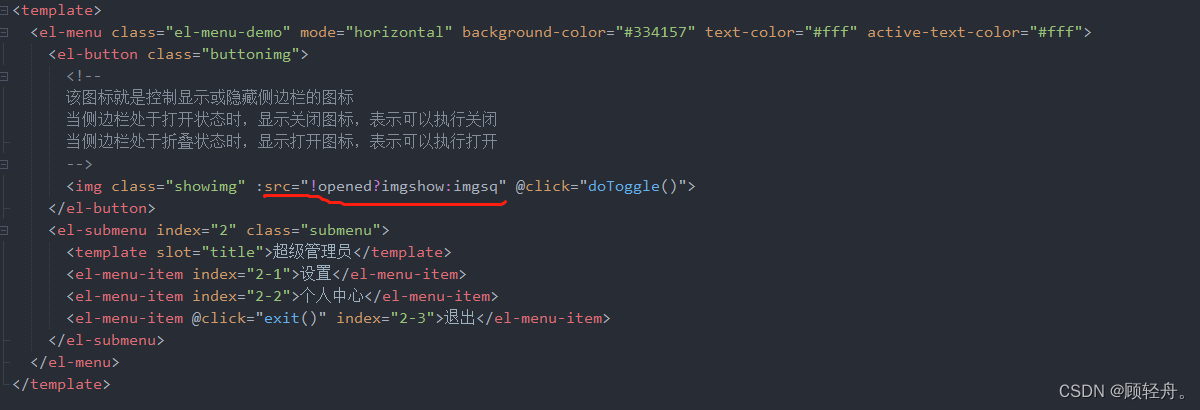
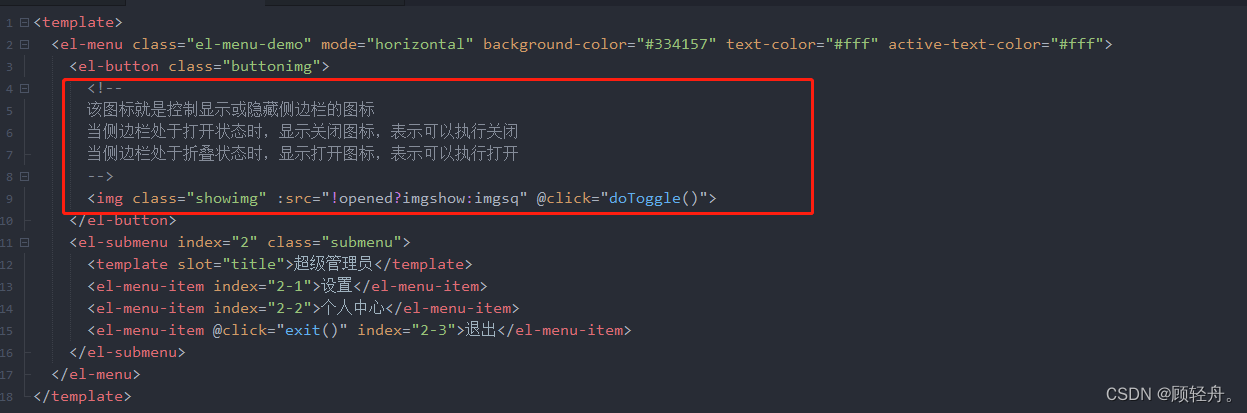
3.5 The top component displays a fold or display icon
TopNav.vue

export default {
    //定义组件名称
    name:'TopNav',

    data: function() {
      return {
        //默认展示侧边栏
        opened:true,

        //require是node中遵循CommonJS规范的模块化解决方案,支持动态引入
        imgshow: require('../assets/img/show.png'),
        imgsq: require('../assets/img/sq.png')
      }
    }
}
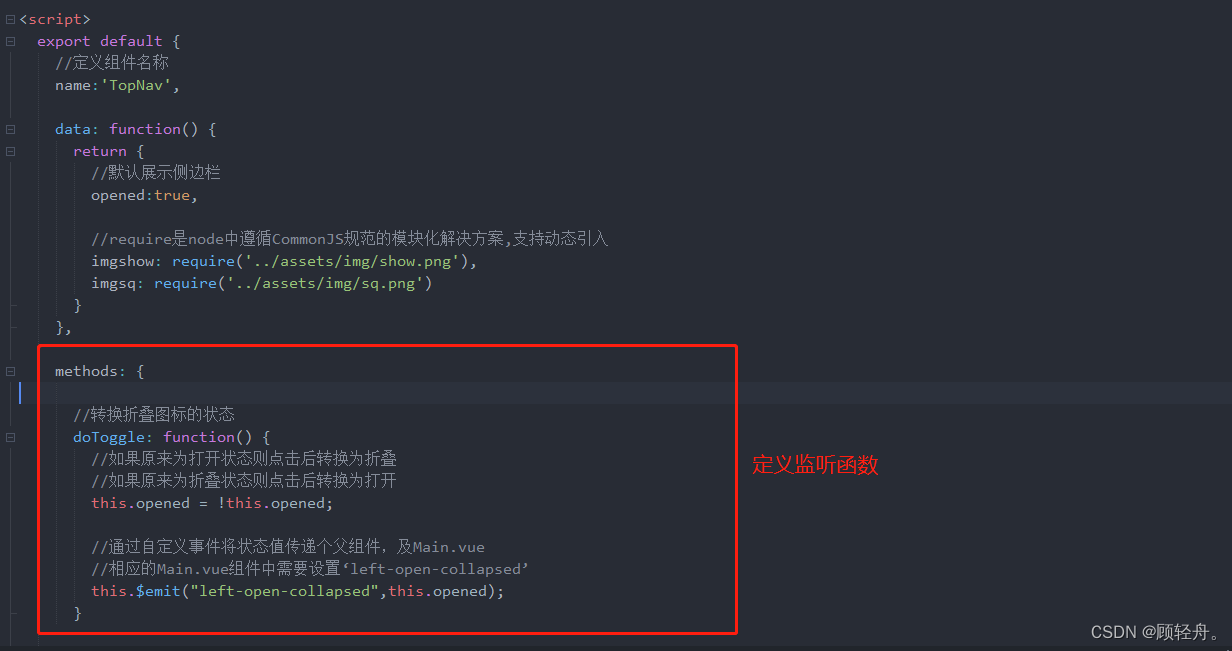
3.6 Realize the folding effect of the left column
step:
1.TopNav.vue defines a listener function, listens for the click event of the folding button, and passes the collapsed or opened state value to the Main.vue component through a custom event.
2. The Main.vue component receives the state value passed by the TopNav.vue component, sets the style of opening or collapsing according to the state value, and passes the state value to the LeftAside.vue component through props
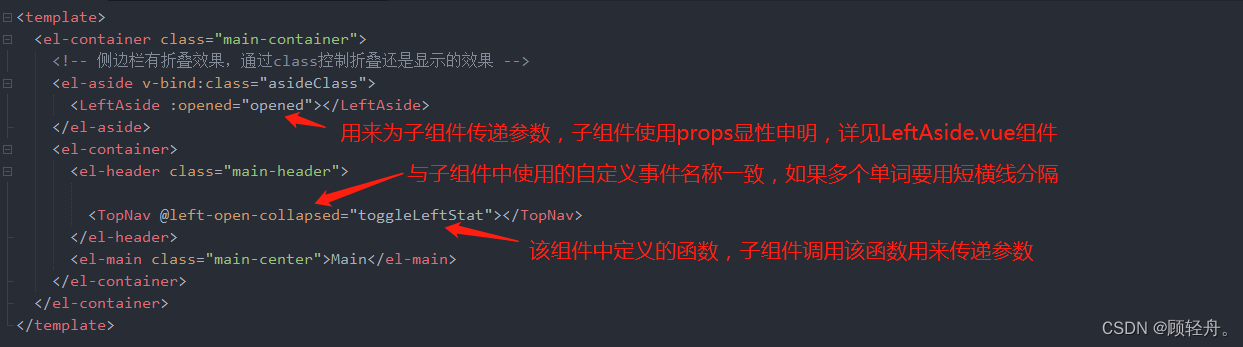
script section: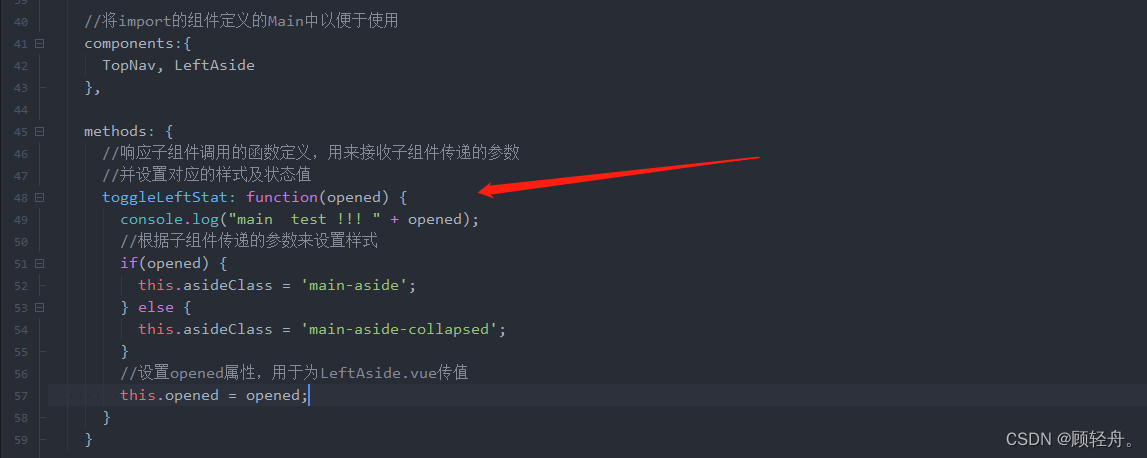
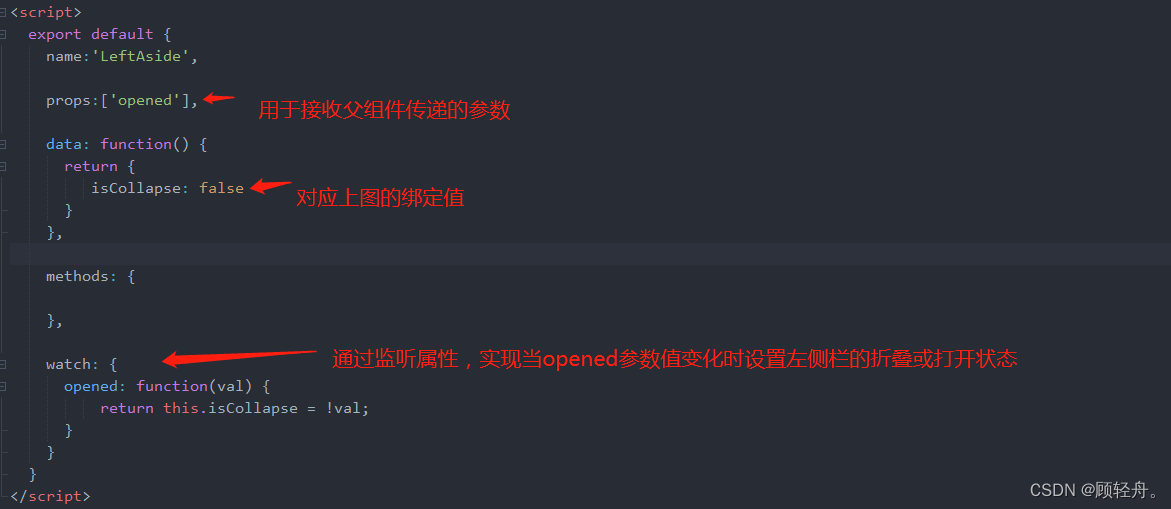
3. The LeftAside.vue component sets its own opening or folding effect through the received state value.

Show results: