- Prepare the environment
Three Ubuntu-based computers
same local area network
Java1.8.0_121
Hadoop2.8.0
Zookeeper3.4.8
Hbase1.2.6
You can download the latest version of each tool from the official website.
- Hadoop fully distributed configuration
- Install JDK
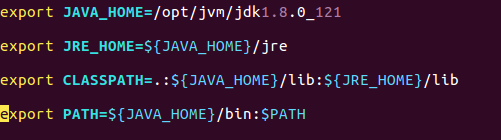
Unzip java1.8.0_121.tar.gz to /opt/jvm, edit the vim /etc/profile file, and add the jdk environment variable:
The source /etc/profile command makes the configuration take effect
The java -version command checks whether the jdk environment variable is configured successfully
2. Configure the hostname and hosts of all machines
(1) All three machines create a new hadoop user for specialized operations related to hadoop big data
(2) To change the hostname, you can edit vim /etc/sysconfig/network to take effect after restarting.
(3) To change the host, you can edit vim /etc/hosts and add the following content:
192.168.1.8 bigdata1
192.168.1.7 bigdata2
192.168.1.10 bigdata3 (I use bigdata3 as the master here) The
hosts can be inconsistent with the hostname, and they are written here for easy memory agree.
3. Configure ssh password-free login
(1) Enter the command, ssh-keygen -t rsa, generate a key, keep pressing Enter, and
it will be generated in ~/.ssh: authorized_keys id_rsa.pub id_rsa Three files, what I
want to say here is that for the sake of between each machine login-free, this operation must be performed on each machine.
(2) Next, on the bigdata3 server, merge the public key into the authorized_keys file,
enter the /root/.ssh directory, and enter the following command
cat id_rsa.pub >> authorized_keys to merge the bigdata3 public key into authorized_keys
ssh [email protected] cat ~/.ssh/id_rsa.pub>>authorized_keys
ssh [email protected] cat ~/.ssh/id_rsa.pub>>authorized_keys
Merge bigdata1 and bigdata2 public keys into authorized_keys
After completion, enter the command to remotely copy authorized_keys to bigdata1 and
scp authorized_keys 192.168.1.7:/home/hadoop/.ssh/
scp authorized_keys 192.168.1.8:/home/hadoop/.ssh/ in bigdata2,
it is best to perform chmod 600 authorized_keys operation on each machine,
Gives the current user read and write permissions on authorized_keys.
After the copy is completed, perform the service sshd restart operation on each machine to restart the ssh service.
Then enter ssh 192.168.1.xx on each machine to test whether the other two machines can be connected without entering a password.
4. Configure Hadoop environment variables, HADOOP_HOME, hadoop-env.sh, yarn-env.sh.
(1) Configure HADOOP_HOME, edit the vim /etc/profile file, and add the following:
export HADOOP_HOME=/home/hadoop/hadoop-2.8.0 (Hadoop installation path)
export PATH=$PATH:$HADOOP_HOME/sbin
export PATH= $PATH:$HADOOP_HOME/bin
(It is best to add the following two lines. If Hadoop and hbase are not started, there will be a warning that the lib is not loaded successfully)
export HADOOP_COMMON_LIB_NATIVE_DIR=$HADOOP_HOME/lib/native
export HADOOP_OPTS="-Djava.library. path=$HADOOP_HOME/lib/native"
(2) Configure hadoop-env.sh, yarn-env.sh,
edit vim etc/hadoop/hadoop-env.sh in the Hadoop installation directory and
add export JAVA_HOME=/opt/jvm/ jdk1.8.0_121 (jdk installation path)
edit vim etc/hadoop/yarn-env.sh and
add export JAVA_HOME=/opt/jvm/jdk1.8.0_121 (jdk installation path)
save and exit
5. Deployment basic relation xml, core-site.xml, hdfs-site.xml, mapped-site.xml, mapped-site.xml
(1) Configure core-site.xml and edit vim etc/hadoop/core-site.xml in the Hadoop installation directory
Mainly configure the URI of NameNode and the storage directory of hadoop temporary files

(2) Configure hdfs-site.xml and edit vim etc/hadoop/hdfs-site.xml in the Hadoop installation directory

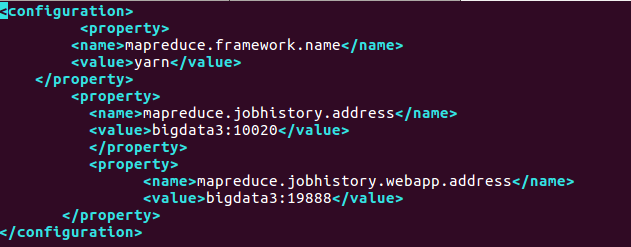
(3) Configure mapred-site.xml and edit vim etc/hadoop/mapred-site.xml in the Hadoop installation directory
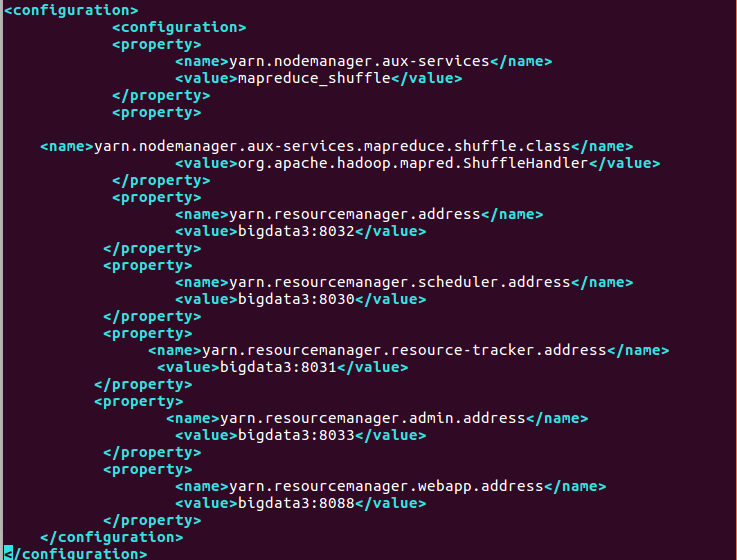
(4) Configure yarn-site.xml and edit vim etc/hadoop/yarn-site.xml in the Hadoop installation directory
6. Configure slaves
In the Hadoop installation directory, edit vim etc/hadoop/slaves,
Remove the default localhost, add bigdata1, bigdata2, save and exit.
7. Copy the configured Hadoop to the corresponding location of each node through the remote copy command scp
scp -r /home/hadoop/hadoop2.8.0 192.168.1.7:/home/hadoop/hadoop2.8.0
scp -r /home/hadoop/hadoop2.8.0 192.168.1.8:/home/hadoop/hadoop2.8.0
8. Hadoop Start and Stop
(1) Start hadoop on the Master server, the slave node will automatically start, enter the Hadoop directory,
enter the command, bin/hdfs namenode -format to format hdfs
, enter the command, sbin/start-all.sh,
you can also start separately. , sbin/start-dfs.sh, sbin/start-yarn.sh
enter the command on the master: jps, see the ResourceManager, NameNode, SecondaryNameNode process
Enter the command on the slave: jps, see the DataNode, NodeManager process
The appearance of these five processes means that Hadoop has been successfully started.
Enter http://bigdata3:50070 in the browser to view the status of bigdata3(master),
Enter http://bigdata3:8088 to view the cluster status
(2) Stop hadoop, enter the Hadoop directory, and enter the command: sbin/stop-all.sh to stop the Hadoop processes of the master and slave
- zookeeper fully distributed configuration
(1) After decompressing the downloaded zookeeper, then enter the conf directory (change zoo_sample.cfg to zoo.cfg) mv change the name or cp one, the old one is used as a sample
(2) vim zoo.cfg for configuration
tickTime=2000 Heartbeat interval
initLimit=10 Initial tolerated heartbeats
syncLimit=5 Waiting for the maximum tolerated heartbeats
dataDir=/home/hadoop/zookeeper-3.4.8/data The directory where data is stored locally, and the temporary data stored in tmp can be modified to its own directory;
dataLogDir=/home/hadoop/zookeeper-3.4.8/logs log save directory
clientPort=2181 Client default port number
server.1=192.168.1.8:2888:3888
server.2=192.168.1.7:2888:3888
server.3=192.168.1.10:2888:3888
(3) Since the data directory and logs need to be created in advance, now create the data directory under the zookeeper directory:
mkdir data
mkdir logs
Then create a file myid in the data directory and write a 3 in it (each machine corresponds to the x number in server.x of its own IP)
(4) Then copy the modified ones to bigdata1 and bigdata2, remember to modify the numbers in myid
(5) At this point, the construction of Zookeeper is completed. Start Zookeeper and start them separately:
If you do not want to switch to the Zookeeper directory to start, you can configure the environment variables:
vi /etc/profile (modify the file)
export ZOOKEEPER_HOME=/home/hadoop/zookeeper-3.4 .8
export PATH=PATH:ZOOKEEPER_HOME/bin
Recompile the file:
source /etc/profile
Note: All 3 zookeepers need to be modified
(6) The three start zookeeper respectively and check the status

Jps checked the process and found that all three had more than one QuorumPeerMain process
(7) Close the zk command: bin/zkServer.sh stop
- HBase distributed installation
(1) Configure environment variables
编辑 vim /etc/profile 加入
export HBASE_HOME=/home/hadoop/hbase-1.2.6
export PATH=$HBASE_HOME/bin:$PATH
Edit vim /home/hadoop/hbase-1.2.6/conf/hbase-env.sh
export HBASE_CLASSPATH=/home/hadoop/hbase-1.2.6/conf
export HBASE_PID_DIR=/home/hadoop/hbase-1.2.6/pids
export HBASE_LOG_DIR=${HBASE_HOME}/logs
export JAVA_HOME=/opt/jvm/jdk1.8.0_121/
export HBASE_HOME=/home/hadoop/hbase-1.2.6
export HBASE_LOG_DIR=/home/hadoop/hbase-1.2.6/logs
export PATH=$PATH:$HBASE_HOME/bin
export HBASE_MANAGES_ZK=false
export HADOOP_HOME=/home/hadoop/hadoop2.8.0
(2) Configure the hbase-site.xml file

(3) Configure regionservers
Edit vim /hadoop/hbase-1.2.6/conf/regionservers to remove the default localhost,
Add bigdata1, bigdata2, save and exit
Then copy the hbase configured on bigdata3 to the corresponding locations of bigdata1 and bigdata2 through the remote copy command
(4) Start and stop Hbase
On the basis that Hadoop has been successfully started, enter start-hbase.sh, and the startup will be completed in a few seconds.
Enter the jps command to check whether the process is successfully started. If HMaster appears on bigdata3,
HRegionServer appears on bigdata1 and bigdata2, which means the startup is successful.
Enter the hbase shell command to enter the hbase command mode.Enter status command and you can see the following content: 1 master, 2 servers, and 3 machines have all started successfully.
1 active master, 0 backup masters, 2 servers, 0 dead, 2.0000 average load
When you want to stop hbase, enter stop-hbase.sh, after a few seconds, hbase will be stopped
- The configuration is now complete!
shutdown sequence: hbase-->zookeeper-->hadoop