Original link: https://blog.csdn.net/qq_36731677/article/details/79084083
0. Environmental description
- Equipment: Raspberry Pi Raspberry Pi 3b
- Mirror: raspbian-stretch-lite (2017-11-29)
- Gateway: ordinary router NETGEAR R6220
- Access method: wired access
1. Configure the system
- Mirror download address: https://www.raspberrypi.org/downloads/raspbian/
- Burning tool: Win32DiskImager
- After the burning is completed, create a file named "ssh" in the boot partition, create it with Notepad, and have no suffix.
- The first login user name
pi, passwordraspberry, change the passwordsudo passwd pi. - (Optional) Install the editing tool vim:
apt-get install vim. - Change the source to Ali's source http://mirrors.aliyun.com/raspbian/raspbian/ , modify the file
/etc/apt/sources.list, replace the two links, and remove the comment before the second line of connection. - Update the software library and update the software
apt-get updateandapt-get upgrade. - Personally, it is recommended to use root privileges to install the software throughout the process.
2. Install Nginx
The image I used actually had Apache2 pre-installed, and I doubted whether I was using the lite version. Maybe I don't know much about it. I didn't like using this, so I removed it entirely. The reference shell is as follows:
apt-get remove --purge apache* -y
apt-get autoremove --purge -y- 1
- 2
Install the Nginx reference shell as follows:
apt-get install nginx- 1
The configuration of Nginx is put first, and then it is all installed.
3. Install PHP7 and some plugins
If you use apt-get to install directly, the 5.6 version of php is installed by default. If you want to install PHP7, please refer to the following shell:
apt-get install software-properties-common
add-apt-repository ppa:ondrej/php
apt-get update
apt-get install php7.0 php7.0-fpm php7.0-mysql php7.0-common- 1
- 2
- 3
- 4
- The first two lines are installing the ppa source of php7
- PHP7 can only be installed after updating the source list (common to PHP7.0 and PHP7.1)
- The last line installs the PHP7.0 main body, the php7.0-fpm plug-in connected to Nginx, the php7.0-mysql plug-in connected to mysql, and the php7.0-common plug-in of the common function tool.
The configuration of PHP is also a bit complicated and will be discussed later.
4. Install MySQL (MariaDB)
The MySQL installed using the apt-get command is the MariaDB distribution by default. I am not very good at changing it. It seems that this problem can only be avoided by compiling and installing. I'm lazy and can only accept it. Fortunately not much difference.
The shell command reference for installing MySQL (MariaDB) is as follows:
apt-get install mysql-server mysql-client- 1
5. Configure Nginx+PHP7+MySQL(MariaDB)
5.1. Restart the service shell
/etc/init.d/nginx restart
/etc/init.d/php7-fpm restart
service mysql restart- 1
- 2
- 3
Nginx and php-fpm can also be restarted with service, however. . . I'm not used to it
5.2. Configure php-fpm
Here you need to choose the form of Nginx connecting to the php service, tcp mode or socket mode .
The first thing to do is to find www.confthe file. This file is not easy to find. Different platforms will lead to different file locations.
My file location is /etc/php/7.0/fpm/pool.dhere, and there are still online tutorials etc/php-fpm.d.
Edit www.conffile reference:
vim /etc/php/7.0/fpm/pool.d/www.conf- 1
find parameterslisten = /run/php/php7.0-fpm.sock
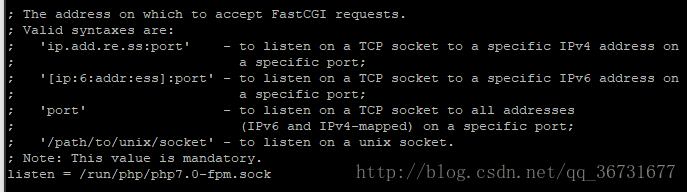
If the parameter corresponds to XXXX.sock, it means that php-fpm communicates with Nginx through socket mode.
If the parameter corresponds to 127.0.0.1, it means that php-fpm communicates with Nginx through socket mode.
You can modify it according to your needs, please remember this parameter , which will be used when configuring Nginx.
5.3. Configure Nginx
I don't know why, the Nginx installed by apt-get is written more scattered than the configuration file installed by yum. Various include
configuration files are fine under normal circumstances , but all the files in the folder are introduced into the files nginx.confon my platform. config file, that's it. . . Please modify the configuration file reference:nginx.confsites-enablednginx.conf
#在http{}内有
#include /etc/nginx/conf.d/*.conf;
#include /etc/nginx/sites-enabled/*;
#我建议修改为
include /etc/nginx/conf.d/*.conf;
include /etc/nginx/sites-enabled/*.conf;- 1
- 2
- 3
- 4
- 5
- 6
Using the defaultfile as a template, create a website configuration file under the sites-enabled folder. The shell reference is as follows:
cp default my.conf
vim my.conf- 1
- 2
To configure site information, refer to the following:
#个人建议在server{}中删除root和index
location / {
    root /home/www;
    index index.php index.html;
    try_files $uri $uri/ =404;
}
location ~\.php$ {
    root /home/www;
    fastcgi_pass   unix:/run/php/php7.0-fpm.sock;#socket mode
    #fastcgi_pass   127.0.0.1:9000;#tcp mode
    fastcgi_param  SCRIPT_FILENAME $document_root$fastcgi_script_name;
    include        fastcgi_params;
}- 1
- 2
- 3
- 4
- 5
- 6
- 7
- 8
- 9
- 10
- 11
- 12
- 13
Notice! ! Notice! ! fastcgi_passIt must correspond to the php-fpm connection method I mentioned above. If it is in tcp mode, please modify it to the corresponding address and port. Otherwise it will appear 502 Bad Gateway.
Tip:
If it occurs during the test 404 Not found, the general case is that the path corresponding to root is set incorrectly.
If it occurs during testing 502 Bad Gateway, the general situation is that the mode corresponding to fastcgi_pass is set incorrectly.
Save the configuration file after configuration, create a test file in the folder corresponding to root, restart Nginx, and try to use the host's IP to access.
It is recommended to use <?php phpinfo();?>it for testing first, if unsuccessful. . . Please self-study to adjust
the configuration of Nginx, please refer to my other article: http://blog.csdn.net/qq_36731677/article/details/77376140
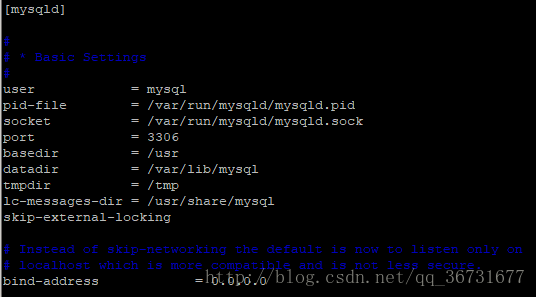
5.4. Configure MySQL (MariaDB)
I have written down the problems and solutions I encountered below, and you can eat them selectively.
- php connection to mysql failed: install the php7.0-mysql plug-in, and assign the correct user name and permissions in mysql (please Baidu yourself).
- Shell login to mysql:
mysql -u root -pno password by default, just press Enter. - Allow remote connections: execute commands within mysql, refer to
UPDATE mysql.user SET host=% WHERE user='root';FLUSH PRIVILEGES; - 100061 error occurred on remote connection :
- Edit
my.inithe file (in MariaDBmy.cnf, mine is in the/etc/mysqlfolder, then the file tells me it directly imports two files, gan) - Find
[mysqld]the field (not the [mysql] field) (in MariaDB it needs to be found in/etc/mysql/mariadb.conf.dthe folder50-server.cnf) - Modify the bind-address in it to
bind-address = 0.0.0.0 - Save and restart the mysql service to take effect
- Official documentation https://mariadb.com/kb/zh-cn/configuring-mariadb-for-remote-client-access/
- Edit
end
After all this tossing and turning, my small site can run on the Raspberry Pi, and it still feels good.
After a while, you may consider installing a NAS service on the Raspberry Pi to fully explore its value.