1. Custom label steps
- Create a component that needs to be extended
- Define the xsd file to describe the component content
- Create a file, implement the BeanDefinitionParser interface, and parse the definitions and component definitions in the xsd file
- Create a handler file, extend NamespaceHandlerSupport, and register components to the spring container
- Write spring.handlers and spring.schemas files
2. The code is as follows
1. Write pojo
public class User {

	private String name;
	private String sex;
	private int age;
//省略getter、setter

}
2.xsd file describes the content of the component
<?xml version="1.0"?>
<schema xmlns="http://www.w3.org/2001/XMLSchema" targetNamespace="http://www.springtest.com/schema/user"
	xmlns:tns="http://www.springtest.com/schema/user" elementFormDefault="qualified">
	<!-- 表示数据类型等定义来自w3 -->
	<!--表示文档中要定义的元素来自什么命名空间 -->
	<!--表示此文档的默认命名空间是什么 -->
	<!--表示要求xml文档的每一个元素都要有命名空间指定 -->

	<!-- ……定义主体部分…… -->
	<element name="user">
		<complexType>
			<attribute name="id" type="string"></attribute>
			<attribute name="name" type="string"></attribute>
			<attribute name="sex" type="string"></attribute>
			<attribute name="age" type="int"></attribute>
		</complexType>
	</element>

</schema>
Describes a new targetNamespace and defines an element whose name is user, with id, name, sex, age attributes
3. Create a class that implements the BeanDefinitionParser interface
package test.customtag;

import org.springframework.beans.factory.support.BeanDefinitionBuilder;
import org.springframework.beans.factory.xml.AbstractSingleBeanDefinitionParser;
import org.springframework.util.StringUtils;
import org.w3c.dom.Element;

import com.model.User;

public class UserBeanDefinitionParser extends AbstractSingleBeanDefinitionParser {
	// Element对应的类
	protected Class getBeanClass(Element element) {
		return User.class;
	}

	// 从element中解析并提取对应的元素
	protected void doParse(Element element, BeanDefinitionBuilder bean) {
		String name = element.getAttribute("name");
		String sex = element.getAttribute("sex");
		String age = element.getAttribute("age");
		// 将提取的数据放入到BeanDefinitionBuilder中,将所有beanbeanFactory中
		if (StringUtils.hasText(name)) {
			bean.addPropertyValue("name", name);
		}
		if (StringUtils.hasText(sex)) {
			bean.addPropertyValue("sex", sex);
		}
		if (StringUtils.hasText(age)) {
			bean.addPropertyValue("age", Integer.parseInt(age));
		}

	}

}
4. Create a handler file and register the spring container
package test.customtag;

import org.springframework.beans.factory.xml.NamespaceHandlerSupport;

/******创建handler文件,组件注册到spring容器***/
public class MyNamespaceHandler extends NamespaceHandlerSupport{

	@Override
	public void init() {
		// TODO Auto-generated method stub
		registerBeanDefinitionParser("user", new UserBeanDefinitionParser());
	}

}
5. Write the spring.handlers and spring.schemas files, which are under the /META-INF/ file of the project by default
spring.handlers
http\://www.springtest.com/schema/user=test.customtag.MyNamespaceHandlerspring.schemas
http\://www.springtest.com/schema/user.xsd=META-INF/Spring-test.xsdNote here :
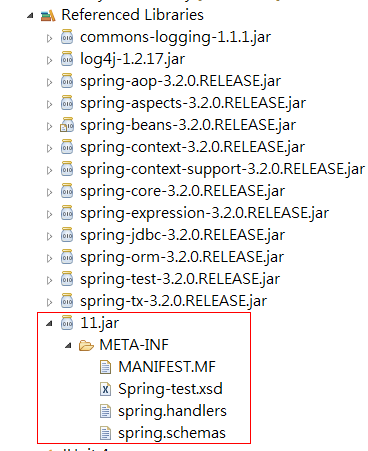
Here because I created a java project, building META-INF directly under the project will prompt that the corresponding file cannot be found, so here is to package the file into a jar package and import it into the project. As shown below

6. Test
Import custom labels
<beans xmlns="http://www.springframework.org/schema/beans"
	xmlns:xsi="http://www.w3.org/2001/XMLSchema-instance"
	xmlns:myname="http://www.springtest.com/schema/user"
	xsi:schemaLocation="http://www.springframework.org/schema/beans
        http://www.springframework.org/schema/beans/spring-beans-3.2.xsd
        http://www.springtest.com/schema/user
       	http://www.springtest.com/schema/user.xsd
        ">
	<myname:user id="testBean" name="aaaaaa" sex="dsaf" age="12"></myname:user>
</beans>
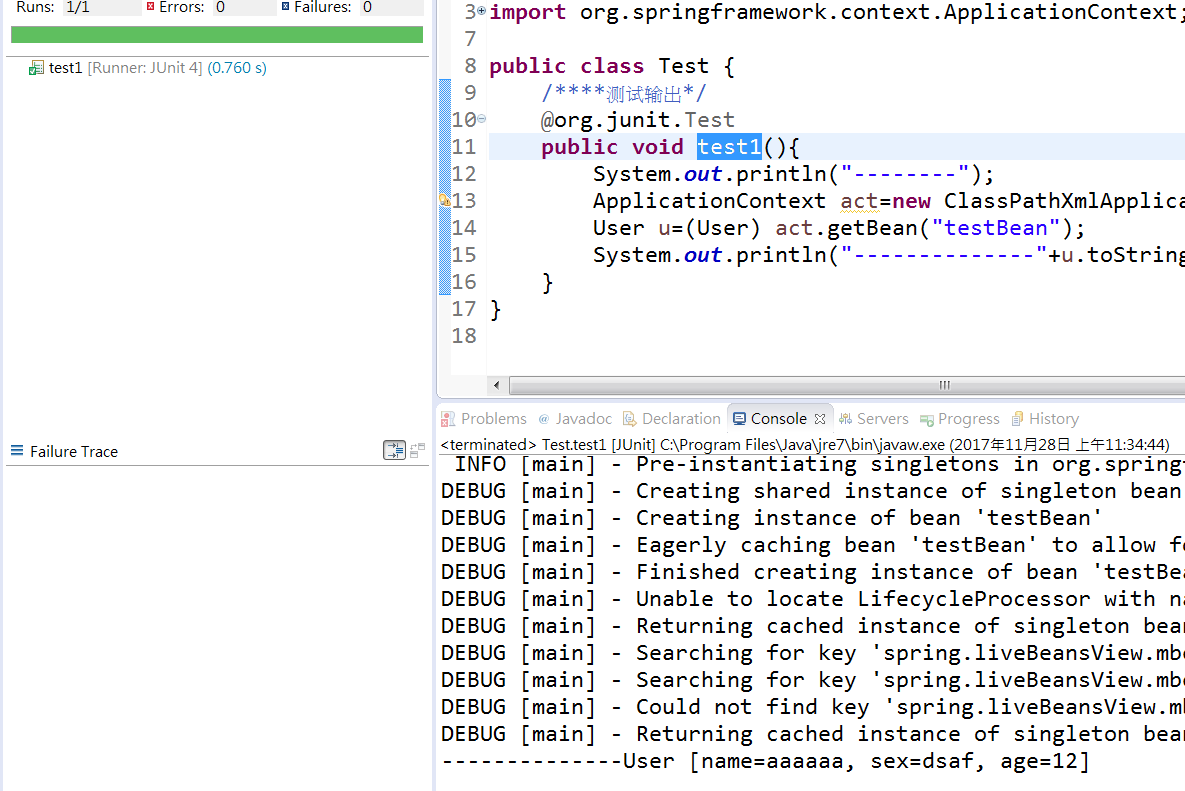
test code
public class Test {
	/****测试输出*/
	@org.junit.Test
	public void test1(){
		System.out.println("--------");
		ApplicationContext act=new ClassPathXmlApplicationContext("applicationContext-service.xml");
		User u=(User) act.getBean("testBean");
		System.out.println("--------------"+u.toString());
	}
}
output result
3. The whole project structure

Reference from: Spring source in-depth analysis