Yesterday, Mr. Tuya introduced how to build an audio and video communication system on the iOS side. Today, I will show you how to build a complete Android audio and video communication system.
1. Preparation :
First, register on the official website of Tucodec: http://tucodec.com , and obtain the AppKey and AppSecret required in the SDK. After registration and login, the following figure is shown:

Figure 1 Obtaining AppKey and AppSecret after registration
Next, go to the developer and choose to download the required SDK in android.

Figure 2 SDK download display
Finally decompress, as shown in the following figure:

Figure 3 SDK decompressed content
voip_android_demo1.0 is a demo used for demonstration. Mr. Tuya will also explain according to this demo and SDK development documents, and open the resource resource file, as shown in Figure 4:

Figure 4 Contents of resource folder
Extract voip_android.aar and import it into the project, which contains java classes and so libraries that provide related operations, and configure related environments.
Import the "voip_android.aar " file (as shown in Figure 5)
Add the aar package under the "libs" folder and under the build folder:
repositories {
flatDir {
dirs 'libs'
}
}
Add under dependencies:
compile(name: 'voip_android', ext: 'aar')
Configure other third-party libraries (as shown in Figure 5)
Add the following three-party libraries under dependencies in the gradle file:
api "com.alibaba:fastjson:1.1.63.android"
Join permissions
Add the following permissions to AndroidManifest.xml:
<uses-permission android:name="android.permission.RECEIVE_BOOT_COMPLETED" />
<uses-permission android:name="android.permission.CAMERA"/>
<uses-permission android:name="android.permission.INTERNET"/>
<uses-permission android:name="android.permission.ACCESS_NETWORK_STATE"/>
<uses-permission android:name="android.permission.READ_LOGS"/>
<uses-permission android:name="android.permission.RECORD_AUDIO"/>
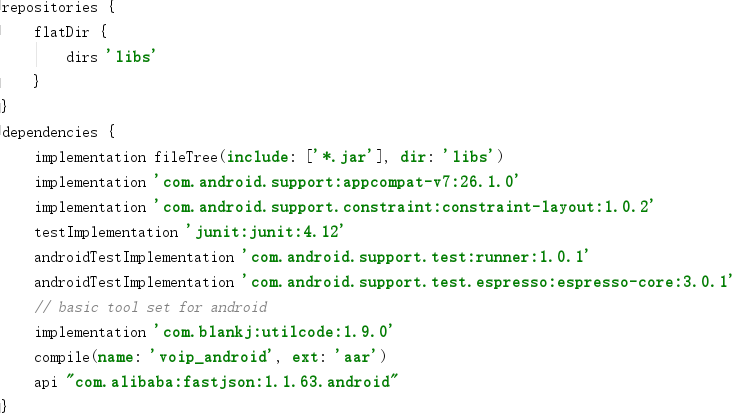
Figure 5 gradle file content
After completing the above operations, the general framework required by our audio and video communication App has been completed, and then the code code is completed to complete the logical operation of the system UI interface drawing and the communication between users.
In the SDK provided by Tuya Technology, we can see that we only need to call three classes to operate, which shows that the rapid integration of audio and video communication is not that complicated. As shown in Figure 6:
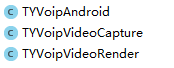
Figure 6 Operation class in SDK
Second, the operation class definition:
1. TYVoipAndroid: Provides all Voip related methods
2, TYVoipVideoCapture: camera management class
3. TYVoipVideoRender: Voip client video rendering view. Rendering is performed on this view
After understanding the above-mentioned main interface files and their definitions, let's understand the communication principle in the SDK: In the SDK , all users exist in the form of communication nodes, and users who are nodes have their own unique representation - UserID , the entire SDK will Communication is carried out according to the UserID of each user .
For example, to communicate between A and B, suppose A's UserID is 401 and B's UserID is 402. After A logs in, he sends a message to B that I want to start a video with you, and B sends a message to A that I want to start a video with you after logging in. A Start rendering B's view, B starts rendering A's view. After completing all the above operations, A and B establish communication.
3. Introduction to the complete SDK usage steps :
<1> Initialize the TYVoipAndroid, TYVoipVideoCapture classes:
mTYVoipAndroid = new TYVoipAndroid(new Handler(), Context,null);
mVideoCapture = TYVoipVideoCapture(mTYVoipAndroid ,
TYVoipVideoCapture.CaptureParam(mTYVoipAndroid.config.videoWidth,
mTYVoipAndroid.config.videoHeight));
<2> Log in to the forwarding server (recommended to be written as a singleton, log in once, and call multiple times):
loginRelayServer(String ip, short port, int userId, int sessionId, int AppKey, int AppSecret);
<3> Turn on the camera, register the audio and video callback, initialize the Voip client, and start the transmission
mVideoCapture.start(false, mTYVoipAndroid.config, mMainRender.parentas ViewGroup);
mTYVoipAndroid.registerVideoCallback(mVideoCallback);
mTYVoipAndroid.registerAudioCallback(mAudioCallback);
mTYVoipAndroid.initVoip(mVideoCapture);
mTYVoipAndroid.startVoip(int videoBitRate, int audioBitRate, int userId);
<4> According to logic, add (delete) nodes that need to be called:
mTYVoipAndroid.addClientNode(int userId);
//mTYVoipAndroid.removeClientNode(int userId);
<5> Stop voip when you don't need to talk:
mTYVoipAndroid.stopCall()
//Clear the existing connection node (no longer receive data from the node)
mTYVoipAndroid.clearClientNodeList();
<6> Repeat steps 3, 4, and 5 according to specific business logic
<7> Destroy voip at the end of the program
mTYVoipAndroid.release()
4. Part of the code explanation: (interpreted from the implementation code of user A)
private TYVoipVideoRender preView; //Render A's view
private TYVoipVideoRender otherView; //Render B's view
<1> Login operation:
A (UserID: 401) login operation, the return value is whether the login is successful (non-0 means success):
/**
* Connect to forwarding server
* @param ip @param port number @param userId @param sessionId
* @param AppKey @param AppSecret @return !0 is success
*/
mTYVoipAndroid.loginRelayServer(ip, port, 401, sessionId, AppKey, AppSecret);
<2> Connection operation
A connection B operation:
...a series of operations/
//A joins the communication by himself
mTYVoipAndroid.startVoip (512, 16000, 401);
//Add node (add USerID of B)
mTYVoipAndroid.addClientNode(402);
//View rendering on videoCallBack
private TYVoipAndroid.VideoCallback mVideoCallback = new TYVoipAndroid.VideoCallback() {
@Override
public void renderVoipVideoData(VoipImage voipImage) {
if (voipImage.isLocal){
//Local video rendering (A's data stream)
preView.pushVideoFrame(voipImage);
}else {
//Non-local video rendering (B's data stream)
otherView.pushVideoFrame(voipImage);
}
}
};
//The audioCallBack callback method has not been used yet, ignore this callback
<3> Disconnect operation
A performs a disconnection operation
//stop camera video capture
mVideoCapture.stop()
//Clear the existing connection node (no longer receive data from the node)
mTYVoipAndroid.clearClientNodeList();
//End Voip call
mTYVoipAndroid.stopCall()
//Release resources
mTYVoipAndroid.release()
The most important code in the project has been introduced, so let's test it and see our results.
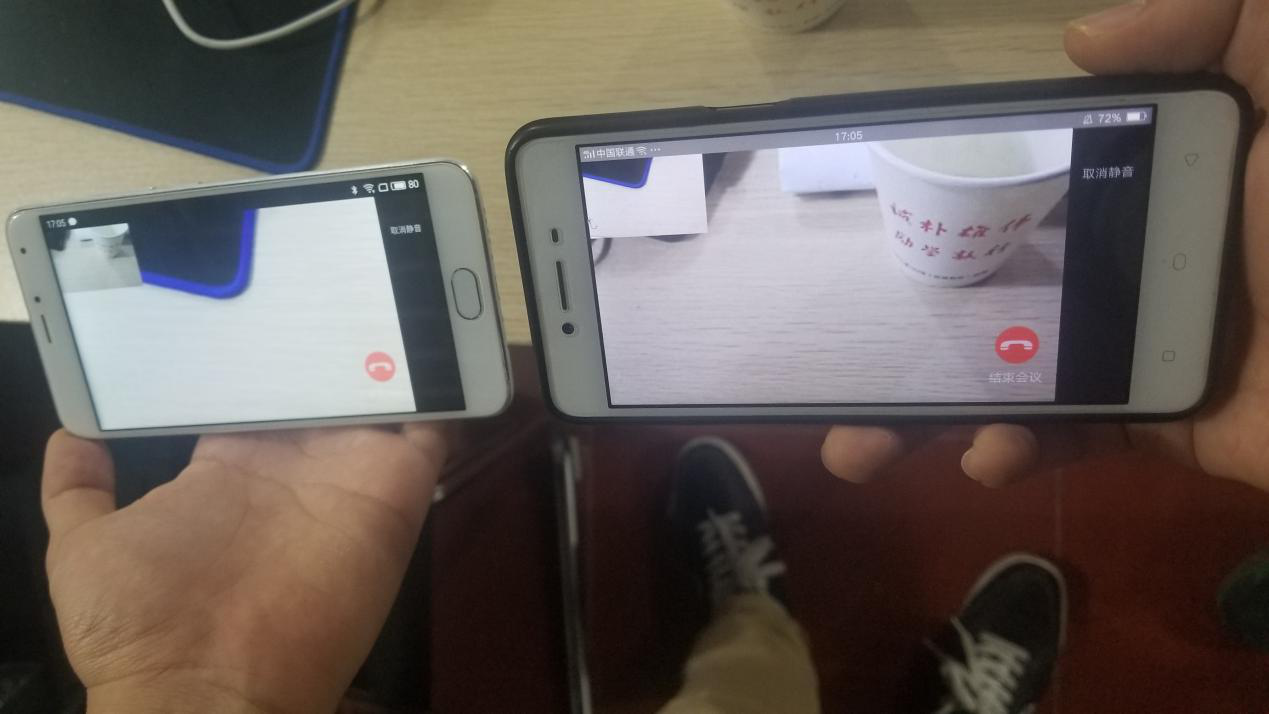
Figure 7 Test renderings
Achieving the result shown in the figure above, a complete set of android audio and video communication system is completed.